DIY Stained Wood Raised Platform Bed Frame – Part 2
Well, my friends, I didn’t get the platform bed frame completely finished like I had hoped. (Click here to read Part 1 of this raised platform bed frame project if you missed it.) I only had a couple of hours to work on it yesterday, but I did get all of the decorative trim attached, so I wanted to show you how I did that. Trim always makes such a big difference on a project like this!
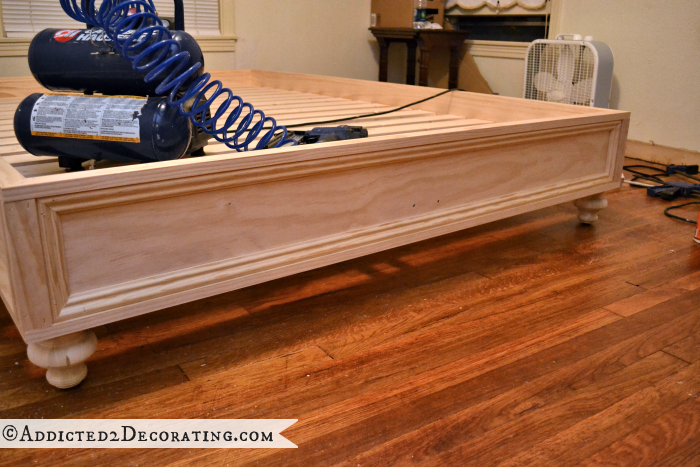
When I finished working on it on Sunday, my bed looked like this…
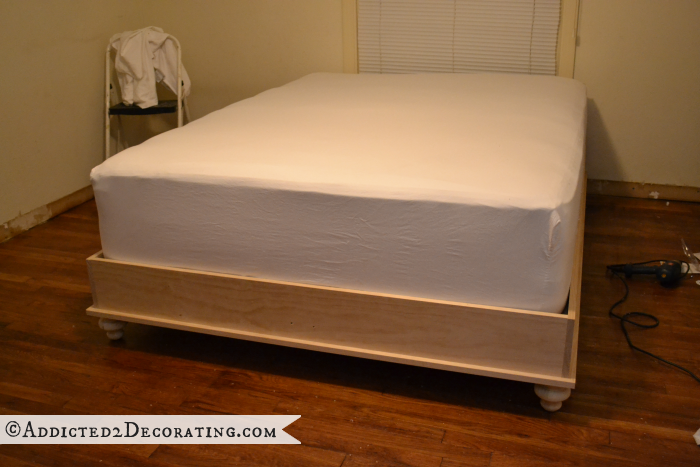
That was definitely a good start, and it was functional at that point, but with cut edges of boards and screws showing on each corner, it was far from finished.
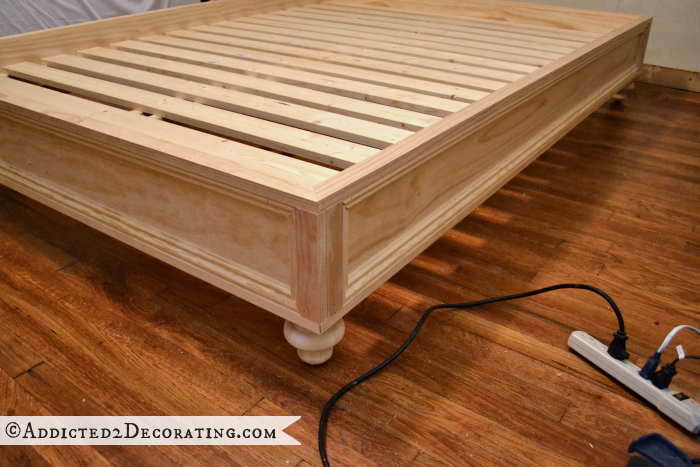
And today, with the decorative trim added, it looks like this…
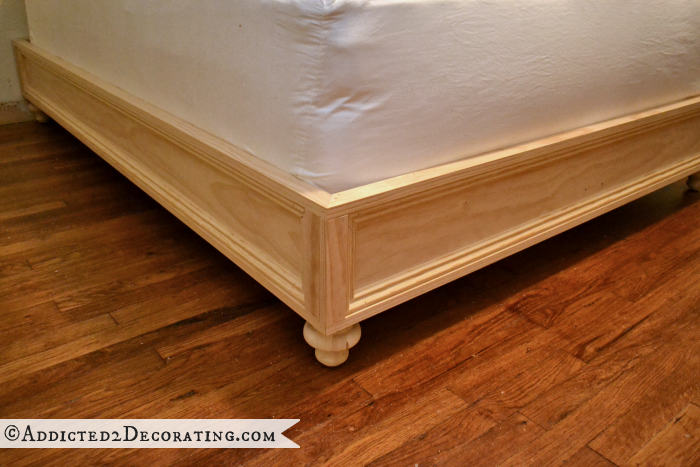
There are no more cut board edges showing, and no more screw heads showing (except for the two right in the middle of the board on the end, which will be filled in with wood filler). So much better now, right?
Here’s how I did it…
Add a “frame” to the top edge:
Just like I did on the bottom edge of the basic bed frame, I added a “frame” with mitered corners using 1″ x 2″ lumber to the top edge of the bed frame.

Cover the screws and cut ends:
Next I needed to cover up the screws and the cut ends of lumber that were visible on each corner of the bed frame.
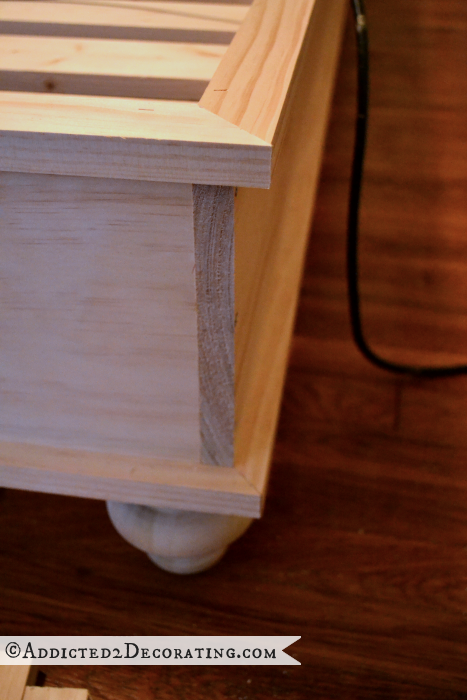
I did this by cutting pieces of 1″ x 2″ lumber to fit vertically…

Then I added another piece on the other side of the same corner.
Now you can see that I still had an edge showing, but at least it wasn’t a rough end cut, so this edge won’t stand out like a sore thumb after it’s stained.
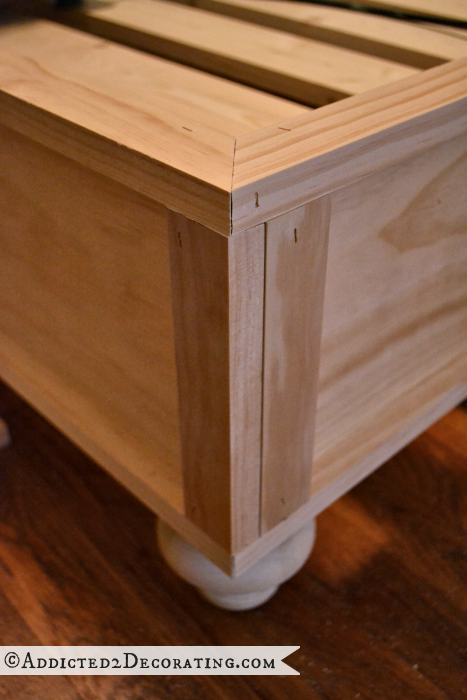
If I were a proper woodworker with proper tools, I would have run each of those pieces through a table saw to miter the edges so that I’d be left with a perfect 45-degree angle with the pieces meeting right at the corner.
But I’m not a proper woodworker, and I don’t have the proper tools. I’m a DIYer who makes the most of what I have, so I have to be okay with imperfection. And I figure that’s what wood filler is for, right? Leave the perfection for the true wood workers, and leave the wood filler for the rest of us. 😀
I did make sure that the whole pieces would be visible on the foot of the bed, which is the side that’s visible when you walk through the door of our bedroom. The side with the “seam” is on the sides of the bed, so they won’t be the first thing that people see when they glance in or walk into our bedroom.
Add decorative trim moulding:
The last step was to add decorative trim moulding to each side of the bed. (Note: I only put this trim on three sides. No need for it on the headboard side since it’s against the wall and will never be seen.)

I attached all of these pieces using 1 1/4-inch brad nails in my nail gun, and shot them through the thickest part of the trim. Again, these little holes are nothing that wood filler can’t handle. 🙂
So now, all of the actual building is finished.
The finishing steps will include filling all of the nail holes, cracks, and the two remaining screw holes on the end of the bed frame with wood filler, sanding everything smooth, and then staining and polyurethaning the whole thing.
Not to shabby, right? 🙂 I’m really hoping I can get everything finished up today. Quite honestly, I’m a bit scared to stain this thing. I made it out of pine just to save some money (the really nice pine boards are still expensive, but they’re still about half the price as oak), and to have more options with trim, but I generally hate how pine takes stain. I suppose if everything goes sideways with the staining, I can always paint the bed frame and call it good. 🙂 We’ll see!

Addicted 2 Decorating is where I share my DIY and decorating journey as I remodel and decorate the 1948 fixer upper that my husband, Matt, and I bought in 2013. Matt has M.S. and is unable to do physical work, so I do the majority of the work on the house by myself. You can learn more about me here.


Wow! Always impressed! Great job!
I love this idea, Kristi, you did a beautiful job! I actually built my headboard a year ago following your tufted headboard tutorial, and it came out wonderfully, but I think a platform base like this would really make it awesome. Definitely saving this for when I actually have the room to take my table saw out of storage!
And with your table saw, you’ll be able to make those corners the proper way! 🙂 I really need to save up for a table saw. I’m always wishing I had one, and now I actually have room for one.
It’s definitely worth it! You’ll never go back to a circular saw for straight cuts or large miter jobs again. 🙂
Do yourself a favor and look into track saws before buying a table saw. For breaking down sheet goods, there’s nothing better.
Don’t know if someone already asked this but do you have a ballpark figure of how much it all cost?
I’ll do a breakdown of the cost in the final post when it’s finished. I have to find my receipts. 🙂
I couldn’t wait until today to see what you did with the trim, I might steal this design for our bed frame when we get to it! Beautiful!
So excited to see the finished project, you have done a fabulous job. I love all the finish moulding it sure makes the project look complete.
Wonderful job!!!!! That bed is beautiful…..
#1 Before you stain, coat the wood well with sanding sealer…available in any paint/big box store. After it dries, scrub it down with a metal “Chore Girl” kitchen scrubber. You will be amazed at how beautifully smooth it will be. Then proceed with your staining and finishing.
#2 There is a guy downtown…on Washington Ave….I think between 12th and 13th street…who sells used woodworking equipment. It is in great shape and he has perfect prices. (we have a shop full :^) The name of the shop is “For Woodworkers”.
Fantastic tips! Thank you! I had no idea there was a place here that sold used woodworking equipment. I’m definitely going to check that out.
Lovely!
Perhaps if you have any of your floor sealant left, using that over a darker stain would help the Pine look more expensive? And that way you wouldn’t have to Poly it. ~:)
That’s a great idea! I think the Waterlox might give it more of an antique, hand-rubbed look, too. Much better than polyurethane.
Wowsa! I’m sure you probably know, but don’t forget the wood conditioner first. I can’t wait to see it all done, looks fabulous so far!
I did know, but it’s good to be reminded. In my haste to get this finished, I’d probably go right to the staining, watch my pine turn yellow and orange and blotchy, and THEN remember that I forgot to use wood conditioner. 🙂 I’ve done that more than a few times.
Great reminder. The wood conditioner will make ALL the difference. Looking so sweet already!
You have just built a very high end bed frame. Pat yourself on the back.
Awesome work you do and it’s easy to see that you are doing what you love.
I really love the trim you put on the frame. Very classic and will look really beautiful with stain on it. Good luck with the staining process.
i second the wood conditioner! great job, Kristi!!
wow, love it!
I just have to tell you Kristi, you are amazing!! I can’t wait to see it all finished. God bless you abundantly!
Awesome as usual, Kristi! I’ve missed you…glad you are back. 🙂
Wow. Just wow. Can’t wait to see it finished!
The bed looks great, Kristi! Besides also suggesting the use of wood conditioner before staining such woods as pine and cherry that blotch, I would add a warning to the suggestion of using steel wool. Do not use it if your finish is water-based, as the steel particles will react with the water in the finish and make tiny rust marks on the wood. It is, of course, fine on oil-based finishes.
Beautiful work! I love the design and can’t wait to see it finished. And, I love to see a DIY building project that doesn’t use a kreg jig. I’m sure they are fabulous, but I don’t have one (maybe the only person in the world, by the blogs I follow), so I like to see there are still projects that are possible to do without!!!
Congratulations on a very nice looking project.
I think that you’re just asking for headaches trying to stain this. You’ll get a much more professional looking result with paint. Seal the pine first with shellac, like Zinsser’s Bulls Eye shellac sealer and finish. It does a better job of preventing sap stains down the road than primer.
Beautiful! You do such pretty work, Kristi, it’s something I would go want to buy if I saw it in the store. I’m with you on stained pine and being afraid to stain it. I might be tempted to paint it myself instead, but like you said, you can always paint over it if you don’t like it.
This is not what most of us do when we make our bed. 😉
Seriously, looks awesome! Look forward to seeing how it takes stain!
enjoyed following your journey. I find Old Master’s gel stain to work best on pine.
Good luck!
The bed is beautiful! Glad you are back 🙂
Kristi, you did an awesome over the top job!! Okay, it’s not perfect but it LOOKS like it is. Keep up the good work. How did you like doing this project in your new bigger place? Miss your projects when you’re busy with other concerns. Thanks for sharing!
Beautiful. I want to be you when I grow up.
Love it! You come up with the greatest ideas.
First of all, I love your posts; and look forward eagerly to every update.
I also hate the look of stained pine. As I do quite a bite of faux finishing, I have found that thinned latex or acrylic paint in a stain like color produces a wonderful alternative to staining.
I used this same method on my horrible oak cabinetry to achieve a mahogany finish, as well as pine and rubber wood.
In case you want to try it…here’s what I do.
Dip a 2 inch artist’s brush into water and paint the surface with water first, follow it with smooth thin layer of color. Let dry between coats and repeat till you are happy with the shade. You will still see grain but not the full “piney” effect. Let the paint cure thoroughly several days before following up with a light sanding with fine grit paper and wipe on satin poly for a quality furniture look.
Gosh, Kristi, you did such a great job on the bedframe! It’s gorgeous! I would definitely buy it if I were in the market for a new bedframe. It’s going to be even more gorgeous once the headboard is done; I can’t wait to see it!
You’ve gotten some great tips on preparing the bedframe for staining and I’m crossing my fingers it turns out exactly the way you want!
The bed looks amazing already. Can’t wait to see the final results!
so far so gorgeous!
Hmm…is there anything you CAN’T do?! Great job!
I wanted to ask. I want to use a box springs, can I just leave the top boards off and set the box springs down inside. I usually make my own dust ruffles and make upholstered headboards but I think I do way to many decor changes and want to make things more simple.
Hi Kristi! I have just recently started following you and love, love, LOVE all of your projects. I am planning on doing this platform bed and have a couple questions.
a) Is this a queen bed? That is what I have and need to know if I need to change any dimensions.
b) At what point would you stop with the trim to upholster? I’m thinking no frame on the bottom and attach the feet after upholstering? I suppose I could figure it out on my own but would love to hear any suggestions 🙂
Thanks! Can’t wait to see what you do next!
Are all of these materials available at Home Depot? Or do you need more of a specialty wood store to find the wood necessary?
I bought everything, including the decorative feet, at Home Depot.
Hi
Great job on the bed! Any tips on attaching the feet?
Just use the metal plates that you screw the feet into. They’re sold right next to the furniture feet at Home Depot or Lowe’s.
I agree about the stain and pine, not my favorite. But a couple of weeks ago I ran across a product called stainable primer. I purchased it off Amazon. I bought 1 qt for $50, yes pricey. But, I was able to sand and paint the primer on my vanity and use actual stain to achieve an espresso stained vanity from a white cheap wood vanity. I seal it all with a pre-catalyzed spray lacquer in satin finish, also purchased from Amazon. The quart did a whole 10′ vanity, the entire doors and drawer fronts. I still have a 3rd of the can for another project. I used to 2 cans of the lacquer and 1 $5 pot of stain.
I love the bed style.
Great job and great build..
Can I use finishing nails instead brad nails to attach the trim? I don’t have a brad nailer.☹️
I have looked at a ton of beds, but yours is by far one of the best and your directing with pictures are so easy to understand, that I a novice, am seriously thinking of trying it. You did an amazing job!🥳🥰
You can use 18-gauge finishing nails.