Fancy But Easy DIY Door Trim Design (Plus Seven Design Variations And How To Create Them)
Last week, I had several people ask for details on how I did the trim around my door in the kitchen, so today I’m sharing the details, plus several variations using stock trim from Home Depot or Lowe’s.
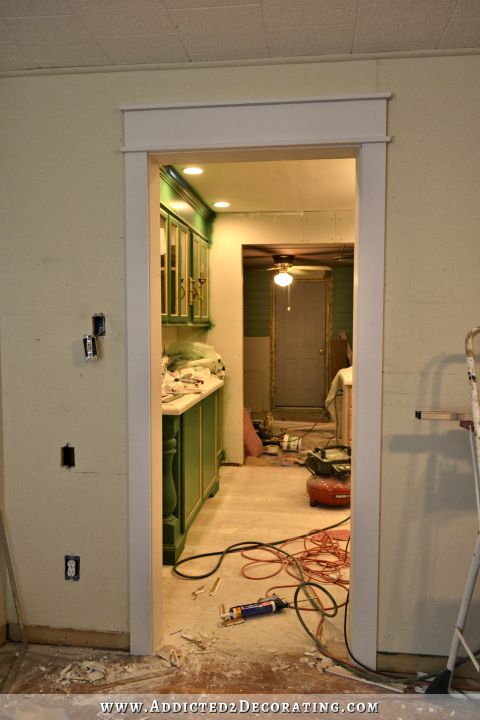
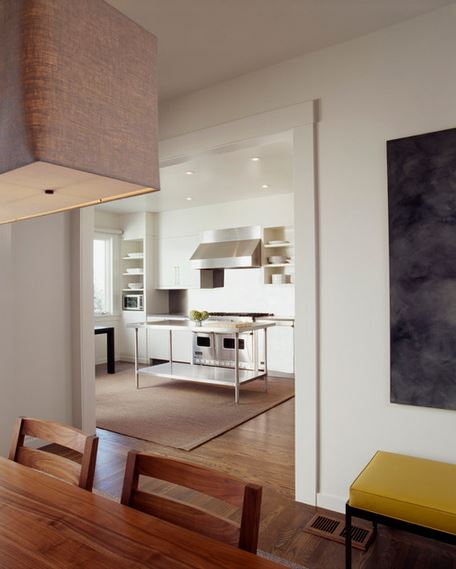
The trim I used around my door is very simple, both in design and in the skill it takes to create it. I wanted something fancier than just plain trim, mitered at the corners, but I don’t think my house calls for anything that’s really super fancy with crown molding and such, so this is what I came up with…
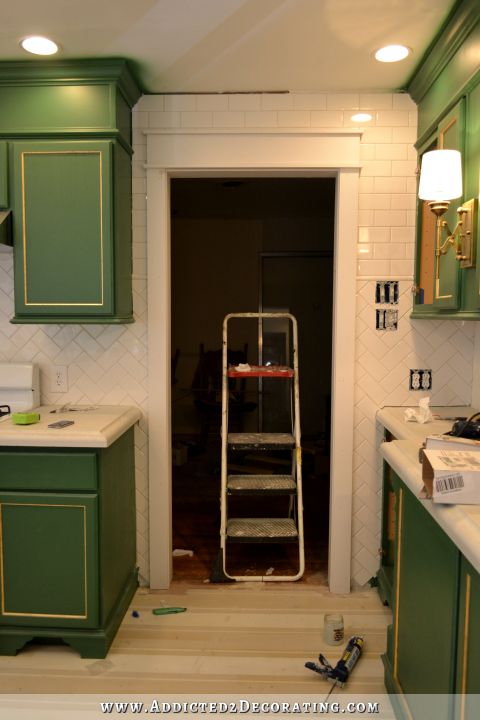
And by the way, there’s no door there. I took the photo at night, and didn’t turn the light on in the music room, so it’s just really dark in there. But there’s no door — just an open doorway.
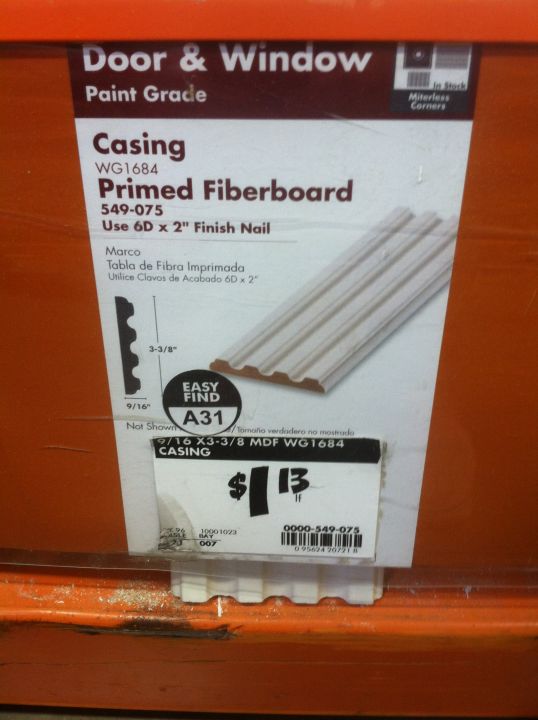
To create this look, you use either plain 1-inch solid wood lumber, or you can use pre-primed MDF boards. I chose to use MDF boards because they’re pretty much perfect — consistent thickness and width, and perfectly smooth with no wood grain or knot holes to deal with.
A quick lesson in MDF boards — MDF boards are available in almost all of the standard sizes that regular wood lumber is available in — 1″ x 2″, 1″ x 4″, 1″ x 6″ and so on. But at Home Depot, they have them labeled differently. For example, if you purchase a piece of real wood lumber, it might be labeled as a 1″ x 4″, but the actual dimensions are more like 3/4″ thick and 3.5″ wide. With MDF boards, they’re labeled by their exact dimensions. So the equivalent of a real wood 1″ x 4″ in an MDF board is labeled 11/16″ x 3.5″. So from here on out, I’m going to use the dimensions as if I used real wood lumber. None of this 11/16″ stuff. Got it? 🙂
I added trim to the other side of the kitchen doorway so that I could show you how it’s done, and my door already had door facings (which yours will as well if you’re just wanting to replace existing trim).
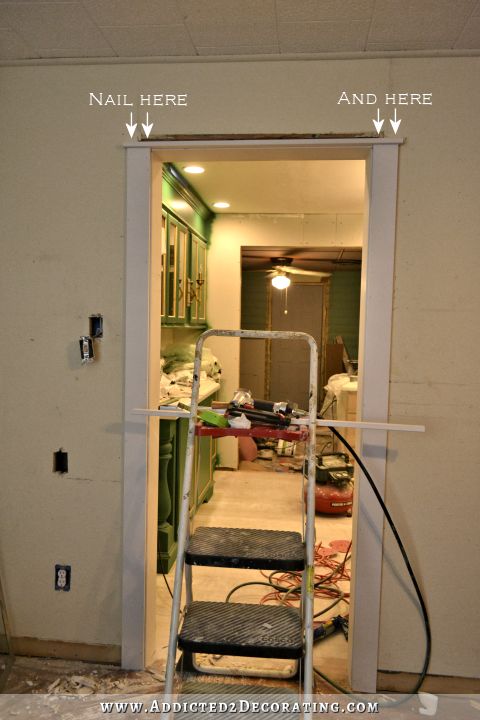
But in the event that you’re dealing with a roughed in doorway with no trim at all, here’s a close up view of how the door facings are installed. A roughed in doorway (with the 2 x 4’s showing) is generally not perfectly level, so you have to use wood shims while installing the door facings to get it perfectly straight. Start with the top piece, shim and level, and then nail into place. Then shim and level the side pieces and nail them into place.
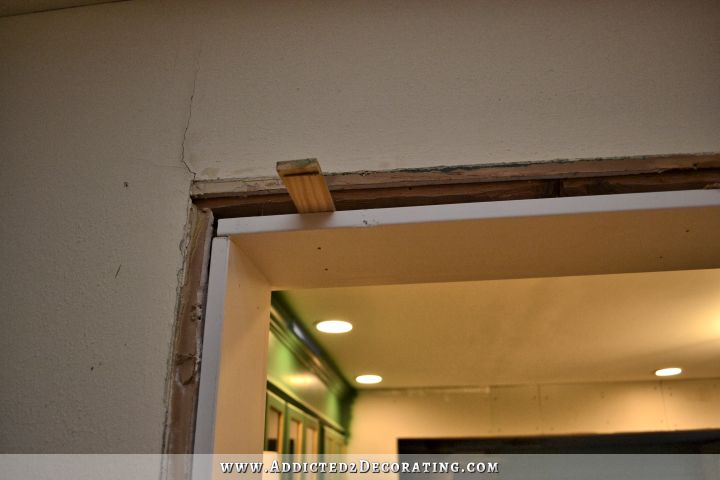
If you have shims sticking out, you can either use a utility knife to score them and snap off the parts sticking out (often requiring a hammer), or you can use your oh-so-handy Dremel MultiMax, which I know you have because I’ve suggested it about 100 times now, right? 🙂
Now to do the trim, start by measuring the height of the opening. Add about 3/8-inch and cut two pieces of 1″ x 4″ lumber to that length. Attach them to each side, setting them over about 3/8-inch from the edge of the door facings. (You never want the inside edge of the trim to go right up to the edge of the door facings. Leave just a little space to create a tiny inset corner.) I used my nail gun and 16 gauge 2-inch finishing nails to attach mine.
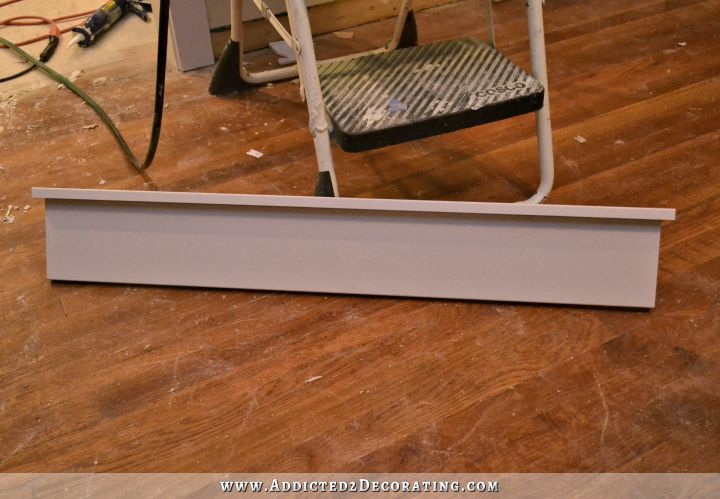
Now measure the width from the outside edge of one 1 x 4 to the outside edge of the other 1 x 4, and cut a piece of 1″ x 6″ lumber to that length. Add one inch to that measurement, and cut two pieces of 1″ x 2″ lumber to that length. Mine measurement was 40 inches, so I cut my piece of 1 x 6 to 40 inches long, and my two pieces of 1 x 2 to 41 inches long.
Place one of the 1 x 2 pieces flat on top of the 1 x 4 pieces so that the 2″ sides are facing up and down, and the 1″ sides are facing front and back. Make sure it’s centered perfectly, and nail the board into place. I used 1.5-inch 18 gauge finishing nails to secure mine.
To make the final section, attach the second 1 x 2 to the top of the 1 x 6 using wood glue and nails through the top of the 1 x 2 into the edge of the 1 x 6. I again used 1.5-inch 18 gauge finishing nails in my nail gun for that.
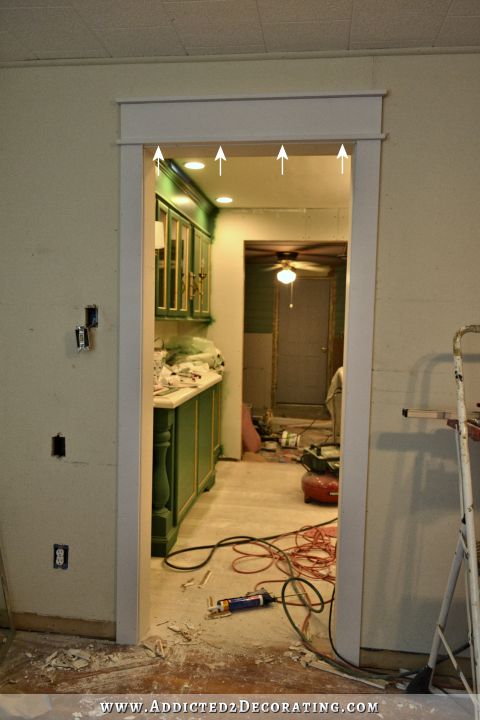
Place a generous amount of construction adhesive on the back of the 1 x 6, place on top of the first 1 x 2, and press to the wall. Then use a few finishing nails through the bottom of the first 1 x 2 into the edge of the 1 x 6, as shown by the arrows in the photo.
And that’s it! Now you’re ready to fill and sand the nail holes, caulk all of the corners and spaces between the boards, prime, and paint.
It doesn’t get much easier than that. But if that’s not quite your style, you can get so many different trim ideas from places like Houzz or even by browsing the trim aisle at Home Depot or Lowe’s. Here are five similar variations that I found on Houzz.
To create this first one, you would simply eliminate the two 1 x 2 pieces. For the top piece, you can use the same width lumber that you use for the sides, or you can use the next larger size to create more of a statement. Either way, it’s pretty, and it’s something different from the standard, ubiquitous mitered corner door trim.
Modern Kitchen by San Francisco Architects & Building Designers Cary Bernstein Architect
This second one eliminates the bottom 1 x 2 piece, and in place of the top 1 x 2, you would use a small crown molding instead. Using crown molding does take the difficulty level up a notch because you have to miter and wrap the corners, but if you’re skilled with a miter saw, that should be no problem.
Traditional Hall by Norwich Architects & Building Designers Smith & Vansant Architects PC
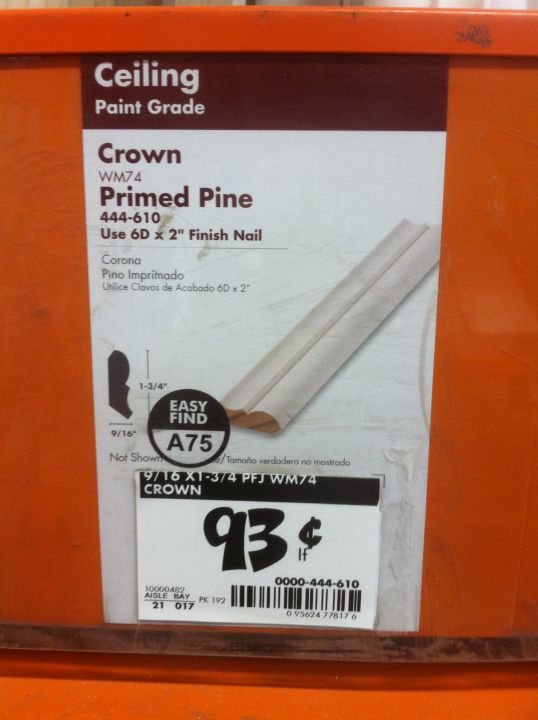
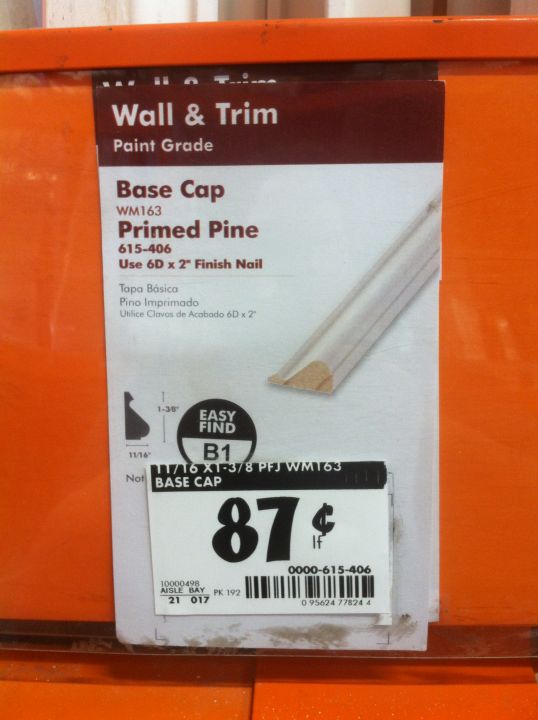
I would suggest a very small crown molding for that look, like this one from Home Depot that runs under $1.00 per linear foot.
This third idea uses a fancier trim on the sides rather than standard lumber. Then top that with a 1 x 6 and your choice of crown molding.
Traditional Bedroom by Allston General Contractors Boston Green Building
My Home Depot didn’t have anything quite like that, but I did find two different styles of this fancy grooved door casing trim, which could be used on the sides.
This fourth design is very similar to mine, but eliminates the top 1 x 2. Talk about easy!
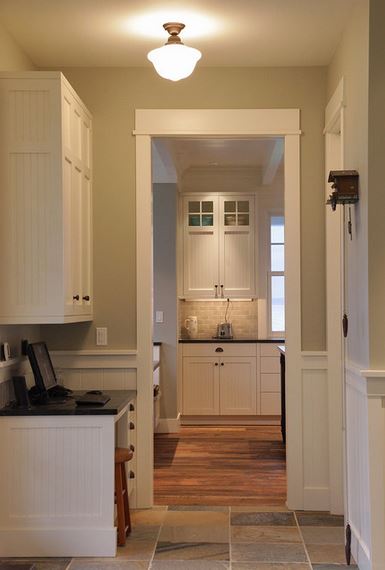
Traditional Hall by Seattle Cabinets & Cabinetry Warmington & North
And finally, this fifth design that I found is the fanciest of them all, but still not difficult. To create this, use the 1 x 4’s or even 1 x 6’s as the side pieces, place a 1 x 6 on top, top with crown molding, and then use a pretty molding that is flat on back to create the bottom division. That piece also has to be mitered on the corners and wrapped, so you’d have to know how to miter corners to create this look.
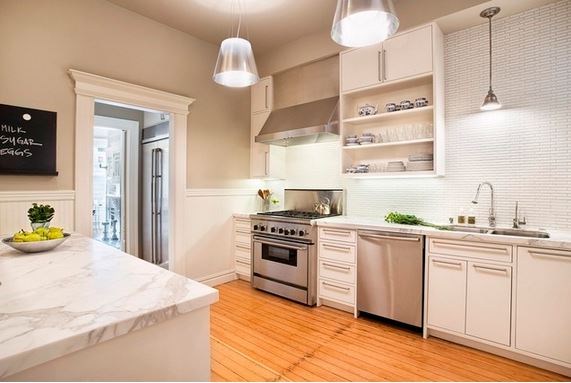
Contemporary Kitchen by Oakland Architects & Building Designers Patrick Perez Architect
For the small molding at the division, something like this from Home Depot would do the trick.
And of course, that’s not the only one that would work. It’s just the one I would use if I were creating this look. 🙂
The possibilities are really endless. Just stroll down the trim aisle at Home Depot or Lowe’s, and let your imagination go. For example, if you wanted more dimension on the side pieces, but didn’t want any of the fancy casing trim they have, you can create your own.
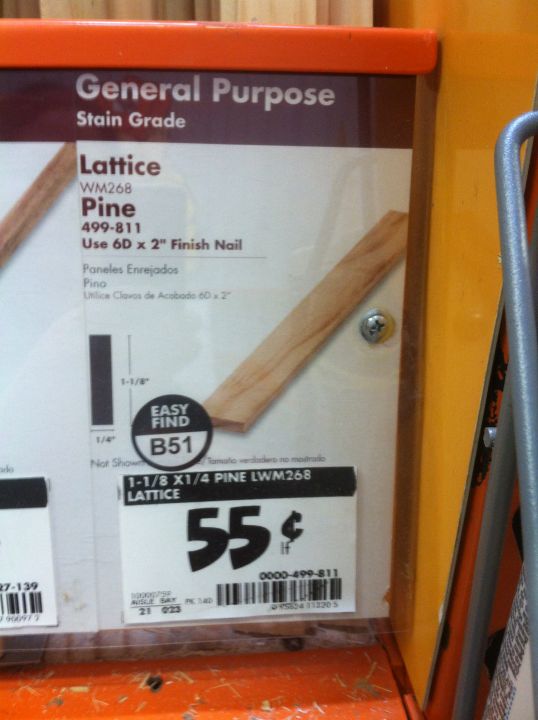
Use a 1 x 4 and add strips of lattice to each side to create a dimensional look with a bit of a cleaner, perhaps more modern look.
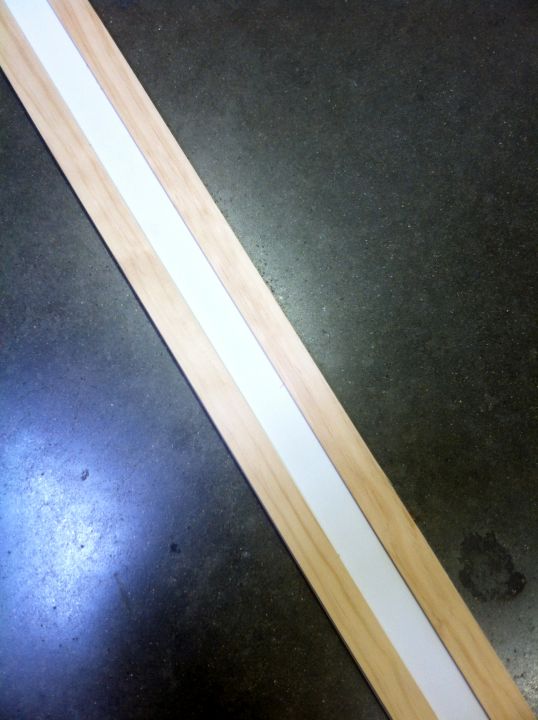
(Sorry for the awful phone pic!)
Once everything is caulked and painted, it’ll look like one solid piece.
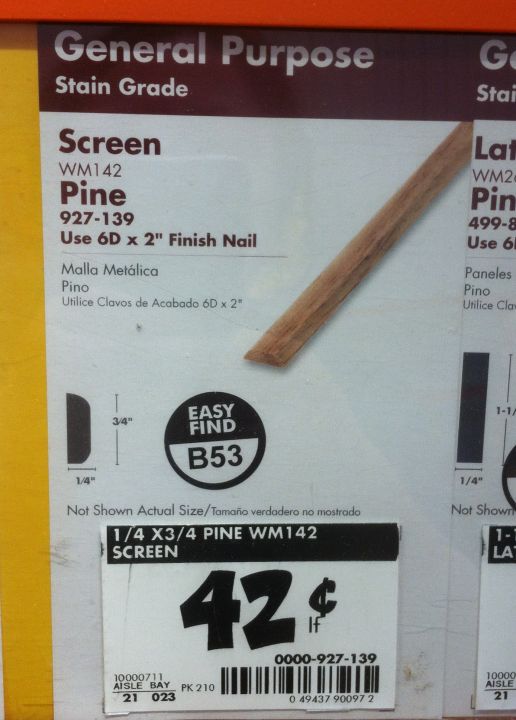
Or if that’s too bulky, you could try using strips of screen trim on the edges. Screen trim has rounded edges, so it creates a softer look.
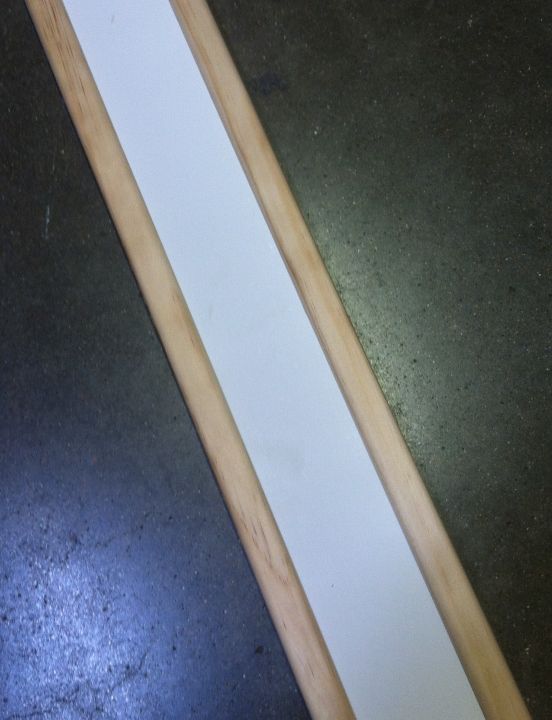
(Another awful phone pic. So sorry!)
I could go on and on with this all day long. I love browsing the trim aisle at Home Depot and imagining the different things that I could create with all of these different styles and sizes.
So have fun with it! And remember…there

Addicted 2 Decorating is where I share my DIY and decorating journey as I remodel and decorate the 1948 fixer upper that my husband, Matt, and I bought in 2013. Matt has M.S. and is unable to do physical work, so I do the majority of the work on the house by myself. You can learn more about me here.
Good morning Kristi — as usual another informative post. Not sure how you found time from your to-do list to go to HD and take pics of items plus write a post. Everything is shaping up and looking beautiful!! Enjoy your day!
I seem to make a trip to Home Depot at least five times a week, so I just took a few extra minutes to snap some pictures. HD is my favorite store, so I can always find a reason to take a break from what I’m doing and go there. 😀
Thanks, I really admired your new door trim so I certainly appreciate the tutorial. I hope it will look good with my relatively pedestrian six panel doors. Option number two has a cool recessed panel door.
Thanks for the tips and info. I may have to try this. Do you follow with the same trim along the floor for the baseboards?
I’d like to put trim around my windows and replace the sills but not sure how difficult that would be. Mine are the plain windows without any casing and the marble sills. Very boring. The house was built in the 80s. We need to replace the windows so maybe that’s the best time to redo it all?
I’ll be using the same trim for the baseboards, but of course, you don’t have to. There are all kinds of baseboard designs at HD and Lowe’s.
Looks great. Cant wait to try this in my new house!
Good info! One of these days, in my spare time, I am going to print all the wonderful info I have gotten from the internet and fill binders full of ideas and how to’s! Who knows, maybe one day one of my kids will discover that they have the DIY bug. If not, I always have the info to show to “I know how to do that” contractors. Hope things are going well with the kitchen. I know you said you were giving yourself two weeks so I imagine by Friday you will have a big reveal for all of us. I am sure you will be happy to see the back end of this project. Blessings
My goal is to have it finished by Monday the 18th. 🙂
Love that trim (THOSE trims), and I think even I could do that! They look so good in your kitchen. I’m looking for a fixer upper to re-do for resale, so you have given me tons of tips and tricks. I’ve got a few fixer-uppers under my belt, but still want more before I get too old to climb a ladder. 🙂
Only 5 comments? That just goes to show you how happy to read your kitchen blogs. Some days you have 35 or 40! By the time I get to read it someone has already said everything I want to say. Your readers anxiously await every step of your kitchen project.
Beautiful! I did the wide open space between my living room & dining room (6+ ft. wide) along the lines of the last one. Now can’t wait to do over the doors & windows! I actually assembled the top piece on the table and had someone help hold it up to nail – less strain on my arms/neck/shoulders with all the gluing & nailing. A couple of places I wish I’d taken the time to miter, but lesson learned 🙂
When we remodeled our old house, which had been built in three different stages, we replaced all the door trim and baseboard trim in order to bring cohesiveness to the different additions. I chose the simple first style you pictured for all the doors and windows, and used 1×6’s for the baseboard. We were blessed enough to get loads of lumber from a local hotel being demolished, so I spent days pulling nails, ripping down the boards, and painting them while my dh was at work. Then when he got home, we would nail them in place. Much more character than the standard mitered narrow door trim!
I love your addition of the 1x2s, it does dress it up without being too ‘fancy’, and gives just the right look for your home. You have an unerring eye for what is just right. I’m really looking forward to the big reveal this weekend. Since my birthday is the 17th, that is going to be one of my birthday presents!
Onward and Upward!
That’s my brother’s birthday, too! So I’ll be celebrating with cake and will think of you! 😀
How cool! Thanks, eat a bite of cake for me, and give your brother my Happy Birthday wishes!
Can I just take a moment to say THANKS! Seriously, here you are in the midst of a total house remake — which is pretty much being done by YOU,,,and you stop and take the time to post pictures of items that we would never question! I never REALLY LOOKED at a door frame – but WOW – what a HUGE difference that it makes in the finished product!
But more importantly, you didn’t have to post this today, you could have continued showing us how your floor is going or painted the ceiling — in other words your list is still REALLY full, and you sat down to look for and post seven different ideas on how to frame a doorway in a pretty way without going nuts or overboard in the costs!
So THANK YOU!! I just think that you are awesome – and I know that MANY other people do as well — SO – Rock On Sister Friend Decorator chick!!! Keep the good stuff coming – because – I just wanted to let you know that, we REALLY do appreciate all that you do both in your house, and the ideas that you throw out there for our brains as well!
🙂
I second that! I was really looking forward to a tutorial on the door trim, but didn’t expect it to come online before you’d finish your kitchen project 🙂 Many thanks for all the useful tips and ideas, I can imagine doing that in the near future and thus improving our house a bit Kristi-style!
I keep my fingers crossed that you’ll reach your timeline for the kitchen in order to feel satisfied – but you know that we will read and follow you quite as willingly if it takes longer, don’t you? Please be assured that a longer-drawn out-project won’t keep me from reading your blog addictedly every day!
I do know, and I appreciate that. 🙂 I mainly need to finish for my own mental health. LOL. If this drags out much longer, I don’t know if I’ll be able to handle it. I need my kitchen finished, my tools and paint moved out, and the fridge stocked with good, healthy food. 🙂 And I need it NOW! 😀
if only I’d be living near you I would invite you over for dinner or fill your fridge 🙂 I really admire how you two cope with the kitchen in this state and can perfectly well understand your cravings! So, I’ll keep my fingers crossed twice in order for you to reach your goal!
You’re very sweet. Thank you. 🙂
Yay! I was hoping you would tell us what you did! So simple and beautiful:-)
The simple idea you chose for your kitchen is so perfect because simplicity is elegant. And a more fancy door frame might compete with the star of the show. But it is above and beyond builder grade, and therefore unique.
I do love the plynth blocks at the bottom of the door framing in picture number 5. And I also love that the plynth block is taller than the baseboard.
If we are blessed enough to build a small retirement house and move onto our farm, I do believe I will copy the door frame you chose because of it’s simplicity, yet elegance.
Thanks for taking time for this tutorial. Watching you eagerly, whether I ever get to put any of this to use or not.
I don’t where you live but in my climate, (Southern California and close to the beach); I have had problems with installed MDF trim throughout my house. Sure, it looks good initially, and you can’t beat the price compared to comparable real wood trim, but I discovered after about three years, that the MDF pieces that were installed in heavier traffic areas (like frequently traveled hallways), have a tendency to dent, chip and gouge much more easily than real wood. A very small (and lightweight) framed work of art fell off the wall and damaged the MDF baseboard below it quite easily. Even my housekeeper’s careful vacuuming every other week has dented some of my MDF baseboards. Also, MDF crown molding tends to expand and contract more easily during weather changes; i.e., going from Fall to Winter and Winter to Spring causes the MDF boards to split and separate at the sections where they are joined, but the places where we installed real wood trim isn’t affected at all. I think what happens with the MDF is that over a period of several years, it begins to break down and show signs of sponge-like behavior. After a few years, it becomes more porous which makes it more susceptible to being damaged, and this is even when only the slightest pressure is placed on it. If I had it to do over, I’d have my contractor install real wood trim in all of my high traffic areas and also install real wood crown molding in my common areas. These types of improvements are something you’re going to live with for a long time so why not spend a few more dollars and thus avoid the potential for problems from living in an area that has higher humidity. That’s my two cents worth.
Interesting. It must be climate-related. I’m in central Texas, and I’ve been using MDF for years (trim, boards, and sheets cut to build items), and while I have noticed that they scar more easily than real wood lumber, I’ve never experienced the other issues you mentioned. My entry table is made out of MDF, and I set things on it all the time, and have even opened the front door too hard and it hit the table a few times, and it’s still just fine. I love MDF and use it quite frequently.
None of my doorways / pass-thru’s between rooms on the first floor have any trim whatsoever and they look plain. We want to paint the den/office ceiling a different color from the rest and we want to do a treatment to the kitchen ceiling, but we were frustrated that the edges and lines would show at each doorway / pass-thru.
Reading this blog of yours has answered our prayers! I love what you did and I am going to show this to my husband so he can see how simple it is. The mitered corners around our front door are rough, do not meet, and looks horrible, so your solution is perfect for that, too!
Thank you so very much!
I absolutely love your trim. It’s the same we have in our Craftsman bungalow style house. Simple Shaker style trim is so much prettier to me than what is used in most modern homes. At our old house, there was nothing WRONG with any of it per se, but it so wasn’t our style. Even the “normal” trim/moldings/baseboards/doors irked me. My husband is so obsessed with the trim in our current house that he won’t even let me hang curtains because he doesn’t want to cover any of it!
By the way, I was perusing West Elm’s wall art today and came across these two gilded metal wall installations which reminded me of your kitchen art search:
http://www.westelm.com/products/gilded-vines-metal-wall-art-w1186/
http://www.westelm.com/products/spiral-spray-wall-art-w1189/
That spiral is very interesting, but I LOVE those vines!!! Thanks so much for passing along those links!
Thanks for much for the info on your doorways…it was so helpful and full of good ideas. I have a question…what would you do if you already have trim around your door that is builder grade unremarkable. Remove it and start over with something like you have shown or is there any way to leave it and dress it up???
You can always add a pretty trim around the perimeter and paint the whole thing out in the same color to make the casings look wider and more custom. The additional trim that you add would need to go all the way to the floor,so part of your baseboards would need to be removed to make room.
But imagine something like this…
http://www.houzz.com/photos/70438/woodlawn-residence-traditional-hall-other-metro
Just pretend that the inside section is standard builder-grade facings, and then add more trim around the outside to bulk it up.
Here’s another idea too: http://decorchick.com/wp-content/uploads/2011/07/Door-Molding-1.jpg
Thanks so much for taking the time to answer my question…I love both of the examples you have shown!!! 🙂
Kristi…this was a great tutorial, and I really like your simple, yet stylish doorway. I noted that a couple of your other responses spoke about putting molding around larger pass through openings like those between a 1970 ranch style Living and Dining rooms. These openings don’t normally have a door facing, they are wrapped with drywall …so I measured my depth and it is closer to 5 inches, if I were to add a door facing I would think I should do this first, and should it be a 1×4? or would I need a custom cut MDF?
Kelly, I’m not Kristi, but since a 1×4 is really only 3 3/4″ wide, you’d need either a 1×6 ripped down to 5″, or MDF cut the same width.
Kelly, if your walls are standard thickness (i.e., 2 x 4 framing with 1/2-inch drywall on each side) then you should be able to purchase pre-cut, pre-primed door jambs at Home Depot or Lowe’s. The only reason you would need to have anything custom cut is if you have additional thickness on your walls for some reason.
Did you have any issues with the drywall being slightly proud (sticking out) from the door casing? That’s the issue I’m running into. It’s frustrating because we’re loving the pre-primed finger joint boards we’re using, but we’re left with this huge gap between the trim board and the door casing. Just curious! Thanks so much. I LOVE your cabinet color!!
I hope I’m understanding your question, and if so, the answer is yes. I did have that problem in a few areas. What I do is use a very sharp blade (utility knife, or even a drywall knife) and cut away the excess from the face of the drywall in an angle. So the drywall where it meets the door jamb is slightly beveled, kind of like the edges of a brand new piece of drywall where it’s beveled to allow space for the taping and mudding. That way, right where the casing meets the jamb, it’s flush and the trim will sit right against the door jamb. It’s not pretty under there, but when you cover it with the casing trim, nobody will ever know.
Nice. Is that acoustical tile on the ceiling? I’ll be watching to see what you do with that. I have a room with the very same tile and I’d like to get rid of it.
I absolutely love love your blog. I have a house similar to yours and soooo needed these ideas. Thank you from the top and bottom of my heart. Keep doing what you do! Now, Is the trim work expensive or is it comparable to regular trim?
Trim definitely adds up very quickly, but when you consider the cost versus the impact it has on a room, I think it’s totally worth it! If I had to guesstimate the cost of all of the trim for this room (including the crown molding, but not including the ceiling), I would ballpark it at $275-$300.
I can’t thank you enough for this simple yet practical idea to dress up the trim around my front entry door. Was looking for ideas and your DIY trim tip will fit the bill quite nicely…pun intended(smile)
Thanks
Thanks for a REALLY helpful tutorial! No home depot near us but I’m going to browse the Lowe’s website. Will be showing this tutorial to my husband tonight….we have an ugly door that has needed framed for 5 months now!
I see a lot of people are painting their trims today…however, I like the look of wood. Are stained wood finishs going out of style? I am getting ready to put up some trim around some new windows and doors that I’ll be staining a walnut color. I have a question…when you use 1x4s for trim around the door…do you also use 1 x 4s for the mopboard application as well. I was thinking of using 5/4 x 4 boards for the door trims and using 1 x 4 boards for the mopboards. I was thinking if there was any veration in the way the mopboard meets the door trim it would not show.
White trim is definitely the most popular, but you can stain or paint your trim whatever color you want. It’s your home! I used 1 x 4’s around my doors and windows but used moulded baseboards. But you can use 1 x 4’s as baseboards, too.