Kitchen Progress So Far: Three Walls (Almost!) Finished
Progress has been slow but steady in the kitchen. I’ll be honest…those tiled walls have taken way longer than I expected. One of the most time-consuming parts was having to clean all of the grout lines with a razor blade before grouting. If I had been using white grout, it may not have been a big deal since the thin set mortar that I used was white. But since I was using a grout color called bone, every bit of the white had to be scraped off completely so it wouldn’t poke through the grout. But I got it done, and was able to check a few other things off of my list as well! 🙂
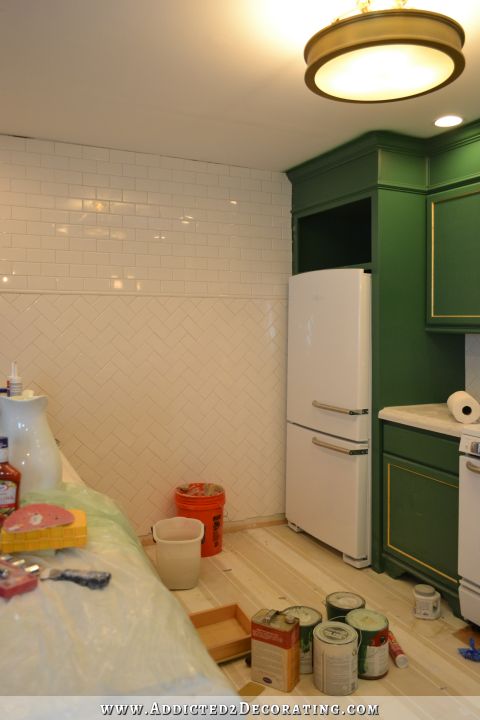
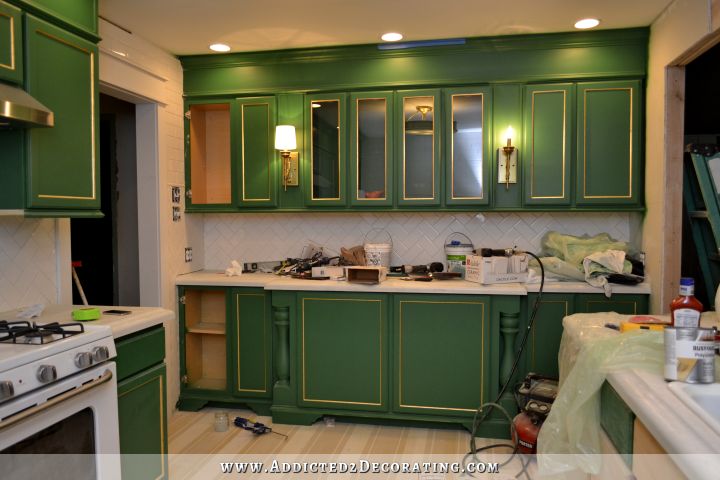
So here’s a peek of the progress so far. I apologize, but I didn’t clean up for these pictures. However, my mom did spend several hours over here on Wednesday cleaning up, organizing, and taking loads of trash and construction debris out. I have such an awesome family. 🙂
I got all of the tiles around the perimeter cut and installed on the wall of tile, including another ogee edge around the peninsula. (Just one more ogee edge to go on the other end of the wall of cabinets!! Those things are not fun to cut.) I also got the tile grouted.
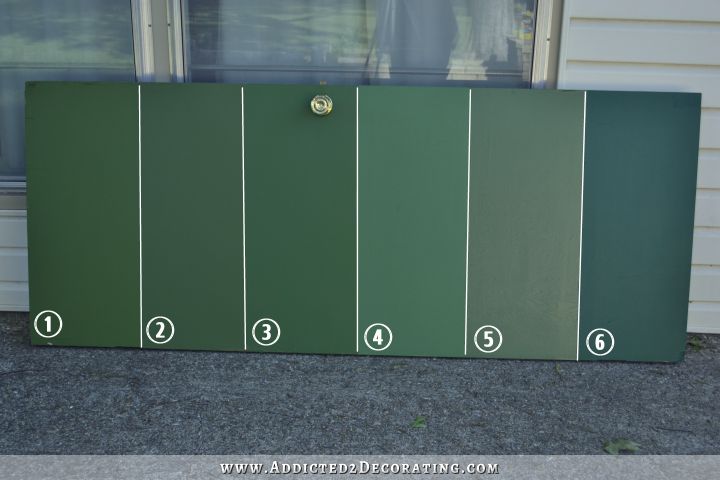
As a side note, I absolutely love the color of grout that I chose. I didn’t want white, because that tends to make white subway tile kind of disappear. I most certainly didn’t want black or anything dark. (Am I the only one who hates that look?) I wanted a non-white-yet-subtle color, and I got it! When it’s completely dry, the bone color is so subtle that it almost just looks like a light shadow rather than an actual grout line, so all of the individual tiles are clearly visible, but the grout doesn’t really jump out at you.
On the refrigerator wall, I got the range moved in and hooked up, and also caulked around the tiles. My mom helped me change the door swing on the refrigerator. I think it only took us two hours! 😀

I also figured out how to lower the leveling feet (wheels, actually) on the front of the fridge, but even with them lowered all the way, the refrigerator still isn’t level.
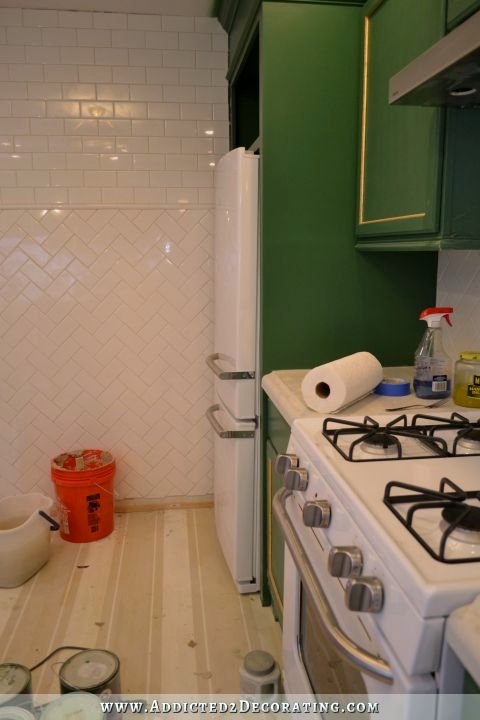
I should probably just leave well enough alone with that, but I really want it to be more level. It’s in as far as it’ll go at the top, but you can see that it’s out about an inch more at the bottom than at the top…maybe even a little more than an inch. The owners manual says that the front needs to be 1/4-inch higher than the back so that the doors will close on their own, but that’s definitely more than 1/4-inch.
Now I know I’ve said time and again that I love mixed metals in a room. And I still do…that hasn’t changed. I really like the stainless steel, gold, and brass mixture in the room. But there is one detail that’s really bugging me, and I think I’m going to try to remedy it. (One more easy task for my “to do” list! Ha!) I don’t know if you can even see it in this photo, but it’s the stainless steel frame around the window on the oven.

Perhaps you can see it better in this picture…
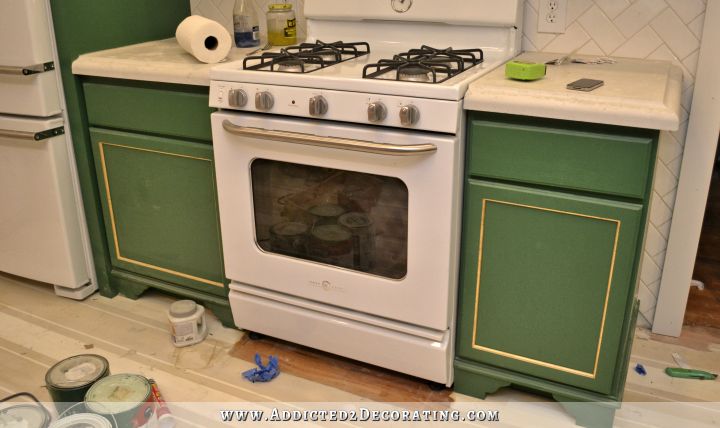
There’s just something about that rectangle with the rounded corners framed in silver sandwiched between two rectangles with square corners framed in gold that really bothers me. I know my perfectionist tendencies might be showing here, but I mean, it really bothers me. So I’ll probably end up painting that little silver frame with some black high heat paint to make it disappear. Anyway…
I got all of the tile around the doorway grouted. I still need to caulk, which is why the two cabinet doors are still off. And I still need to figure out how to trim out the top of the walls to cover the small gaps between the tile and the ceiling.

One challenge I’m facing is that my ceiling isn’t perfectly level. On the wall of tile, I made sure to level all of the tile, and at the refrigerator end, the tile is right at the ceiling. But at the other end, it’s as much as 1/2-inch to 5/8-inch away from the ceiling. So I have to figure out a clever way to (1) trim out the top and (2) camouflage the unevenness of the ceiling. I have a couple of ideas that I’ll be trying out this weekend. That’s just part of the joy of living in an older house. 🙂
And as you probably noticed in the photo above, I got the door facing and trim installed around the kitchen door.
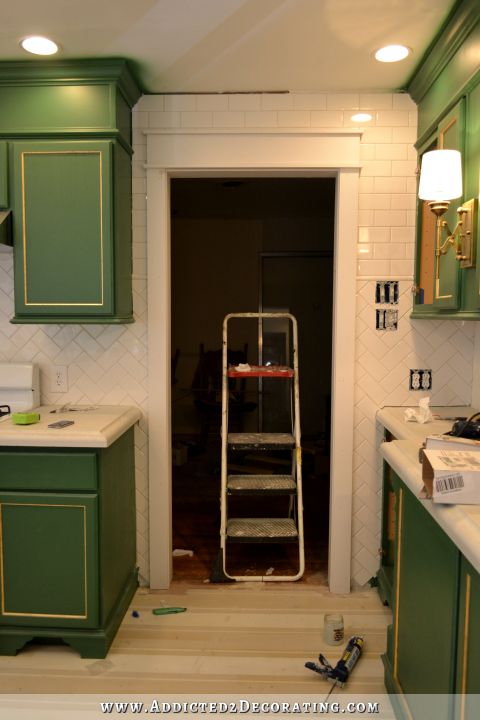
It’s not painted yet, but I love it already. That’s the trim style that I’ll be using on all of the doors and windows in the whole house. It’s very simple, but yet visually raises the height of the doorways and dressed them up just a bit. I think the opening between the kitchen and breakfast room will look amazing trimmed out like that.
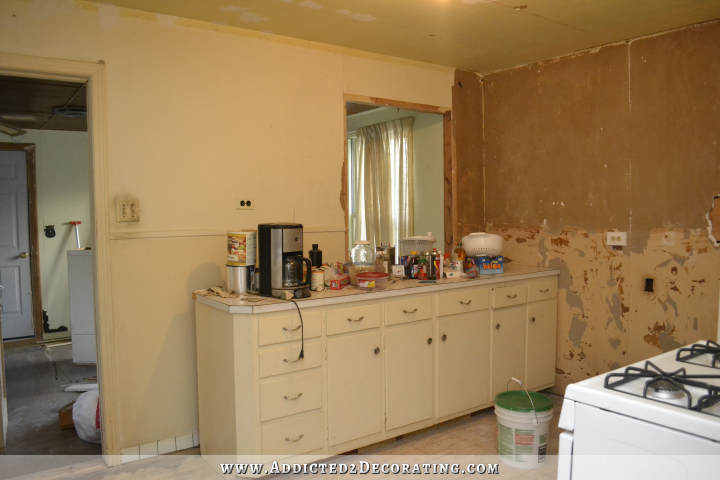
And finally, the third almost-finished wall is the wall of cabinets, which you’ve seen plenty of times already. Nothing’s changed on that wall as far as progress. It does look like I’ve taken a step backwards since two doors and one lamp shade are missing. 😀
So that’s my progress, and that’s I’m facing as I head into this weekend. Just a few days left if I want to meet my goal! My official goal is to have this done by Monday the 18th, but I think it would be pretty cool if I could have it done by the 16th. That’s our official 1-year house buying anniversary.
And for those of you who like lists, here are my completed projects and still-to-do projects in list form:
Wall of tile:
- Install the rest of the tiles around the perimeter
- Clean the grout lines and grout the wall
- Caulk around the edges
- Install trim at the top of the wall
- Install baseboard
- Clean film off of tiles
Refrigerator wall:
- Grout tile around the doorway
- Caulk around the tiles
- Install the stove
- Replace the trim on the cabinets that had to be removed to tile 🙁
- Switch the door swing on the refrigerator
- Touch up the ceiling paint along the crown moulding
- Install and paint the trim around the door (in progress)
- Install trim at the top of the tiled wall
- Install baseboards
- Install undercabinet lighting
- Wire vent hood with a plug (currently has no plug and has to be hardwired)
- Clean overspray from inside of cabinets
- Make and install corbels
Wall of cabinets:
- Order shelf pins and install glass shelves
- Clean overspray from inside of cabinets
- Touch up ceiling paint along crown moulding
- Install undercabinet lighting
- Make and install corbels
Peninsula and surrounding partial walls:
- Install tile on the wall
- Grout the tile
- Caulk around the edges of the tile
- Install trim at the top of the wall
- Install trim around the doorway/opening
- Remake four large drawer fronts
- Make and install the furniture feet on the cabinets
- Install trim on the cabinets
- Prime, paint and polyurethane the cabinets
- Gold leaf the large drawers and cabinet doors
- Install baseboard on left wall
Other:
- Sand and Waterlox the floor
It’s gonna be a busy weekend! 😀

Addicted 2 Decorating is where I share my DIY and decorating journey as I remodel and decorate the 1948 fixer upper that my husband, Matt, and I bought in 2013. Matt has M.S. and is unable to do physical work, so I do the majority of the work on the house by myself. You can learn more about me here.

Wow!! I have been following your kitchen remodel from the beginning and it is stunning!! It looks so beautiful, I can’t wait to see the finished product.
I love everything!! You have done a fantastic job and I cannot WAIT to see what you get done next! I’m rooting for you – your ideas that have turned into the real thing just couldn’t be more perfect 🙂 I have a question – the door facing and trim around the door that you installed – I LOVE – did you make that or buy it like that? I would Love to replace the trim in my home with that!!
I am with Angel–could you please share the doorway trim info—I need to get the info to my daughter she has a doorway to her kitchen unfinished and this would look wonderful! Totally am enjoying the progress of all your hard work.
Yep I also would love a tutorial on the door trim! Or even a post on what wood to buy :-))) Looks so awesome!!!!
that’s eyxactly what sprang to my mind when seeing the picture: I’d love to have that door framing around all my doors because now they look boring, plain and could do with some more (visual) height. So, please Kristi, when you’re done with the kitchen give us some hints how to build them! Thanks a lot and a good weekend with lots of jobs done which you then can cross off the list (very satisfying!)
Crown moulding exactly like the top of your cabinets (I know you created it out of several pieces) but if you continue that across the tops of the tiled walls, but painted white. It will finish it off, hide the gaps, and painting it white could make it look finished but not compete with the tile or cabinets.
Kourtney, that’s exactly what I was thinking! Also, how are you straightening out your doors? I have a media console I built from stock cabinets and none of the doors line up. How do you do it?
I was thinking the same!
The trim around the door opening is such a cool detail! Could you please do a post showing how you did that in detail?
Just beautiful! It was mixing metals that led me to your blog in the first place. Then I watched you spray paint a shower enclosure and have been hooked ever since. I have to laugh to your reaction to that window frame, but understand about being bothered by it.
Thanks for the photos that show more than one wall, i’ve been waiting for that. You get a better feel for the room. So lovely!
Kristi…where oh where do you get your energy? Happy one year anniversary sounds like a win win day to celebrate. You have earned it…love the kitchen…
I love that trim work around the door Kristi! Please share how you did that. Would like to mimic in my new/old house.
Oh, Kristi, I almost teared up when I saw your progress! It’s looking sooooooo beautiful! I LOVE the trim around your door frame – I agree that it adds just the right touch of elegance to the door frame, and is completely appropriate for the style you are achieving. I got a kick out of seeing the refrigerator handles switched, and the stove installed. It’s looking like a real kitchen in there! lol.
Have you considered a simple quarter round molding between the ceiling and the tiles? If it was painted gloss white, it would blend into the tile and echo the tile dividing trim. It would have to be a thicker quarter round, bigger than the shoe mold at the bottom of the baseboard molding, if you know what I’m referring to. Also, would it be feasible to set the rear of the fridge on a piece of lath to bring it up just a little?
I would love to live close enough to you to come over and help you clean up. Your family is the greatest, that’s for sure. Your Mom (and your brother) need to have a special dinner cooked for them in your new kitchen when it’s completed!
Having a goal to strive for is a good thing, but please don’t exhaust yourself trying to reach it. You are very close to having this project finished, but there are still some time-consuming aspects that may slow your progress, like remodeling the drawer fronts and finishing the floor. If you don’t get everything done by the 18th, we’ll still think you’re amazing. Right, guys?
Onward and Upward!
maybe something like this: http://www.crownmoldings.net/media/ecom/prodxl/Orac_Decor_CX132.jpg
How funny! I was just now looking at that website! 😀
Great minds! 😉
or, even simpler, this: http://www.foamcrownmolding.com/Quarter_round_molding/imag001.jpg
Sure is going to busy. Hope you have a good weather forecast. Blessings
I absolutely LOVE this kitchen and what you have done!! our kitchen has alot of plain pine cabinets that I would love to paint but my husband wont let me!! You amaze me everytime I see what you have done – such an inspiration!!
I love the countertops & tile with the beautiful green cabinets. Can’t wait to see it all with the floor done! You are amazing! I can’t wait to read your updates each day!
another idea: just use a flat molding the same height of the crown molding and paint it gloss white. This would allow you to run the bottom of it perpendicular with the line of the tile, while angling the top edge to fit the ceiling. I don’t know if that would be too obvious, but it’s an idea. just brainstorming!
sort of like this: http://i201.photobucket.com/albums/aa77/kitchenkelly/DSC00286.jpg
I meant ‘parallel’, not ‘perpendicular’.
Looks like I’m not the only one that would love for you to explain your door trim. Gotta’ look ahead to when we finally find our next house! 😉 Your kitchen looks wonderful already, can’t wait to see it all done. You truly are amazing.
Hi-
Happy one year anniversary!
I would use a piece of bullnose trim, or quarter round in that tiny gap below the ceiling, and paint it out to match the white of the door trim.
You are making great progress!
I know you are dreading doing the floors, but they are going to look so fantastic with the darker wood against the white tile and green cabinets. I love the kitchen door trim. For a minute I thought you had painted the door black and then realized there was just no light coming through the space, but wow, I think the door might look good painted black. Totally agree with you on the oven. It would drive me bonkers.
I really like the first link that Alta provided. The quarter-round with just a little added detail is so sharp looking. The kitchen is amazing. Love the subway tile everywhere. You’re going to be able to look at it and think “I did that.” What a great feeling. It’s really coming together now and it must feel fantastic to have the home stretch in sight.
STUNNING!! There really are not other words for you astonishing attention to details and your steadfast capabilities of being able to accomplish this on your own! If there has ever been one lady that can inspire so many other ladies, its YOU!!!
AND –
You got the Fridge door switched around!!! 🙂
How funny it has been with EVERYTHING that you have been doing that this always seemed to be the ONE thing that people ALWAYS pointed out!
This is probably the most REAL remake/makeover, of a house that I’ve EVER paid attention to! It is happening in ‘real’ time, it is taking place in the span of a ‘one woman show’ that is not only doing everything right, but isn;t happy when something seems ‘off’. Lets face it, you could have been done long ago, if you were not so spot on with your attention to detail. You always say, “it’s the little things that make a difference”, and its true! YOu can see something, and not like it, and you got back to FIX it! How many contractors would just leave it and hope that the homeowner doesn’t see it as well! We have so many spots in our home that were done half-a$$ed, and just left that way. We cannot got back and fix these things without tearing out a LOT of finished work that would require us to rip out half of the house – so it isn’t practical for us. But I’m impressed at the fact that you are going back and fixing things that have not made you happy as the way I see it, if I sit long enough I can point out the things that drive me bonkers about things that I wish I could fix. You on the other hand, will be able to sit in your kitchen and be happy knowing that you never settled until it was perfect, or at least coming pretty darned close to perfection, when dealing with an older house makeover! This is probably one of the prettiest kitchens that I’ve seen in ANY book or magazine — and its not even finished yet!!! You ROCK!!! AND Inspire us ALL!!! And, I bet that I can speak for ALL of your followers in saying that, WE love this kitchen!!!
(we love you, and all of your hard work – please know that, this is coming across in the most non creepy way possible!!! LOL)
I just cannot wait to see the finished room with the darker floors, as it is going to pull those cabinets together in a way that it was meant to be seen! Magazine worthy looks, coming from Kristi L. yet again! So proud of your work!
Just beautiful! What an inspiration. I am rooting for the 16th! So Matt can eat in the kitchen on your 1 year home anniversary! LOL
P.S. I am glad you got some rest yesterday. This post was worth the wait.
Everything is so beautiful! Really like the door trim and want to use it in my home. Please share the door trim process.
Everything looks great! I have a question – how long does it take the waterlox to cure/dry? do you put a clear sealer on top of it ( like polyurethane?)
Gorgeous. And so much progress every time I stop by to check. You are such a hard-worker, very inspiring!
Have you got anything interesting planned for switch-plate covers? Totally just curious…Cannot wait to see the all finished/accessorized/art-adorned space.
love visiting your blog,
The kitchen is nothing short of stunning gorgeousness. It is really coming together beautifully and again I am amazed at your energy and ambition. I wish I had a tenth of it!
It keeps getting better and better! I love the trim around the doors. Very nice!!!
Wow kristi. It’s beautiful. I just love the tiling. As for the gaps I would use a simple moulding something like quarter round and paint it the same as the ceiling. Can’t wait to see the finished kitchen. Cheers
How wonderful it is to see that refrigerator wall with your vintage inspired appliances! I truly love it. I purchased a Maytag refrigerator from Sears and the two men who came to set it up insisted that the front of the refrigerator be elevated at least an inch above the back, causing it to tilt backwards. They said it was the only way to insure that the door fastened properly each and every time it was opened. You are only noticing it because of the enclosure you built for it. I would not raise the back any at all, because one day you will find that the door didn’t close tight and everything is spoiled.
Love your door crown. I insisted on something very similar for the double opening between my daughters living room and dining room, and she has always loved it. Did the same thing for her living room door going out onto her porch. It just adds a little extra interest.
Tell your mom thanks from the rest of us who would have loved to help you clean up and organize. She’s a keeper.
I’ll try to remember on the 16th to go back and look at pics to the very beginning of your work on the house. I know it will be overwhelming.
How quaint! I LOVE IT!
I have followed your kitchen makeover. I have been so impressed with all that you have done. I just have one area I wish you would rethink. That is the stainless hood. Either you need a bigger more substantial hood or you should go with a wood one. Something that gives dimension to that area like the little “columns” you have on the lower cabinets. Just my opinion.
Wow – it just looks better every time!
Really love the molding for the door – so simple and elegant
Your kitchen is looking amazing. I mean really amazing. So unique and wonderful. The color is rich and lush and it’s really captivating!! I love everything you are doing, and can’t believe you are doing it! You make me tired.
Absolutely gorgeous. I love everything about it!!
You probably won’t see this comment, but I’ll post anyway. Was just looking through LittleGreenNotebook and spotted a page with art in the kitchen. Several have framed art hung on top of subway tiles! Here’s the link:
http://littlegreennotebook.blogspot.com/2012/03/hungry-prints-and-art-in-kitchen.html
Yah Kristi!!!
(that’s me cheering you on 🙂 )
FYI…..Not all fridges are supposed to be truly level. Many are made to slope to the rear so that the defrost drains properly and so the doors will close on their own. Check your manual first or call the manufacturer before getting it truly level!
I’m aware of that. 🙂 As I stated in the post, my owners manual says that the front needs to be 1/4-inch higher than the back so that the doors will close on their own, but but mine is definitely more than 1/4 inch even with the front lowered all the way. If it were only 1/4 inch, I’d be fine with it. Perfectly happy, in fact. 🙂
I know your blank wall screams to you, “Wall art!” To me, it screams, “Pot rack and/or a couple of accent shelves with Ball jars on them containing foodstuffs!”
Then again, I’m a cooking hobbiest. 🙂
Beautiful job with the tiling. I don’t know if I’d have the guts/stamina to do all of that but it looks great!
Congratulations on an amazing kitchen. Are you happy with opening the freezer? I am looking at that GE Artistry fridge, but like yours, the side would be against the wall. I read a review elsewhere online that said she could not pull out the drawer in this situation where the door can’t open 90 degrees or more. I wonder if that means you just can’t totally remove it, how well you can get at things in the freezer when full, how far the drawer can pull out, etc. Thanks for your blog on this!