How To Create A Wallpaper Or Fabric Design From A (Very Simple!!) Acrylic Painting
Y’all, have I got some knowledge to pass along to you today! If you like wallpaper, fabric, and abstract acrylic paintings as much as I do, I think you’ll enjoy this. I want to show you how to turn a very simple acrylic painting into a repeatable pattern that you can use to print on wallpaper and fabric.
So let me back up a bit. Are y’all familiar with The One Room Challenge? I think it’s twice a year (spring and fall) and it’s where a group of bloggers each redesign and decorate one room in their own home over the course of six weeks, and then at the end of those six weeks, we all get to ooohh and aaahh over their results. I always look forward to the reveals. I make a Saturday morning of it, looking through all of the before and after room makeovers.
One of my all-time favorite rooms was a dining room by Cassie at Hi Sugarplum. The thing that absolutely made that room was the wallpaper. It’s truly spectacular, in my humble opinion. I’ve gone back probably a hundred times to look at that room and those walls.
Well, a few days ago, I was looking at the website of the artist who designed the wallpaper (I’m not going to link to the website, for reasons that should become obvious, so if you want to see those designs, you can do a bit of link-following to find it yourself), and it dawned on me that the design used to create that wallpaper was incredibly simple. As in, literally anyone who can hold a paint brush can create something similar. And you can customize it just for yourself using colors specific to your house or your particular room.
So I spent literally ten minutes yesterday afternoon making two 8″ x 10″ paintings, painted on 1/4″ MDF and using leftover Behr paint that I had on hand. And then I created my own wallpaper designs. Again, these were five-minute paintings using leftover paint that I had on hand. Here’s what the original paintings looked like…
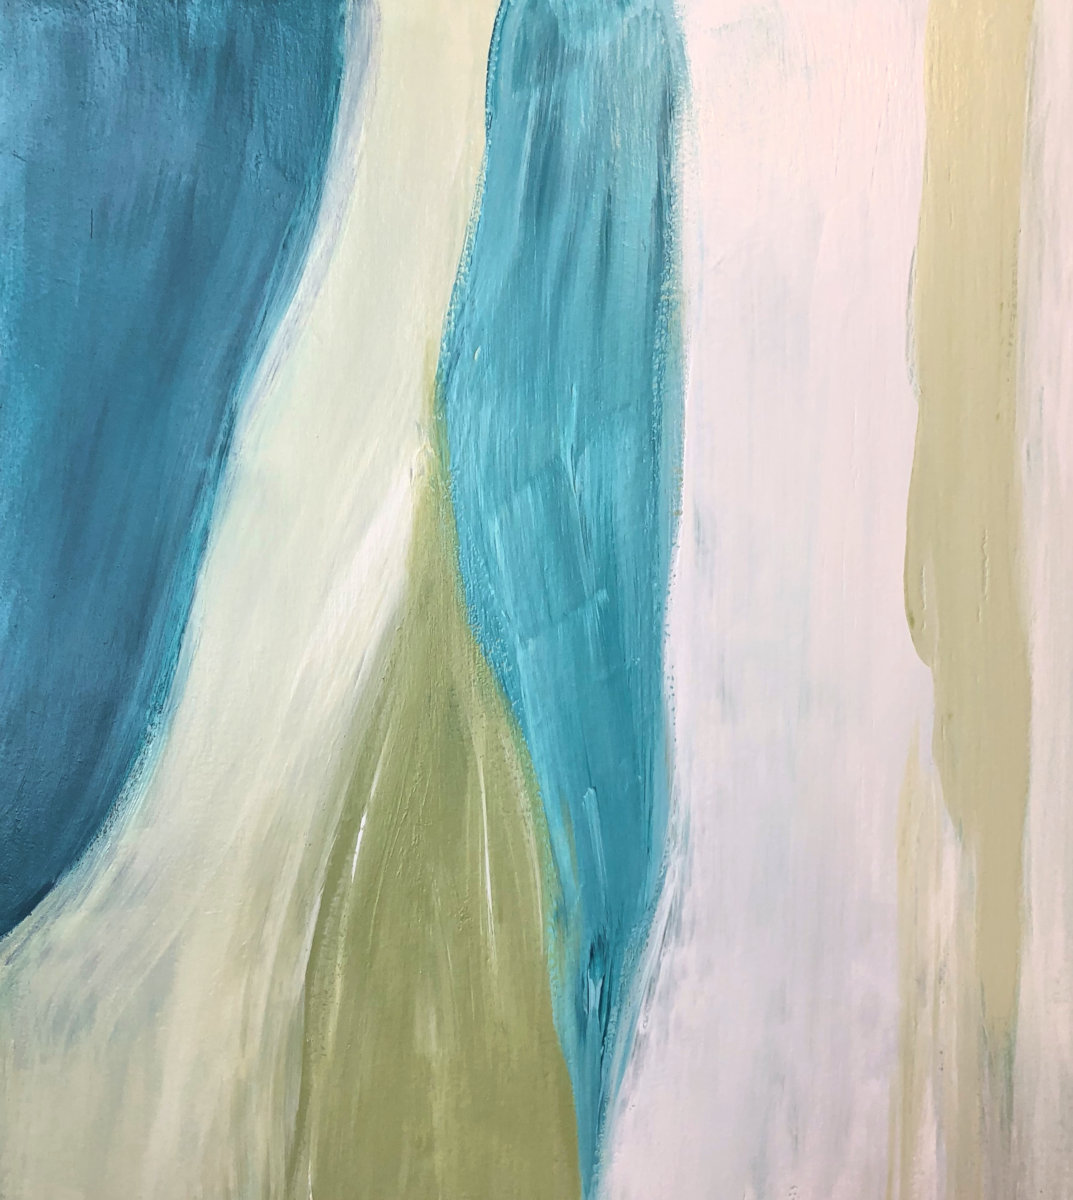
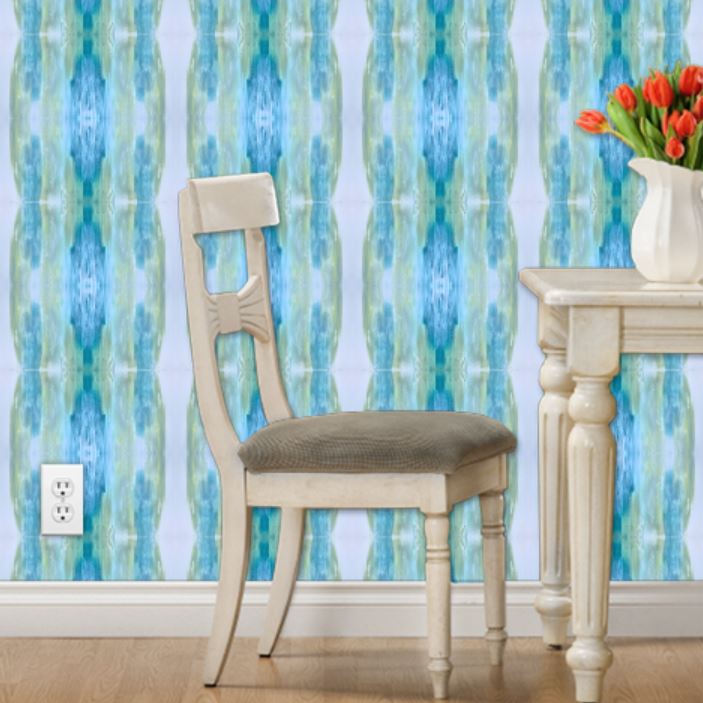
I mean, those are pretty basic paintings, am I right? I’m pretty sure most people can do something like that. But that first simple painting turned into wallpaper looks like this…

(I should have brightened the image of my painting more with the white balance tool in my photo editing software before uploading it, but these are just quick examples.)
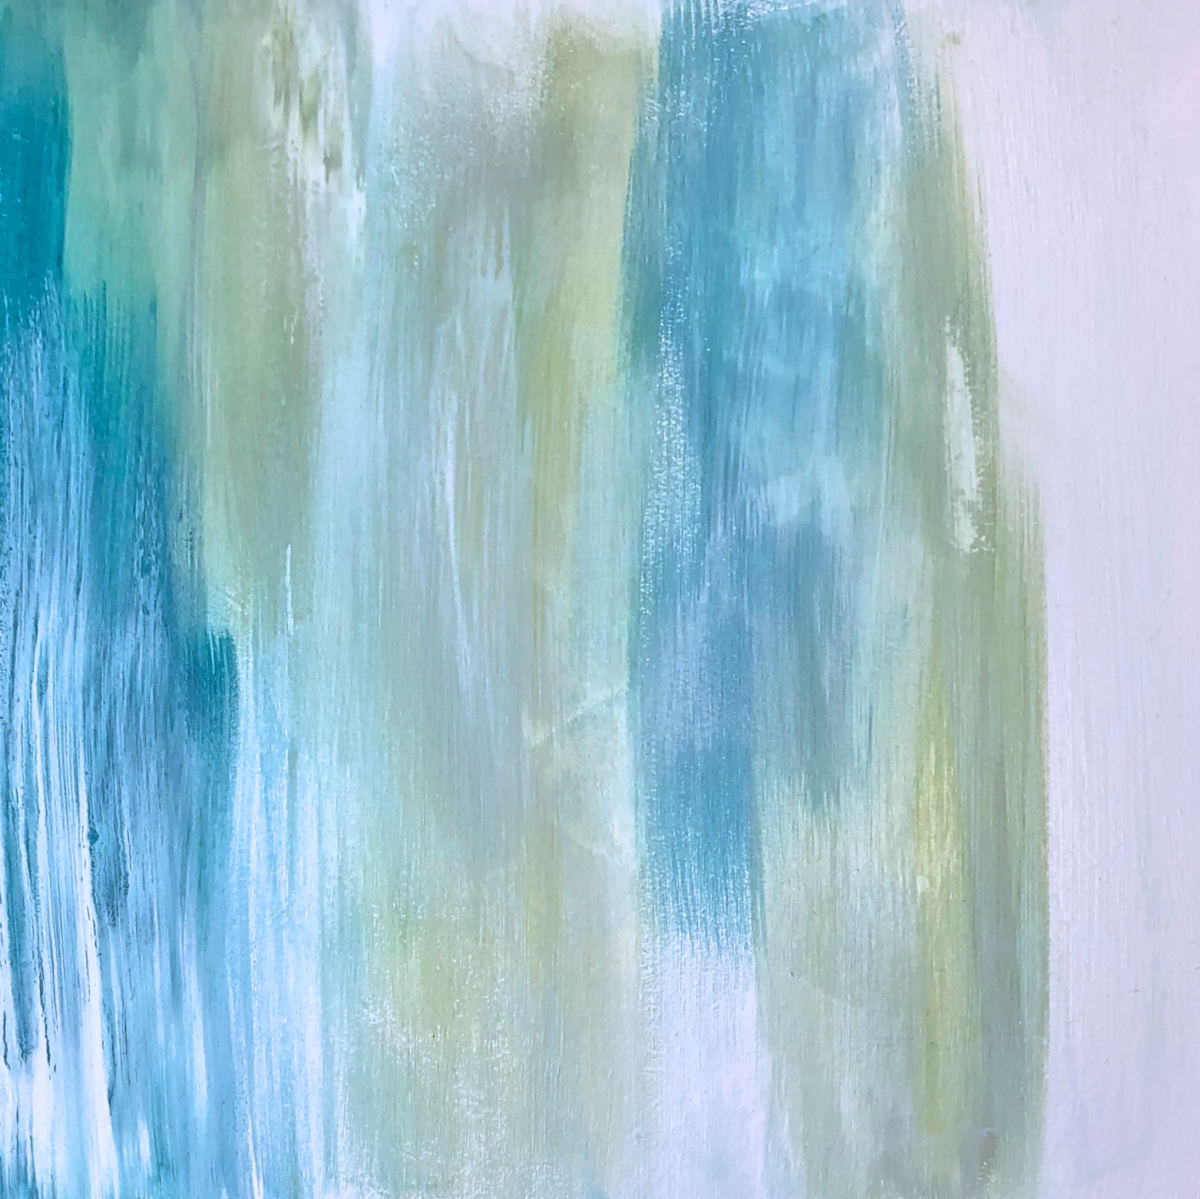
And the second simple painting looks like this…
Pretty awesome, right!? Now just imagine what you can do if you put a little more than five minutes into your painting, actually thought through the design a bit, and purchase some paints in amazing colors rather than using leftover scraps.
So let me show you how I did this. First of all, I use a program called Paint Shop Pro X8 to do all of my photo editing. It’s similar to Photoshop at a fraction of the price. Even my Photoshop-expert mom was pleasantly surprised at the capabilities of this program.
The X8 version is outdated, but you can click here to find the most recent version on Amazon, available in an instant download. You can also get it on a disc…but why would you do that when instant gratification is available? 😀 Anyway, here’s the process I used. And all of these screenshots should be clickable so that you can see a larger image with a bit more detail if you need to.
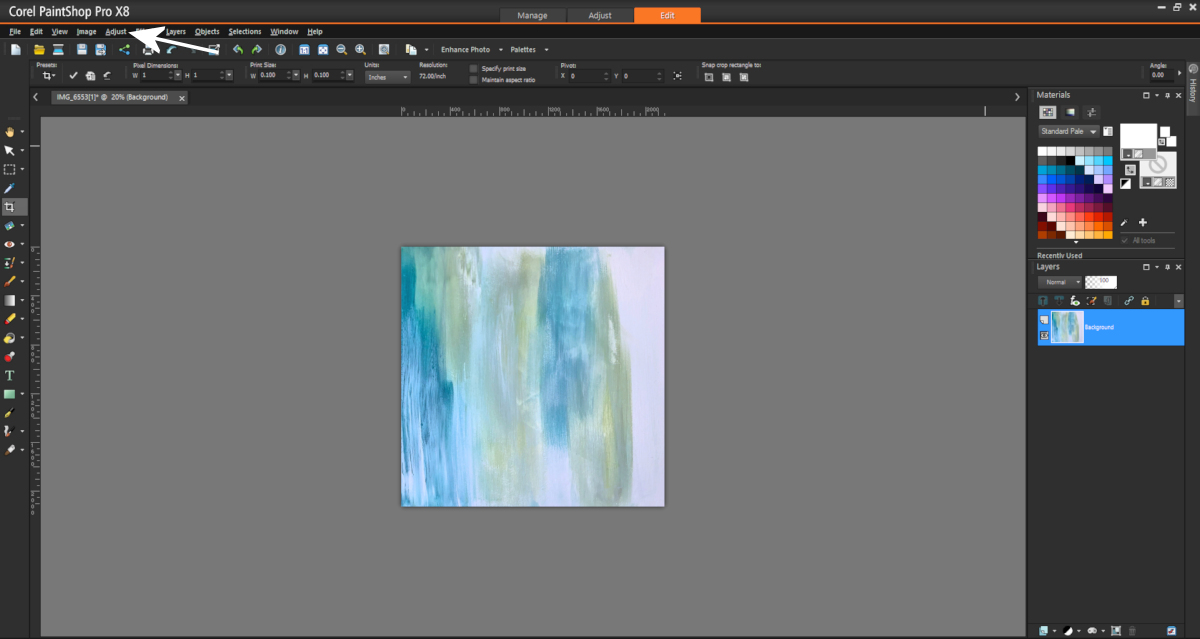
After I did the painting and let it dry completely, I took a relatively close-up picture of it, making sure that there weren’t any glares anywhere on the painting. I have an iPhone X, which is as good as many (but obviously not all) DSLRs available today, so that’s what I use for all of my pictures these days. I pulled up the picture in PaintShop Pro, and this is what it looked like right out of my phone.
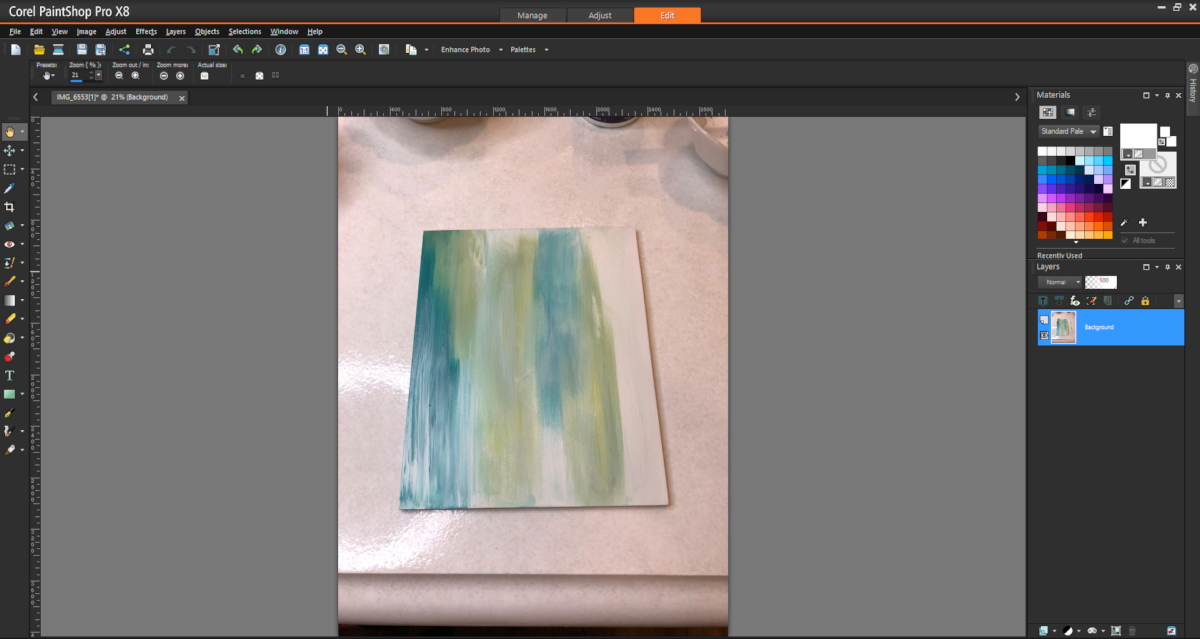
You can see that the picture is kind of dark, plus there’s quite a bit of my kitchen countertop in there. All of that can be edited out. But first, I needed to straighten the edges of the painting, which I did using this pointer tool on the left. Once you click that, you can Shift, click and drag the corners of the picture to straighten the edges of the painting.

And then I used the cropping tool to crop out the countertop, leaving me with just the painting with straightened edges.

Next, under the Adjust tab at the top, I corrected the white balance, I edited the brightness/contrast, and I edited the fill light/clarity. You can play around with these options to see how they affect your image, but I generally have to brighten mine quite a bit.
Do not, at any point, resize the image! You want it to stay as big as possible, just as it is right out of your phone or DSLR.
When I had the brightness and contrast just like I wanted it, I clicked on the image and did a Ctrl + C to copy the image. Then under the Image tab at the top, I resized the Canvas Size to make it twice as wide and twice as high as the original picture.

It gives you the option to select a background color. This color won’t show in the final image, but making the color something dark (like black, which is what I use) or something bright (like hot pink) makes it easier to tile your image and make sure that you’re not leaving any areas exposed. It also gives you the option to determine placement of the original image on the new larger canvas. Just make sure your original image is placed in one corner rather than being centered in the middle of the new canvas size.
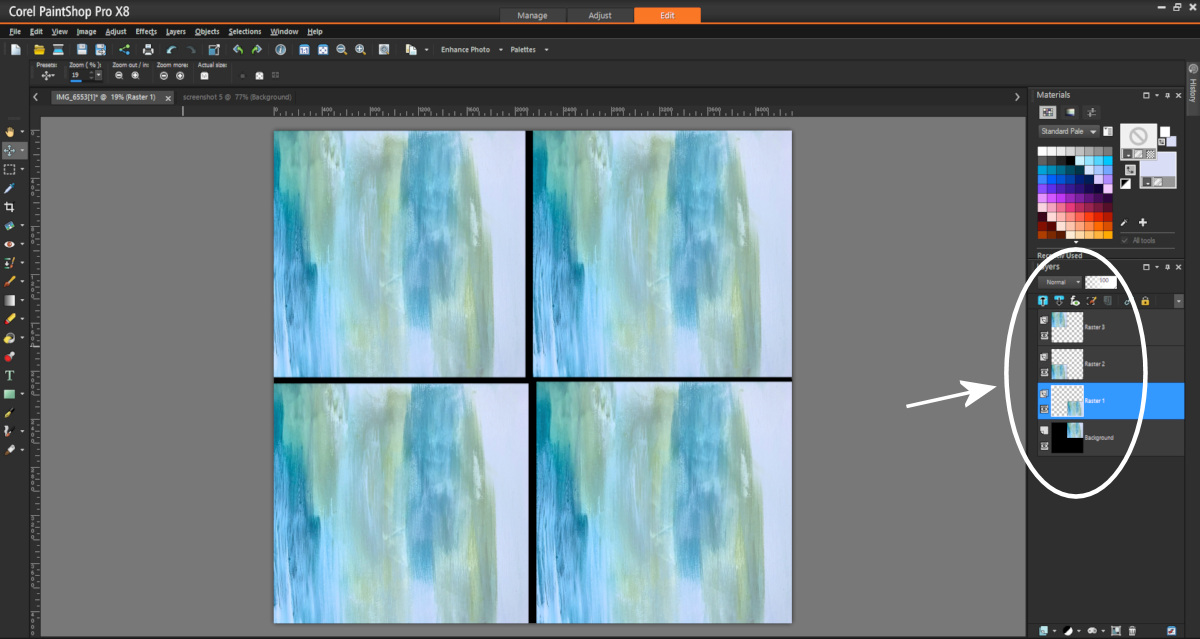
Then I pasted three additional images of the original painting using either the Edit –> Paste As New Layer option on the top menu, or by hitting Ctrl + V. Then I clicked and dragged each layer to its position. You can see the layers on the right side of the screen. The original one is the one with the background color.
Next, I clicked on each new layer one at a time, and flipped them using the Flip option under the Image tab at the top.
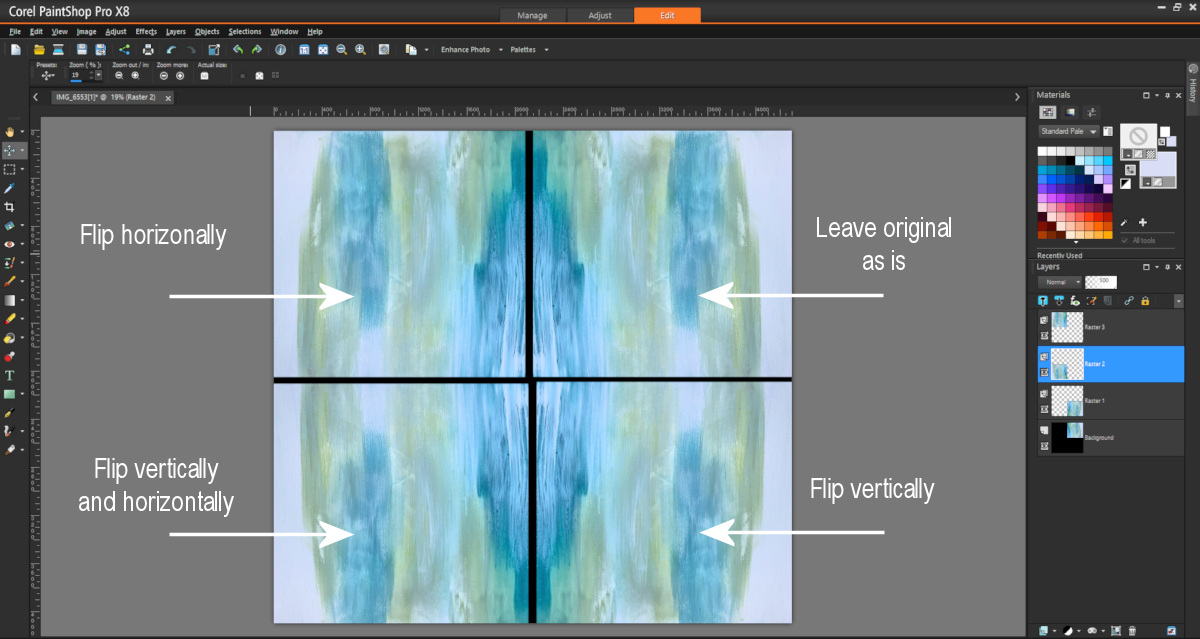
Then I clicked and dragged each layer so that they were perfectly lined up next to the original layer. You really have to zoom in to be sure they’re lined up. They may look lined up when you’re zoomed out, but if you zoom in, you can see that they’re just a couple of pixels off. I just use my arrow keys to get them perfectly in place.

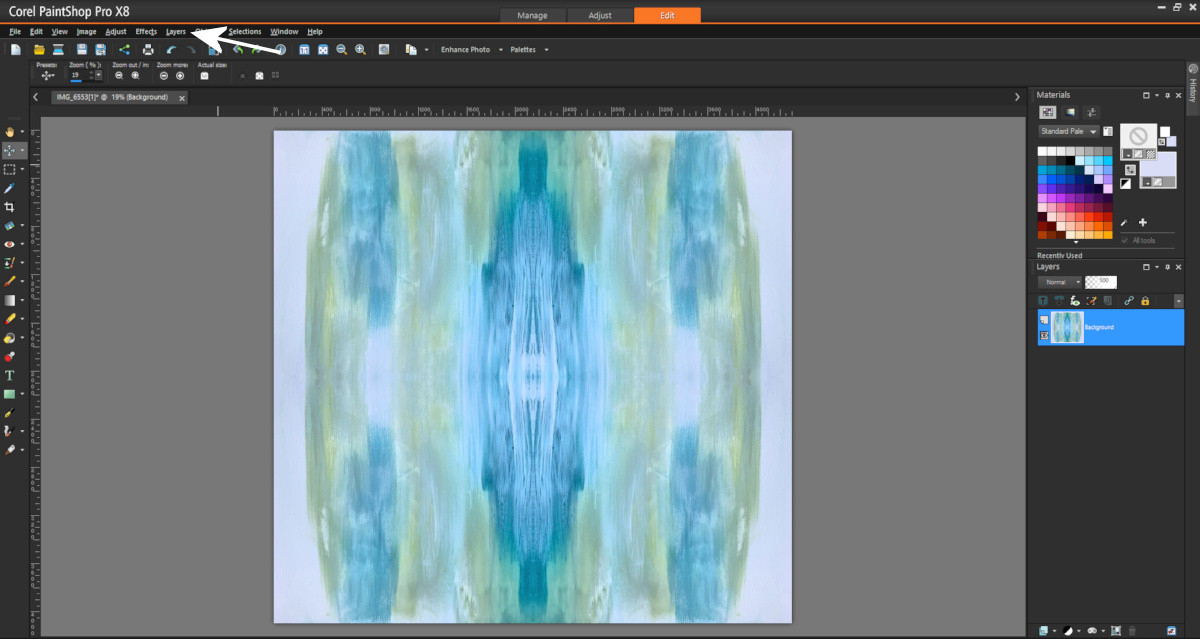
And then when you zoom out, you should have a perfectly repeatable design. Just click on the Layers tab at the top, and click Merge –> Merge All (Flatten) to turn the four layers into one layer.
In order to upload the design to Spoonflower, the file has to be under 40MB. You can change the file size and quality as you’re saving the image. I personally use .jpg files, and I save them as high quality as I can while keeping it at or under 40MB.
And again, remember that you do not want to resize the actual dimensions of the image. Keep it as large as possible!
Once you’ve created your repeatable pattern, you’re ready to upload to Spoonflower. You’ll have to create an account, and then head to the Studio Home section on your user account, where you’ll see an option to upload a new design.
Once you upload it, it automatically sends you to the Fabric tab, and the proportions will probably be off. Mine looked like this…
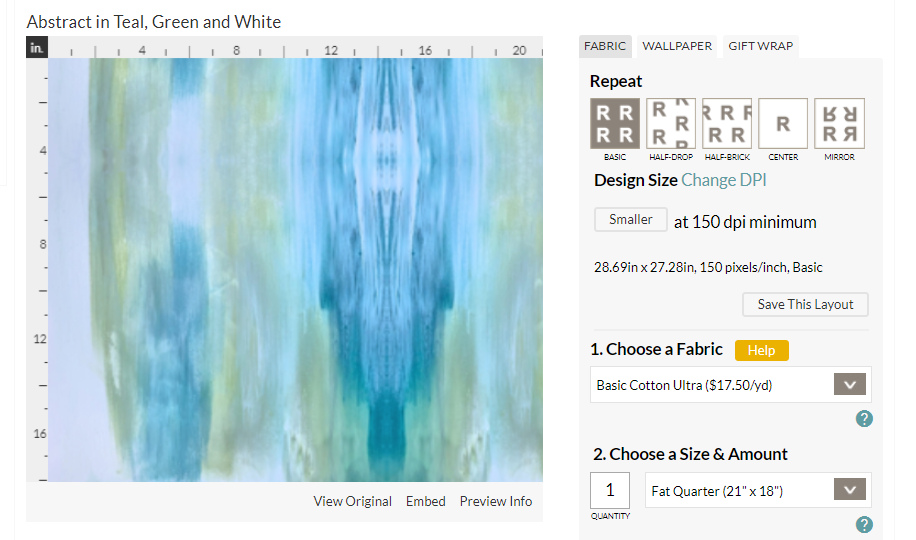
The first thing you’ll want to do is choose which fabric you want because this will affect your design since each type of fabric is a different width. I ordered a sample of the linen cotton canvas ultra, and it’s really nice. It’s a soft cotton with a medium weight to it, which seems perfect for draperies, pillows, and pretty much all home decorating projects. So I chose that in the drop-down menu, and it automatically changed the dimensions of the pattern based on the width of the fabric.
But you don’t have to keep those dimensions. You can choose to make the pattern repeat smaller or larger. I like to have full repeats on my width of fabric, so I clicked the “smaller” button a couple more times until it showed me two full horizontal repeats of my pattern. 
I liked it, but I decided to go even smaller and have three horizontal repeats on the single width of fabric. That made each horizontal repeat 18 inches wide. (It shows you the dimensions of the repeats just under the “smaller” and “bigger” buttons.)
Once you get the design the size you want it, just click the “Save This Layout” button, and you’re ready to place your order. I highly recommend ordering a sample first to make sure the colors are right, and the fabric you chose will work for your project.
Next you can click on the “Wallpaper” tab and basically repeat that process, making the design the size you want it. It automatically displays a large pattern with a 24-inch horizontal repeat…
…but you can make it smaller. I prefer my repeats to be 12 inches for wallpaper.
And when you’re pleased with the size, click the “Save This Layout” button, and you’re ready to order your sample.
Easy peasy, right?! 😀
It really is quite a simple process from beginning to end. The photo editing process might have a bit of a learning curve if you’ve never edited photos before, but it’s really not difficult. And just imagine what you can create! You can cover your walls with your very own custom design that no one else will have.
And now that you know the process, you can go to the aforementioned artist’s website, reverse engineer the whole process, and see for yourself the original images that were used to create those gorgeous wallpapers. I think you’ll be amazed. Please don’t copy another artist’s design, but you can certainly be inspired by them, and use them to gauge just how detailed or simple you want to make your own design.

Addicted 2 Decorating is where I share my DIY and decorating journey as I remodel and decorate the 1948 fixer upper that my husband, Matt, and I bought in 2013. Matt has M.S. and is unable to do physical work, so I do the majority of the work on the house by myself. You can learn more about me here.

Yeah, yeah, yeah, wallpaper…. but DID YOU SEE that this place offers GIFT WRAP???? DID YOU???
I have been holding on to one last roll of a long since discontinued gift wrap that was just a photo of antique christmas ornaments repeated endlessly. Looks like I’ll be able to recreate it and get as much as I want!
YAY!
BAHA, this comment made me laugh out loud.
I like to see someone else get so excited about wrapping paper! It’s one of my favorite things! We may have had this discussion in the comments once before, I can’t remember! Too funny 🙂
I agree! Wrapping paper is the best! I have way more than any human needs, but I just love the stuff.
We haven’t, Sherre, which means there may be enough of us to form a support group!
Haha! “Wrappers Anonymous!”
Spoonflower has been on my radar screen for several years now. I recently took the opportunity to finally place an order – a couple of yards of fabric for a project (a birthday gift for my niece’s unicorn obsessed daughter).
I was extremely pleased with the speed of delivery, the quality of the fabric and the fact that the colour was just what I expected.
Oh, and she was thrilled with the pillow covers and tote bag. LOL. The pattern was not my own design – this time – that’s for a later date.
Very cool! I remember when spoonflower came on the radar… mind blown… endless possibilities! I have never done anything with it though cuz tech stuff is not my thing, so thanks for the tutorial. Maybe I’ll give it a try now.
Kristi, while I was reading this, my first thought was, what a perfect way to “make some trim” for curtains. I remember your frustration of not being able to find just the right one for the living room.
Where will you be using this beautiful wallpaper?
I won’t. These were just for demonstration. If I were going to make a wallpaper to use in my house, I’d spend a little more than five minutes on the painting. 😉 But I will probably see if I can design something for my studio.
This is so cool!! Are you going to try this for the wallpaper in your studio?
I probably will see if I can come up with something original for my studio since all of the ones I’ve found so far just aren’t quite right.
Long time reader – 1st time posting… Oh my 🙂 You unleashed my imagination with this post! Thank you so much!!!! I have spent the past few hours creating fabric and wallpaper from one of my garden photos (tweaked in Photoshop Elements) and I must say I am in love! I’d add a pic but I don’t see anywhere to do so… it turned out to be a vintage floral ribbon style that will be perfect for my granddaughters room!
OMG, I have held onto a tiny sugar pack for more than a decade hoping to find some wallpaper that looks like it. I wonder if I can do something about this now…
I do have a question – why did you merge 4 images into one? Wouldn’t that Mirror option on their website work like this?
Probably because in design software, you have more control and precision than through Spoonflower.
You can move things around and then tweak them as needed in the software.
What Sabrina said. 🙂 I like to have full control. Plus, sometimes I crop, tile and flip the images, and then find that I needed to crop the image a different way, so I just undo, recrop, and retry. I’ve cropped, tiled, undone, and re-cropped several times on one picture to get it just like I want it, and it’s so much easier to get it right using my software rather than uploading the picture and doing things in Spoonflower each time I want to make a little tweak.
Kristi, I saw a video of an artist who “draws” geode art. I thought of you and just know it is something you could do. https://www.mrscolorberry.com/ She is from Germany, but her video is amazing to watch.
Karen
Wow! That Mrs. Colorberry art is amazing! What a need find!
*neat
Not enough coffee yet today. LOL!
Oh, my…I started drooling when I saw what Mrs. Colorberry was doing, especially the hot pink one! This is right up Kristie’s alley!!
I think I may just have to design the perfect wallpaper for an accent wall in my living room. So cool! By the way, I spent some time reading the blog you linked to today, and I must say that while she had some beautifully decorated rooms, I so much prefer your blog. I find the tone of your writing much more down to earth, and the projects you do much more accessible or something. I appreciate that you don’t have a hundred annoying affiliate links in every post. Mostly, though, I think it’s because you do so much on your own, and we’re neck deep in diy renos too. I’ve found so many good ideas and been inspired to do so many things I would have never thought to do on my own before reading your blog (sewing roman blinds! building built ins from scratch! not denying my love of colour colour colour!).
Yes! I like your straight up, real tone too and all the DIY stuff is useful. I have stuck around because I like the DIY tips, art projects and I’m a color/pattern but too.
Thank you, Heidi. 🙂 And I love hearing that you’re tackling things you never thought you would!
This is perfect! Years ago (maybe 25+), I read an article in a magazine that showed a bathroom wall painted in a sort of watercolor ombre effect. I’ve been wanting to try something similar ever since, but didn’t think I could pull it off actually painting on the wall. I think I’ll finally get around to installing PaintShop on my computer and see what I can do!
Awesome tutorial! Thank you, Kristi!
Kristi, I really like the Ikat style pattern you came up with, and these more graphic design-y projects.
This type of project can also be easily done in vector-based design software like Corel or Illustrator, where you can upload a photo into the software and draw directly over it, preferably in a layer over the scanned/uploaded art.
The difference between pixel-based design software (photoshop, elements, paint shop pro) is that vector art is made from lines and drawn shapes you can zoom in on or make huge and no information is lost. It lends itself to designs with crisp edges.
Corel and Illustrator are Vector software. I don’t know any cheaper ones like Paint Shop Pro, but an online search should bring up some!
So let’s say you find a stencil image like Kristi’s and you want to redraw it for wallpaper. You can draw it at a smaller size, and then blow it in Spoonflower, the edges won’t get fuzzy. It all depends on the look you want.
Have fun!
Okay, here is a good article explaining vectors and some free/cheap alternatives to Illustrator!
https://creativemarket.com/blog/illustrator-alternatives
And, vintage wallpaper from the 20s-70s in all sorts of designs:
https://hannahstreasures.com
For inspiration, of course!
Does this mean we can expect an original beautiful floral wallpaper for the studio? I think you should take inspiration from your favorites from your post about the wallpaper choices for the studio and create your own. If I remember, each one had a little something that wasn’t quite right for you…so problem solved?!?!
Maybe so! 🙂 I have some time before those walls will be drywalled and ready for wallpaper, so I have time to give it a try, make some tweaks, etc. We’ll see what I can come up with. The one problem is that most of my favorites are watercolors, and I’ve never done watercolors in my life. I can give it a try, though!
Wouldn’t your Mom be the perfect person to paint just exactly what you want for the studio?
Not really. The watercolor effect is what I’m drawn to, and she has as much experience with watercolors as I have, which is to say, none. 😃 Her expertise is oils, and she also has done some acrylics.
You are amazing but this is all way over my head. You never cease to amaze me with your knowledge and talents!
Hi,
thank you for this. i wonder, where did you go to get the wallpaper printed? i looked at contrado but, it was a bit to expensive. i am artist and i have started to experiment with some wall paper designs. thanks
I got mine from Spoonflower.
Wow Kristi! This is so helpful to me. I’ve been taking photographs of my watercolor paintings and loading them up on Spoonflower but they always have those funky edges when I try to create fabric. I’ve never used Photoshop for any other editing tool so now I’m about to try it. I really, really, really want to have my own paintings as upholstery fabric and you’ve given me hope that I can do this. Thank you so very much!