Kitchen Progress — The Biggest Cabinet Removed And A Widened Doorway
I didn’t make a ton of progress this weekend on the kitchen. The fact is that my body just needed a break. My right elbow has been in so much pain ever since I spent the day doing the prep work for taking out the wall, and then building and installing the header.
So I did try to take things slower this weekend, but it’s not like me to just sit and do nothing. I just can’t stand that, especially when I don’t have a working kitchen right now!
One major project checked off my list was removing the one large base cabinet where the original sink is.

To be honest, I had very little confidence that I would be able to get that base cabinet out by myself, but I wanted to at least give it a try before calling in reinforcements.
It took probably a couple of hours, and I started by removing the countertop, which was nailed in with about 100 massive nails!! It came off in three pieces, and the two side pieces where the countertop met the corners were the most frustrating and difficult parts. The middle part with the sink came out quite easily once the other two were gone.
Then I had to remove all of the trim from around the cabinet, all of the Formica on the walls and backsplash, and even the trim around the doorway. Basically, I had to remove any obstacle that would prohibit me from just pulling the cabinet straight out.
After about two hours of wrestling all of that stuff free from the wall and the top of the cabinet, the cabinet was finally free and clear, and I was ready to give it everything I had to get it pulled off of the wall.
By that time, I was so exhausted and wanting to take a break, but first I wanted to give it one test tug to see how strong the nails were. I gave it just a bit of a tug with about half of my strength, and the whole entire thing moved!!! Matt was sitting there watching me, and with an obvious look of complete shock on my face, I turned to him and yelled, “DID YOU SEE THAT?! The whole thing moved!!”
And just as easy as that, I was able to move the cabinet away from the wall just by going from one end to the other, pulling it out a couple of inches at a time so it wouldn’t get wedged, until it was completely pulled out. The hardest part was getting it shoved into the breakfast room, but I finally made it.

That got a little overwhelming seeing that room filled with two huge base cabinets, piles of trim and boards, one of the upper cabinets that my father-in-law and I had removed, an extra new-ish cabinet, and a big huge mess, but I got it under control by the end of the day yesterday.
The most interesting/disgusting/kind of creepy thing was moving that cabinet out of the kitchen and seeing piles of leaves under the cabinet, along with one more big hole in the floor, which I immediately covered with a gallon of water for obvious reasons.

I was a bit puzzled by all of the leaves until I spotted one very discernible nest of some sort.

That at least put my mind at ease that it wasn’t rats or a snake, since I’m fairly certain that neither of those make nests. I’d put my money on a squirrel. And even though I think squirrels are adorable, I still think it’s kind of creepy to think that one might have been living under the cabinet in the kitchen.
Aahhhh, the joys of an old house! 😀
But once I finally got all of the old, pieced-together drywall removed, and got all of the mess cleaned up, I was pretty proud of the work I accomplished on my “take it easy” weekend.
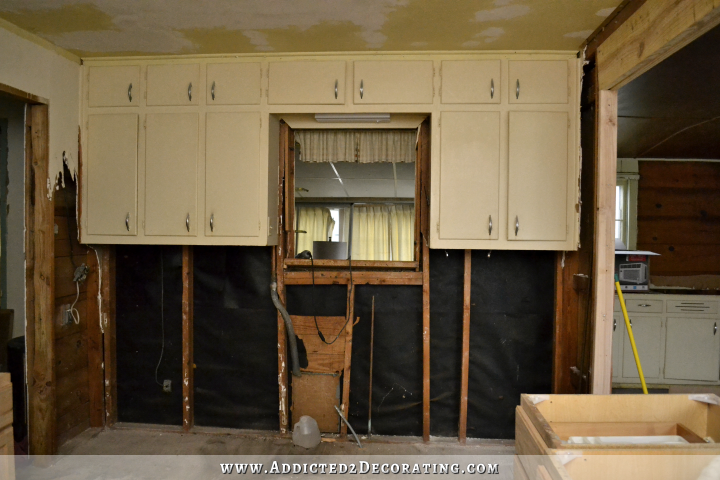
Now I just need to get those uppers out of there! I have a feeling that’s definitely not a one-woman job. 🙂
Probably the most exciting part of this whole process was what I found when I removed the trim from around the door going from the music room to the kitchen.

Do you see that gap between the stud and the door facing? Well it was like that on both sides!!!
When I asked Matt about a week ago how much the doorway needed to be widened for him to get through it easily, he said about three inches. There were four-and-a-half extra inches of space hidden behind the door facings!!!
Y’all, I was jumping for joy over this discovery. That means that I don’t have to widen the doorway at all! And since I won’t be moving studs, it also means that I won’t have to figure out how to fill in holes in my flooring.

What’s there is definitely filthy and will need to be cleaned, sanded, and protected with Waterlox, but at least it’s there!
I’m still trying to figure out how to handle the unlevel floor in the breakfast room.

I only need the floor raised up to the point where I can cover it with a plywood subfloor, and then put new floor boards on top of it to match the ones in the kitchen. It’s the only room in the house with a slab foundation, and it also had two cracks running the full width of the room.
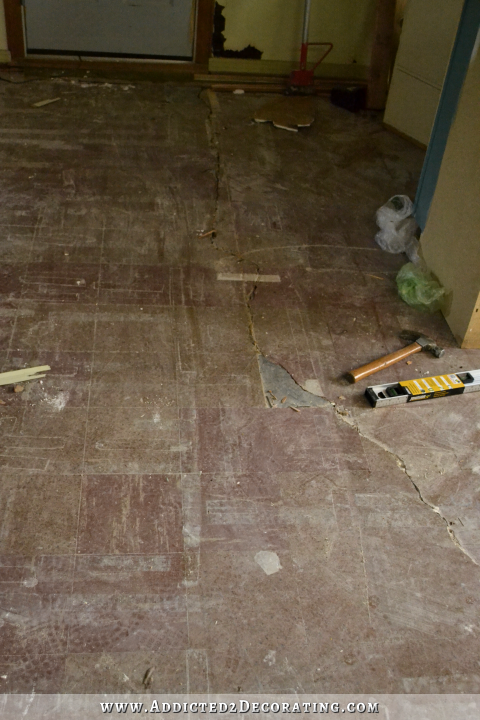
And to answer the question I know someone is bound to ask, no the cracks don’t scare me at all. This foundation is probably three feet thick, and it was poured in the late 40s, and probably poured without rebar. That’s why it cracked, and I have a feeling it’s been that way for many decades, and that’s why the previous owners put carpet in this room to cover the cracks (that was done in the early 80s). So I don’t think it’s still moving. I just need to figure out how to level it.
I know I’ll probably need to use some sort of self-leveling concrete product, and for some reason the thought of using that stuff intimidates the heck out of me. I think it’s the thought of having to mix so much of it for this big room, and spread it all out before it starts to harden. I’m wondering if there’s another much easier way to level this floor that I just haven’t thought of yet.
If you have any slab foundation floor leveling experience and/or advice, I’d love to hear it!




What a great discovery about your door frame!!! If you don’t have to widen the doorway now, you might reconsider the cupboard/space behind the fridge to open the fridge door completely – it is a nuisance if you’ll be stuck with that compromise for the next years, believe me (I know from experience and was soooo happy when I finally changed it). Your poor elbow though – it doens’t sound as if it got a lot of relaxation over the weekend 🙂
Yes! That’s exactly the thought I had when I read about the gaps in the door!
Squirrels can be cute outside—not so much inside where they can be very destructive, especially if they start chewing on wiring. Glad you found that nest!
You did get a lot done over the weekend, and it’s great that you can widen that doorway without having to worry about patching the floor. You are one go-getter, girl.
One question. Have you considered leaving those upper cabinet frames, and just replacing the doors to match your new cabinets? You could still fill in the window and make that into an open display area by adding a shelf or two. And, since you already have wiring above the old sink, you could put glass inserts into the little cabinet doors near the ceiling and have them lighted. I’ve seen a lot of kitchens done that way, and it really looks nice. Just an idea for your consideration.
When we remodeled our current home, we found mice nests in the wall under the sink. Ewwwwww! Glad to have that gone! putting fiberglas insulation in there keeps them away too.
You’re making great progress, but it will come in fits and spurts. Lots done one day and then little nit picky things that slow you down the next. But, look at what a difference! Thanks for sharing it with us!
Didn’t get a lot done? Seriously? You definitely underestimate yourself. I admire your tenacity. Great job and what a wonderful discovery behind the door trim! I’m excited for you!
Take it from an old lady who is always doing stuff she shouldn’t…..
get a $1.00 bottle of rubbing alcohol from the store…..buy a small bottle of generic aspirin…..dump the aspirin into the alcohol and let it sit until it dissolves. Shake well and rub it on your poor elbow a couple times a day (especially after a nice hot shower). Pretty soon your elbow will quit giving you so much pain!!
Your goin’ strong there young lady!! I am so glad your found the extra spaces in the door jamb…that will make your life so much simpler for that spot ;^)
Blessings,
J
I have never heard of this trick. Going to try it.
Kristi don’t forget to drink a lot of water, ice the area and elevate. I hurt my elbows taking our fireplace down, and then spending two months refinishing the basement. Three months later it is just now starting to feel normal.
Make sure the bottle of aspirin you buy is non-coated aspirin but this home remedy is dead on the money. My grandfather used it for years on his knees. Also, I’m a pharmacist and I recommend it to people that have arthritis all the time. You create a rub that if it was a prescription would cost about 400 bucks!
WOW!! You’ve made great progress! Can’t wait to see what happens next! Hope your arm is better soon though!!
There is a great article on “this old house” about self leveling concrete flooring. I just happened to watch it the other day. Looks pretty easy to do.
we think alike. just commeted about it.
I live in Texas where slab foundations crack all the time – even WITH rebarb in there. Since this is such a small area – being only one room – my guess is that it wouldn’t take much $$ to fix it correctly by putting piers under the edges. I think they are around $300 each – and in a small space like that it might only take a few. A foundation repair company can do this. I’d at least give them a call.
Yes. This. I live on a 70s slab foundation. It’s worth money to have it done right. Mine was a bunch more than $300/pier – more like $1,300, but definitely worth the piece of mind, because they’ll also jack that section of the house up to level it, as well.
i love to watch This Old House tv show and they just did the self-leveling concrete product here is the show
http://www.thisoldhouse.com/toh/tv/video/0,,20781175,00.html . it starts at 3:46 for the concrete. i found this QUIKRETE® Self-Leveling Floor Resurfacer (No. 1249-50) is a self-finishing interior floor topping and underlayment specially formulated to produce smooth surfaces ready for the installation of ceramic tile, resilient flooring or other finishes. No troweling required. i hope this will help.
do not know why it did not do the whole thing you orange but you have to use the numbers to get it.
Great video. This Old House is one of my favorite shows. I used to watch it all the time when Bob Villa and Norm did them together. I watched this episode (just copy the whole link and paste it into a new window) and almost felt at “home” hearing my native New England accent again. I’m from Maine and we have a thicker/stronger New England accent than the people of Mass, but it was close enough.
I watched them pour the self-leveling compound to even out the floor and it looks like a LOT of work for one person. I don’t know if I would be able to do anything like this by myself, but it seems a lot easier than pouring concrete and having to use a leveler.
Thanks for sharing the link, Angela!
Now tell me again, when did you relax? Somehow I read right over that part. LOL. You’re right, you probably had a squirrel in residence. They would bring leaves for a nest.
If it doesn’t blow your budget, I think you should hire someone to pour leveling concrete. Didn’t you once consider moving the laundry room into the back part of that den/breakfast room. Hoses can be run through the wall from your current utility room to make it work. It looks big enough for a breakfast room, and a laundry/sewing room.
Kristi, I am in awe of your accomplishments, as usual. Just wondering about your plans moving forward. Didn’t you mention getting the foundation leveled before doing any work on the walls? Wouldn’t the cabinet installation have to wait until the foundation work is done? Also, would the foundation work that you are having done do anything to the concrete slab?
You’re making wonderful progress. I so enjoy your methods and determination. I’ve done a lot of carpentry myself, but have never done it on this scale, though I’d give it a try. Your writing, as well as the subject matter and photos are all A-1! Love your posts.
I sure hope you are going to reuse the original cabinets you took out that are awesome??
Great work on your house. Did I miss the part that showed where your washer and dryer will be?
I so look forward to all your posts, you are awesome… my husband owns a construction company, I tell him all the time what you’re doing. He does alot of kitchens and bathrooms, New and remodeling. He says do one 5 gallon bucket of self leveling at a time. It will move its self around, so no tools needed. Good luck
My husband wanted to know how far off the floor is (inches)? He said you could lay 2×4 and nail in to the concrete then lay your sub floor (plywood). Just a random thought.;0)
Kristi, I know this sound crazy , but your arm pain may be realted to carpal tunnel syndrome. If you wear a wrist brace it will make an amzing difference. I wear one while doing anything that does not include water. Things are definitely coming along! I have used the self – leveling concrete and it is easy to use. However I did not have such a large area to cover. Perhaps this should be hired out?
It’s hard to tell how much you need to raise the floor to match the kitchen but a thought that came to my mind is to go to the opposite wall in the breakfast room and nail appropriate sized blocks at 2 foot intervals. Then run new “floor joists” over to the kitchen area to the point where they are level with the kitchen floor, shimming as you go. Then cover the whole floor with plywood (I’d say 3/4 thick for sturdiness) and tying in with the kitchen, Then cover it with whatever flooring you choose to use. Two foot intervals should be close enough not to allow “sag” in the floor. If needed you may have to run joists the opposite direction also if the floor is out of level in both directions.
Goodness sakes – when exactly do you rest?
As old as those cabinets were, maybe the nest was old? Trying to think positive! Either way, with all the construction, you’d probably drive them away! LOL
Just wanted to give you a thumbs up on your progress and letting you know I am rooting for you. Love your work, love your style. Love you being you. I love real people!
I don’t know how many inches you need to level up to the other floor but here is what I am going to use on my back porch (from Home Depot):
Place N’ Go Terra Cotta 18.5 in. x 18.5 in. Interlocking Waterproof Vinyl Tile with Built-In Underlayment
Specs show the installed height is 3″, zip locks together, just lays on top of the floor you already have, can be picked up and removed anytime you need.
You probably want wood floors in there but just thought I would throw this out to you.
Love the on-going renovation and creativity but people need to watch out the remedies they blindly endorse.
Nix the rubbing alcohol people. Get smart and look up the dangers of aspirin for yourself.
There are no acceptable drugs or chemicals, prescription or otherwise. All have undesirable side effects. Educate yourself. Natural remedies abound for free or little cost.
http://www.berkshire.com/pdf/MaterialSafetyDataSheet100%25IPA.pdf
ummmmmmm you don’t drink this stuff….you just rub it on the sore area….
I have used this concoction for about 40 years, and I am still here to give the recipe. I am of an age where everything should hurt, but nothing does for too long!
Go toot your horn somewhere else!
You amaze me, woman!! Just hoping, as much as you move things, you have one of those handy “creepy-crawlers” (for lack of a better name) in your bag of tricks/tools to help you with furniture etc. They look like the old time crawlers mechanics would lie on to get under cars. I use mine all the time. Maybe a little red wagon to help load all the debris on wouldn’t be too bad either. Keep up the good work. You are a true inspiration.
I would not ever use self levelling concrete again unless it was for a very small area. We used it on a kitchen floor to fill a dip and. It hardened so fast we had a lump instead and there was no way on earth to shave it down again. Our only floor option then was Lino because it could mold over the bump.
Here are four options to consider.
1: pay a concrete company to pump in a special self levelling cement that goes on like thick paint and gardens beautifully. I don’t know the cost but that would be the simplest way.
2: I forgot the depth of difference you had to make up but one thing I did when enclosing a cement porch was lay sheets of rigid insulation on the floor and then cover with plywood. It helped to insulate the floor and deaden sound as well. Both are available in several different thicknesses you may be able to combine to make up the difference.
3: Dricore subfloor panels have plastic on the bottom with dimples for air circulation and to wick away any moisture that may leech out of the concrete. I think they are about 3/4″ thick and they are a floating floor that simply go together with tongue and groove. You have probably seen them at Home Depot. Anything else can be installed on top of them to make up the difference.
4: the easiest option and probably the cheapest would be to back your cabinets up to cover most of uneven area, out whatever you want on the concrete floor to bring it as close as you can to the kitchen and then make a slight ramp in the doorways with thresholds designed to even out the difference between two types of flooring that meet in a doorway. This wood give you several inches more floor space in the kitchen as well.
You should check out how Young House Love did their sunroom using self-leveling concrete! It didn’t seem intimidating at all! 🙂 best of luck Wonder Woman!
http://www.younghouselove.com/2013/10/ready-set-tile/
Hi Kristi, I don’t like that we live in different time zones!! I think I checked my email 4 times today till I finally saw your post. Get aome Salon Pas Spray at the drugstore, or Walmart or whatever you have in TX. It does work great and it will make your elbow fell better. You can use it anytime you have aches and pains. I use it for my arthritus on my elbows thumbs and knees. I think y8u did plenty this weekend. Sometimes you have to give your body a break and just do some planning with your brain. I amcurious as to why you are changing the upper. Cabinets. I think they are charming. New handles, fresh paint and maybe some some extra molding, they would be gorgeous. Gotta run anxios to see next step, kisses!
If you do use the self-leveling concrete that you have to mix, be very sure to mix it in an open area (outside) and use a dust mask. I mixed it once to do a floor, and ended up at the emergency room with severe laryngitis/pharyngitis! Be safe!
Reading your blog and comments you receive is like sitting under a shade tree in front of an old country store in the South. You ask for advice for leveling a floor and you get advice on pain remedies, etc. Very entertaining and informative!!
These appliances look similar to yours! http://www.houzz.com/photos/3306099/Traditional-Homes-traditional-kitchen-phoenix
sorry, that link did not work, don’t know why.
You certainly get an amazing amount of work done each and every day! Moving those cabinets alone was a ‘super’ effort but I’m glad they moved pretty easily for you. Also, happy that you can widen the doorway without any other problems.
As for your uneven floors, I’m certainly no expert but I’m thinking you might want another person there to help with the concrete work. Can you rent a small concrete mixer to use to mix up quantities larger than a bucket at a time? That might make the process move along faster. Just a thought…
I know this has nothing to do with your floors but….you may have tennis elbow, I started to have serious pain in my right elbow after a demo and remodel job at the father-in-laws. I went to the Dr. and he said tennis elbow & I don’t pay tennis, lol. There is a arm band type brace you can pickup at any drugstore and it works wonders, but you have to wear it for quite some time, Doc said it’s the “female tendon” once you make it mad it doesn’t forget for a long time….he’s right I haven’t forgot his comment, lol 🙂 Be sure to take care of this asap or it will only get worse and take longer to get better.
BTW you ROCK! my lazy weekends involve pizza & TV not ripping out cabinets!
I was just thinking that Kristi’s affliction might be tennis elbow (lateral epicondylitis), which can be caused by repetitive movement that aggravates forearm muscles. I had that once from working a lot with tile. It happens most frequently with the dominant arm. The condition went away after resting my arm for awhile (no lifting weights, swinging hammers, etc.)
Kristi you really have guts. You are a very brave woman and I am learning a lot of things from you. Keep up the great work.
Just wanted to let you know that in an old house we had years ago, while watching TV one night I saw something out of the corner of my eye. We finally figured out it was a mouse. We didn’t see it again for a while. But then one morning my son opened the bottom drawer to his dresser and he found a small nest of mice. It turns out the little mouse had babies. She had pulled insulation out of the walls, leaves from outside, thread from clothing, whatever it took to build her little nest. Needless to say I wasn’t happy. Just saying…..
You are the most awesome DIY-er ever! I am constantly inspired and amazed by you!
Hi Kristi. I’m a new reader to your blog and I’m enjoying watching your kitchen project. I just wanted to give you a heads up about the floor tile in your sunroom. If it’s an older house there’s a good chance that the floor tile, adhesive or both contain asbestos. I’m an architect and I’m familiar with the appearance of asbestos tiles. Just want you to be careful about what you breathe in and dispose of.
Yep, these are the old 9 x 9 tiles. Definitely asbestos. 🙂
I’m actually not planning on removing them. Whatever I decide to do will just be done right over top of these to encapsulate them.
You are amazing! What a big job. Don’t hurt yourself. Last time I did a small project I was sore for days. – I believe you found a squirrel nest. You are lucky they did not do a lot of chewing. Good luck on your project.
Karen at The Art of Doing Stuff had to level her floor; might be worth it to dash a message to her and pick her brain as to the particulars. Her kitchen is smaller for sure, but can’t hurt to inquire.
Best of luck.
Kristi, whatever you decide to do about the floor proper, have you considered a sort of incline threshold to make the transition from the doorway to make it easier for Matt’s wheelchair to roll through?
WoW! You are amazing! I admire the heck out of you!
Look forward to watching your progress! And learning from all your hard work!
Great job Wonder Woman! And by the way, rats and mice DO make nests. I live in the country and find them quite often in the oddest of places….like under the base of our portable basketball goal. We turned it over to empty out the water so we could move it and there was a mouse and his nest….poor little fellow went crazy trying to figure out what was happening to his home! Another sign of course is there are usually a ton of droppings wherever mice and rats are.
Read up and look for youtubes. We used the floor leveling mixture and our floor is still very uneven. Pops when you walk over parts of the floating floor. 🙁
My husband and I live in a 100 year old cottage and are battling leveling issues all the time. He releveled the floor in our bathroom which was really off, by placing plywood to build it up, then using a leveling compound. He said that one lesson he took from it was to MAKE SURE that the next time we do this we get a SELF LEVELING compound. The first time I went with what was recommended by a rather surly sort at the local Lowe’s.
He had to work about a 3′ square area for almost 2 hours trying to get it level. Ugh. When we level our badly listing breakfast room we will use 1″ plywood blending out to 1/2″plywood then 1/4″ plywood, The plan is the thinner to thicker layers of plywood will make the floor more level and use much less of the leveling compound. The point of the self leveling compound is that you mix it in a 5gal bucket, pour it on and leave it. No troweling for hours and hours trying to get it level. That’s our plan
As always love your work ethic and your creativity! Must tell you that the best thing for your aches and pains are Young Living Essential Oils! I am an Independent Distributor and LOVE to talk about oils and the wonderful impact they’ve had on my life and my pain, as well as those I love and care for. If you’re interested, let me know and I’ll share the information with you.
Blessed Days….
Don’t know if this helps or not, but John and Sherry over at Young House Love had to level their back sunroom/porch area and it was pretty big. I bet you could get some pointers from them. 🙂
Some thoughts on the floor. Is it un-level where the cracks are, or do you just need to get it to the level that the sub-floor can be laid. I believe if it is an old crack I would not worry with it too much, because it can be very expensive. One thing we did when trying to get two floors level, was to screw a layer of concrete backer board to the concrete floor, which evened up the floor enough for laminate floors. You could use this under the plywood sub-floor if the cracks are not to un-level. Just throwing some ideas out there. I’m glad about your door discovery, woo hoo!
If the entire floor isn’t way off from level, maybe you can just do areas, if that makes any sense?
why are you not thinking about leveling the floor with small srtrips of wood and plywood? wouldn’t that be easier than concrete inside?