Kitchen Cabinets — A Preview
Well, it’s been quite a week around here! I feel such a sense of accomplishment. If you had told me last weekend that by the end of this week, the wall separating the kitchen and breakfast room would be gone, and that I would have done it myself (with the help of my brother, of course), I don’t think I would have believed you. Amazing how the ball gets rolling once we make up our minds to do something!
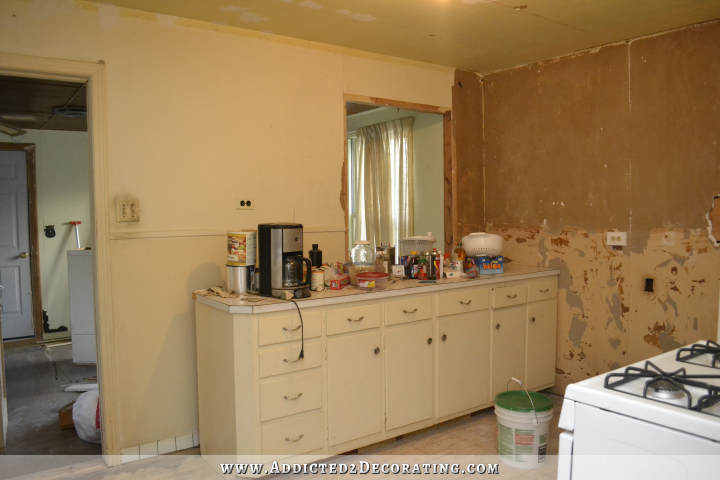
And what a difference it made! Just a few short days ago, my kitchen was a dark, closed up shoe box.
And now it’s open and bright!
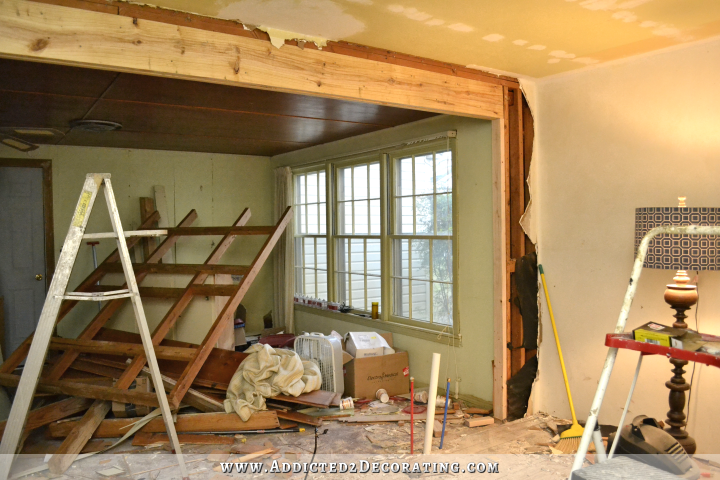
It looks like a completely different room now. (Of course, that pic was before I spent a day cleaning up the mess.)
I decided that I’m definitely going to use the stock cabinets from Home Depot. I don’t want to waste time building cabinets from scratch, because again, we’re without a kitchen sink right now, and it’s driving me crazy. So I really need to speed this along.
So during their last 20% off sale (that ended day before yesterday) I got the cabinets for the sink side of the room, and the fridge/range side of the room. I worked all day yesterday cleaning up construction (destruction?) debris, and then last night I brought in the cabinets just to get an idea of how this space will shape up once they’re all installed.
Here’s the sink side. The space where the floor lamp is sitting is where the dishwasher will go. And the sink base cabinet will be pushed back even with the two drawer cabinets, but my new pipes are in the way. I guess I’ll need to drill holes through the bottom of the cabinet for them to come through, which is strange. I’ve only ever seen them coming through the back of the cabinet, not the bottom. So I’ll double check with my plumber before making any cuts.

And then on the wall opposite the sink is the fridge/range side of the room. I still need to switch the door swing on the fridge but…you know…I’ve been a bit busy. 🙂
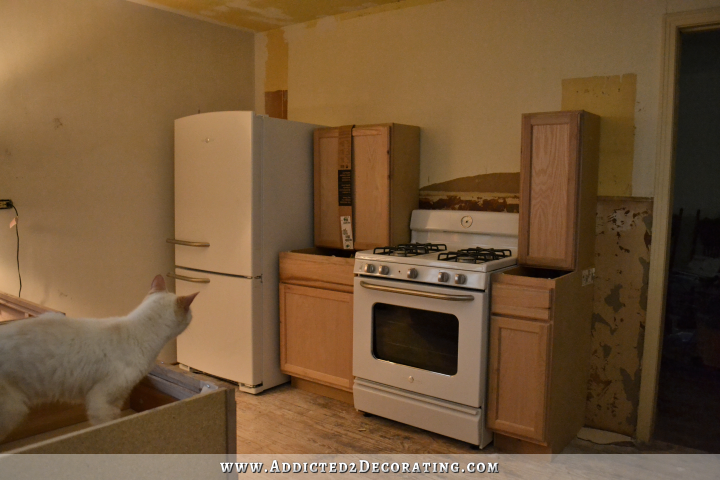
Now unfortunately, I’m having to forgo the idea of the tiny little storage area on the left side of the fridge that would allow me to open the fridge door past 90 degrees to easily remove the drawers for cleaning. I know it might cause a bit of inconvenience for me, but I just don’t have room. Plus, I lived for seven years in the condo with a fridge pushed right up against the wall, and I know that while it’s more difficult, it’s not impossible to remove the drawers. But the fact is that I needed to get in as much countertop space as possible (which still isn’t much) while still leaving enough space to allow me to widen this doorway, and widening the doorway is imperative for Matt’s sake.
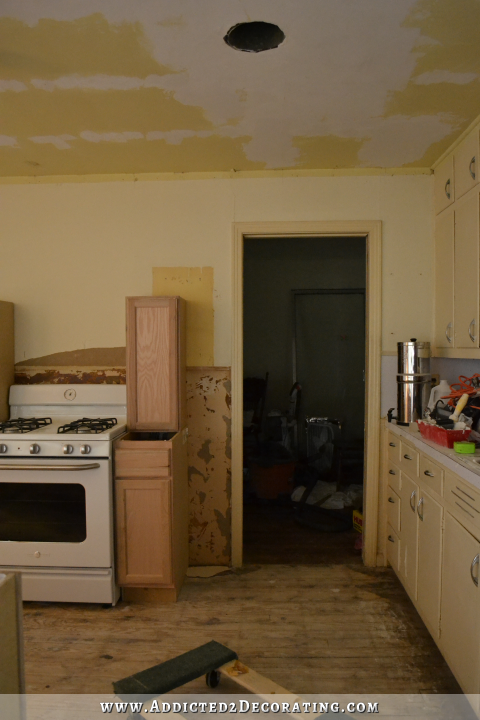
And since that wall ‘o cabinets to the right is currently a non-standard 22 inches deep (with the countertop being 23 inches deep), that means that the doorway needs to be moved over to the left about two inches plus it needs to be widened. I’ll be cutting it very close, but it’ll work.
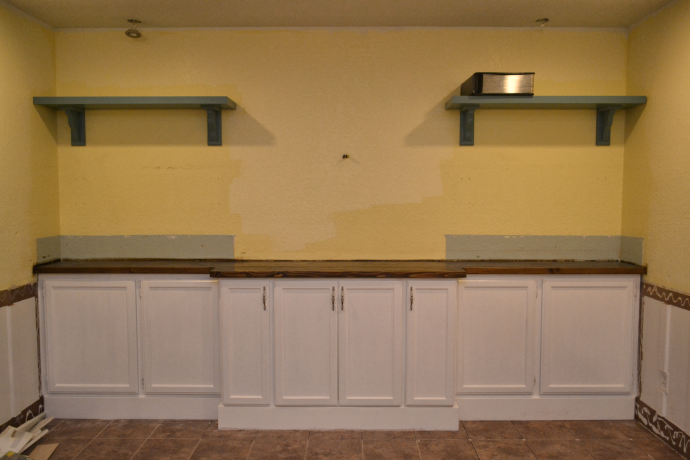
I didn’t buy cabinets yet for this wall, because I really want to think about how I want the wall configured (both practically and decoratively), and I didn’t want to make a rush decision, seeing that I arrived at Home Depot at 8:30pm on the day that the sale was ending. (I was a bit busy installing a load bearing beam that day, and working as fast as I could.)

So I’ll have to wait for the next sale on those…or maybe not, if I get impatient.
The countertop on the cabinets on the sink side will be extended to create a bar area on the breakfast room side, but first I have to contend with the uneven floor.

If you’ll remember, the wall I removed was an original exterior wall, and the breakfast room was originally an outdoor area, like an open breezeway between the kitchen and the garage. That’s why it’s the only room of the house that has a slab foundation, and that’s also why the floor is so uneven between the two rooms. So I’ll have to come up with a solution to raise the breakfast room floor about 1.5 inches to make it level.
And yes, I also have a couple of holes and one rather large gap that just goes right under the house.

That’s where I took out the original threshold, and it left that big gap. I can just imagine a snake coming up through that gap, but I’ve just been trying to put it out of my mind and trusting that my cats (who have taken up residence in the drawers of the new cabinets) will take care of any unwelcome visitor.
So that’s where things stand right now. The next order of business will be to remove the rest of the old cabinets, clear out the room, and paint the floors. That might also require me to at extend the floor into the breakfast room at least far enough to cover the area where the bar will go. Then I can install those cabinets, build a countertop, and get my sink installed.
Now as far as customizing the cabinets, I’ve got a few things in mind. Of course, they’re still going to be green. I love that idea more with each passing day.
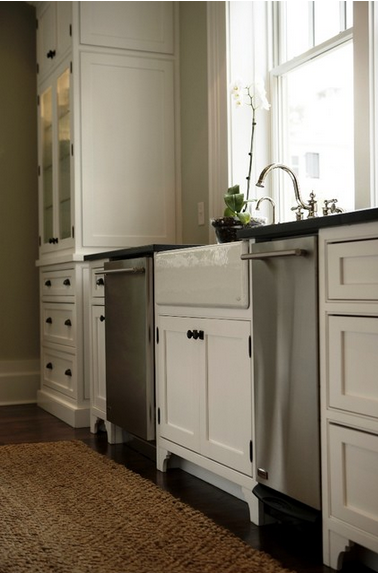
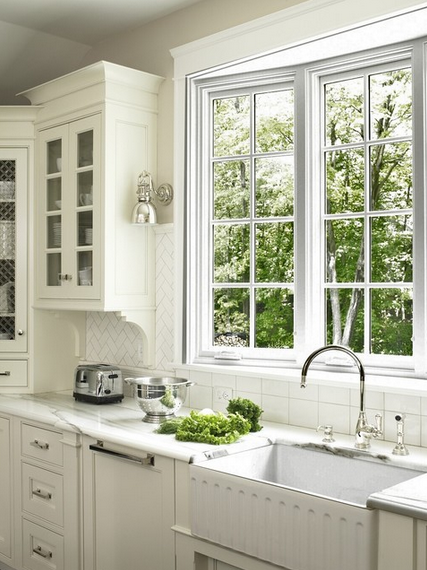
I want to add feet to the cabinets. At first I thought I might want bun feet, but I’m leaning more towards something like this…
 Traditional Kitchen by Wilmington General Contractors plantation building corp
And as far as cabinet detailing, I really like the simple corbels used on these, as well as the pretty top with the crown moulding.
 Traditional Kitchen by Dc Metro Design-Build Firms Glickman Design Build, LLC
So I think that’s the direction I’m heading with these stock cabinets. Let’s just say that when I’m through with them, they won’t look like stock cabinets anymore. 🙂
Still so far to go, but wow…what a sense of accomplishment this week!!!

Addicted 2 Decorating is where I share my DIY and decorating journey as I remodel and decorate the 1948 fixer upper that my husband, Matt, and I bought in 2013. Matt has M.S. and is unable to do physical work, so I do the majority of the work on the house by myself. You can learn more about me here.


Wow, what a lot of work for one week! Congrats!
Is it not possible to swap the fridge and stove? You’re really going to hate it if you can’t open the door all the way on the fridge, and there’s also a possibility of damage too.
Or maybe, from the wall: narrow cab>stove>wider cab> fridge?
Sorry for the multiple replies but I’m still on my first cup of coffee. If you reverse, you can make the narrow cab even narrower (sheet pan storage?) and the larger cab bigger- more counter space.
Maybe like this?
http://www.koverkrete.com/natural-oak-and-walnut-kitchen-cabinet-sets-with-unique-pendant-lamp-shades/heavenly-exclusive-oak-kitchen-cabinets/
Not the whole configuration, of course, but the cabinet/stove/cabinet/fridge layout? You wouldn’t need to flip the door on the fridge that way, either! 😀
Nope. Plumbing is already done, plus I have an issue with the idea of walking into the room from the main entrance and seeing the big solid side of the fridge to the right. That would make the room appear smaller and closed in. I’d rather have it feel more open (accomplished by having cabinets there rather than the big side of a fridge), and sacrifice the ability to open the fridge door more than 90 degrees. I lived with the fridge in the condo like that for seven years, so I know that while it’s a bit of an inconvenience, it’s not terrible. My mom’s fridge (in the house where I grew up) is like that also, so I’m quite used to it. 🙂
LOL Okay. 😉
Hi! Before anything else, I wanted to tell you I absolutely love your blog – it’s the one thing that helps me relax after a busy day – plus, I’ll have to do a lot of things in my house come summer, so you are definitely an inspiration!
To the point at hand, the first thing that struck me with the photos was I didn’t like the stove sticking out in-between the two sets of cupboards – plus you have the fridge problem… I, too, would hate it if you switched it with the stove, btw, wouldn’t like walking into a room and have it looming over me as I enter 😛 What I wanted to propose was, couldn’t you move the small cupboard to the wall? It would make it go away from the stove, give you the space you want for your fridge, and the only thing sticking out would be the stove, which is ok, as it’s only one change in the edge line, and it’s, well, the stove!
I can’t wait to see your kitchen!
It’s looking great! We’ve removed some walls in our house as well and I love how it brightens and enlarges the space. Maybe if you put the fridge to the right of the stove by the door, you could open the door all the way and wouldn’t need to reverse the doors.
Continue to be amazed at your energy and determination . . as I looked at your pictures -especially with the uneven floor – I wondered why you are sticking to the original floor space of your kitchen? Why not put the cabinets further into the breakfast room – its a huge room so you could incorporate those windows, have a breakfast bar area that overlooked the view and still have room for a table and chairs toward the other end of that room . . ????.
Two words…slab foundation. Running any plumbing through a slab foundation would increase the cost of this remodel exponentially.
Plus, I don’t need or want a big kitchen. I spend far more time at the dining table (it’s where I work at my computer) than I do in a kitchen, so I want the table by the big front windows.
I promise, I’ve considered every possibility, and this one is the one that works best for me. I have no doubt at all that someone who actually enjoys cooking and spends far more time in the kitchen that I would do this much differently, but this works for me. 🙂
Your analysis makes total sense . . you have usually thought things through very thoroughly . . just wondering and appreciate your quick response 🙂
Can’t wait to see how you customize the cabinets!!! I really want to do the same thing with my kitchen:)
I have been reading your blog for about a month now. I get excited each day to see what you have accomplished. And when you throw out new ideas (like you just did about the cabinets), I get even more excited to see them. I know you have to be exhausted, but know that there are many people cheering you on and waiting to see all that you create. Thanks for sharing your adventures for all to see. It gives inspiration and confidence that we can do the same thing 🙂
I do have a request when you find some time (although I know you are very busy): Could you make a list of specific tools DIYers need and what they are good for. I know in some of your previous posts you have mentioned your jig and your nailer. If you had to do a top 5, what would you pick as necessities to have on hand to make jobs easier.
Thanks again for everything and best wishes for all future projects!
I don’t have a current list of tool essentials (my list always seems to change…ha!), but if you click on this link, you’ll see several posts with “Essential DIY Tool” in the title. Those are tools that I definitely recommend.
https://www.addicted2decorating.com/diy-basics
I was lucky enough to get my cabinets ordered on the last day of the Home Depot sale. How do you plan to customize? The pieces you show at the bottom of the base cabinets-will you get those in millwork section of Home Depot ? As well as the corbels?
I’m thinking about making them all myself using a jigsaw. That would be the most economical way.
If I can make a slight suggestion on the footy’s that you want to make for the cabinets — BLOCK them in if you can with a solid piece of material if you can. I have feet like this on mine – and the debris that gets caught behind them is appalling! And, getting a broom, behind the ‘feet’ is a PITA.
I love the look of them, but they DO harbor a deep dark secret need, to gather dirt – I’m hoping to make sort of a solid block shape,,, (almost in a triangle wedge), to bump into the area of the foot backing,,,this way, you won’t see it, but it will stop stuff from gathering into the abyss of space, behind them. I know that you have cats,,,we have a Sheltie – and between fur & crumbs, the amount of garbage that strategically hides out behind there, is astonishing (and a bit gross if I do say so myself!!
Just a pre-warning-suggestion,,,,if that helps!
Carry On my Interior Hero!!!
RE the pipes running through the bottom on your sink base, that’s the way mine are and I’ve seen it done on DIY shows. The only problem I’ve had with it is, my drain pipe leaked one time and the water ended up under the cabinet. I had to pry up the “floor” of the cabinet to ensure that it dried out completely. If you can somehow seal around the water pipes and drain, there shouldn’t be a problem.
Love what you’re doing! Can’t wait to see the end result!
Thanks for the tip, Cathy! I’ll have to see what I can do about making a waterproof seal around them.
Why not try the fridge on the wall where the old cabinets still are? That would give u the needed space for counter and doorway expansion. You could then do a built in look around the fridge. I’m thinking the right of the window. Just a thought.
I considered that, but I don’t like the idea of the fridge sticking out further than the cabinets on that wall. That would create an obstacle for Matt to get around going from the kitchen door into the breakfast room.
you are already going to make the door wider so just move it down more and make the other side of the door so you can put the fridge and wider cabinets next to it.
i love corbels but they cost to much for me so when go to places like goodwill i buy the wall sheelf and to off the top and i have my corbels and i can get for as low as .50.
I don’t want to offend you but being the old busybody that I am, I think if you are going to stay with the refrig. where it is, I’d leave the handles the way they are…it allows you more room to get in the frig. With it being againest the wall, it would seem to really cut down on how far it opens (which you’ve mentioned) which makes getting things in and out difficult. At my house there would be dents in the wall from people (family) being in there. Just my 2 cents, probably not even worth that. By the way, I LOVE your appliances! Especially the refrigerator!
Matt isn’t able to access the fridge with the handles the way they are. 🙁
I know you like the idea of a counter on the old sink wall, but moving that door is going to be another aggravation. How about just using upper cabinets as the base with a counter on top, and then put more upper cabinets above that. I haven’t found a picture illustrating this, but hopefully you get my drift. 30″ upper cabinets, set on the floor, with a counter on top, then add more upper cabinets on the wall above. The upper cabinets will only be 12″ deep, but will still give you a counter for serving, be a good height for Matt to reach, and give you the extra storage space you want. Plus, you can then move the stove and refrigerator back down toward the door opening and have that broom/storage closet next to the refrigerator. Whaddaya think?
this one has shelves above, but it gives an idea of the upper cabinets as the base: http://lh3.ggpht.com/-rBUwzy1Ekd4/UJFS1VGkbII/AAAAAAAAYIU/pEWeu-u5uWw/IMG_3437_thumb%25255B6%25255D.jpg?imgmax=800
Here ya go! What do you think of this idea? http://www.remodelista.com/files/styles/733_0s/public/fields/Mark_Reilly_Stanford_Avenue_12.jpg
This idea would work to cover the disparity in the floor, but I don’t know if it would work for Matt: http://i268.photobucket.com/albums/jj29/LaylaPalmer/Presto%20Changos/New_Kitchen_6.jpg
This photo shows the feet you were thinking about! http://www.decorioo.com/wp-content/uploads/2014/01/traditional-kitchen-corner-base-cabinet-knob-placement-ceiling-lighting-cookbook-shelf-crown-molding.jpg
You mean like I did in the condo? 😉
https://www.addicted2decorating.com/my-diy-built-in-bookcase-wall-is-finished-before-after.html
That definitely might work!
The door still needs to be widened, but at least it wouldn’t have to be widen and moved.
Exactly! Great, you know just what I’m trying to say.
Yes the fridge door is puzzling. Here is a thought…have the fridge on the other end then add a face board on the side. I am sure you could add a fancy thing on the show side. My friend did this and it works well. On the other side you could still bump out making shelfing extending down. Agree fun to read and watch your posts!
For some reason, I just can’t get myself to be okay with the idea of walking into the main entrance of the kitchen, and seeing the big, solid side of a fridge there. Just seems like it would close in the room and make it looks smaller from the entrance.
You would not see the solid side bc it would have a face board painted green like you cubboards with maybe a bulletin board, art or something, But yes I do also like the balance of having the big object at the other end. Fun to puzzle it over…
I live in an 1890’s farmhouse and did a low-budget DIY kitchen make-over last year. Had the same issue with the refrigerator. I too moved mine in the corner so it doesn’t stick out in the middle of the room. Couldn’t believe how much it opened up the room! You will not regret it!
Hi Kristi,I too am working on some remodeling projects in my 100 year old farmhouse. You mentioned in your post wanting to maximize counter space. I feel like the layout that is going to give you the most prep area etc. would be if you move the dishwasher to the left of the sink and move the refrigerator to the right of the stove. This would free up your lovely, freshly smoothed wall for cabinets. If you are like me, you have spent hours thinking over your layout to choose what is best for you. I even woke up during the night thinking about it when I was deciding on my kitchen layout.
Also, our previous home had a peninsula with sink as yours does and our plumbing came up through the floor.
Best wishes as you continue.
I tried a “U” shape, and it made my kitchen feel about the size of a postage stamp. In fact, I tried it one day when my brother was over, and he immediately said, “Oh gosh, no!!” LOL…we both agreed that it just doesn’t work in this space.
The problem with a U-shaped kitchen is that those corners are where kitchen things go to die. 😉 I was the designated “diver” to go into those black holes to retrieve whatever Mom needed for once a year whatevers. Yes, they make gizmos to make those holes more readily accessible but they are not cheap. Even a lazy susan is not ideal. That’s why I’m really liking Kristi’s galley kitchen.
I think you do a bang up job of diy and … entertaining your adoring fans! 🙂 I don’t mean to be critical, but I think you will really regret sticking your fridge in a corner as you have it. As someone else suggested, switch out stove and fridge, but put one of the cabinet sections in the corner next to the stove. I think the larger in the corner would work best as it would give you more elbow room when cooking. I really strongly urge you to seriously consider this!
Thanks again for all the wonderful tips, ideas and oh of course, ENTERTAINMENT!
Wow indeed! I’m so impressed.
I love what you are doing. I also LOVE that remaining wall of cabinets (minus the sink/ mirror?). I can see that set with the green finish, a brass or copper smooth backsplash and butcher block counter. Add display shelves where the mirror went, under counter lights and it could be really dramatic. I think it is great to retain some of the original makes it more interesting.
It’s actually a window, not a mirror. 🙂 That’s an original exterior wall, so that window used to look out to the back yard. Now it look out to the sunroom. But yes…that window’s days are numbered, and I’m filling the entire length of space with upper wall cabinets.
That will be beautiful and functional Kristi and the wall cabinets as base cabinets is great solution as well. If you don’t have to move the door as much , that will give you a bit more space on the frig wall won’t it? That might be just enough to resolve the frig door opening completely issue too.
Looking carefully at the new cabinets , the doors have decorative molding but not the drawers. It is simply mitered too. This made me think about adding the same mitered molding to the doors on the “wall of cabinets” and switching out the hardware, so it would have the look of new but the footprint of the old, just a thought.
Wow, it’s coming along in leaps and bounds, great job, you are going to love this room/rooms. I sort of like the fridge where you have it, but maybe leaving the doors the way they are for better access. What I really love is the idea of upper cabinets for the top and bottom on that current sink wall, plenty of storage and makes more space too. I know you are going to enjoy having your table in front of that lovely window. We had to add sub-flooring to a room to even it up and it seem like such a waste of money, but it had to be done.
So glad you went for the stock cabinets, that means I get to see green sooner! It really is kind of addicting to see what you have worked through each day. You obviously got alot of clean up done!
It seems you have a case of the missing 6 inches on a wall 🙂 and we all want to help you with it! lol. I love that you don’t get bogged down by things not being perfect. I like Alta’s idea with the shallow depth cabinets, you could always pull them out like you did on the center section of your built ins so that you could maximize counter depth and still keep door in place, just widen and have room for fridge opening.
Another idea is to swap one of the drawer cabinets for the large door cabinet,…that would give you a few more inches to play with (you’d have to exchange that upper for a smaller one, but that is minor). I personally would go crazy with the dishwasher and the fridge down against the wall, but seeing as this is your kitchen, not mine, I am sure you will end up with the perfect solution for you and Matt.
Where do you get the “feet’ for the cabinets? home depot too? Love the white kitchen! you inspire me!
I’ll probably make them myself. 🙂
Unless I decide on bun feet, then I’ll order them online.
Kristi, your hole in the floor reminded me of a house in which we removed an out side wall in my kitchen. (It opened onto an old porch that had been converted into a dining room) I too had to wait to cover and create a new floor to blend the two rooms. So, the next morning I was getting ready for work and heard a strange hissing sound. I looked at the opening and an ugly looking opossum had it head through the floor hissing at me. My dog was going crazy tring to get down the hole to get the ugly animal and it would duck and hide then reappear. It was like my dog was playing WHACK – A- MOLE. LOL. We coved the hole that evening. Anyway, I am enjoying experiencing this DIY though you! Looking amazing as always. Thank you for sharing.
Sheila!!! Your story just freaked me out!!! Okay, I’m definitely finding a way to cover those areas TODAY! 😀
Kristi, my parents did work on the house I grew up in, and we did have a snake and a massive spider (it was actually a tarantula, if you can believe one showing up in Southern California) come up through a hole in the floor (not at the same time LOL!). You never heard two little girls (my sister and I) scream so loud and jump on top of the kitchen table so fast! My mom in full-on mama lion protecting her cubs mode, killed that massive spider with a fly swatter LOL! and my dad had to “remove” the snake. Even if you stuff the hole with old carpeting, that’d be a temporary fix to keep the creepy crawly critters out!
The sample cabinet you showed us are GORGEOUS. They are going to be beautiful finished in your green. Can’t wait!
I have a very similar situation as you with the wall of cabinets. Instead of using a standard size, the cabinet makers used 12 inch uppers. It gives us a ton of extra storage. They also put a desk in at the one end that sticks out a bit farther than the 12 inch cabinets. This would allow you to make the opening larger on that side instead of losing space on the fridge/stove wall. Maybe even allowing some storage to the left of the fridge. I can email you photos if you are interested.
It’s going to be so awesome when you are done!
We have an island with a sink, dishwasher, and breakfast bar. It has an extra 5 inches added to the back of the cabinets for plumbing and electric outlets. Wanted to let you know just in case you needed a little more depth.
How the heck did YOU put in a load bearing plank? I hope to God you had some HELP!!!
Beth
Didn’t you hear? I’m Wonder Woman! 😀
Actually, my brother helped me put it in place. 🙂
Wow!! Impressive amount of work. Sounds like you are okay with the fridge beside the wall … But what about if you made a narrow pull out type of cabinet for between the wall and the fridge? The ones I have seen are great for canned goods. Love Pinterest 😉
Kristi, you mentioned you may need more stock cabinets and may wait until they are on sale or not. If not, ask the manager for the discount! You have given The Home Depot lots of free advertisment on your blog! I’ve heard this before about asking for discounts even when there is no “sale” on the item you want to purchase!
I love getting up every (most) mornings just to read your blog! Go Super/Wonder Woman!!!!!! You are my hero! : )
Love it! Did you decide to leave both sides of the sink bar open or is there something going in on the far side of the base by the wall? Dishwasher possibly? The one thing I wish I had left room for was a trash can – we have the compactor (hate it) but no one opens it.
I also love the idea of using the existing cabinets or wall units for the wall’o’storage rather than moving the door further, allowing a pull out pantry/spice rack/ mop closet to nestle in behind the fridge. How much stuff do you have that needs a full 24″ depth? You must switch the handles though – I can’t imagine how Matt could get into the refrigerator easily the way it is now. (well, access might be the better term. I doubt he actually tries to get in the fridge!)
Trash Can!! Don’t forget that necessary evil while you’re in the planning stage. It doesn’t look like you’ll have enough extra cabinet space to stash your trash. My pet peave – trash cans sitting in the middle of the floor looking lost. I frown at mine every day! 🙂
Kristi, all I gotta say is, “you rock”!
You sure don’t waste any time do you? Wow! I like the way you configured your kitchen and I think you’ll love that wall of cabinets for storage and for serving buffet style. I personally love the retro look of the older cabinets but understand that you will update them someday, $$ and time allowing, to match your new cabinets. With the color, trim, and feet they will look amazing. The old cabinets can be repurposed for your office or garage workshop – can’t have too much storage. Happy Weekend!
I am loving getting to go through every step of this remodeling experience with you!! Bravo on all you do, and thank you for sharing your thinking/planning process with us. BTW, my refrig is up against the wall (well, a few inches away) and I have no problems with it.
the lines coming out of the floor is the way we do it here – we all have basements so it is normal to see that. Just drill two holes in the bottom of the cabinet for them to come thru and it will work out fine. An earlier tip of finding some way to seal it after the lines are thru is good advice. I use that spray foam insulation in a can as it expands and creates a solid seal, so, if at some point you do have a small leak, it will be contained and easy to clean up.
I was thinking, for the amount of time any of us have a fridge open, why not just leave the door as is. Step around as needed and you can still get components out to clean. There seems to be plenty of room. Just a thought.
You are doing amazing things. We are all out here enjoying every step of the way. Thanks for teaching and sharing your experience with us.
Ok, seriously. Just when I think something you’ve done is my favorite thing…you just go better. But right now, this kitchen project is my FAVORITE!! Love your plans. I too like the fridge in the corner…other ways may be more user friendly but I think it’s imposing looking to have anything that big right there when walking in. And if you decided to keep the wall of cabinets with the same non-standard dimensions, I think you will still have plenty of counter space…I have a generous amount of countertop and honestly use about a 1/4 of it (and I think we’re pretty similar about cooking). If you went that route and only had to widen the doorway and not move it also, it could give you a few inches on the fridge end. I know you mentioned pushing the fridge wall out so that the fridge is flush with the cabinets…have you considered doing a built in around the fridge? I love the custom look it gives (w/out the cost of an actual built-in refrigerator) and this is something you could easily and inexpensively build while at the same time giving you a few extra inches on the wall side. Not sure your plans for the cabinets on that wall but on this one picture below I love the open shelves above the fridge. I’m looking forward to what you do with the cabinets…not many people could take stock cabinets, add in their own work and end up with a fantastic, custom look!
http://www.houzz.com/photos/116065/Kitchen-Backsplash-farmhouse-kitchen-philadelphia
http://www.houzz.com/photos/45187/Buena-Vista-Kitchen-traditional-kitchen-san-francisco
http://www.houzz.com/photos/457026/Tracey-Stephens-Interior-Design-Inc-traditional-kitchen-newark
Just thought I’d mentioned a drawback to the open legs concept on the lower cabinets. My current house has cabinets that are completely open underneath, and every time I drop something, it hits my foot and rolls under them. If you go with this type, please consider a recessed kick plate. Now, if you’ll excuse me, I have a peanut butter jar lid to retrieve.
I love watching you plow into your projects….You have made spectacular progress. I cannot remember from previous posts if you are going to leave the window on the wall of cupboards where the sink is. Now that you have more natural light from the breakfast room is that window going away?
You might want to check with your contractor / engineer to see if the single 2×4’s on each end of your beam is enough. We had to do this with an addition and it was required to have three 2x4s nailed together, solid to the foundation supporting each end of the beam, per engineers design.
Just found your previous post, don’t know how I missed it. I see that you will be adding more 2x4s. 🙂
I thought for sure the cabinets would be painted and in place by now. 😉 Seriously, you are amazing. I can almost bet that you’ll make your own cabinet feet, but just in case you decide to buy, I ordered from vandykes.com for our bathroom cabs. I like an organized site, and you can search their feet & legs by height and width.
Here is the link to my bathroom vanity if you want a peek at the feet we used. Excuse the lousy pictures! 😛
Oops, here it is: http://www.plumdoodles.com/2012/04/16/giving-a-standard-cabinet-furniture-style/
Sheila, that looks very custom! Great idea!
I especially like the idea of painting the toekick black; it makes it disappear!
holy cow! i can’t believe how much you’ve accomplished this week! it’s coming along! i can’t wait to see you vision come to life!
You know what I like about you? You remind me of me! LOL!
I love the idea of detailing your stock cabinets. I have some similar stock unpainted cabinets and we are working on redoing our kitchen too! Hubby took the doors off and washed them with tsp to clean off old gook. I will be painting tomorrow. We are going for a white kitchen. Our countertops are at a store but we can’t get them delivered till we get the painting done.
You are doing a great job:) It’s funny I am doing a kitchen redo with some of our old cabinets and some new ones also. Ours will be put at the ends of a long run, so we are hoping they ‘blend’ as the style is similar but not exactly the same. Adding trim will help unify them I think:)
Kristi, you are doing a wonderful job as usual! Always amazed at your energy and enthusiasm, and the never give up attitude that always prevails. I agree with not wanting your fridge at the doorway. It makes walking through the doorway more like walking through a tunnel. I need to feel I’m stepping into the room when I pass through the doorway, and that applies to any size room. At one time we had tall storage immediately to one side and the spare fridge on the other side of the kitchen door leading to the garage. So even in the large garage, it felt constrictive to me, to have to pass through those items before I was in the garage! Excited to see how you customize your cabinets. I noticed your example cabinets have trim detail on the exposed ends. The house I’m in now is the first to have cabinets with such trim work on the sides that can be seen, and I really appreciate that touch. Thought you might want to consider that if you haven’t already (though I’m very confident you have!). Wonder if you’ve considered putting your work into a book? Or how do you feel about public speaking? Not only does your blog offer clear how-to instruction, you are truly a motivation that we CAN do what we truly want to do! Just a couple of ideas maybe for on down the line as you get your house done!
You are amazing. I could never begin to do the things that you do. We had a major leak in our kitchen and had to have new cabinets put in and our cat did the same thing before the counter tops were put in. She thought the cabinets were her private playground. She would jump in and out of them, even go to sleep in them. She was really mad when the countertops went on!!! Keep up the great work. Love reading your blog. I did buy an electric fireplace set after seeing yours and absolutely love it.
I can’t wait to see what you do with those stock cabinets. We are househunting for a retirement home in Florida and oh my gosh all of those cabinets are so ugly in the houses down there; flat melamine mostly with the 80s wooden pull. I don’t think I would even want those in my garage!
Your customized cabinets will be absolutely beautiful. I do like the idea of using wall cabinets as base cabinets on that buffet wall. And if you wanted to, you could even pull them forward 3 or 4 inches rather than push them flush against the wall behind them, making them appear slightly deeper than the top cabinets. I don’t see that you need a full-depth cabinet there. Of course, they’ll be more economical also. They would come flush to the floor, and not have a kickplate with feet, but you need some variation in your cabinets anyway.
Love your plans and will be great looking in the green.
I’m guessing you’ve only seen pipes coming through the back of a cabinet before because it has been against a wall. Islands are through the bottom.
I’m not familiar with why your husband is in a wheel chair and what his capabilities are, but if he wants to get stuff out of the fridge wouldn’t it be easier if it wasn’t at the far end, but closer to the door opening ie other side of the stove. Would eliminate door swing issues too. It also keeps others from having to cross through the kitchen to get to it.
I am slightly envious because my kitchen reno has been ongoing for 6 MONTHS! But I am happy for you and I know it will look great when you are finished. Way to hustle!
Hey Kristi, I visited your blog and I must say you did a commendable job. Renovation is not an easy task but you did it and that also very nicely. Your idea is innovative and simply great.
Things are looking great!!!
My water lines come up through the bottom of the cabs, and we have not had a problem….
If you want to see them, shout….just wear your rose colored glasses…it’s not pretty in there :^)
Blessings,
J
I recomend that you put the fridge in the middle og the wall vhere the windo is, you dont need the windo, and make that wall a pantry/ China wall, put glass kabinets on each side of the fridge deep dravers underneth,,and i recomend you bring in a dishvasher, 🙂 from Iceland
Hey, I visited your blog and I must say you did a creditable job. Redecoration is not an easy task but you did it and that also very properly. Your design is innovative and simply enormous.
This reminds me so much of my new home. The floors is uneven, we had to put up a new header after taking down a load-bearing wall. You did a lot of work!
And how cute is the ever so helpful kitty!
Dang, woman! You are kicking major booty! Great job. May I suggest a can of Great Stuff to fill up that snake hole? If you’ve never used it-start sparingly- it expands WAY big, but it would easily take care of that big gap in your threshold. I sell commercial modular buildings for my “real” job and our setup crew uses it to seal all the gaps between each module. 🙂 http://greatstuff.dow.com/
Can’t wait to see the finished product!
Thanks, Beth! I’ll try to find some of that.