Music Room – Black Walls Preview
After over two weeks of not working on the house, I finally got back to work yesterday. And apparently, DIY skills are like muscles in that if you don’t use them, they begin to atrophy. If someone who didn’t know me and wasn’t aware of my blog had been watching me paint trim yesterday, she would have thought that I was a complete DIY novice. I was slinging and dripping paint everywhere. I started to get back into the groove of things after a couple of hours…thank goodness. But it was rough going there at the beginning.
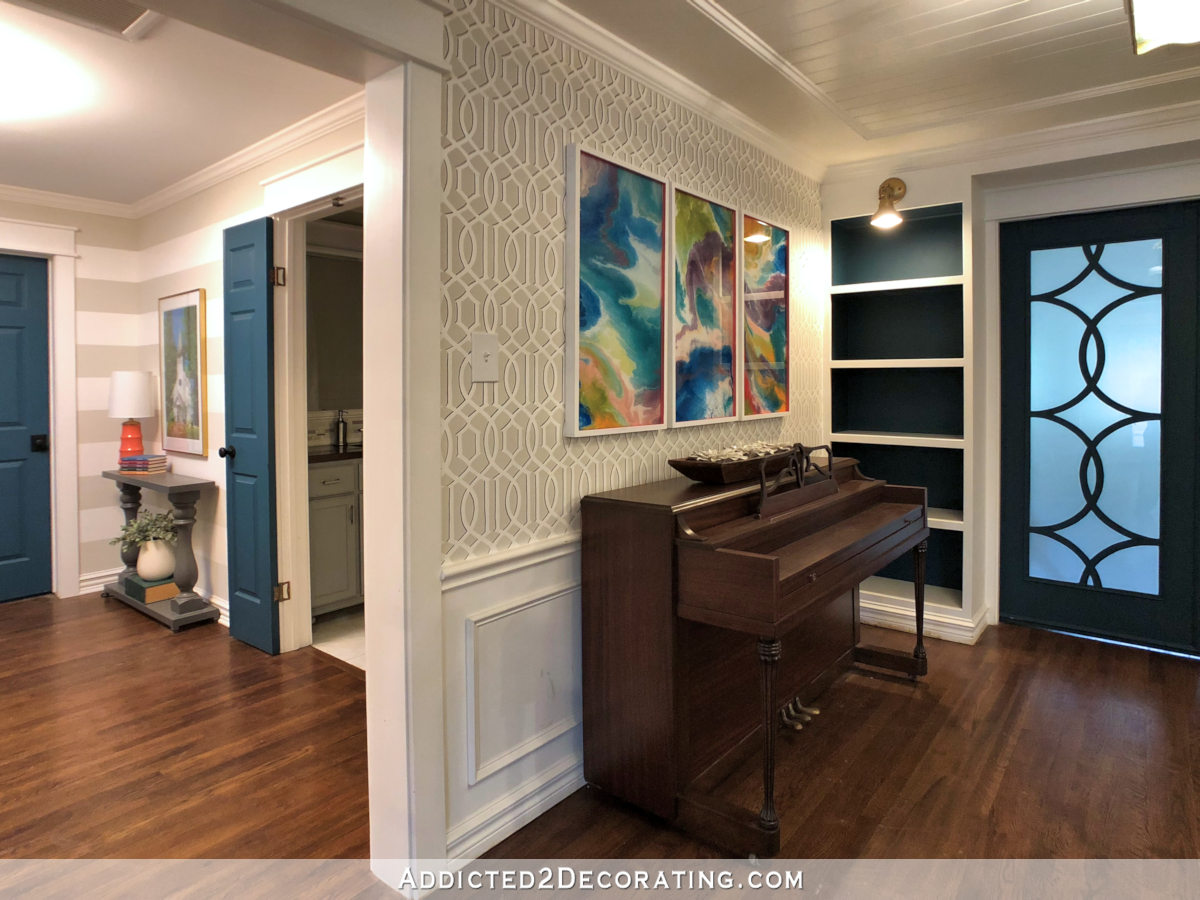
Anyway, after getting all of the wainscoting and door trim painted on the left side of the room, I finally got to the part I have been anxiously awaiting for quite some time now — the black paint on the upper wall. I only got one coat on, so the color isn’t quite as saturated as it will be when I get a second coat on. But at least we can get a preview of what the finished walls will look like…
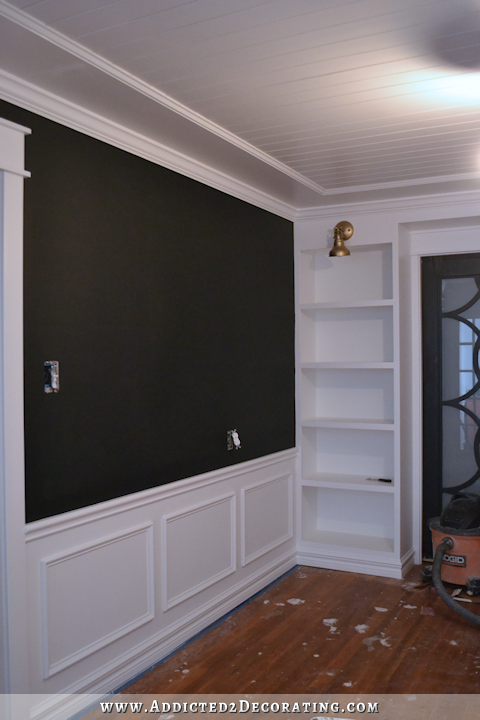
I think I’m really going to love it when it’s finished. And since there’s already so much going on in the room, I’ve decided to just keep the walls solid black rather than doing a stenciled design. However, I do reserve the right to change my mind in the future 🙂 , especially after these rooms are more finished and I can get an idea of how they’ll look all decorated and accessorized.
Painting the black walls against the bright white trim was a lot harder than I thought it would be. As a general rule, I have a very steady hand and can do all of the cutting in with a brush quite easily. But the high contrast of the black against the white was incredibly unforgiving. Every slight little wave in the painted edge seemed to be magnified since the contrast was so high.
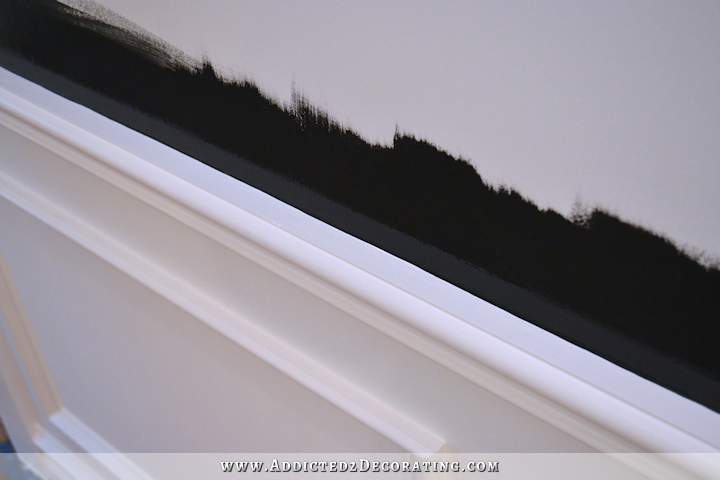
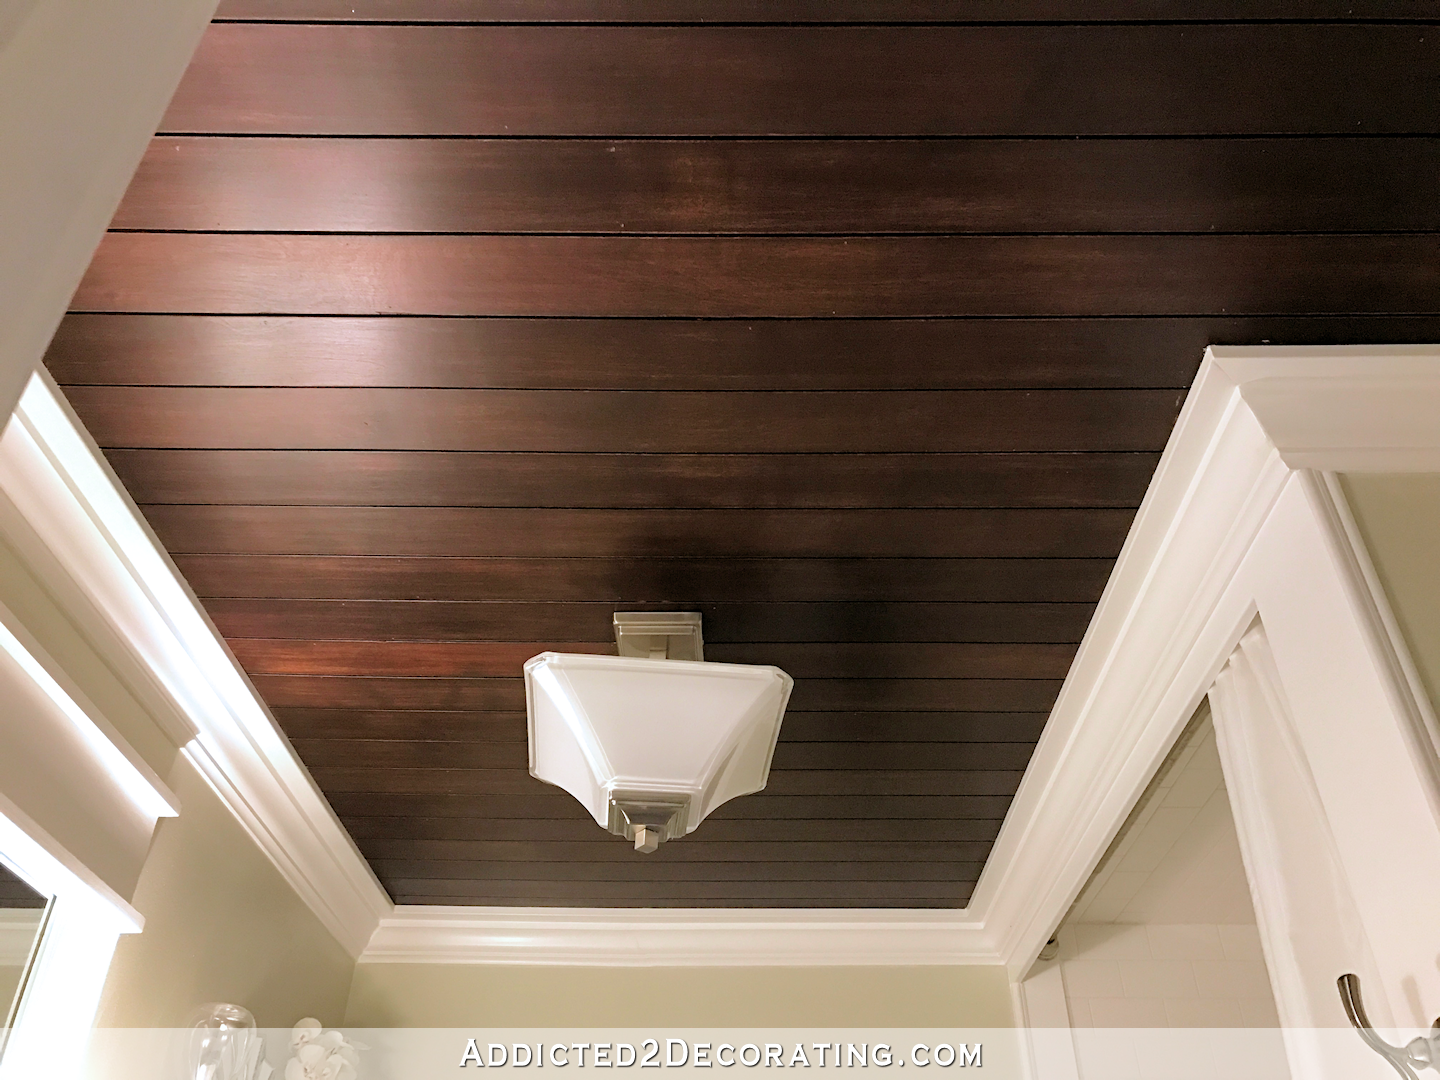
I finally gave up on trying to paint a straight line against the bottom of the crown moulding, and instead I used a trick that I learned many years ago. Instead of painting the black up against the wall just under the crown moulding, I decided to go ahead and paint the very bottom edge (the part that’s about 3/16-inch wide) of the crown moulding. You can see what I’m talking about in this picture. This is the area of wall between the top of the door casing and the crown moulding. On the left side, I painted the bottom lip of the crown moulding. On the right, I tried painting just under the crown moulding with a steady hand.
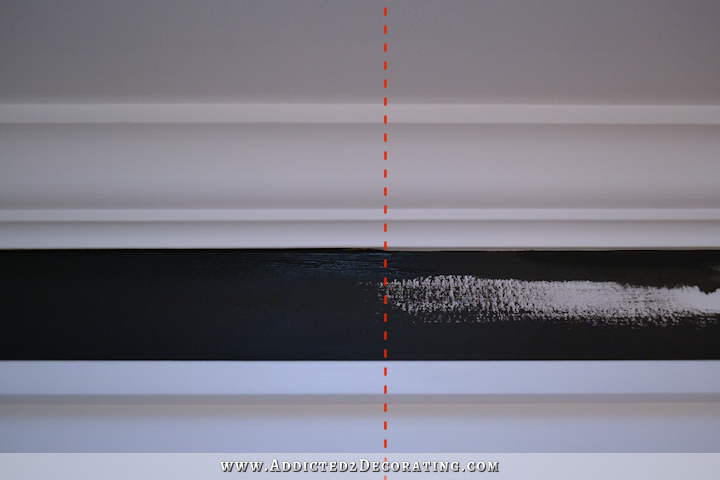
See how much cleaner the left side looks? And the right side looks kind of sloppy and wavy.
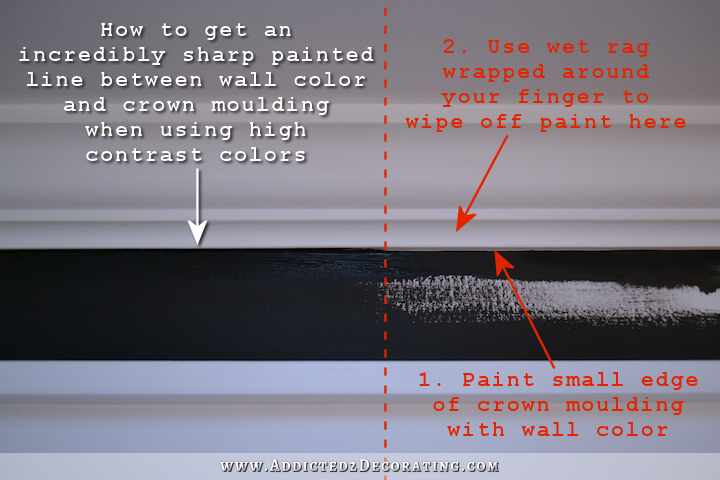
This method is super easy and goes so fast because a steady hand isn’t needed at all. You just paint that bottom lip on the crown moulding, and then use a wet rag wrapped around your finger to wipe off any wall paint that gets above the bottom lip of the crown moulding.
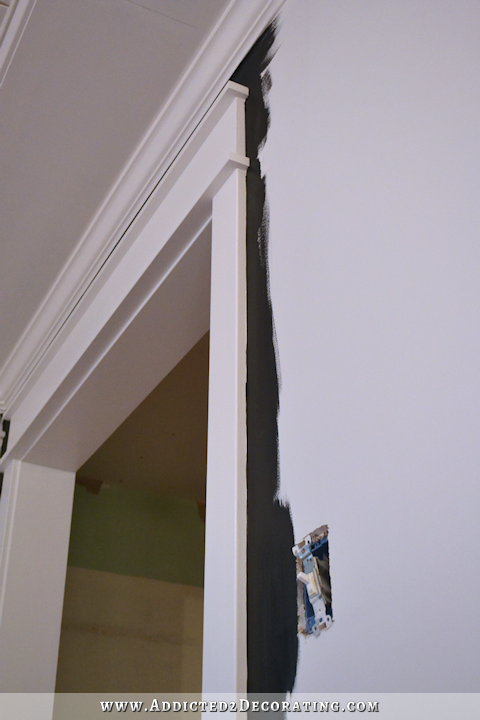
Unfortunately, I don’t have any tricks for painting alongside other types of moulding, like door casings. I did an awful job on that and ended up with a wavy line. If I were using a light neutral wall color, it wouldn’t be so noticeable. But like I said, there’s nothing at all forgiving about a black and white combo. I’ll have to do more work on this, because this will drive me crazy having to look at that every day.
I managed to do a much better job above the chair rail.
So that’s my progress so far on the walls.
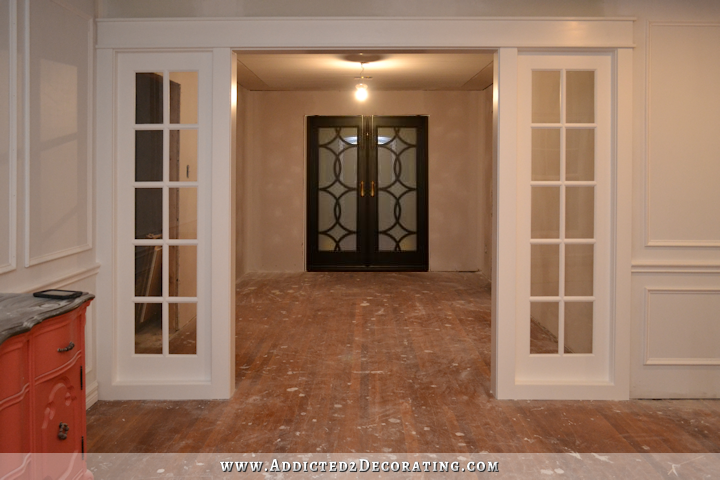
I can’t wait to get this finished and show you the view from the kitchen. I think it’s so pretty, and really complements my kitchen beautifully.

Addicted 2 Decorating is where I share my DIY and decorating journey as I remodel and decorate the 1948 fixer upper that my husband, Matt, and I bought in 2013. Matt has M.S. and is unable to do physical work, so I do the majority of the work on the house by myself. You can learn more about me here.

I really like it! and as I suspected it doesn’t look like a dark room at all because of all the white.
p.s. I’m having a really difficult time leaving comments in this interface and yesterday I just gave up.
This is THE perfect room for black walls! The large cased door openings (trimed in white), the wainscoting, the white bookcases, the decorative ceiling (in white) — everything works to make the black walls look fresh and original. And they give the room a feeling of “substance” without being overwhelming. BRAVO!!!!
Perhaps using the dreaded painters tape…I prefer the “Frog” as it seems to work better than the blue. just a suggestion. I did not think I would like the black but oh my goodnes I LOVE it! LOL have a blessed beautiful day 🙂
I just painted black chalkboard paint on 2 of my white kitchen cabinet doors with a perfect straight line. You tape it off then paint the trim color to seal the tape down. Then go back and paint the black. It works like a charm!
Love it!!
Love it!
I have to admit I was skeptical that I’d like the black, but it really does look great against the white. I think maybe a whole wall of black versus a half-wall, I probably wouldn’t have liked.
I have that same edging problem with textured ceilings. In our condo, we had poorly done popcorn ceilings. In the house, we have sanded swirl-coat ceilings. In both cases, unless you have crown molding, it gives you a bumpy line for your cutting brush to follow. No matter how straight you think the line is when you’re up on the stool/ladder, once you get down and look at it from below, it almost always looks like you either painted the ceiling or didn’t get close enough to it. The more you mess with it, the worse it gets. And it doesn’t really matter what the color is. I’ve tried using tape, but that doesn’t work (because of the bumps). I have been known to get out the artists brushes when I just can’t seem to get a line straight against a piece of trim.
I had this problem too at my house. The ONLY way to get a strait, crisp line is to tape, seal the edge of the tape with the underneath wall color (or ceiling color if you’re painting the walls up to the ceiling), then, once it’s dry, go back with your new paint color, then tare off the tape. Perfect lines every time.
I love this technique, use it all the time when I paint, you can also use clear polyurethane if you do not know or do not have the original wall color. And the Frog tape is really much better then the blue stuff.
Try scoring a straight line along the top of the wall and ceiling. When you cut in, the paint fills the ‘score’ and you will get a straighter line. It takes a little time to score the line but it is worth it in the end.
Yes, I tried this for the first time a few months ago and it makes cutting in at wall/ceiling so easy. I just uses a flat head screwdriver to make the line.
I used a wide flat screwdriver and scraped the popcorn from the ceiling along the edge. Made it much easier to paint and the scraping is barely noticeable.
Good ol’ artist brushes work great every time….although can be time consuming. But, if you know your going to have to use them, it’s actually an easier alternative!
LOVE THE BLACK WALL! I can’t wait to see it done. I know you have already put up the trim and everything but would you suggest if anyone else were to do this to paint the walls first then install the trim??
I love it! Also love the changes to your website <3
I use a small craft paint brush around casings to get a straight edge. The black and white is stunning!
I love it so much! The black looks so nice!!
OMG – I thought I would hate a black wall – but your wall is stunning. It looks so sophisticated, and upscale (like you would see in a posh decorating magazine). Another good choice by Kristi!! You always end up with perfection!!!
Stunning. Here’s a good tip for painting crisp lines. Use frog tape and paint over the first color (ie the white trim) on the tape and allow that paint to dry on the tape (what bleeds through is the color that is on the trim anyways). Then paint your wall color over that so if it gets on the tape, the first color is already creating an extra barrier on the tape. Here’s a tutorial. It works great for people like me without steady hands and with uneven wall edges.
http://www.houseofhepworths.com/2011/01/11/what-everyone-should-know-about-painting-perfect-lines/
I love the contrast. So sophisticated. I have a suggestion that helps me. It is a bit more time consuming, but I like it. I use a flat artist brush to paint those areas. The slim tip or the artist brush is less likely to give you that wavy line, and it is easier to control. You are unable to load much paint on it, and it takes longer, but the results are much better for me. Maybe it will help. Love the idea of painting the bottom edge of crown. Never thought of that before, but it seems much easier and definitely a cleaner look.
I agree. I was going to say “classy” but sophisticated is a good way to describe the final product. Will the yellow piano still be going in here?
It’ll go in there for now. I can’t guarantee that it’ll stay yellow all this year though. 😀
Absolutely love this. I am living through you since my husband looked at me like a crazy woman when I suggested doing this.
Ok, so I was wrong, it actually looks very beautiful and not like a cave at all! I will never question your decisions again. So glad you are back blogging again. Happy New Year to you and your husband. Can’t wait to see the great things you are going to do this year!
It’s beautiful! I just saw an industrial inspired bathroom that used white on three walls and black paint on the sink/mirror wall. I am fantasizing about doing the same thing in my own home as I love the high contrast. I appreciate that you share your challenges alongside your successes, as it helps me feel less intimidated when approaching my own projects. My own projects have taught me that DIY requires bravery to try new designs, skills and ideas, flexibility to make changes when needed, and optimism when projects do go as planned. Sharing challenges provides an opportunity for others to share valuable insight and I appreciate that. 🙂
I use same technique for cutting in around crown at top . ( rag on finger is best tool in painting. )a professional painter taught me a great easy way to cut in at top between popcorn ceiling and wall. Take a flat head screwdriver and run the edge carefully in the crack of the very corner along the poocorn area and scrap a small line of popcorn off . It gives a area for wall cut in brush to reach to very top with out hitting the popcorn and staining the ceiling.. I have done this in every room that has poocorn and iit has really made the task much easier.
Also, tape is the best way to go aoung sides of door frames . Since your trim paint is dry and cured for a whiletaoe off the trim to paint black or your color on wall. Pull tape of as soon as you can and you can finger wipe any bowbows on trim.
you have inspired me to get busy on bedroom I have put off , love your blog
Thanks for the painting tip, it’s a good one and I hope I will remember it when I need it. This room is so beautiful! Love it!! You Inspire me all the time!
It looks stunning. Glad you are waiting on stenciling or other effect until you see everything in the room. Sometimes, simple is better. I actually tape when I’m using dark and light colors and use a small angle artist brush. Just takes more coats.
It is very sophisticated but my first initial gut reaction was ‘it looks like a chalkboard!’ I think I would like it better with stencil only for that reason. Thanks for being inspiring! Love your work!
I LOVE it!!! Great tip, I am going to use that in my daughters room.Slate gray and has been driving me crazy.
Absolutely beautiful!!!
You probably already know this, but you can buy paintable outlet covers (they actually cover the *entire* outlet). Made a huge difference when I used them on my dark red DR wall. http://www.azpartsmaster.com/Products/Taymac-Masque-2000W-Decorator-Duplex-Wall-Plate__EA2000W.aspx?affid=googleproduct&gclid=CIH9qpeDk8oCFQ2UaQodWx4Clg
Painting the bottom lip of the moulding is a great tip. As for the green Frog tape … I used that recently and when I removed it it pulled off 4 layers of paint AND the primer (not new paint!). Love the black ! Very dramatic.
I absolutely love the wainscoting and bookcases in this room…Would love to see it in my new foyer. Glad you are back after a much needed time off…
We use the same paint technique-paint the underside of the molding. I love the black and white going on!
Looks Great!! i love the black and the white
I ADORE THIS BLACK AND WHITE WALL! I can picture your yellow piano and print chairs….. Oh an the book cases accesorized. I think this will end up my favorite room!
Sheila F.
Absolutely stunning!
Looks great! I have the opposite and love it. I never use painters tape either. I find it easier to paint a straight line going down the wall along the door jamb rather than going up to the door jamb…does that make sense?
The contrast between the black and white is absolutely beautiful. Great job!
I love this! I’m glad you’re waiting on the stencils, it’ll be better to see it all finished before adding more. Thanks so much for the trip about painting along the trim. I’m definitely going to use that one!
Love the black and white contrast especially with half wall only. Whst a fresh look! For whatever reason couldn’t leave comment yesterday…wondering if black counters will take away from gorgeous cabinets or add to … sigh … always a surprise with you! Lol
That room is going to be stunning done in black with all the white trim! I have always loved black or navy rooms, but never had the guts to do one.
Can’t wait to see the room done and decorated, Kristi.
I love it and thanks for the painting tip!! Might I add that ceiling is gorgeous also! It makes it seem so bright! Beautiful, just beautiful!
Have you tried one of those straight edges? It has a plastic handle and a metal edge. I think it’s worth a try. Love the black and white! Glad your back! Missed checking your blog.
You can try this: paint black as close to the edge as possible to the moulding. Once dried take a very thin bead of caulk along the trim. Looks like a crisp edge without the suffering. I have moulding and trim all over my home. Doesn’t matter what color the walls the edges look great.
I too love the way it looks. With that room being so small, and the two end walls being white (excluding the pocket doors), you really have very little space that will be painted black. I think it has a very upscale look to it. I hope you can continue it on the wall in the foyer area. I don’t suppose there will be that much since you are building the coat and storage bench on that wall. I really think the continuation into the foyer will be very dramatic. I can’t remember if you have a chandelier for the foyer ceiling or if it is a ceiling mounted one. Something in a black metal would be stunning. Just have to watch the style of your storage cabinet and compliment that and also your dining room. I love the way the house is shaping up. I think 2016 will be a very good year for you. I do have a question…I have noticed a different format for responding to your blog. I also notice that there are some very upscale adverts. I am wondering do you solicit for adverts? I figure ads plus views equals income. Do I have that right? I have always been curious about how blogging works, not that I would ever do it, but what a great way for someone like you to share your expertise, and your fails with others. I have learned a lot. I will never paint again without adding a few drops of additive to my paint. Anxious to see it coming together..blessings as always for the New Year and Matt’s health
What additive are you adding? And is it to latex paint?
Outstanding! Love it!
Beautiful!!
I wasn’t sure of the black paint but the contrast with the bright white looks good. This room is coming together nicely.
I have seen a tool advertised, that lets you paint right up to your trim, but I don’t know the name of it. I’ll try to find out. I think I’d try a wide putty knife as a stop for your brush, and just start at the top and pull both down at the same time. Be light handed with the knife, so you don’t get digs in the wall. I have seen painters use this, and it may take practice! I’m not to that point in my house yet!
The black looks wonderful, a perfect backdrop for some fabulous artwork! I have a gallery wall in our upstairs hall painted black and a TV wall in the basement painted black and i love them both! It’s simple, clean and just creates a great background. It really makes good, thick trim work look like a million bucks! Love it!
Wow. I am not a black kinda decorator but love this.
That sure is pretty.
I’ve loved black in my house for years. It has taken some time to convince the hubby. What brand, color, and finish of black paint did you use? When I do trims and doors I use an exterior satin paint. With five grandchildren and their menagerie of pets visiting often I love how it wears like iron with great scrub ability.
I, too am glad you are waiting to stencil; in fact I hope you don’t. It looks so sophisticated now and the stencil might make it too busy. Anyhow, I can’t wait to see how you solve your dilemma. You always do the hard work, and we get to sit back and learn from it!
BTW, what additive do you use in your paint?
I think the black and white wall is beautiful! I was not sure at first but oh my goodness! Simply stunning! I can not wait to see the room finished. It is going to be a jaw dropping beauty.
Looks AWESOME!!! Wish I were that brave. Great tip about the crown, but I don’t paint anymore…I have a great son in law who is a professional painter. ;- He can knock out a room in nothing flat, and he’s the tidiest man I’ve ever seen. He does my dishes after family get-togethers too! Love that guy!
I can’t wait to see the continuation, glad you’re back! And loving the new site changes!
WOW – incredibly beautiful, in whole context and as a particular wall. thank for the tip
Wow it’s stunning. Can’t wait to see you finish the room. I’m glad you decided to wait on the stencilling. Once to add your furniture, books, artwork etc you will see that it gets to busy. Also thanks the tip on painting the underside of the mouldings. I’ll be trying that the next time I’m doing that. Here a tip I do when painting down the sides of trim like you have. I paint the white trim first making sure to go onto the walls then instead of trying to get a straight line into that corner I come out an eighth of an inch. Works perfect. I also do this when painting up next to a stuccoed ceiling. Cheers
As much as I know you hate to tape, I think you may have to this time.
Gosh, do I L O V E this so much! Beautiful 🙂 Nice tip about painting with moldings…painting this weekend and although we don’t have high contrast paints, it’s still a nice tip because I like a very crisp paint job. 🙂