My Latest Project–Patchwork Top Dining Table
Well, my husband thinks I’ve completely lost my mind…
Yesterday, I decided to take a break from the construction-type projects (cabinet installation, wainscotting installation, etc.), and do something a little more relaxing and crafty. So I turned my attention to my dining table.
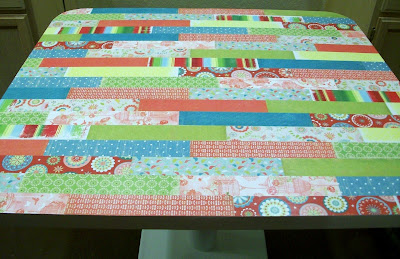
I had purchased a table base for $15 at my favorite local thrift store (which is going out of business…booooo!) It was old, but I loved the shape, and a few coats of crisp white paint brought it back to life. I then added a table top made from two layers of 3/4″ MDF, and then I did something a bit crazy. You see, lately I’m a bit obsessed with color. Bright, cheerful color. So I decoupaged some brightly colored papers onto the top of the table. Here’s the result:
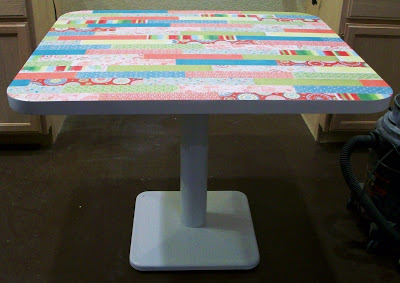
I absolutely love the way it turned out. My husband, on the other hand, was a bit…shocked.
When he walked into the room, I said, “Well, what do you think? It’s fun, right? Maybe a bit funky?”
His reply was, “No…you know what it is? It’s pretty!”
Now before you say “Aww, how sweet”…let me just stop you. I don’t really think he meant that as a compliment. You see, when we got married six years ago, my taste in decor was very…well…masculine. I liked dark colors, dark woods, clean lines, contemporary style, and no clutter. Definitely nothing frilly, lacy, ornate…and definitely no PINK.
Now I’ve done a complete 180 degree turn. My taste is more vintage-inspired, with more frills, more sparkle…and with lots of pink!!
I’m sure he’s regretting giving me complete control over the decor of our home.
Well, that’s all of the time I can spare on the crafty stuff for now. Today, it’s back to the heavy lifting and the construction-type projects. I’ll be so glad when it’s finished!!!
Edit: After doing several decoupage projects, and always being frustrated by wrinkled paper, I finally learned how to decoupage without wrinkles! Click here to see what I’ve learned. On a project like the table above, I always seal the decoupage with at least two coats of clear water-based, non-yellowing polyurethane.

Addicted 2 Decorating is where I share my DIY and decorating journey as I remodel and decorate the 1948 fixer upper that my husband, Matt, and I bought in 2013. Matt has M.S. and is unable to do physical work, so I do the majority of the work on the house by myself. You can learn more about me here.


Your table looks great! I like how it turned out. Your poor husband. 🙂
Yay! I just love this table. JUST LOVE. You should sell these.
Saw you at Mod Podge Rocks – great job!
It's wonderful!!!
I think your table is awesome! If you love it … that's all that matters (and a little bit if your hubby loves it) after all, you're the ones who'll be living with it. 2 Cool!!
SHUT UP! I couldn't love it more! It's never a compliment when my husband says something looks "cute". I love patchwork and this is absolutely fabulous.
Great project! Now maybe you'd like to make some cute coasters from some fused plastic bag fabric?
Take a look at my blog for that and much more….
http://www.creativejewishmom.com
oh my gosh. thats gorg! and you must be my decorating dople ganger because i was EXACTLY LIKE THAT TOO! and then about a year ago i started veering towards the hand made and brightly colored. great work on this. you have inspired me!
Wow! Wow! Wow! Super Impressive! What tricks do you use to keep the paper from bubbling???
megsalome, the only trick I have is to use smaller pieces of paper, which is actually why I decided to try the patchwork table. I had tried a couple of projects using large sheets of paper, and it kept wrinkling and bubbling. It was incredibly frustrating. The smaller pieces are much more manageable.
I also learned that if I want to cover the entire surface of something with one print, it's much, MUCH easier to use fabric instead of paper. No wrinking, and bubbles can be pressed out easily. I used fabric on this project: http://blog.addicted2decorating.com/2009/10/before-after-chest-of-drawers.html
hi.. do you ever put hot plates on that? i did and it sticks and it left white mark.. any solution for that? it is a dining table…
No, I don't ever put hot plates on it. Not necessarily because it's decoupaged, but because I have just never put hot plates on tables. I always use a pot holder/hot pad.
I'm not sure if it would stand up to hot plates. I did, however, put several coats of non-yellowing polyurethane over the top. If you're wanting a super-resilient finish on the top, I would suggest a resin finish–the two-part mixture that you mix together and then pour onto the surface. One application of resin is about the equivalent of 50 coats of polyurethane. You can purchase it in the paint department of Home Depot.
Kristi, I borrowed your idea. Thanks so much! I used the idea for a toddler table…LOVE it! Your post was the only one I could find with a similar idea to what I was wanting to do. If you want to see a pic, visit http://owensofyorktown.blogspot.com/2010/08/table-collage-revamp-for-roo.html
Thanks again for the amazing idea…love your stuff!
Great project, I enjoyed reading it, thank you.
This is really cool! Keep up the great work!
I think I'm a little more like your husband … not exactly my personal style.
Still, you did a beautiful job with it. Nice work!
Nice post, thank you for sharing. The dining table design, material, and function have developed for several years. I still remember my family dining table has changed from single wood table to glass table with various functions.
I love your table! I am about to start a similar project on my dining table and I read where you said to use a "resin finish–the two-part mixture that you mix together and then pour onto the surface". I've never used that before, but I like the idea that it would be more durable for my 3 kiddos, however I was wondering how you keep it from running off the edges of the table if you "pour" it on to apply it?
Hi Stacey~~I've actually never used the resin before, but I've see it done. They way they did it on a table was to let it run over and coat the edges (you'll need to put down drop cloths), and then after the resin began to set and get a bit solid, they cut away the drips with a knife.
I really like the colour of patterns on the top of the table
great table! i love it, but i have a question when i decoupage things and they get wet at all it turns all white how do you keep your table from getting all white and gluey?
I use Mod Podge, and I've never had a problem with it turning white.