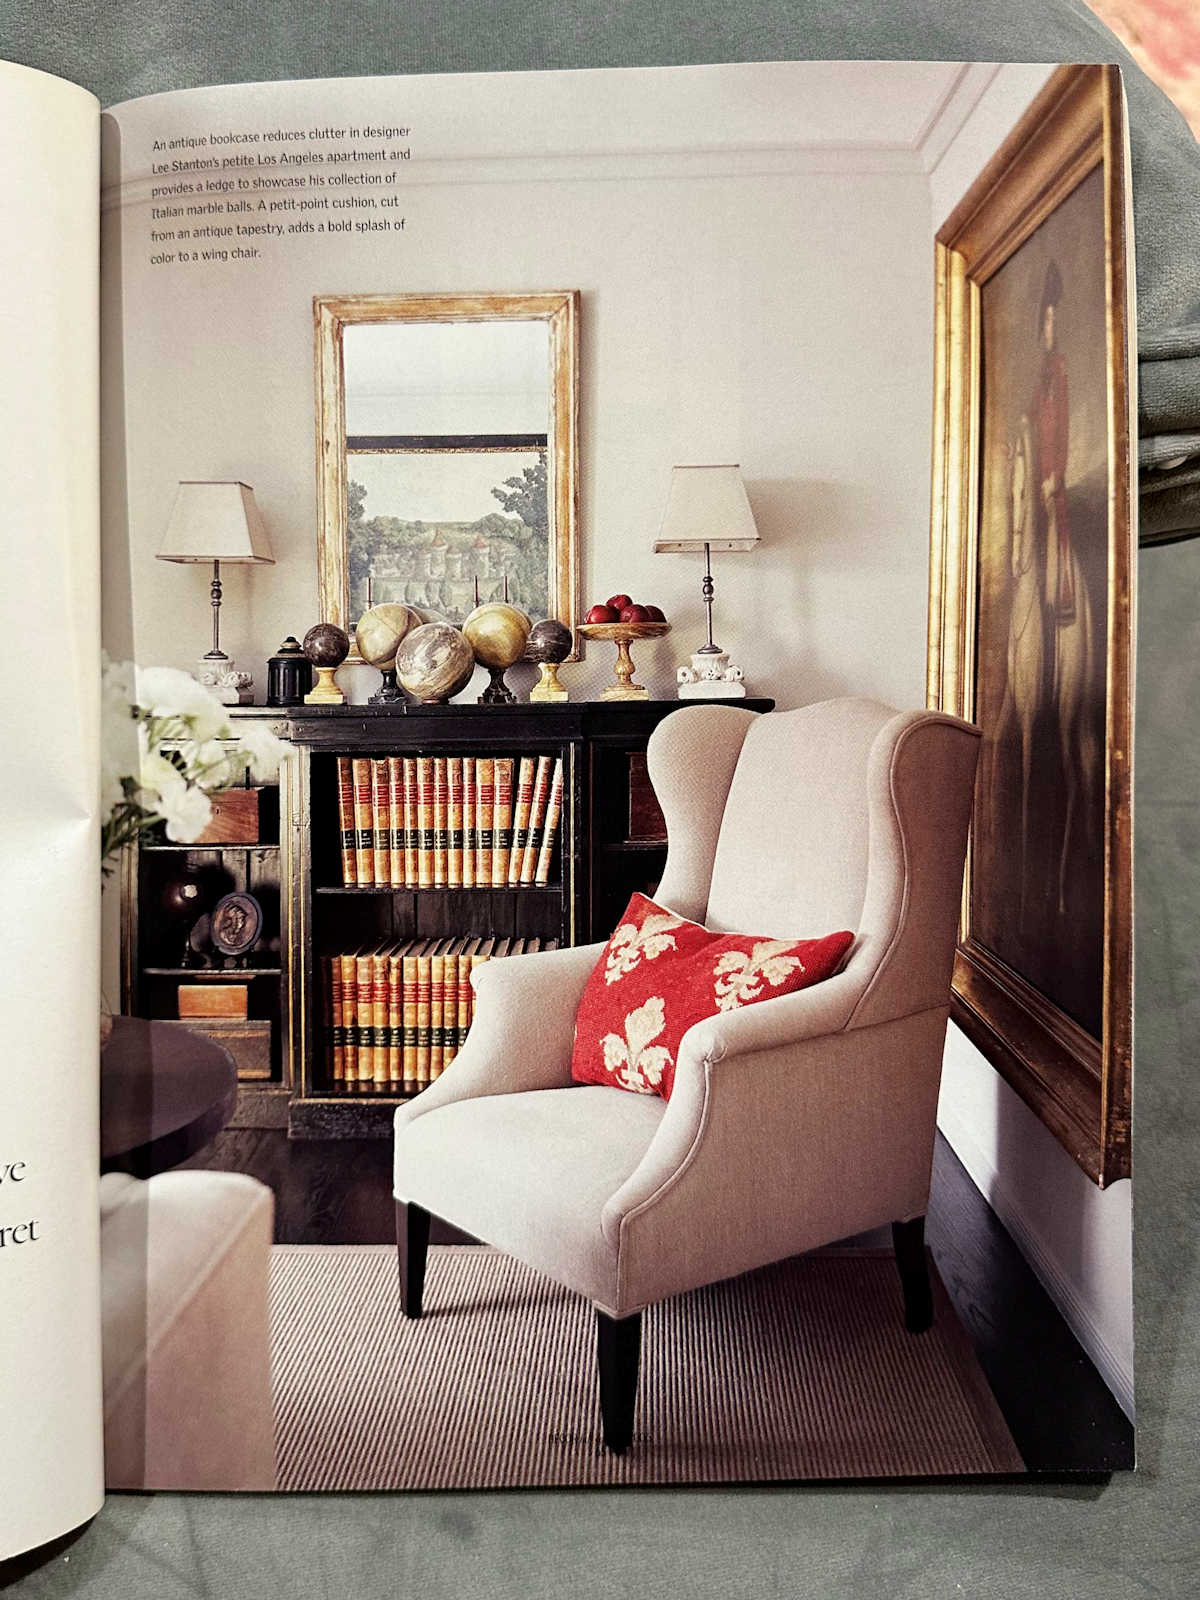
My Mom’s Kitchen — The Magic Of Making Old Grout Look New Again
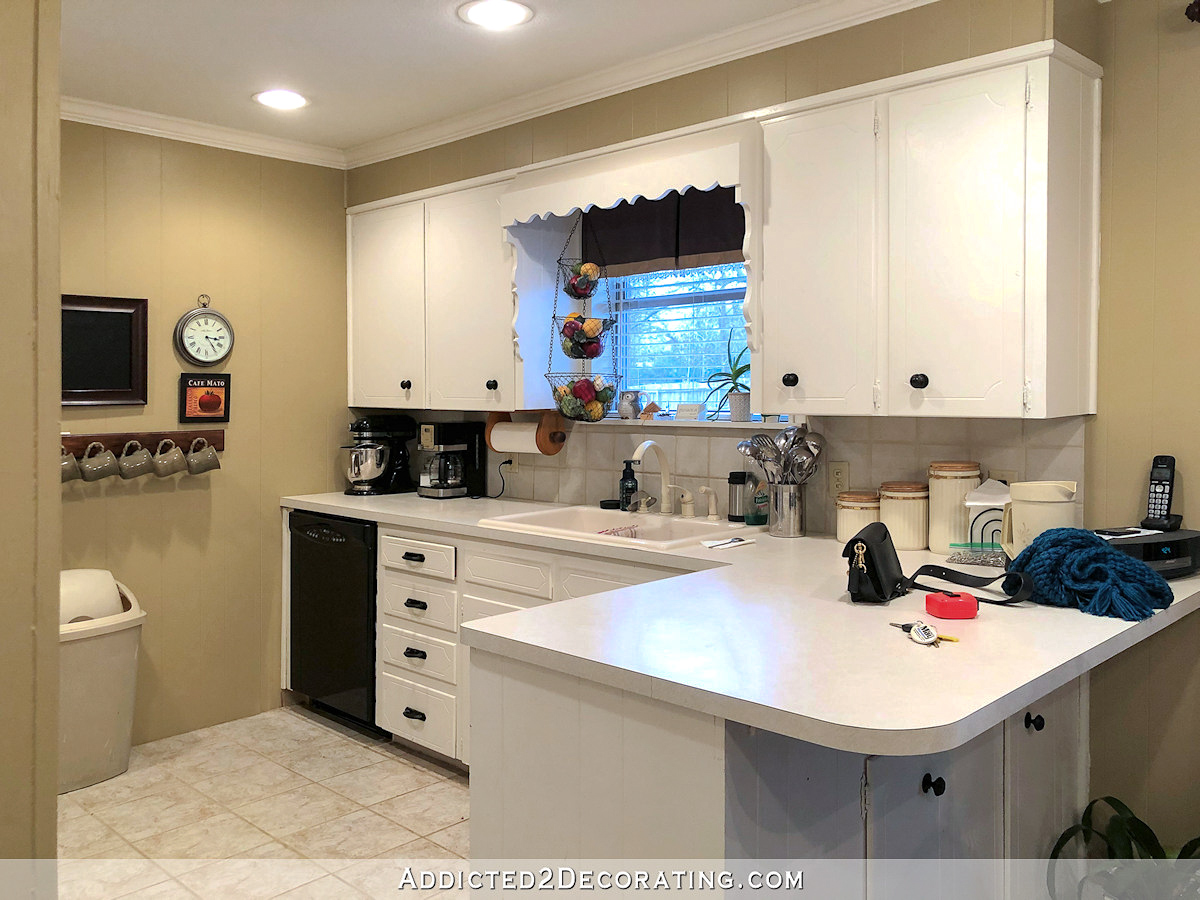
Yesterday, I started working on my mom’s kitchen. If you missed this announcement a while back, I’ll be doing a relatively low-budget update on my mom’s kitchen (low budget relative to the cost of a kitchen remodel, that is). This is what we’re starting with…
The goal is to get the makeover finished by mid-April for my grandmother’s 108th birthday party. I feel confident that we can get it done in time, although we seem to be gradually adding things to our “to do” list each day. 😀
So yesterday, I gathered up all of my tools and packed them into my car, then headed to Home Depot where we got everything we need to get started on this project. As is often the case on the first day of projects like this, the first day didn’t really result in much actual progress on any of the big projects, like making the cabinet doors. But at least I got all of my tools over there, and we have all of the materials there and ready to go for today.
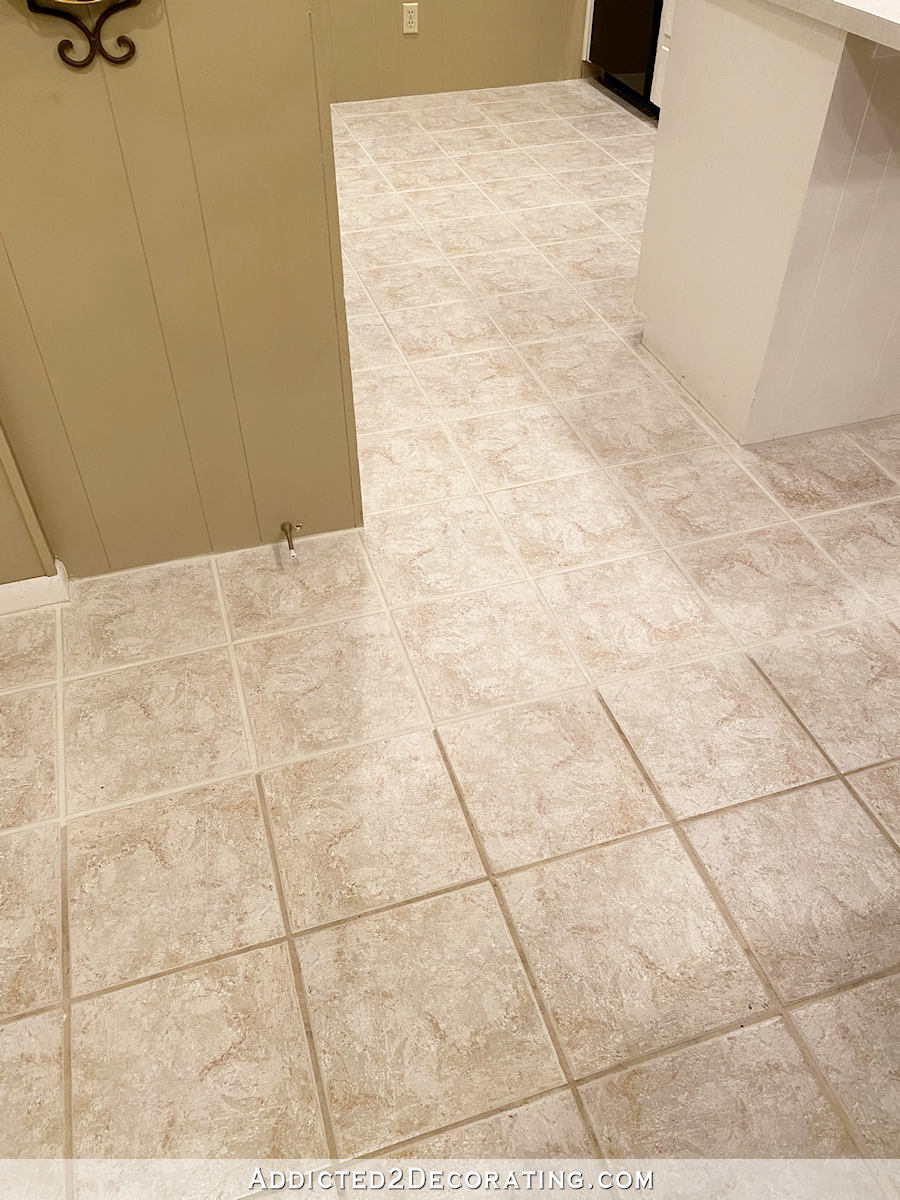
But one thing we did start working on was the grout on the tile floor. I don’t really know now old this tile floor is, but it’s been there at least two decades. And over time, the grout (which I think started out a bone color) has gotten gradually darker and darker. Honestly, I don’t think the grout was ever sealed when the tile was installed.
So after a couple of decades, this is what the grout looked like…
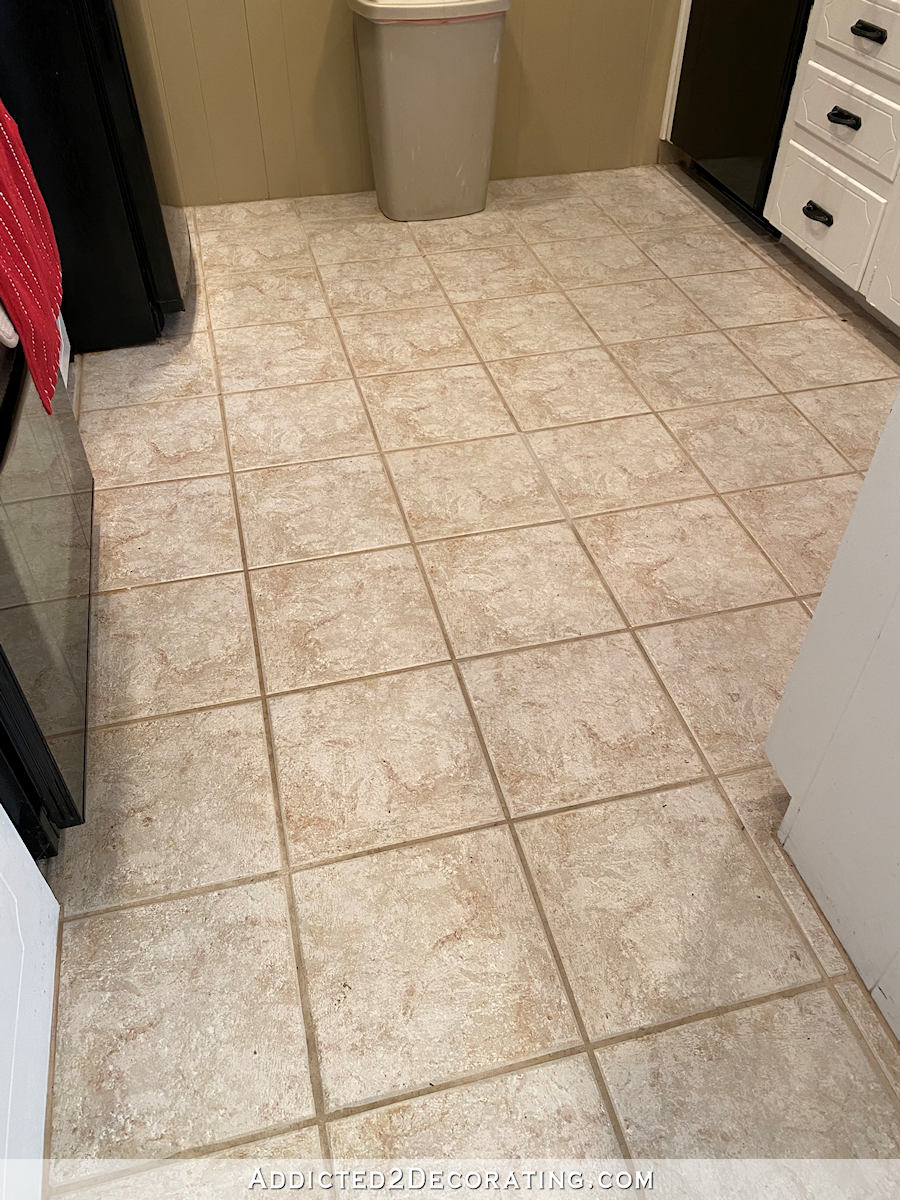
The dark grout really makes the whole floor look dark because it highlights the dark colors in the grout.
So while we were at Home Depot, we picked up some Grout Renew in Antique White (you can also find it here on Amazon) and spent some time yesterday evening applying that to the dark grout. The difference is astonishing!
Here’s how the grout looks now after two coats of the Grout Renew…
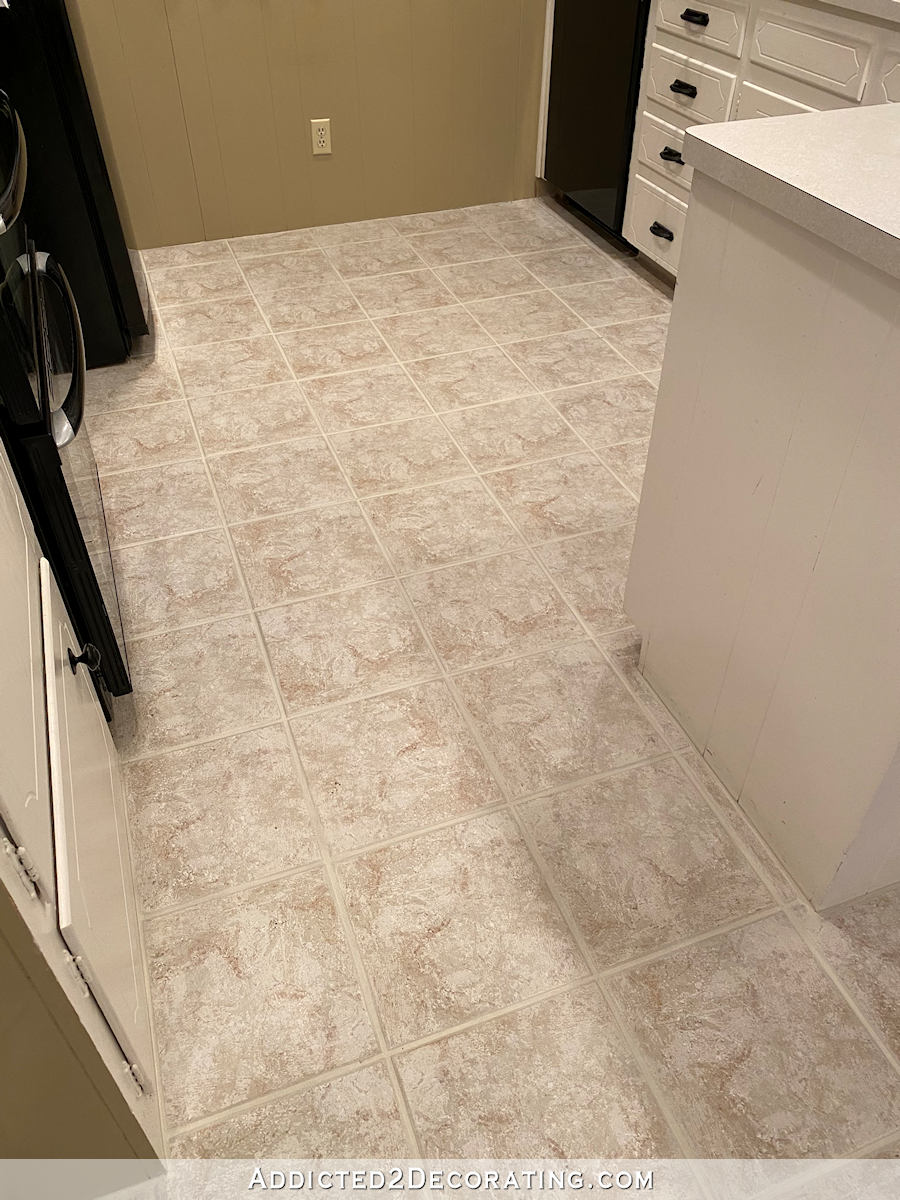
Isn’t that amazing?! Here’s a side-by-side of the before and after…
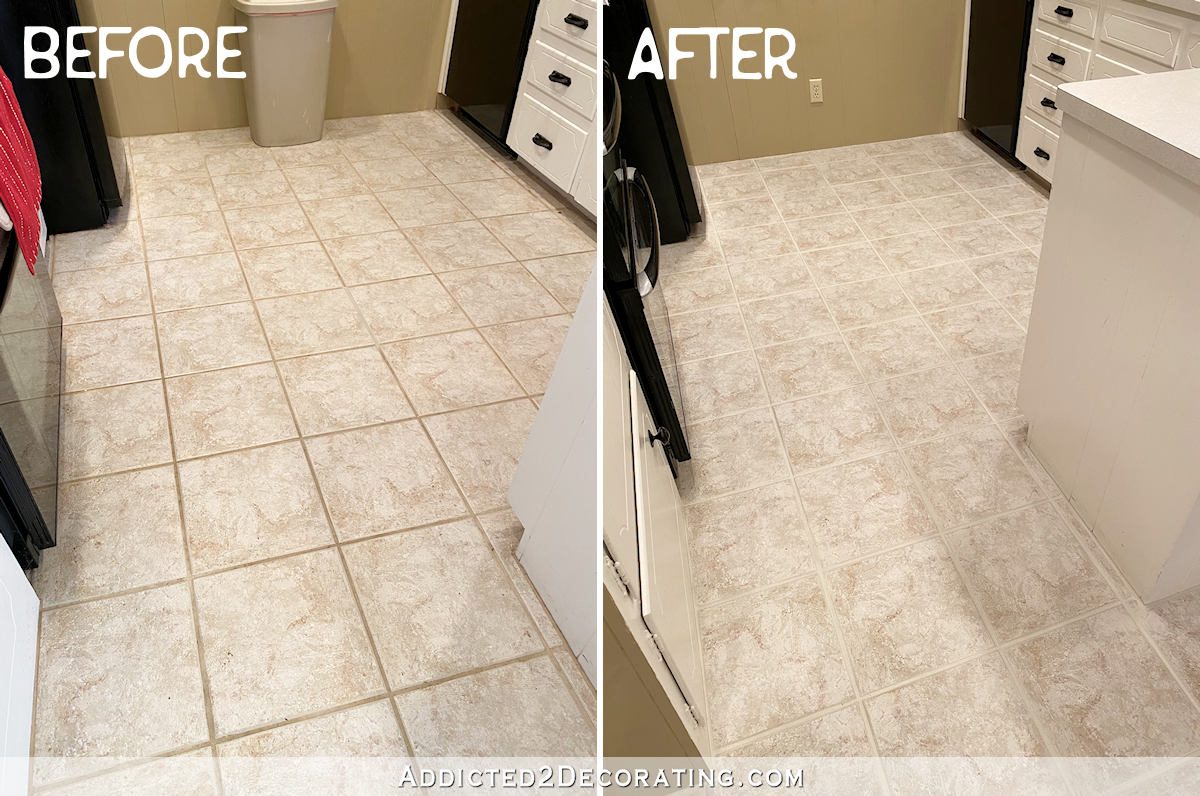
It’s amazing to me the huge difference that grout color can make! The dark grout color really brings out the dark colors in the tile, but the light grout color brings out the light colors in the tile and makes the entire floor look lighter and brighter.
Here’s a progress picture showing the part that has been lightened with the original grout color.
I just can’t stop staring at that. I’m so amazed by the difference! It’s like she got a whole new tile floor, and all we did is lighten the grout color.
We didn’t get anywhere near finished on this. She has this same tile on the floors in the kitchen, breakfast room, hallway bathroom, hallway, and entryway. There’s also a coordinating tile on the kitchen backsplash and tile surround in the hallway bathroom. And naturally, she wants the grout on all of those areas to match. That’s going to be quite the project, especially since it’s taking two coats to get the bright, even color in the “after” grout above. It’s a very easy project (just apply with a toothbrush, and wipe off excess with a wet rag) except that it requires you being on your hands and knees on a hard floor, so it’s something that my mom can work on while I’m working on making the new kitchen cabinet doors and drawers.
By the way, I’ve been painting grout, either with regular latex paint or with Grout Renew, since the condo days, and I’ve never had any trouble with it at all. When I installed the backsplash in our condo kitchen, I used grout that was labeled “bright white”, but it dried a dull off-white color. So I painted it with regular latex paint in a satin finish. Because it was going onto sanded grout, the painted grout didn’t have a sheen to it, but it made the grout look so bright and white and clean, with the added bonus that it was perfectly sealed and easy to clean.
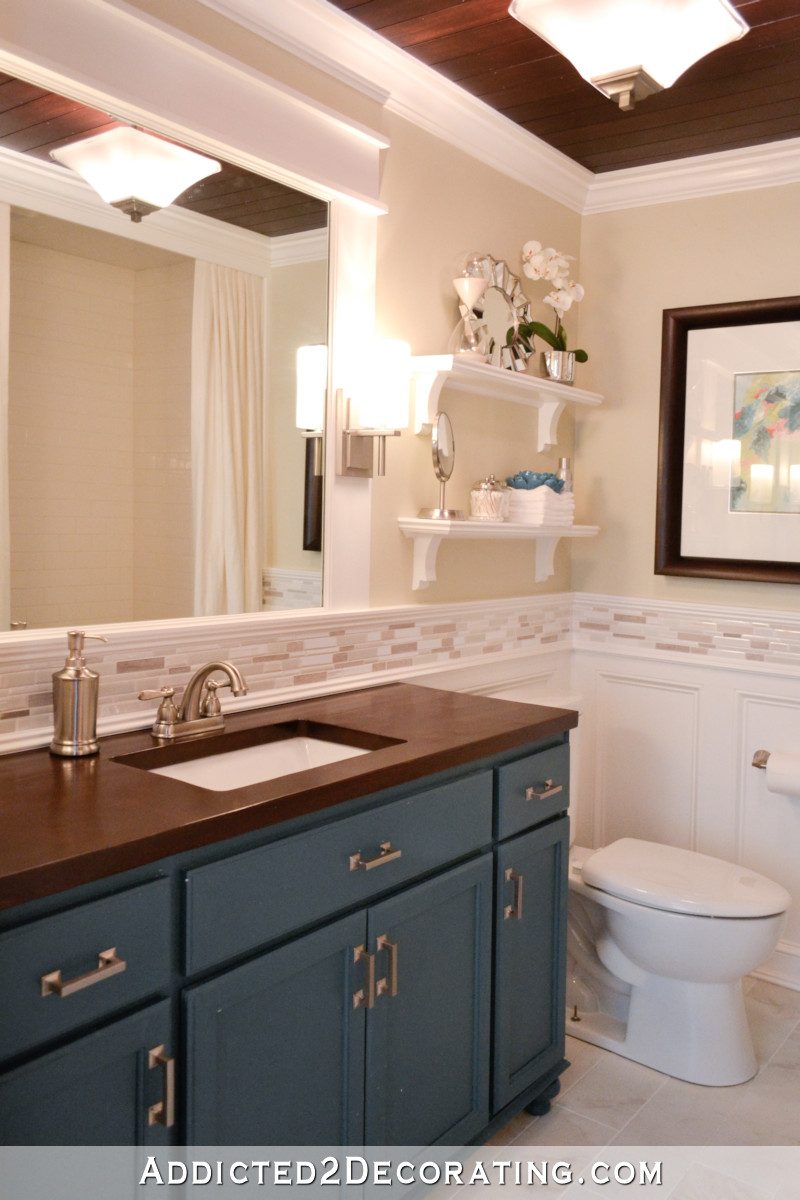
In our current house, I don’t have any grout that hasn’t been painted either with latex paint or Grout Renew. The accent tile in the hallway bathroom has painted grout (along with some strategically painted tiles). Here’s what it looked like right after the remodel…
And here’s what it looks like now…
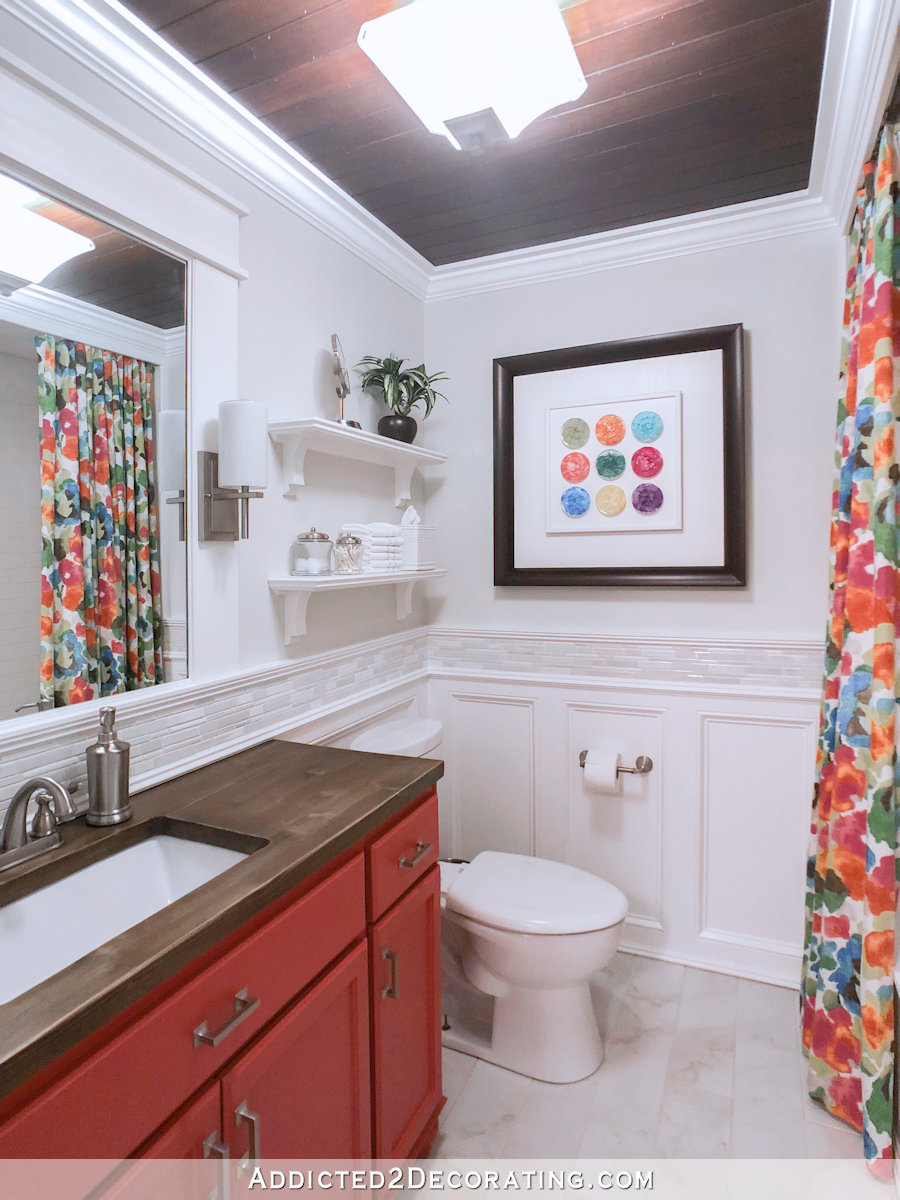
It’s probably harder to tell the difference in the painted grout in that bathroom because I did use white grout originally, so the difference isn’t as dramatic as the difference in my mom’s grout. But the original grout in this bathroom dried to a dull off-white color. So paint to the rescue!
The tile on the bathroom floor, bathtub surround, and my kitchen walls have all been brightened and sealed with Grout Renew. The grout on the tile accent border in the studio bathroom has been painted with latex paint.
Painting grout either with latex paint or Grout Renew has just been my M.O. for pretty much every tile project I’ve done for over a decade now, and I’ve never had any problems with it. I will emphasize that I’ve never used latex paint on grout on a floor, bathtub surround, or shower. For those areas, I’d always recommend using Grout Renew.
Anyway, enough about grout. Let’s talk cabinets! We finally decided on a cabinet and wall color! At least for now, this is the direction we’re going…
We needed to find something that coordinates with her draperies, because changing draperies would set off a cascade of other changes that would result in her whole downstairs needing to be redecorated. That’s not an option. 🙂 So after picking up a whole stack of green paint samples from Home Depot, we discovered that the stripe in her draperies is really not that green at all. I mean, it has a hint of green, but none of the Behr greens even came close to it, and I tried every single one that was even remotely close.
But I happened to find one color at Lowe’s that will work. It’s called Sweet Carolina, and I think it’ll be perfect, especially after we lighten up the wall color quite a bit. The wall color we’re leaning towards right now is Behr Aged Beige. You can see above how much lighter it is than her current wall color. It think it’s going to be beautiful with the green cabinets!
So the fun is just beginning. Hopefully today, we can actually make some progress on the cabinet doors and drawer fronts. We’re going with a very simple design (no fancy cabinet-making tricks or tools needed), so I hope to have some progress to share with you tomorrow.

Addicted 2 Decorating is where I share my DIY and decorating journey as I remodel and decorate the 1948 fixer upper that my husband, Matt, and I bought in 2013. Matt has M.S. and is unable to do physical work, so I do the majority of the work on the house by myself. You can learn more about me here.


Thanks for the tip! I’ve been struggling with the grout on my tiled bathroom floor. I think this is exactly what it needs!
I could kiss you! This is the best info ever. I have worked on cleaning the grout on our tiled bathroom floors for years! And now this. Ordering Grout Renew now…….happy dance!
Amazing! I wanted to ask how is cooper with his pain? I hope he’s better!😊
Ohhhh! I just saw the design routed into the doors and drawers! That was exactly the same one featured on Today’s Homeowner with Danny Lipford this past Sunday. They turned them into Shaker style with thin strips of wood similar to what you used as drawer dividers. They removed the little rounded edge, added the boards to the face and used automotive body filler to finish the edges. Painted & looked great. Much easier than making new doors.
So, I love my local Lowe’s and avoided commenting on your previous post about HD vs. Lowe’s. I will say, however, that while I love my local Lowe’s, I had a HORRIBLE paint experience with Lowe’s paints about 15 years ago. Maybe they’ve changed their paint since then, but I wanted to share so you can plan ahead. Basically, we were paintings few rooms and decided to go with Lowe’s paint. We selected colors based on sample cards, bought the paint we needed, but realized that once we got the paint on the wall the color WAS NOTHING LIKE THE SAMPLE CARD!!! Same thing happened a second time. So, on the third try we went to HD to buy Behr paints and got the perfect colors that we wanted. So, like I said, maybe the Lowe’s paints are a better match to the sample cards now, but I would strongly recommend getting an actual paint sample now and testing it out before assuming that the color you see on the card is the color you’re going to get. You’re good about making colors, so I’m sure you would be able to work around any such hiccup like I experienced. But, I just wanted to give you a heads up.
That’s awful!
Behr is my go-to brand. 🙂 Even if I find a color somewhere else, I just have Home Depot mix it in Behr paint.
Paint always looks different on the wall and from the chip.
Yeah. We expected it to look different in the light, but unfortunately, it was just off a little. Full on pink undertones, no matter what color we selected. It was very weird.
*wasn’t just off a little
I have grout in my bathroom that needs to be cleaned and brightened and will definately try this stuff. Thank you. Your Mom’s kitchen floor looks amazing.
I love the pom poms on the curtains 🙂 I’ve never heard of grout renew but I may give it a try. I have a white tile floor with white grout that is no longer white. I rented a grout cleaner before Thanksgiving and went through three of the wire brushes and it still doesn’t look clean. Perhaps Grout Renew will work until I can replace the floor 🙂
I used the renew on all our tile floors about four years ago and it has held up perfectly. When we bought our house in Florida the grout was probably off white but very discolored. I used a grey renew color and it really brought out the grey in the tile and made an amazing difference. Your moms floors look so good, it really brightens up the whole room. I found sitting on a folded bath towel and using a small craft type paint brush to work the best, it only took one coat.
Thanks so much for the grout tips! The floor at your mother’s house looks amazing. Good luck, can’t wait to see what you do!
Kristie
Did you use white for the tile. Mine are so discolored that I am not sure whether white or a light grey. I can’t find a hidden place that is tiled, so I can find the original color. Your Mom’s look great, don’t know if I can do the hands and knees.
We used Antique White for my mom’s grout.
Thank you Kristi
The grout above my cooktop are so discolored, due to CNN ooking with oil…same with my floor in that area, do you still recommend painting it in those areas? Would it need to be sealed to protect it from future staining? Discontinuing cooking is not an option, LOL..😝
Obviously CNN is not cooking in my kitchen, …should read
“cooking with oil”
I thought, “Wow! She’s got someone from CNN cooking her meals for her?!” 😀 Just kidding. Autocorrect is so funny sometimes.
I think the Grout Renew would work just fine BUT you’ll want to clean the grout really well first and let it dry completely before using it. I’m sure the Grout Renew bottle or website will have directions, but if I had to guess, I’d say you probably have to clean it first with some sort of TSP-type product. And the Grout Renew is a sealer, so it does make cleaning the grout easier after application.
Thanks…I appreciate your input and info…
I’ll have CNN get on it!😉
What’s a TSP-type product?
TSP is trisodium phosphate. It’s a cleaner that you can find at places like Home Depot.
My friend used “Grout Deep Clean” by Aquamix, it worked really well on hers. @ Home Depot.
I have used Grout Renew on two bathrooms to change the color. Did this 5 years ago. Still looks brand spanking new. I need to re-do my kitchen, the grout is now gray, White would be perfect, however I wonder if white will last. I know that Mapei has a sealant in Grout renew. Oh you can also purchase this at Floor and Decor for half the price at Amazon. And it comes in 30+ colors.
I used a grout “paint” in a rental home I had once-and I would put that stuff in a cake decorating sleeve with a small, plain tip so I could get it just where I wanted-no toothbrush needed. That said, you mom’s floor looks great-and how LUCKY are you to still have your g-ma!
Ohhhh! I just saw the design routed into the doors and drawers! That was exactly the same one featured on Today’s Homeowner with Danny Lipford this past Sunday. They turned them into Shaker style with thin strips of wood similar to what you used as drawer dividers. They removed the little rounded edge, added the boards to the face to cover the old design and used automotive body filler to finish the edges. Painted & looked great. Much easier than making new doors.
Boat cushions!!! Yep, the ones rated as life preservers are the handiest things when working on your knees. Lightweight and waterproof. They are also wonderful when having to work on plumbing in a sink cavity, providing some degree of comfort when you have to lay on your back half-way inside a cabinet.
Wow Kristi, the difference in the before/after of the tile and grout is almost like an optical illusion! It’s crazy how the darker grout makes the entire floor look darker because it really seems to match the darker color swirls in the tile, and then does the exact opposite with the new, lighter grout! The after looks like an entirely brand new floor, not just a grout color difference! This project is going to be so fun to watch. I’m really eyeballing those “I called dibs on ’em” scallops LOL!
I am so excited to see what you do to your Moms kitchen!!!! It will be nothing less than perfect!!! Thanks for the grout information!
WOW that is freaking AMAZING…!! At first I thought maybe it was supposed to be that color.
As for the color chip you have on the cabinets, to me it looks like grey. Not green at all. I must be color blind.
What is the name of that..?
That came out amazing! Great job and thank you so much for the info!