Black And White Painted Chevron Floor Design
Y’all know that for months now, I’ve been dreaming of having a black and white design on the floor in the back entry of my studio. Whether I used tile or hardwood flooring, I was determined to have a black and white design in place of a rug. (Rugs and floor cloths just aren’t wheelchair friendly, and this area needs to be easily accessible to Matt.) Well, I finally got my design painted, and just in time because my polyurethane for the floor should be arriving today! I went with a black and white painted chevron floor design, and here’s how it turned out…
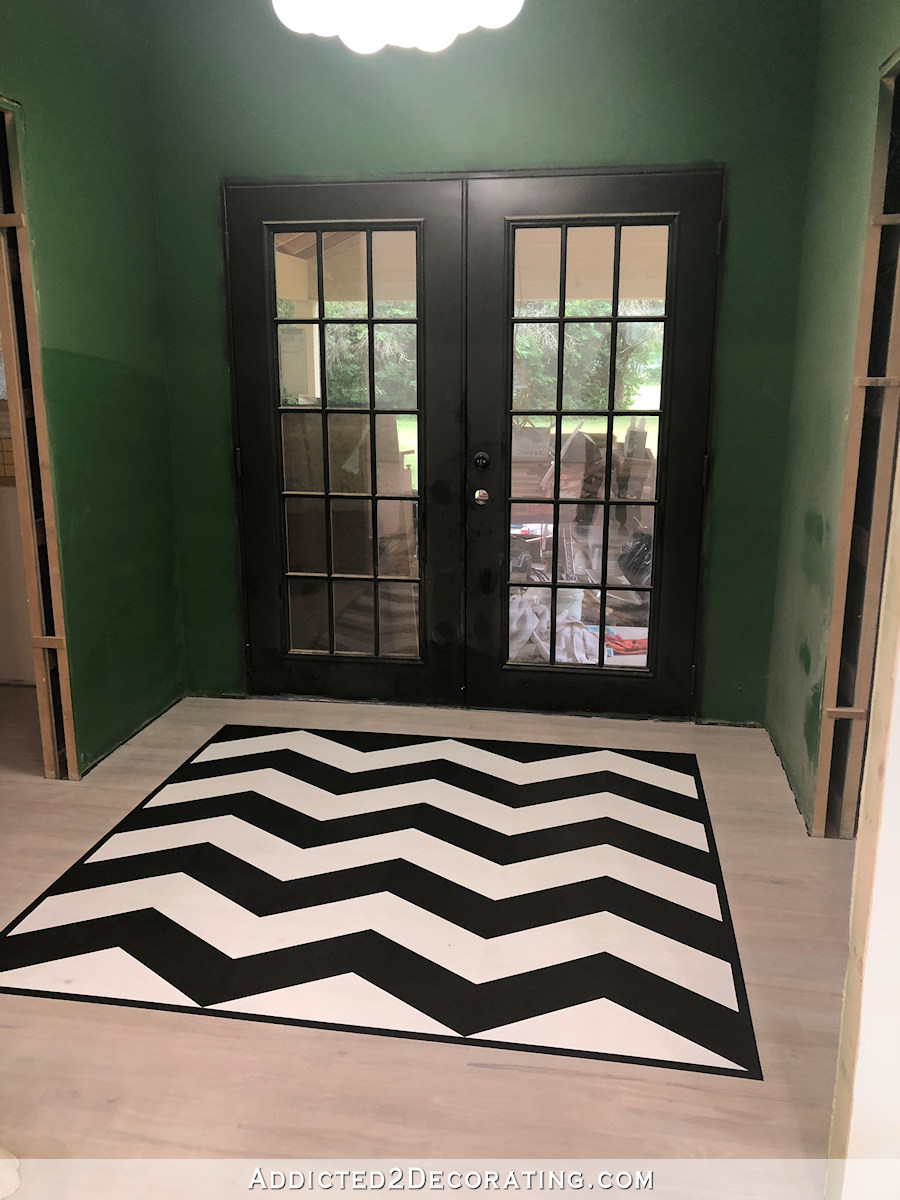
Please excuse my dusty walls and doors. 🙂 Those of you who are able to rent truly dust-free drum sanders for hardwood flooring where you live are very fortunate. I’ve only found one place in the Waco area that rents drum floor sanders, and let’s just say that they’re FAR from dust-free. I got the walls in the studio cleaned off, but clearly I overlooked this back entry. 😀 Now it’ll have to wait until the floors are polyurethaned, because I don’t want to stir up dust right before I polyurethane the floors.
Anyway, back to the painted black and white chevron floor. Here’s how I painted the design…
I used ScotchBlue painters tape for walls, wood floors, and freshly painted surfaces. It worked perfectly, and I didn’t have one single bleed through (bleed under?) on the whole design. I painted the entire design in one day, and got perfectly crisp lines. Just be sure to burnish the tape down really well with your finger right before painting.
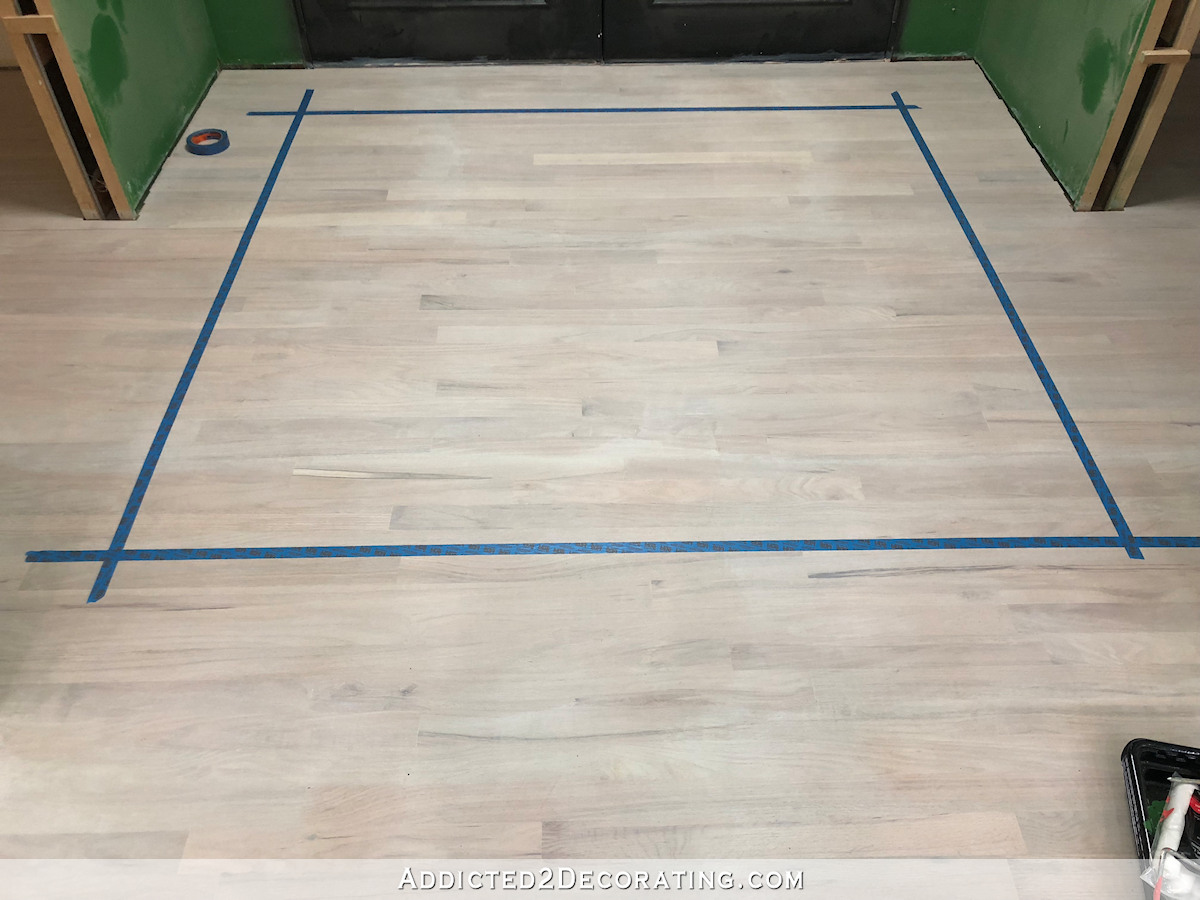
I started by taping off the area where I wanted to create the design by measuring 12 inches from each wall.
Using a 6-inch roller for smooth surfaces, I gave the whole area two coats of paint, sanding lightly by hand with 220-grit sandpaper between coats.
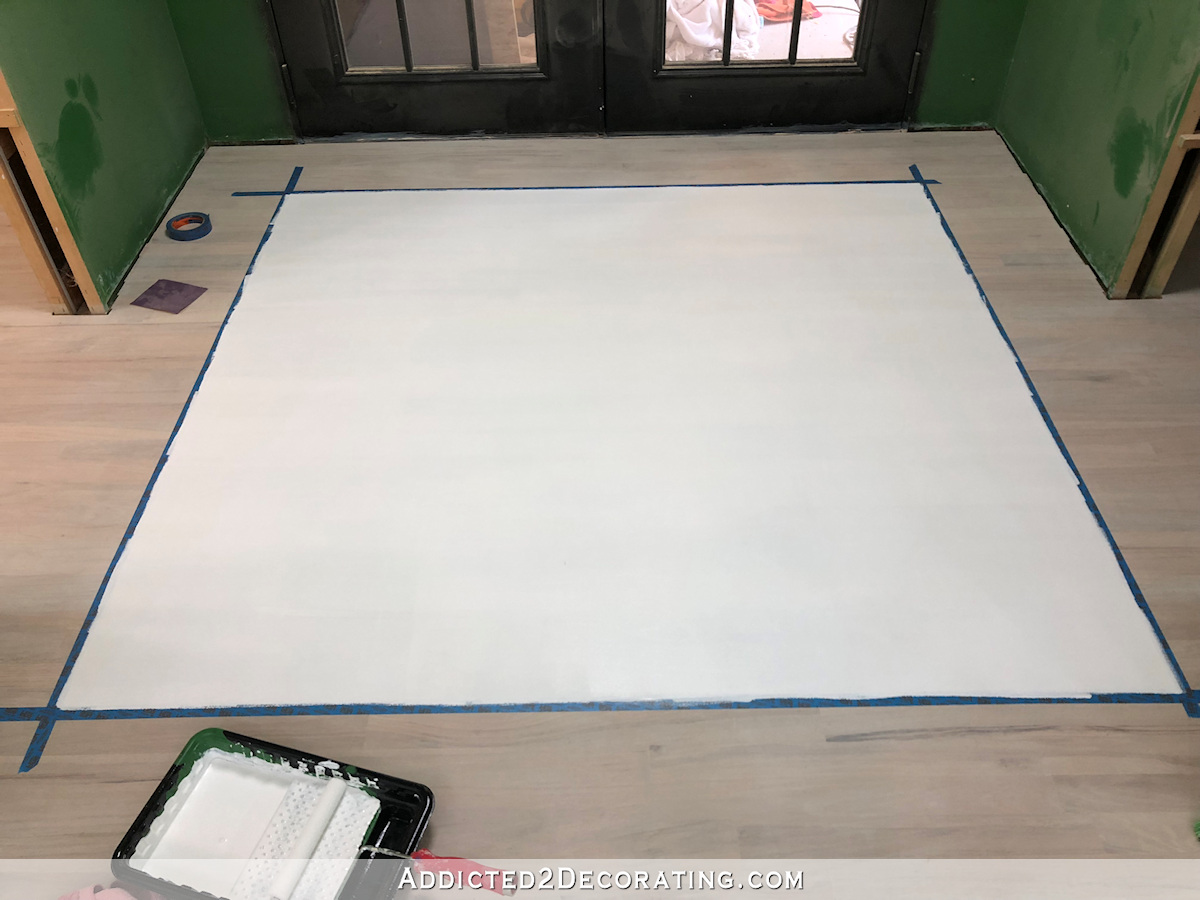
I used Behr ceiling white paint right out of the can (i.e., no tint added to it), but I did mix in about 4 ounces of water to the quart of paint in hopes that the more watery consistency would allow the paint to soak into the wood better rather than building up on the surface. It seemed to work really well.
Now I’m sure you’re wondering, “Why ceiling paint?” I chose to use that because it’s a very flat paint, and for some reason, it just makes sense in my mind to use flat paint if I’m going to polyurethane over the top. Flat paint has a slightly rougher feel to it than the shinier sheens, so it’s almost like it has “tooth” built into it, and in my mind, that creates better adhesion for the polyurethane topcoat. Perhaps I’m just making that up in my mind 😀 but I never put polyurethane over semi-gloss or glossy paints. If I’m going to polyurethane over paint, the highest sheen I would use is an eggshell, but I almost always opt for flat. And it doesn’t get much flatter than ceiling paint.
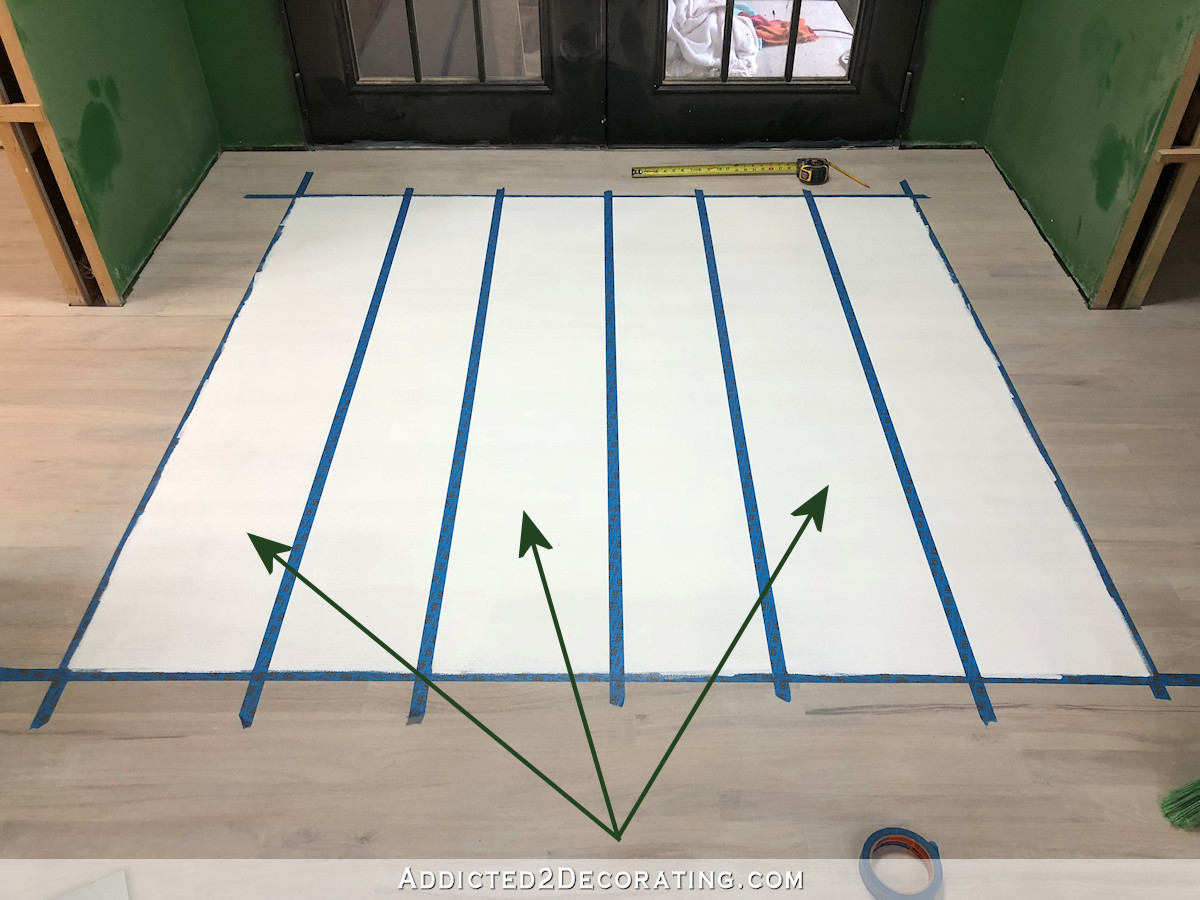
Next, I measured and marked the vertical lines. I wanted an even number of sections, and I wanted the sections as close to 12 inches wide as possible. My taped off area for the whole design was about 67 inches wide, so I divided that into six sections that were just over 11 inches wide. Then I taped off those vertical sections so that I could work on the first, third, and fifth sections at the same time. In other words, I placed the painters tape on the outside edges of the lines for those sections.
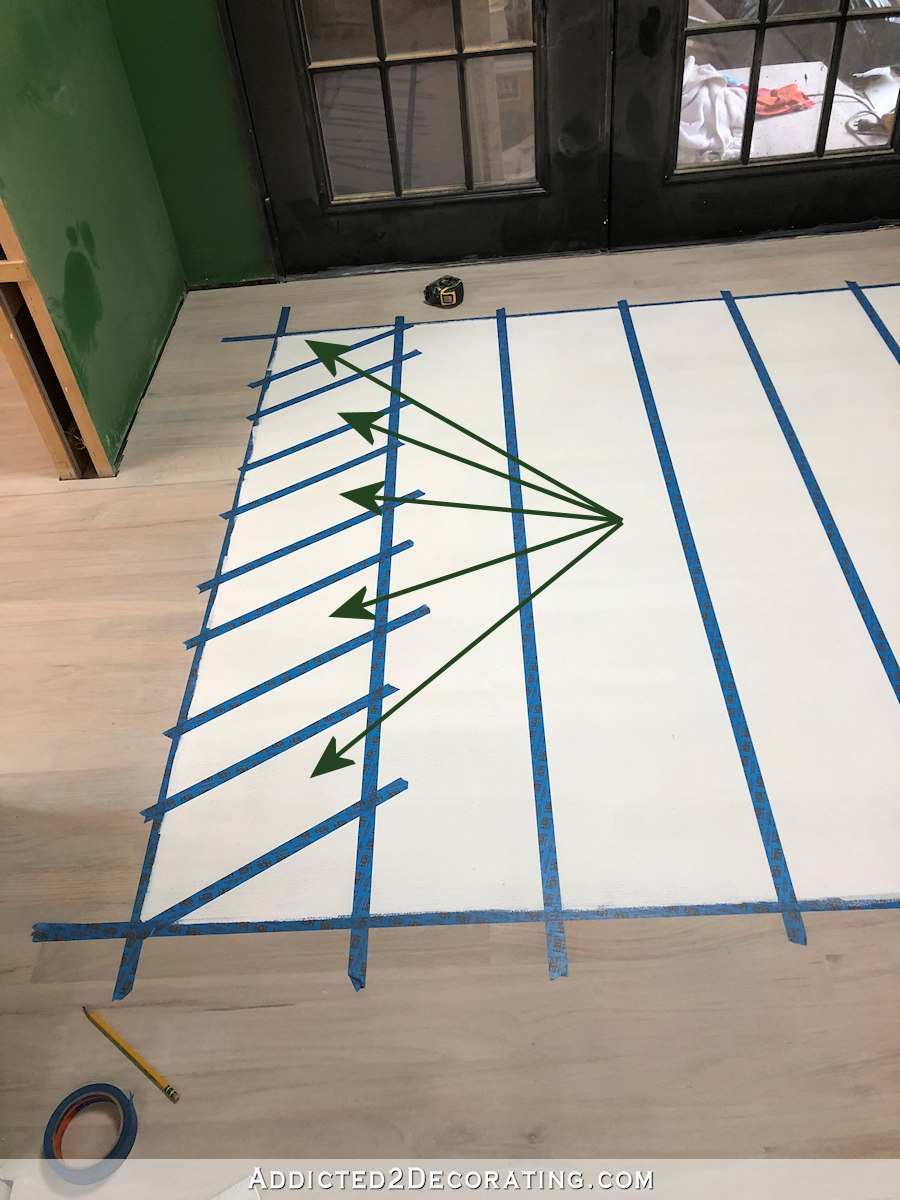
Next, I marked and measured for the diagonal design. I wanted each diagonal stripe to be between 7 and 10 inches high, and the vertical section just happened to be 63 inches high. That made it pretty easy! I just marked and measured every 7 inches on both pieces of tape on either side of each vertical section, and then used my painters tape to tape off the diagonal design.
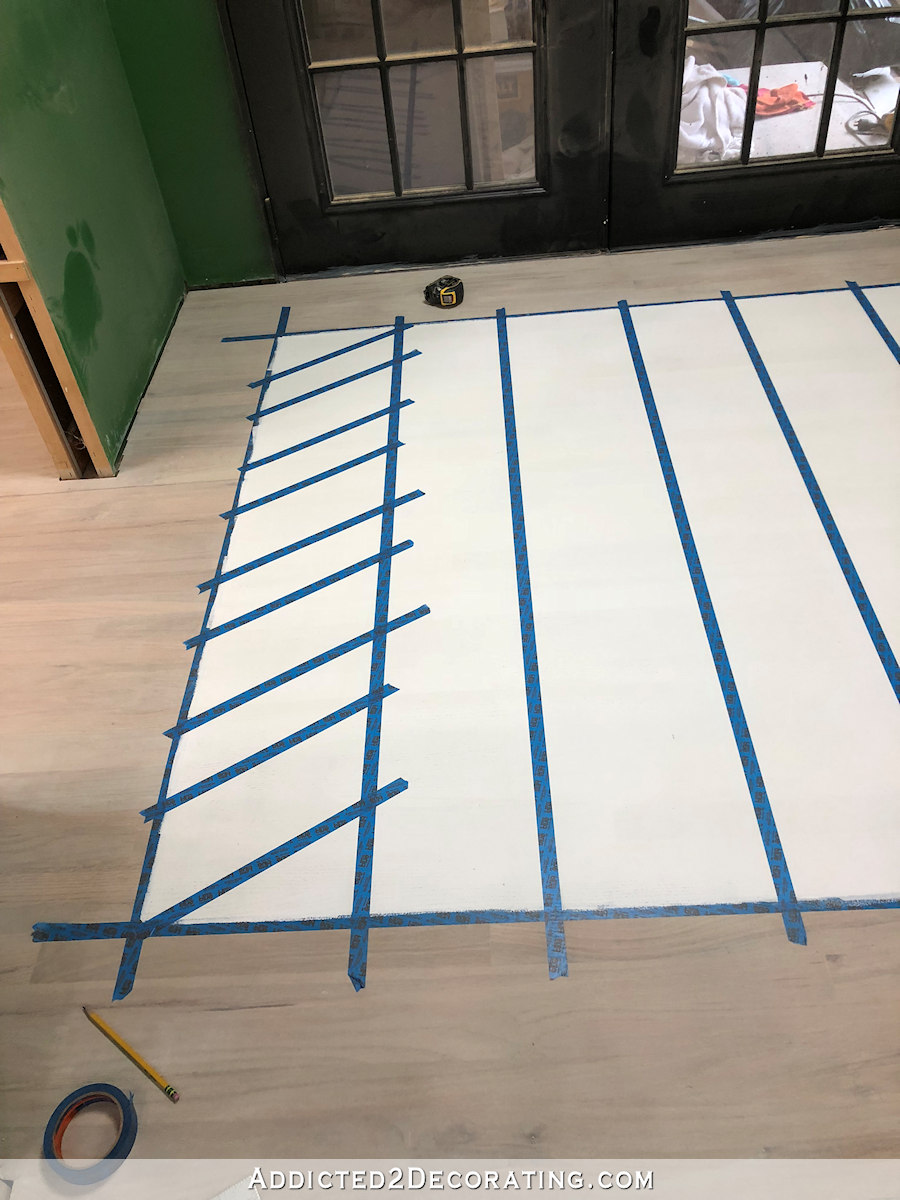
And again, I placed my tape on the outside edges of every other section. This makes it look like some sections are larger than the alternating sections, but once the tape is removed, they’re the same size.
I used black Behr paint in a flat finish. (There’s no color name or number. I just went to the desk and asked for solid black paint.) I painted two coats of black on each alternating section, sanding by hand with 220-grit sandpaper between coats.
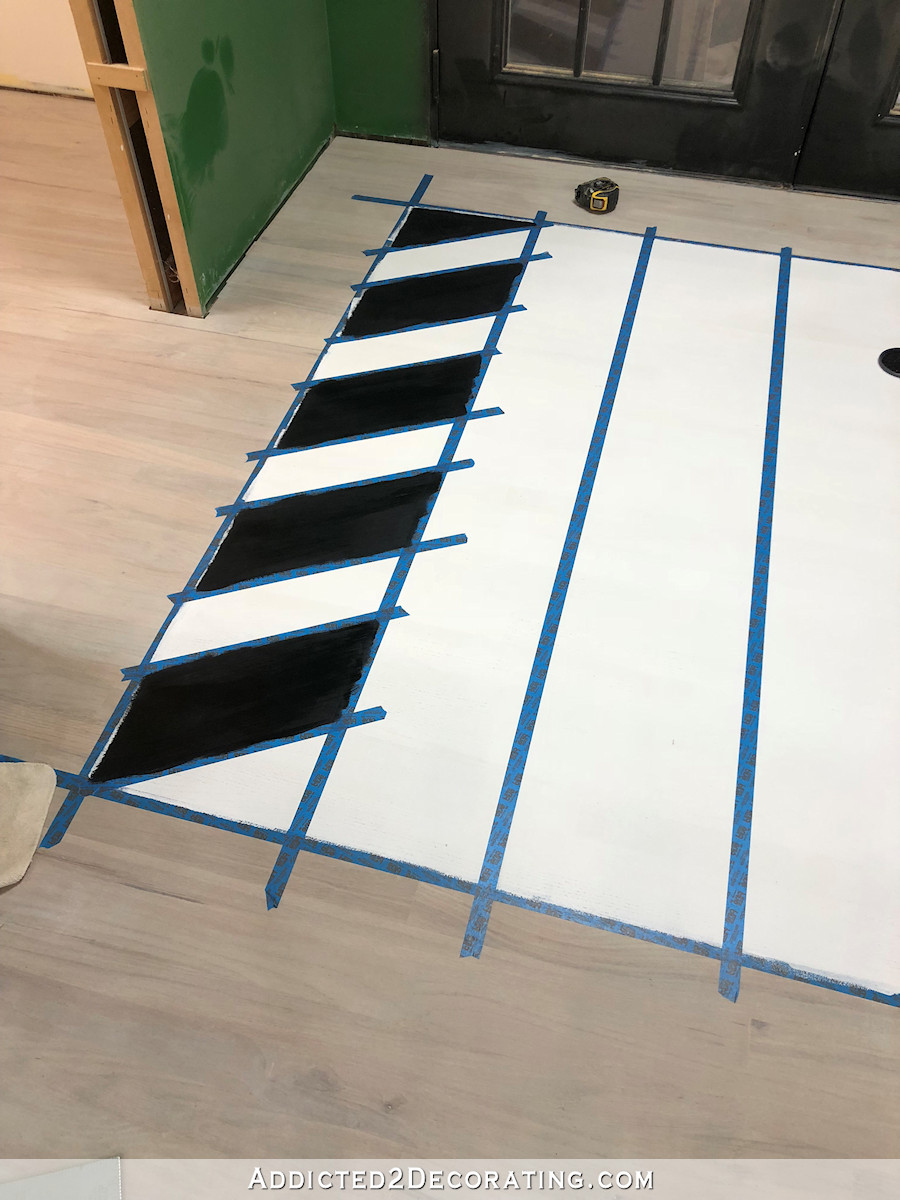
Another reason I love using flat paint when I know I’ll be polyurethaning over the top is because flat paint dries very fast. So by the time I got the third vertical section painted with the first coat, the first section was already dry and ready for sanding and recoating. As soon as the second coat was on, and while it was still wet, I removed the painters tape.
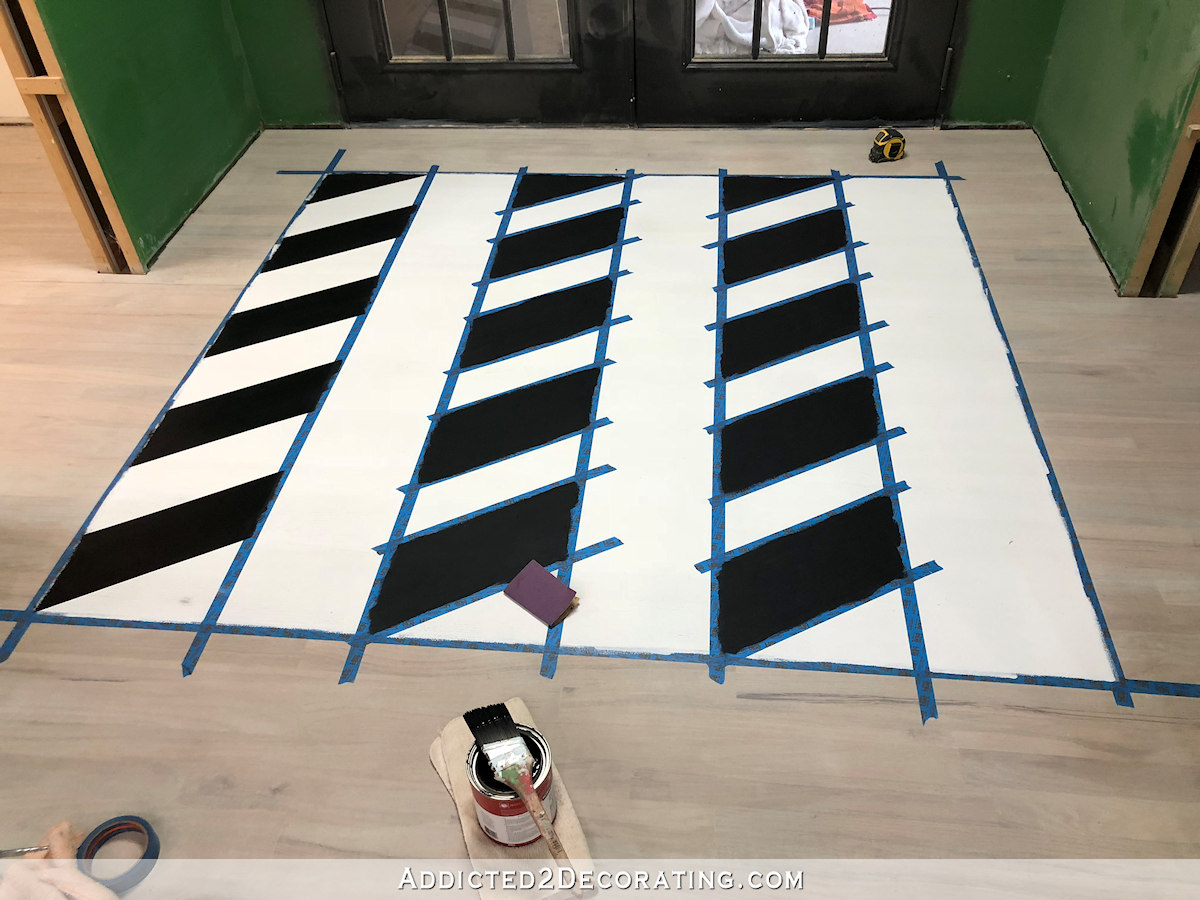
And here’s how it looked with all three vertical sections painted and the tape removed.
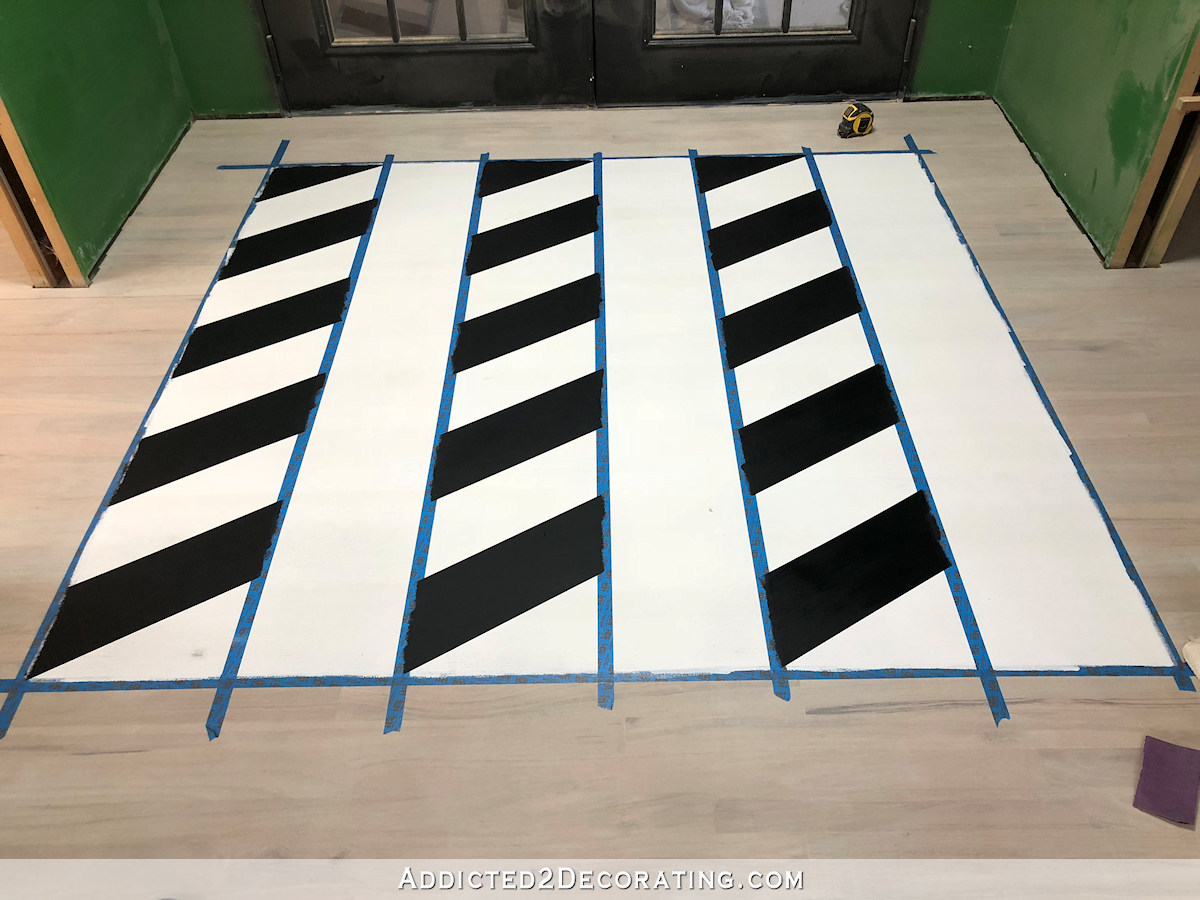
With those sections done, I could go ahead and remove the tape separating the vertical sections.
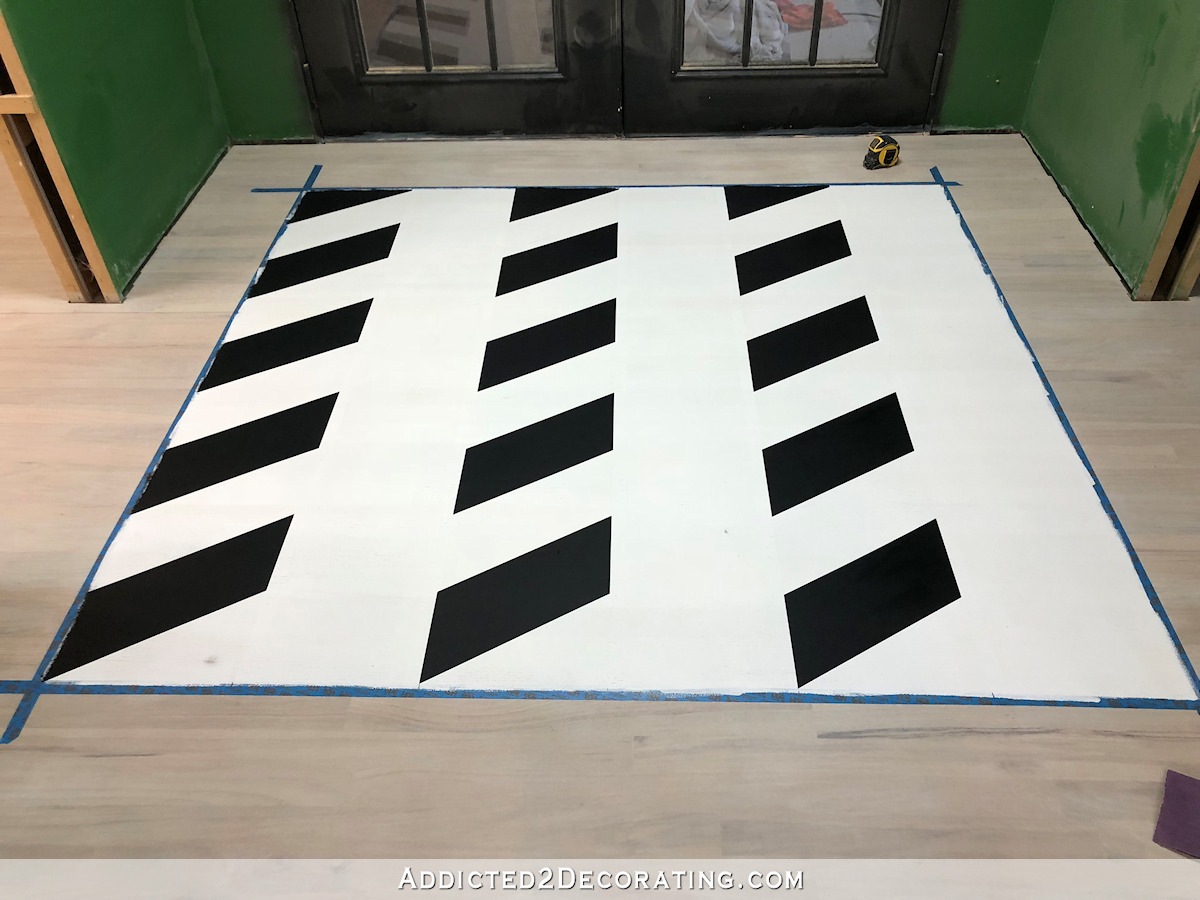
At this point, you can either create a regular chevron pattern, or you can create an offset chevron pattern. It just depends on where you put the tape when connecting the sections. You can see the difference between the two in this post.
I had planned on doing an offset chevron pattern, but in the end (because of my intense need for symmetry), I decided to go with a standard chevron design. So using painters tape, I connected the first sections of the black pattern. I painted this in the same way — two coats of paint, sanding by hand with 220-grit sandpaper between coats.
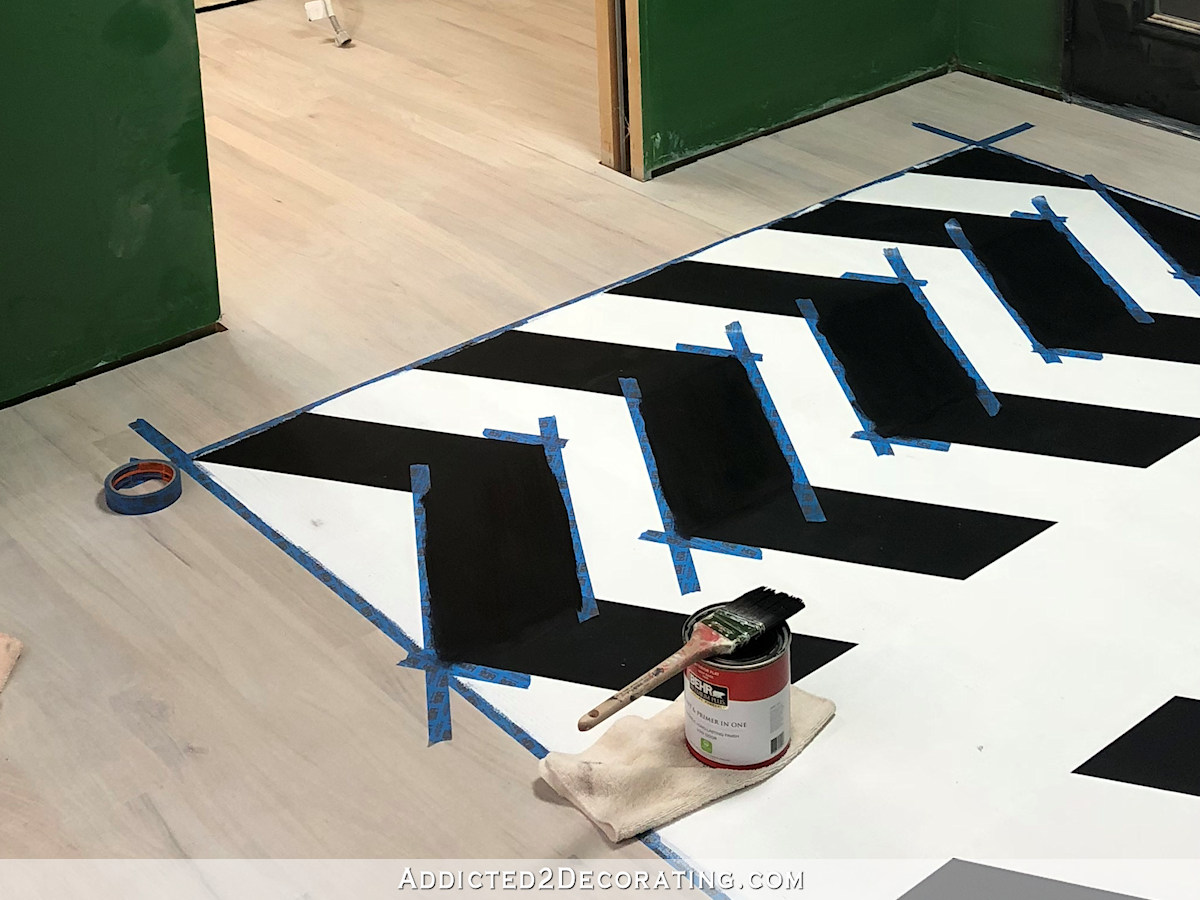
And here’s how it looked with all of the sections connected, painted with two coats, and the painters tape removed…
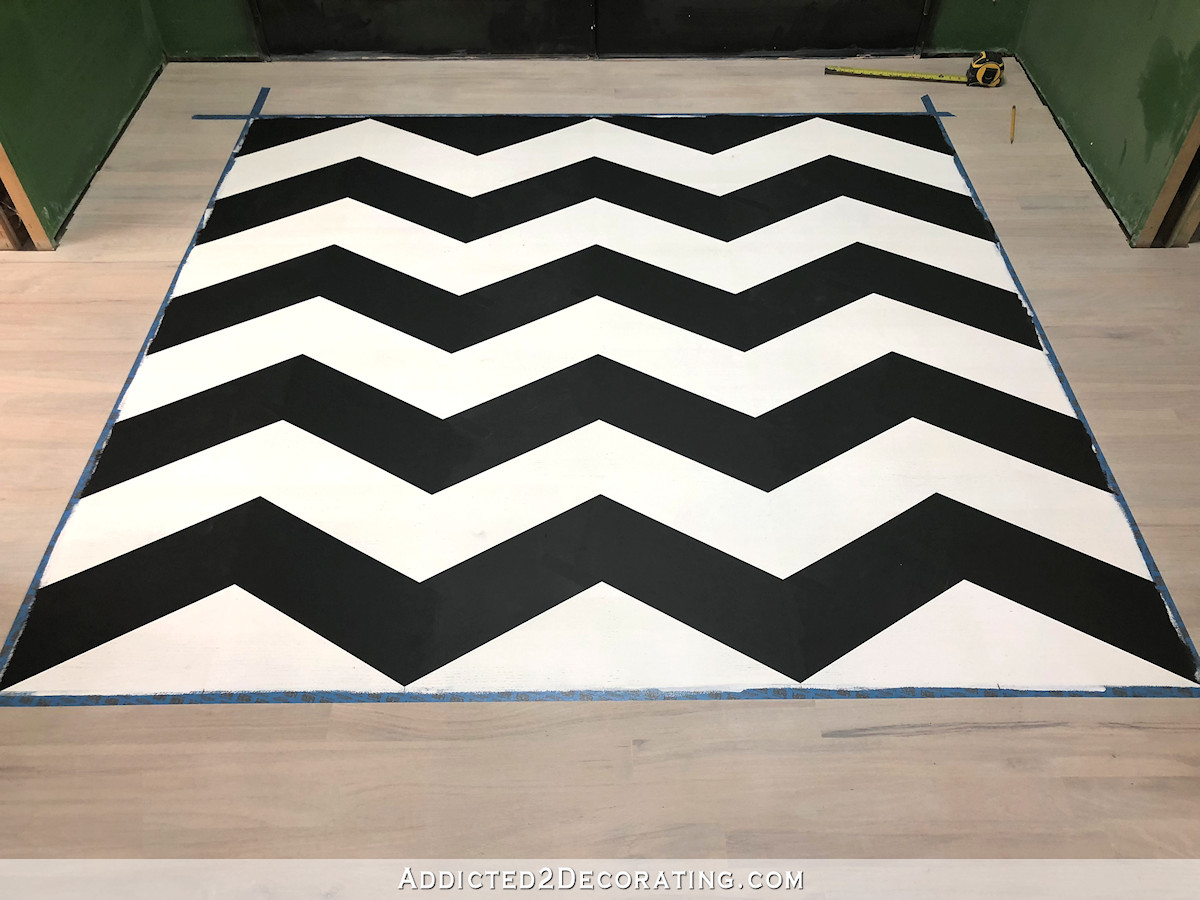
And finally, I wanted to paint a thin border around the whole thing. I did this by adding another strip of painters tape right along the outside edge of the tape that was bordering the design…
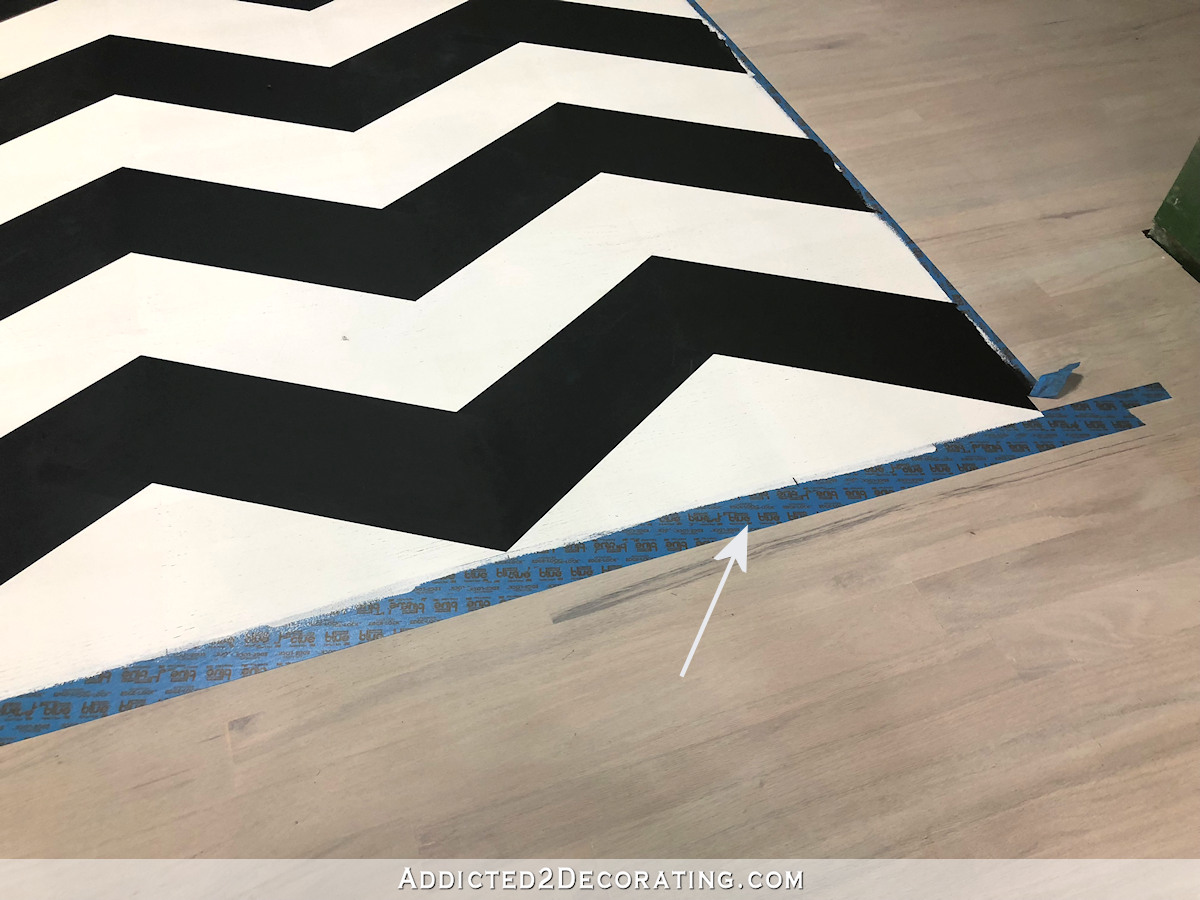
And then I removed the original tape bordering the design, leaving this border.

And after taping off that border on the other side (i.e., placing tape right on top of the actual design all around the edges), I painted the border with two coats of paint, sanding by hand with 220-grit sandpaper between coats.

With the second coat still wet, I removed the tape, and my design was finished.
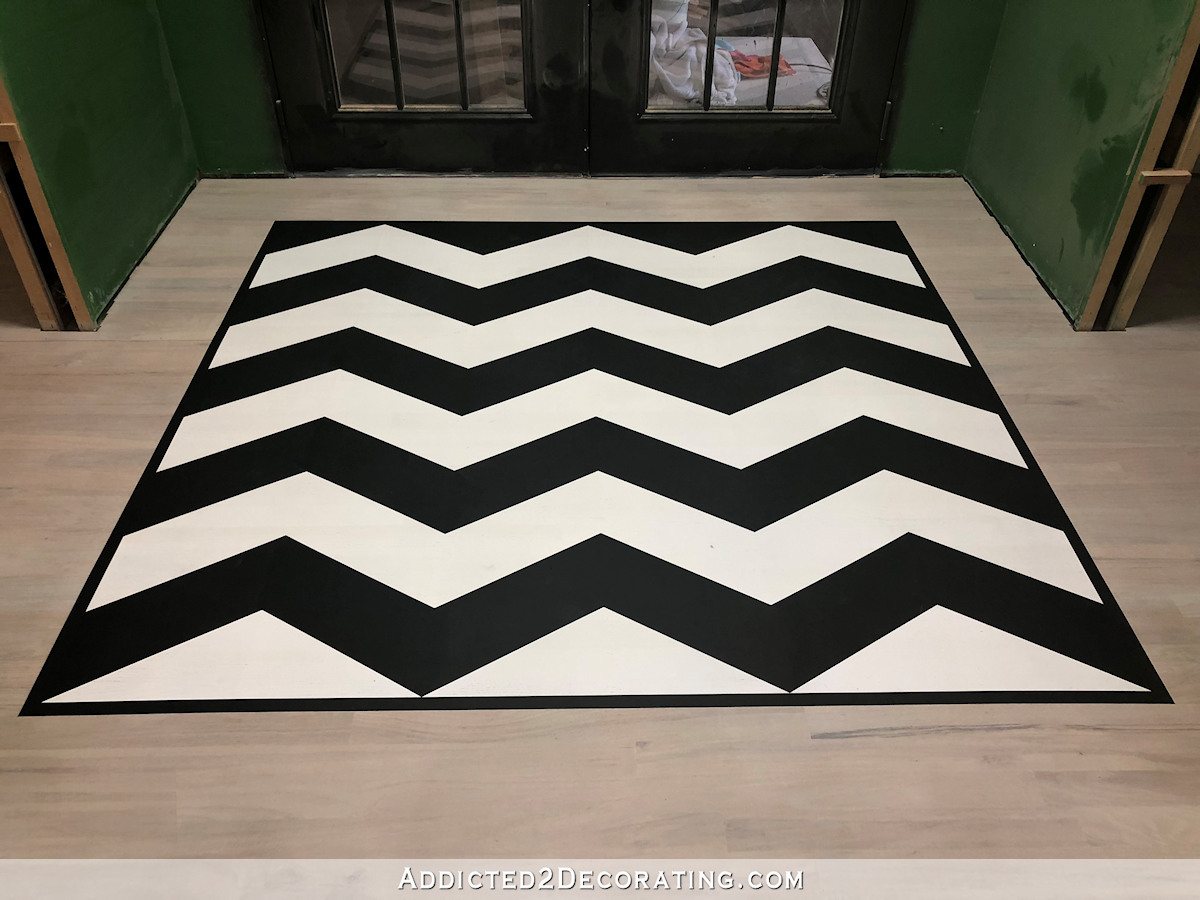
Now if someone can just tell me how to get dust off of dark walls without leaving them streaky, I’ll be forever grateful to you. 😀

And of course, at this point, you’ll just have to imagine what the area will look like with actual door casings, which will be painted white, and will go a long way towards adding some brightness to the area and giving it that beautiful, finished look. Right now, it’s still got that whole construction zone vibe to it.
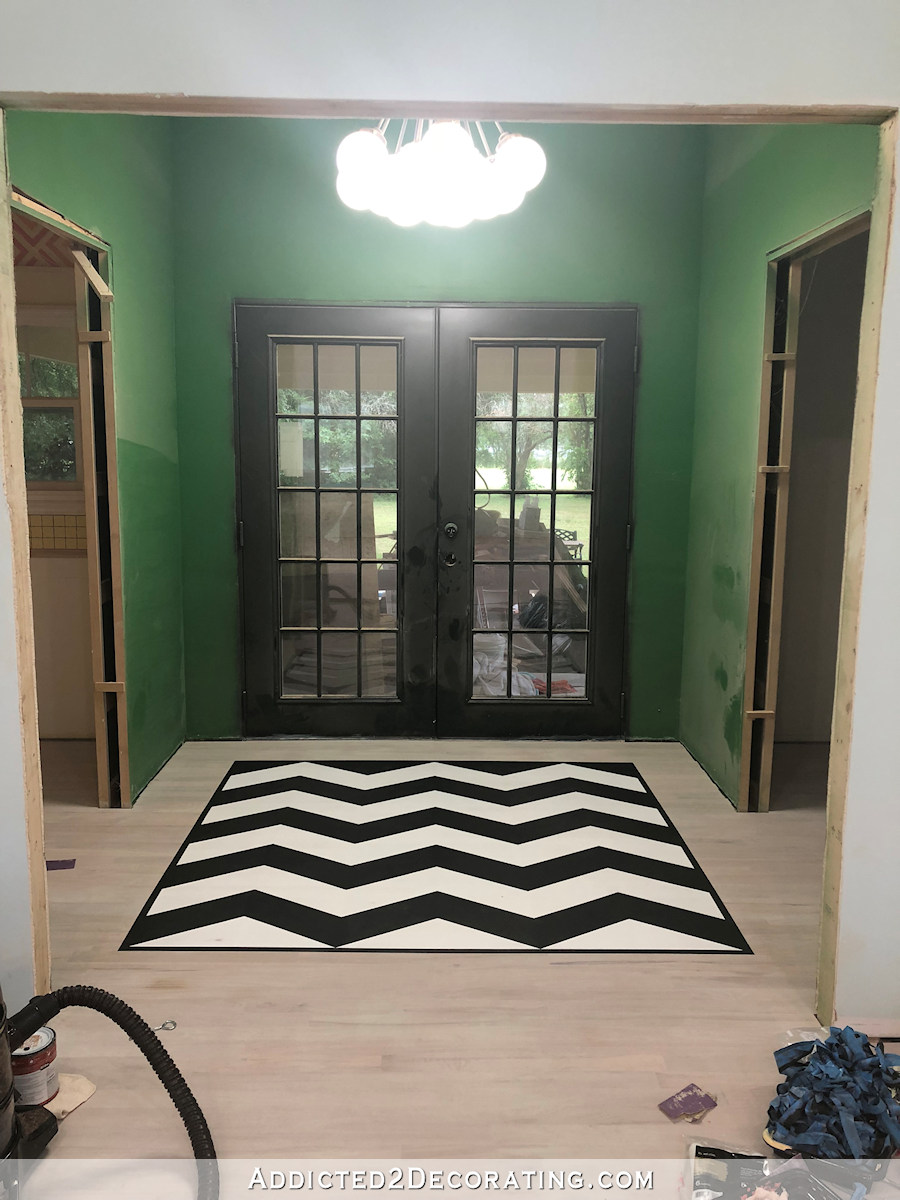
And here’s the view from the studio towards the back doors. Sorry for the mess. I removed that last bit of painters tape at 11:00pm last night, and headed straight to bed. So for now, you’ll have to look around it. 🙂

Fingers crossed that my polyurethane comes in today as scheduled! I’m so ready to get these floors completely finished so that I can move on to door casings and finishing up the bathroom. I’ll pretty much be at a standstill on everything else until I get the floors finished.
Update:
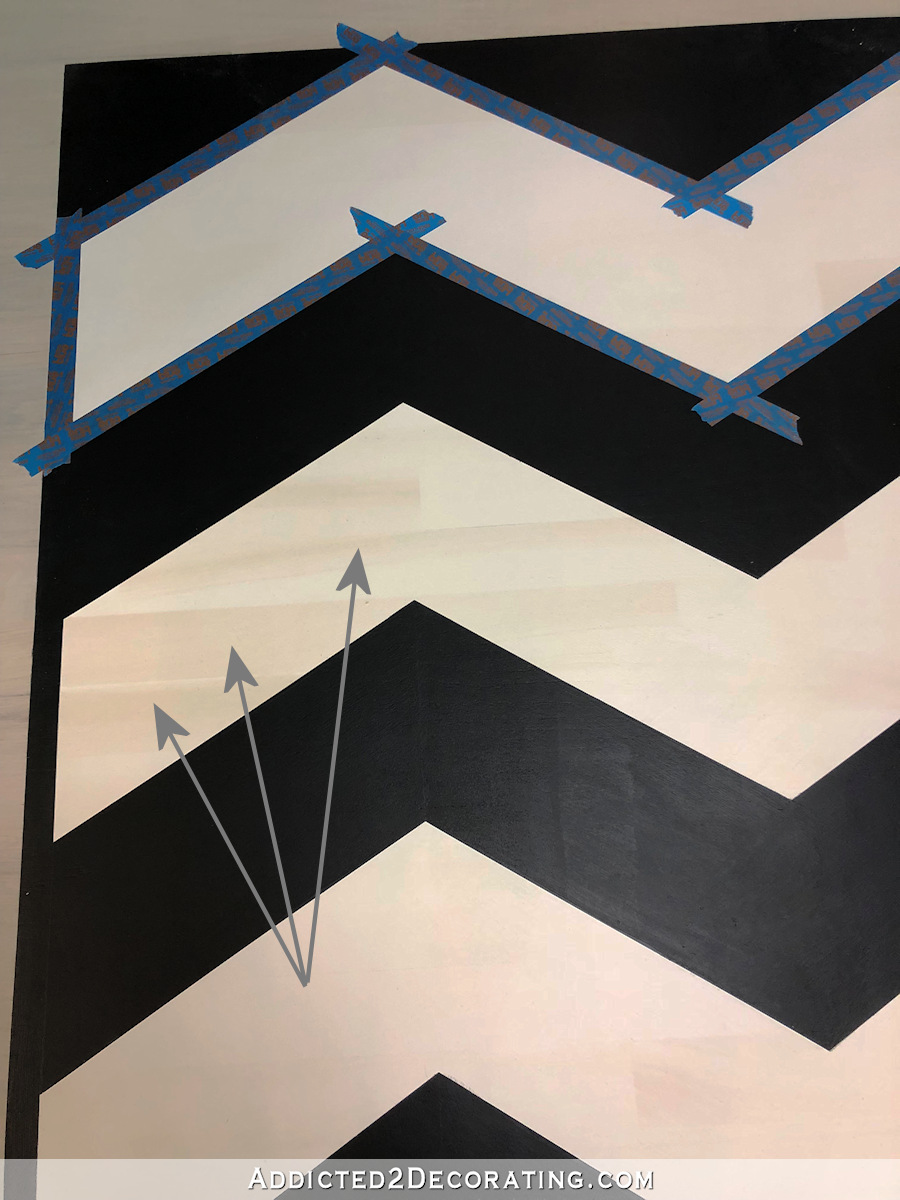
I had a problem with the wood tannins bleeding through the white paint. You can see what that looked like, as well as my fix for it, in this post…
Addicted 2 Decorating is where I share my DIY and decorating journey as I remodel and decorate the 1948 fixer upper that my husband, Matt, and I bought in 2013. Matt has M.S. and is unable to do physical work, so I do the majority of the work on the house by myself. You can learn more about me here.


Wonderful! It looks just perfect!
Looking good!!!! Love the black and white chevron design. You’re amazing!
That is just amazing, so pretty, wow, what an inspiring studio this is going to be. I would probably use a dust mop to knock down the worst of the wall dust and use the vacuum cleaner attachments every so often to clean off the dust mop. Just an idea.
I was going to say the same thing – microfiber dust mop or maybe even just a vacuum attachment with the brush end. My Miele canister vac is great for sucking up a lot of dust and my microfiber dust mop gets the last clingy bits. Just don’t use any water- I think that would just make mud and you’d be chasing streaks forever after it dried.
Yes that is what I would suggest
Your chevron painted rug is simply stunning! What a statement for your back entry way. You’ve again impressed us with your creativity and design Kristi. Well done.
Fantastic!!!!! Seriously–amazing! Can’t wait to see the final pics!
Love it!!! Even the center point of the chevron matches up with the center seam of the doors! You are good!!!
For getting fine dust off walls… I use a soft brush on end of a vacuum..
Beautiful work! I use a clean swiffer floor mop to wipe down walls during constructions. Works great at picking up all the dust and it’s quick.
The Swiffer is a good idea, or you could wrap a large piece of microfiber cloth around a broom. This chevron floor “rug” is very cool and lends a real designer look, especially with that awesome chandelier! You really work wonders with paint—Behr should have a photo of this area on their website once you have the space complete!
Very impressive! Wish I had a spot for it in my house
Looks great! How are you going to get all the dust off all those globes on your light fixture? 😬
You are so talented and creative it’s almost scary. Your “rug” is striking and will look fantastic in your finished room. I agree with not doing anything to disturb the construction dust. Once started, it would take days of vacuuming, wet wiping and still more days to be sure its settled. So much quicker and easier to polyurethane, let cure and then tackle the messy job without worrying that you’ve compromised the finish of your beautiful floor.
Omg! I love that you are so willing to just do what your mind thinks of. My mind always goes to… what about when I’m tired of it, what would happen to the floor if I don’t want it? All the things that would hold me back from the awesomeness that you are creating. I’m re-doing some rooms now, I’m trying to go with my gut. But I’m very visual, so it’s hard to choose things. Come decorate my home for me!
WOW! That is so cool. I love it. Thanks for all the instructions, I have always wanted to do something like that but it perplexed me.
I had envisioned your black and white floor going to the entry walls. Such a better treatment to make it bordered by the whitewashed wood. A genius choice.
Although you don’t usually do so, I think you should consider covering over your wood floor with that padded paper that is generally used. This will allow you to do all the rest of your fine carpentry and cabinet installation without damaging your hard-wrought newly finished wood floors.
SWOON!
LOVE LOVE LOVE!! I think this will create a good distinction between the back entry and the studio!
I love the rug effect, so good. It adds the right about of weight to the entry area.
so beautiful and inspiring! Is there anything you cannot do dear lady!
No help here on how to get the dust off, but for next time:
When I sand my hardwood floors, I hook up a shop vac with a dust cyclone attachment to the sander. The cyclone keeps 90% of the dust out of the shop vac to keep the bag and filter unclogged, and together they cut the dust coming out of the sander to almost nothing.
It’s a bit more of a hassle while you’re sanding, but so worth it. Keep it in mind for when you’re doing your additions.
My set up (though I have different brands): https://www.amazon.com/Oneida-Air-Systems-Cyclone-Separator/dp/B002GZLCHM/ref=sr_1_10?crid=4T730KWBF5O4&keywords=dust+cyclone&qid=1559151847&s=gateway&sprefix=dust+cycl%2Caps%2C167&sr=8-10
My favorite thing in your project!!!
Construction dust on dark walls is no joke: my usual soft-brush-vacuum-attachment method did not work and it’s still streaky. Interested to see what you figure out!
Beautiful floor, super cool!
Perfect! Beautiful! I was thinking (don’t know why) that the design was going to cover the whole area/space in the entry! This makes it look like a carpet or rug there! I love it!
Looks great! Microfiber cloth will get that first layer of dust off. I learned by accident that baby wipes clean up walls pretty nice. (2 kids & a slobbery dog. There seems to be a package of baby wipes at arms reach at all times and have definitely been my go to to clean everything!)
When I had my hardwoood floors sanded, we used a swiffer (for the floor) on the walls. Of course, that was after the floor guy cleaned up his sanding dust….But they do work well for walls.
To remove the dust from the walls, use a Swiffer floor cloth and remove the excess. Washing afterward would hopefully, not makes streaks.
Totally agree with Barb Leroux….. change out Pad OFTEN!😉
Wowza! That’s beautiful! I love the colors and design you did.
You obviously made A’s in Geometry . ;0) So pretty and you deserved a win after the epic bathroom caper !
You are amazingly talented! I bought the same 13 globe light fixture; I LOVE IT!
Thank you for the symmetry. I’m that kind of person too.
Lane
Just wash the walls until they’re completely clean !
Love that you did a faux rug – perfect!
As usual you knocked it out of the park! Beautiful! Can’t wait to see it all come together.
I love it! So precise and it will be welcoming as you come into your studio from the back.
Kristie the floors look amazing… I have a question that isn’t related to the floors. Recently I saw a wooden farmhouse sink, have you ever tried making one? They are beautiful.
I’ve seen wood sinks (and bathtubs). They look amazing, but I don’t know that I’d ever try making one, or have one in my house. The way most people make their sinks waterproof is by covering them in epoxy resin, which scratches so easily. I often put my really hot pots and pans directly into the sink, and you would want to avoid that with an epoxy-coated wood sink in the kitchen. Plus, silverware, plates, etc., I just image all of those would eventually scratch up the sink.
Dusty walls, ceiling, etc…Take a tack cloth and wrap around a swifter!!!
I very seldom post here…but that is absolutely too gorgeous not to say so…what an entrance…and so good for Matt to maneuver. He has to be so proud of you. You are making that old house looks so magazine worthy…not to mention fun living in worthy. You have inspired me! thanks!
I haven’t read the other posts. I am not a fan of this stark rendition of a floor rug.
OMG!!! The black and white floor revives! I love it!!!
For the walls, you can use a very soft broom to get the huge amount off (if necessary, depends on how bad the situation is, test the swiffer first), then use a dry swiffer (well, multiple lol). Repeatedly. When you no longer get much dust on them, then use water.
Hi Kristi. I LOVE the ‘rug’ you painted…gorgeous. It makes me smile because I see peaks and valleys…continuous peaks and valleys with no break in pattern. You did this so perfectly!! I love that it doesn’t look flat…at least to me…and yet it is. God bless.
Gahhhh! I love this!