Pantry Design Details
I spent all day yesterday in my pantry with my laptop, a roll of painters tape, and a tape measure. I tried so many cabinet configurations, thought through several corner designs, and then made some final decisions. At the end of the day, I had the basic footprint for my freezer and cabinets marked off.

So first, let’s talk about those lower corners. There were so many great idea shared on my last post! If you’re building or remodeling a kitchen or walk-in pantry, and wondering what to do with those lower corners, be sure to read all of the great suggestions on that post.
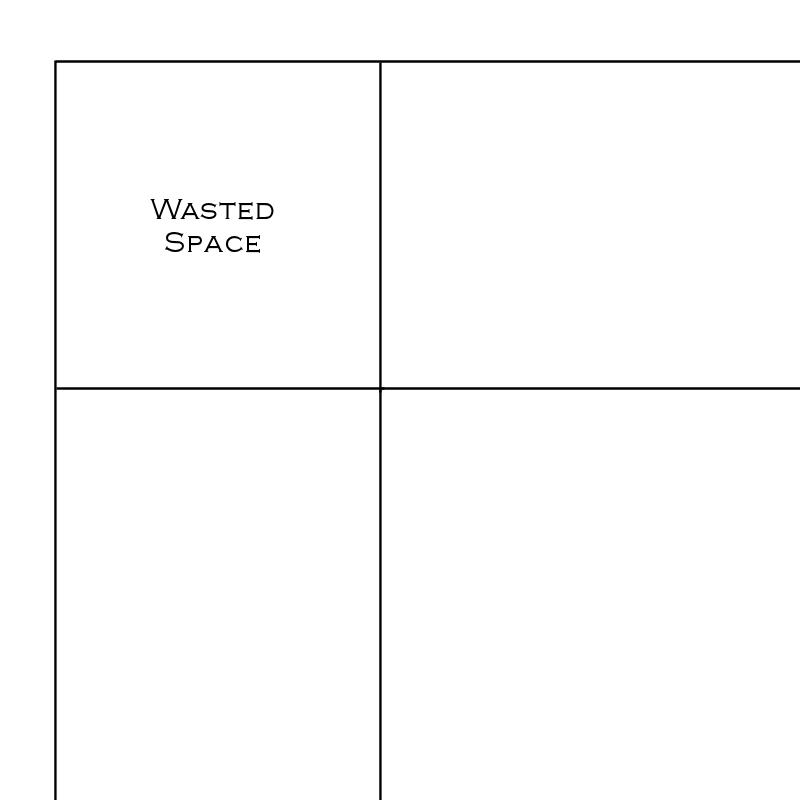
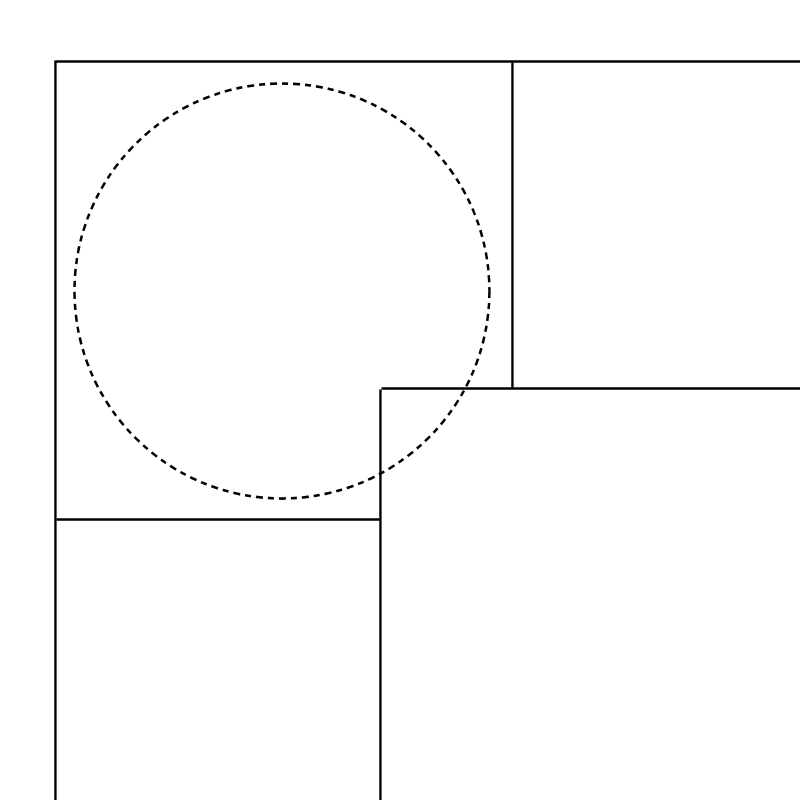
So here’s the deal with the corners. If you just build two regular cabinets and put them together at a 90-degree angle so that the front corners meet, you have an entire corner of wasted space, right?
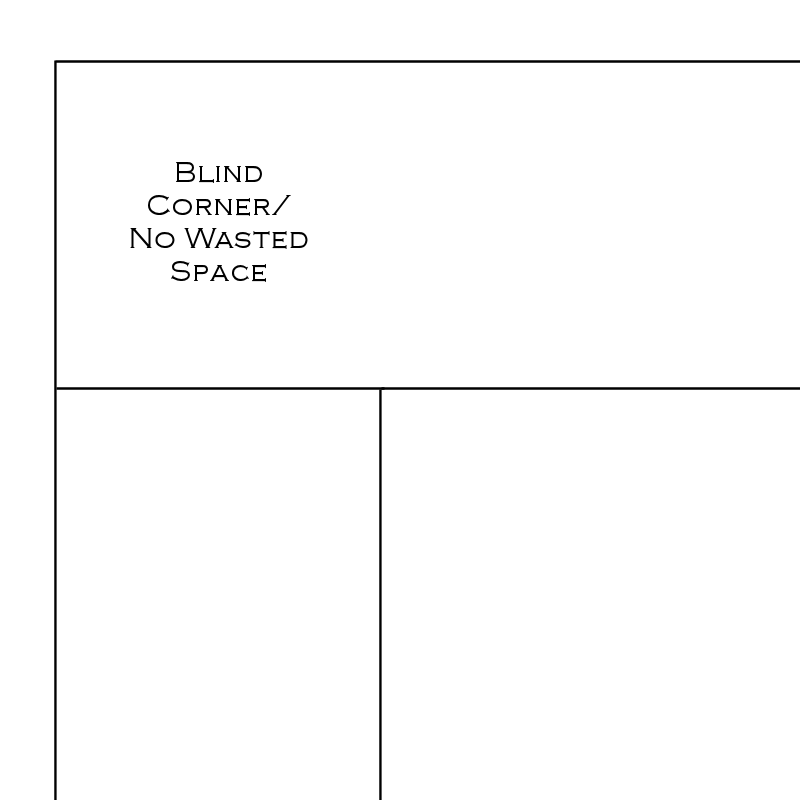
Another option is to build one cabinet all the way to the wall, and then build the other cabinet so that it covers 24 inches of the first cabinet. That creates a blind corner with no wasted space.
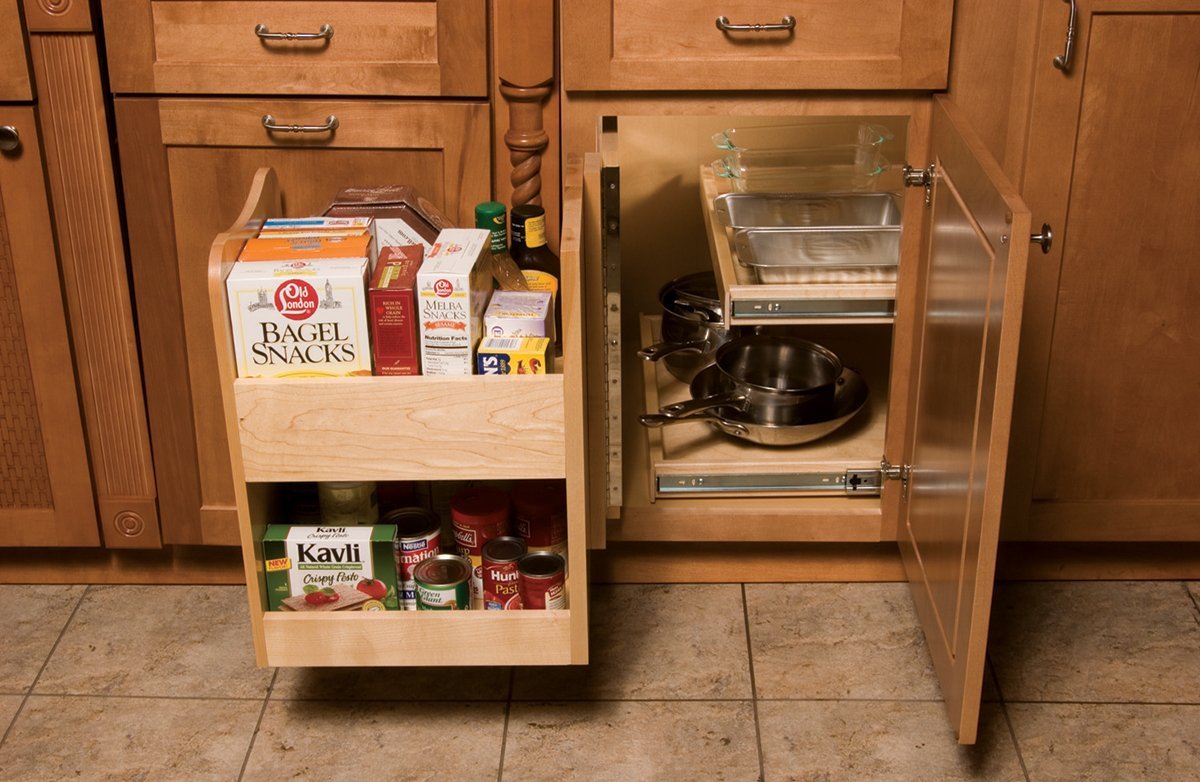
And of course, there are loads of products you can purchase to utilize that blind corner. But quite honestly, I don’t really like most of the options out there. My favorite is this Rev-a-Shelf blind corner storage unit*…
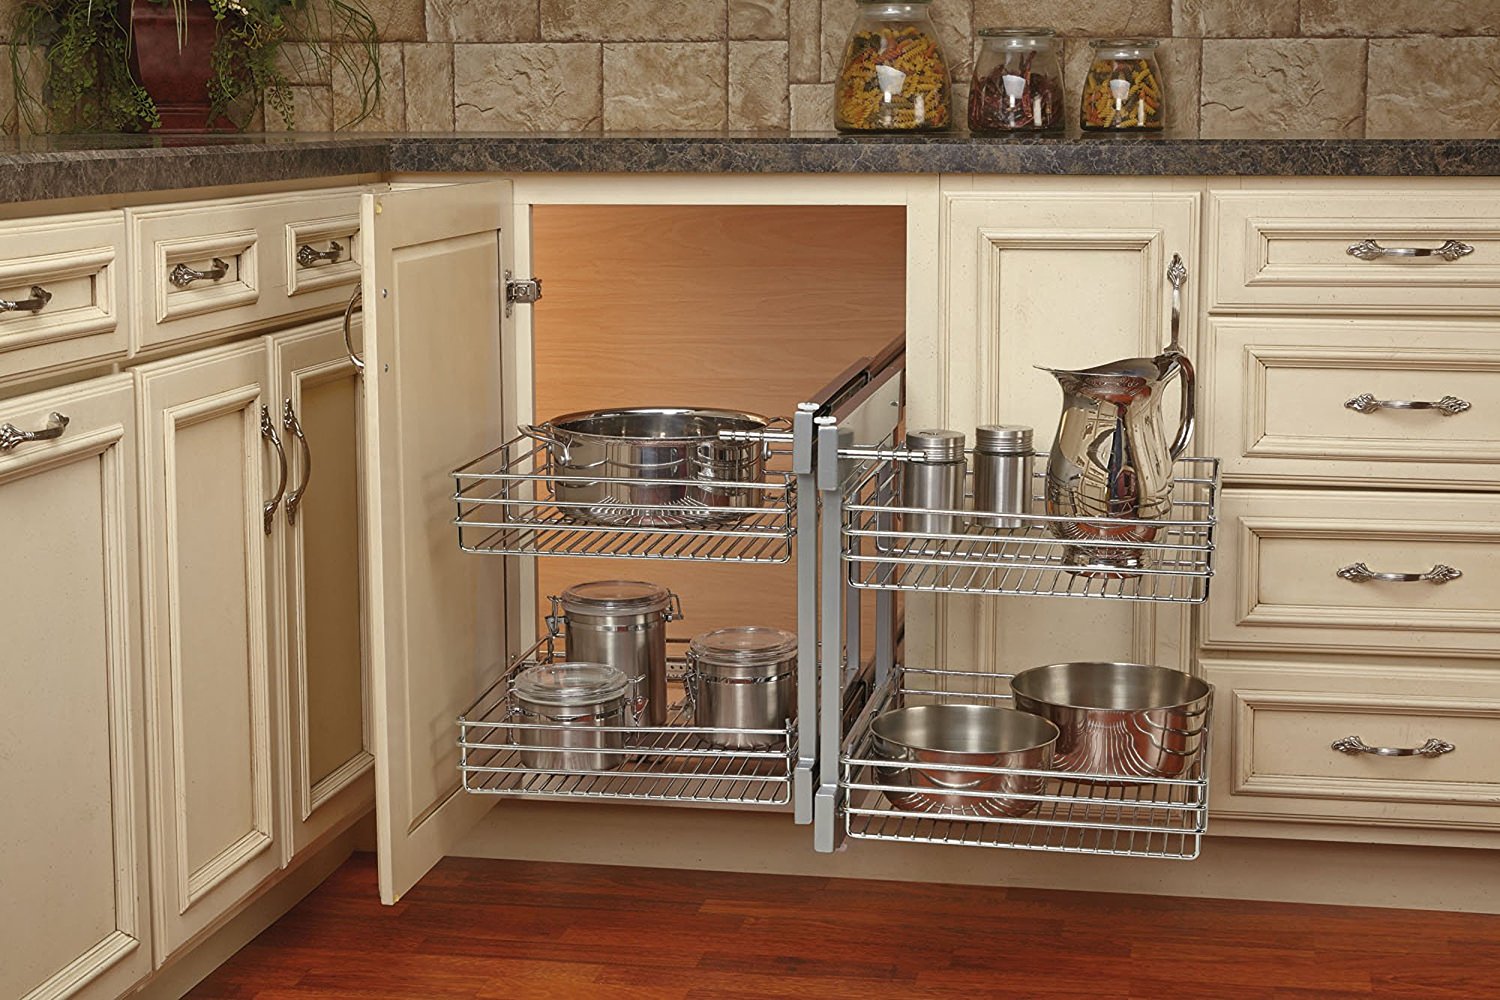
But that costs $366! That’s way more than what I want to spend on something like that. Plus, it still leaves space unused in the cabinets, and I DO NOT like wire storage shelves.
I also really liked this one*, which is a similar idea, and I like that it’s made of wood. But the corner shelves only pull over to the side. They don’t actually pull out. And this one is just under $275 with shipping.
Then I got to thinking that I could probably just make something like that for far less than $275. Many of you pointed me to Sawdust Girl’s DIY blind corner storage, and then others of you pointed me to her post where she scrapped that idea and just blocked off the corner because after days and days of trying different hardware options, she just couldn’t get it to function as smoothly as she wanted. If Sandra can’t get it to function smoothly, I have very little confidence that I could.
Another idea that some of you had was to build corner drawers.
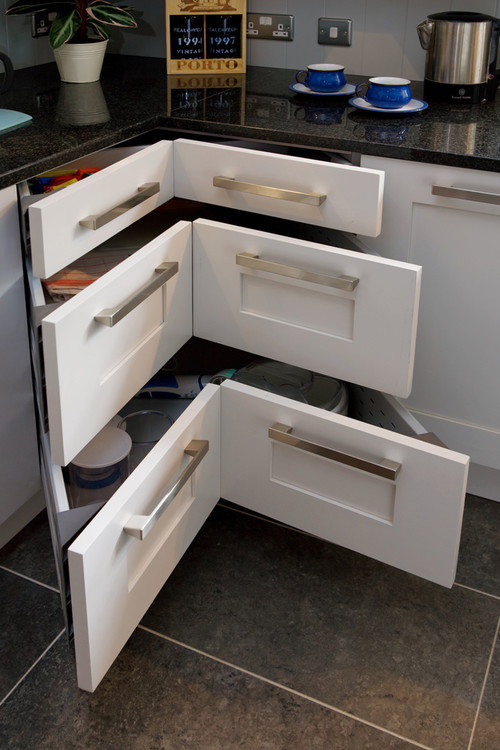
That was initially my very favorite option, but as I thought more about it, I couldn’t figure out how that actually solved the issue of wasted storage space. So I drew it out, and realized that corner drawers are more of a really cool looking novelty than a an actual dead-space-utilizing idea. In order to have room for corner drawers, you have to take your cabinets that meet in the corner…
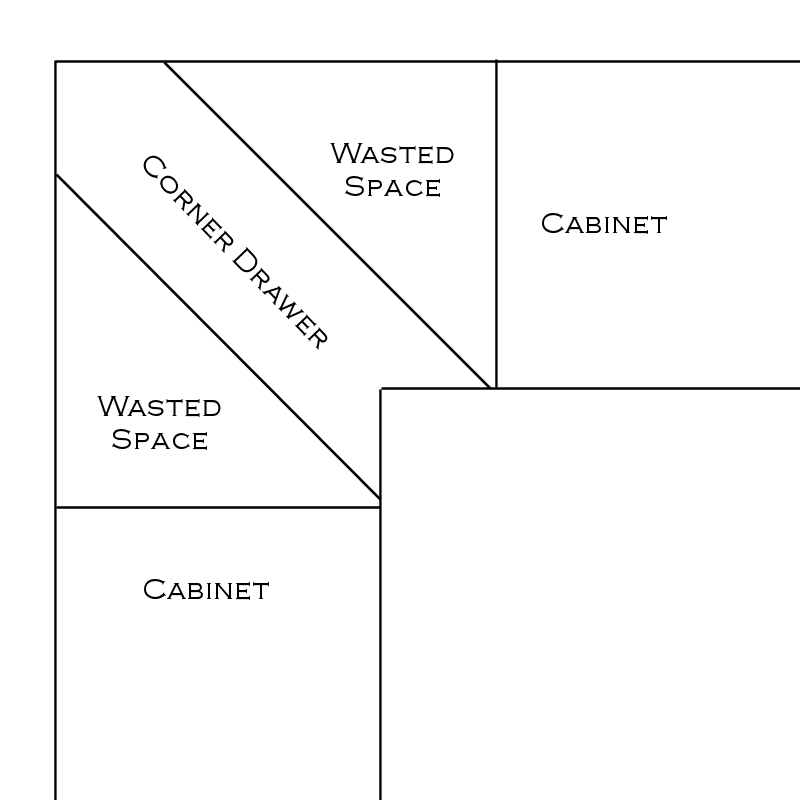
And you have to move them over so that there’s room for drawer fronts. And then the drawers go straight back to the corner, creating a triangle of wasted space on each side.
Put those triangles of wasted space together to form a square, and you’ve basically got the same amount of wasted space as you had with the side cabinets sitting right together at the front corners. So corner drawers, while they look interesting, would be a headache to build with no payoff that I can see.
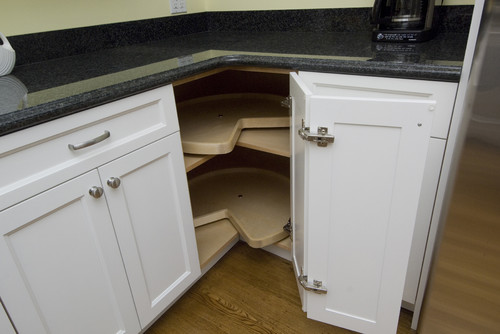
So in the end, when it comes to the specialty items for easier access to corner storage, my favorite idea is the 36-inch corner cabinet with Super Susans* (a term I had never heard until yesterday!).
Super Susans* seem to offer the most convenient access with the least amount of wasted storage space. And you can even buy the ball bearing lazy susan hardware and custom make one to perfectly fit the size of your cabinet so that you have as little wasted space as possible.
The difference between a lazy susan and a super susan is the pole in the middle. I’ve never been a fan of lazy susans because the pole in the middle just seems in the way and limits what you can store on them.
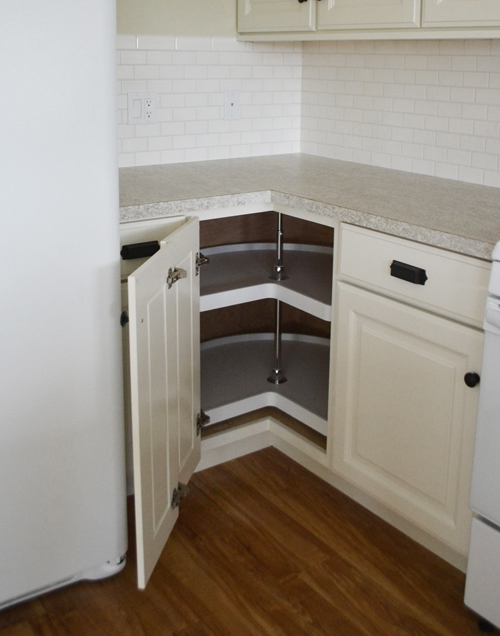
But Super Susans don’t have that middle pole, so you can store much larger items on them. And because of the way they’re built, you can also store heavy items on them.
So after reading through all of the various suggestions, and looking at tons of different ideas and configurations, I’ve decided that in these two back corners…
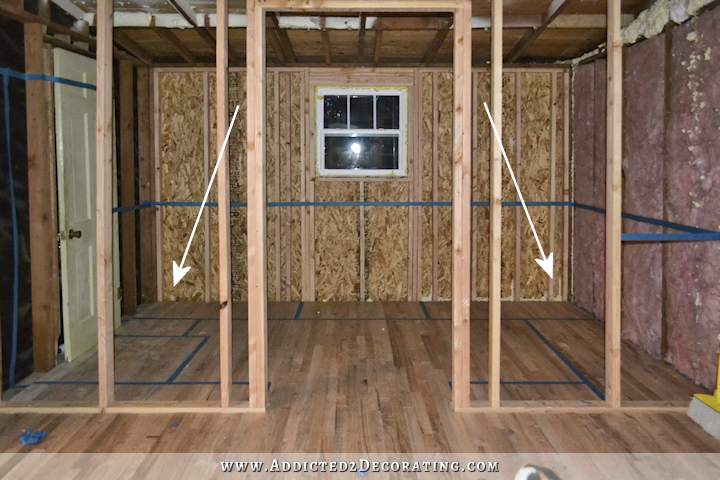
…I’m probably going to go with the easiest option which allows the most storage — blind corners with no fancy contraptions for easy access.
I’ll just use those corners to store items that I use infrequently, and I’ll probably even add some lighting in those cabinets so that I can see what’s back there. If I change my mind and decide to do something fancy, I’ll go with the Super Susan idea and build my own custom size to use every bit of space possible.
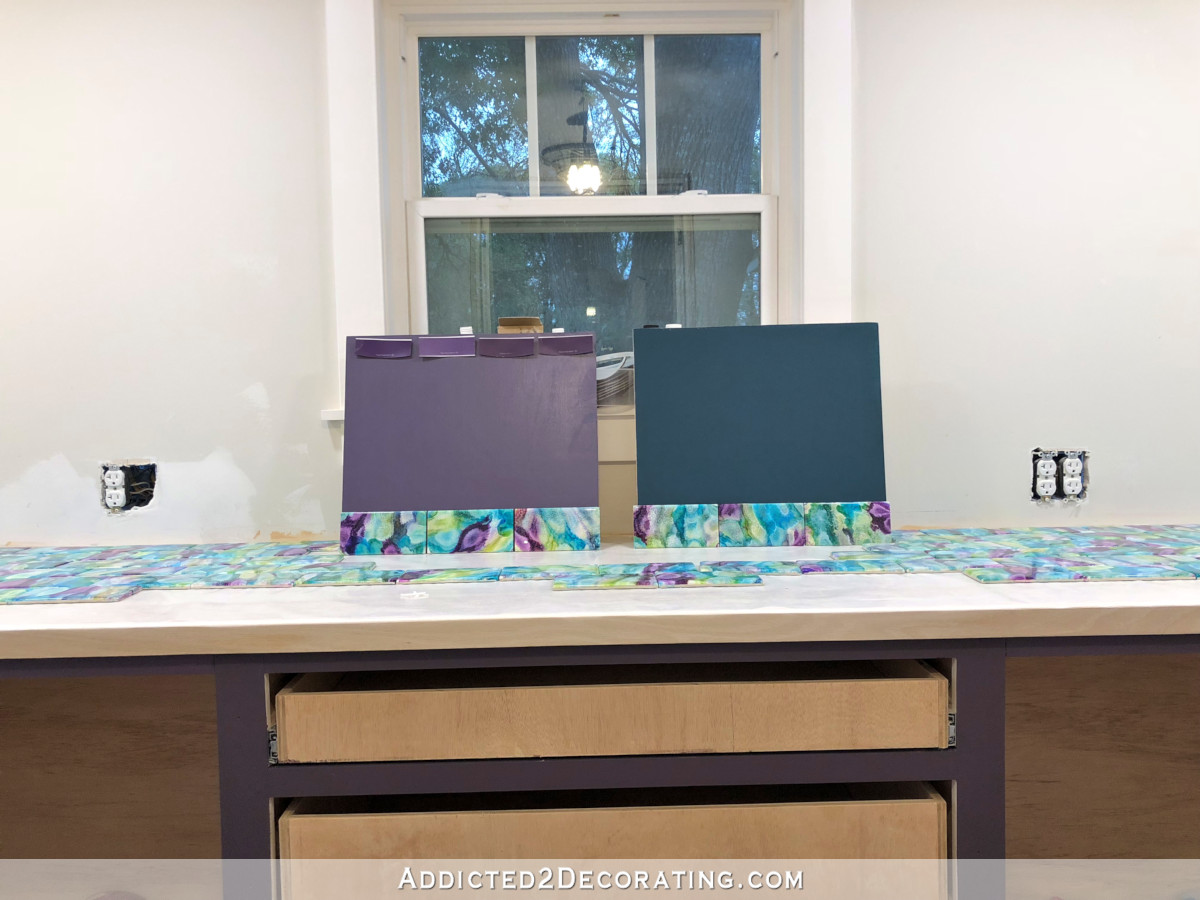
The only other specialty storage I’m planning will be right in the center of the back wall underneath the window. You can see where I have a 42-inch-wide space taped off there.
In that area, I will build a cabinet with two large, deep, strong drawers. Everything else will be open storage. The blue tape on the wall around the room marks the countertop height. The countertop will be along the full width of the back wall, and will wrap around the full width of the right wall.

And then on the wall with the pantry door, I plan to build some shallow shelves, floor to ceiling, for small items like canned good. I’m still working out how to tie that section in with the countertop section, so we’ll have to see how that comes together. I’m determined to make it work, though, so that I don’t lose any storage space.
On the opposite wall is where my freezer will go.
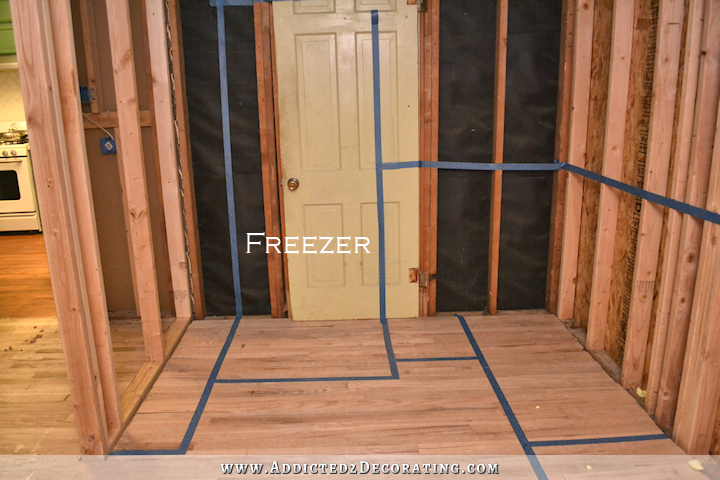
So the lower cabinets and countertop will wrap around onto that wall about 15 inches and then end against the freezer. Of course, that door will be gone. I just placed it against that opening so that I could mark off the area with tape. That leaves me with an awkward corner to the left of the freezer with more blind storage, but I chose to do it that way because blind storage is better than no storage at all. And if I shove the freezer all the way over to the left wall (i.e., the wall with the pantry doorway), then I completely lose all of the shallow storage next to the pantry door because I’d have to leave that space for the freezer door to swing open. So I figured that half usable storage and half hidden storage on that shallow storage area was better than losing all of it.
I still might rethink that, though, because as I’m writing this I’m realizing that moving the freezer all the way into the corner will gain that 12 inches of vertical space from floor to ceiling on the right side of the freezer, and it would all be easily accessible space. That actually makes more sense. 😀
So evidently, I still have some details to work out, but it’s coming together!
Update:
My pantry is finished! Want to see the entire project from start to finish? You can find every single post about the pantry build right here…
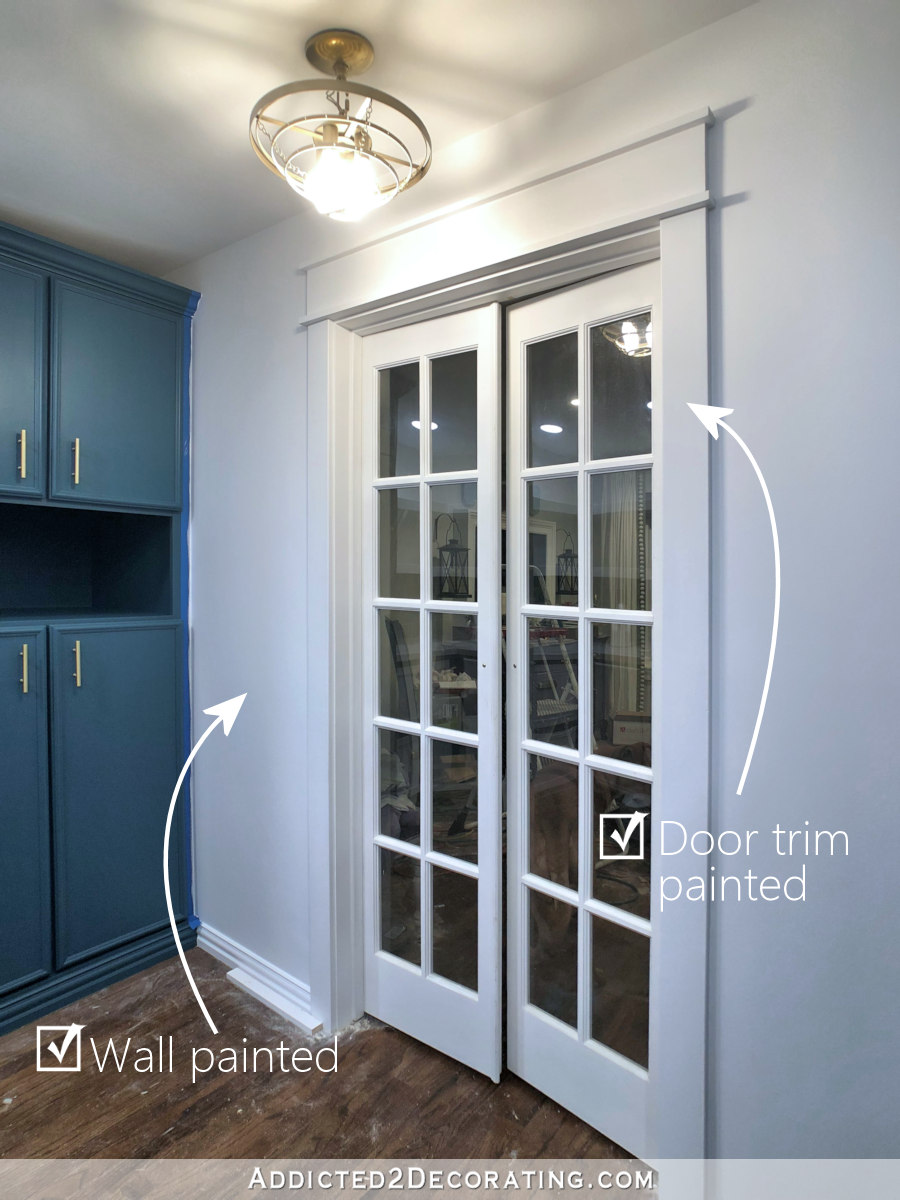
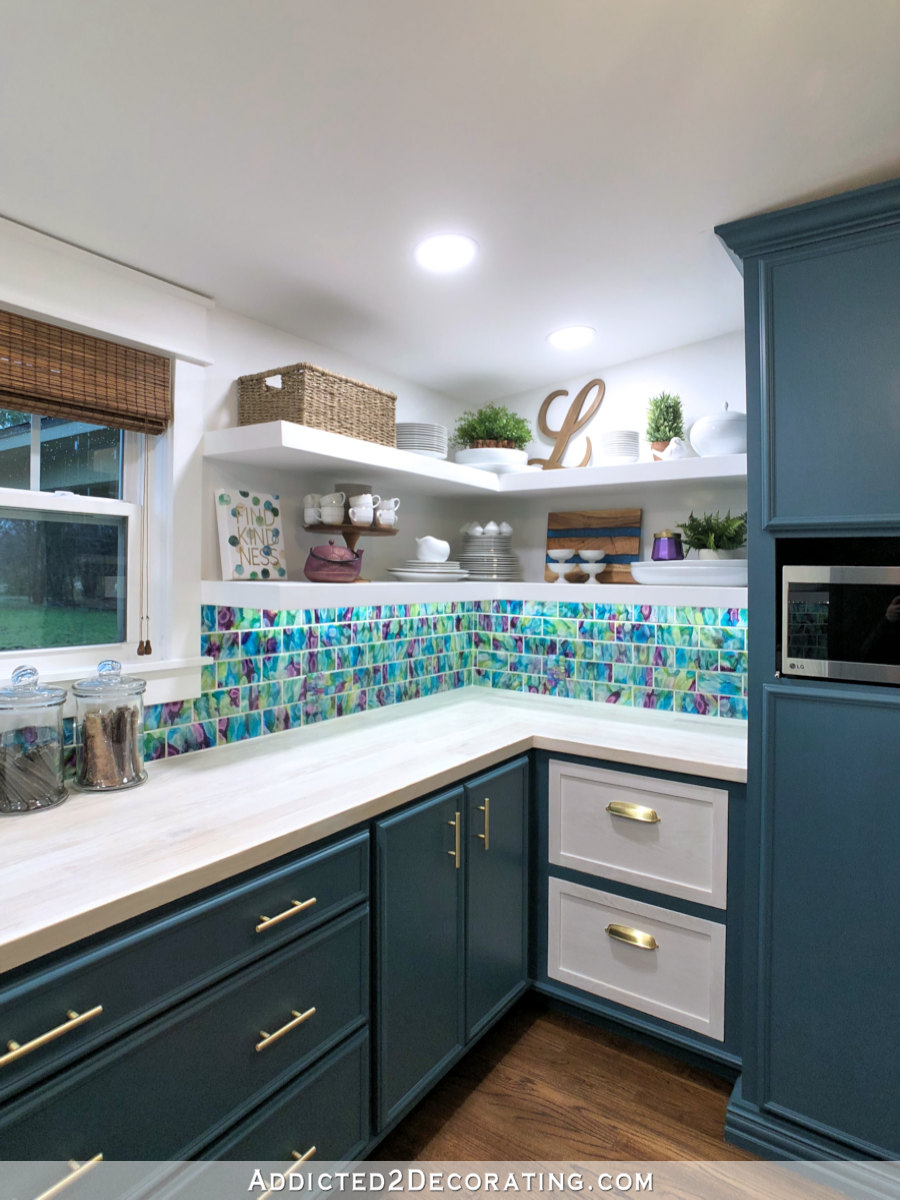
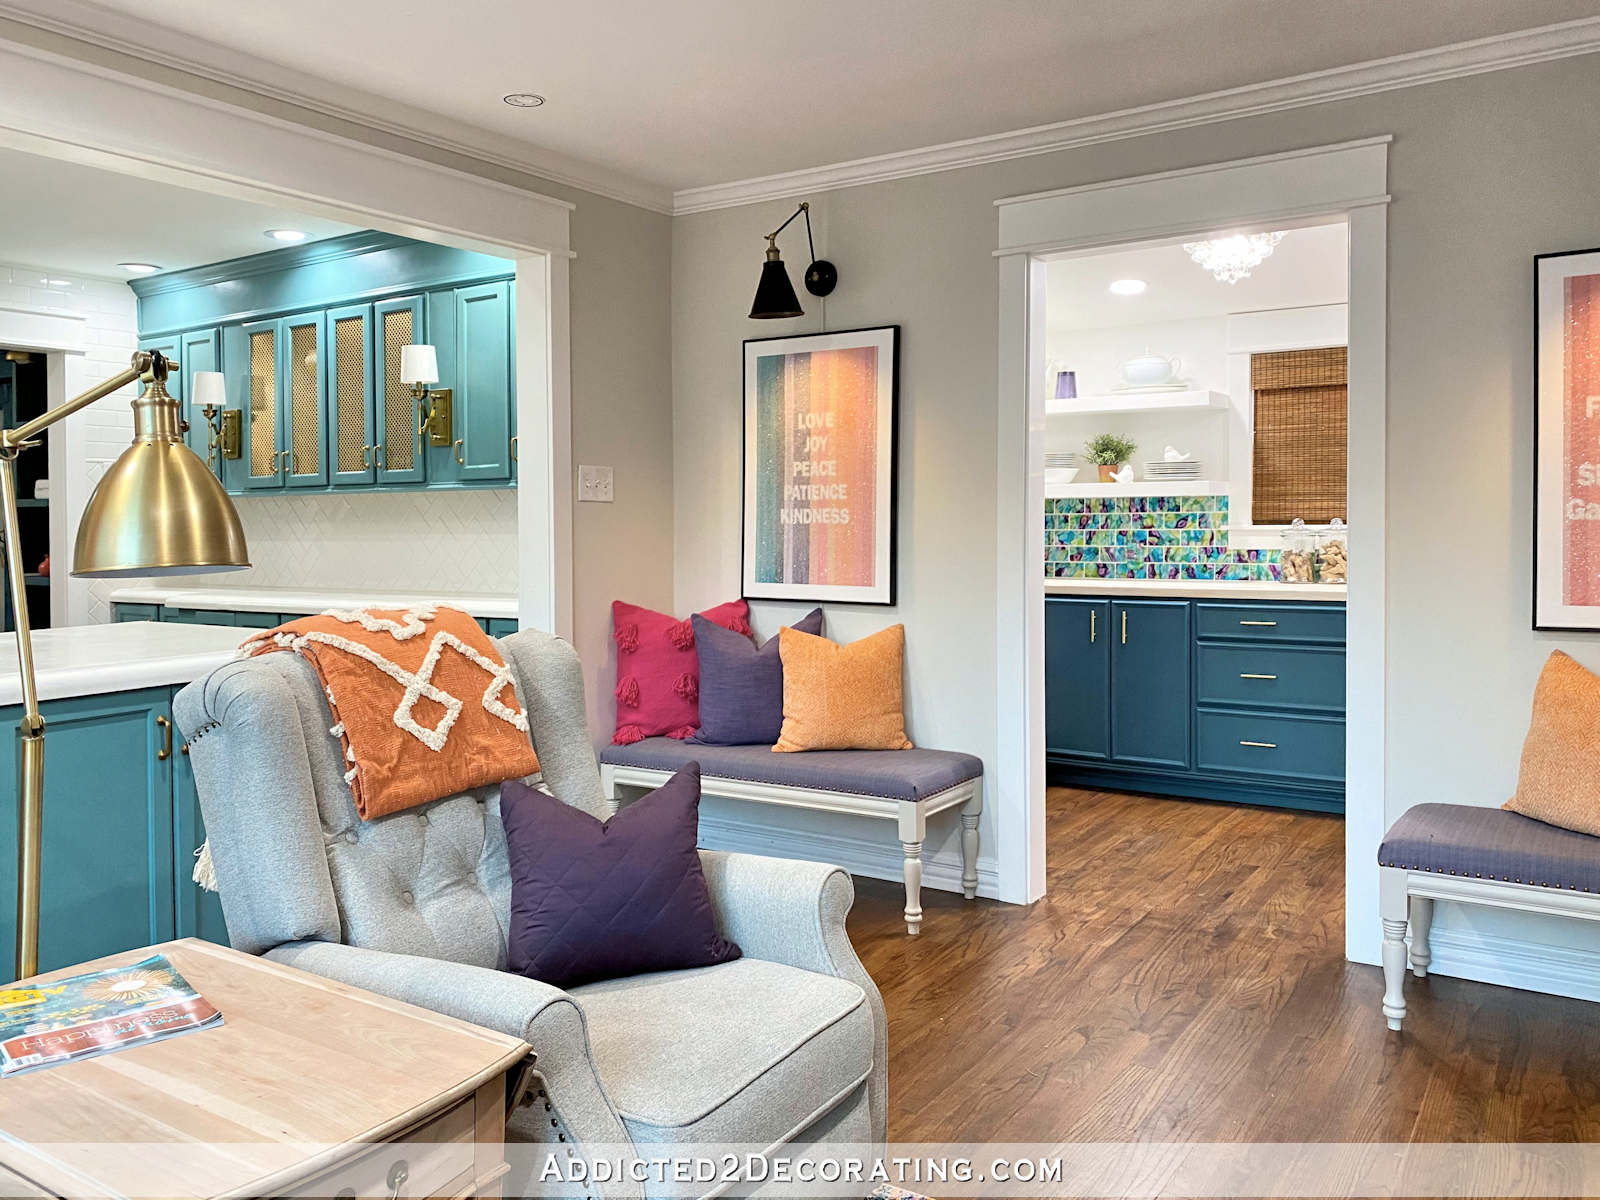
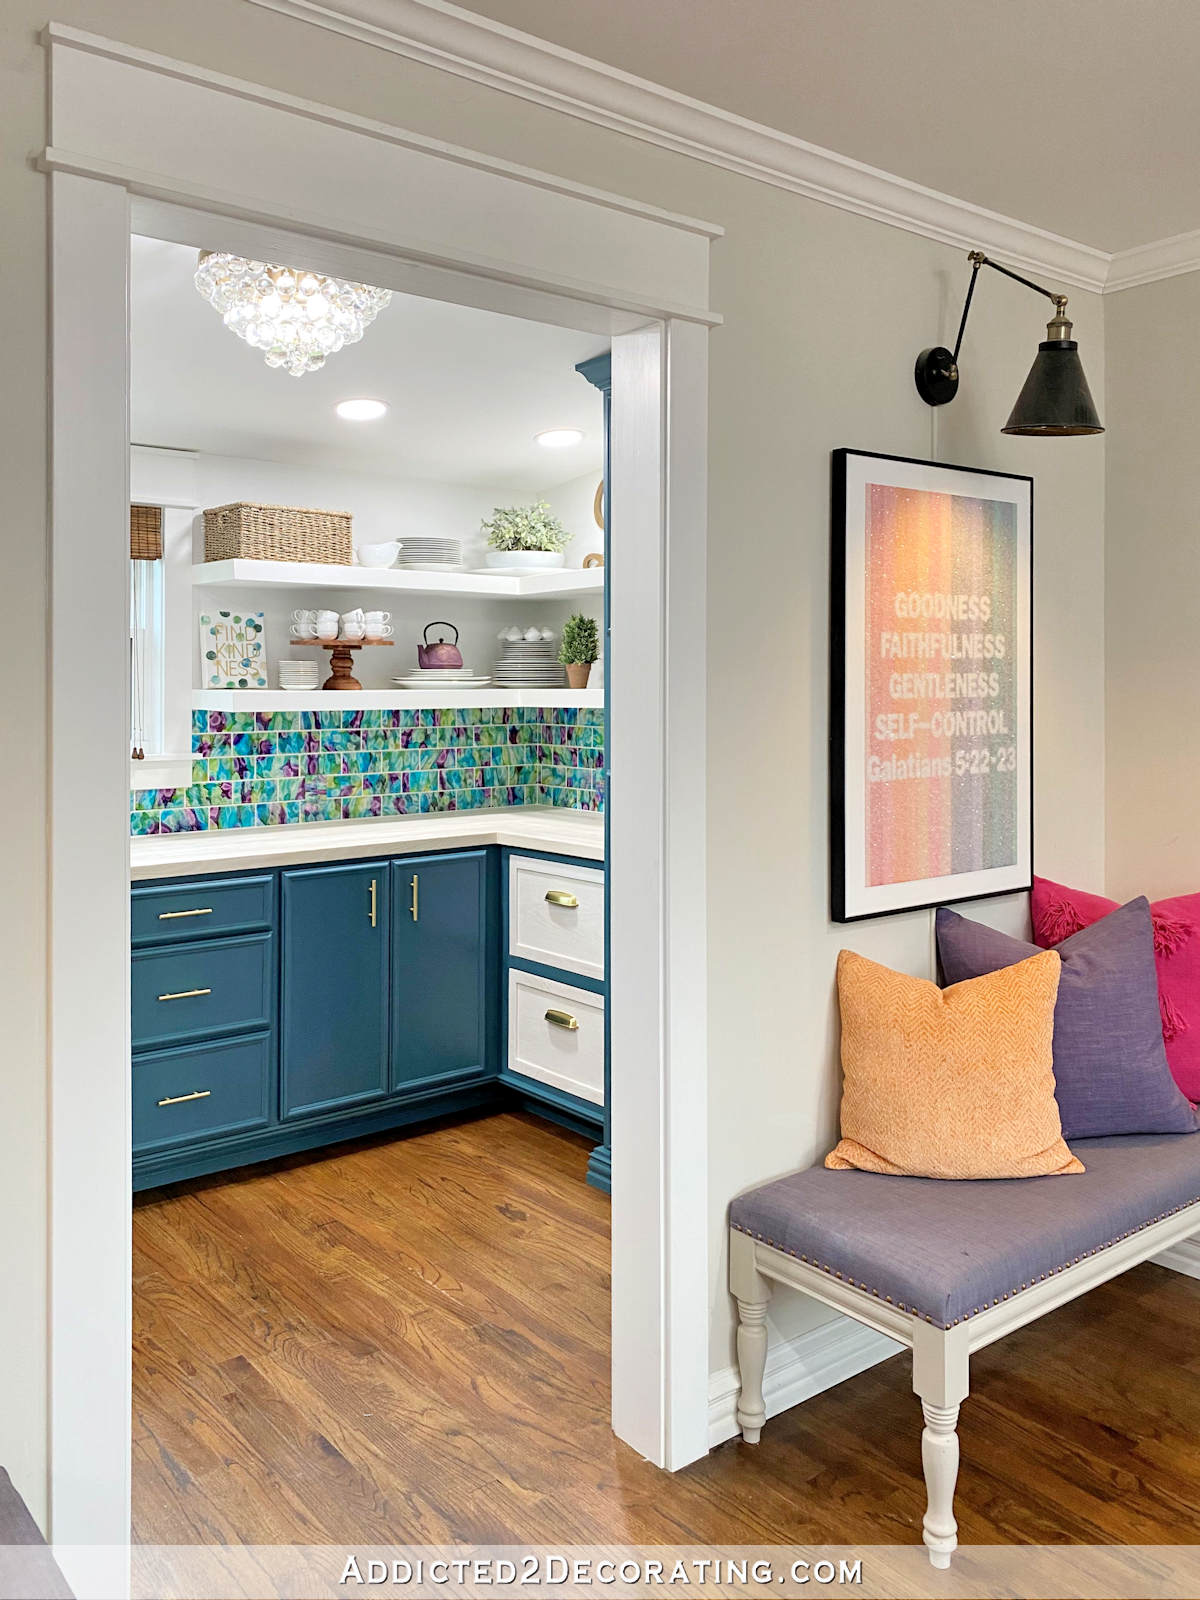
Or you can skip to the end and see how it turned out. Here’s a peek of the finished pantry…

You can see more pictures on the before and after post right here…

Addicted 2 Decorating is where I share my DIY and decorating journey as I remodel and decorate the 1948 fixer upper that my husband, Matt, and I bought in 2013. Matt has M.S. and is unable to do physical work, so I do the majority of the work on the house by myself. You can learn more about me here.

Love it! I’d probably put the freezer dead-center in the middle of that wall because…OCD and symmetry and stuff. that would make the counter have some less usable area on either side. You could probably do a narrow upper cab to the left of the freezer that pulls out with pantry shelves inside…but that would lose the shallow wall shelves in order to accommodate the pull-out. Whatever you do will look amazing…well…because whatever you do always does!
It’s a mind boggling process, for sure! Even the pros get it wrong sometimes. We just went thru this with our new house. We built the same house we had just lived in, because we liked the overall plan. Wanted to tweak some things, and one was the kitchen layout. Our plan had the fridge against a corner, where we had a side by side fridge/freezer. You could never get one door opened all the way because of a wall. So we opted for a french door this time with freezer on the bottom. Still not perfection, but at least we can access this one a bit easier. There were no other configurations that would work. We also went with the corner cabinet that accepts the super susans, but left out the susan. It will work for what we plan to store there.
Good luck, and BTW, I agree with the freezer on the entry wall next to the door, just leave room for the door to open fully. Maybe a tall open shelf in the corner?
Not just open, but open enough to get the racks out for cleaning. Centering it more would help as long a the bottom shelves aren’t as deep as the freezer.
Happy to hear that the super susan is still a backup plan. Really think about that. If I didn’t have two of them, my tiny kitchen would be useless, storage wise. I’ve have the blind corner and trust me, it’s called that for a reason. The tenth time you are on your knees, dragging everything out onto the floor, you may be rethinking that decision.
Oh, btw, after having had seven kitchens in all my moves, I discovered that Doors are a ridiculous item(except the super susan and the sink, of course) because you then have to have another expensive pullout system to access all the items in the back. Remember what I said about being on your knees?? Well, here we go again. We designed a kitchen for an elderly cousin and she said the best thing we did beside the enormous single sink was the drawers because she couldn’t get down on her knees. I know this is a pantry, but the concept is the same. She can open the drawers, see and pick out her pots and pans, etc. and she’s good to go. Just some thoughts from a lot of experience.
Hearty agreement here! Had a blind corner in the past, and it means on your knees, taking out everything in front of you to reach into the blind corner. NO problem, I thought. I will only put rarely used things in the blind corner. They then became never used things because of the difficulty in getting to them. We had a lazy susan with a pole, and it was great! The super susans look even better. But blind corners are more than a hassle — they are irritating, not useful, and problematic.
I also agree with the idea of drawers instead of doors. Our current kitchen has drawers and they are great for pots and pans, serving dishes, everyday dishes, etc. We bought heavy duty FULL EXTENSION drawer guides so it is no problem getting to what is in the back of the drawers. The full extension is a must.
Another thing to consider for the upper cabinets in the corners is a butterfly door. The inside shelves go around the corner and you open one door, then the other to reveal them. Small lazy susans in each corner are great — they use the corner, everything is accessible, and there is no frame in the middle to work around. Highly recommend!!
I had a super susan at my last house. At my new house I had to use 3 shelves in my pantry just to begin to hold all the items that used to be in my lazy susan. And it’s still harder to find the flour and baking soda than before. I designed my last kitchen around it. I really miss my super susan and when I get around to a kitchen rehab at the new place it will be mandatory.
You will need some countertop on the opening side of the freezer, else you will be setting items removed from freezer on the floor. I love full-height shallow shelving for vases, tall bottles, skinny pasta boxes etc.
Kristi, are you going to have your “boxes” 32mm drilled? I’ll bet you can find a shop that will do that for you…or is a drill press on your wish list?
I am planning on having them drilled. I was actually hoping to do it myself with a jig, like this Rockler Pro Shelf Drilling Jig –> http://www.rockler.com/pro-shelf-drilling-jig
We have a different version of a jig. Used it to add extra holes in an ikea shelf (thankfully it matched up!, and was for one just shelf). It’s more like that Jig it! one (back up to “drill jigs”). The inlaws had purchased and used it to build their library in their unfinished basement. For adding holes, it was perfect (used extra pins to hold it in place) and not too difficult to use. That black block is perfectly sized and spaced to push into a tough corner or hang around the front (if that makes sence). I wasn’t involved with the library build, but my husband was, and still loves the jig.
I have a Lazy Susan, with the pole, in a small corner area. I really use that space too. I would love to have a huge walk in pantry like the one you are building though!
I have these in my corner cabinet:
http://heavyeditorial.files.wordpress.com/2013/04/512.jpg?quality=65&strip=all&w=780
I think they are a Swedish design, but the lady at my cabinet place said they all call it “the peanut” because of the shape
Hmmm…I think you linked the wrong picture, unless you have them trained to fetch the items you need. 😀
Too funny, what the heck are those cats for?
Well the cats will have fun hiding in the blind corner….come find me Mom!
Wow, you can fit a lot in your corner cabinet! And they do look kinda Swedish! 😀
You have really thought this through! I never realized that my corner drawers really are not saving space after all.
I have the blind corner cabinet and I do use that space for items that are not used but maybe once a year, but it seems like that year comes around too fast when I realize I have to go get down on the floor and pull everything out to get to that one item I need. Especially now that I am 75 years old! I vote for the super Susan.
You have a good point. My knees aren’t getting any younger.
And if you happen to store anything in the least bit tall right inside the cabinet door, you have to move everything in the front out of the way, unless you have a really strong back and can lift that big bowl or George Foreman grill OVER everything. This twisting maneuver always does a number on my back, and I don’t even have back problems.
Woah, I keep reading lost space in a walk-in pantry? It’s an entire room dedicated to storing food and appliances. Could you be stressing over something very trivial?
Doesn’t seem trivial to me at all. I have the opportunity to custom build an entire walk in pantry, and I want to plan it efficiently. That doesn’t seem trivial to me.
Who says she’s stressing? She’s trying to figure out a good solution for a problem, considering she has the opportunity to get it exactly the way she likes it.
If you call that something trivial, DIY blogs shouldn’t interest you at all, considering that 99% of what we do when we remodel is trivial. After you’ve got a roof, walls, working plumbing, heat and electrical, what more do you really need?
Does it really matter what color you paint your walls? Or how you decorate? Or what kind of lighting/furniture/counter tops you have?
ALL of that stuff doesn’t really matter, except when it comes to increasing our enjoyment of our own homes.
And not having wasted space in her pantry will increase Kristi’s enjoyment of her own home, so it’s not any more trivial than ANY other decorating decision anybody has ever made after they had their basic shelter taken care of.
I like the freezer in the corner. You can use that blank wall space next to the door for other creative things. Hang sheet pans. Aprons. White board with inventories or shopping list. A lid rack. I’m sure you’ll come up with something.
If you keep the freezer in the same place you can use that section of less accessible storage for sheet pans, muffin tins, turkey platters, etc. Or store bulky things there like the 24 pack of paper towels or 100 rolls of toilet paper.
I think a bit of open wall space might be nice in there though. I know the purpose of a pantry is storage but it doesn’t look like you’d be loosing too much usable shelving though.
Also, Re: freezer…I either meant to leave a comment and got distracted or actually did leave a comment, I don’t remember which, so sorry if this is a repeat. 🙂 When you buy your freezer be aware that many deep freezes are still a manual defrost. With your freezer being in the house proper and on your nice wood floors you might want to consider an auto defrost. I’m sure others might be able to defrost their freezer mess free, but I am very glad ours is in the garage on concrete…I always seem to have water puddles around when I defrost, even when I’m being careful!
Well, darn. I have selected a manual defrost upright freezer because I’ve learned (from very informative readers) that they store food better and longer. Now you have me reconsidering having it inside. Hmmmm…darn.
Cleaning a freezer mess free:
Cover the bottom of it with old towels, etc.
Get a bottle of salt water and spray down the ice.
Wait 10 minutes.
All the ice will peel off in chucks/sheets and you can just move whole chunks to a bucket instead of waiting for it all to turn to liquid.
No/minimal liquid = no mess.
Thank you Ishtar! You just made one of my fall chores a lot easier! 🙂
That sounds doable!
When we removed our countertops during remodeling last year, I was astonished at all of the wasted/unusable space in the lazy-susan corner cabinet. I insisted that it be removed and came up with a design to add a 12″, 90 degree horizontal shelf in there instead. We used the same cabinet doors, but bought hinges to hook them together and after several trips to HD to look at cabinet floor models, we were able to duplicate the hinged, corner cabinet door. Now, when I open the doors to that corner, I can see everything that is stored in there, with no more blind, wasted or unusable storage…and it is easy to access. I absolutely love it and will never have another lazy susan.
No broom/vacuum/swiffer closet?
That’s what I’m planning on using the 12-inch-deep, floor-to-ceiling storage just to the right inside the pantry door for. I’m making it with adjustable/removable shelves, and for now, I’ll add hooks to hang my broom, mop, etc. there. When I have my laundry/utility room in the future, that stuff will be store in there, and I’ll add the shelves back to that area in the pantry for food storage.
Might be great to have an outlet in there too. To recharge hand held vacuums and the like.
Kristi,
Yes, outlets for sure. We leave our cell phones/iPad/tablets in their to charge versus all over the house. Love it. Also, we have a motion censored light! Love that too. No accidental lights left on when door is closed.
I have a super susan in the house we just built. I was initially sad that I didn’t do the drawers in the corner as I had originally wanted. After seeing your drawing, so glad we didn’t. I keep my four slot toaster and large crockpot on my super susan.
I also agree, you aren’t stressing too much. When doing something, especially from scratch…you want to do it right. Thorough research of different ideas is a must in my book.
Have you considered a tall vertical cabinet next to the refrigerator for broom, mop, vacumn cleaner, cleaning supplies you want high and/or hidden, etc? You may already have that storage in your laundry area. But if not, you may want to include something like that in your panty and use adjustable shelves that are left open so it accommodates tall items now. Then once you remodel your laundry area and include all the cleaning storage you want in there, you could add the adjustable shelves in your pantry vertical cabinet to use for other items. You may have odd size items like wrapping paper or a pizza peel. Love to see your process unfolding!
As an aside, I would highly recommend including vertical storage slots in a lower cabinent to accommodate cookie sheets, pizza pans, muffin tins, serving trays etc. if you don’t already have this in your kitchen. My husband retrofitted vertical spacers for me to use in a cabinet where we took out a built-in grill and it is very functional!
Oh how I wish I had tall broom storage in/near my kitchen!
Was just going to recommend that. We went with a counter depth french door fridge and have a 6 foot tall, 14″ wide cabinet between that and the wall (24″ deep) that provides plenty of room for the swing of the french doors, but is also a great place to store brooms, step stools, etc. Super useful rather than having to go out to the garage to get those things.
What is your countertop choice, concrete like the kitchen? Just curious
Stained wood of some sort. I’d love to use walnut butcherblock, but I don’t think that’ll be in my budget.
If you like maple, you might check CL for “bowling alley” sections. Maple was also used for gymnasium floors and often can be found for sale after schools are torn down or refurbished.
http://www.improvenet.com/a/11-small-kitchen-ideas-that-make-a-big-difference
This has a can storage unit that can hide half of it alongside your freezer but rolls out across the doorway for access to make total use of that space.
My friend has one of these pull out storage units beside her refrigerator and it provides a great deal of storage space, easy to access, easy to see storage. It could also solve your freezer door swing space issue too. I bet you could build one or maybe two – on either side of the freezer.
Hey, I had no idea I had a Super Susan until you explained it! My corner cabinet actually has a door set at a 135 degree angle from each of the side cabinets. So instead of a 90 degree angle where two perpendicular cabinets meet, with the corresponding weird bi-fold door, I have a middle cabinet with a 6 sided interior that nicely holds a circular Super Susan that is quite large. I love it. I can store all my very large mixing bowls, and I have a lot! There is only a small amount of dead triangular space at the very back. Have you seen what I’m describing? I can send a pic if it’s not very clear.
I have actually seen quite a few photos of those angled corner cabinets. I was considering making one, but I’m not so good with the geometry, and I could see myself wasting a lot of plywood trying to get the angles on the front just right to meet up with the side cabinets. I might still try it though. I do like the look of it. I’d just leave mine open (i.e., no door) since it’s a pantry, and I’m using mostly open storage.
I am very good with math and geometry, plus I am a mean user of power tools, so if you need calculations for this you can send them to me in private and i’ll get the results back to you.
I like the door and shelves idea of the Super Susan, but I just wouldn’t do the lazy susan part.
Great reading your ‘think’ processes and your follower’s ideas. I highly recommend that wherever possible you go for deep drawers, preferably with full extension vs. just shelves. Exception would be for heavy appliances such a mixer where doors with pull outs would work best.
Here is a weird idea for the corner issue: create access from the counter top down with a ‘lid’ or ‘lids’ with recessed handles that lift to access bins for flour and other dry goods on the first level.
For me, I would opt for open shelves in the corners.
One had one shelf from the left, at one height, and the other shelf from the right at a higher height. Tall things stored under the higher side. No blind spots. Simple and easy to do, open 90* corner. Then your counter top could be the same, or narrower on the side wall.
Several options on pinterest, including installing rounds in the corners of open shelves, all the way up.
Did you order left hand open freezer/ French door? Is there such a thing as French door on top with bottom drawer rather than full door? Just wondering because I love the pull out drawer s of the freezer part of my refrigerator . I also agree that frost free burns food quicker than manual defrost. The forced fan that keeps things defrosted drys out food causing freezer burn. I have both and there are definite pluses and negs to each.
I get confused if it’s left hand or right hand. The handle is on the left side of the door, and it’s not reversible. It’s just one full door. I’m getting a manual defrost, and I haven’t seen any of those that come with any fancy bells or whistles. All that I’ve seen are just very plain, simple, utilitarian-looking, which I’m okay with. As long as it keeps my food frozen with no freezer burn, I’ll be happy. 🙂
Kristi, I read your posts daily, and I comment rarely; however, the freezer space has me so confused. If the handle is on the left, then the door swings open to the right, so you will have the door acting as an obstacle to work around to get to a counter top. Have you considered rotating the freezer? Move the freezer completely to the left in the layout, and rotate it, so that the door now opens, and rests against the wall where the white door is currently propped up. Then you will have some remaining space to the left of the freezer to put a normal cabinet, either tall, or lower/upper with counter. This also would solve one of the blind corner issues. Instead of wrapping a corner cabinet around the left side (the space that would now be to the right of the white door) you could end your run of cabinet at the wall, and have access to everything. Any space left over, on the wall (to the right of the white door) could either have peg type storage where you could hang things, or hooks, or a pot rack of some type, or some type of shelving on top with bins below for holding dog food, etc. I hope this makes sense…I’m just thinking that I would not want to work around my freezer door like that. My mom’s is like this, with no counter space handy, and, it is so frustrating. Anyway, I agree on the manual defrost, for what that is worth! Love all that you do, and, I’m sure the pantry will be fantastic when you are finished with it.
We have one (though I never heard it called that til today! – and it’s actually got corner drawers above it, which I also love. But I just wanted to warn you that the super susan might be kindof tough to execute as a backup plan.
The thing is, they are so big that they might not fit through the front opening of your cabinet to install them. Ours had to be installed before I could screw the backs on the cabinets since there was no way to arrange them to get them through the front or the top due to the face frame and the support bracing.
This might be less of an issue if you don’t use up vertical space with a couple (admittedly, kindof gimmicky but I love them!) corner drawers at the top the way I did, but definitely keep it in mind!
I vote you move the freezer all the way to the left and have a big corner cabinet to the right of it with no blind space and zero contraptions.
Examples:
https://www.pinterest.com/pin/291889619574073785/
http://ths.gardenweb.com/discussions/2703712/smart-corner-cabinet-door-design
When my parents redid their kitchen, it made them nuts that the counters did not meet the edge of the refrigerator and freezer – different depths. Looks like your blue tape is showing the same footprint. They solved the aesthetic problem by pushing the fridge back into the wall. Now the front of their fridge/freezer comes off the wall at the same depth as the counters. It looks much better than jutting out into the room. For people who get twitchy eyes over that type of thing, it was a very clever idea.
Any thoughts on what you’ll use as a countertop yet?
Wood. I’d love to do clear walnut butcherblock countertops, but I’m pretty sure those are out of my price range. I’ll have to come up with a Plan B, but I definitely want stained wood.
In my kitchen, I have a broom closet. Have you given any thought to that, or do you put your brooms, vacuum cleaner in another spot in the house?
For now, I plan to use the shallow storage cabinet just to the right inside the pantry door for that stuff. I’ll attack some mop and broom hangers there. When we eventually have the laundry room built, that stuff will go in there, and I’ll add the removable shelves back into the shallow storage cabinet in the pantry for food storage.
I like it. I’m glad you went with the blind storage and I LOVE the deep drawers–I really miss the ones I had in my condo. The only other option that would have been that simple (and I’m not sure why I didn’t think of it since I have them in my own kitchen) would have been to put a corner cabinet that has the door at a 45 degree angle (and countertop cut to match). Similar to the lazy susan idea, except with just shelves inside instead of the spinners. That would allow you to put the spinners in later if you wanted. But I think the blind corners will serve you well. You could even put stuff in boxes or baskets so it’s easy to move the stuff in front out to dig for stuff in the back of the blind space.
I had a thought on the freezer blind space though. Awhile back, Killer B Designs (www.killerbdesigns.com) did a roll-out thin cabinet on the side of her fridge, similar to the thin “pantry cabinets” you often see in RV’s and campers. Think like a thin bookshelf on wheels that you slide between the wall and the fridge and the end is often capped with a false door and handle to look like it’s part of the rest of the cabinetry. When you roll it out, one side of it is a solid back-panel and the other side of it has shelves and strapping so you can store canned goods, jars, and other thin things and they won’t fall out as you roll it.
I don’t like her design very much or the hardware she used, but in your case, I wonder if you made yours so it extended from the back wall of the freezer to the door casing (as marked out in tape above) but instead of building it fixed in place, mount it on straight casters and some sort of sliding door hardware at the top (just as a track to keep it straight and not tip) so that when you pull it out, the regularly exposed portion would cover the doorway and the part that’s normally hidden behind the freezer becomes exposed. Then, you just retrieve the item you were looking for, slide it back, and exit the pantry. The only thing you’d have to be careful of is not storing stuff in there that is sensitive to heat (flour, spices, oils, etc.), since the freezer is going to blow a lot of heat on them. It might be a good place for thin pans stored upright, empty containers, cleaning products, etc.
Another option is to move the freezer to the wall like you were thinking, but make the thin bookshelf cabinet against the wall move to cover the pantry door like I described above so you can open the freezer.
You could also consider having the freezer open the other way (and just angle the shelf enough to give clearance). Ordinarily, having a freezer door open into the room, rather than against a wall, is not desirable, but since you’re going to have a landing zone for the items you’re taking out right there on that center 42 inch cabinet, it might not be that inconvenient. My main fridge has been set-up backwards for years (because I was too lazy to swap the door hinges when we bought it) and it doesn’t really bother me.
One last idea. Instead of the bookshelf style shelving on one side or the other, what if you built yourself a small rolling cart to park there. I’m thinking that if you’re working on a cooking project and you need 3 or 4 things from the pantry (or a heavy item like an appliance), it might be nice to be able to load up the cart and take it into the kitchen, then return it all to the pantry when you’re done.
The cart idea sounds smart!
I love the idea of a rolling cart.
Where can you buy the super susan?
Amazon has them right here –> http://amzn.to/2dGNi6g (that’s an affiliate link)
Kristi,
Thank you for posting your ideas. You are a very articulate writer with great pictures and greater ideas. You are an inspiration!
Great idea. In my kitchen I have 2 corner cupboards without lazy Susans, just huge deep shelves. I use them for things I do not access often and don’t have any issues with this. You will probably be fine with the blind corners as long as you don’t need to access what is in there very often.
I have a thought about the side with the freezer… Why don’t you go all the way to the wall on the left side and if you really wish you had shelves along the wall to the left of where the freezer is you could do shelves recessed into the drywall. My mom has a whol bunch of shelves recessed into the drywall and they fit the canned applesauce she makes every year perfectly!
If you are making cabinets instead of buying them, you could make the cabinet to the right of the freezer the same depth as the freezer. Then you would get the same look as the counter depth freezer you were talking about earlier in the process without having the extra cost!
So exciting to see you go through the process. Fun to see what you decide works best for your lifestyle!
Just wanted to add to my comment from yesterday. My super susan in my corner angled base cabinet has 3 fully adjustable shelves so I can accommodate any height of appliance or things needed to be stored. Each shelf has a fully 360 turntable (no cutout) that is 32″ in diameter. Each turntable has a small railing to keep things corralled when I swing it around. There is no center pole. Holds a ton of stuff and all of it is easily accessible. It’s awesome!
Have you considered adding a door(s) to the wall on the breakfast room side of the pantry to access the under counter dead space ?
I have a U shaped kitchen plus a peninsula, so three corners. Two of them have Lazy Susans like the Ann White picture. The peninsula corner has a door on the exterior side of the cabinets to access the shelves. {Hope this makes sense.} It eliminates all of the dead space. It’s underneath the overhang of the countertop and I have to move a bar stool when I want to get at what’s in there, but I use it for items I use infrequently so it’s not a problem.
I agree with those who recommend a Super Susan in the corners. A few times a smaller item has fallen off my Lazy Susan at the back and it was a challenge to retrieve it. Even for infrequently used items, I would have a difficult time pulling out something that’s on the back of the shelf, especially the bottom one.
This is what we have as well. The dead space is accessible from the backside which is the dining room. It has four deep drawers that are lined with felt for “silver and china”. I do have my grand-mother-in-law’s silver, but just some pretty serving plates instead of “china”. I use my Blue Willow everyday.
My refrigerator is all the way in the corner in my kitchen, and it’s awful. The doors don’t work properly. Definitely keep the space.
Ktristi, I read some of the comments yesterday, now there are more, which I haven’t read, so maybe somebody has already suggested this. Is it possible to have the wall, where the window is as planned. Then the freezer and other deep cabinet/shelves on the wall, where the door is. And have shallow shelves on the 2 short walls. This way your blind corners wouldn’t be so deep. I am not sure what the dimensions of the pantry are, so this might be not a good idea though if there is not enough room between the two parallel rows of deep cabinets.
Have you thought of accessing them from the other room?
Can the super susans be purchased anywhere. I’m about to face that very same problem and will end up with lazy susans if I can’t purchase super susans.
I am in the process of redoing my kitchen. Not remodeling, just redoing. Finally, getting the cabinets right. Right things in right places. Getting rid of things I don’t have use for. We have a huge deep drawer with a metal insert to keep bread fresh. That is going. I have a cute bread box, and there are only two of us. One loaf of bread and maybe a few rolls at a time. Never more. So the bread drawer has become a catch all. Now it will loose the insert and I am taking an idea I saw on the internet and running with it. I could drill and use dowels for what I am doing, but have decided on small white tension rods. This way, I can move them. They will go in a row from front to back in the drawer and all of my glass pot lids will find a home within. Same with the drawer below. Filled with more kitchen linens than anyone needs. It will all come out, and the space will again be utilized for those things that are hard to find a home. I recently purchased a rolling cart. I thought I could put it next to my countertop and keep my applianeces on it. Well, it does not work there, at least not with the trash can we have, which by the way,started the whole problem. It was too hard to get the bags outs, and since my husband has lost most of his strength due to his chemo treatements he wanted a smaller more manageable can. OK, got that. Only he does not like that it goes under the counter and rolls out. Send that one back. Next I opted for a stand alone stainless steel job, on the high side, but he does not like how it looks with the rolling cart. Nothing worse than having a semi retired husband. Back to original trash can. I bought it at Pennys. It does not look like a trash can, which I like and I think it is easy to use. Finally I said just drill some holes in the bottom and the bags won’t be so hard to get out. We have had the trash can ten years, I guess he needed to be here to take out the trash to realize it was a pain. Now it is easy. So, my rolling cart no longer has a home. I do think I may have found a spot for it, and if so, all my “small appliances” Kitchen aide, blender, food processor, food storage sealer, toaster, wafflemaker will all be at my finger tips. No more hunting in cabinets to find out where they are hiding. There will also be three baskets for linens. One for cloth napkins, which we always use, one for dishtowels and one for dish cloths. The aprons hang on a hook in the pantry. This way I can control the chaos. No more ten dishtowels in use at a time. It makes me crazy. Since we will be listing our home in the spring, I have started to take seasonal pictures of it. Right now, I am getting the garden in it’s waning stage, The tall grasses are getting their plumes, the butterfly bush is still attracting monarchs, but soon will stop making flowers. I am decorating the mailbox area to photograph along with other fall vignettes in the yard and on the porches. When December comes and I change it up, I will do the same thing. I hope to have an array of shots from all of the seasons to put in an album for home shoppers to peruse while looking at the house. I think it is a nice way to give prospective buyers and idea of how the house can look during various seasons. I also plan to set my kitchen and dining room tables seasonally. My thinking is, if the table is set with placesettings no one will come in and start dropping things on the table. I am so tired of my kitchen table being covered in “stuff”. When I was here alone during the day, the mail came in, got trashed or filed. NOw it comes in, gets opened and tossed on the table. (read retired husband), same thing with stuff from his pockets. Why does he have to take all the change out of his pockets everytime he comes in the door? It was great for seven months when we put it in a big piggy bank for the new baby who is on the way, but the pig is now in the nursery across town.
You know there was that old rhyme about little boys, “snips and snails and puppy dog tails” that’swhat little boys are made of. Guess what,so are big boys. Snips of paper meaning nothing, no bugs or tails, thank God, but stuff, stuff stuff. I have reached my clutter overload, I do not like this Sam I am. Just the ranting of a crazy old lady.
I also went with a blind corner when we remodeled our kitchen. We have a tall pantry cupboard in the one corner with L-shaped shelves so you can reach into the back, it works well. The other corner is a normal below counter height cupboard and I use that blind corner to store the giant bags of dogfood (there is no shelf in there). It works for us 🙂
The one option that isn’t listed in your post is what i thought was the obvious one (obvious to me i realize because it’s all i’ve really seen much of). To just do a corner cupboard with shelves (similar to the super susan minus the susans). this option has no wasted space either, and in my opinion (having used both the blind corner and this large corner cupboard and lazy susans), this is the best compromise of good access and viewing and good use of space. In the one i had growing up, the upper shelf of the two was slightly smaller and set back so the bottom one wasn’t such a cave
http://thebestcabinetsite.com/wp-content/uploads/images/design/sq-corner-1.jpg
http://www.woodweb.com/knowledge_base_images/bah/corner_cab_01.jpg
With slight tweaking it also can be done with the two different door options as seen above. the diagonal door happens to give more counter space but the down side would be it is more of a reach for getting into the uppers in the corner above because you can’t stand there anymore. and if you don’t like the look, that is a downside too.
a way to eliminate the problem of reaching the uppers would be to set the cabinet below in a bit and then both cupboards beside have very slight blind areas. which does not work if you plan on having drawers beside of course. but if not, it is another option.
http://www.mhcustom.com/wp-content/uploads/2014/10/inset-corner-cabinetry-2.jpg
I know this is late and I’m not sure if you’ve started building yet but I have an idea…why not install a slide out cabinet (on casters) between the freezer and the blind corner shelf. Place your kitchenmaid or whatever you use often in the kitchen (but not often enough to take up valuable countertop space) on it & baking supplies below (or whatever). It can also serve as a cutting block island if you finish the top in butcher block (for holidays or large gatherings) You can then slide it out to access the blind storage and even move it into the kitchen for holiday baking, etc?