Pantry Cabinet Progress — The Finalized Layout
I have pantry cabinet progress to share! It’s not much yet. As you probably know, plain cabinet boxes really aren’t pretty or exciting to look at. They’re just plain plywood boxes, after all. It’s the trim that really dresses them up, and I’m not quite to that stage of the project yet. But I can at least show you the finalized layout.
I feel like I’m running way behind schedule on this project, and I’d be further along if the dang weather would cooperate. On Saturday, just as I was getting ready to start cutting my plywood for the cabinets, it started pouring down rain. A few minutes after that, we started getting severe weather notifications on our phones. And then a few minutes after that, the civil defense sirens started going off, which generally means that a tornado has been spotted in the area.
So I had to hurry and get Matt up and into his wheelchair, gather the animals, and get us all hunkered down in the hallway bathroom until the tornado warning was over. It was a little unsettling, to say the least. After the excitement was over and I got Matt back to bed, I was finally able to get started on the cabinets.
But it’s been raining ever since, so when I realized that I had forgotten to get the plywood for the backs of the cabinets (I use thinner plywood for the backs), I was kind of out of luck. I don’t have a way to transport sheet goods in the pouring rain since all I have is an open bed truck, so I’ll have to wait. But seeing that it’s supposed to rain for the next 40 days and 40 nights (kidding, kind of, but the forecast is showing rain for the next 13 days), I have no idea when I’ll be able to get the supplies to finish the cabinets.
Anyway, I’ll just do what I can, and appreciate any forward momentum I can get on this project.
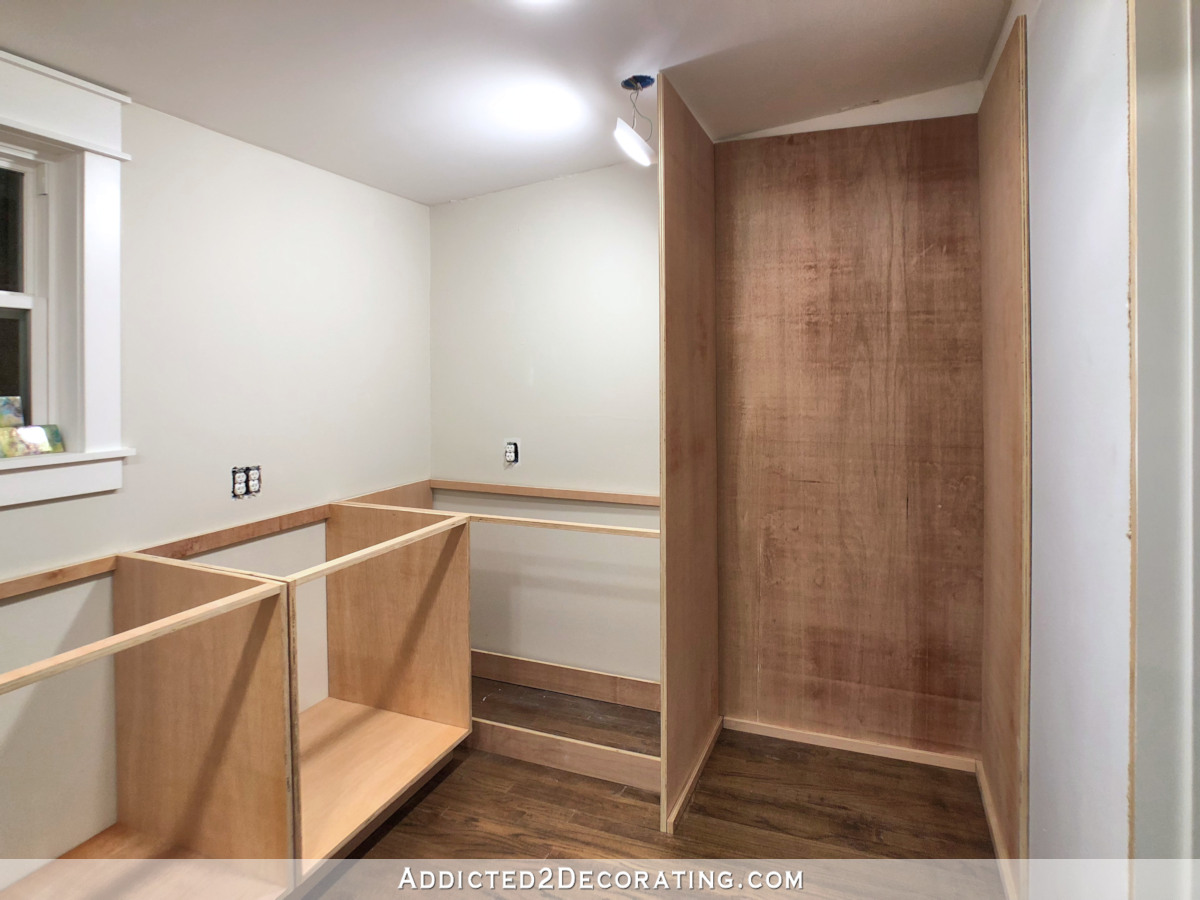
So let me show you the final layout! First up, here’s the view straight through the pantry doors to the back wall…
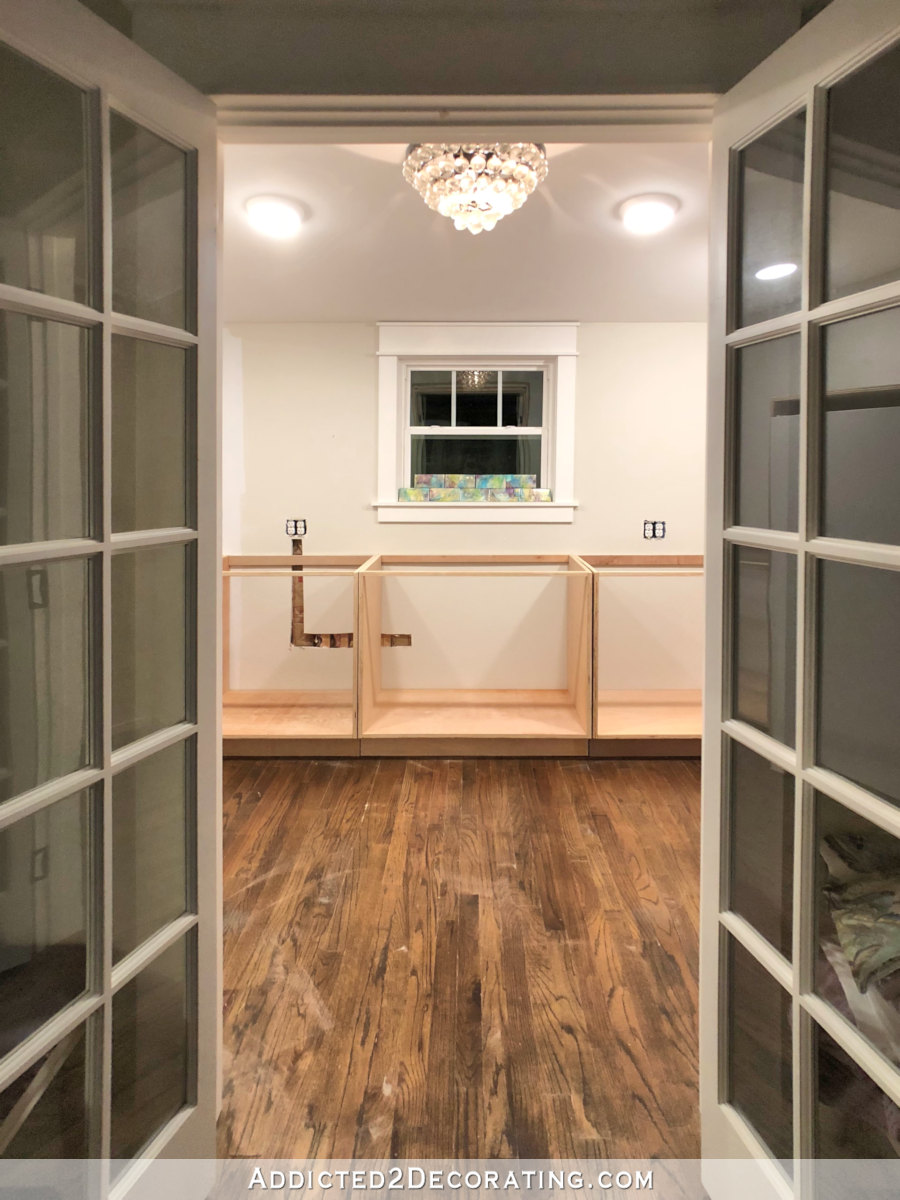
The middle section will be three big drawers, and the sections on either side will be…well, I’m not quite sure yet. I’m just basically making things up as I go along. 😀
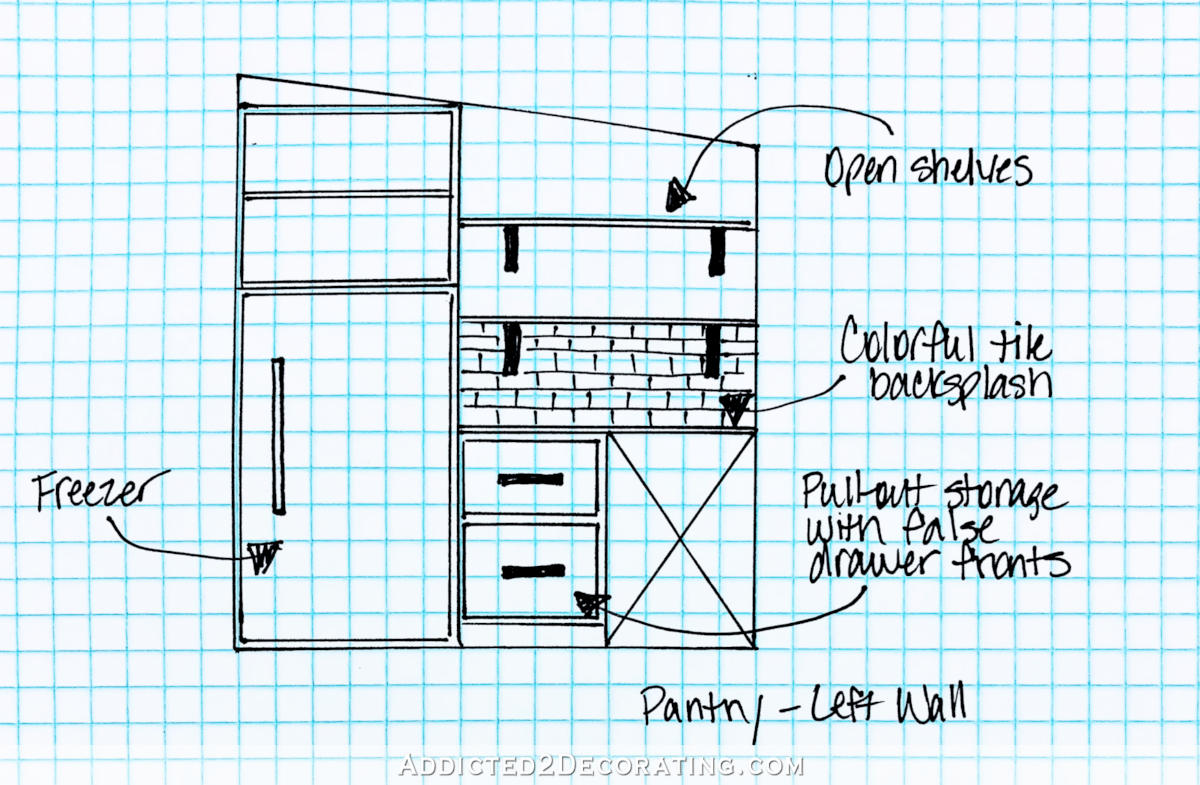
And next up, the left wall. Here’s the drawing I did of the left wall where the freezer is…
And here’s what it looks like so far…
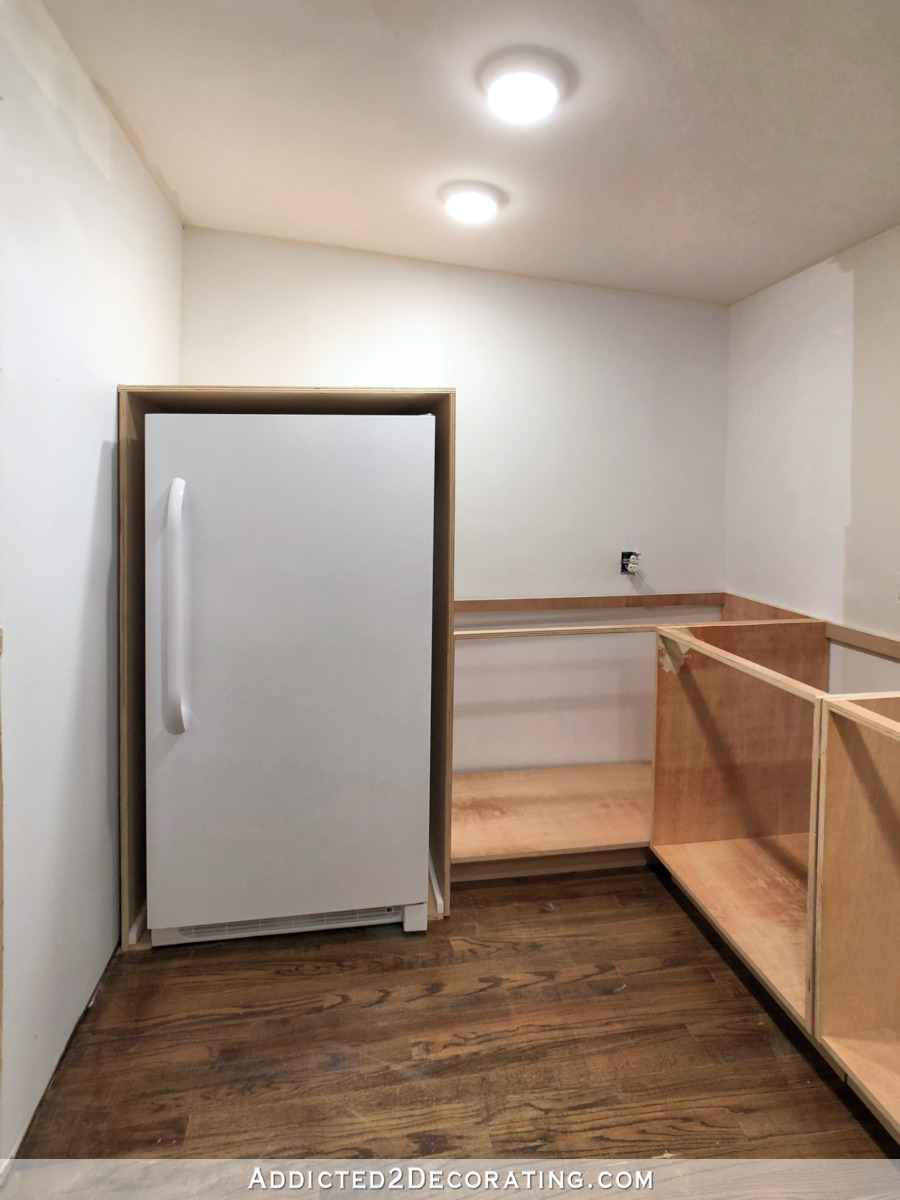
I thought that I had gotten the basic carcasses built for all of the cabinets, but when I started taking these pictures last night after putting the final cabinet in place, I realized that I had completely forgotten about the shelves above the freezer. 😀 Oops! I’ll get to those today.
And as you can see, I decided to keep the freezer on the left wall. This left wall/right wall comparison was the deciding factor for me. On the left wall, where it opens the “wrong” way, it opens way past 90 degrees…
And since the freezer sticks out past the cabinets, there will be nothing there to hinder the door from opening this wide when it’s all finished.
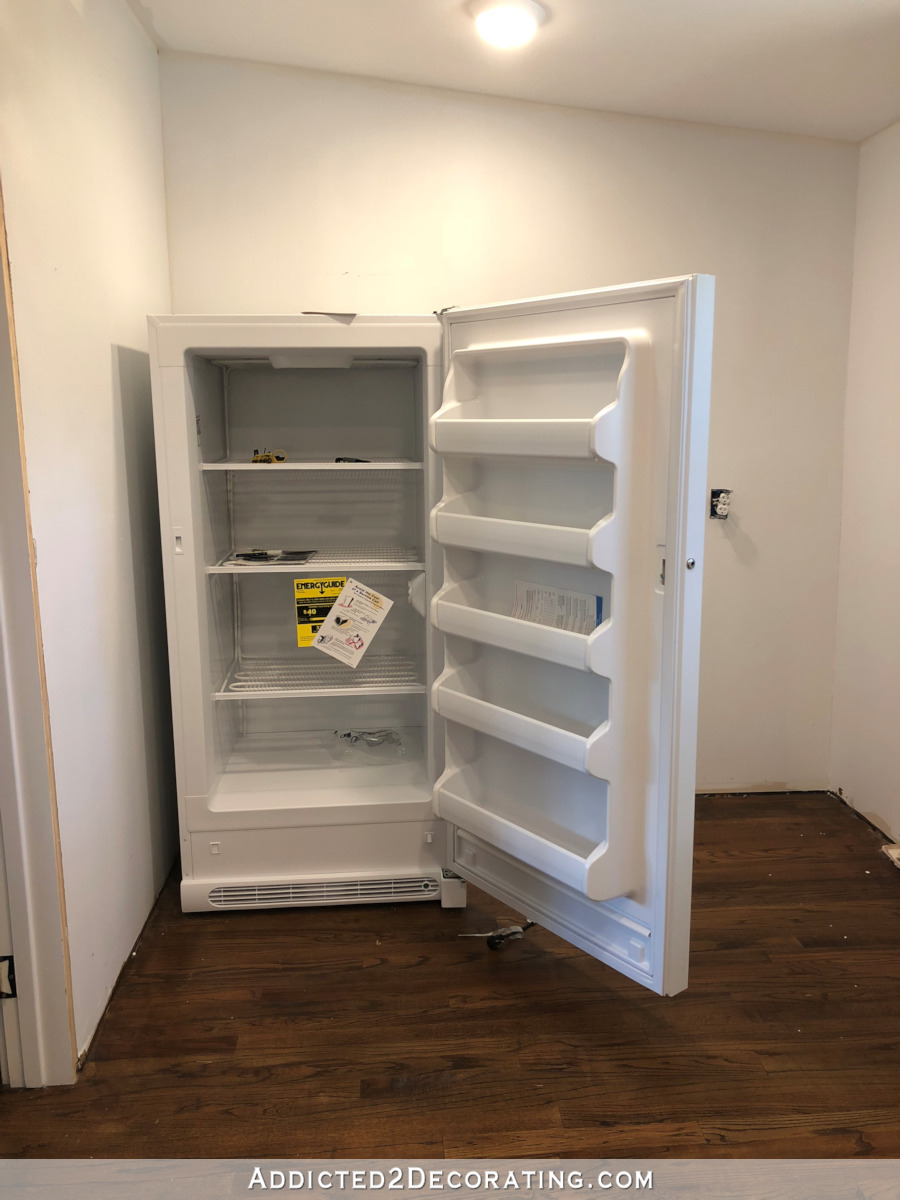
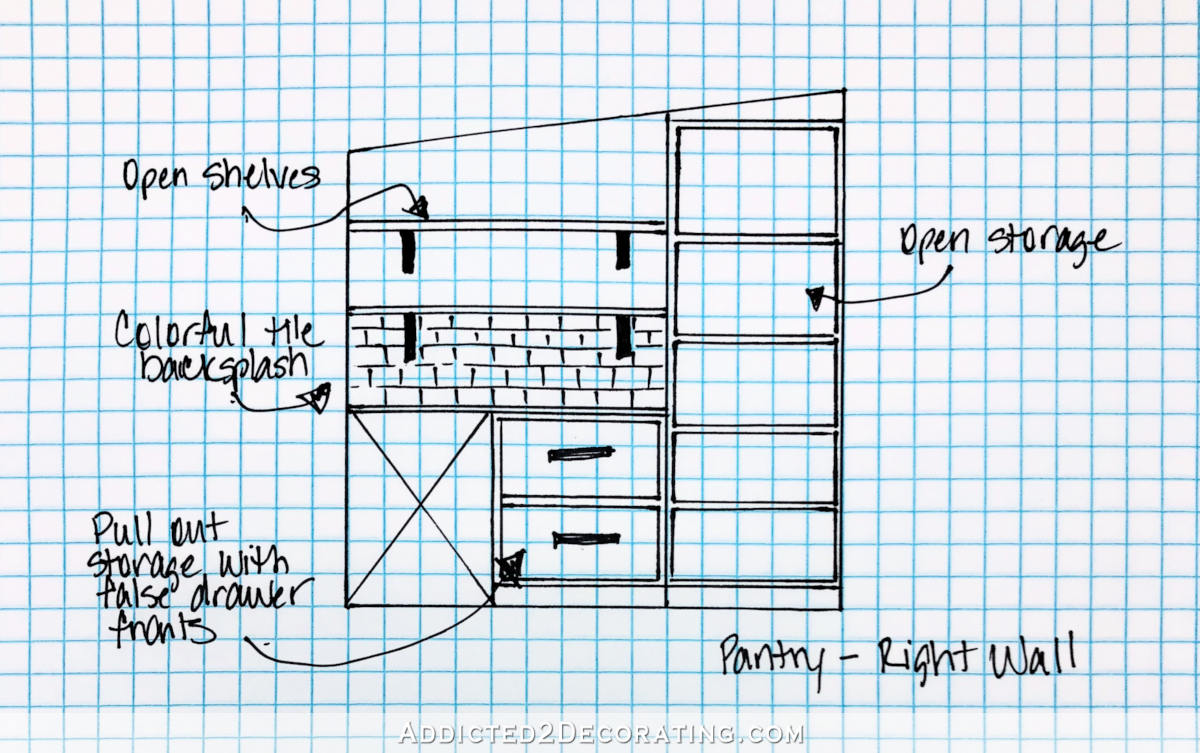
But on the right wall, where it opens the “right” way, it doesn’t even open a full 90 degrees…

I read all of your other suggestions. Some suggested returning this one and getting one that opens the other way so that I could keep it on the left wall, but then I’m right back to it not even opening 90 degrees. Some suggested putting it in the middle of the side wall, but since the room is only seven feet deep, that really hinders the storage space on either side. And if I moved it over too much towards the back (window) wall, it would increase the amount of blind storage in the corner from the standard 24 inches deep to 30 inches deep. And finally, some suggested putting it so that the back of the freezer was against the pantry door wall and creating a galley-style pantry. But the freezer with the door open all the way is 60 inches (five feet) and the countertop on the cabinets on the back wall will be about 25 inches deep, so that doesn’t leave enough room for the freezer door to open all the way.
So in the end, the left wall was the best option.
Moving on to the right wall, opposite the freezer, I plan for it to look like this…
And here’s the progress so far…
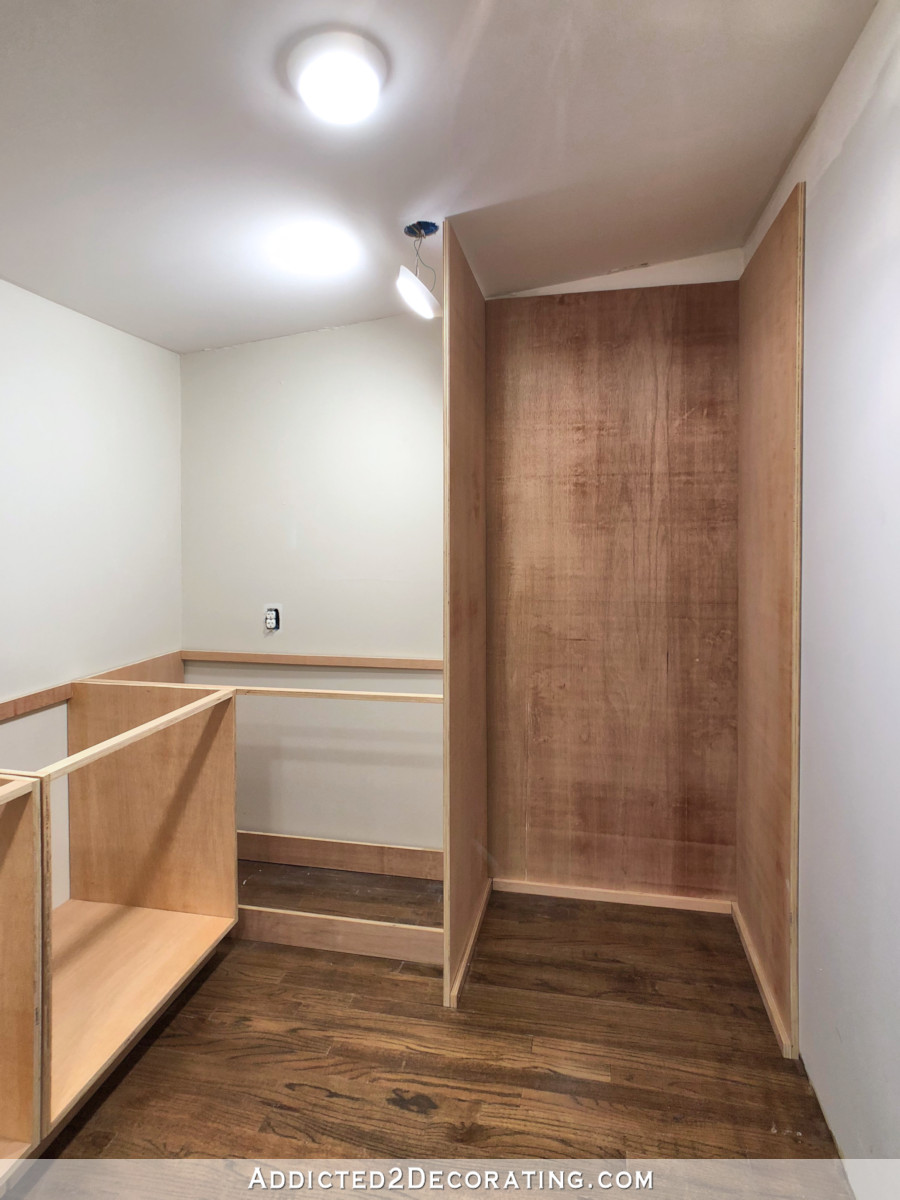
As you can see, I’m going to have to move a couple of lights since they’re in the way of the tall pantry cabinet and the freezer cabinet. I’d like them better centered over the cabinet/countertop sections anyway.
I made that big cabinet the same width as the freezer cabinet because I need symmetry. 🙂 And it’s almost the same depth.
I had originally planned for it to all be open shelves, but I think I’ve changed my mind on that. I’m going to have an open shelf in the middle because I’ve decided to get a microwave. I haven’t had a microwave or used a microwave in fifteen years, and for the most part, I haven’t missed it at all. But I’ve decided that since I have plenty of room in this pantry, I want one again for random things like mug cakes and heating water for hot chocolate. So it’ll go on a middle open shelf, but the rest of them will be closed. I’m not quite sure exactly how just yet, because again, I’m kind of making it up as I go. 😀
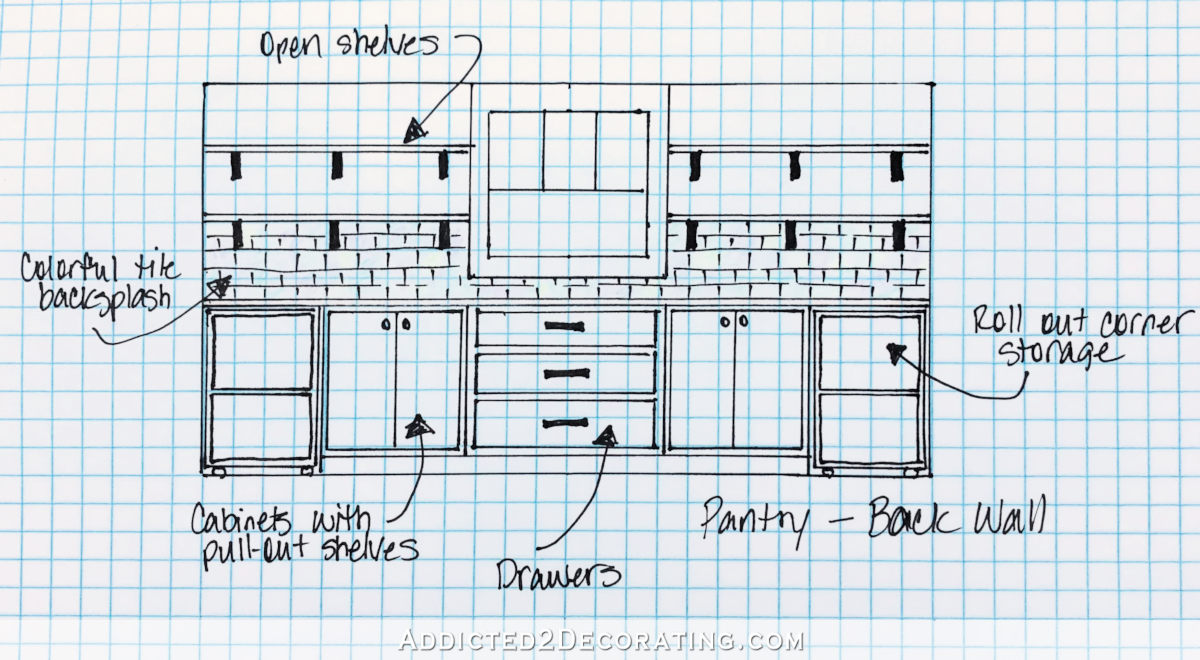
And finally, the back wall will look something like this…
And this is the progress so far…
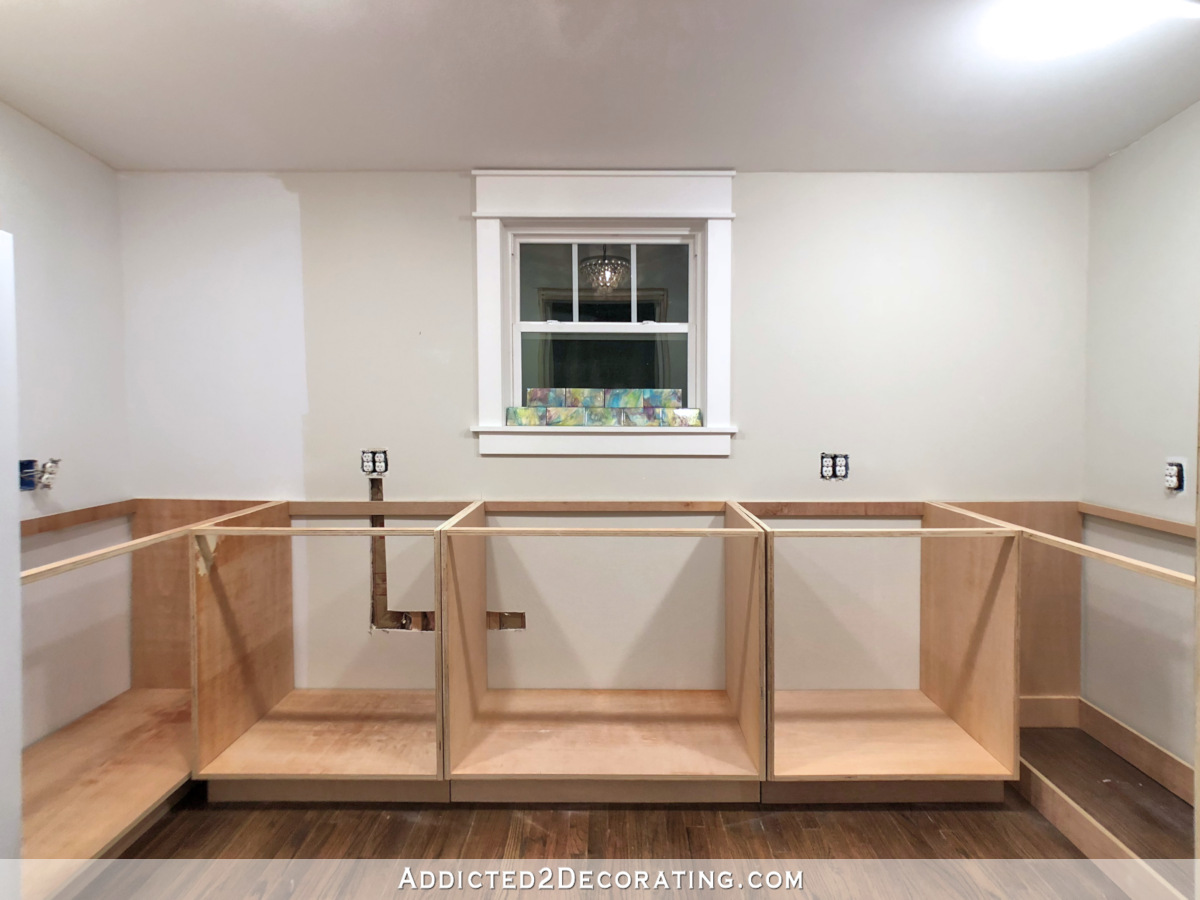
Those cabinets look ridiculously deep, but that’s just a distortion from the wide angle lens that I used. I promise that they’re just a standard cabinet depth.
One major change I made was to the corner storage. I had planned some elaborate design with a pull out rolling carts that would fit right next to the freezer cabinet and the pantry cabinet opposite the freezer. That would allow me to pull out the cart to access the blind corner storage.
In the end, I decided that was just way too much, and would probably be more frustrating than convenient. So I just built regular cabinets that went all the way from the freezer/tall pantry cabinets to the back wall…

Over the last couple of days, several people have tagged me in Instagram posts demonstrating the Rev-a Shelf blind corner storage shelf, which looks really great…
View this post on Instagram
I was about five seconds away from clicking the Buy Now button on two of those when I decided to wait and take a look at the customer-submitted photos. I’m so glad I did, because this photo submitted by a cabinet maker immediately changed my mind on this purchase.
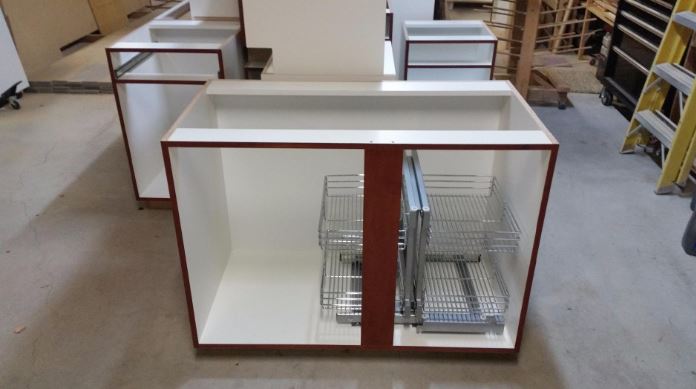
And those things are over $300 each!
So after looking at what seemed like 1000 other ready-made, ready-to-purchase blind corner storage options, I finally decided to go with this option that I’ll make myself…
I mean, presumably I’ll only be storing things in those corners that I won’t need to access very often, so I’m okay with the fact that the corner shelves only pull over to the side and don’t actually pull out.
I’m so tired of thinking (and worrying) about corner storage, so I’m done. This is it. I’ve ordered the drawer slides, and I’m just going with it. 🙂
So that’s the progress so far! Now I just need a break in the rain so I can get the rest of my plywood and finish building these cabinets. I can’t really move forward to other things (like the countertop) until I have this basic cabinet build done.
Update:
My pantry is finished! Want to see the entire project from start to finish? You can find every single post about the pantry build right here…
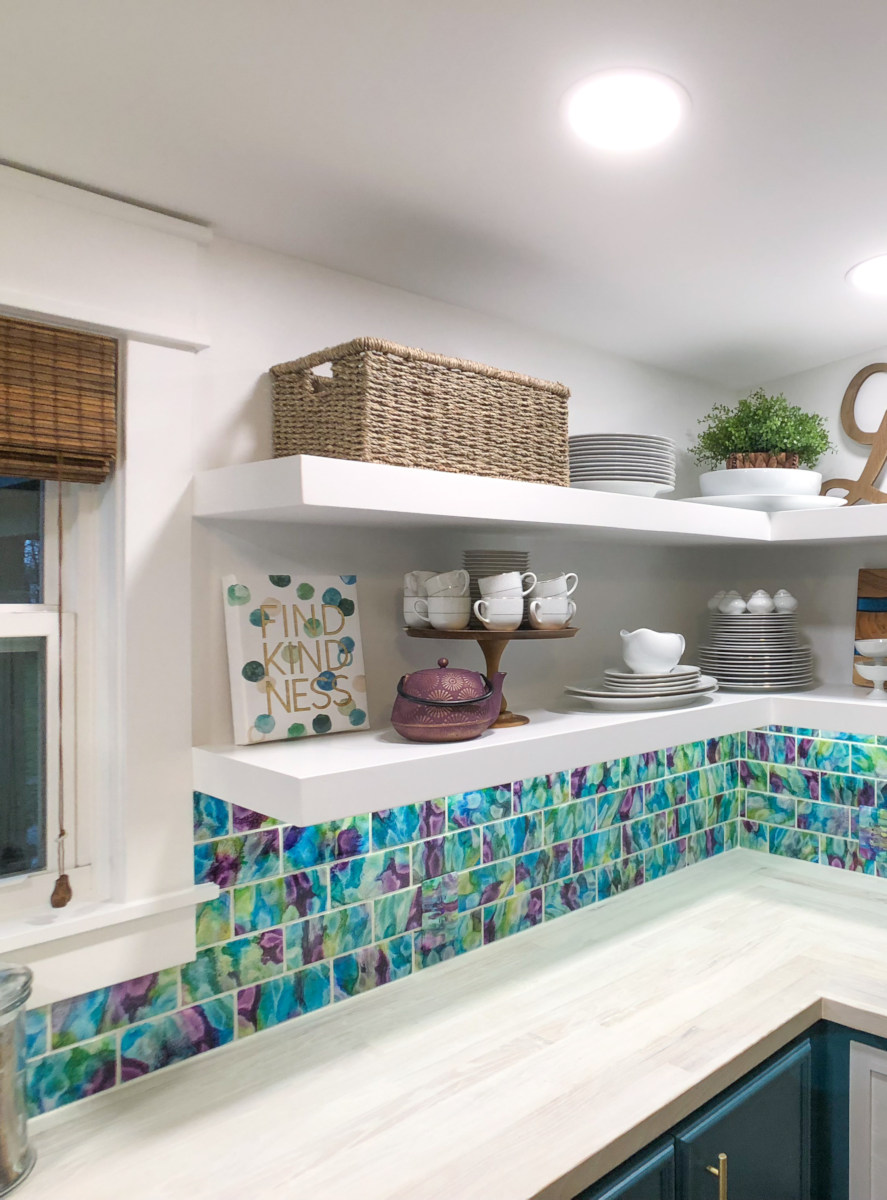
Or you can skip to the end and see how it turned out. Here’s a peek of the finished pantry…
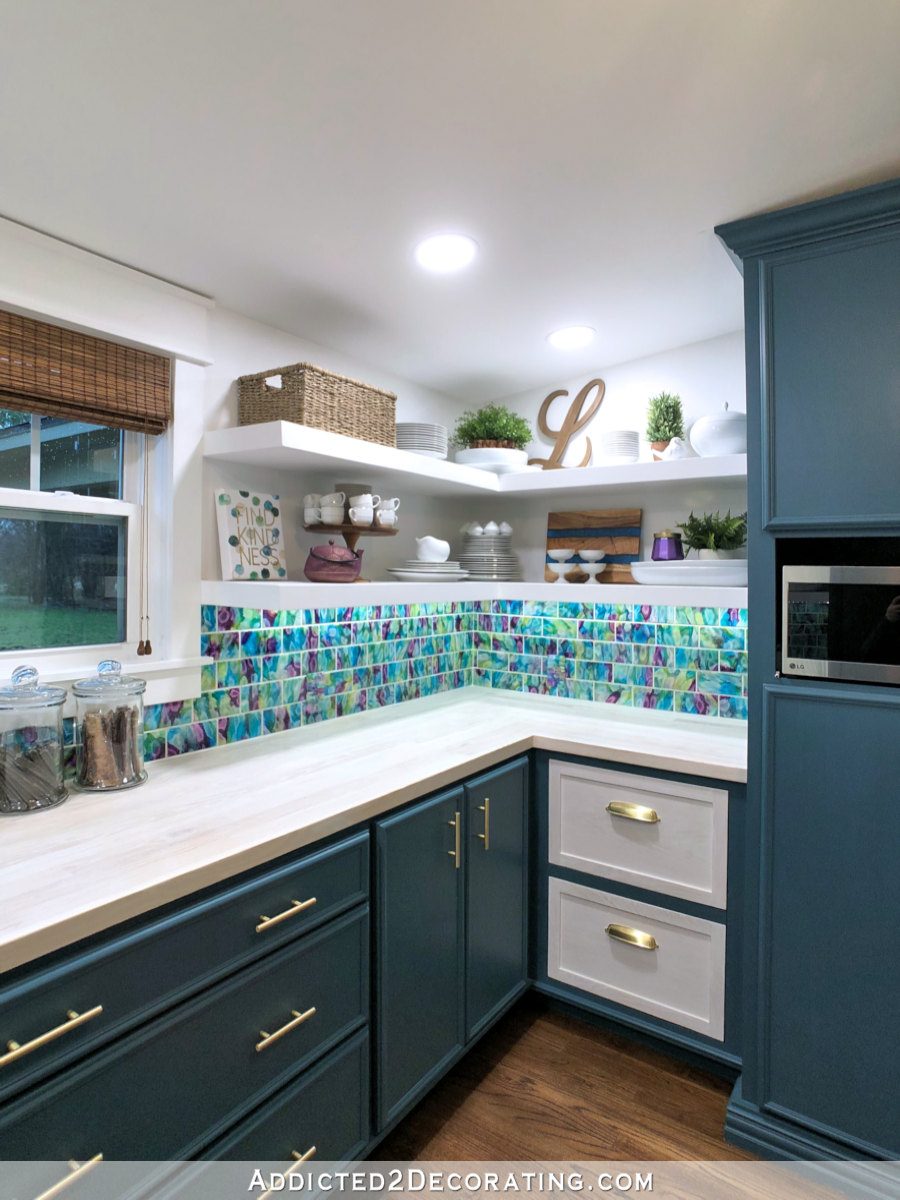
You can see more pictures on the before and after post right here…

Addicted 2 Decorating is where I share my DIY and decorating journey as I remodel and decorate the 1948 fixer upper that my husband, Matt, and I bought in 2013. Matt has M.S. and is unable to do physical work, so I do the majority of the work on the house by myself. You can learn more about me here.

Love the Progress! Love your choices. This is fun to watch, as always .
We just purchased a GE Profile microwave/convection oven combo. It was pricey but gives me a second oven without having to buy a second oven. I’m really liking it- I usually use the convection oven feature and my husband uses the microwave.
Patricia, how do you know how to cook in it? We bought a house just over 2 years ago with the same GE appliance that you have (an Advantium) and I don’t know how to use the convection oven (unless I use the recipe book that came with it). I just keep using it on microwave. Can I just google a bit and figure out how to set it? Help me! Thanks!
Here: http://www.fixya.com/support/p126617-ge_advantium_120_900_watts_convection/manual-51050
Kristi, do you have a post or a video showing how to make the cabinet boxes? I would love to make my own cabinets but don’t know where to start. Thanks in advance!
I will have a full post on it when I actually finish them. I almost shared the steps for the progress so far in today’s post, but decided to wait until the cabinets are actually completely built with the back panels and the face trim. If I can get a break in the weather so I can buy my supplies, I should have that post later this week.
I can’t wait to see how you built the cabinets.
Have you considered using a tarp to wrap the plywood so it doesn’t get wet? Lay a tarp or that black plastic sheeting in the bed of the truck, lay the plywood on it, and then wrap the plywood. We’ve had to do that a few times. It works at keeping the wood dry. I know how frustrating it is to try and wait for the rain to stop.
That might be my only choice. If I’m going to have a chance at getting this done by the end of the One Room Challenge, there’s no way I can wait much longer to get the supplies I need.
Would Home Depot deliver, in a covered truck? Just a thought! My local [Higgenbothems-sp?] delivered my lumber order, no charge about 20 miles. Maybe they would too!
Have you considered just renting a uhaul truck, usually locally it can be like $20 and you’d have a closed box.
This is what we do on the West Coast of BC. We are in a rainforest, so if we didn’t tarp the truck, we’d never be able to transport anything. A nice big tarp, 8’x20′ or so, laid down with a few feet hanging off the tailgate, plywood in on top, the short end wrapped up and in, and the long end at the cab wrapped down and around, then secured with ratcheting tie downs around the load and to the truck bed.
April Wilkerson just shared a plywood dolly a couple days ago on her blog. If i had a shop space larger than my one car garage I’d be getting one for sure.
I love your progress so far – I need to build cabinets for our pantry/freezer room, so I’m watching pretty closely!
Maybe you can get the hardware store to cut the backs to the right size for easy transport?
What about renting a cargo van from uhaul to pick up what you need? They are like $20 a day plus $0.59 per mile. If you just need to run to home Depot or Lowe’s a time or two I’d think it would be worth it to get moving on your project! We’ve rented them twice in the last week to pick up furniture we’ve bought from Facebook marketplace because we don’t have a vehicle large enough. It’s a simple solution that could get you back to building and those vans should be more than big enough for sheets of plywood.
Looking forward to that post Thank you!
This all looks awesome. Keep in mind that for those pantry shelves that you are really thinking will be mostly closed, you’ll have the same 90 degree issue you had with the freezer. I have pull out shelves with cabinets doors AND cabinets drawers. The drawers are SO MUCH more functional, give you access to the back and won’t compete with doors and your wall. Good luck!!
Young House Love went with drawers in their kitchen too and did a video tour recently. I’d love to have that option in my next kitchen
It’s looking great so far!!
Are mug cakes and hot chocolate Keto?! I lived for several years without a microwave and was just fine without it. Then I got one, and I don’t think I could go back. It’s very hard to cook for one, so I end up with a lot of leftovers throughout the week! The microwave makes life so easy. Plus, popcorn! 🙂
For the large open “pantry” opposite the freezer- have you thought about making shallow drawers instead of stationary shelves? My dad built our pantry with very shallow drawers, only about 1.5 to 2-inches deep. So it acts like a shelf, but it’s very easy to get to the back when you need to!
If you look on Pinterest, you can find keto-adapted recipes for just about anything you can think of. I see keto mug cake recipes all the time and keep thinking, “Oh, how easy! And I have the stuff to make it on hand,” and then realize I don’t have a microwave. 😀
haha, I have those same moments with DIY projects. “Oh that looks easy and affordable…I’ll just need to purchase a saw, nail gun, and compressor.” 😀
Muffin in a cup is great! I pretty much create a lot of single serving dry mixes at once. 1/2 cup flax meal, stevia packet, tsp baking soda. When the craving comes I cook em in a little pyrex bowl vs cup (easier to clean). Add egg, tsp oil, then flavor, stir like it’s scrabbled eggs. The flavor can be some berries, cinnamon or what you got on hand. I think I nuke for 45 seconds. Eat once cool enough, and clean the bowl then because it’ll dry out and harden quickly.
wow, your choice is amazing…who would have come up with this idea! Love it! Rain rain go away, Kristi wants to play! I do too…but it is a rainy day here again …so we will “play” inside.
Microwave suggestion; install the electrical plug in the cabinet sidewall OR in the extreme bottom corner of the rear wall. My plug is centered on the back wall and, even with rather long arms, it’s a booger to reach. (Yes, those micros die at some point.)
The ShelfGenie is a terrific find.
I think the blind corner solution you selected will work just fine. There really isn’t a one best option and I generally find that most people are practical and will learn to work with what they’ve got. I support your decision to just make a decision and move forward!
I was in the camp to leave the freezer on the left so that it would open > 90 degrees. I’m glad you did that!
On another note, the muted tiles look great in there! When I look at them in place, I think green cabinetry would look nice. Green with butcher block counters and wood-toned floating open shelves. But, that’s just me. 🙂 I’m sure you’ll pick something that works for you! I think you might want to install the backsplash before picking a cabinetry color, which I’m sure is the totally wrong order to do things, but it might give you a better feel for your color selection.
I’m hoping the weather cooperates for you!
No, I think you’re right about installing the backsplash before picking a paint color. When looking at the tiles lying on the table in the breakfast room, it’s impossible to get a feel for how they’ll actually look in the pantry. And I’m also starting to think that dark purple will be too dark for such a small room. And I love the green suggestion. I saw a picture the other day of a kitchen with green cabinets and wood countertops, and it just looked perfect. Green and natural wood just seem to go together so perfectly.
Mother nature put green and brown together. She didn’t get it wrong! 🙂 I’m sure inspiration will hit when you see it on the wall! 🙂
Looks great, love the layout and excited for forward progress.
I have Genie shelves and they are great. I’m tall, so its convenient to be able to extend the shelf out and grab what I need rather than get on hands and knees and dig at the back of the cabinet.
The corner cabinet option you chose is genius!! Now I want to re-do my corner cabinets.
This may be a TERRIBLE idea but… have you ever considered buying a larger amount of the plywood or MDF that you use regularly and storing it in your garage/shed? I know it may be cost prohibitive but in the long run it could save you time and trips. Also, maybe you could get it delivered! Just a random thought…
I like your corner solution. It seems like the most straight forward and economical plan, especially for storing the stuff you rarely need or think about. Loving the progress!!
Plywood is so expensive and adds up so quickly that I generally only have enough money in my monthly budget to purchase just what I need for the current project. I’d love to have a big stock of plywood stacked in the sunroom, though! That would be amazing! As soon as I win the lottery, I’m going to do that. 😀
I hear ya! I knew it was probably a long shot! But, it’s a fun dream! 🙂
Loving the progress. I can’t wait to see if all done. What are the dimensions of the whole room? I originally was going to have the door on my pantry to the left but now after seeing yours, I’m thinking I might like it in the middle. So many ideas. LOL
It’s 7′ x 12′. It’s a good size, but if I were building from scratch, I would have liked one additional foot of depth. An 8′ x 12′ pantry would be perfect.
Okay….my hubby is building mine 8 x 14 so looking at yours I’m getting a much better idea of what it’ll look like. This helps so much!
Looks awesome! For our last house remodel I wanted a built in microwave “ look” without the cost. I bought a micro from sears ($189) that had a compatible “built in” stainless surround ( approx $100) Looked expensive without the cost.
Going to be gorgeous! You are so talented. Always giving me ideas for my house! Can’t wait to see it finished. Be patient and it will be beautiful in the end!!!
Maybe have Home Depot deliver what you need so it won’t get wet? This is all looking so inspirational.
The ShelfGenie blind corner is new to me! As I was watching the video, though, I thought…I would like it better if it used trays on shelves instead of drawer slides…then the first one could be removed (out of the way) and set on the floor to get to the second one, which could slide over more ‘full extension’ (or even come out for cleaning!). Of course, that precludes storing heavy things…if you have to lift it completely out. Sigh.
BUT…I am in love with the pantry light! I am openly coveting…did you share the source for that already?
It’s from Home Depot, but I painted it before adding the glass balls, and I also had to do some swapping out on the canopy so that it would hang from a slanted ceiling. This is the original light:
https://www.homedepot.com/p/Home-Decorators-Collection-13-in-4-Light-Chrome-Semi-Flushmount-with-Clear-Crystal-Balls-Shade-24429FM-15/206405836
And here’s where I made the changes to it:
https://www.addicted2decorating.com/pantry-lighting-plus-adapting-a-flush-mount-light-for-a-slanted-ceiling.html
❤️❤️❤️
I so wish that freezer didn’t have that utilitarian looking handle. Speaking of which, when you buy your microwave do yourself a favor and get one without a handle but with a push button to open. Sometimes the handles resist (happens when freezers create a suction also) and the oven slides when you try to open. Also if your hands are full it is easier to push a button with one finger or your elbow to open 🙂
I agree about the handle. It’ll come off, and I’ve been trying to think of a way to either change it out (but that would require a very specific size) or change the look of it somehow. Still mulling over some ideas.
Little Green Notebook added cute fridge handles to hers, maybe a similar concept would work for you in whatever style you choose. http://littlegreennotebook.com/2017/10/21507.html/
This is going to be an awesome space. I so wish I had the room in my house for a pantry. I can’t wait for the finished result with those tiles. Your building skills continue to amaze me.
yay!! I’m so glad you started on your pantry! 😀
Sorry about your tornado scare and the rain but I love
the progress you have made. I agree being able to fully open
your freezer is what matters.
The music for that second video was hilariously dramatic
but so is the task of finding the perfect corner storage access solution!! 😀
Cannot wait to see the finished room. Hope the weather gets its act together
for you guys 🙂
I am in awe every time I see what you are building next!
I’m sure you’ve given this some thought, so my comment may be for my own peace of mind more than yours, but here goes. I’m a kitchen designer, and looking at the cabinet that butts up to your blind cabinet, to the right, is making a big red danger sign flash in my brain! Are you planning to use partial or full overlay doors or maybe inset? Will you be adding pulls/knobs?
It’s hard to see for certain in the picture. Do you need a couple inches (filler or wider faceframe) in the corner so the doors open past the doors+hardware on the blind cabinet and vice versa?
I ask only because it is one of the small but important details most commonly overlooked in kitchens.
I wish I had a fraction of your talent. It’s shows in every room of your home!
I’m still not sure if I’m going to use cabinet doors or just open shelves with pull-out shelves. I’ll decide when I have to. 🙂 But if I decide to do cabinet doors, I’ll use partial overlays and make allowances for clearances for door swing and hardware when I install the face frames.
I love the layout! I’m short and my kitchen has those blind corners and if I hit the lottery maybe someday I can fix mine! I also think tile first then paint. I have a built in microwave and as a single gal I use it all the time. I love mug muffins!
It’s looking great, Kristi! You can never have enough storage.
We ended up with a blind corner when we remodeled our bath. We made a concealed removable panel for hidden access. I store valuables there when we are out of town.
Great progress! Love your choice for the corner cabinets. Will be Interesting to see what color you choose for the cabinets!
We just had rain here in Kansas for the past couple of weeks. I was really depressing. Got over 10 inches. Totally maddening as I was trying to get plants moved…so I feel your pain. Things are really looking good.
Looks great so far! I was wondering, your studio is empty and you were going to use it for your projects, so could you cut your wood in there where is it dry and covered. It looks really big and since it is unfinished it would be easy to clean up. I have those rev-a-shelves in all my cabinets (not the corner one, it still has a lazy susan, but I really love them being able to slide out like that. It makes life so much easier.
I’ve been working in the studio. I dragged all of my plywood in there, and put the piece of foam insulation on the floor to do all of my cutting. I loved having that huge space to work in, so now I’m thinking my future workshop needs to be 20′ x 20 as well. 😀 And it’s also got me to thinking that I might need to build all of the cabinets for my studio before I actually have the finish work (drywall, insulation, flooring) done in there. I could build them in the studio, store them in a front bedroom, and then move them back in when I’m ready to install.
I love the way your pantry is shaping up and it looks like it’s going to be wonderful. Much better to have the freezer on the left hand side of the room as you have decided. I think people that objected are forgetting that this appliance is a FREEZER not a refrigerator. You probably won’t be accessing it daily so it is more important to have the best possible visibility with an accessible fully open door since the depth of the room constrains the design. It’s the ideal solution. Ditto with the blind corner problem. These will be rarely used items and I think your solution is excellent. Sad you have to move the lighting, though you will be much happier when it’s just right for all the various areas of the room. So excited for you!
Kristi I think it will be a perfectly usable space and you’ll love all the storage you’ll have. I love it and have no place for anything like that so enjoy it for me!!!
In Australia, most cabinets are made of melamine, which is a plywood type of material with a white laminate coating. You seem to use plywood all the time. Is there a reason you choose the plywood over the laminated material?
We don’t have melamine made of plywood here (or at lease I’ve never seen it). The melamine here is laminated particle board, and I’d just never choose to spend my time or money building cabinets from scratch out of particle board.
Wow, it is looking so good. It is going to be fantastic. You really are so clever. Cheering you on from the other side of the world!
I’ve got the UK version of the Rev-a Shelf blind corner storage shelf and haven’t regretted a moment since I bought it. I did buy the size suitable for my cabinets (there was a choice of size) do I don’t have a great amount of waste in the corner – certainly not the amount that is shown in the picture you’ve shared – and what space was left has been used to store things I rarely use but don’t want to get rid of yet. (the baskets can be lifted off to give easy access to that bit of ‘dead’ corner).
My one concern with the Shelf Genie is the amount of stretch needed to reach the back. I don’t think I, personally, could reach to the very back so that space would be wasted if I couldn’t reach it, unless the front trays can be lifted to allow easier access to the back. I’m sure there could be a way devised to make that access easier if needed 😉
Just to add – it’s looking amazing and can’t wait to see the finished room x
I was wondering what height you are thinking of installing the micro at and how many drawers underneath. I ask because I am unsure of what height to do mine at (I will be having all drawers under it) and how many drawers under in whatever amount of space is left. Are there standard drawer depths? Also I’m sure you’ve accounted for, but I just wanted to mention the side cabinets against the walls and between the fridge and the cupboards and if you need spacers or not so doors can open a full 90. I don’t know anything about building cabinets other than what youve taught me, just don’t want you to have to have a hallway cabinet redo repeat especially considering you are on the orc deadline.
I was thinking of just putting it at or around countertop height, so around 36″ high. If I do drawers underneath, that would leave room for three medium-sized drawers, or two really deep drawers. I’m sure there are standard depths, but I’m not aware of them. I just go to Houzz.com and look at the pictures to see what seems standard, and it seems like on a standard-height countertop cabinet, people generally have three drawers under the countertop — one top drawer that’s shorter, and the other two that are equal height and taller.
I love the solution of the ShelfGenie Blind Corner. It seems really smart.
The music on that video though… lol, so dramatic!
Wow! I’m so impressed with your progress!!
I realize I’m playing devil’s advocate here and it might be too late anyway, but I have a suggestion.
If I remember correctly, the other side of the pantry’s right wall is the studio’s mud room? If so, have you considered making some sort of pass through/direct access from the mud room to the pantry? This could be helpful for when you bring groceries home. Perhaps some kind of opening that is framed out on both sides with cabinets doors? The opening could open up right on to the counter area in the pantry’s right wall that you already have in place.
I believe the other side of the right pantry wall is actually the half bath.
Sounds like a good plan!
I heard from my daughter in San Antonio about all the rain….it better stop soon, as we are heading there the first of the month! We want to hit the Vintage Market that weekend, but not if it’s raining!
When we had a pickup truck, hubs rigged some 2×4’s above the wheel wells in the bed and would transport the sheets of plywood etc. on those. Kept them off the floor of the bed, and he tarped over the entire bed if it was wet out. If he bought other stuff ( boxes of screws, or other small things) they would go under the raised up plywood. Don’t know if your truck has grooves/slots for the 2×4’s, but ours did. Worked great! RAIN, RAIN, GO AWAY! And be in the 60-70’s when we come! LOL!
If I were you I would only do a bottom corner shelf like the one in the video because I have pull-outs in my lower cabinets and that top shelf is quite shallow so I would suggest just doing one on the bottom for larger pieces
AHH!!! I’m so jealous of your pantry!! It’s going to be awesome.
I love your blog and I love your choices, but forgive me, I can’t tell what it was in the user submitted photo that made you decide not to get the Rev-a-Shelf unit. I’m considering one of those, and I’d like to know
what I’m not seeing.
It’s all of the empty space on the left side of the cabinet that the shelf doesn’t fill.
Oooohhhhh. Thanks!
I really think a lighter purple (than what you’d shown) would be gorgeous in there with your tiles. I keep looking at them and there seems to be a little of teal/ish/green tone with purple highlights! I think that would be beautiful? But whatever you decide will turn out beautiful as always!
As soon as you get your blind corner storage all finished, I’ll probly have to go redo mine because yours look like they’re going to work so much better than mine do. Can’t wait!
I know you recently figured out how to cut plywood at home (yay), but couldn’t you just have Home Depot cut the sizes you need and put it in your car?
Love, love, love. I want that pantry. But I just can’t find a place to put it.