Pantry Remodel Follow-Up: Video Tour, Under Cabinet Lighting, Etc.
I’m back today with a little more info about my pantry remodel. If you missed the big “before and after” post filled with photos of my newly finished pantry remodel, you can see it here:
I had intended to include a short video tour in yesterday’s post, but after encountering technical difficulty after difficulty with my computer on Wednesday, it was all I could do to just get photos edited. So I finally gave up on the video and went to bed. But I gave it another try yesterday (after doing quite a bit of computer maintenance to make things run smoother), so I thought I’d go ahead and share it today.
(Having difficulty with that video? You can click here to view it on YouTube.)
I also wanted to take a moment and answer a couple of questions that I was asked by several people yesterday. First, let’s talk about under cabinet lighting.
How I installed my under cabinet LED tape lighting
Several people wanted the details on just how I installed the lighting in my pantry, so let me show you some close up photos of just how and where everything is attached.
You can click here to see the LED tape lights I used for the pantry. These are the same ones I used on my front porch just a couple of weeks ago. If you missed that project, you can see it here:
For the pantry, I needed two sets of those lights — one set for each side. And each strip of lights needed to be plugged in, obviously. And since these are dimmable and operated by a remote control, each strip also needed a little sensor for the remote to be accessible. If you look at the bottom left corner of the microwave, you’ll see one of the little sensors sticking out…
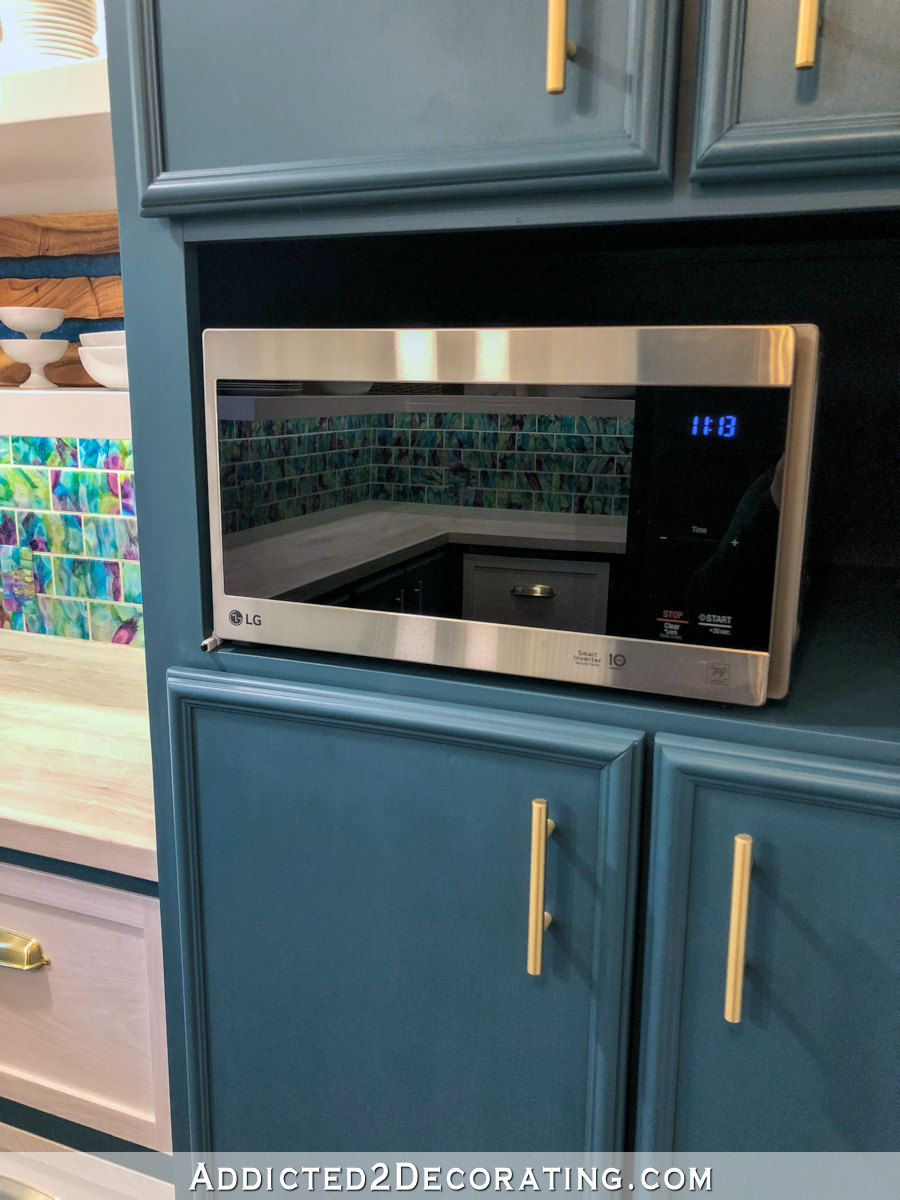
So the lights on the right side of the pantry are plugged into the same outlet that powers the microwave, and the transformer box is just sitting right beside the microwave. When the microwave is in its proper place, you can’t see the box. But here’s a look at it with the microwave pushed over some…

And then to connect the light strip, I just drilled a 1/2-inch hole through the side of that cabinet right in the position I wanted the lights.
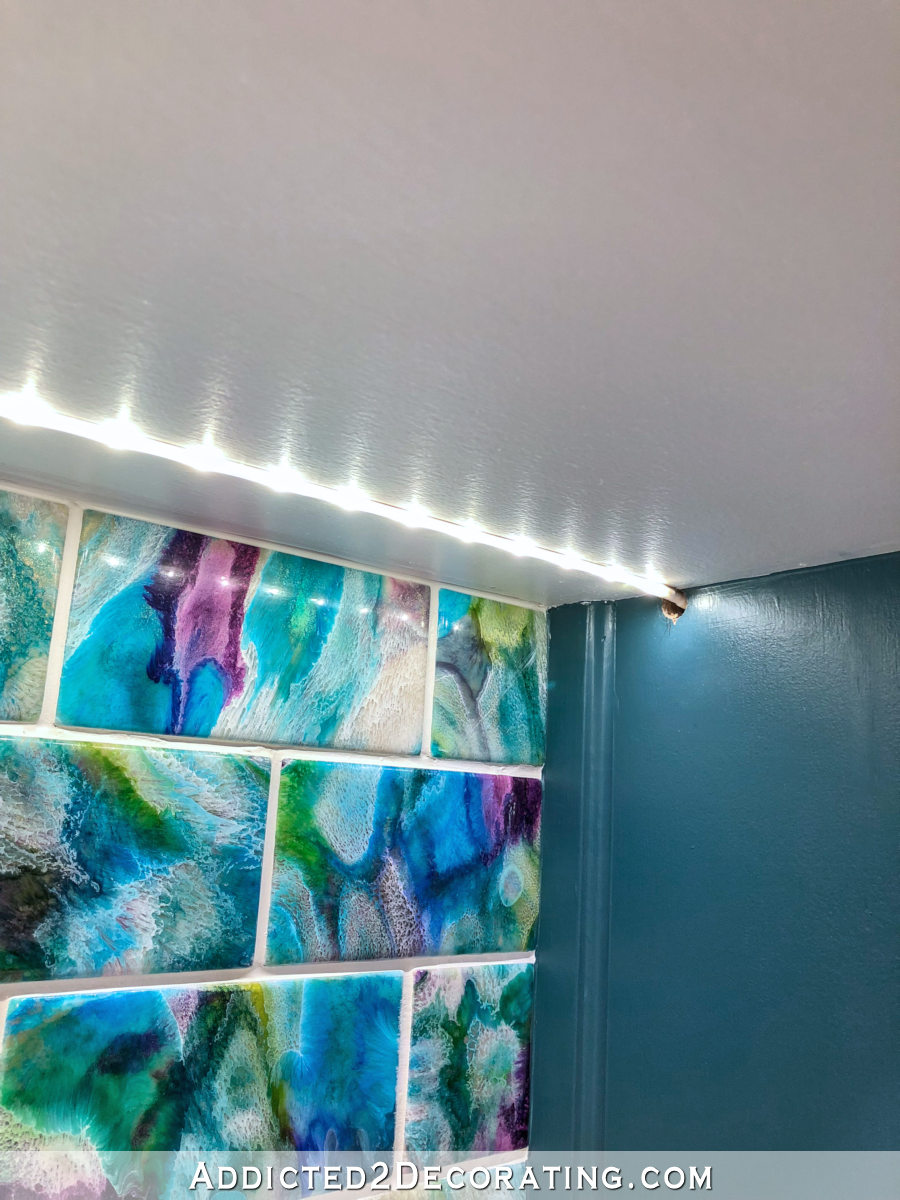
I tested out several positions for the light strip — right up against the tiles, an inch away from the tiles, two inches away from the tiles, etc. — before committing and drilling that hole. I finally decided that for this room, 2.5 inches away from the tiles was the perfect position for the best lighting and the least amount of harsh reflections on the tiles. I just used a scrap piece of 1″ x 3″ lumber (which is 2.5 inches wide) as a guide to attach the light strip.
On the other side of the pantry, the undercabinet lights share the outlet where the freezer is plugged in, which is down towards the lower left of the wall behind the freezer…
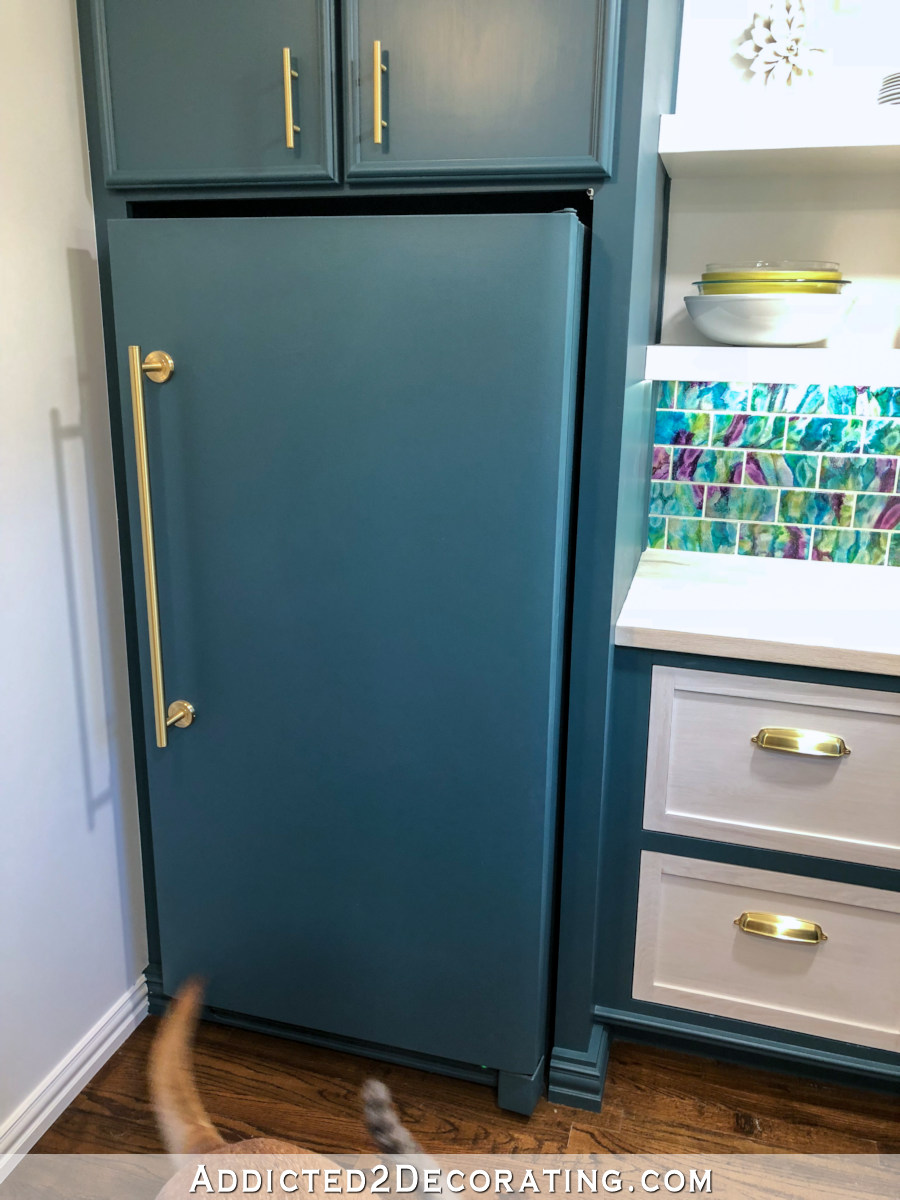
The cords on those lights are pretty long, so there was plenty of cord to reach around the back of the freezer and up to the right side of the inside of the freezer cabinet. And that’s where I attached the transformer box and the sensor.

I enhanced the fill light while editing that photo above so that the transformer box would show up, but in the actual room, it’s not noticeable. And you can see that the little sensor for the remote peeks out in that corner. I used the small wire staples that come with the lights to secure the sensors on both sides of the pantry.
And just like the other side, I drilled a 1/2-inch hole and fed the light strip through, and then used a scrap piece of 1″ x 3″ lumber to determine placement of the strip.

As far as the remote goes, I just used a piece of sticky Velcro to attach it to the wall just inside the pantry doors.

It actually works just fine without removing it from the wall, so the Velcro probably wasn’t needed. I probably could have just permanently attached it right there.
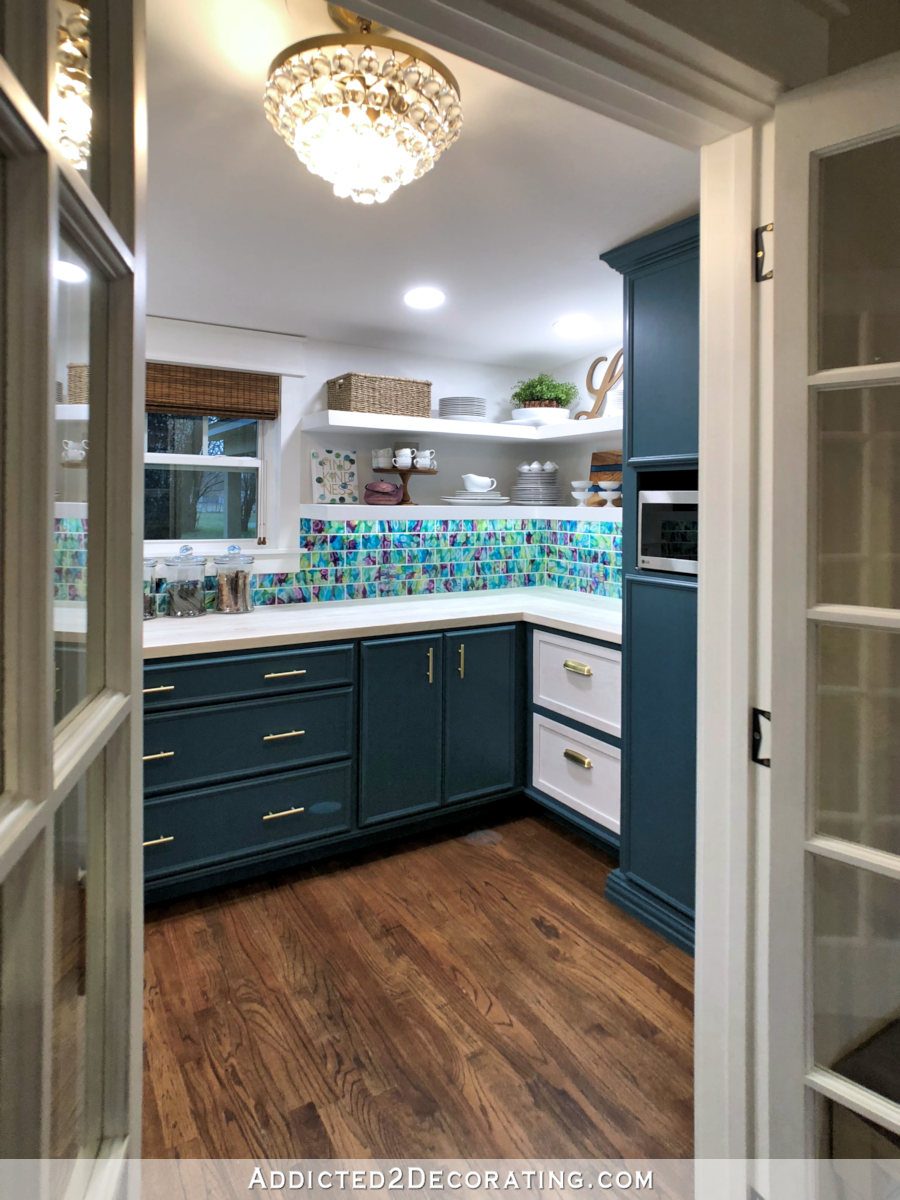
During the day, I love to keep the under cabinet lights on with the rest of the lights off. I just love seeing those tiles sparkle when I walk by. The picture doesn’t do it justice, but it’ll give you an idea of what it looks like…
It looks like that in the early morning and midday until around 1:00pm and later. That window faces west, so after around mid-afternoon, the room fills with sunlight, which is also very pretty. But I’m partial to the look of the dimly-lit room with the undercabinet lighting on.
Where exactly is this pantry?
I had a few people comment about how strange the placement of my pantry is. I agree that it’s not the ideal location for a pantry. Most pantries are just a room right off of the kitchen, and mine is not. Mine sits at the back of the breakfast room.
I really didn’t have a whole lot of options when it came to pantry placement. Our house was built in 1948, and when remodeling an old house to fit today’s needs and wants, you’ll most often come up against a few challenges. Big walk-in pantries weren’t really a thing in 1948, so I had to improvise.
So while it may not be exactly where I’d put a pantry if I were building a custom house from the ground up, it’s really not as strange as some might think.
Again, my pantry isn’t a food pantry, except for the freezer. And the freezer isn’t something I’ll need to access over and over while cooking. In fact, I generally get the chicken or beef out of the freezer early in the morning so that it’s thawed by the time I’m ready to cook lunch. The rest of the pantry stores my cookware, kitchen appliances, and gadgets that I don’t use on a daily basis. The cookware I use every single day is stored very conveniently on either side of my stove. So in the event that I do want to dehydrate some veggies, or use my air fryer, or cook some chili in the InstantPot, I’ll go to the pantry, get what I need, and that’s it. It’s just not the type of pantry that I need to access several times while cooking a meal.
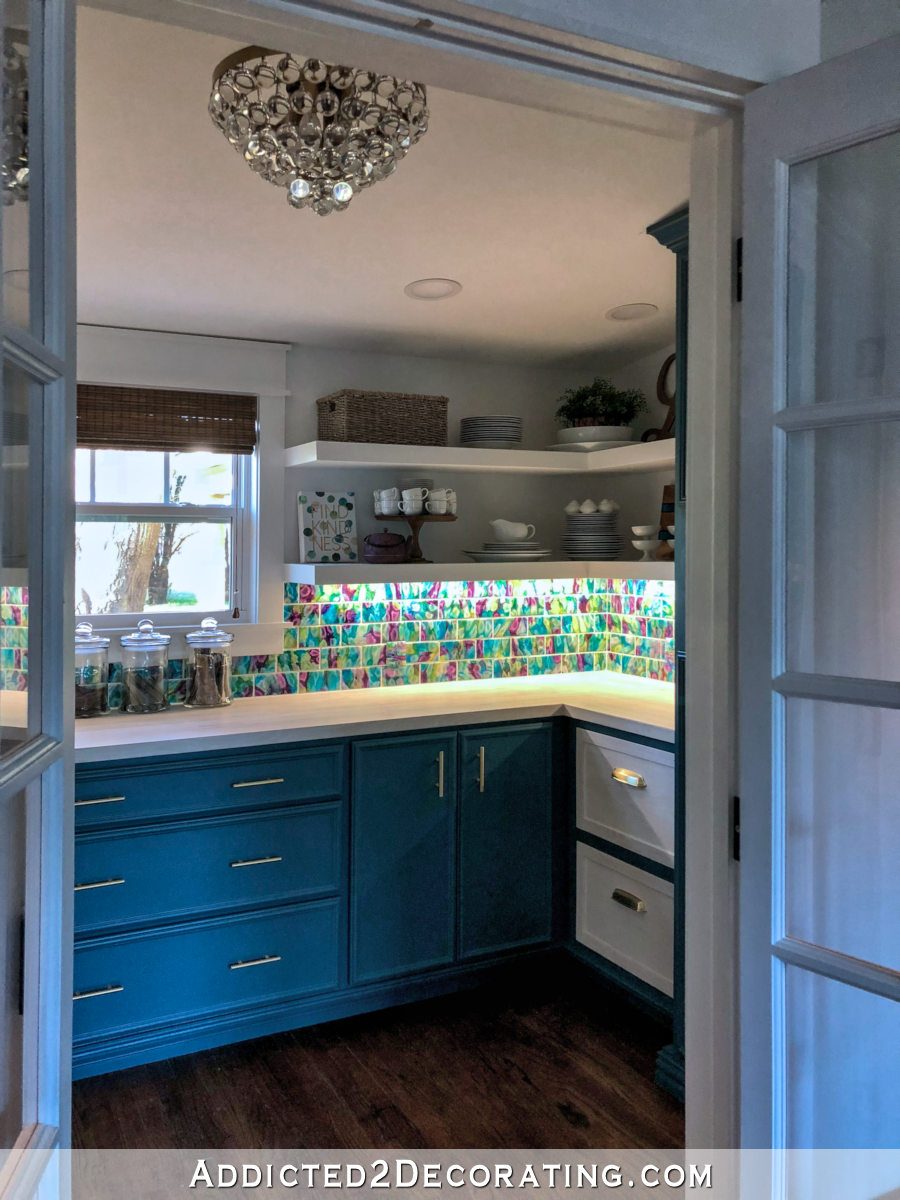
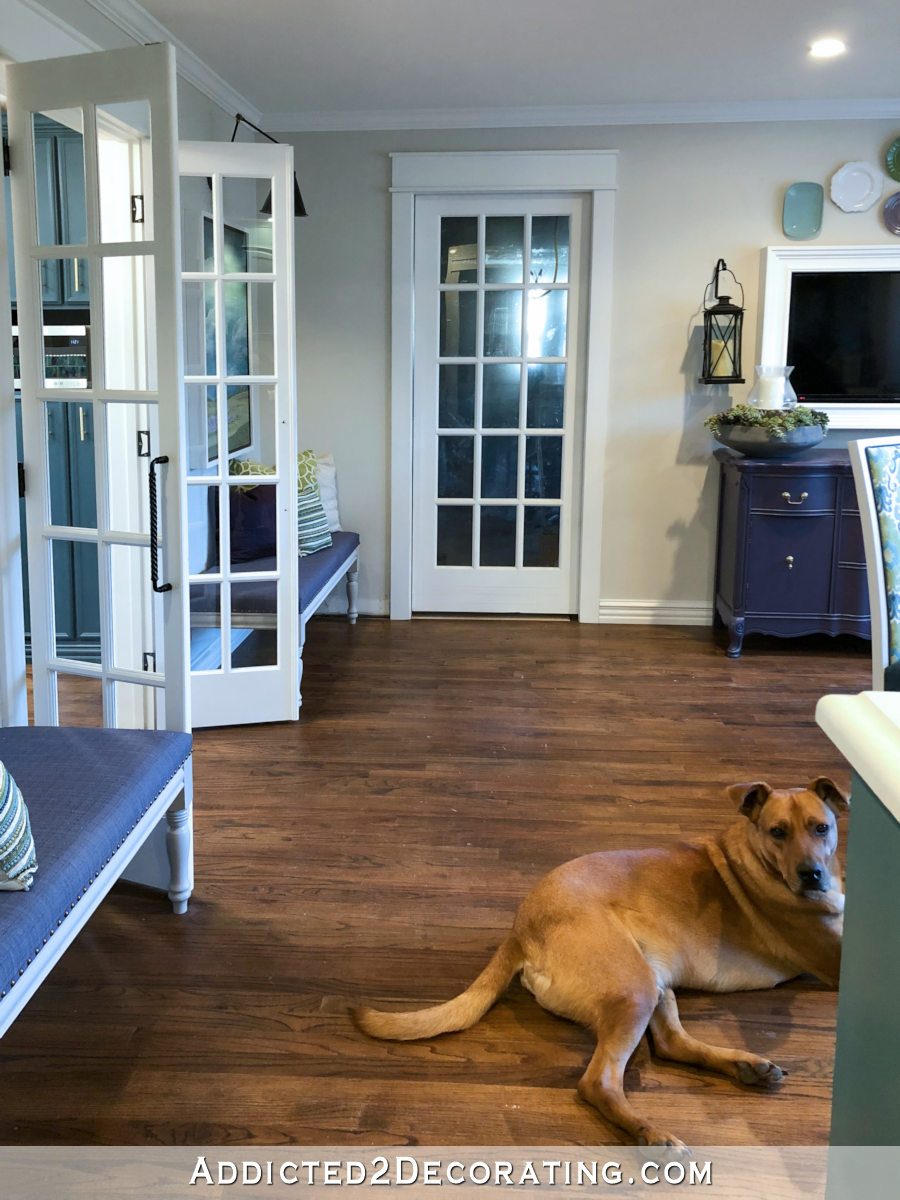
But even at that, it’s still very convenient. In this picture, I’m standing at the kitchen peninsula, right where I do the large majority of my food prep, and you can see that the pantry is literally six steps away…
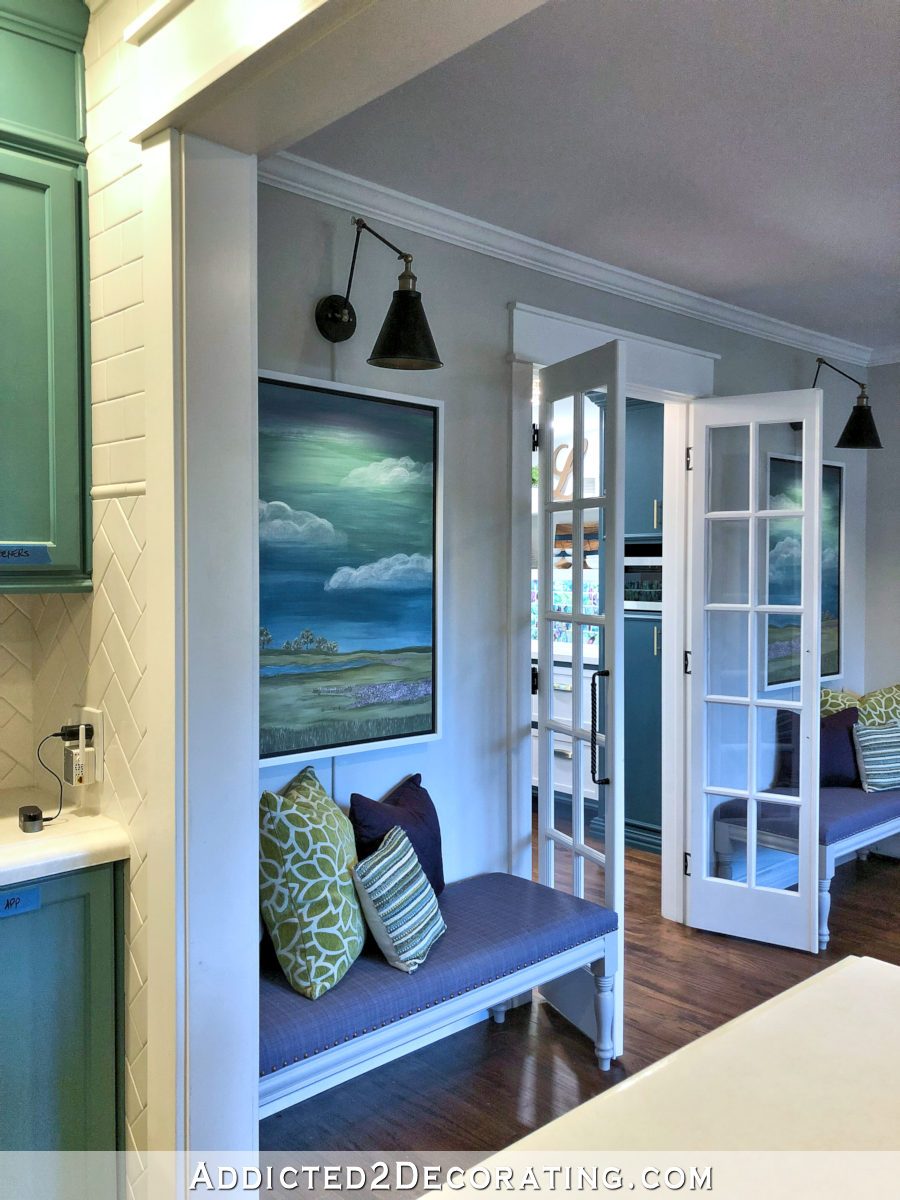
And while it’s at the back of the breakfast room, I don’t have to actually walk through the dining area. The area where the table and chairs sit is separated from the back pantry area by a clear and unobstructed traffic path that leads from the kitchen, through the breakfast room and into my studio. You can see below that the table and chairs sit to the right of that traffic path, and the pantry is to the left.
It’s actually very conveniently located, especially considering that I had to work within the confines of an existing old home in order to carve out a space for a pantry. My mom lives in a house built in the 60s, and she has zero space to add on a pantry even if she wanted one. So she uses a closet in her garage as a pantry-type space to store overflow items from her kitchen that she doesn’t use regularly. So I’m perfectly okay with those six extra steps I have to take to get from my kitchen to my large walk-in pantry. 🙂
How Did I Clean My Floors?
I know that so many of you get concerned about my floors when I’m working on a big project and I post pictures of them looking like this…
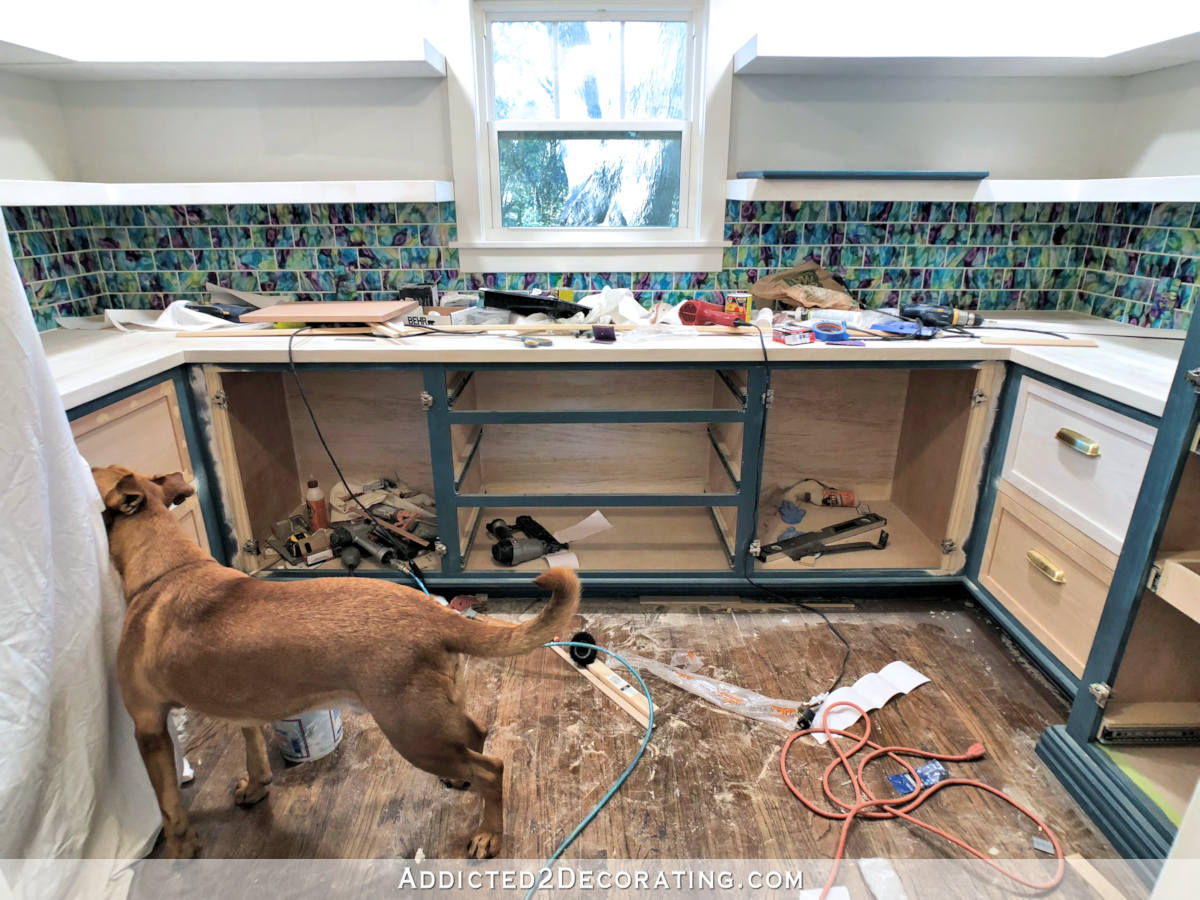
I get it. That really does look pretty bad. It’s not just dust, but it’s also a few paint splotches, some drywall mud, a few globs of wood filler, with probably some caulk thrown in.
If you’ve followed me long at all, you know I have an aversion to drop cloths. I find them to be more of a hassle than a help. I know there are other things you can put on the floor, like that cardboard roll that contractors use, but I just hate the hassle. And I’m always quite confident that I can get everything off of my floors when I’m done. 😀
And you’ll notice that in my pictures yesterday, my floor was clean and unscathed.
And I promise you that I didn’t do a single bit of retouching with my photo editing software on those floors. If I had, I would have removed that one reflection towards the corner. (That’s where the recessed light reflected on my camera lens.)
I’ve shared before how I clean my floors after a big project, and I’m happy to share again. I get a big bucket of warm/hot water, and I add white vinegar, baking soda and a small bit of Palmolive Oxy dishwashing liquid. It bubbles vigorously, and I use it as quickly as I can after mixing it.
When I shared this before, someone commented and said, “Kristi, all you’re doing is making salt.” I thought, “Wow. I should have paid more attention in chemistry. Now I feel really stupid.” And for several months after that, any time I finished a project and needed to clean my floors, I’d just use water with vinegar.
But it just didn’t work. Warm vinegar water would not get up the paint splotches and other mystery substances that landed on my floor during a project. So I went back to my original formula, and it just seems to work. Maybe salt is a powerful cleaner. I have no idea. But I know that it works, and I don’t question the magic. 😀
I mix it up, use it as quickly as I can while it’s still hot and bubbling a bit, and I use a yellow and green kitchen sponge to scrub up any stubborn spots. If something isn’t coming up easily, I get the sponge pretty wet, set it on the stubborn spot for a few minutes, and then scrub it up. I use a moderate amount of pressure to scrub — not enough to scratch the polyurethane finish on my floors.
And that’s it! After I vacuum up all of the dust, and scrub off all of the spots of paint, caulk, etc., I then do a couple of passes with my Bona hardwood floor spray mop (which you can find here…I’d be lost without mine!), and it’s done!
Please note that I cannot and will not guarantee that this will work for you if you choose to forgo the drop cloth, let stuff drop on your floors, and clean them up after your project is done. I’m just sharing what works for me, and the process I’ve been using for years.
I think those were the main questions I got, but if I missed something that you’re wondering about, don’t hesitate to let me know! And I’m still working on that final cost for the pantry. I’ll probably add it to the original pantry before and after post when I have that info, but I’ll let y’all know when it’s updated if you want that info.

Addicted 2 Decorating is where I share my DIY and decorating journey as I remodel and decorate the 1948 fixer upper that my husband, Matt, and I bought in 2013. Matt has M.S. and is unable to do physical work, so I do the majority of the work on the house by myself. You can learn more about me here.


Impressive!
I love that your pantry is located where it is. Convenient, pretty and practical, all at the same time.
Thanks for the tour. You really have something to be proud of. Great job Kristi. Happy New Year to you both. PS great job on scanning comments, much nicer place now.
Baking powder? I’ve heard of using baking soda, but not baking powder. May give that a try!
Wait! No! I think I mixed those up. Baking soda is correct. 😀
Are you sure there isn’t a Murphy bed in there? 🙂 That is a gorgeous room.
I tho’t when we moved into this house that I’d have TONS of storage…pantry, open shelves & loads of cupboards. But the pantry is along one wall & all cut up into odd spaces. When my contractor gets here, one of the goals is to tear out all the odd spaces & do a whole wall pantry with doors that open all the way. Can’t wait.
So proud of all you’ve done. You ROCK!
Beautiful! So glad you have it finished and can enjoy the fruits of your hard work. Hope to see you in the Spring ORC.. 🙂
Hi Kristi, this is completely off topic but I just wanted to say, I love the new look of your website! Very “you”!!
I’m surprised that people thought your pantry was inconveniently located. Even in brand new houses, my family had pantries that were in the hallway, around the kitchen island, in another room, the list goes on. And those were food pantries! I honestly would think it would be no issue to have a pantry located like yours, even if it was a food pantry.
I love all the photos of your pantry, and the poochie photo bombs as well. He’s so cute.
I agree. My “pantry” is down the stairs in my basement. I’d love to have a Butler’s pantry so close.
We use a mix of warm water, vinegar and dish soap for cleaning and it does wonders! Have you tried that and leaving out the baking soda? Baking soda and vinegar react and essentially create water and a bit of salt. I really wonder if it isn’t the vinegar and dish soap that’s getting your cleaning done! I use a mix of straight vinegar and dish soap to clean the bathtub and it works wonders! Removes hard water stains better than anything I’ve bought at a store.
I LOVE your pantry and am so jealous! We moved this fall and left a home in TX that had a big beautiful kitchen with PLENTY of storage for everything and now we have a tiny kitchen and a mixed use pantry in our home in ID. It mostly has food in it but also acts as overflow for all of the extra kitchen stuff that won’t fit in the kitchen. I’d love to have plenty of space again for everything!
Your pantry is absolutely beautiful. I would like a Butler’s pantry but do not have a place to put it and I do not have your building skills. I would also like a library like in old English homes, I’m working on that.
Ahhhhh. Your pantry is just soothing. It’s so lovely! Congratulations on the finished room, enjoy for many years to come!
Don’t you have any issues with the floors getting scratched while you’re doing construction? Or is that just part of the charm of making them look older/age of the house?
I will have to try your magic formula on a closet somewhere in my house next time I paint.
Did you used to use the same tactic back when you had waterlox on the floors?
I waterloxed mine (based on your post) and I love them because of how easy to retouch they are when I get scratches.
LOVE the pantry! So cute!! So organized and functional. You are amazing. And please update us if you find a good 90-second cake recipe. All the brownie and cake ones we’ve tried have been total flops!
Love the Butlers Pantry!! I have been inspired to do some of those tiles 😁.
If I had such a lovely room I would leave the strip lights on all the time. This pantry (esp. the tiles) makes me smile, and lifts my spirits every time I see it.
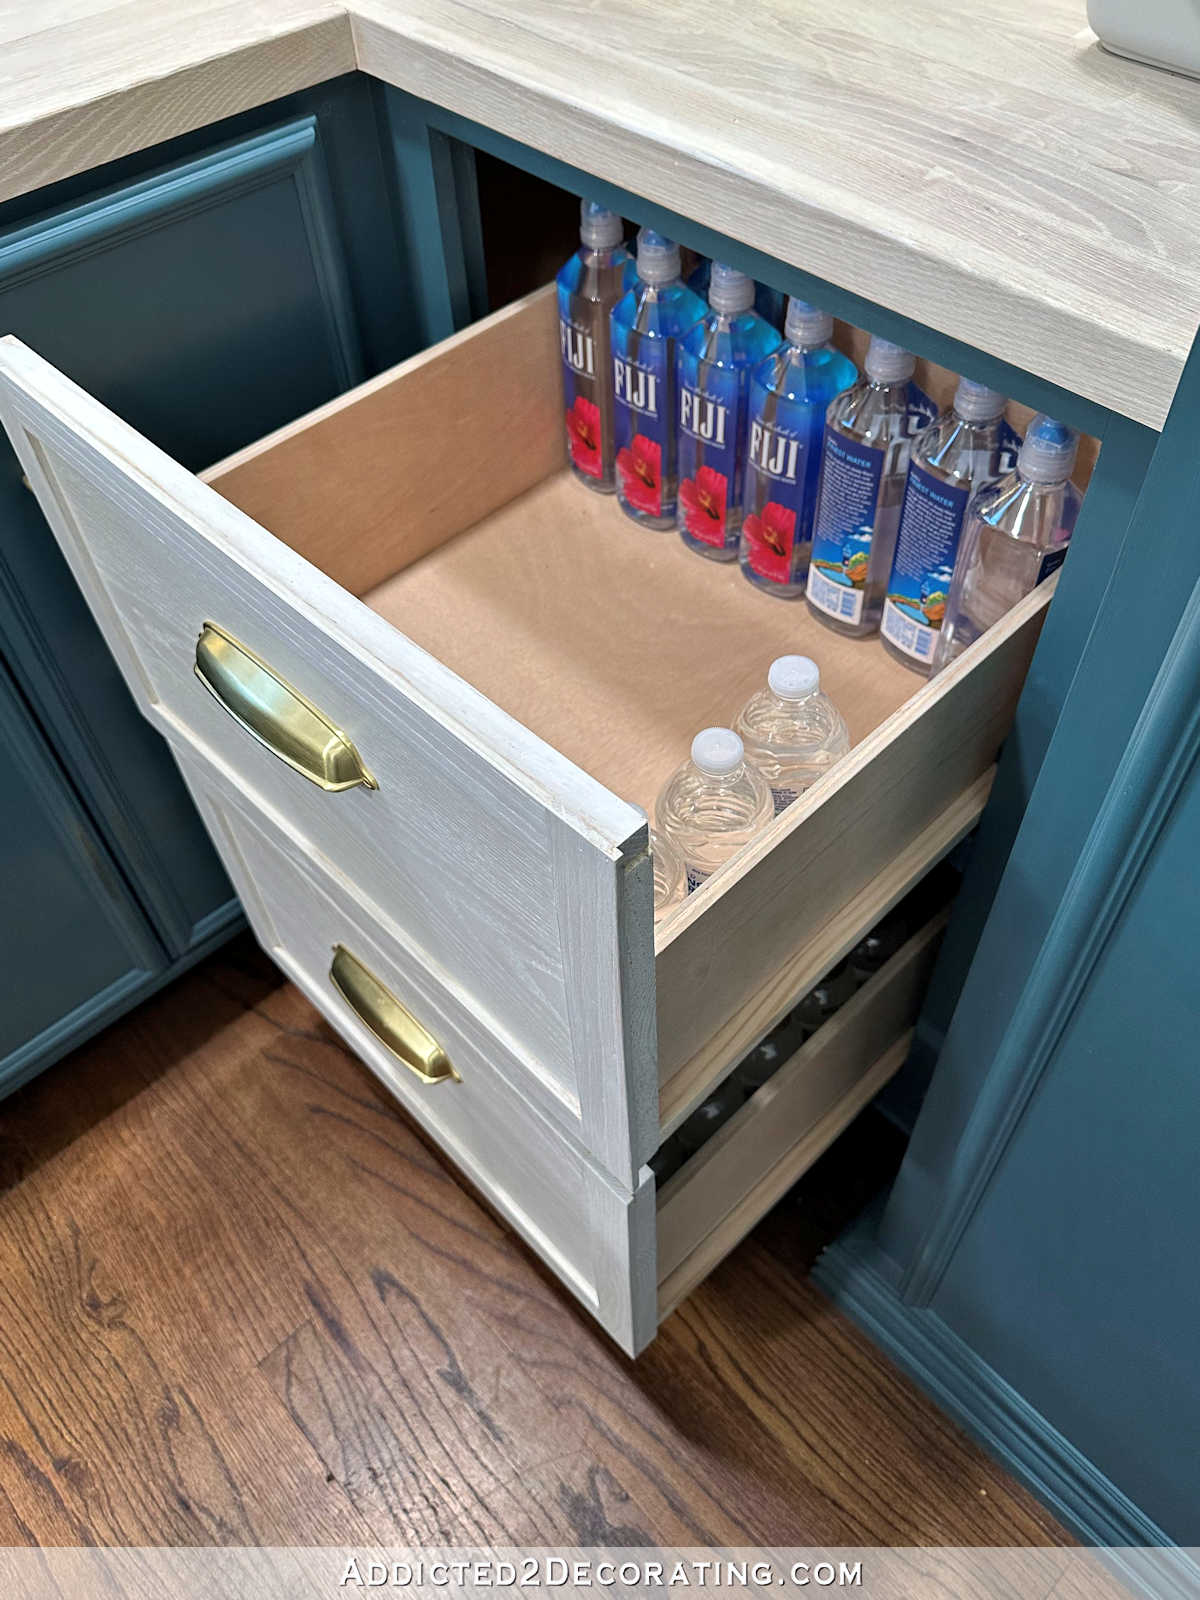
You have done a fantastic job. I awe-struck by your ability to do just about anything. Is there a chance that you will put together a tutorial on how to make the pull-out drawers? I want to do what you did to my bottom cabinets throughout my kitchen. I’m need a step by step including measurements of everything. I can do it with your help.
I have never used the Tape lights, and am curious ; what if they are longer than the place you want to put them? Do you just cut off the extra? We wanted undercabinet lights, hard wired, but our builder messed that up. He put outlets in cabinets and intended to just plug in the lights by running the wire through the bottom of the cabinet to the outlets. I don’t want the plugs sticking out in the cabinet, taking up valuable space where dishes need to go. Any ideas/thoughts? I wouldn’t mind mounting that transformer box in there, if I can place it under one of the cabinet shelves where it won’t be in the way. You always have an answer, and I love how you solved your “problems” to get the results you wanted!
I was wondering how long the strip lights are supposed to last? Would it be difficult for you to replace them if they go out? Just curious because I would like to try this. Thanks.
Kristi, you do absolutely brilliant work, and I’m so happy you are documenting it to follow along with. I’m planning on using your cabinet tutorial in my bathroom renovation this year, so the timing could not have been better.
I’m also surprised you are getting comments on the pantry placement. Even if you had laid out the floor plan yourself, it seems like an intentional place to put it.
Just beautiful. Your whole house is really coming together just beautifully! Thanks for sharing your projects.
Just as a small note, salt has been used to scour things for decades, if not centuries. While not the most effective cleaner in and of itself, it’s good for sucking up stains and scrubbing things. The polishing effect might have been what you were missing with just water and vinegar. 🙂
You amaze me!! You are so talented and have such a beautiful eye for color. I look forward to your posts and seeing your house transform.
My freezer is in the basement. Who wants to go down in the basement for a popsicle. Not me!
Also, I’d file your file your floor process under “work smarter, not harder”. Seems to work well, looks great!
WOW WOW WOW, what an amazing transformation! You should be very very pleased with yourself! What you did would have taken contractors much longer and it certainly wouldn’t be nearly as nice or as much attention to detail! You have an amazing eye for detail and perfection which you would never get from a contractor! I’m so amazed and a bit it to jealous of all that you can do! I can’t wait to see what is next! Keep it coming! However please make time for yourself (more than 1 week a year)
Just gorgeous! Your talent is amazing. Enjoy
It’s beautiful! I admire you immensely.
Thanks for the video tour, it made me smile again at the beauty of those tiles and the overall look of this wonderful room! What I’d be greateful for is a (short?) video to demonstrate how those hidden shelves work – I still cannot imagine them properly and was actually waiting for you to pull out one of the drawers and show that storage 🙂 Of course only if it isn’t too much work – I guess those videos take a lot more time then writing your posts, right?
How do you go about styling your rooms? Like the shelves in you pantry. How do you decide all the little knick knacks that go in a space? I find that being the hardeat part of a room for me. Finding the balance between clutter and what is us. Maybe it is that I haven’t come into my own style yet?
Since you invited us to ask questions, how well are your floors holding up? You have pets and a busy life. I was wondering how well the two coats of poly/stain you put on the floors are holding up to pet claws, dripping water/drool, and construction. Lol.
I look forward to your posts and updates. I’m sure you have spoken about your blind preference but as I look at the one in your pantry, I’m curious as to where you purchased it. What do you recommend?
The pantry is beautiful. I look forward to 2019 and your new projects. I have followed you for many years. I love your art projects and tutorials. Thank you. Happy New Year!
Hi! I was wondering if you could give more insight into how you installed the resin tiles. Was it exactly the same as regular tile? Thinking of making my own, but have had situations where my resin gets scratched which I would think might happen in the grouting and cleaning process. Thanks! Fun and creative work all around!
I installed it like regular tile. I just made sure to use unsanded grout so that the grout didn’t scratch the resin.