The Studio Has Flooring!
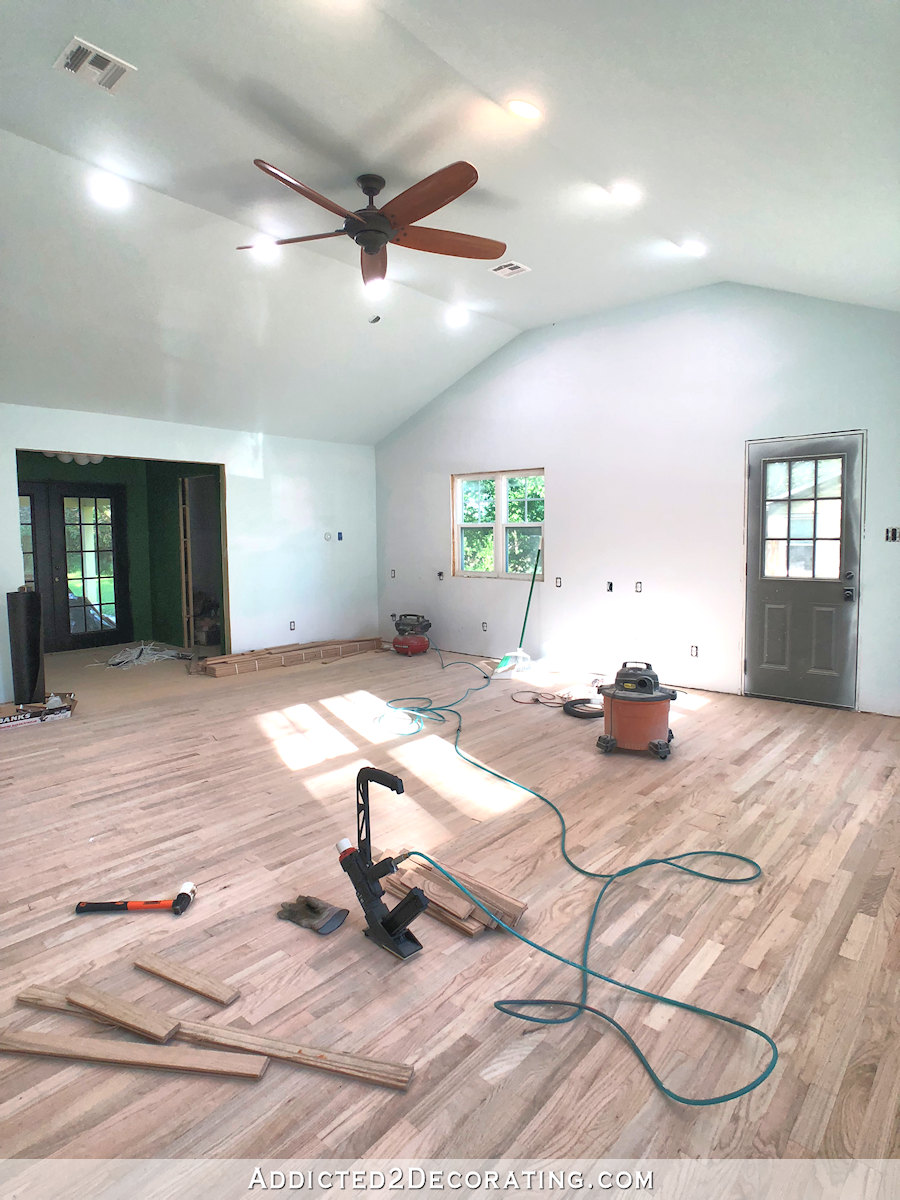
Y’all, I’m so excited about the progress that my brother and I made on the studio flooring yesterday! We got all of the flooring installed that could be nailed down with the flooring nailer. That left about four or five rows that will have to be nailed down with a regular nail gun, but after working for 8.5 hours, with me standing and bent over almost that whole time, there was no way I could get on the floor to nail those last rows down. If I had gotten down there, there’s no way I could have gotten back up. 😀
So those last few rows will have to be done today or tomorrow.
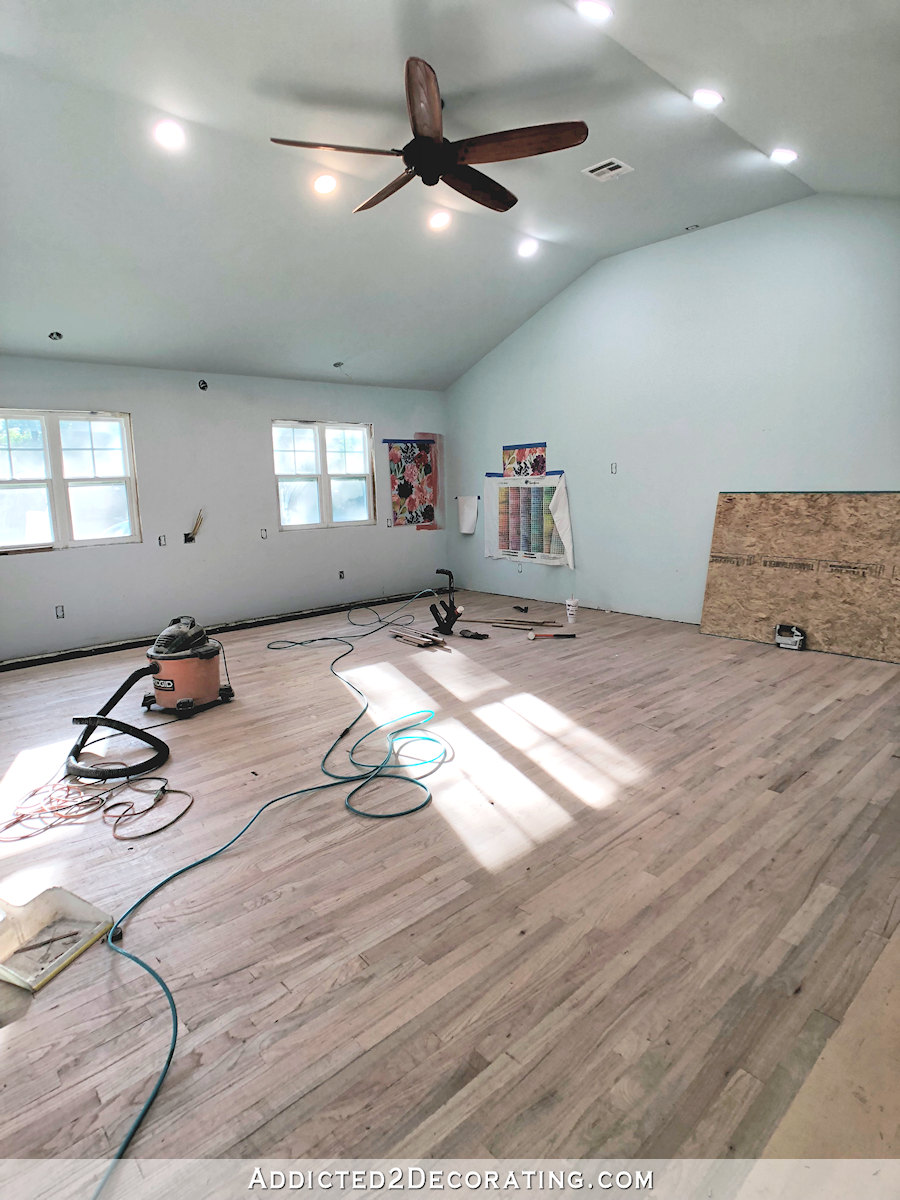
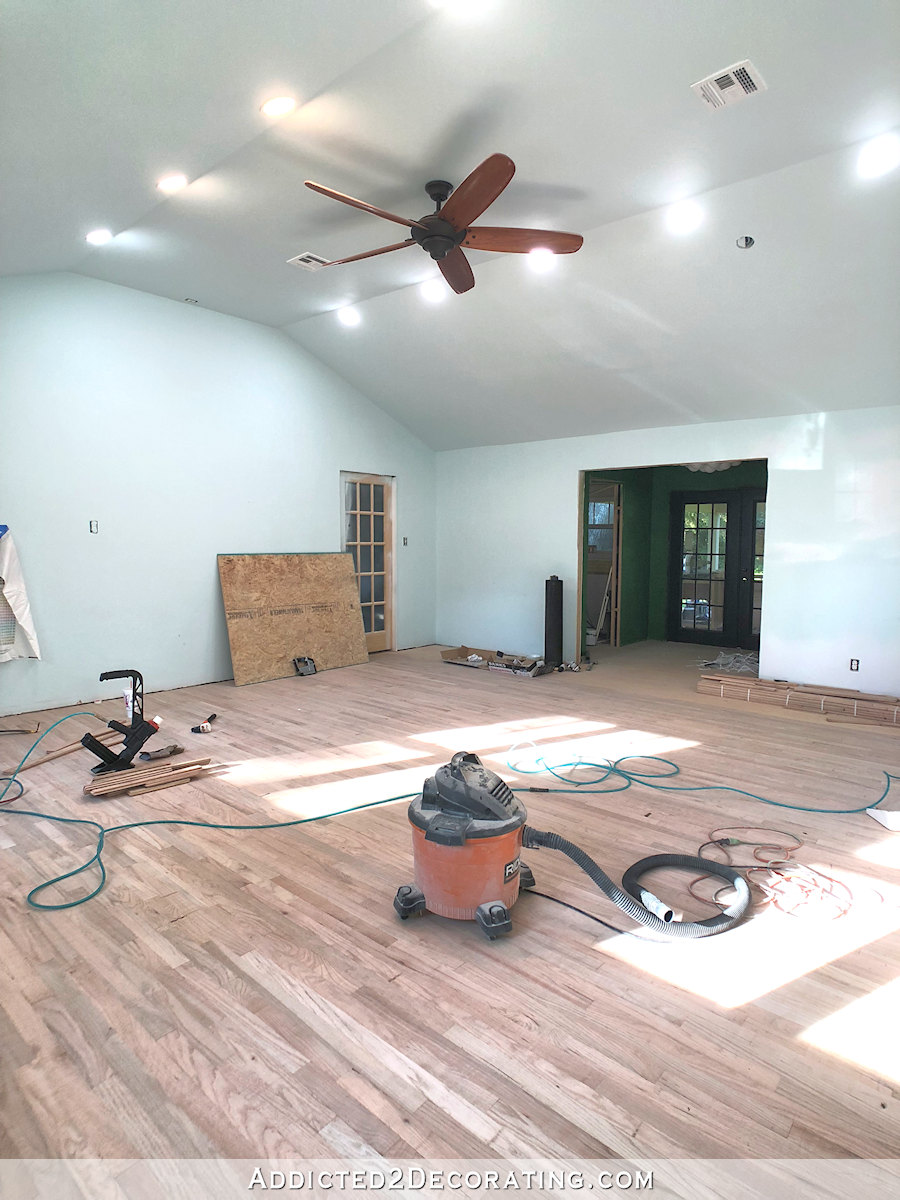
But let’s focus on what we did get done — about 350 glorious square feet of hardwood flooring installed.

We worked from noon to 8:30, but about an hour of that was wasted on a tool malfunction. My flooring nailer must have blown a gasket of some sort, because all of a sudden, air started leaking out of the head cap (i.e., the part that you strike with the mallet to shoot the nail), and I couldn’t get it to stop. I took it apart to see if I could find the problem, but I couldn’t figure it out.
So I ended up having to purchase another one to finish the job. I could only find one locally at Harbor Freight that used the same size of nails that I had already purchased, and it was much cheaper than the one that Lowe’s had in stock. This is the one I purchased, and it’s a great flooring nailer. If you’re about to tackle a nail-down hardwood flooring installation, I highly recommend it. It’s inexpensive, lightweight, and didn’t jam a single time while I was using it.
So the hour delay was frustrating, but we still managed to get it all installed, and finished around 8:30. It was exhausting work, but it’s so rewarding to see how much we accomplished!
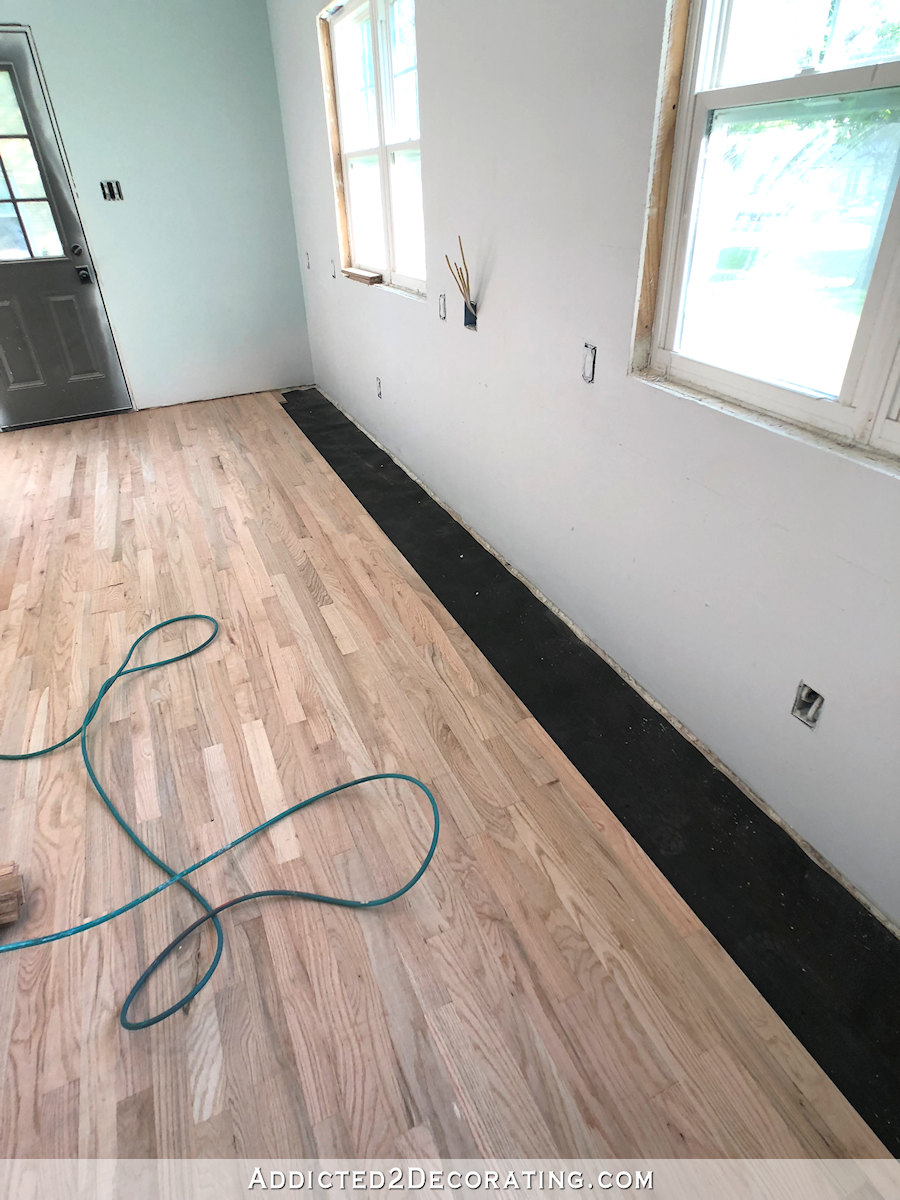
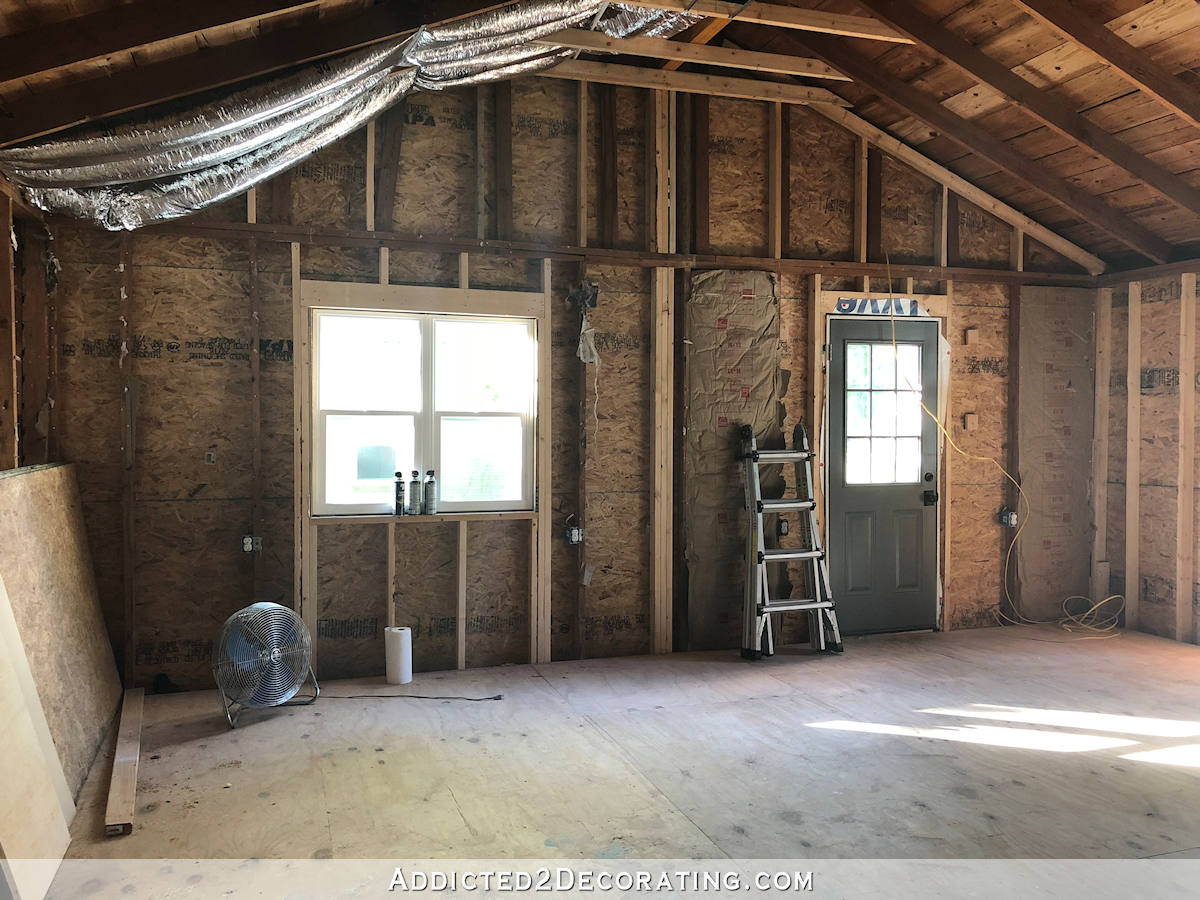
I’ve still got a heck of a lot of work ahead of me in order to get the floor completely finished. I need to instal those last few rows, and then rent the big sander and get the floor wood filled and sanded. But can we just take a minute and remember where this room (garage) started? It’s hard to believe that it’s the same space! Here’s what it looked like when it was a garage, with the concrete floor, garage doors, and black tar paper walls.
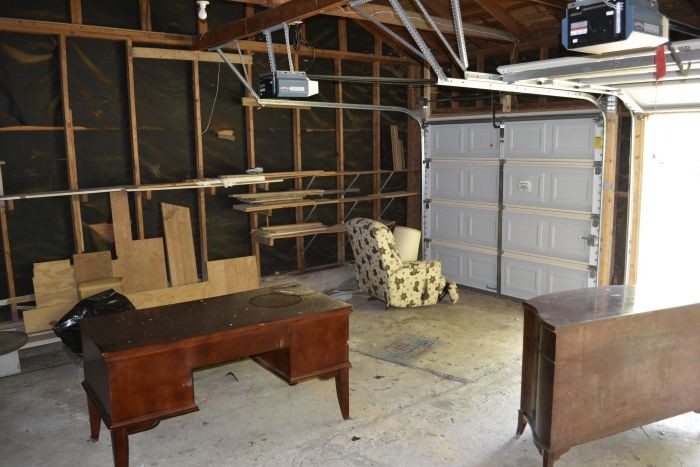
After the floor was raised and the ceiling was reframed, it looked so much different, but it still didn’t look like a room where I’d want to spend any amount of time.

But now, it’s starting to look like an actual room!
All three of those pictures were taken from the breakfast room door, so it’s all the same view of the room. Isn’t that an amazing difference? I’m so excited about how this room is shaping up, and I haven’t even gotten to the really good stuff yet. 😀 There’s still so much more to come!

Addicted 2 Decorating is where I share my DIY and decorating journey as I remodel and decorate the 1948 fixer upper that my husband, Matt, and I bought in 2013. Matt has M.S. and is unable to do physical work, so I do the majority of the work on the house by myself. You can learn more about me here.
I am do thrilled for you! This will be a great work space!
Oops, so thrilled!
Gorgeous space! You’ll never leave it.
Favorite thing, is now Matt has an easy path to the ramp now. Congrats!
Looks beautiful!!!! Can’t wait to see more!!
I love that you take your B/A photos from the same spot; it has so much more impact.
good job to you and your brother!!
I only wish that I had had my wide angle lens when Matt and I first bought the house. I don’t have any good pictures showing what a mess the ceiling framing was in the garage before it was reframed. 🙁 Oh well.
What an awesome job! Well done Kristi and to your brother too for helping you. The room is really transforming now with the flooring.
Flooring looks great! Glad you ended up going with the hardwood. It adds a lot of warmth. I couldn’t help but notice that two of your recessed lights are still set to the warmer yellow tone! Haha, I’m not sure how my eyes caught that with the great expanse of flooring that I should be focusing on. 😁
Ha! I notice that every time I turn on the lights, but I can’t bring myself to drag out the 10-foot ladder just for the lights. I’ll have to drag that ladder out when I finish painting the walls, so hopefully I’ll remember to switch the lights then. If you see pictures with the ladder out in the near future, you might have to remind me! 😀
Wow, it look awesome. Are you sure it’s only about 350 square feet? It looks way larger?
I am always amazed by your abilities. Can you tell me what the purpose of the wood filler is? Is to keep dirt from settling in the cracks? Does it affect sounds, like creaking?
It’s just to fill the cracks and make the flooring as smooth as possible before staining. Pros almost always use full-trowel wood filler on unfinished wood floors that will be finished in place, but this is my first time to use it. I didn’t use it in the kitchen or breakfast room/pantry, and in hindsight, I wish I had. The flooring I use is a #2 oak floor, considered utility grade, so it’s kind of rough and has some not-so-perfect areas in it, so the filler corrects all of those areas. As far as I know, it won’t affect the sound. If a nail starts to work itself loose, the floor will still creak.
Kristy you amaze me with all of your talents. Your Studio is coming together so beautiful. Can’t wait to see it finished, and you working in there.
The room is actually bigger — about 20 x 20. But I had already installed a few rows myself, so I think my brother and I tackled about 350 square feet. But the studio is about 400 sq. ft. and the bathroom/back entry/storage closet area is about another 140-150 square feet.
Wow, the place looks so big and beautiful. Congratulations. Such an accomplishment.
Awesome job!!!! You deserve a high five! I’m so proud of you guys. What a major accomplishment. You’re a superwoman!
Christi: I don’t post very much.
I think you are doing an amazing job on your home.
I just love your flooring choice. It has inspired me to consider it for a house we have torn carpet from. In the other parts of your house with this flooring, how is it holding up to Cooper’s nails? We have dogs 50 to 60 lbs and hubby imagines that they would have to be restricted to tiled places in the house and I’m not having it, I want my dogs AND my hardwood floor. Ours run around on over 100 acres and we generally don’t have to worry about nail length. Any advice about best finish on red oak under big-ish dogs would be appreciated! 😉
It’s actually holding up quite well, and let me tell you, Cooper is a CRAZY hyper dog. He runs, skids, twirls, jumps. I don’t think he even knows how to just walk from one place to another. 😀 But the floor is holding up surprisingly well. During certain parts of the day, the sunlight streams through the windows and front door more, and I can see some light scratches here and there, but he’s never scratched it enough to go through to the actual stain layer, so there are no scratches deep enough to expose raw wood. It’s all just very light surface scratches in the polyurethane (I used Minwax oil-based poly for hardwood floors) that generally don’t show unless the sunlight hits it in a certain way. So I do anticipate that at some point (but not any time soon), I will have to lightly sand and add another coat of poly. But that might be two or three years down the road. Or I might not do that at all, and just embrace the light scratches. 😀
you must be thrilled!
It looks huge in there!!! Wow!!
Where and what kind of hardwood Oak planks did you buy? How much per square foot? Looks really nice.
I bought the unfinished red oak hardwood flooring from Home Depot. The one here carries it in stock, and I think that’s because most of the old homes in this area (those built from the early 1900s to about 1950’s) have this exact flooring original to the houses, so HD carries it for people who need to fill in, repair, replace, or add on to match the original. It’s the narrow slats (about 2 1/4-inches wide) that were used in older homes. The price fluctuates depending on time of year, but right now I think it’s about $3.20/square foot, plus I got a discount for purchasing over $1500. When I purchased it for the breakfast room and pantry, it was around $3.85/square foot. But if you’re buying large quantities, be sure to ask about the bid room –> https://www.addicted2decorating.com/studio-flooring-plus-a-home-depot-money-saving-tip.html
It’s amazing what a difference the flooring makes. It looks like an actual room now even if you do have more to do. LOL
Awesome progress!
That is amazing! You and your brother are a really good team and when he’s around you seem to get a lot of heavy things taken care of. Lovely floor!
This is shaping up to be a spectacular studio space!! I think the part I’m looking forward to most is seeing the painted cabinets with your wallpaper. Have you ever thought about designing wallpaper—you could offer it on Etsy, though I’m not sure how that would work.
I have thought about it. Perhaps when my studio is done, I can sit in there and dream up some wallpaper designs. 🙂
I’m betting this space will be an inspiration for all sorts of creations—many of which you haven’t even thought of, yet!!
Love all the lights
It’s beautiful, Kristi! So light and bright!!! You’ve come a long way!!! Can’t wait to see the next installment!
Your floor looks fabulous!!!
I am amazed at all you’ve accomplished in this room, as well as your home overall. Kudos to your brother, it’s wonderful to have him nearby to lend a hand. Lookeeeeeng gooood, Kristi!
I wonder if the previous owners follow your blog and what they think of everything you’ve achieved
Wish I had a brother like that.
Wow, I can tell you are SO happy you cleared the room so you could do the flooring! It is looking like a room now, and hopefully you will finish the floors and push through onto cabinets! Don’t let the clutter pile up before you can get the cabinets done! I would love to see you complete this big project by summers’ end! The room is amazing!!!!
Are you kidding? You’re worried about clutter? Last I checked, it is her and Matt’s house! She’s doing amazingly well near as I can tell!
I think you took her comment wrong. She’s referring to the clutter being why Kristi was dreading doing the floor. Check one or two posts back.
Seriously impressed!!! Congrats.
In the past, was there a post about how you plan to use the studio space? At least your ideas at that point. If so, I failed to put it in my file about your house. Or did I just dream you had described that before?
At any rate, It is going to be such a wonderful space to work in.
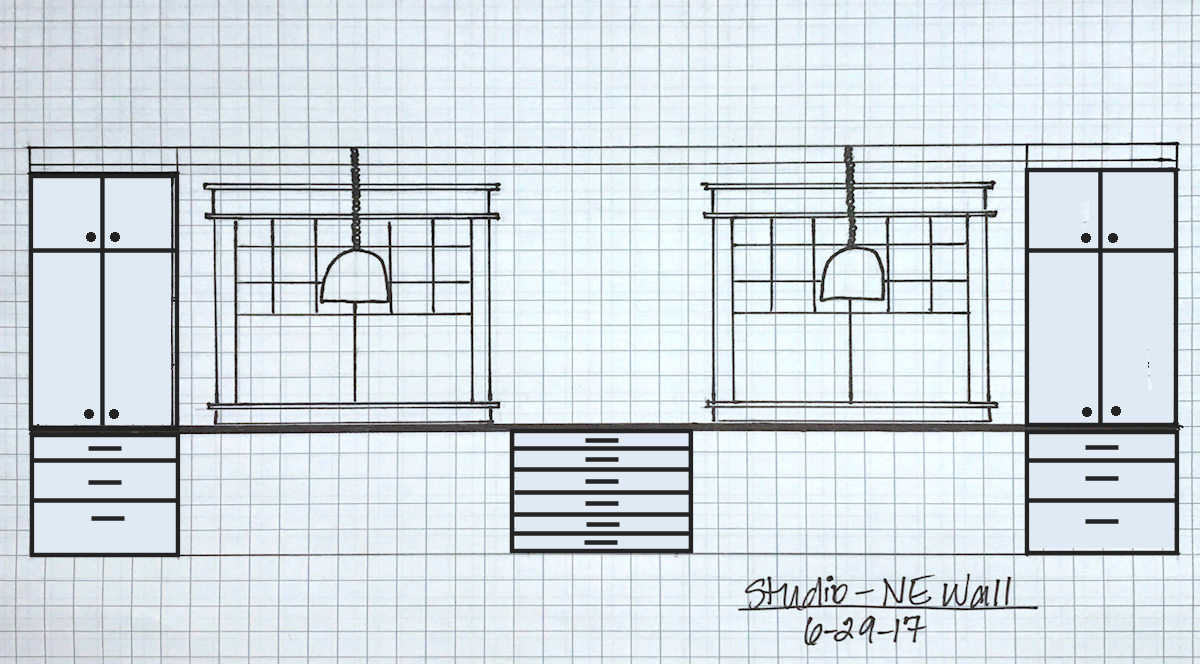
I’m not sure if I wrote a post about it, or just shared it in bits and pieces here and there. But this space will serve two purposes. First, this is where my office will be, so I’ll have a corner with my office desk, computer, printer, etc. I’ll take care of “business” stuff in there, sit in there to edit photos, write blog posts, work on my blog, etc. Then a main part will be project desks and my one huge workroom table. Those will be areas where I’ll work on “clean” projects — artwork, sewing, crafty things, making videos for my blog, etc.
What this room WON’T be is a woodworking workshop. I don’t have my tools, saws, sanders, or those types of things in there. For now, those will have to be used in the carport. I’ll eventually have a workshop built somewhere in the back yard specifically to house and use my tools for messy projects, like sawing, sanding, spray painting, etc.
I figured you would have “departments” but when I saw that beautiful floor I hoped the messy stuff would find a home elsewhere.
I am excited to see things develop as you work on the space.
Thanks for the reply, Kristi. By the way, the Ecuador paint store people have wondered what new things you have been doing so I will stop in and show them on my iPAD.
Gorgeous! I would love to have a work space like that for all of my crafting. It’s so huge and open. It will be a wonderful space when you are done!
My back hurts just reading about all the work. You amaze me!
Girl, I cannot believe you just installed your own hardwood floors! You are a warrior! I do a lot of renovating, and I was terrified at the thought of doing my own floors. We paid more than $10k to have them done! You are amazing!