Staining Red Oak Hardwood Floors (Products & Process)
Staining red oak hardwood floors throughout our home has been quite the process so far, and while I was so hoping that I’d have my floors completely stained by last night so that I’d be ready to seal them today, I didn’t quite finish all of them. I just have one more room to go, though, and so far I’m very pleased with how they’re turning out!
This is a multi-post project. Don’t miss the other posts in this project!
Refinishing Hardwood Floors
*This post contains affiliate links.
Before I got started, I did a lot of reading and watched a few videos on the process of staining red oak hardwood floors. Lots of people recommended “water popping,” which is basically wetting down the wood to open up the pores more for the stain. Others warned that water popping was best left in the hands of pros because if you use the water unevenly, the stain will be splotchy.
Well, I didn’t want to take that chance, and I’ve had really good success with wood conditioner in the past (on much smaller projects, of course), so I decided to stick with what’s tried and true for me. I used my go-to Minwax Pre-Stain Wood Conditioner.
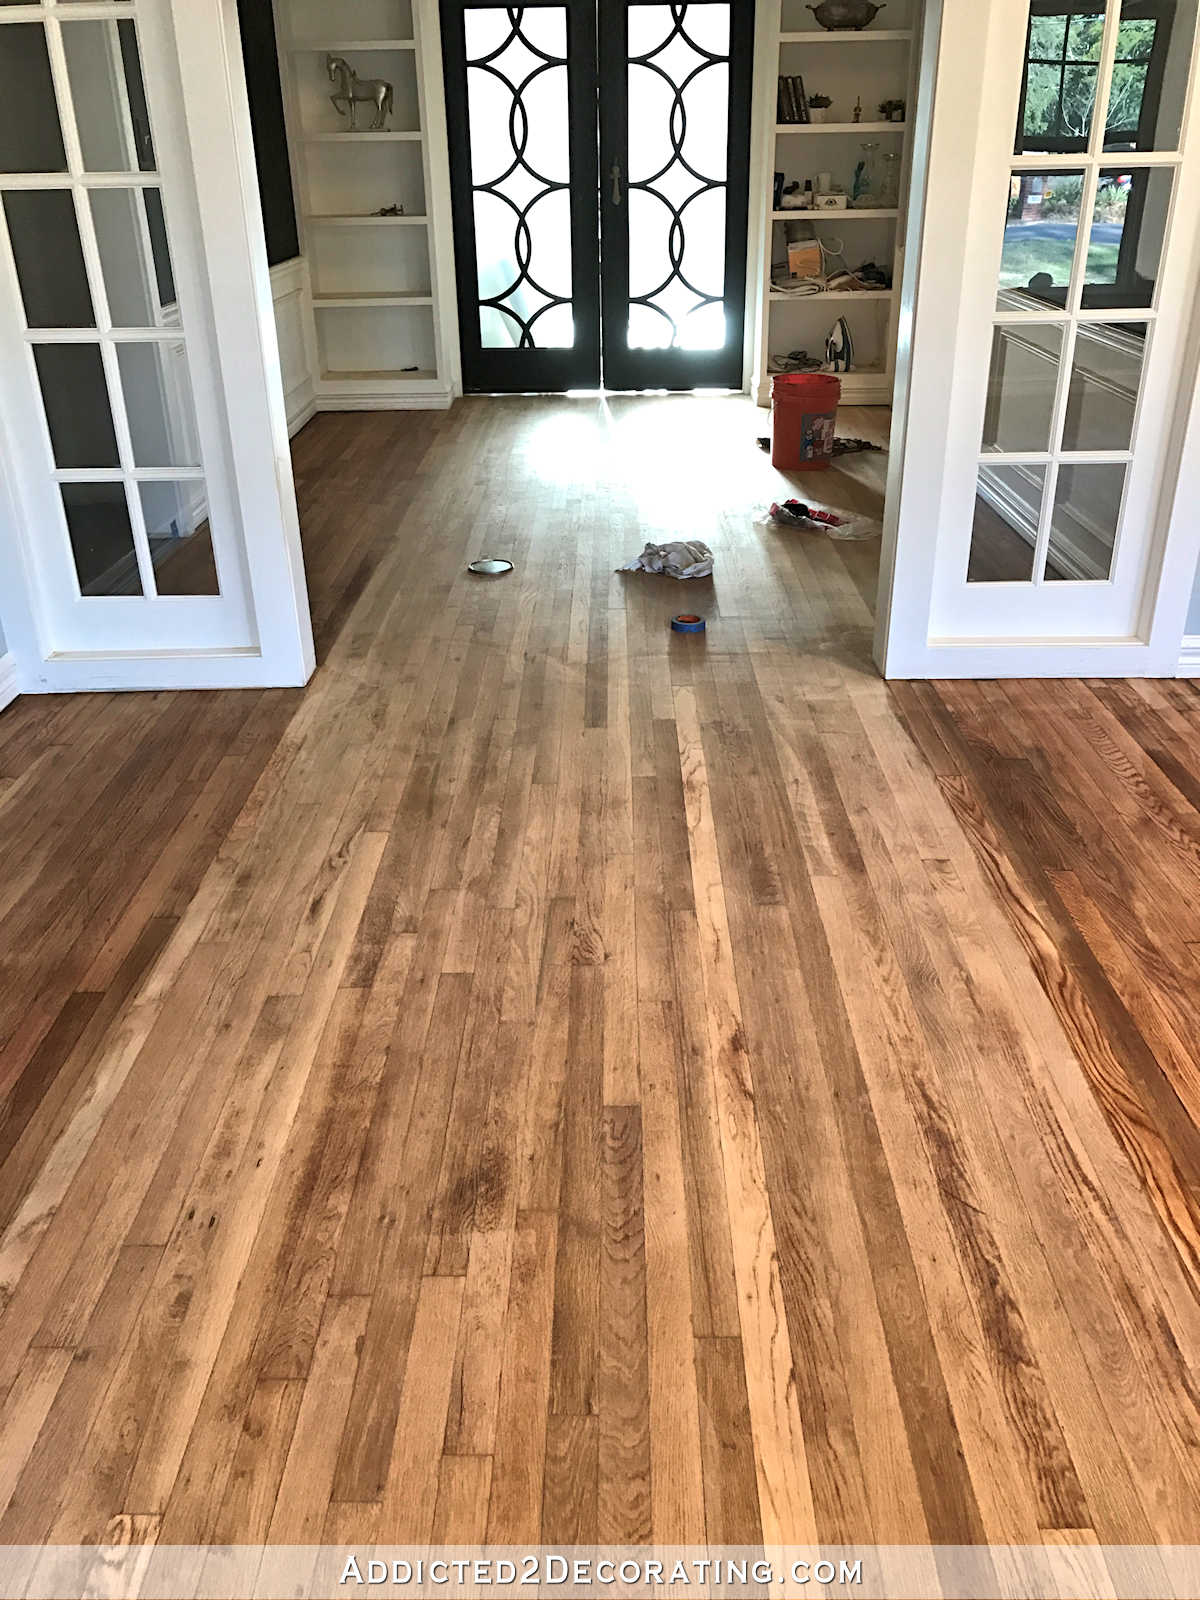
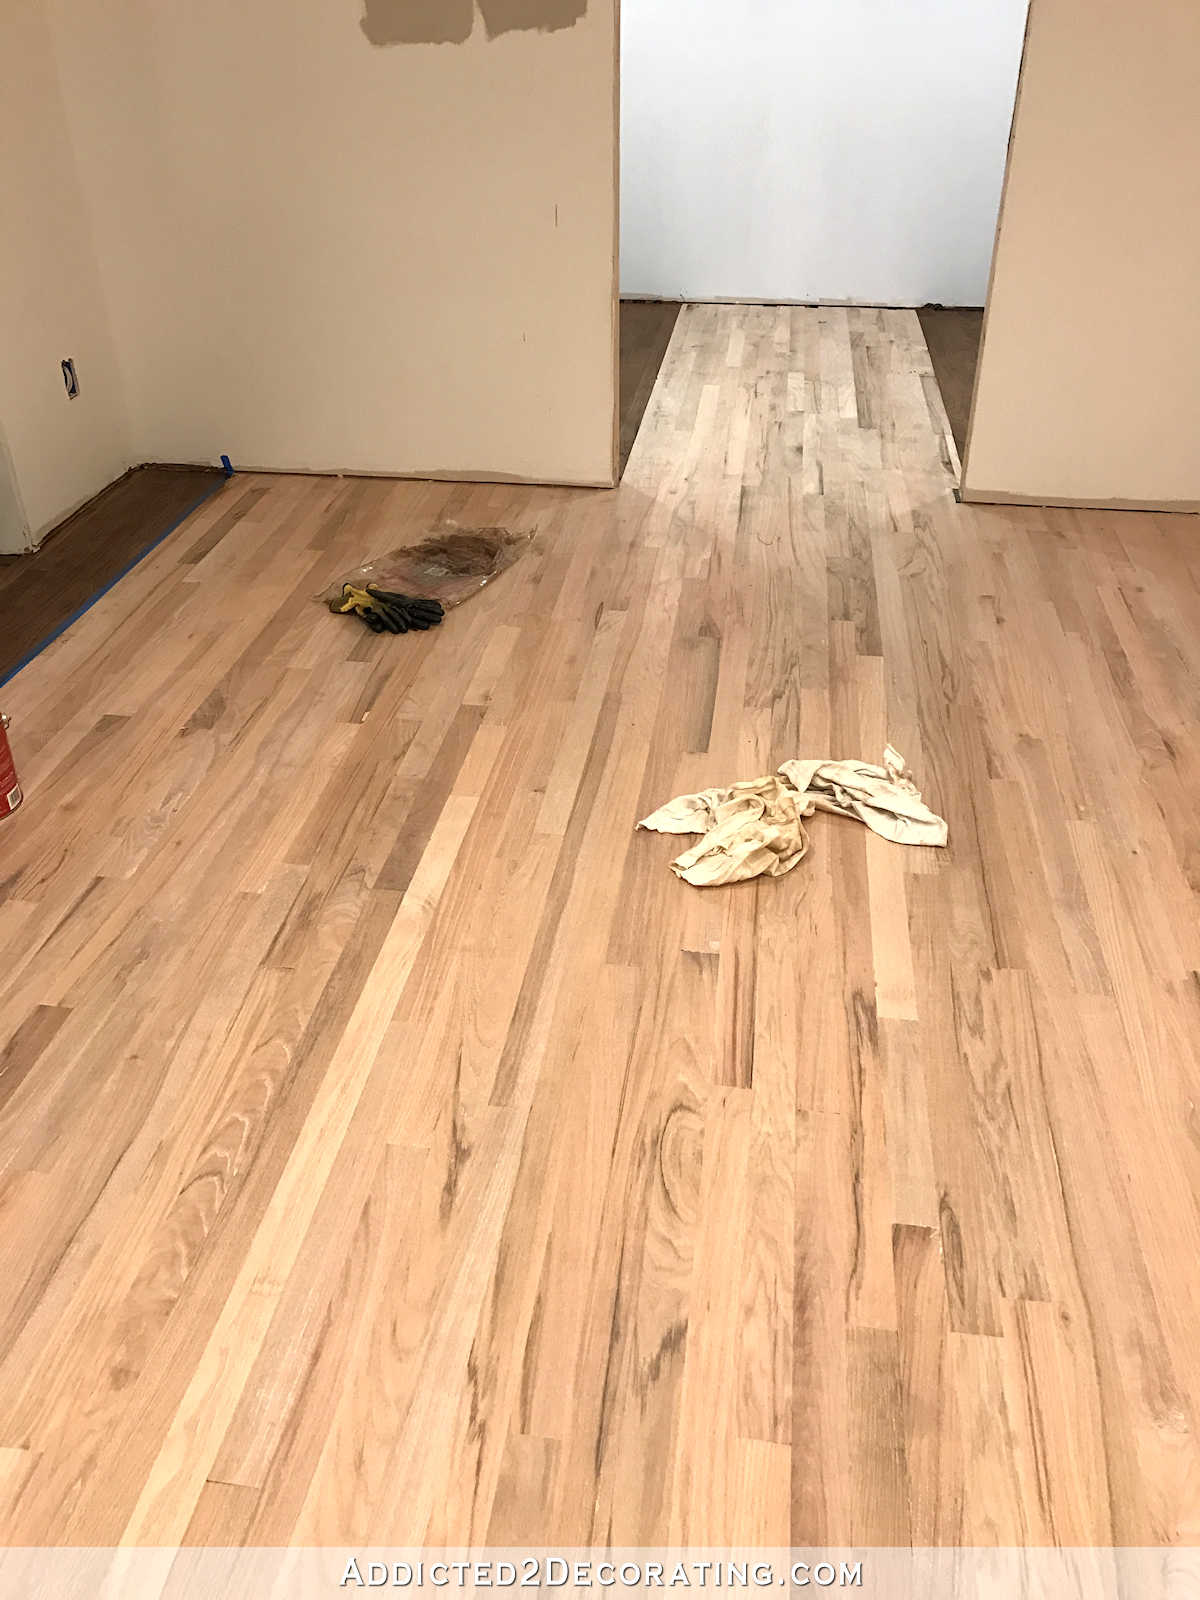
The trick with using this product, though, is that you only have a two-hour window between applying the conditioner and applying the stain. So I decided to work on one area at a time, starting in the hallway and working my way towards the breakfast room. So I applied the wood conditioner to the hallway floor…
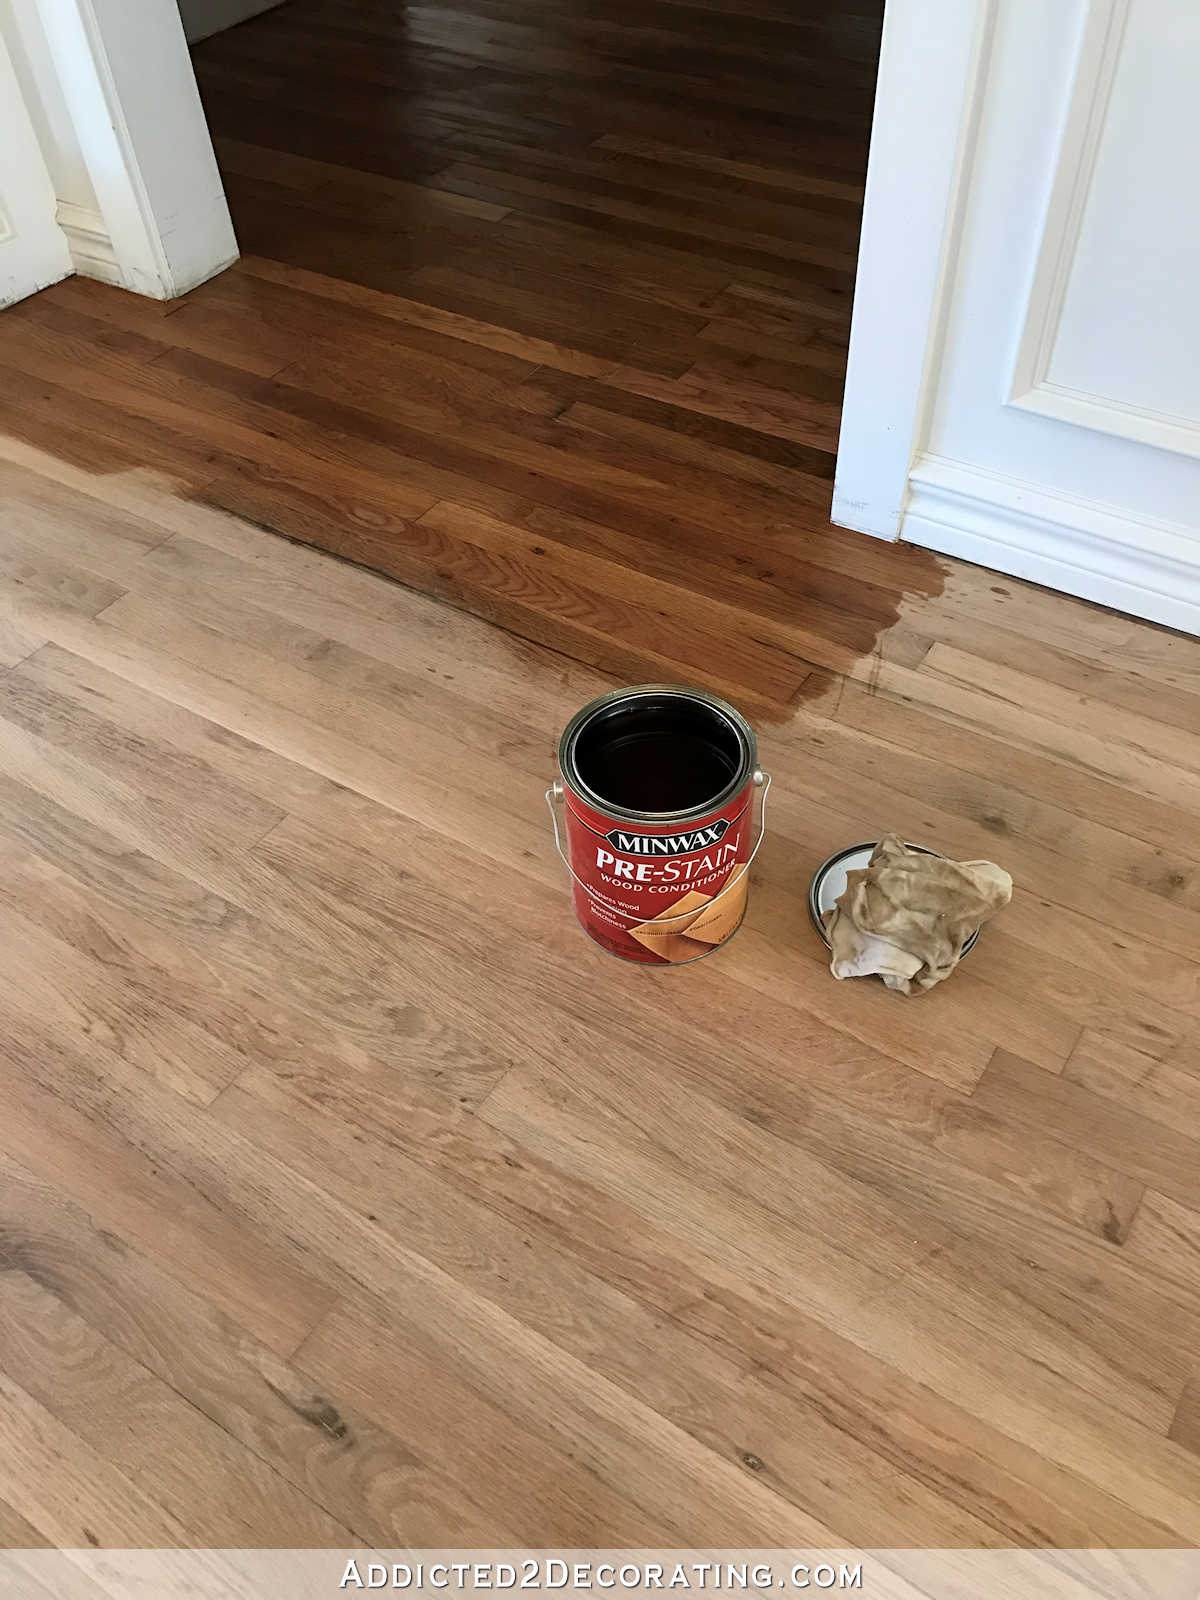
…and then waited the requisite 15 minutes or so. (It was probably more like 30 minutes, at least.) Then I wiped up any excess with a rag, taped off a stopping point with painters tape, and applied the stain. I bought a huge bag of rags at Sherwin Williams called The Brick to use for both the conditioner and the stain. I highly recommend it. The rags are t-shirt material so they don’t leave white fuzz behind.
I watched a few videos on how to actually apply the stain. Some people just get on their hands and knees to do the whole thing, applying the stain with one rag, and wiping off the excess with another. Others like to apply the stain with an applicator pad while standing, but either way you have to get on your knees to wipe up the excess.
I decided to just do the whole thing on my hands and knees since I felt like I had more control over the amount of stain that was being applied. It seems to me like applicator pads put down a lot more stain, which ends up being wasted. But again, that was just my personal preference. It’s perfectly fine to apply it with an applicator pad attached to an extension pole, like the ones you use with paint rollers to get high areas and ceilings, and then wipe up the excess with rags.
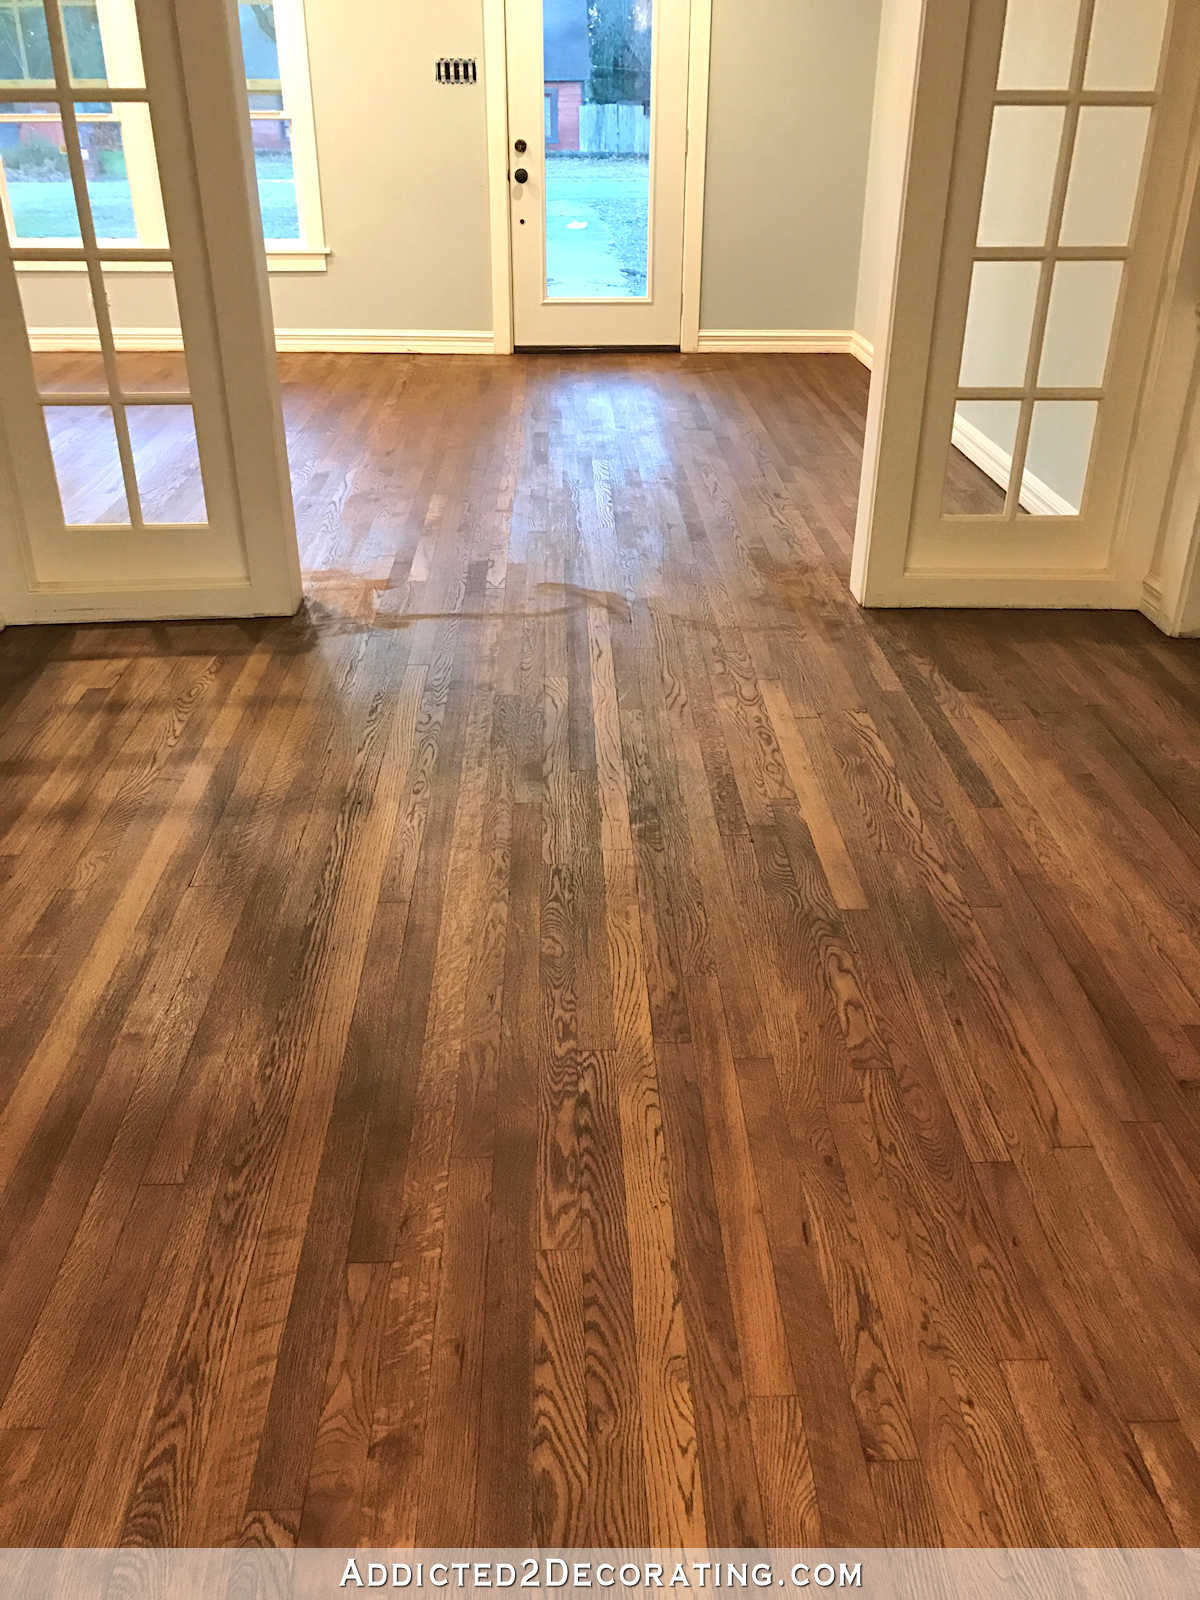
The next section I did was the area in front of and behind the sidelite between the entryway and music room. I stopped there because any long runs of wood, like the flooring that goes all the way from the front door to the sliding doors in the music room, needed to be done as one since you apply stain going with the grain of the wood.
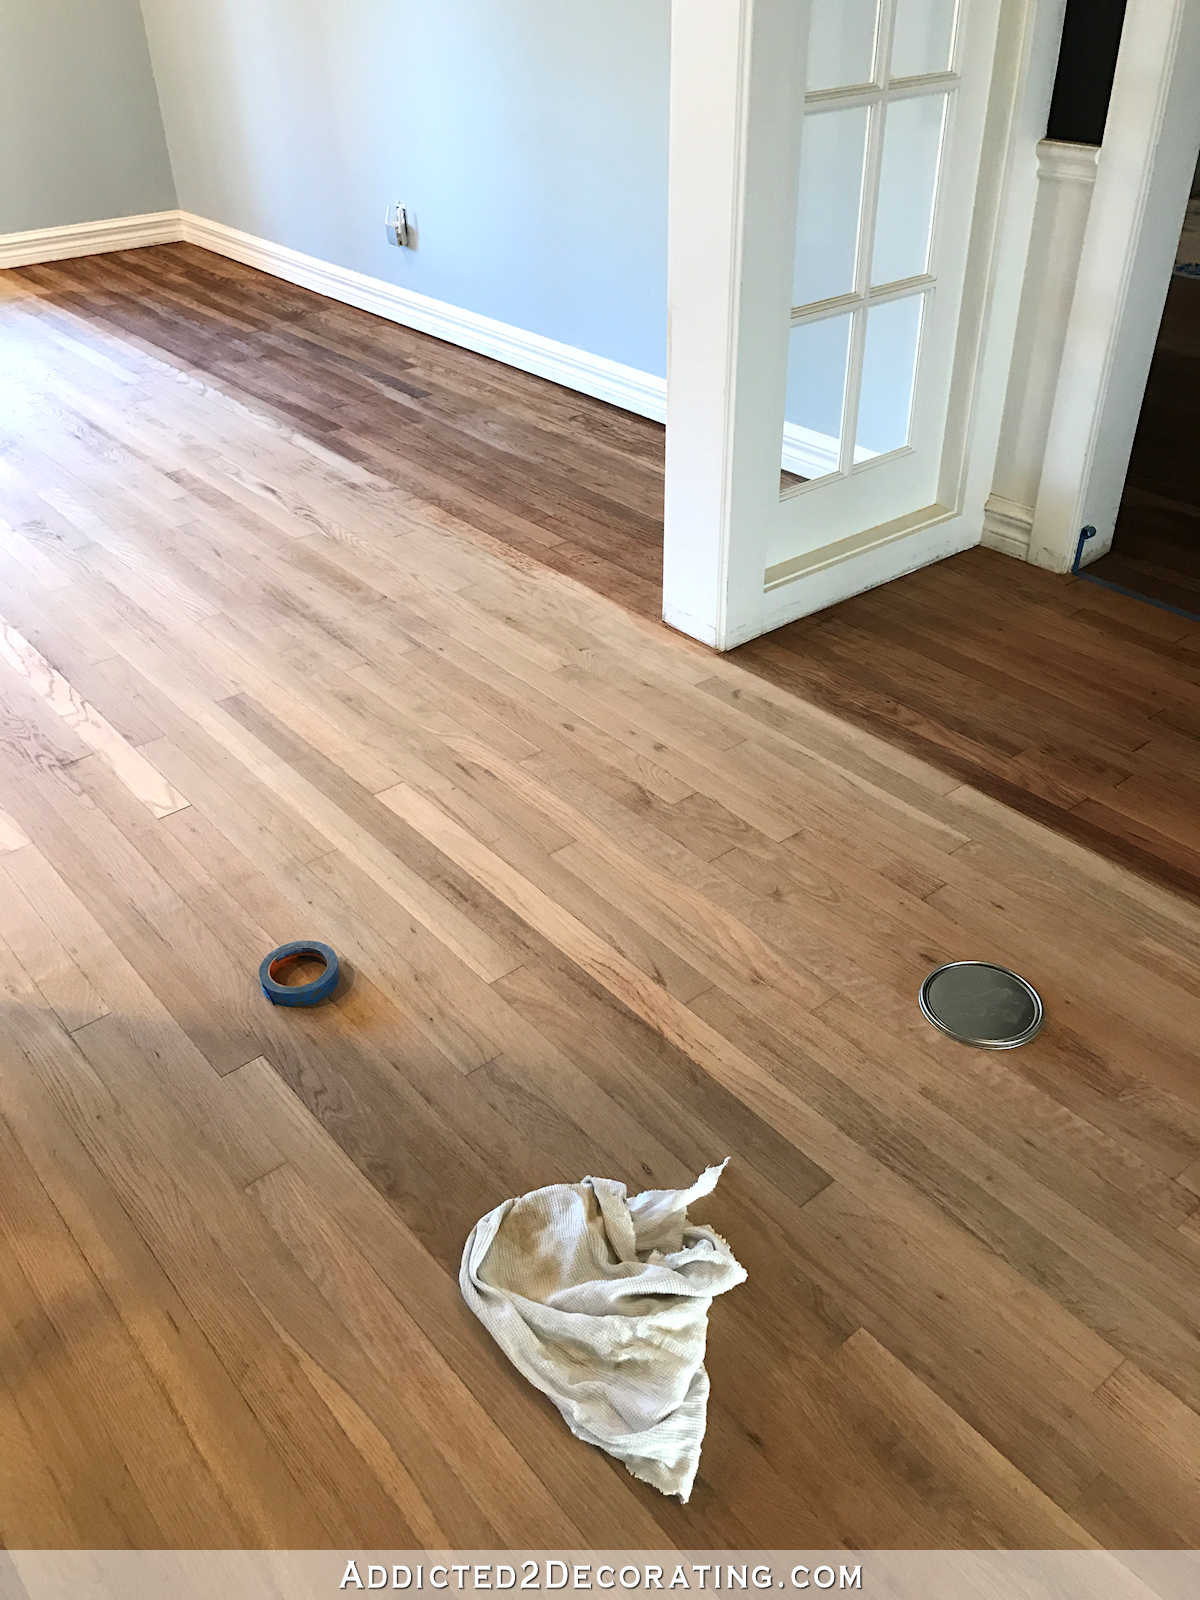
But at the same time, I also did the floor in the living room, stopping at the kitchen doorway. I applied the conditioner to these areas, waited, wiped up the excess, and then taped off these sections.
And then I stained them.
That’s actually all of the staining I got done on the first day (Saturday) since I spent the first half of the day cleaning up dust from the sanding process and making sure the floors were super clean.
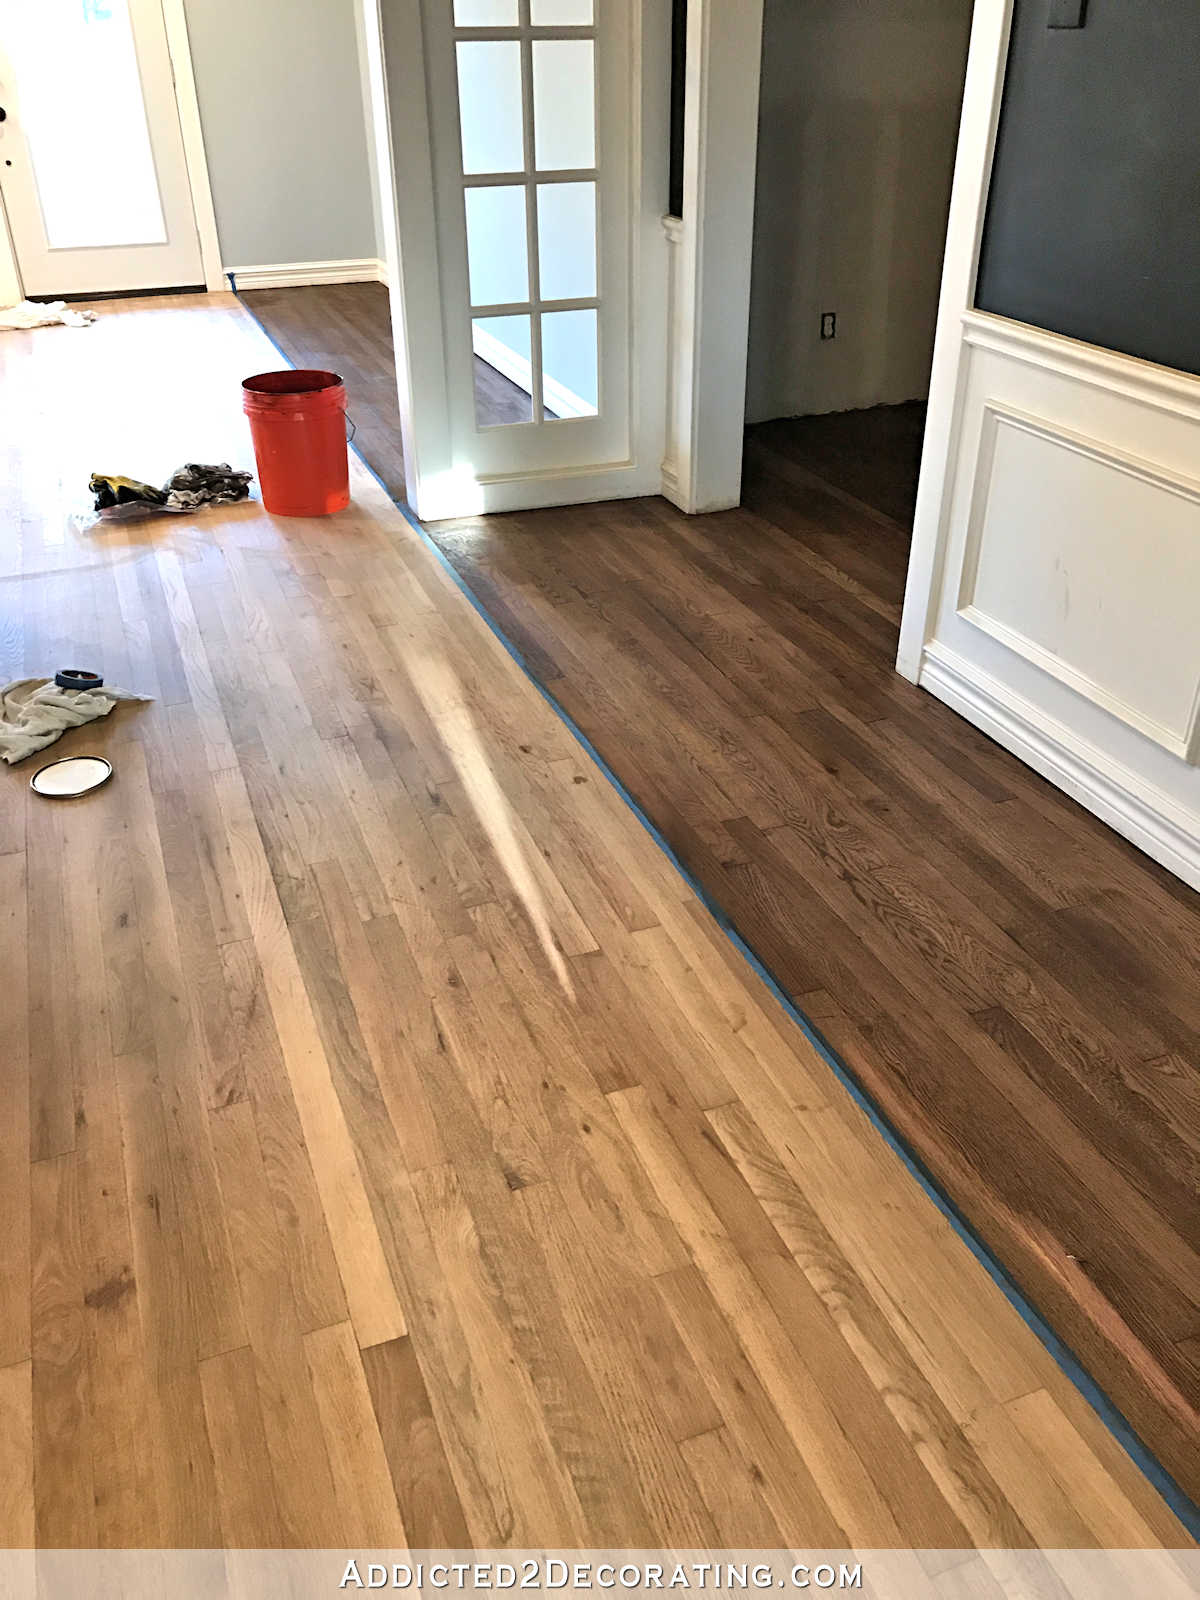
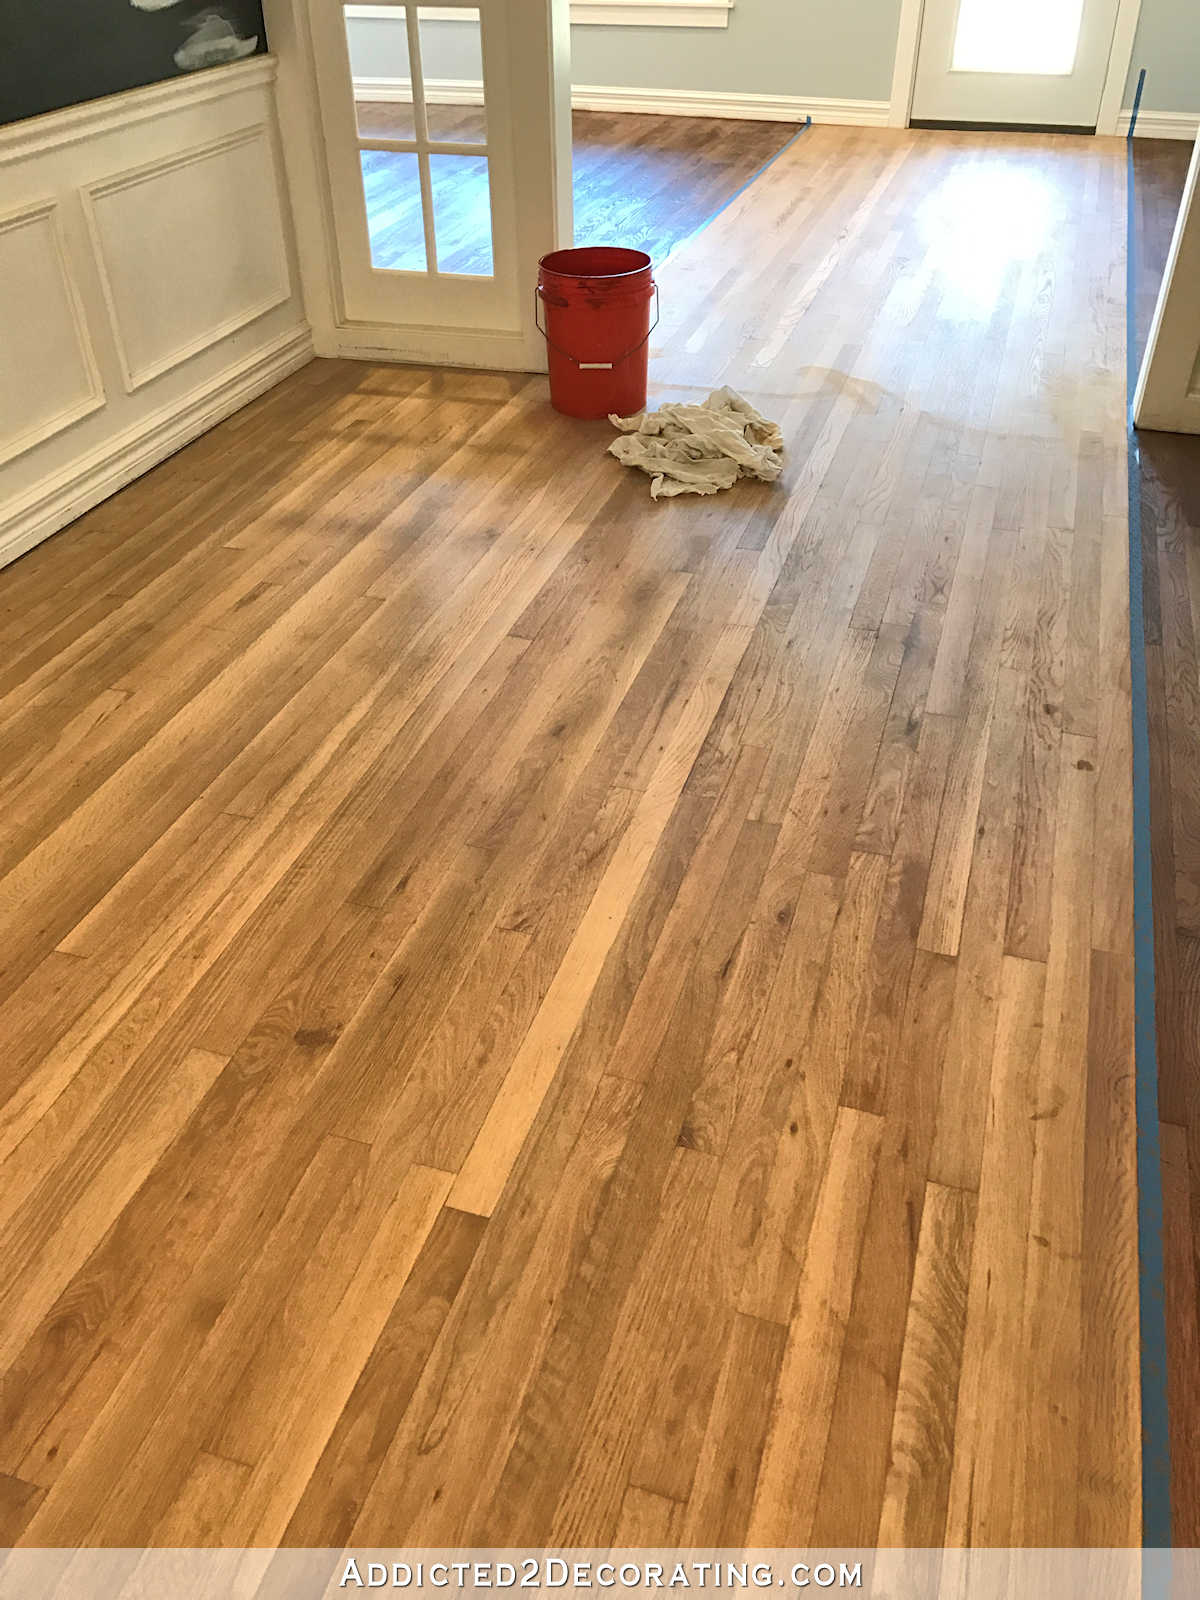
So yesterday, I picked up where I left off. I taped off the previously stained sections, and then conditioned and stained the remainder of the floor in the entryway and the music room up to the kitchen doorway.
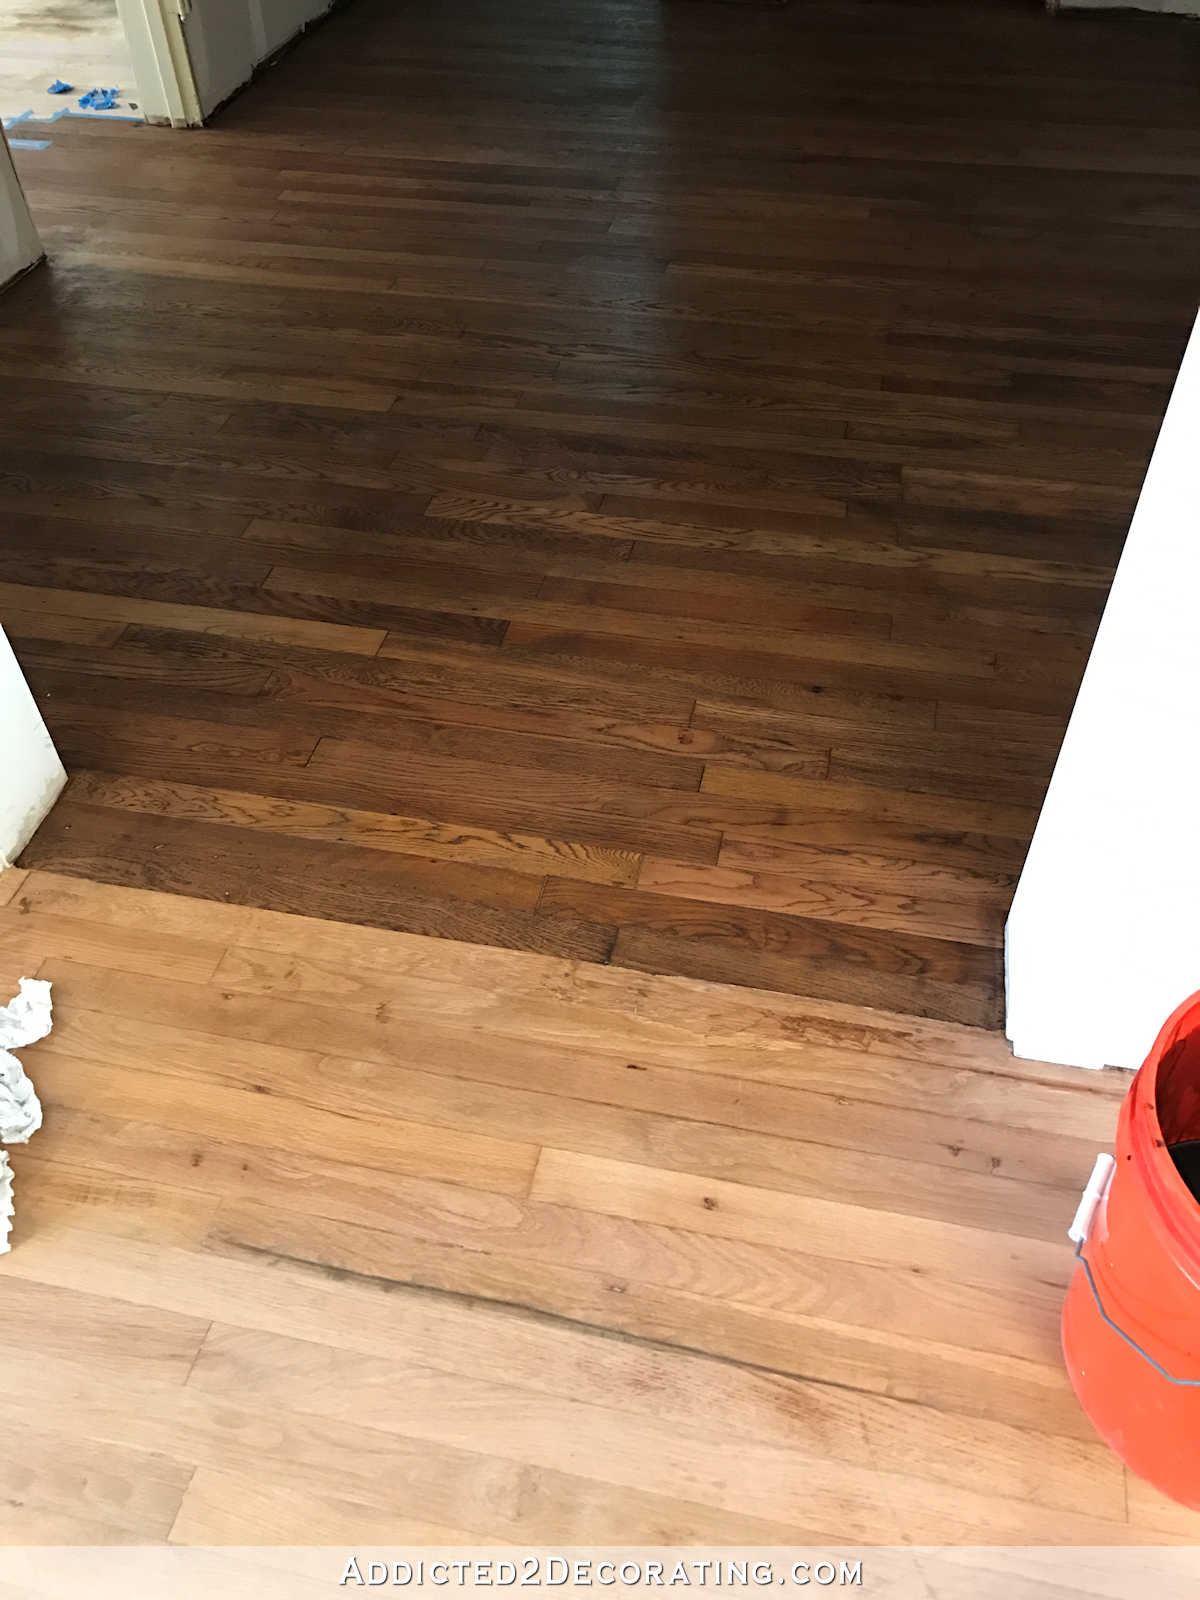
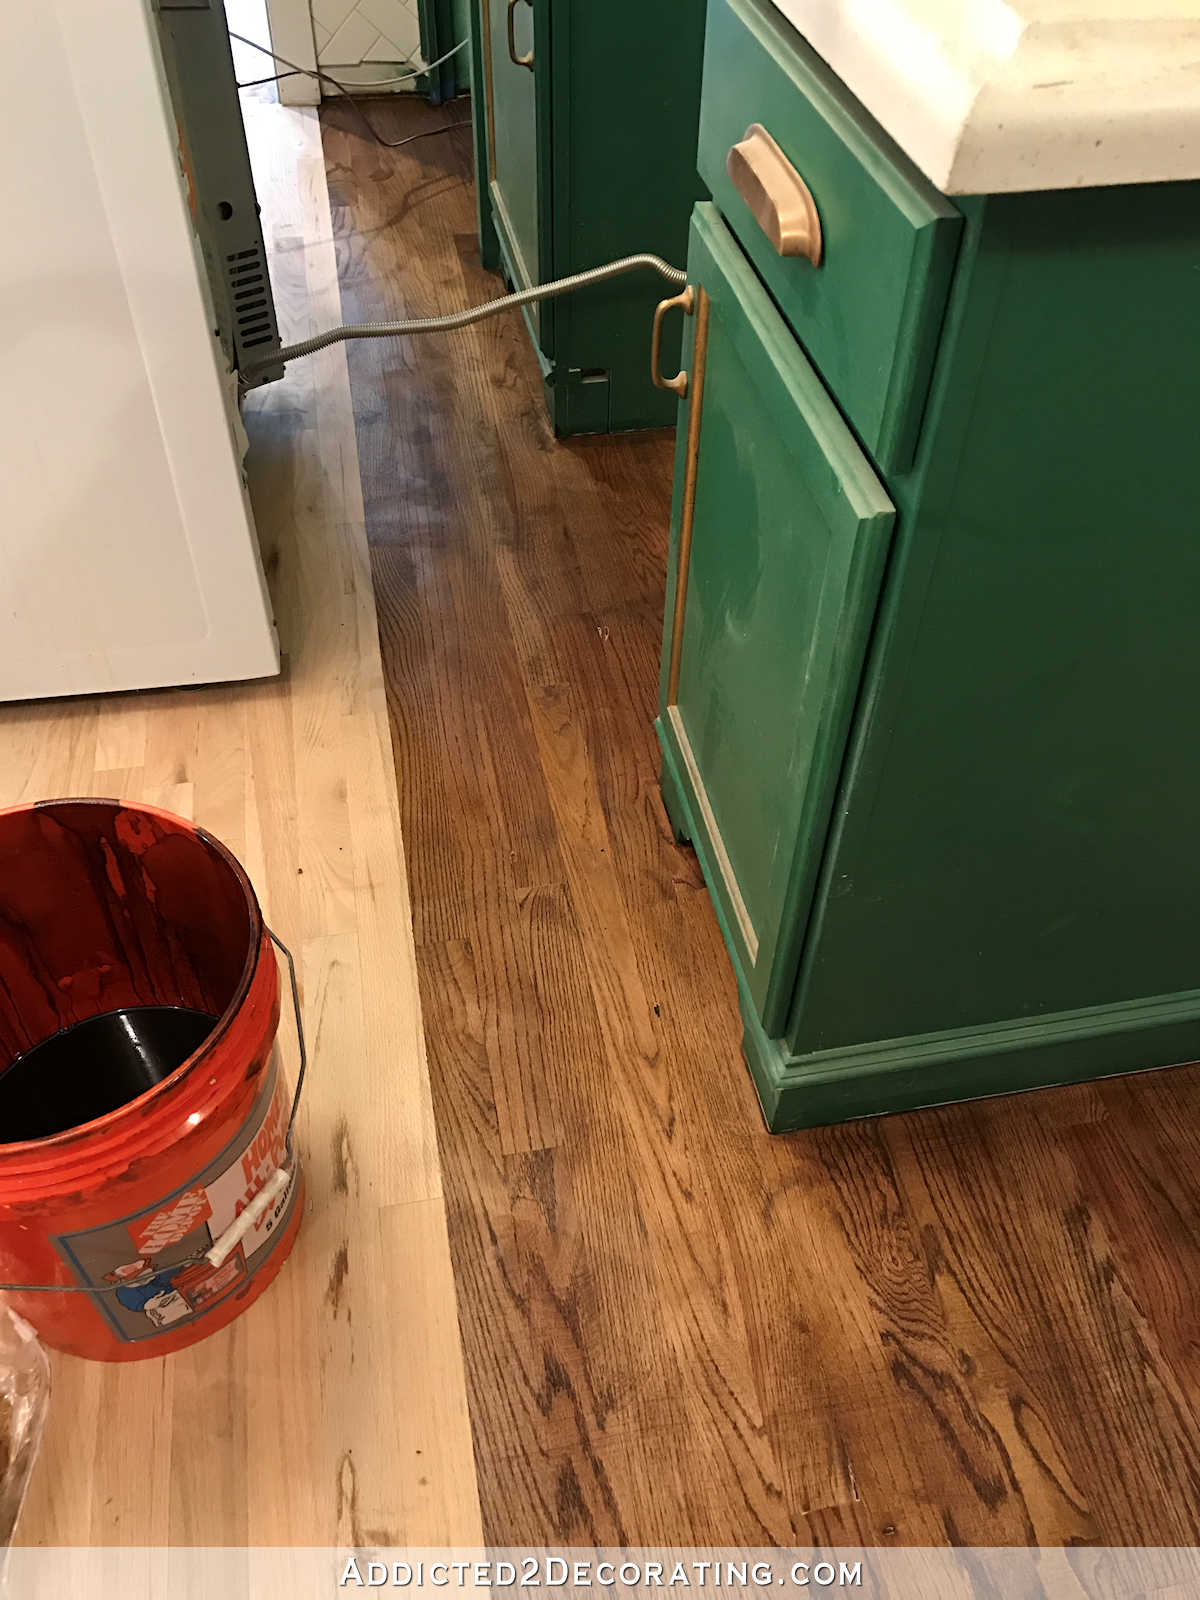
The next section I worked on was the kitchen floor behind the stove and refrigerator. I pulled those out, taped off a section, and conditioned and stained that area.
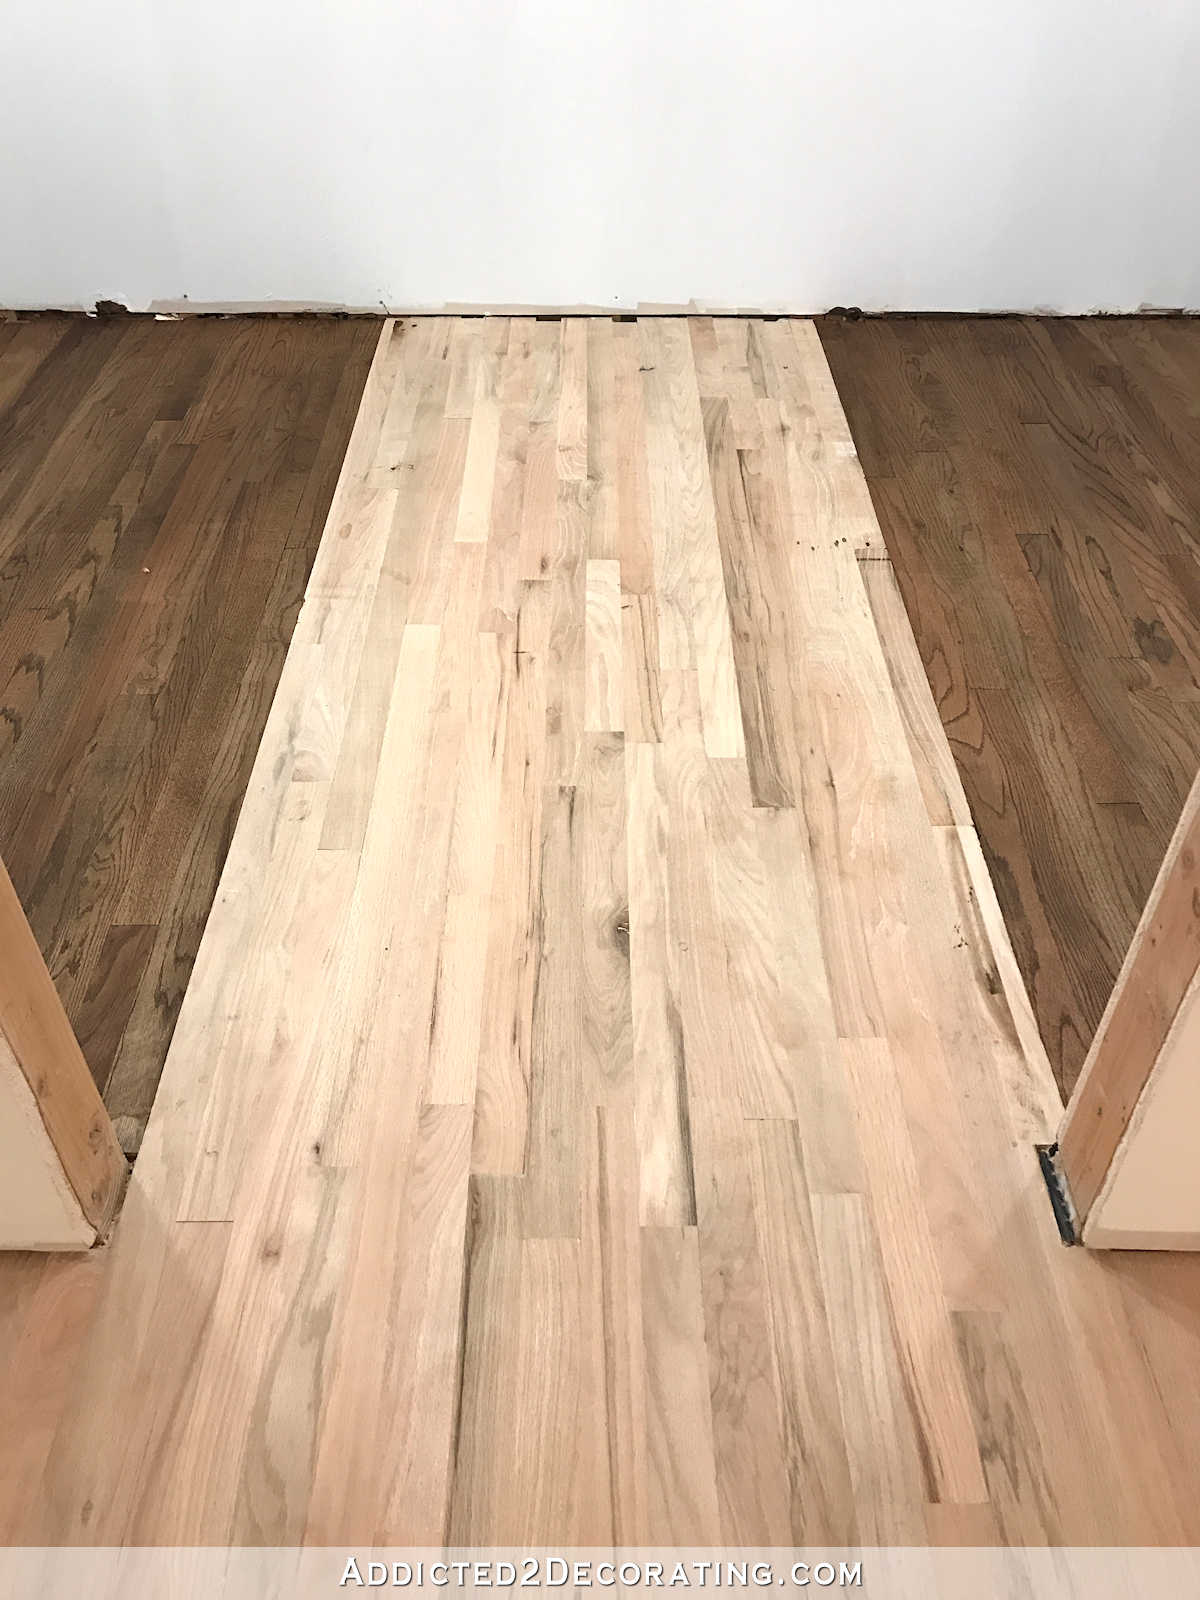
While it was drying, I worked on the left and right sections of the pantry.
And then I moved the stove and refrigerator back into place, taped off the rest of the kitchen floor, and conditioned and stained the rest of the kitchen. I forgot to get a picture of the stained kitchen floor, but you can see where I stopped on the left side of the picture below.
So today, I’ll finish up the staining, and I just have that one section of the pantry and the breakfast room to go, which can all be done at once.
If you’re wondering why I bothered with painters tape, let me explain. First, I wanted very definitive stopping and starting points. That way, I could take breaks, stop for dinner, or stop for the night, and have a very clean and definitive stopping and starting point when I resumed working on the floor.
But the main reason is that in my experience with stain, I’ve found it to be quite finicky. If you stain a piece of wood, and then go over it again too soon with more stain, it can actually remove the stain that you previously applied, leaving a blotchy finish with light spots. On the other hand, if you stain a piece of wood, and then wait a long time (i.e., several hours, as in, if you stop for the night and then resume staining the next day and accidentally go over the same spot twice), then that area will soak up more stain and get darker, again causing a blotchy finish with dark spots that are double stained. So to avoid either of those scenarios while staining red oak hardwood floors (which can be a bit blotchy on their own anyway), I used painters tape to tape off definitive stopping and starting points so that I wouldn’t accidentally go over any areas twice with stain.
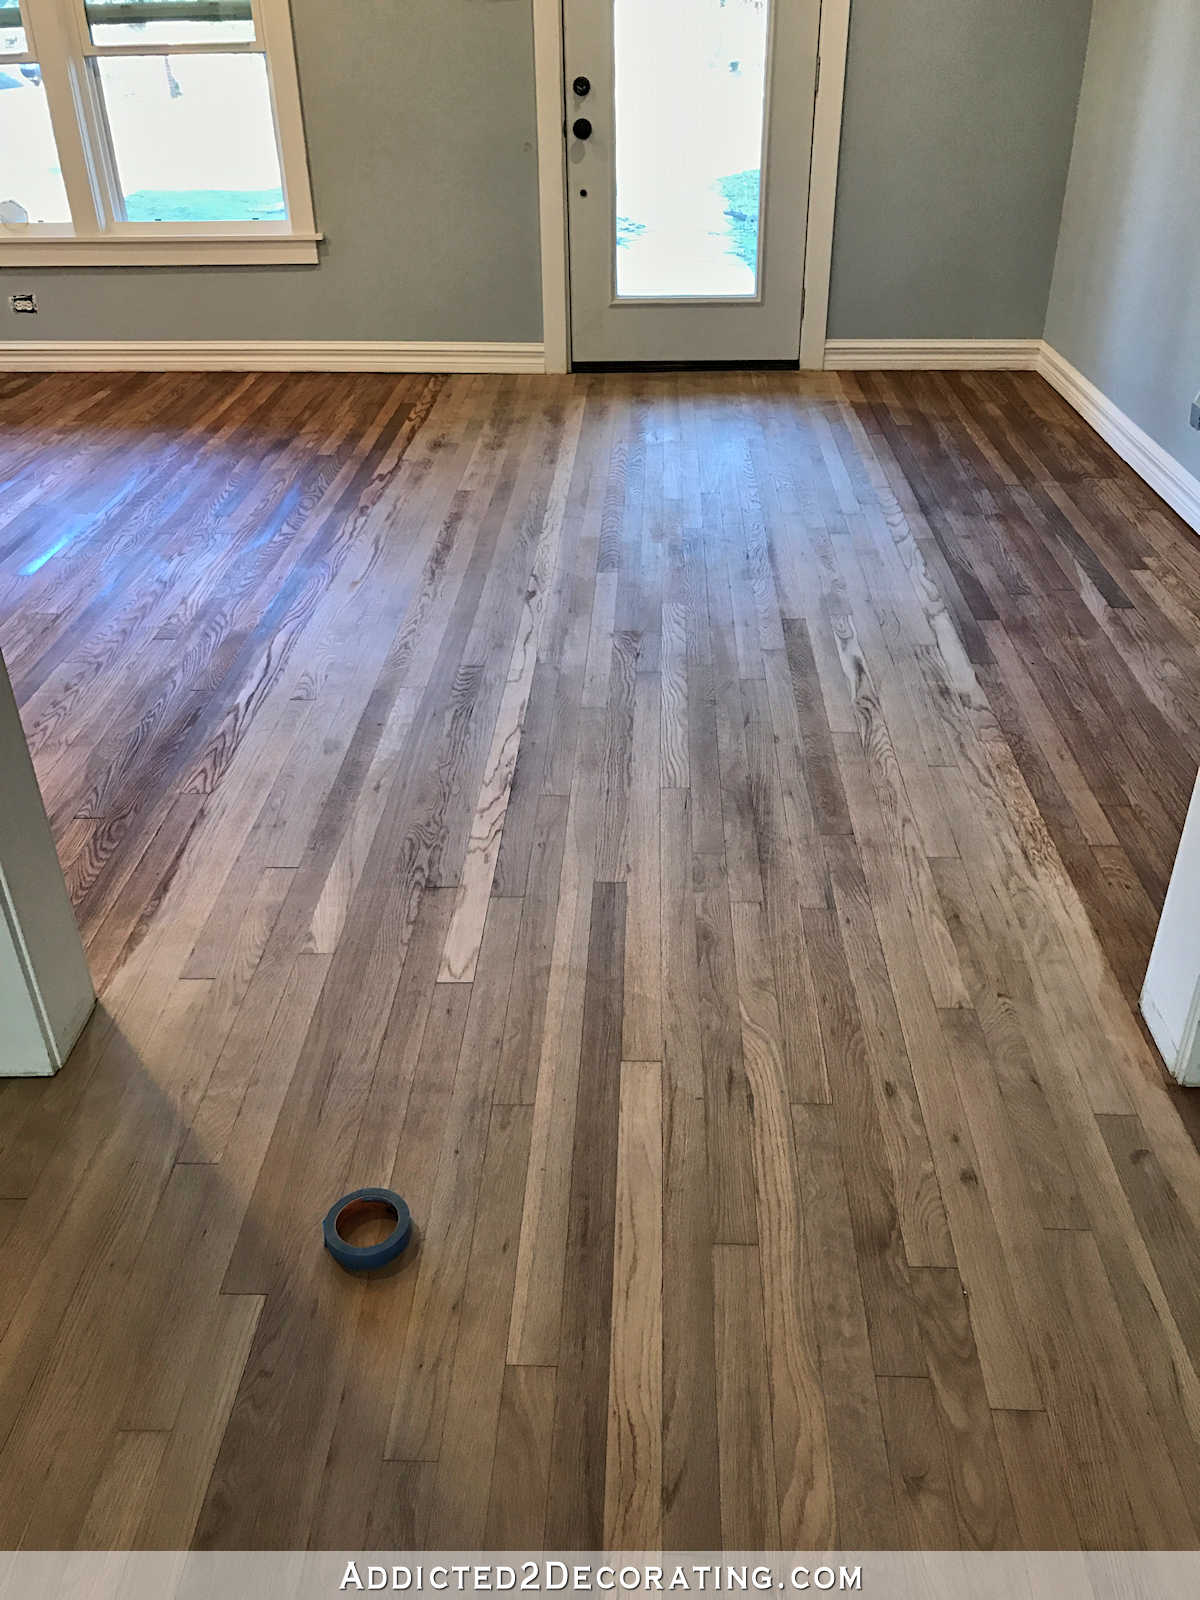
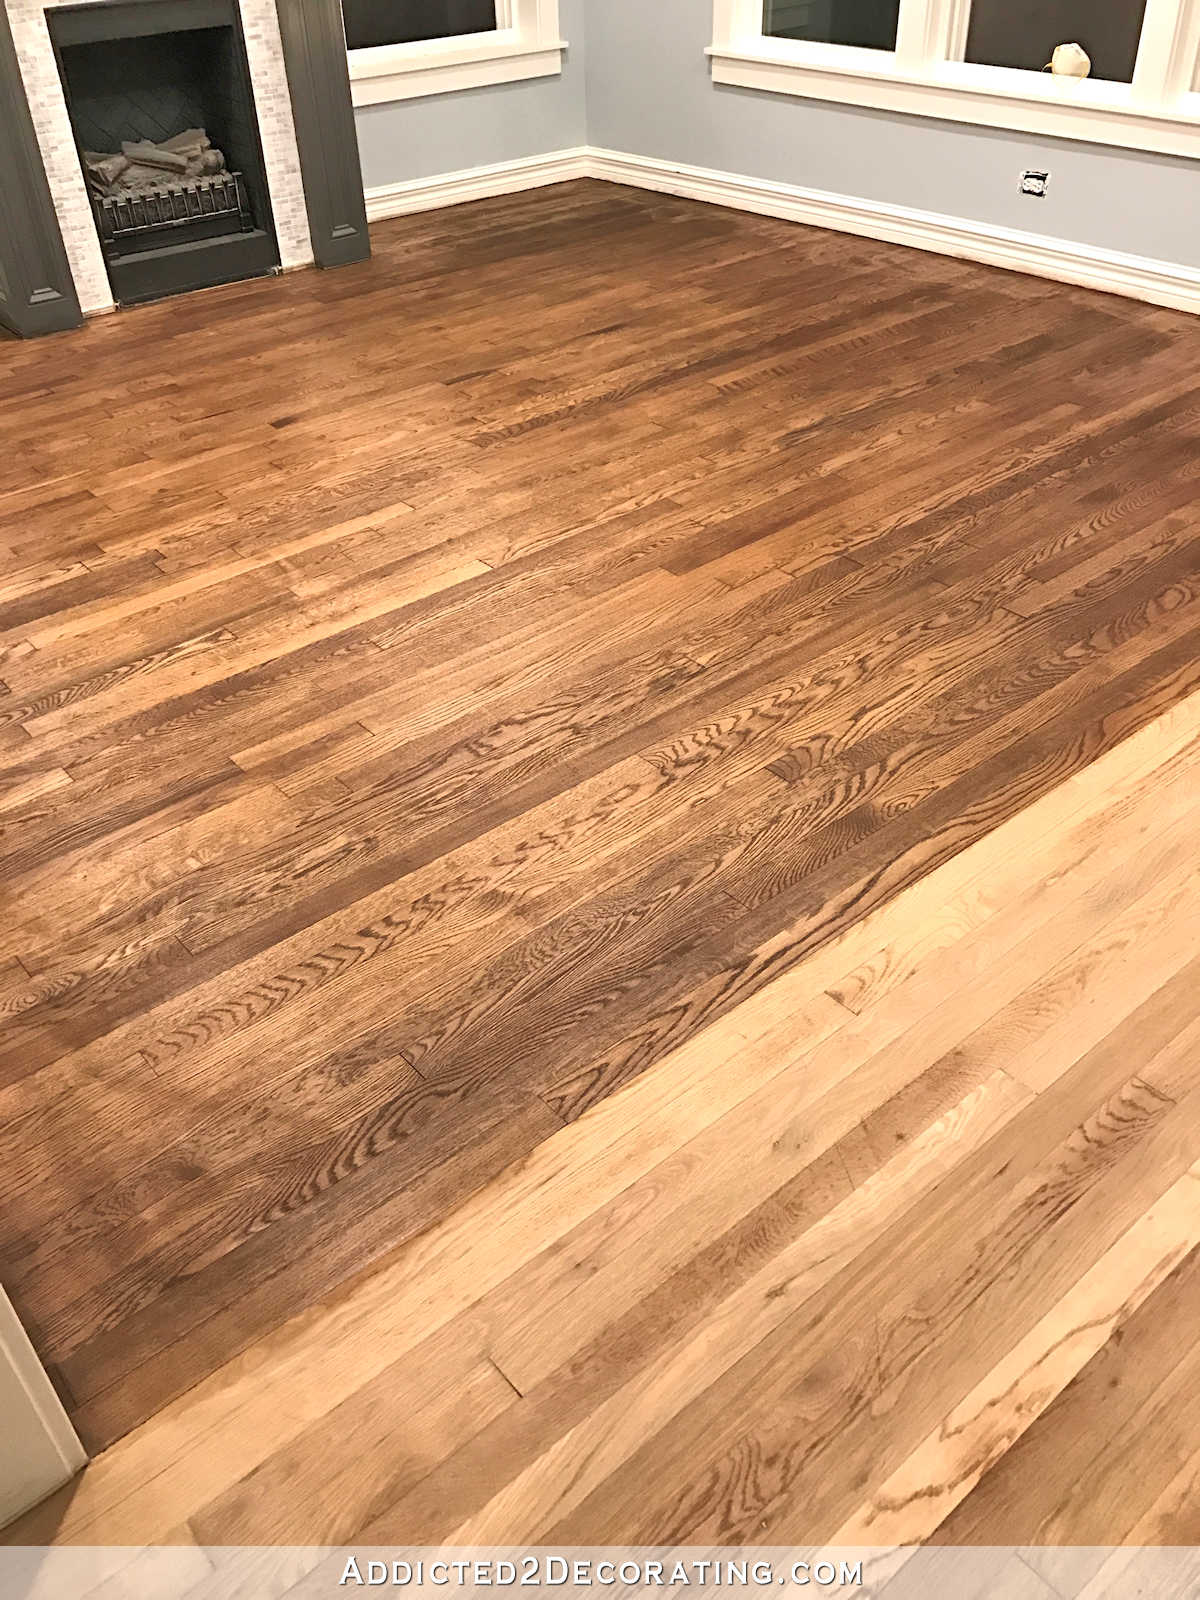
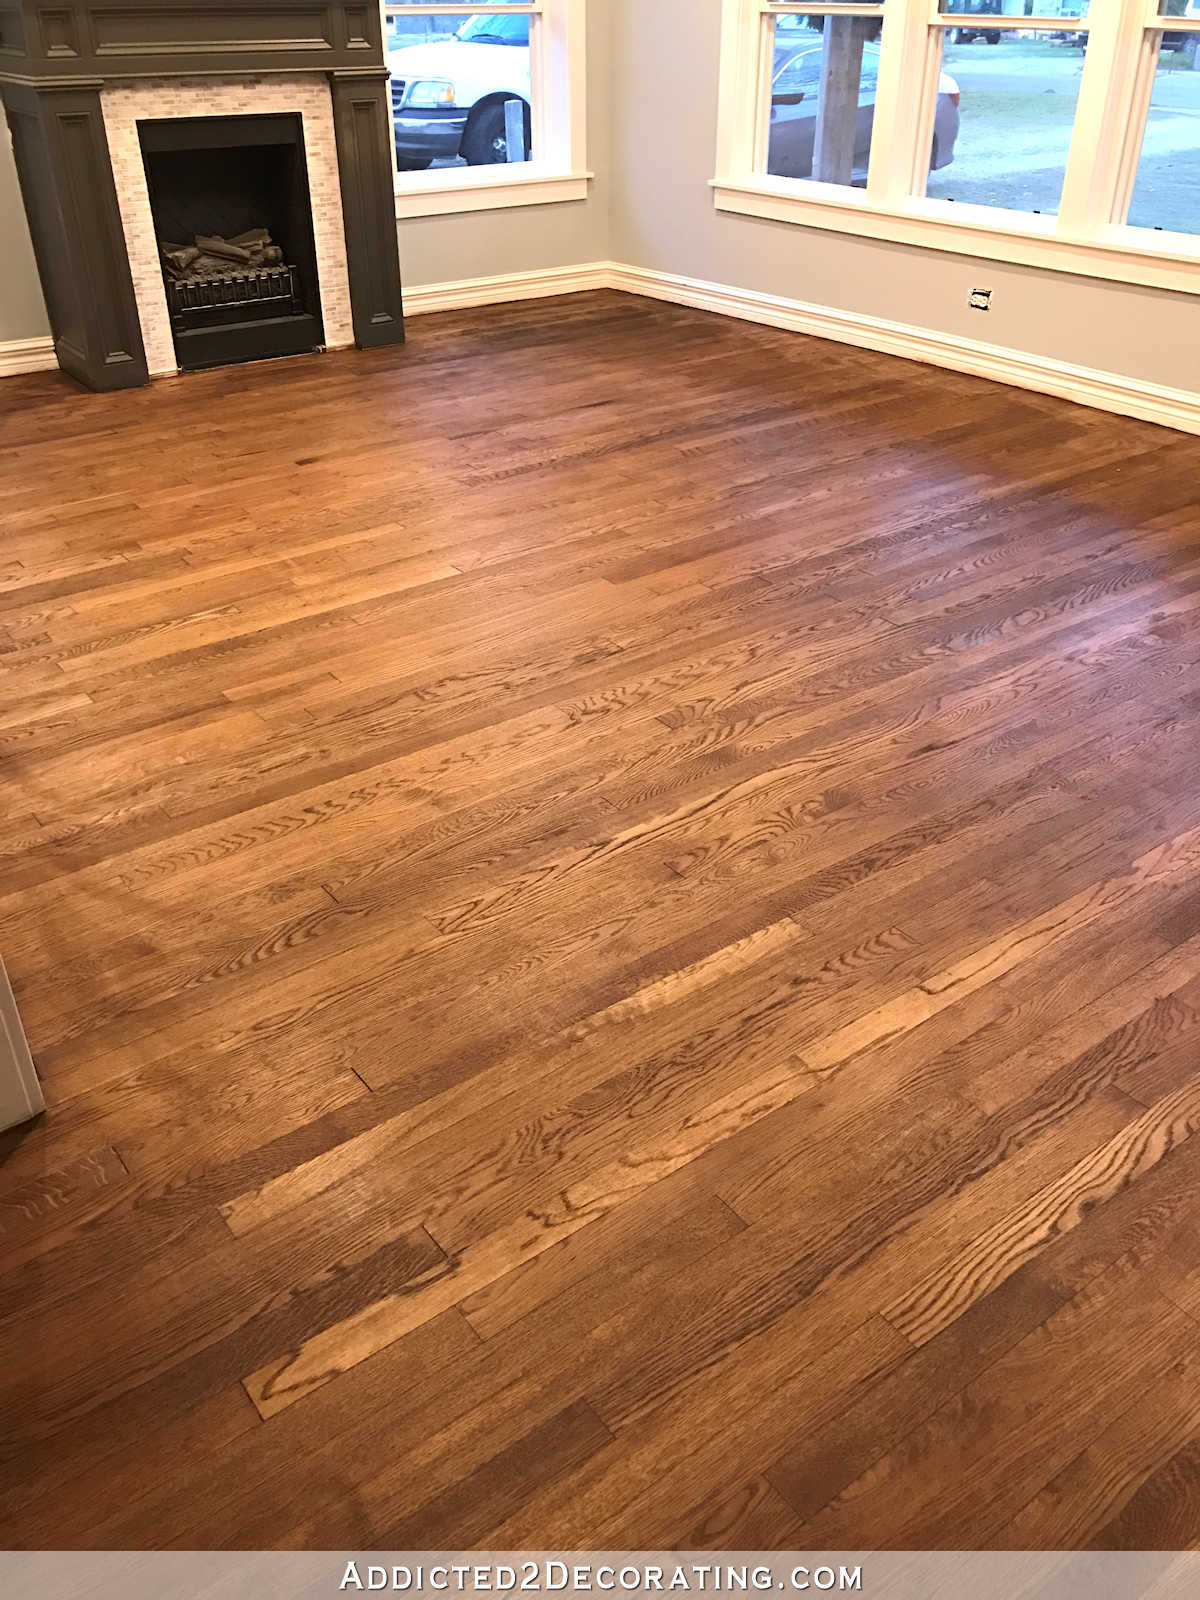
The stain I used is a 50/50 mix of Minwax Dark Walnut and Minwax Special Walnut. It turned out to be a really beautiful color. It’s a rich color to give the house some warmth, but I don’t think it’s so dark that keeping it clean will be a nightmare.
As far as topcoats go, I honestly still haven’t decided. Crazy, I know. I have ruled out Waterlox, though. Benjamin Moore has a really good water-based flat finish polyurethane, but it requires sanding between coats. Ugh. No thanks. So I just don’t know, but I need to make a decision soon! I should be ready for the clear coat tomorrow, or possibly even this evening for the first coat. So we’ll see.
This is a multi-post project. Don’t miss the other posts in this project!
Refinishing Hardwood Floors

Addicted 2 Decorating is where I share my DIY and decorating journey as I remodel and decorate the 1948 fixer upper that my husband, Matt, and I bought in 2013. Matt has M.S. and is unable to do physical work, so I do the majority of the work on the house by myself. You can learn more about me here.

I LOVE the color! I remember when the trend was to strip old hardwoods and leave them ‘blonde’ or unfinished. And then people wanted them as dark as possible…almost black! I hated both of those and I think folks are going to regret making their floors so dark in a few years. Your color is beautiful! Warm and you can see the beautiful oak grain…goes with any color! I love it! I can’t wait to see the finished project photos!
Wow! Thank you for sharing the pics of your progress. Love the color. Really want to take a second look at my own floors now!
LOVE the stain color! So glad you picked the “mix”.
Love the color@ I was looking at your previous post and saw the green and the gray cabinets in one picture and my reaction was “Oh, I love the gray!” So funny to me because I loved your green cabinets, but this color is so perfect for your home. Then I just marveled at your breakfast room pantry. I am reminded of what a talent you have and what a work horse you are!
I’m glad you picked the mix too–it looks great! Is the color more consistent between the new and old floor now?
Yes! I was actually amazed at how consistent it is! And very relieved. 🙂
Looks great! Love the warm color.
That is a really pretty floor stain color. However, I wonder why are you using MinWax? I remember you said in an earlier post that you never have any luck with a MinWax product.
I think it’s waterlox she’s had issue with. Minwax is her go to product 😉
My issue with Minwax in the past is that it’s a true penetrating stain. Any left on the surface will take forever (days) to dry, so you have to wipe off any excess. That’s great if you’re working with a pretty wood with beautiful (or no) grain, like mahogany, walnut, or cherry. But when I build things that need to be stained, they’re almost always made of pine in order to keep the cost down. Many people like the grain in pine. I’m not one of those people. 🙂 And I’m not a fan of the way that penetrating stains turn the grain in pine a yellow/orange color. So for projects like that, I do prefer a stain that can build up on the surface to obscure some of the grain, and also sit on top of the grain so that it doesn’t turn that awful yellow/orange color. Rust-Oleum wood stain was the best I’ve used, but I think they’ve been discontinued. But I’m sure gel stains, like General Finishes, do the same thing.
All that to say that for me, part of the charm of old oak wood floors is the grain, and the grain in oak doesn’t turn an awful color when stained. And for floors, a penetrating stain is preferable so that the color can’t be scratched off with wear and tear.
Love the color but I am wondering if it is uneven under the windows in the living room? That is my fear about hardwoods.
That’s the lighting for the photography, I think.
It is uneven. I think the edge sander and the drum sander leave the wood with slightly different porosity. I was hoping the wood conditioner would take care of it, and I do think it evened it out some, but not completely. I’m working on some ideas for getting it more uniform. 🙂
Another job requiring time spent on your knees…hope you have a good set of knee pads. Looking forward to seeing the finished floor, it’s going to be wonderful.
I really like the color, especially in the living room. It looked so warm and inviting, all you needed was to turn on the fireplace, bring in a comfy chair and read!
Looking good and I think using the painter’s tape is a great move.
I like the color too. What does the wood conditioner do? I have never used wood conditioner. I did not realize that some of your cabinets are still green. When are you going to finish painting the cabinets and have the countertop stained and sealed?
Looks great! We just had our hardwood floors redone…we hired it out. And they used a product by Bona as the sealer. It looks lovely on our floors. I’m not sure how it holds up over time as we just had it done a few months ago. But, I was really happy with the finish…not shiny!
I guess I missed something in another post, why have you ruled out Waterlox? Was there something you didn’t like about it after living with it for a while? I’m very curious because I’d thought of using it in the future.
Love the stain color. It’s a nice medium brown, not too dark.
Colleen, I think it was more of a time issue. The Waterlox requires multiple layers, with a 24 hour (or more?) dry time between each coat. Hard to do when you have to cover the majority of the house while living there.
Yep, exactly that ^^. I actually really love Waterlox, and for anyone who is either building new or remodeling a house that they’re not currently living in (or can move out of for a few days), Waterlox is perfect. I highly recommend it. But the 24-hour wait between coats, with a minimum of three coats, is just too much for me with us staying in the house. I need my house to be out of commission for the least amount of time possible, and I can get all of the needed coats of polyurethane (both water-based and oil-based, whichever one I decide to use) in one day and be able to walk on it the next day.
Thanks! Makes sense!
The floors are looking so beautiful. The shade is perfect!!!!! Can’t wait to see it when the finish coat is on. It will add to the lustre. You are doing a terrific job. I too, like to kneel and not stand- much more control that way!
Looks beautiful Kristi! Quick question…what is up with the floors in the room with the fireplace? Under the windows it appears there is splotching or discoloration? I don’t think that would have gotten past your attention to detail. Is it the lighting?
Here it is! 🙂 It was just in my “pending” folder waiting approval. Now that you have two comments approved, future comments should be automatically approved as long as you use the same email and username.
Anyway, the floor is splotchy in some areas. I was disappointed to see that, and it seems like it’s where the edge sander and the drum sander left the wood with different porosity. I was hoping the conditioner would smooth that out, and while I do think it made some difference, there’s obviously still some visible difference. I’m working on some ideas for fixing that, so we’ll see if I can find a fix for it.
Looking great! Can’t wait to see the finished version. Are you staining your office floor at this time also?
My office floor is sanded, but I haven’t stained it yet. I have two big stains on that floor that I was hoping to remove before staining, but after days of spraying the stains with hydrogen peroxide, I don’t think it’s doing much. 🙁 I’m not quite ready to give up, though. I’ll keep working on it, but if they won’t come up, I’ll end up painting the floor in that room. I don’t mind, really, considering that I’ve wanted a painted floor for quite some time now, and my office might just be the perfect place for that.
I like to leave the stains. It gives character. I have never liked new wood floors. I dread the day that I need to have new floors. I painted my kitchen floor (I have soft pine floors). I had to caulk all the cracks on the floor. They were just dust catchers.
The stain color really warms up your space-love it! What a huge project to be getting done and out of the way. A perfect blank canvas for all your new fun projects!
It all looks lovely. I’m so happy you’re ‘on a roll’!
Love love the color. Love the mix. Can’t wait to see it finished. Not too light, not too dark 😉
Is there a matte finish that’s oil based? Matte is the way to go….doesn’t show every little scratch or mark. I used satin Waterlox, but wish I’d used a matte poly instead. Every little scuff shows!
I’m not aware of an oil-based matte finish. I wish I could find one, though!
Nice work, you forgot to mention how tough this work is on your hands and knees (even with kneepads). Color looks great! I am using General Finishes Antique Walnut gel stain on our staircase. Similar appearance, just a different product.
Dumb question-can you buy the stain as a 50/50 mix (or get it mixed at the store, like with paint), or do you have to mix it all yourself?
You have to mix it yourself. I just bought a gallon of each color, poured them into a 5-gallon Home Depot plastic bucket, stirred, and was ready to go.
Thank you so much for all your detailed information. You answered all my questions (thoughts) that I had while reading your post. I admire your creativity, diligence and attention to detail. I hope you have a good pair of knee pads! I have some furniture to refinish and find your suggestions the most helpful.
Hi,Kristi
I have never posted before on you your blog,but have been watching quietly for almost 3 years.This time I have something to say.
I just have refinished my old oak floors myself couple months ago.Before doing that I have asked several pros what kind of finish to use,and was very keen to oil finish,but they all like one told me it is better to polyurethane.
Well ,I dont know your floors,but mine have slight movement when we walk,I can not change it or fix it.And yes that polyurethane looked beautifull,for 2 weeks or maybe even 1.Now I see a lot of cracking between boards where the movement happens. So I will have to redo it in 4-5 years again,but that I will be using oil for sure.
Something just think about.
Kristi, did you delete my comment from this afternoon? I saw it but it’s gone now.
No, I’m just now reading comment for today, and I haven’t deleted anything. It’s very rare for me to delete comments. I’ll check to see if it got caught in my spam filter, though.
The floors look beautiful! The red is definitely gone! Hello beautiful warm brown! I think you will be so very glad that this project is behind you. Great job on your hard work!
Absolutely beautiful!
Kristy,have you searched for other penetrating oil band rather Waterlox. In area where I live it is impossible to get Waterlox, only buying online and paying shipping . But we have here Osmo and Rubio monocoat. I have not used Rubio, but did my kitchen cabinets with Osmo, so far it holds perfectly and this is what I going to use next time for floors. It not that shiny though like Waterlox It says on their website that full curing time is 7 days, in fact cabinets doors were ready in 8 hours. I think if you guys were able to stay in bedroom for a day, then it is not that hard. Just maybe protect floors from Matt chair for couple days.
If you are looking for an oil poly floor covering, Home Depot carries a great one they recommended to me for my basement stairs. They still look like new after all these years with no signs of wear!
I just did a little research and found an OIL BASED MATTE VARATHANE that Home depot sells for $99.96/gal.
Looks beautiful, love the color. What are u going to do when u finish everything ??!!!! You are a worker bee !!! I can relate some.
I love the color and can’t wait to see the finished product!
Hello Kristi,
I’ve been a long time reader/fan of your blog and really enjoy you sharing all your adventures renovating your home! I rarely comment but wanted to this time to tell you about a company that I found that makes great sealers. It’s called Target Coatings. Have you heard of them? I’ve used their product for furniture and bathroom countertops and vanities. They have all held up so beautifully with no yellowing. I’m not sure if their products are for floors as I’ve never needed it for that use, but wanted to share them with you in case you wanted to check them out. Your floors are looking beautiful and much warmer with this new stain color! I’m looking forward to seeing them finished. And thank you for being yourself and sharing with the world all the good and bad of home renovation! 🙂
http://www.targetcoatings.com
Confused. Thought wood conditioner is for soft woods and oak is a hard wood. Just wondering why you felt the need to use it?
Wood conditioner works on all woods. It’s almost imperative that you use it when staining soft woods, but it does help with hard woods as well.
Oh ok, thanx for the clarification.
Absolutely GORGEOUS, Kristi!!! ❤
It is such a pretty color! Great tip on taping off. Completely makes sense that you don’t want to go over the same area twice. Thanks for sharing! Have a great week. Toodles, Kathryn @TheDedicatedHouse
Those look spectacular! You did a great job.
I missed it somewhere in the article. I see that you used Minwax, but what color was the stain? I love it!
Just discovered your website and absolutely love it. I do have a question: do I understand your process of refinishing your floors correctly in that you neither buffed nor sanded after staining or applying a finish coat? I’m going to have to refinish my floors soon, and the endless process of staining buffing sanding finishing etc. has been very daunting.
According to the directions on the polyurethane, as long as you recoat within 24 hours (I think that’s the amount of time, but verify with whatever brand you use), sanding between coats isn’t necessary. If you wait longer than 24 hours between coats, you have to sand.
My husband and I are thinking of refinishing our oak floors and I LOVE this color that you went with. What is it? Thank you in advance.
You did a great job. Next time try Duraseal. It’s oily and doesn’t have the overlap issues that Minwax does. That will make your job a whole lot easier.👍😁