Bathroom Remodel – Project In Review And Completion Checklist
Well, I’ve reached that point in my bathroom remodel where I’m thinking to myself, “Why the heck is this taking so long?! What could I have possibly done that required this much time?” I’m starting to get more than a little anxious to have this room finished so that I can move on to something else. (I get bored easily, which is why I generally get sidetracked so easily. But I’m really trying this time to stay on task!)
So I hope you’ll indulge me as I review my progress so far, and then go over what still needs to be done in order to call this room finished.
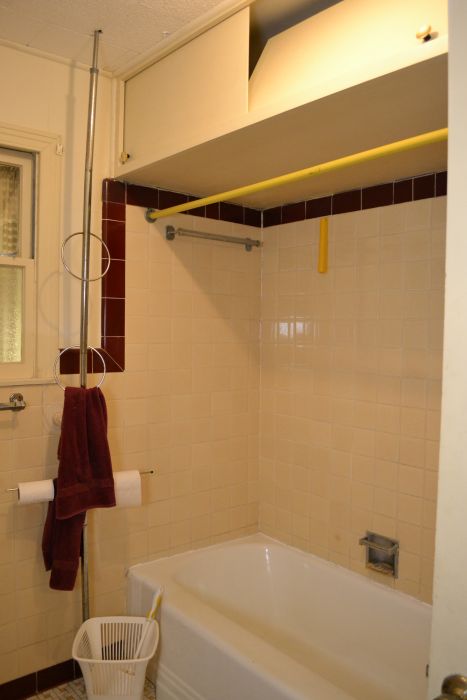
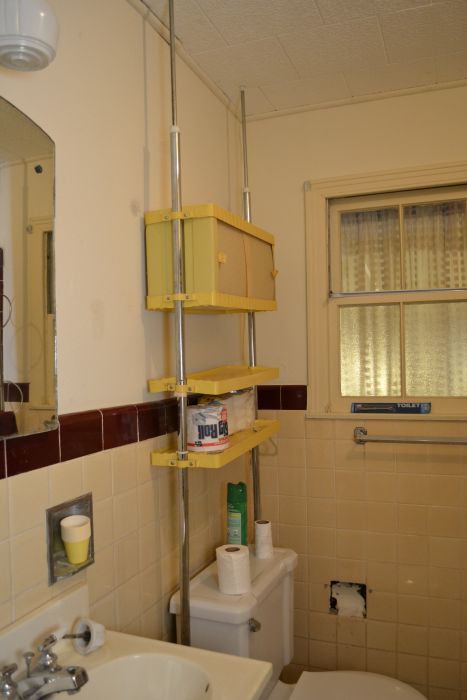
I started off with a very outdated bathroom that had tile everywhere.
So the first thing I did was start smashing out the tile on the walls. That was hard work, and removing the wire mesh that it was attached to was quite a challenge.
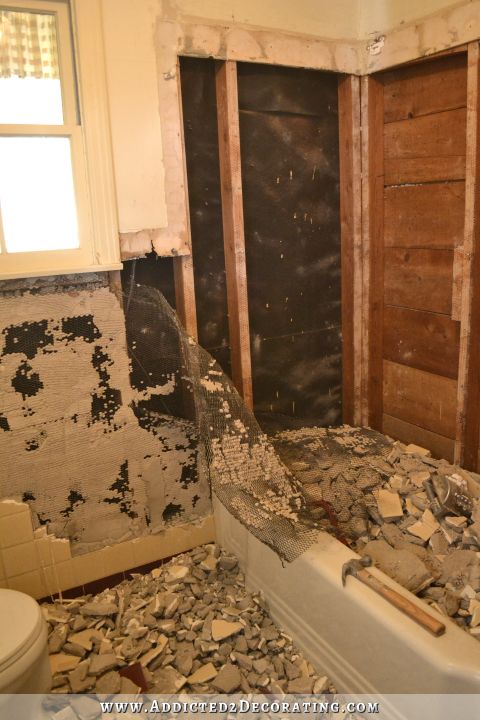
Once that was off, I went to work on the floor. That tile was set on a 2-inch mortar bed.
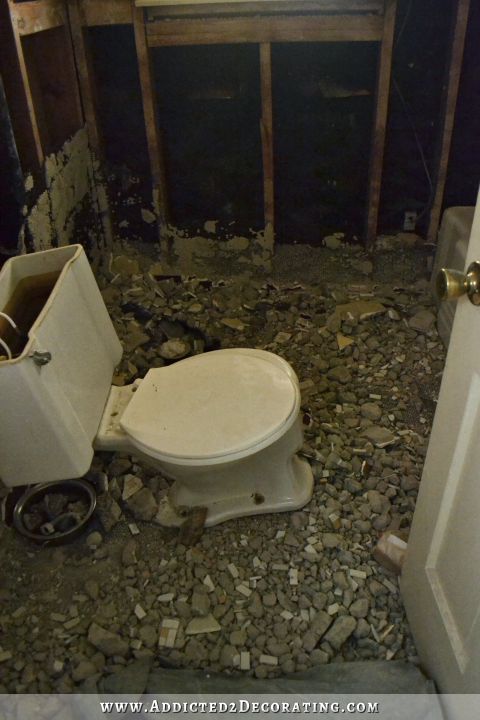
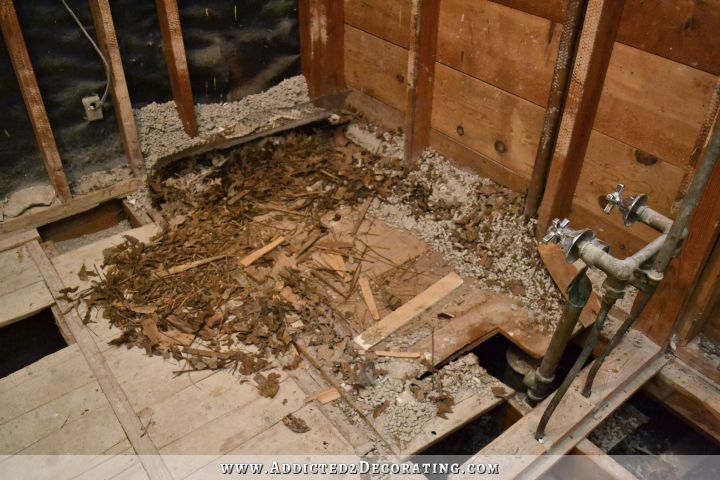
I ended up bagging up 39 bags of tile and mortar just from this small room! I couldn’t believe how much tile and mortar came out of here. Then I decided to remove the original cast iron tub. Obviously I couldn’t do that myself, so I enlisted my neighbor, his friend, and his son to help me with that. Once it was gone, it was obvious that an animal or two had made its nest under that tub at some point in the last 65 years.
With all of that cleaned up, and the tile, mortar, and drywall gone, I could finally start rebuilding this room. I started by running new electrical wiring, which I ended up changing a bit later.
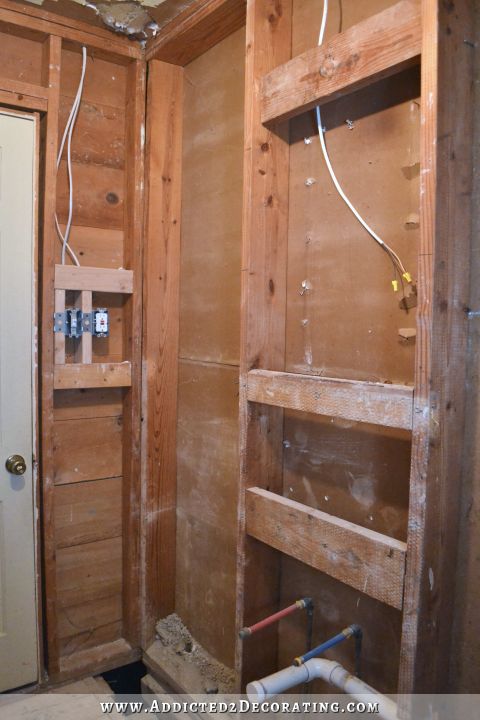
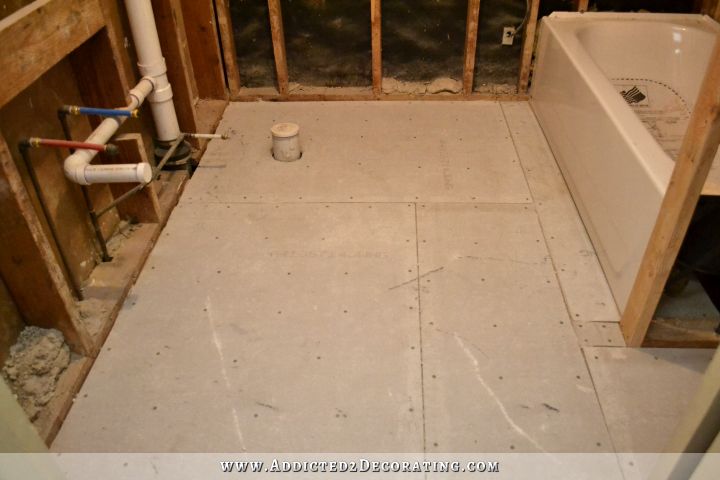
Then in went some of the new subfloor, concrete board, a new tub, and a reframed wall to separate the tub from the linen storage area.
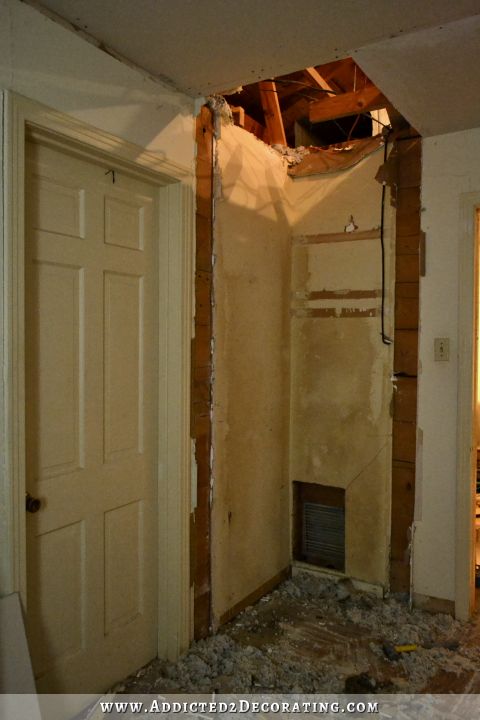
Next I decided that I wanted to move the door over, but in order to do that, I needed to remove the hall closet, and the massive ductwork that as inside the closet.

I wasn’t sure I would be able to do that on my own, but I finally conquered it.
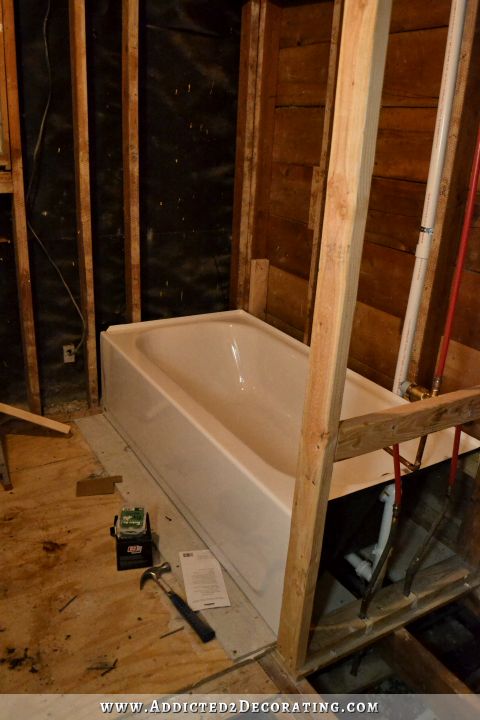
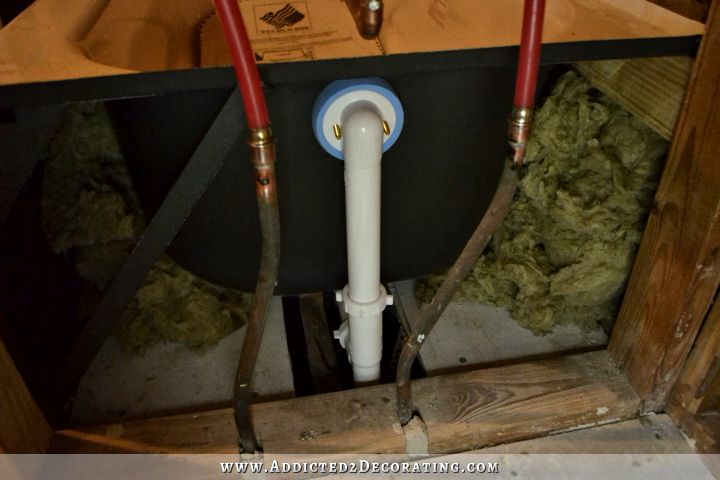
Next I insulated my tub.
And then installed the rest of the plywood subfloor and Hardiebacker cement board on the floor.
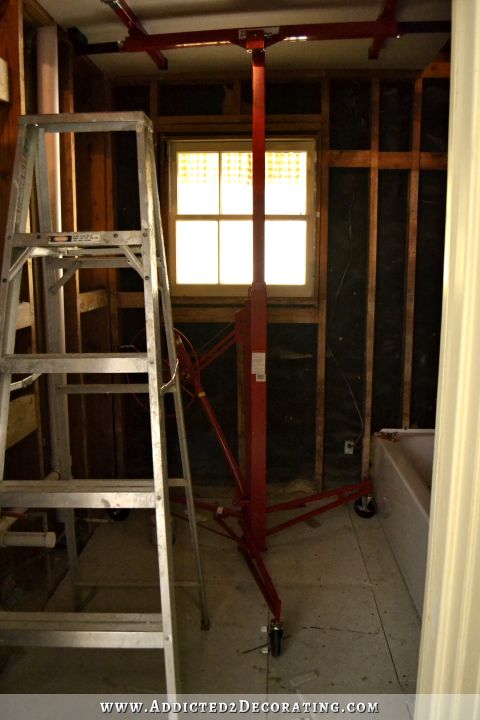
And then I started working on drywall. This was my first time to drywall a ceiling by myself. It wasn’t easy, but that was mostly due to the size of the room, and having to maneuver large pieces of drywall around the wall at the end of the tub, and onto the drywall lift. It was a tight squeeze, but I made it work.
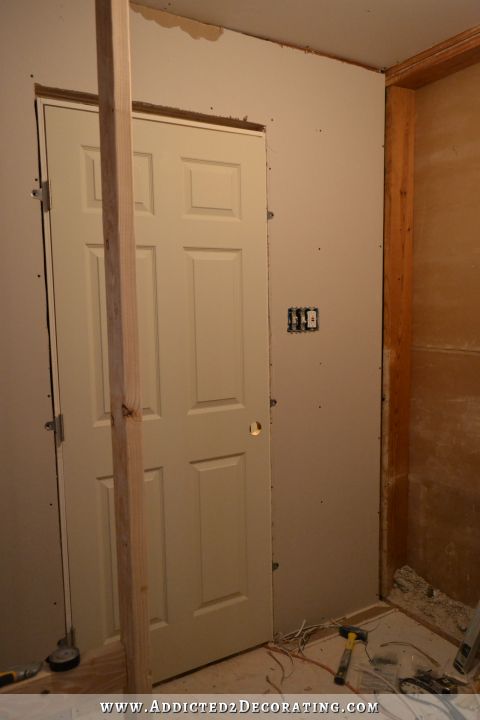
Before I drywalled the walls, I had to reframe the doorway.
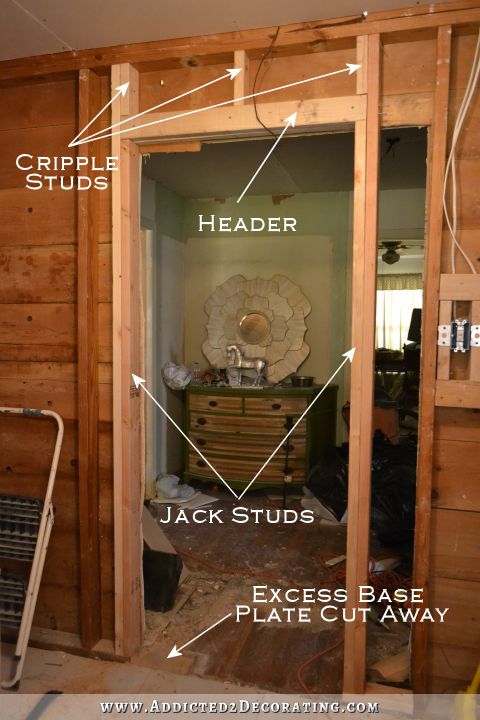
I got that done, and then put up the drywall on that wall so that I could install the new door (which will soon be changed again).
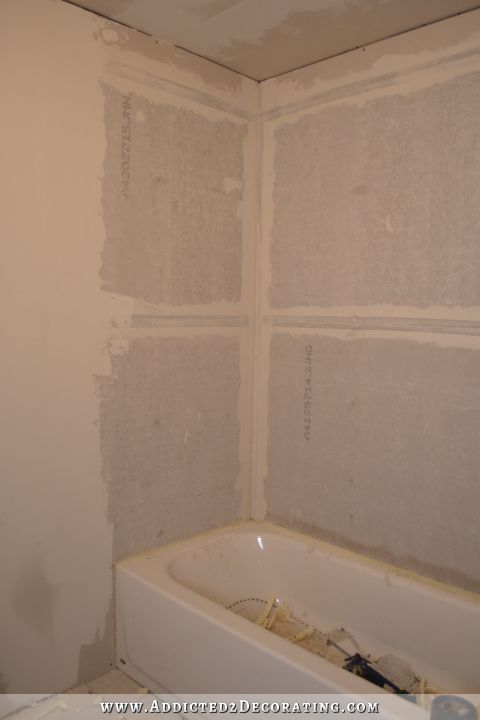
Next came the rest of the drywall on the rest of the walls, and then my absolute least favorite thing ever — taping and mudding the joints.

I also installed the concrete board around the tub, and taped those joints as well.
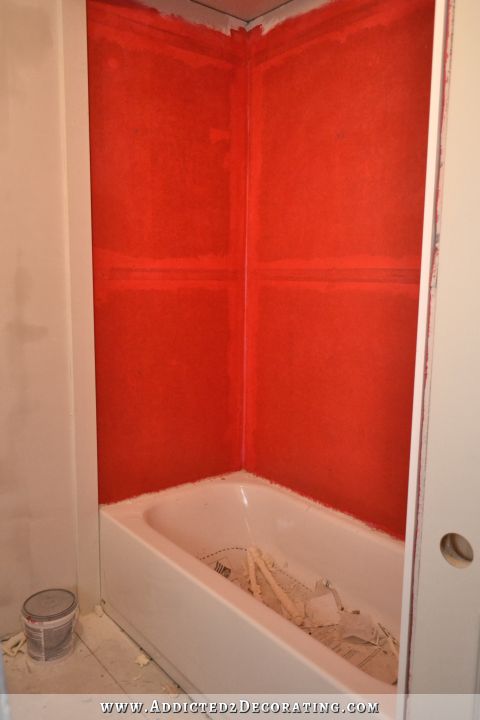
Then I did some waterproofing around the tub with RedGard. That stuff stinks pretty badly, but it’s very easy to apply, and really does a great job of sealing and waterproofing. I highly recommend it!
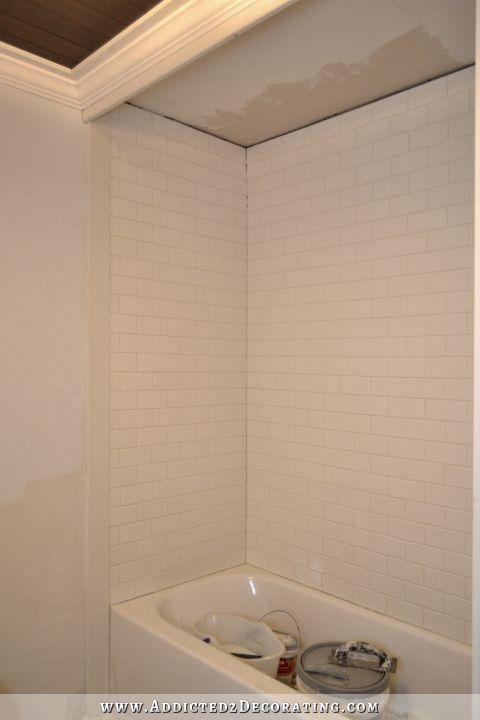
Then I got started on some tiling…
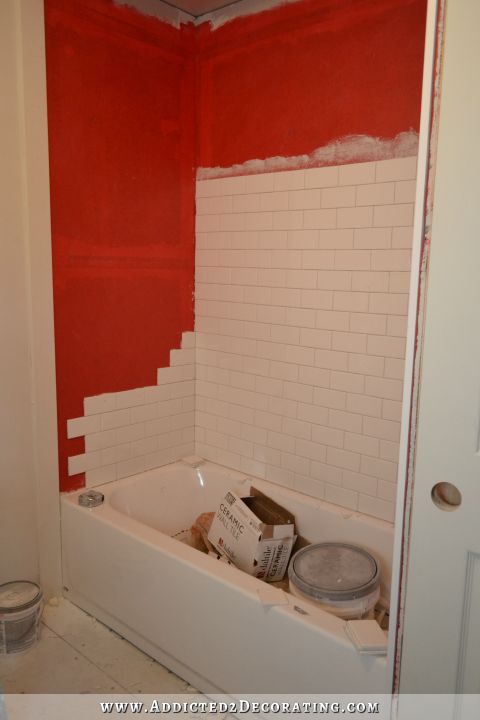
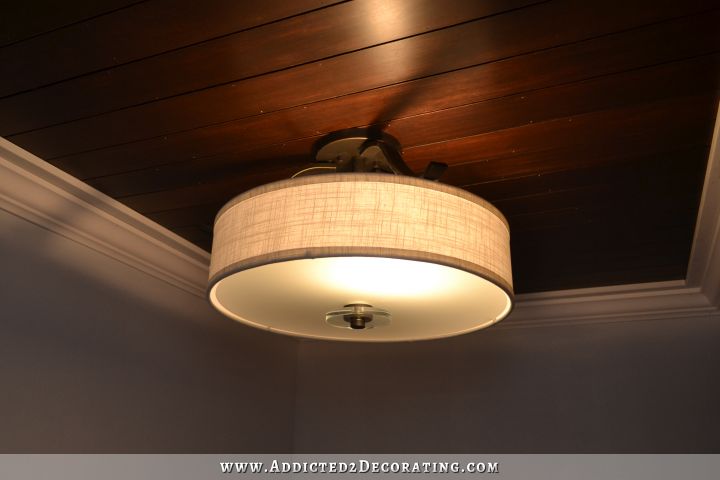
…but in true Kristi fashion, I got sidetracked by the project that I really wanted to do — the stained plank wood ceiling, trim, crown moulding, and my new light.
With that fun project done, I went back and finished up the tiled walls on the tub surround.
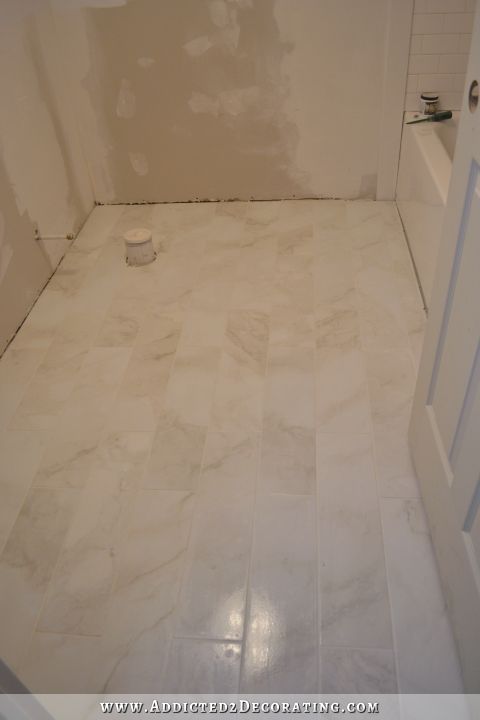
Next I worked on the floors, and got those tiled and grouted.
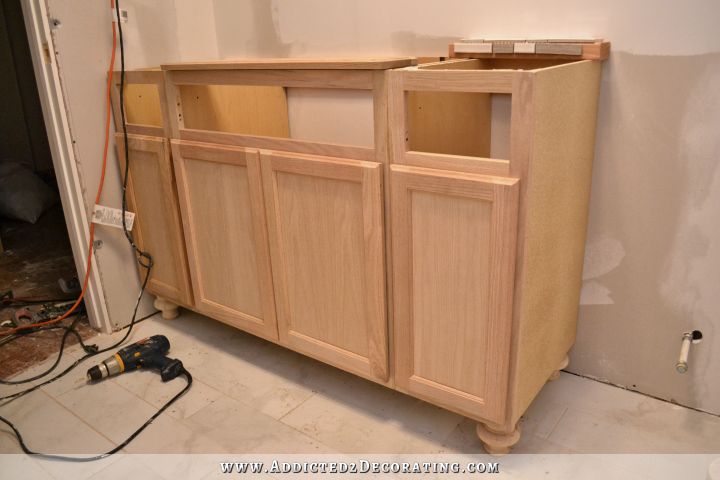
Then I was finally able to work on my vanity. I did a little surgery on some stock oak cabinets…
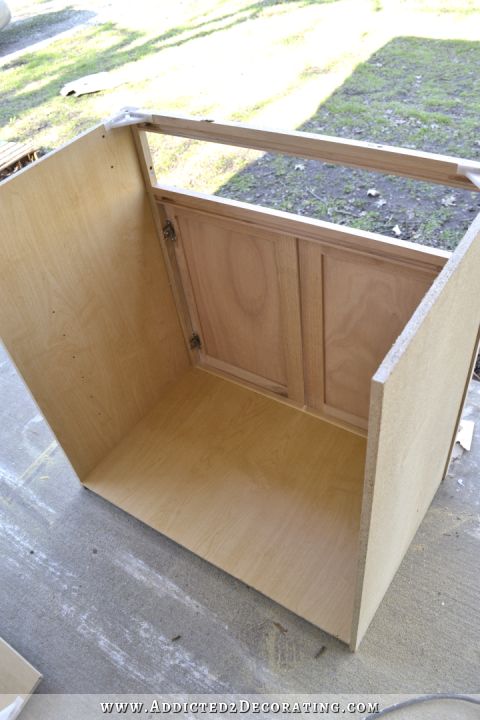
…joined those together and added furniture feet…
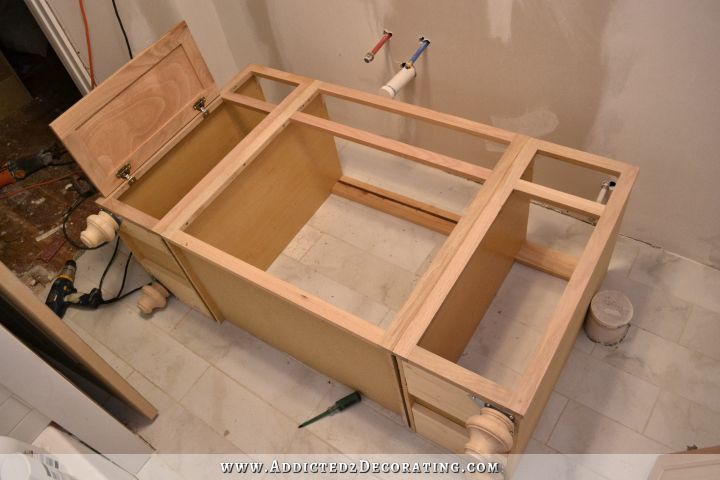
…and had my basic vanity complete. It’s still far from finished.
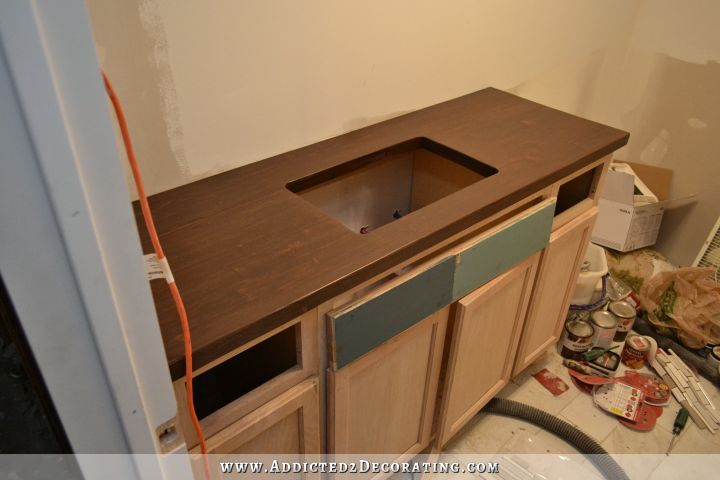
Next I made my countertop by joining pieces of pine lumber together…
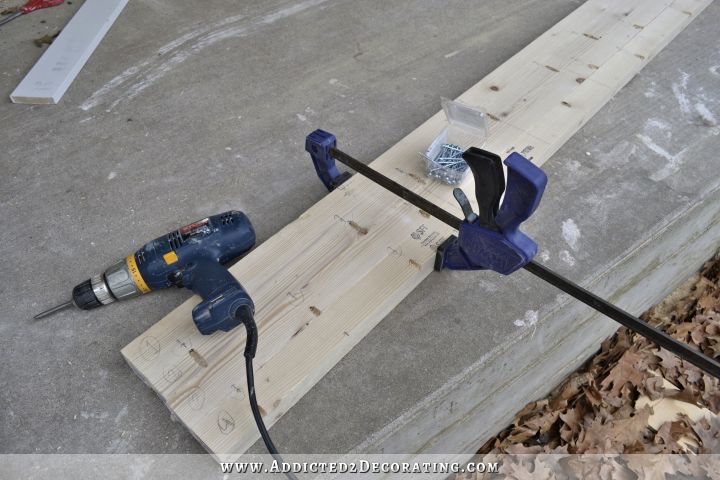
…and then doing loads and loads of sanding and wood filling.
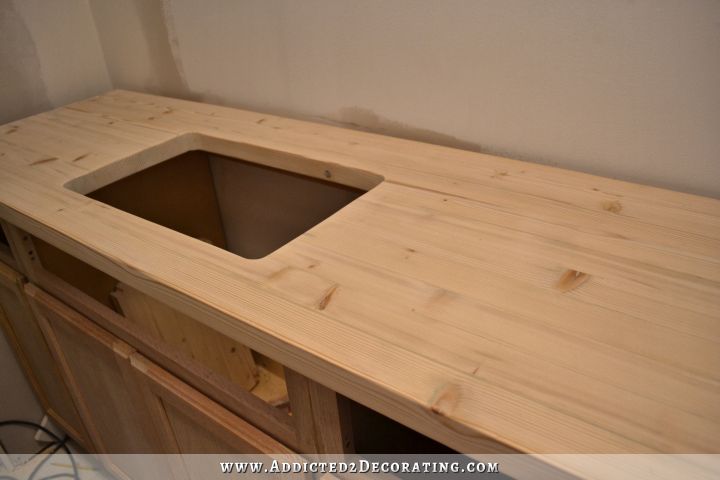
And after some staining, it turned out pretty good!
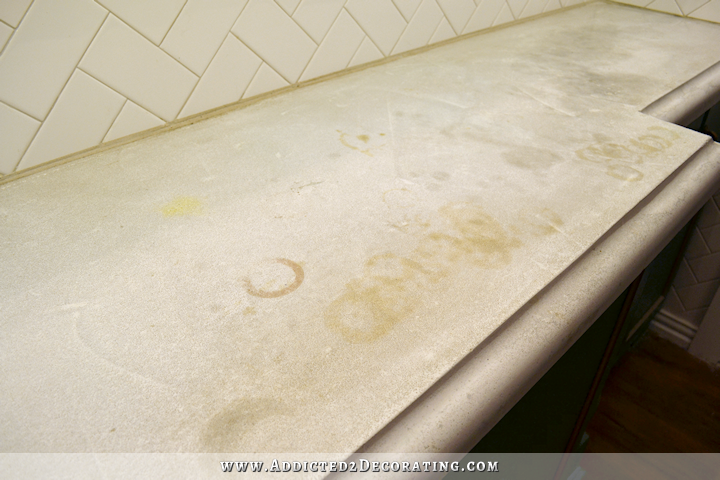
Since then, I have sanded and re-stained that countertop four times to get it just right. I don’t have pictures yet, but I will soon.
And that’s where this project stands right now. I really have done quite a bit of work on this room, so I should give myself a break. But I sure was hoping that it would be finished by now!
So what’s left? Here’s my list, but I might have forgotten something. And it’s not necessarily in the order that I’ll do the projects:
- Install, caulk, and paint the wainscoting on the walls,
- Finish the vanity — add trim, remake and reinstall drawers, prime, wood fill, caulk, and paint,
- Paint the walls,
- Wood fill, caulk, and paint the ceiling trim/crown moulding,
- Clear coat the vanity countertop and do a hand-rubbed finish,
- Install the sink, faucet, and toilet,
- Build, prime, and paint the linen storage built-ins,
- Drywall the hallway wall outside the bathroom so that I can…
- Replace the current door with double doors,
- Clean up grout haze and caulk the tile around the tub,
- Install the exhaust fan above the tub,
- Tile and grout the ceiling above the tub,
- Install a vanity mirror,
- Install the sconces on the vanity wall,
- Repair the wood floor outside the bathroom door,
- Build the tub skirt,
- Make the shower curtain.
Holy freaking cow, this project will never end!! *Sigh* And I thought this one would be quick and easy since it’s such a small room!
Oh well, one day at a time, and one foot in front of the other. It’ll get there! And in the meantime, I’ll just keep reminding myself that I really do enjoy the process, and it’s supposed to be fun! 🙂 Now I better get busy!

Addicted 2 Decorating is where I share my DIY and decorating journey as I remodel and decorate the 1948 fixer upper that my husband, Matt, and I bought in 2013. Matt has M.S. and is unable to do physical work, so I do the majority of the work on the house by myself. You can learn more about me here.


You have completed so much. You should be proud!
I am travelling this week at stayed at the Allegro Hotel in Chicago. Guess what the bathroom had? French doors and they were black. I am sending you via email so you can see. Also take a look at their website, the rooms all have black trim, and black and white wallpaper and they are some the most light filled rooms I have ever seen.
simply AMAZING!!! I still can’t figure out where you get your energy!
Wow, I’m tired just reading that re-cap. You’ve done so much, as Susan Bell said, you should be proud. The list is still lengthy but you got this! We are here cheering you on and enjoying every post bringing us along the way!
I am in awe! Keep up the great work! I’m so proud of you that you taught yourself how to do all of these skills. It looks great. I love how light, bright, and classy this room now looks.
This post reminds me of “If you give a Mouse a Cookie”, lol. I am so impressed with what you can do! I am a DIY wannabe without the time to actually DIY. I keep looking at your projects thinking “one of these days I will get to do_____” It all looks fabulous!
Listen Rock Star, have you forgotten you’ve basically rebuilt this whole darn room not to mention all the demo’ing that had to take place in order to do so???!!! No wonder it seems like a bit of a daunting task! In the end, this room is going from butt ugly to fabulousness so give yourself a big ole pat on the back and repeat after me in your best Steve Urkel voice… “Dang, I did this?”
Another Super Woman patch for your cape!
It’s looking great so far! It probably feels like a long time in comparison to some other bloggers who just change out the finishes, paint, and style, and take a gazillion photos. You did demolition, repair, reframed a door, and created your own vanity and countertop, etc. That is WAY more work that the usual bathroom remodel (especially those seen in blogland). And it has so much more personality than most you see around. It’s looking great so far, and the before/after pictures are so impressive already! So bravo – and have a great weekend!
I agree. This is the big difference between Kristi & most other DIY bloggers….she leaves them in her (drywall) dust!
Amazing progress! Kristi….projects always take longer than we hope! I learned that from you! lol 39 bags of heavy crap is a lot of heavy work and time, and there were a couple days of much needed recovery time from that as well. This bathroom is going to quite luxurious with the marble style tile, planked ceiling, wainscoting! Drool worthy!
Lady, you are a wonder. I read your articles with my jaw dropped. You are an example of “where there is a will, there is a way”!!
I’m compelled to take a nap on your behalf. As always, I’m impressed with your energy, tenacity, and talent. Cheers, Ardith
To say I’m impressed is an understatement. I have followed this whole journey and I am amazed. Your husband, friends and family should be so proud. I know I am! The end is in sight. Keep ‘er goin’!
Great job, Kristi…as usual!! But I must say, YOUR “taking forever” is anyone else’s “pretty dang fast.” You are doing just fine…give yourself a break!! 😉
Hi Kristi, when you installed the floor tile and its backer board, did either of them go under the bathtub? I would like to tile my BR floor and being a first-timer I wasn’t sure about the process. Also, thank you for the vanity updating tips. I have a similar existing vanity and I’m going to add feet and paint versus the expense of new. I’ll put that $ toward a new top and faucet. TU, Jackie
I did put the cement board under the tub, although that’s not really necessary. Most people put the tub on the subfloor, and the put the cement board right up next to the tub. I decided to do it this way since my house is a pier and beam foundation, and I liked the idea of just having more strength and floor thickness under the tub, since a tub full of water can get pretty heavy. The tile does NOT go under the tub, though. That just installs right next to the tub.
It IS a complete remodel from the ground up, like the kitchen but on a smaller scale. But remember, these are the hardest rooms in the house; the most complicated ones you will ever do. You will feel fantastic when it’s done!
You would have been done by now, if you had put the lipstick on the pig, but you wouldn’t be happy! 😀 You started with an outdated room, went down to basically no room at all, and had to build back to the basics that you kinda started with….. after all, even the floor had to be replaced! So, in a sense, you are just now starting on that bathroom. Chin up, you are making GREAT progress and it is becoming the amazing space you imagined. And, we love following along with you.
You’re my hero, Kristi! Oh, the things you can do!
This post reminded me of the book “If You Give a Mouse a Cookie”!
You’ve done a ton of work already so I don’t think your ‘to do’ list is bad at all. I imagine several of those items can be knocked out in 1 day so your list should go down at a faster pace. You did all the hard structural and ‘behind the scenes’ stuff that really took a lot of your time. Way to go!!
You have been so thorough with your whole remodel and have explained the process beautifully. Pat yourself on the back. What you have accomplished so far is gorgeous! I hope when you are done, you give us a cost breakdown. I know you are super thrifty (as am I) and I would love to know all the costs. We remodeled our half bath and I was amazed at all the hidden costs, like backerboard and screws. It was twice as expensive as I thought it would be. We would love to remodel the kid’s bath but I would like to know what to expect before starting demo.
You are doing an amazing job Kristi and the fact that you do ALL the work yourself is a huge accomplishment. Design, concept, labour, demolition, building, creating, painting, tiling, etc etc. That’s a huge achievement and it must be so rewarding as you see the end vision coming to completion. I imagine every time you go into your kitchen, you have a big smile and say “I did this” and I imagine you will be saying the same with this bathroom when it’s finished. We, as followers of your blog, are all in awe of you in all you do!
Kristi, I really do admire you and all of your accomplishments.
Kristi, I cannot believe all the things you are able to do and so beautifully. Have you ever thought of becoming a contractor (or are you already one and I missed that)? I have a question about the floor tile: What was the size of your grout line?
I actually HAVE considered becoming a contractor. It’s one of those recent “I think it would be fun to…” thoughts I’ve had. And it’s something I might consider for when I’m done with my house.
My grout lines are 1/8 inch.
Whew! I’m tired just reading the post – thatsa lotta work! I agree wholeheartedly with all the posts above.
You’ve done the groundwork (literally!), and now you’re in the home stretch with the ‘pretty’ stuff. This bathroom should be featured in a DIYer’s magazine – it’s gonna be a showstopper!
Onward and Upward, SuperKristi!
Hi Kristi, you really did do a lot. You gutted a bathroom. It will get done Maybe you need to switch horses for a day or so. Get some something else going. Maybe make the shower curtain. Anyway, I was thinking about your bathroom the last night. Because I am dying to soak in the tub, but just had my spinal injections yesterday and not allowed for forty eight hours. I am a huge fan of deep soaking baths, especially with Epsom salts, peroxide and baking soda. Pulls out all the impurities and relaxes sore muscles. I use Epsom salts with lavender for a nice scent. So this is what I was thinking, in hind site, too bad Kristi didn’t tile all the way down on the walls, and all the way over under the tub on the floor. If you had done that you could have put one of those darling slipper tubs in your bathroom. Anyone wanting to relax in the bath could, or just stand up and shower. I think it would have really expanded the visual of the bathroom and you so would have enjoyed that tub. I know they are more expensive than a regular tub, but at HD they are not break the bank expensive. I love the ones that have the freestanding base around them. Well, like I said, just hind site! Blessings
I’m saving the really nice tub for our master bathroom. 🙂
Congratulations on another extremely difficult and well-done project!
The only thing I question is why you want wainscoting in that small room. Aren’t you afraid it will make it a bit “busy” and cause it to appear smaller with that feeling of enclosure that results from wainscoting in a small area?
No, I’m not afraid that it’ll look busy. I’ve seen so many picture on Houzz and Pinterest with wainscoting in small bathrooms that I’m quite confident I’ll like the look.
Kristi ~ Seeing #12 on your to do list made me smile. You are going to be so pleased with the results! Look forward to more progress photo posts; as you tick off your list. Bathroom is coming together beautifully.
This is coming together perfectly. The tile you picked works great because it will match almost anything you want to bring into the bathroom.
Looking back to the very beginning, where you first started, I’m shocked to remember how terrible that bathroom was. You’ve been showing such beautiful work, that I had almost forgotten how bad it was. You are turning it into a luxurious spa bath. So happy you have recorded the rebuild in pictures because I believe any magazine will want that article.
You are very through and professional and that takes time.
I’m constantly amazed at your energy and capability when I read your updates. I find it fascinating as well, because being on the other side of the world in Australia, some things are a little different to the way things are done here. Love your updates.
Hi Kristi,
I know the feeling of thinking, what seemed to be a straightforward job, is never going to end. BUT!!!! Look at it this way….(meaning no offence to tradespeople)…… this job would take a team of tradespeople weeks to do. You are one person, slogging at it daily, so of course it’ll take you longer. The issues you’ve had to resolve have been, at times, complicated and beyond your experience, so you had to spend a lot of time thinking of how to resolve them. That’s possibly the main reason it’s taken so long. Next time you’d have those skills up your sleeve, and the job would be quicker.
Take heart, we’re all on the sidelines, cheering you on! Go Kristi! 🙂 You are so close to the finish line and it will all be worth it. xx
I looked at what you have done in the bathroom to date and just shake my head. I would NEVER EVERRRRRRR attempt to do what you have done. You absolutely astonish me in what you tackle. It may seem slow to you, but it really isn’t going slowly. I can’t wait to read each of your posts.
Simply amazing. You are the hardest working blogger in the blogiverse!
Rome wasn’t built in a day and even though you are “SUPPER WOMAN” things done right takes time. You are my DIY HERO. A lot of us feel that way, so pat yourself on the back. Remember the only helper you have is YOU. Your Awesome! I’m so loving this room.
P.S. I’m trying my hand at making a set of lamps and as always I’m using your post where you made your tiles out of water color paper.
Just keep on one task at a time. I am looking forward to the awesome end product. You inspire me to go beyond mediocre.
My friend Patty reminded me that bathrooms are THE most complicated project you can do. They contain everything, packed into a small space where it a) is hard to work e.g. maneuver drywall sheets and b) contains every conceivable obstacle/cut-around…plumbing in multiple places, vents/radiators, ceiling fan, ceiling light, outlets and electrical boxes everywhere. Makes you start to appreciate a big space like your music room, doesn’t it! Great work; keep the faith.
I am always awestruck by your before photos, and the documentation of what you’ve accomplished. I have no construction experience whatsoever, so it increases my respect for what you’ve done exponentially. That “before” photos show a room that’s just hideous (and crumbling, beneath it all), and your “after” photos show a room that is not only structurally sound, but well on its way to being beautiful. I’m amazed that you are able to accomplish all of that, single-handed, in such a short time! Keep going – it’s an amazing transformation.
I am in AWE (and jealous!) of your DIY skills and your innate craftsmanship. You really should have your own show on the DIY Channel! I can’t believe that you feel you haven’t made enough progress. You’ve made ASTONISHING progress!!
Great work Dear …The work that you have did is simple like a pro. Even any professional of this field is not able to do such finishing work …
Kristi, you did enormous ammount of work. In pictures, it looks so easy, mostly because of your explanations.
I want to ask about those tiles. Why didnt you use dark grout? It seems to be a trend with subway tiles.
I try not to be influenced by trends. I don’t like dark grout with white subway tiles, but I’m a perfectionist with slight OCD tendencies, so the reason I don’t like it is because dark grout always accentuates the imperfections in tile spacing and just looks messy to me. I’ve never seen dark grout used with white subway tiles where it looks nice and neat and the imperfections didn’t jump out and grab my attention.
Thanks! This design looks cool as well. Just before this post i was reading the whole process and i was SO disappointed when didnt see the final product. Had to crawl your blog a bit for more info and i must say you have a nice blog. Keep it up!
Wow this is awesome. I’m planning on remodeling my bathroom, but you take it to a whole nother level. Highly impressed by your craftsmanship.