Bathroom Vanity Trim, Wainscoting Progress, and Painted Walls
I have about 100 projects started on this bathroom, but nothing finished at this point. But at least I’m making progress! Here’s what things look like right now.
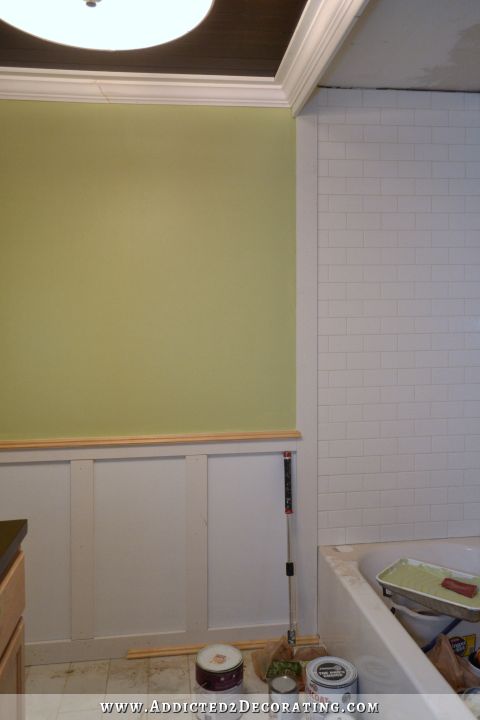
I got two of the walls painted in Behr Crisp Celery. I love the color! It’s so light and fresh, but it’s definitely green. I looked at the samples of this color on the Behr and Home Depot website, and they look incredibly washed out and almost gray. I didn’t find those to be accurate at all. The color is very light, but it’s unmistakably green.
Here it is contrasted with the white tile around the tub.
And I also got a good start on the wainscoting. I have a long way to go before it’s finished. Right now, it just looks like a standard board and batten, but it won’t look like that when it’s finished. There’s still quite a bit of trim to add, and I’ll be doing a tile border along the top.
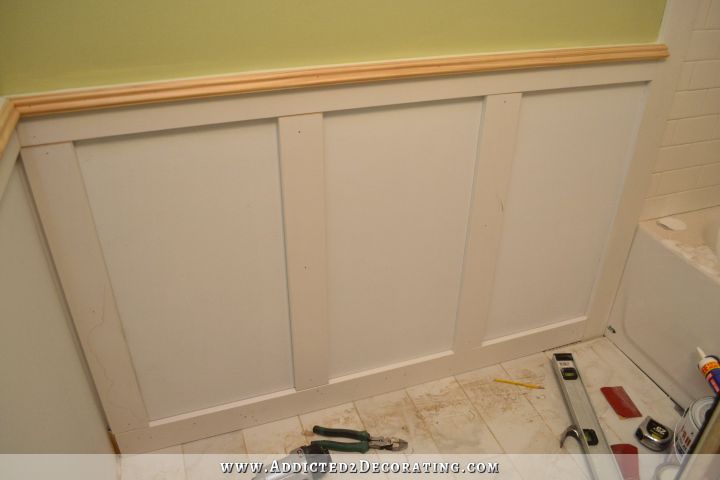
And that tile border will wrap around the top of the vanity countertop and act as a backsplash.

And you can see in the photo above that I also restained my countertop (five times!). It looks awfully dark in photos. I mean, it IS dark, but in person, you can see the wood grain and actually tell that it’s a wood countertop. I’m having a hard time getting that to show up well in photos.
I ended up having to mix my own stain color for the countertop because I couldn’t find anything straight out of the can that I liked. I mixed Rustoleum Summer Oak, Traditional Cherry, and Dark Walnut in equal amounts. It was the perfect amount of dark brown with a hint of red that I liked.
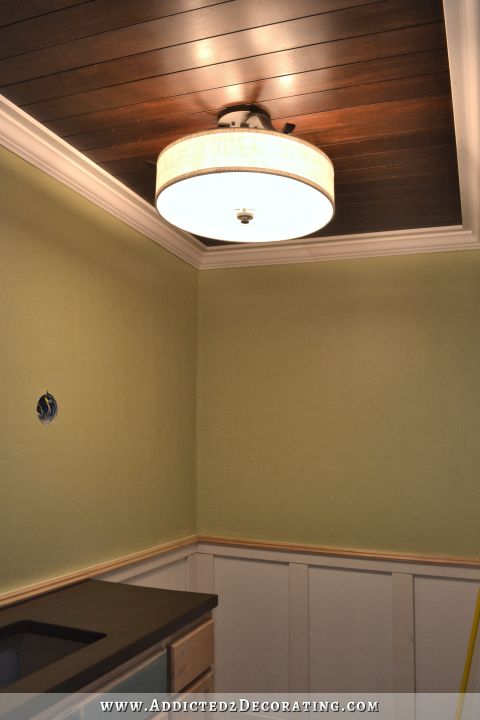
I’m really liking how all of this is coming together. And that wall color just makes me happy. I’m so glad I didn’t go with a neutral wall color!! I love how this green looks with the stained wood ceiling.
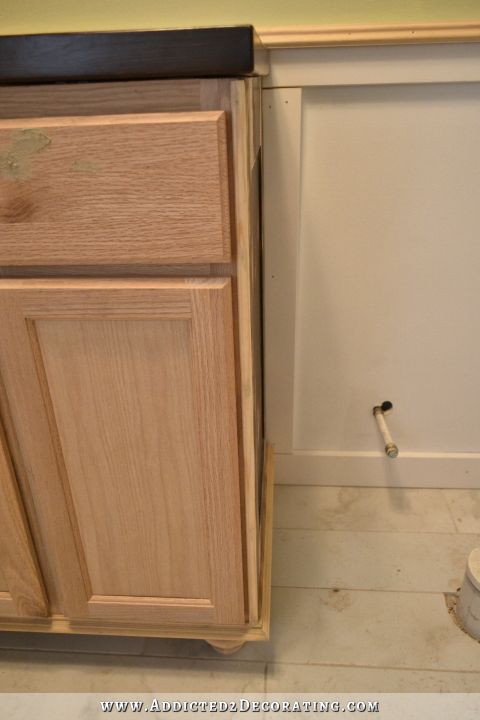
And finally, I got my vanity all trimmed and ready for paint. I actually did this last weekend, but I haven’t shown you yet.
They sell solid panels to finish out these ends, but I decided to trim out the vanity during one of my “I’m so tired of spending money” moods. So instead, I searched around to see if I had something on hand that I could use. And sure enough! I had all of the ends of the plywood strips that I had cut off of the 8-foot pieces when I planked my ceiling. So I decided to put those to good use.
I cut four pieces to the right height (30 inches) and attached them with wood glue and short finishing nails, centered on the end panel.
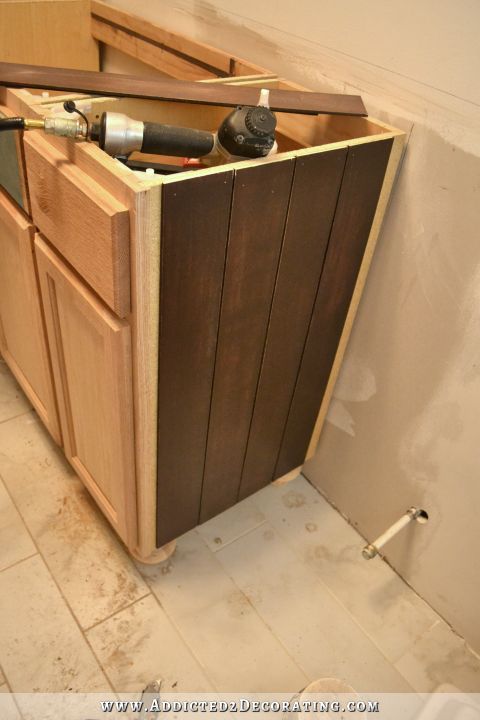
And then I used more of the plywood strips to “frame” the end panel.
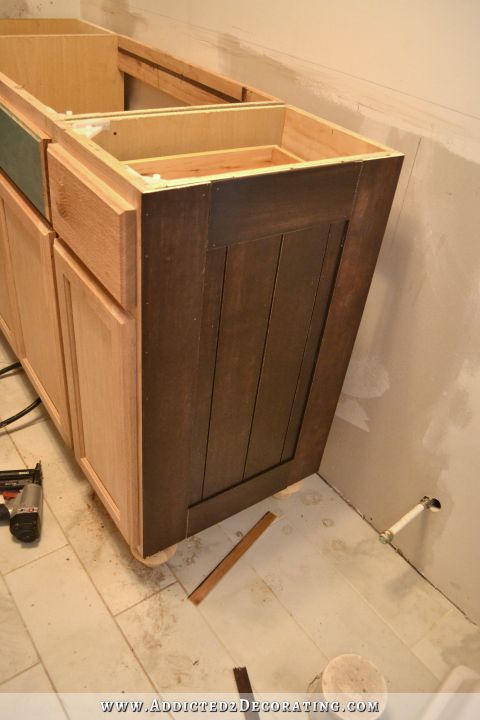
Here’s a view of the other end.
And yes, I did both ends, even though the left side will be up against the wall and won’t show. The reason is because I do want this vanity to look like a separate piece of furniture rather than a built-in vanity, so I needed the bottom trim to wrap around both sides. And in order for them to be even, I needed the same amount of width on both sides. So I went ahead and finished out the left side.
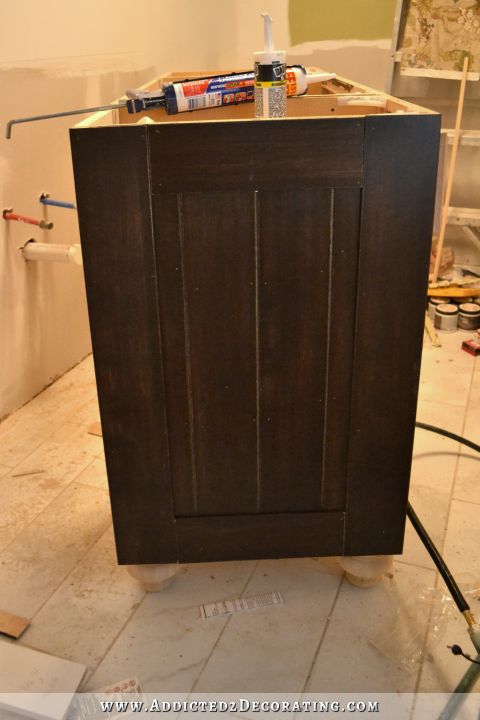
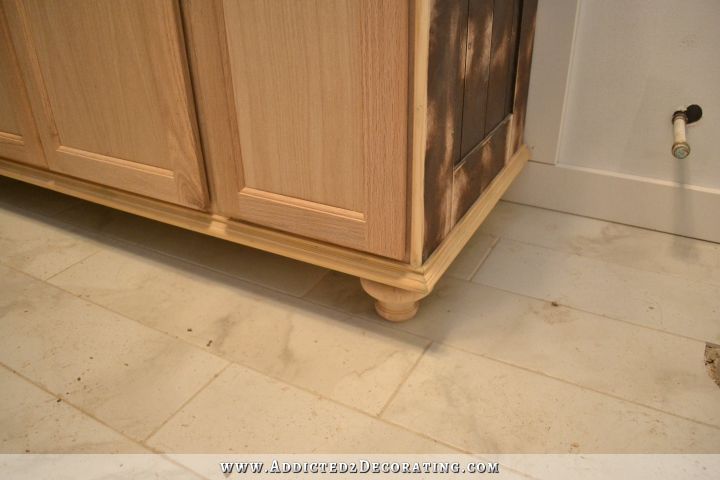
Then I added the trim along the bottom of the vanity, as well as a thin cabinet trim along the front vertical edges of the vanity.
Here’s another view of that cabinet trim along the front edge of the vanity.
And although I’ve probably created a cleaning nightmare for myself, I’m glad that I continued the trim on the left side to make it look like a separate piece of furniture, rather than having this side look built-in.
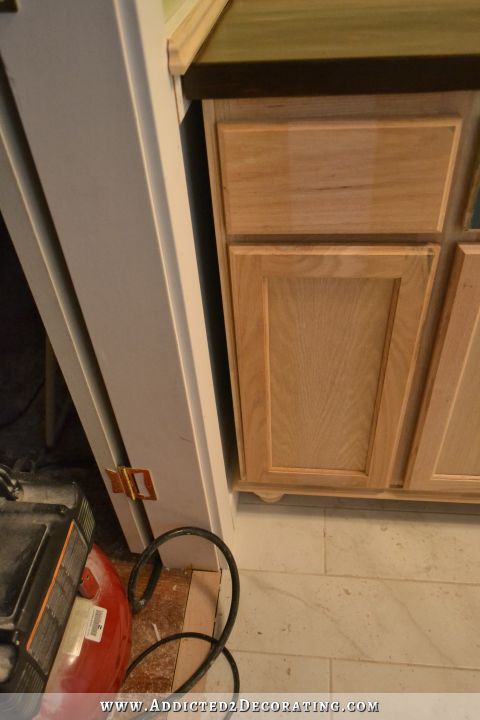
I’m sure one of those flat hand held dusters will fit in there, so I’m not too concerned.
It’s fun to see it all finally start to come together!

Addicted 2 Decorating is where I share my DIY and decorating journey as I remodel and decorate the 1948 fixer upper that my husband, Matt, and I bought in 2013. Matt has M.S. and is unable to do physical work, so I do the majority of the work on the house by myself. You can learn more about me here.

Really beautiful, Kristi! You were absolutely right about that pretty green and how well it works with the ceiling.
Love the color! And the sides of the vanity look great- can’t wait to see it all trimmed out and painted. Love your blog!!
I’m simply stunned at what you are able to accomplish– by yourself! I don’t even own a nail gun (but I’d like to!). I have so many rooms in my house that need renovating but I have limited skills and budget. So, I paint here and there and decorate until I can hire a pro. I love your courage to jump in and teach yourself. You’re an inspiration!
I love the ceiling and the vanity and overall look, but this is where I always decide the color is not right for me and I go buy more paint instead of trusting myself and finishing with fabric, etc….so I am so excited to see the shower curtain and the rest of the trim painted. I love blue and green and all my fabric swatches are waiting on me to make a decision…Hoping this will push me over the edge..Like so many, can’t wait for your next progress…Good job!!!!!
Your bathroom is looking fabulous Kristi! I love the celery green walls, specially in contrast to the white tiles. I am really enjoying seeing your progress each day, and your abilities never fail to amaze me!
I agree! Your bathroom is going to be beautiful…I love how everything is coming together. The vanity is going to be so worth the extra effort you’ve put in. Excellent work!
You are amazing!. I have recently found your blog and cannot believe how talented you are!. I have my eye on a set of (Crate and Barrel) coffee tables that I’d love to recreate. I would gladly pay you for the plans on how to build them 🙂
https://s-media-cache-ak0.pinimg.com/736x/12/a5/de/12a5de5573defc31f47f763e066dc79f.jpg
I had that exact Behr color in the open hallway of my old house. It was the prettiest green – light and fresh but still neutral-ish. My work floors were a similar stain to your ceiling, and they do indeed look great together!
The bathroom is really coming together, kudos to you!
Wow – how I love that color! I almost want to repaint MY bathroom that color!
Looking great as usual! I find this to be so funny that you have now managed a FULL kitchen redo – and now a FULL bathroom redo – all since I started following your blog last year! I love it! You are an amazing decorator AND builder!
BTW – how is your Condo doing?
It’s all coming together so well. I could have you come in and do my whole house and I’d be so happy with the results. Our tastes are so, so similar. I love the celery green. And I think that’s the color I’ve been looking for – for my old bedroom furniture. Now that the 8 ft. piles of snow are melting, I’m anxious to get my carpenter in here. I’m looking forward to your next posts.
I used used that exact Celery Behr color on my front door and side window next to it. It’s so bright and fresh and I think, an uplifting color. It pops against the brick of our house and the deep green & cream trim. We love it and people say it feels welcoming and happy to walk up to 🙂
Walking into a cheery, but warm & elegant bathroom is just a feel-good thing and this one will be that for sure.
Home stretch now 🙂
is it just me who laughed about Kristi’s comment at the start of this blog? It could only be Kristi considering “nothing finished”!! Might I point out the beautiful ceiling, the fantastic tiles, the door? And then there all the other things which might not be finished, but that already show loads of work like the vanity and which show how much progress you’re making! I can only cheer you on and give you the thumbs up: It’s lookign fantastic and you have definitely passed the point where it looks like nothing ever is getting finisehd. Btw, I LOVE the paint colour!!!
OMGoodness. It just gets better and better!
You were absolutely right about the wall color. It looks so elegant with your ceiling, countertop, and light fixture. This is shaping up beautifully.
I used that wall color in my bathroom and I love it! Everything looks like it is going to be so beautiful, I especially like the ceiling and am trying to figure out how to get it done in my bathroom soon. If I were you though, I would be sooooo ready to get finished so that I could be outside during spring! I’ve already built 2 window boxes that I am dying to get plants in, anxious to hang our porch swing back up, etc….inside projects get put on hold as soon as the daffodils bloom! Anxious to see your vanity painted, I love the color you’re using!
Wow Kristi!! That looks fantastic!! The transformation from the original bathroom is amazing! It looks like a totally different room than what you started with. It looks so much bigger than it did when you started and I love all the wood accents you are using. I can’t wait to see how the vanity turns out and how it all comes together. It’s going to be gorgeous when you are done.
You know, I could repeat everything everyone else has said to sing your praises. All of it is true, of course. I have watched this project from the get-go and all I want to add to the comments is – you’re all that and a bag of vinegar potato chips!!!!! (My favorite kind!) You and your quality of work are nothing short of a m a z I n g.
It’s looking gorgeous Kristi. You have been working very hard. Loving the crisp celery color and the wainscoting….it’s all coming together beautifully and can’t wait to see the vanity finished, it’s looking great.
If I had a bathroom like that, I would not let guests use it. I would just cordon it off and tell them it’s a work of art. I would put museum lights at the top of the French doors. And charge a small fee to allow the guests a viewing.
I love it Kristi! Beautiful work. I hope you will talk more about the wainscoting. I was wondering if you will place the vertical board at the edge of the vanity to frame it on the wall or keep the spacing dictated on the adjacent wall? I am trying to do something similar in a powder room and don’t know if there is really a right or wrong way to do the spacing. Thanks.
Sorry, just went back and studied the photos. Your vertical is already there. That’s what I thought I should do, but wasn’t confidant it was right. My vanity is a corner cabinet and will have to be finished on both sides.
Big progress! I can see it! Can’t wait for the vanity to be painted and the shower curtain up. They will pull it all together. I really like the way you used your noodle and leftover stuff for the side panels. Good thinking, use it, reuse it less excess stuff lying around. I think we all fall into that pit at times. You know you have something you can use, but you can’t find it, so you go get something else and then wham! I could have had a V-8! Blessings
That is a wonderful paint color!! I have added it to my list to check out for a dining room wall!
Your bath is going to be absolutely beautiful!
Blessings,
J
Beautiful work. Love it so much! Now I’m inspired to get to work on my powder room. Especially to refinish my vanity. As always, you’ve provided many excellent ideas. Nobody does it better than you…. Looking to forward to more updates. 🙂 Suz
This is THE most favorite bathroom remodel I’ve been lucky enough to follow. OMG! I L O V E everything you have done thus far PLUS I’m able to learn soooooo much along the way. Job SO WELL DONE, Kristi 🙂 🙂 🙂
I was showing my 15 year old daughter the pics of your house and all you’ve accomplished so far. (she’s my co-pilot in all of our diy endeavors.) I came across the post where you had the list of things to get done in 2015…it said, “make the hall bath presentable.” LOL! Isn’t this the way it always is?!!
We have been updating our “new” house for the past year and a half. It’s so funny how “making something presentable” turns into a gigantic, never-ending, complete re-do! And, the part in today’s post where you said that you were in the “I’m so tired of spending money” mood…girl, you are singing the song of my people!! 😉
The thing I like about your blog THE MOST is how frugal and creative you are. It is such a compliment when people come into our house and just ooh and aww! (and, I know how inexpensively I accomplished those things – cost me lots of hours and sweat, but, it is soo worth it!) I appreciate how “real” you are.
Everything you’ve done to your house is absolutely gorgeous! This bathroom is gonna be amazing!! I’m so impressed with every step you show us!! You’re almost to the point where you can put a checkmark beside the “make the hall bath presentable” box on your list! 😉
I love the crispness of the color on the wall in contrast with the white tiles and the countertop. Very nice. Your vanity is awesome and I love that you did both sides. A swiffer duster should take care of the cleaning aspect. Great job so far. Getting excited to see it finished…
In absolute love with the celery! It looks a lot like the Martha Stewart Sultan I painted my bedroom in. I was a little worried when I looked down at my paint roller and noted that it looked strikingly similar to a tennis ball! But wow is it amazing on the walls. Beautiful look!
Martha Stewart? Where did that come from, sheesh! Valspar Sultana.. my brain is foggy today!
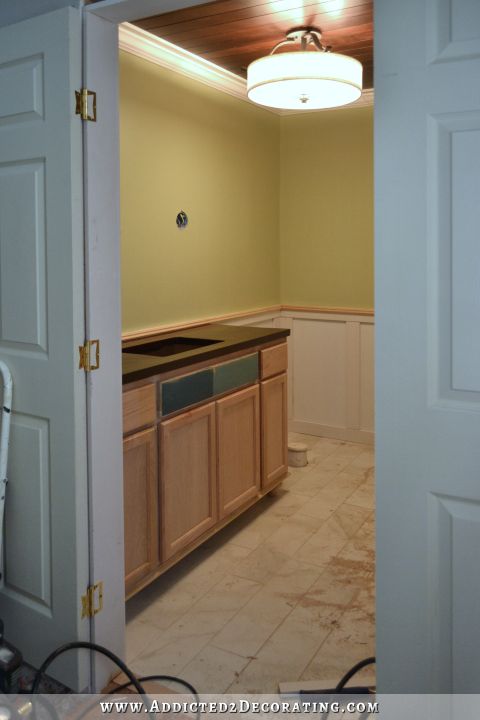
I love the view through the bathroom door!! So may things to love about this room. A great balance of materials, texture, color and functionality to boot. Great work, Kristi!
Oh, those colors look good! Beautiful, beautiful, beautiful. I didn’t have a chance to comment on the doors – what a clever and classy way of dealing with a need for a larger door opening. That room was oppressively small before (I think due to the overhanging storage space over the tub), but now it has a spacious feel.
You have made such wonderful progress on your bathroom and everything is coming together so beautifully. You are amazing, Kristi, and such an inspiration to so many of us “DIY-ers” out here who might otherwise have been too timid to step out there and tackle similar projects before your blog. Thank you for sharing on top of all that you are achieving every day! Wow!
It’s looking so good!! As always, I can’t wait to see the finished product!
Question: Is there a “rule” about which direction to lay tile/hardwood? How do you decide for instance, in a square room, horizontal or perpendicular? Or do I mean horizontal or vertical? You know what I mean, I hope. :o). Does it depend on where doorways are?
Thank you!
Absolutely simply amazing….!!!!! If you look back at a couple of posts ago Kristi and look at this post you will see just how much is “done” and that you have accomplished….!!! One could only wish to be like you one day….!!!
I think this is FABULOS!!!!
I LOVE the color of the walls and cabinet. I would not have chosen those two….but you did and they are WONDERFULLY fun color……I cannot WAIT to see this bathroom finished….you’re nearly there girl!…..you are nearly there!!!
Have a wonderful weekend…..
I have a question about the wainscoting. The verticle pieces are they just glued to the sheetrock or do you have a sheet of something else under? Also what type of wood are you using for the verticle boards. I have perused but not sure if its mdf. Thankyou
Can you tell me the trim types you used for the bottom of the cabinet and the thin trim you used for the vertical ends? As in, the actual name of that molding type. There are so many at the store I do not know what to use, but I like yours.
I think you’ll find that info here:
https://www.addicted2decorating.com/my-favorite-decorative-mouldings-trims-and-how-i-use-them.html