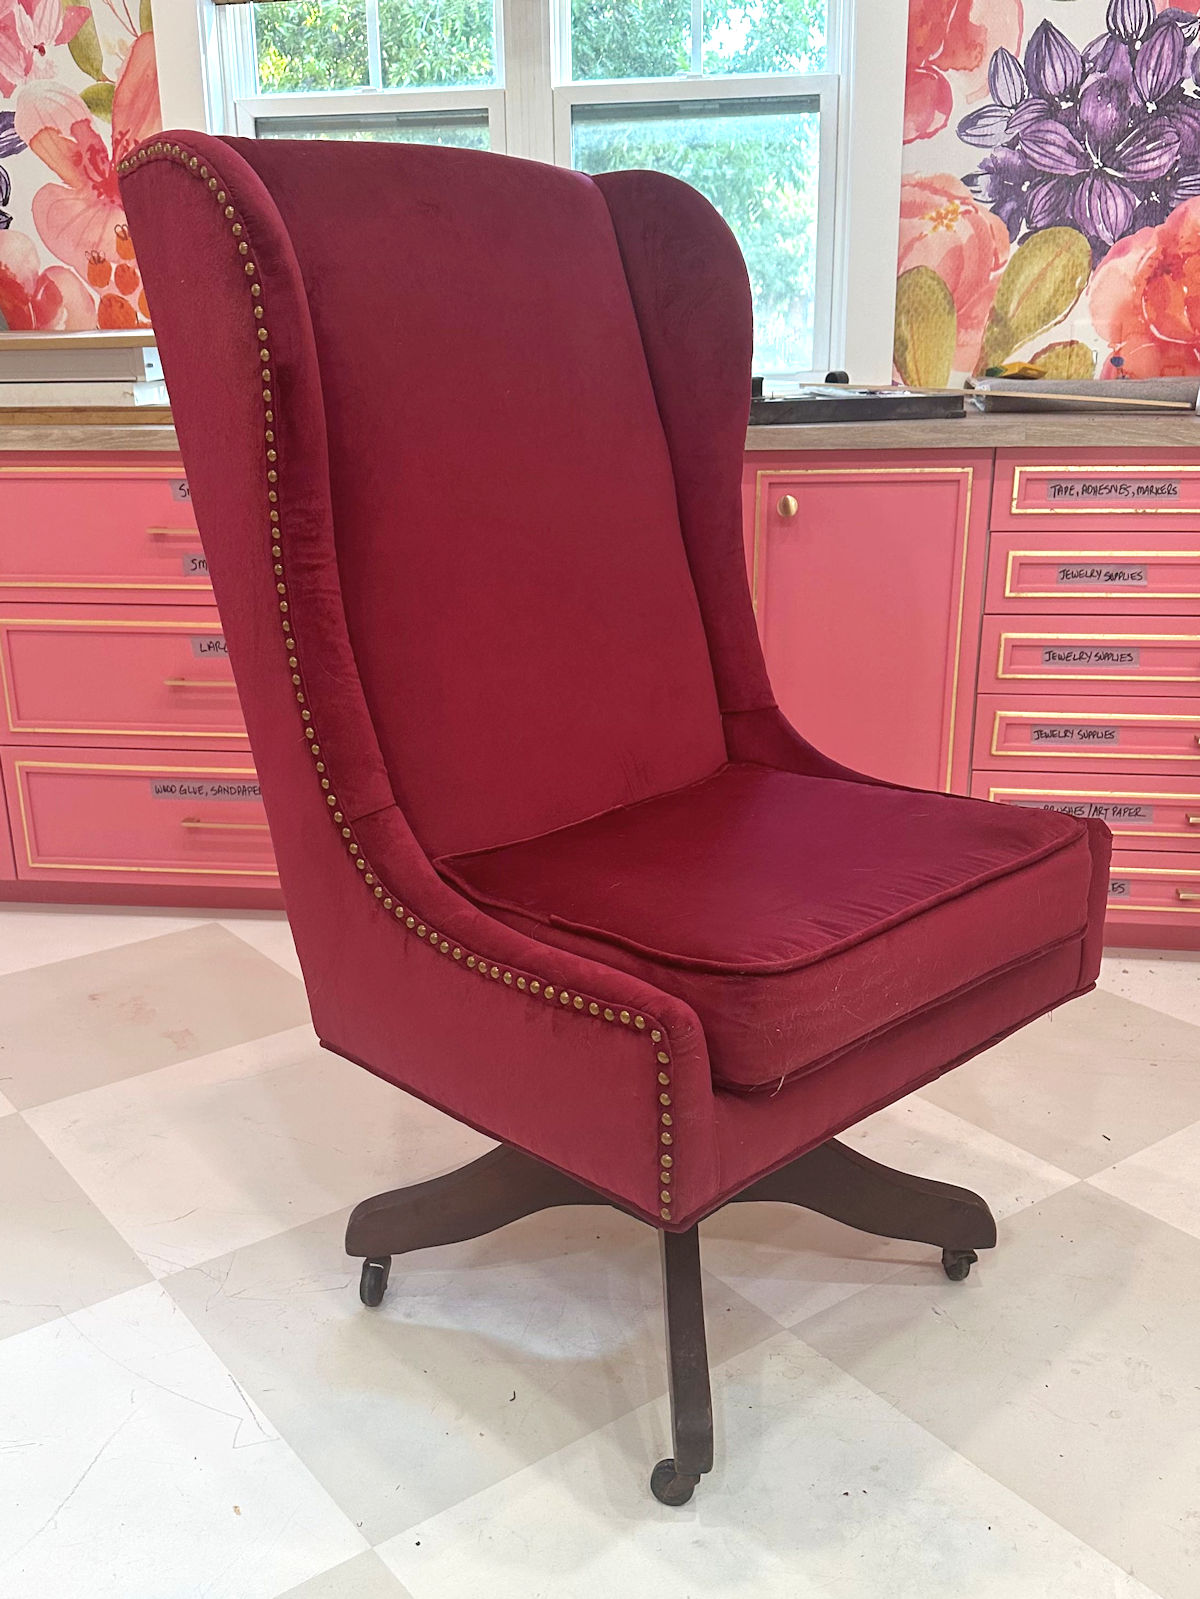
Reupholstered Wingback Chairs
I finally remembered to get a picture of the finished wingback chairs! First, let’s take a look at how these started out…

Not only was the color all wrong, but they also seemed a bit heavy with all of that tufting on the seats and the nailhead trim. They were also not very well padded. The foam on the front of the chair back stood a good two inches away from the springs, so when someone sat down in the chair, the back would sink in. They weren’t comfortable at all!
Now the chairs have fresh new fabric on them. We did away with the nailhead trim and the seat tufting, which gave the original chairs a very frumpy look.

So much better, right?! I love how these look in the room. Now I just have to Scotchgard the heck out of ‘em.
This certainly was no easy project. Neither my mom nor I do very much upholstering, so every time we tackle an upholstery project, we have to re-learn quite a bit, which means trial and error. And believe me, we made PLENTY of errors, and had countless do-overs. But we definitely learned from them! The first chair took us two days to complete, and the second one took us one day.
I haven’t had time to write up the full DIY tutorial yet, but if you missed the “intro to upholstery” post last week, you can click here to see it.
I’m working like a crazy woman to get the family room and kitchen finished. Hopefully I can show you the full reveal next week!!

Addicted 2 Decorating is where I share my DIY and decorating journey as I remodel and decorate the 1948 fixer upper that my husband, Matt, and I bought in 2013. Matt has M.S. and is unable to do physical work, so I do the majority of the work on the house by myself. You can learn more about me here.
I'm speechless! These chairs look AMAZING now. Fabulous makeover.
What the?! Those are amazing! Gorgeous!
Everything you do turns out so perfectly.
LOVE! That is all…
What an amazing difference. I LOVE them and I am not a big tufted chair fan…… LOVE IT.
These just look fabulous, Kristi! Kudos to you and your mother…and I am always so impressed with the quality of your work in whatever project you take on.
~Pam
pamspaintparlor.typepad.com
What beautiful chairs — made even more so by your exceptionally done re-upholstery!
They look amazing!!
Very cool. I've noticed that a lot of designers and shops have been doing tufting on the backs of chairs while removing them from the seat. I really like the look of this, mix of classic and contemporary.
I'm a little inspired now, perhaps we should try to tackle upholstering a chair. 🙂
You did this yourself?!? Good grief… they look AMAZING.
Donna
Well, it was a joint effort. I couldn't have done it without my mom. 🙂
Wow! Simply gorgeous!!! I'm am your new follower!!! 🙂
Wow! Simply beautiful! I am your new follower!
Lovely transformation. Love the new look and colour of the chairs. You did a wonderful job.
I love the update of these chairs! Well done!
Kristi, I found you on my search for DIY upholstering and these chairs are fab! I have been contemplating getting my beloved but very worn (and ugly) wing back chair professionally re-upholstered, but I can't stand to think of the costs. From your posts, it seems (some what) do-able and I would love to see a full tutorial! How much actual sewing is involved and how much is a simple tuck and staple? Please share your wisdom!
J
agirlandakey.blogspot.com
I'm still working on the full tutorial. There are a ton of pictures, and it's really long, but don't let that intimidate you! I'm convinced that most people who have a bit if DIY experience should be able to do this.
As far as sewing, that depends on your particular chair. On the ones above, the only sewing above was the portion that goes on the wings. Of course, this chair didn't have a detached seat cushion. If your chair has a detached seat cushion, that will be additional sewing. But if you've had experience sewing, then sewing a seat cushion should be fairly easy.
Besides that, the rest is wrap, tuck, and staple. I'm not going to lie…it's definitely not an easy project, but if you tackle it slowly and methodically (and PAY ATTENTION when taking off the old fabric), then you should be able to tackle it.
The full tutorial is on the way!
I bought a tufted wingback chair for $25 dollars and you motivated me to tackle the project! Looking forward to reading your tutorial!
Oh my god. I have the exact same chair (only one though) and I’ve been trying to figure out how to reupholster it…I’ve never done anything like this before. I don’t even sew! Any good tips?
It’s funny ’cause I have one of the exact same chair too. Did you happen to get a response with any good tips? Good luck on your upholstering!
Wow. I am so very very impressed. They look brilliant!
I have the exact chairs, do you remember how much fabric it took? Looks great! I never thought of leaving out the seat tufting, great idea, it will save a lot of time!
Is there another part to this posting? I see the before and after pictures and I see this one with the partial upholstering … but I don’t see what your mother sewed or what that sewn piece looks like or how you put it on. Would you mind letting me know? Thank you!!! By the way, you did an amazing job!
I love your blog
Well my niece is giving me a antique sofa and I’m thinking of redoing the whole thing with different color material do you any thing on that reupholstering a long antique sofa.
What you did on those wing chairs it is so beauty.
I am awed by your determination and I can do attitude. You are amazing!! The chairs are great too!! LOL
Hey Kristi! I just found this post through Pinterest since I am looking into reupholstering a similar style wingback. Did you post a full tutorial? If so, please send me the link since I cannot seem to find it.
Thanks so much!!!
Hey, I’ve been following your blog only recently. I’ve been going back and reading some of your past remakes. I couldn’t find the link to the chair remakes. Do you have the tutorial up now? I’ve attempted only one time to recover a chair…didn’t have a clue what I was doing really so I’m interested in reading how you did it.
I love your website and blog. You have a lot of great projects. I loved this room makeover. Awesome!
Hi, Kristi! I too have looked for the tutorial for the upholstery for the wing back chairs, but couldn’t find it. Would it be possible for you to post? I just bought two chairs, and would love to re-do them, and I think your tutorial will be a big help! Thanks!