Built-In Bookcases & Daybed, Part 2 (Daybed, Trundle Bed, and Drawers)
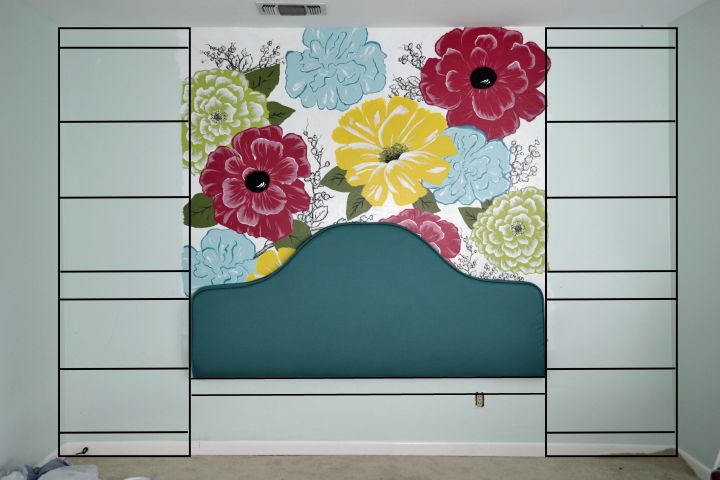
When I last showed you the progress on my niece’s bedroom, it looked like this…
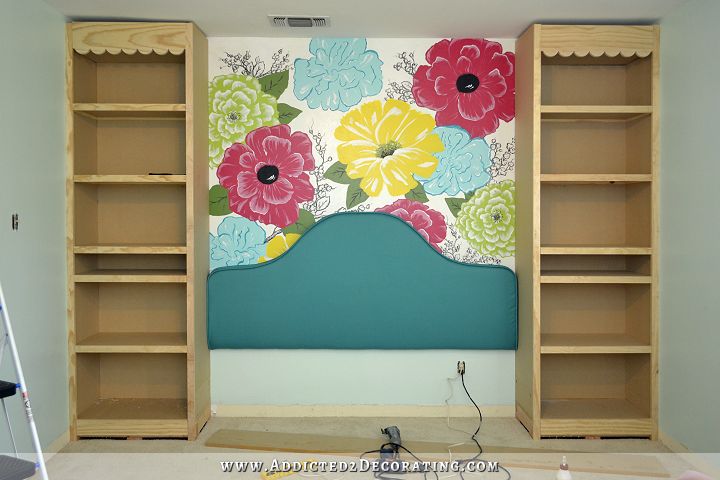
You can find the details on building those bookcases here.
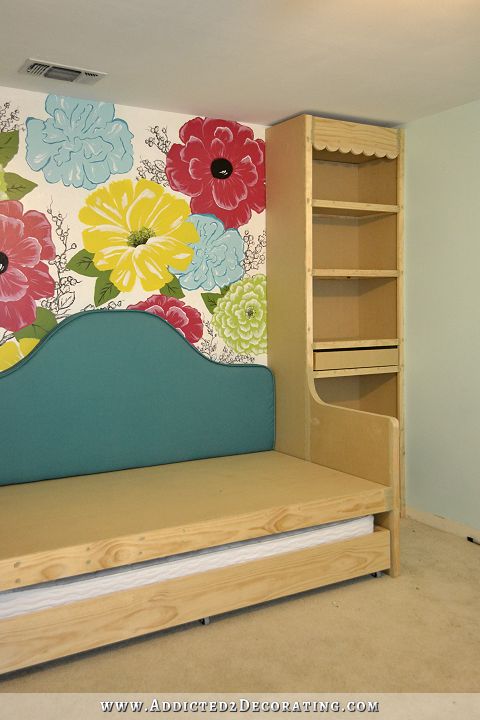
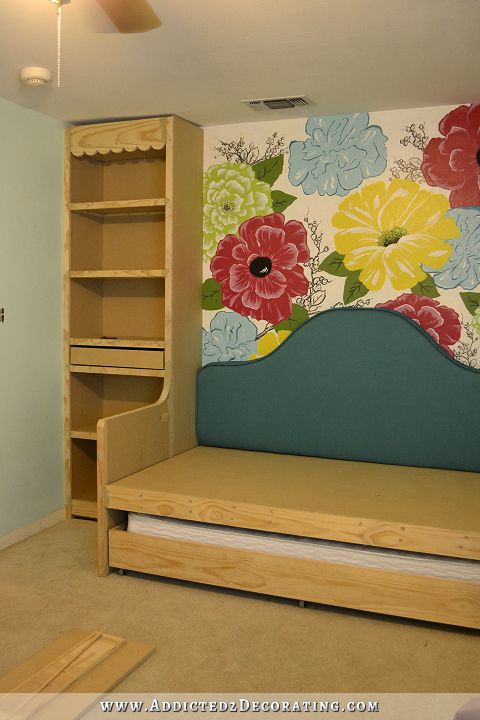
Over the last two days, I’ve gotten quite a bit more accomplished, and now it looks like this…
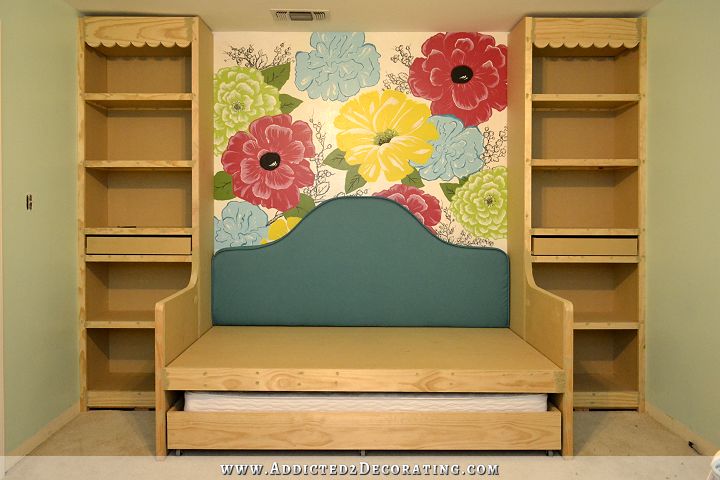
It’s getting there! 🙂 Over the last two days, I built the daybed, including those bookcase extensions that frame in the ends of the daybed (which was much easier than I expected!), built and installed the drawer boxes, and built the trundle bed. Still left to do before I can get to the sanding, caulking, priming and painting are (1) install crown moulding, (2) install baseboards, (3) make and install the drawer fronts, (4) make and install the decorative facade for the trundle bed, (5) add quarter round on the ends of the daybed decking and the inside vertical edges (along mural wall) of the bookcases. I think it’ll take me one more “building” day to get it all finished. But I was so excited about, and proud of, my progress that I didn’t want to wait one more day to show you. 🙂
So let me show you how I did all of this.
Building The Daybed
To start the daybed, I first marked the height that I wanted the frame (based on the height that we installed the headboard). After removing the headboard, I cut a piece of 2 x 4 to the width of the daybed, and attached it to the wall using construction adhesive and 3-inch screws drilled into studs. I had to notch out a bit with my jigsaw for the outlet.
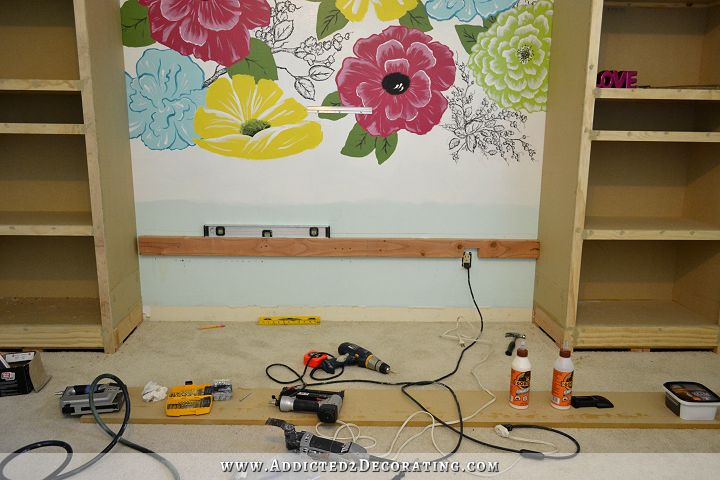
Next I cut two more 2 x 4 pieces for the frame at the ends of the bed. I attached them to the bookcases using wood glue and screws going from the inside of the bookcases into the 2 x 4’s. (By the way, the bookcases are attached to the wall, screwed into studs, so everything is very secure.)
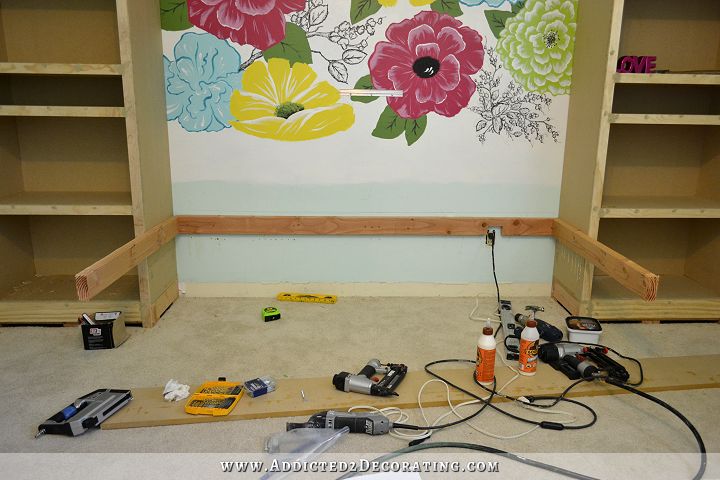
The 2 x 4 extensions allowed me to find the exact angle at which the bookcase extensions/end bedframe pieces needed to be attached. Before attaching them, I cut away the carpet underneath the extensions. Since my mom wants to remove the carpet in the future and replace the flooring, we didn’t want any carpet trapped beneath any of the built-ins.
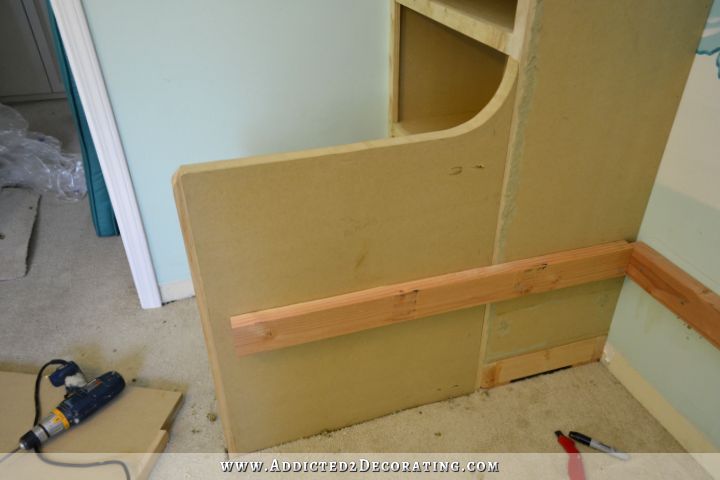
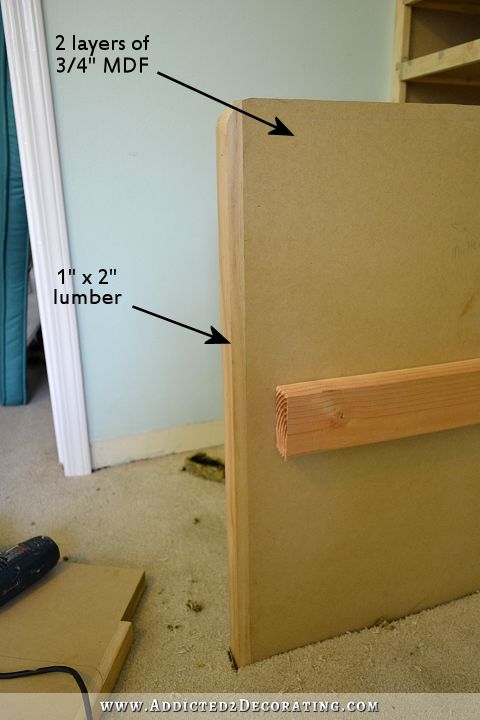
These extensions consist of two layers of 3/4″ MDF, attached to each other with lots of wood glue and 1-inch finishing nails. And since I figured that the front edges of these extensions would be bumped the most, I attached a 1″ x 2″ piece of lumber to the front edge to make it more durable. (Real wood lumber is much stronger and more durable than MDF.) I attached that with wood glue and 1.5-inch finishing nails before I cut out the shape with my jigsaw.
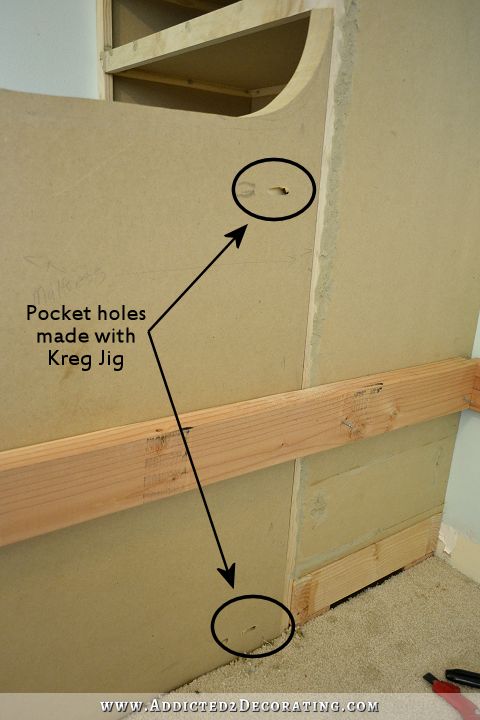
I attached each extension with wood glue and two pocket screws on each side (four screws total), drilled into the stile of the bookcase.
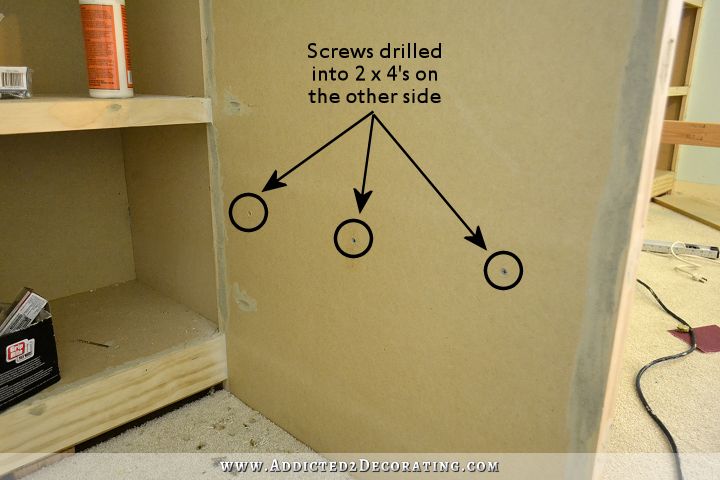
And before I set the extension in place, I also placed glue on the 2 x 4 extension, and then secured the MDF extension to the 2 x 4 extension with three 3-inch screws going through the MDF into the 2 x 4.
With both extensions firmly secured in place, I added the final piece of the outer bedframe — the 2 x 4 along the front. I glued and screwed that into the ends of the side 2 x 4’s.
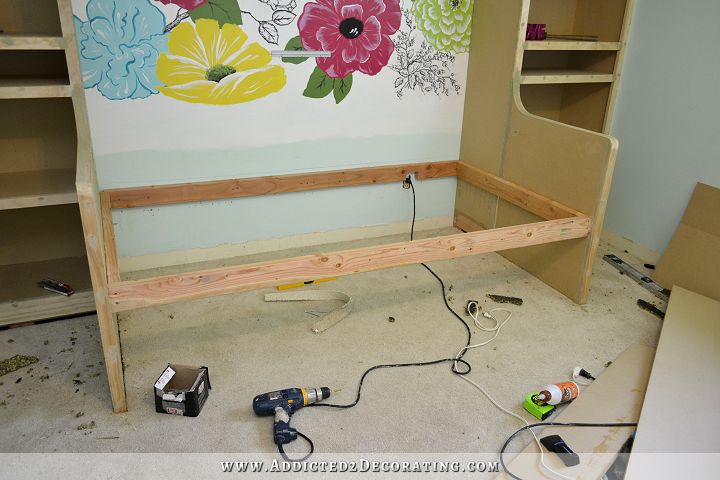
Then I cut five additional pieces of 2 x 4, and attached those inside the outer frame using wood glue and 3-inch screws.
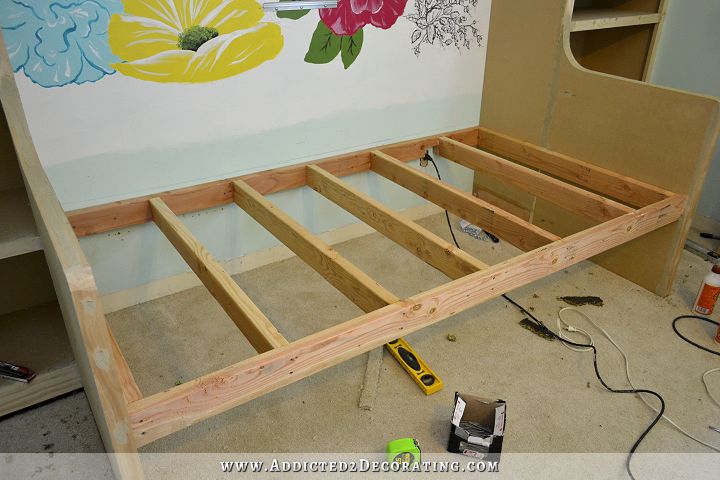
On the front, I simply drilled the screws through the front 2 x 4 and into the ends of the inside 2 x 4’s.
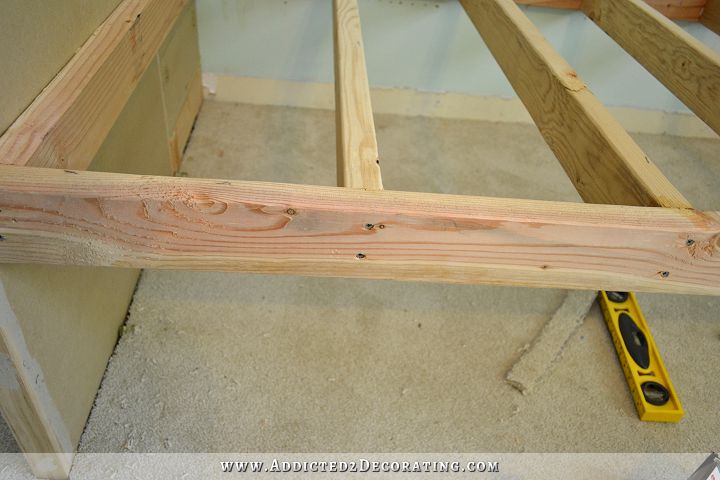
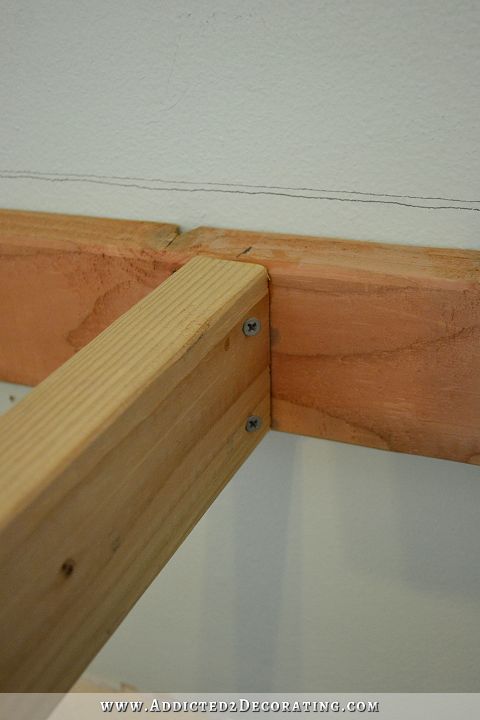
But on the side against the wall, I had to toenail (drill at an angle) the screws in. I could have used my Kreg Jig to make pretty pocket holes for this, but really, there’s no need for it to be pretty since it would be covered up completely.
And then on top of that frame, I added a piece of 5/8″ MDF to form the platform for the mattress.
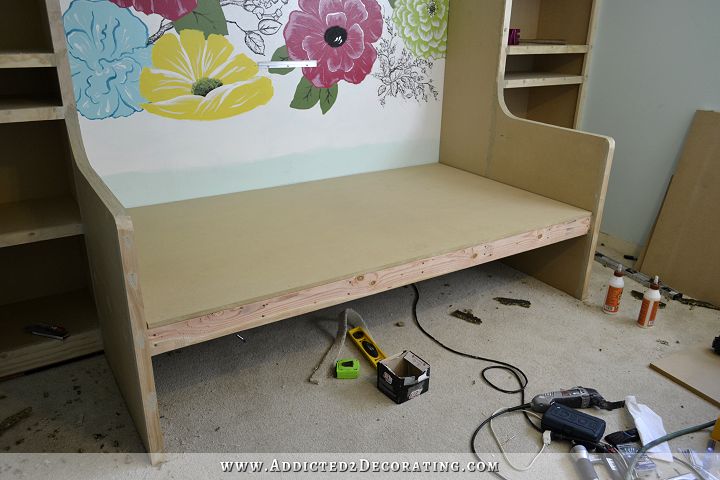
And finally, I added a nice piece of lumber to the front edge to finish off the daybed, attached with wood glue and 1.5-inch 16-gauge finishing nails. I forgot to get a picture of this at the time, but here’s one that I took much later, after I had started on the trundle.
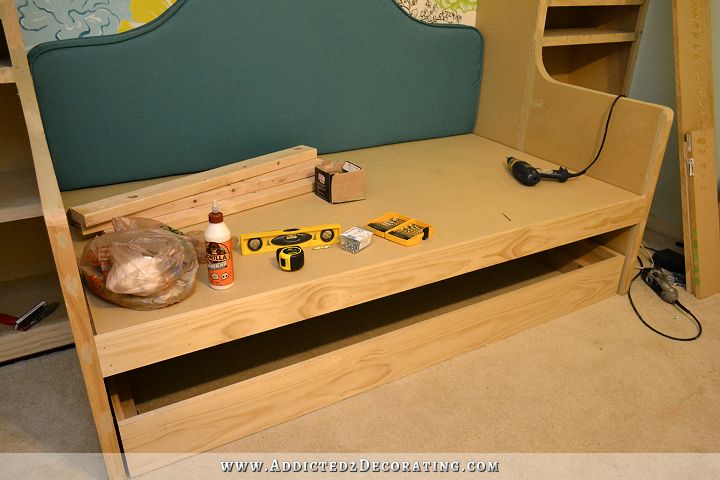
The daybed platform was very sturdy without that that front piece added to the front 2 x 4, but it’s amazing how much strength that piece added. I used a 1 x 6 and cut it down to the height I needed using my table saw (about 4.25 inches, I think it was). After attaching it, and especially after giving the wood glue time to dry, that bed was incredibly sturdy.
Building The Trundle Bed
I came up with a very simple design for the trundle bed. I started with four pieces of 1 x 8 lumber, and glued and nailed those together to make a frame big enough for the mattress to fit inside. And then along the bottom inside edge of that frame, I attached a 2 x 4 frame using wood glue and 2-inch screws drilled from the inside of the 2 x 4 frame into the outer 1 x 8 frame. I also added an L-bracket to each corner.
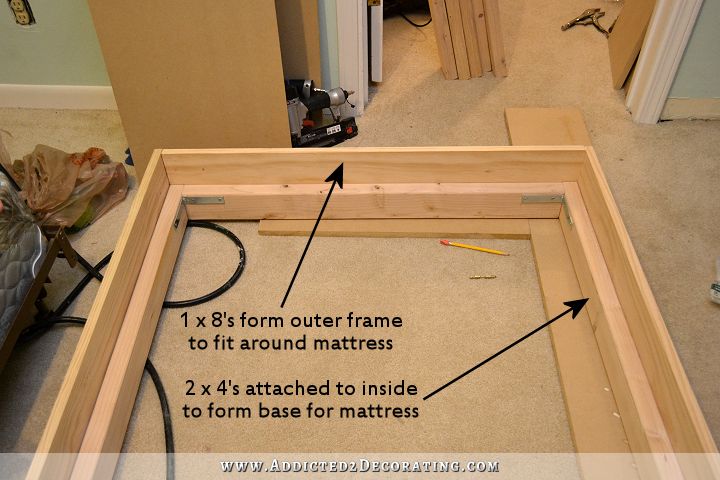
Next I cut some 2 x 4 supports for the inside, just like I did on the daybed, but this time I used my Kreg Jig to make pocket holes.
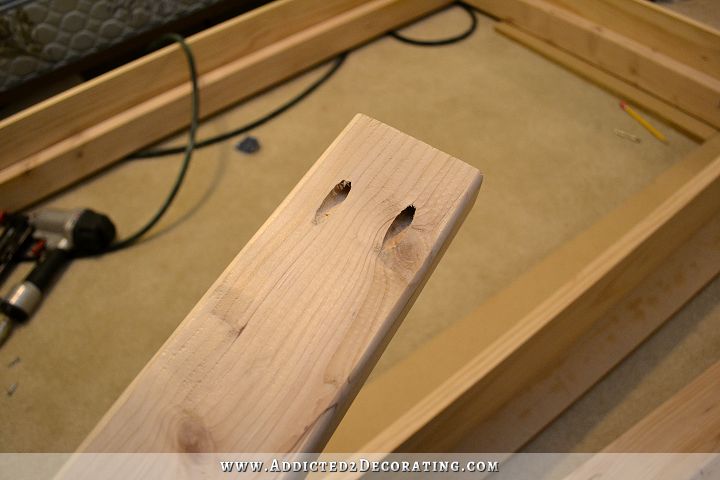
I attached five of those to the inside of the frame using wood glue and screws (two screws on each end of each 2 x 4 piece).
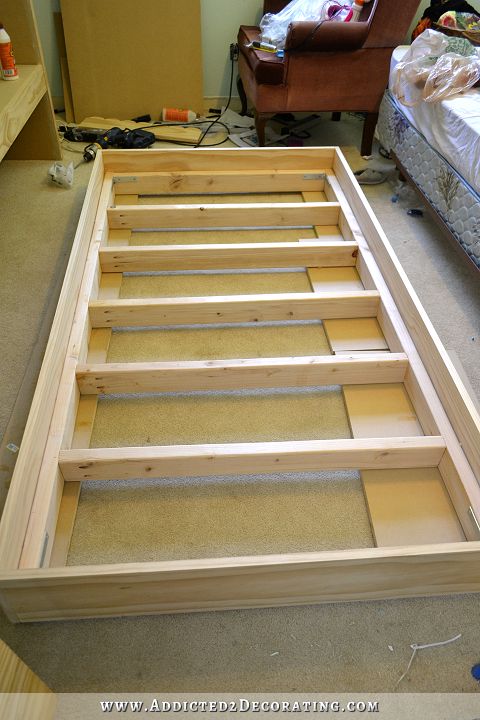
And then on top of that, I placed a piece of 1/2-inch plywood, cut to fit right on top of the 2 x 4 frame. I glued and nailed that into place.
Then my mom and I flipped it over, and I attached seven 2-inch casters to the bottom.
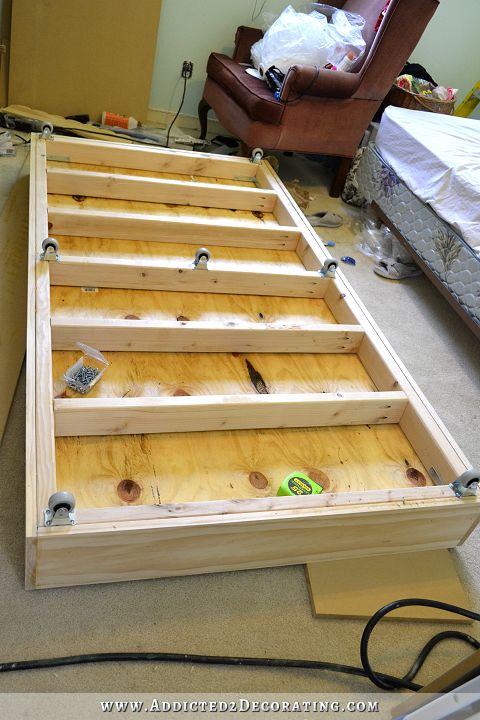
And it was done! We plopped a mattress inside, and we had a trundle bed. It was really so simple to make.
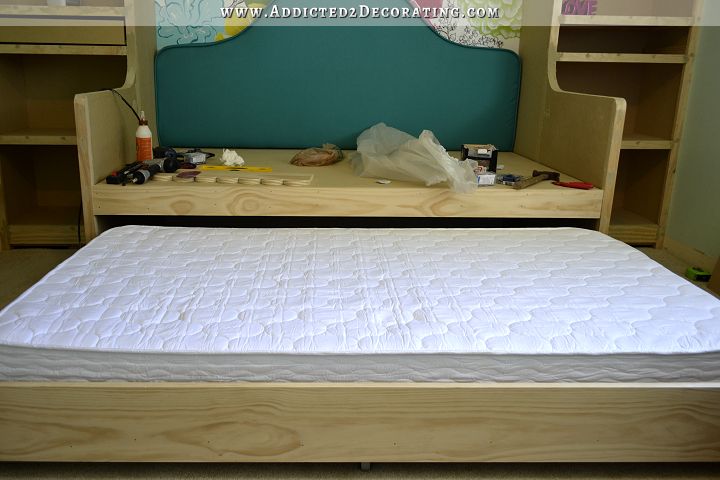
And here it is pushed underneath the daybed. I’ll still attach a decorative facade to the trundle, so when it’s finished, you won’t be able to see a mattress under there.
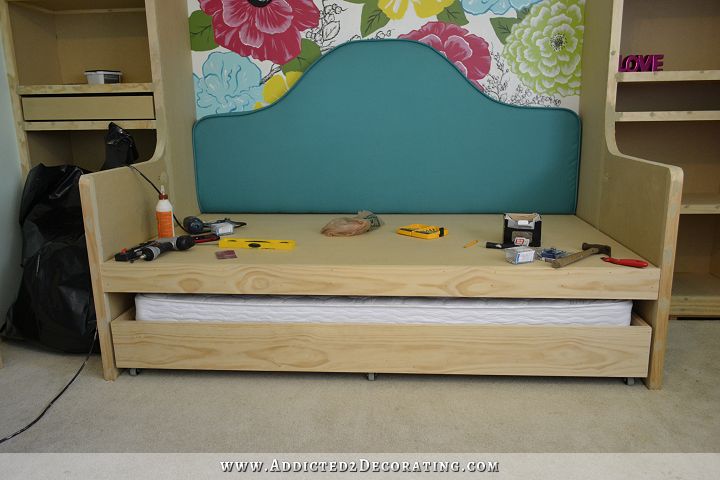
Building The Drawers
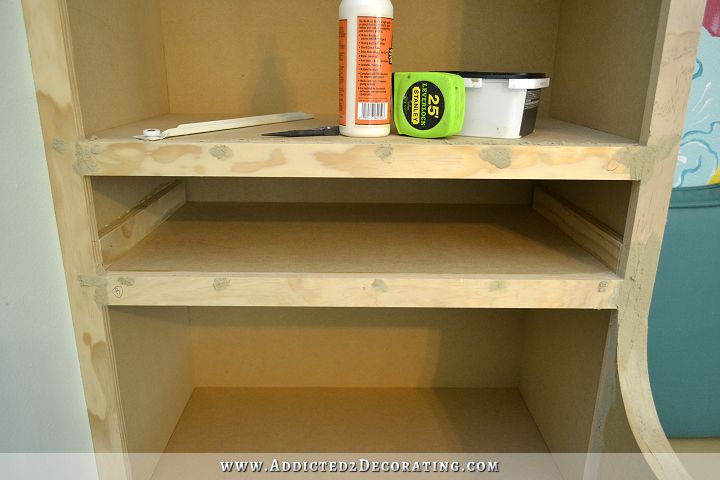
To build the drawers, I started by adding two strips of wood along the inside bottom sides of the drawer openings to make these areas flush with the inside edges of the side stiles on the face of the bookcases. I attached these with wood glue and finishing nails. (Am I starting to sound like a broken record here? 🙂 I don’t build without wood glue, and I use it very liberally.)
And then I attached the drawer glides (according to the measurements in the drawer glide package) to those side pieces.
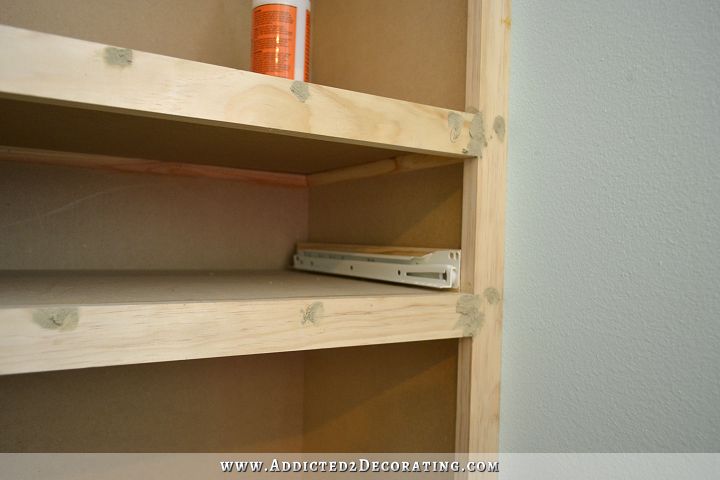
With those attached, I was able to measure precisely how wide my drawer needed to be.
I made the drawers out of MDF. Now please hear me on this. 🙂 Y’all know I love MDF, but if I were building something where the drawer storage was the main part (like cabinets with lots of drawers), I would never build the drawer boxes out of MDF. It’s too heavy, and I think that plywood or solid wood is more suitable for drawers. But for this design, the drawers are kind of insignificant. I mean, I’m sure my niece will use them, but they’re not the main event here. So rather than spending even more money for different materials, I just used pieces from the huge MDF scrap pile that we’ve amassed during this project.
I started with the bottom of the drawer, and then I glued and nailed the sides onto the bottom.
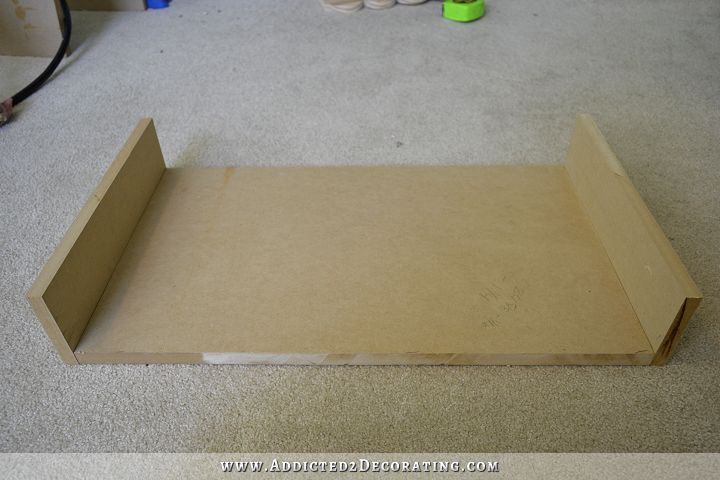
And then I glued and nailed the front and back onto the sides and the bottom. I used 1.5-inch 16 gauge nails for this.
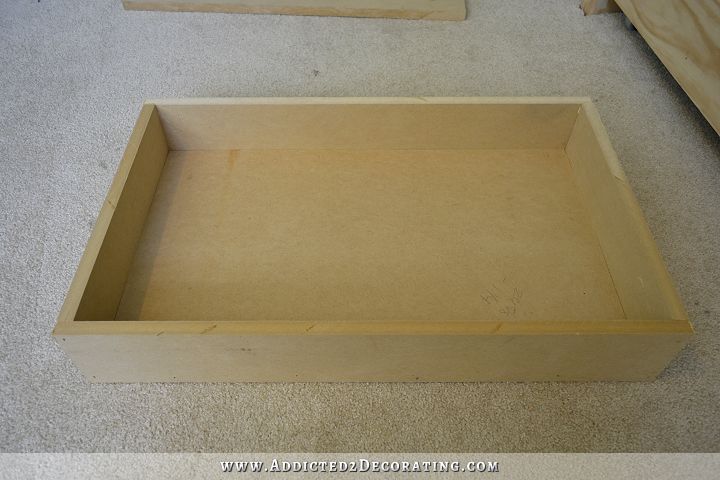
And that’s it. It’s literally the simplest box you can make. Then I added the drawer glides to the sides.
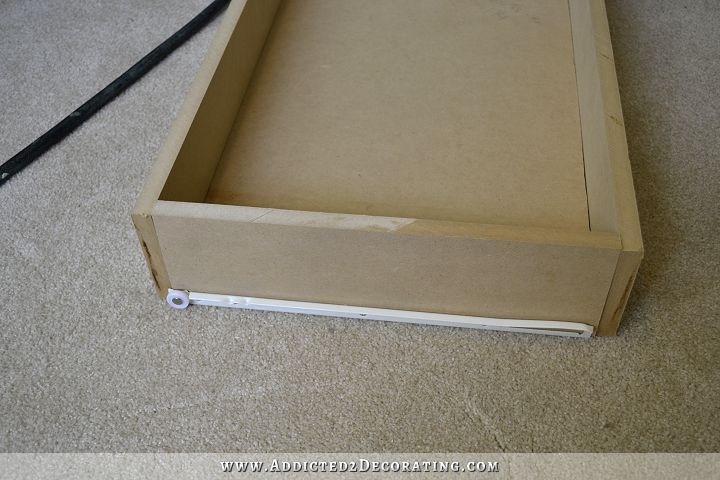
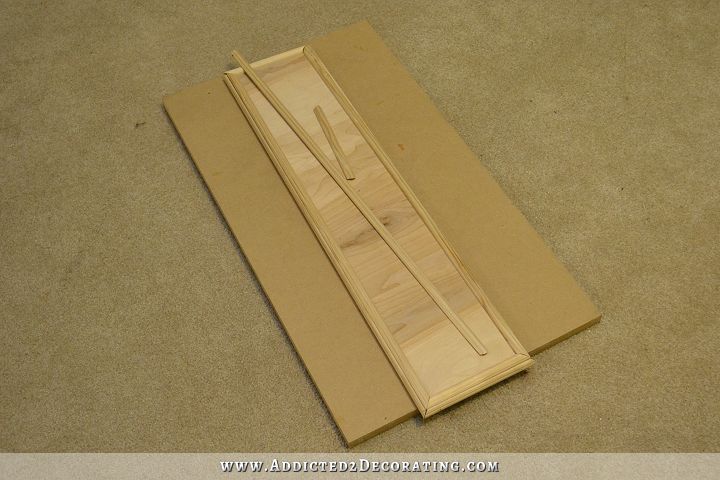
I’m still working on the drawer fronts. It’s a very simple design — 1/2-inch plywood with small cabinet moulding around the outside edges (to cover the raw edges of the plywood) and then attached to the outside edges of the drawer front face, just to bulk up the moulding a tiny bit. Once those are finished, they’ll be glued and nailed to the fronts of the drawer boxes.
And that’s my progress so far!

There were aspects of this project that I was kind of nervous about (like those bookcase extensions/bed frame ends), but everything is turning out just like I had hoped.
Doing all of the finishing work (sanding, caulking, priming, and painting) is going to be a bear.
I’m trying to figure out a way I can spray everything. That would make it so much easier and faster, but I dread the thought of draping everything with plastic. And if I messed up my mom’s mural, I would be sick. So I still haven’t decided if I’ll spray or brush. Either way, I’ve got a huge amount of work ahead of me! 🙂


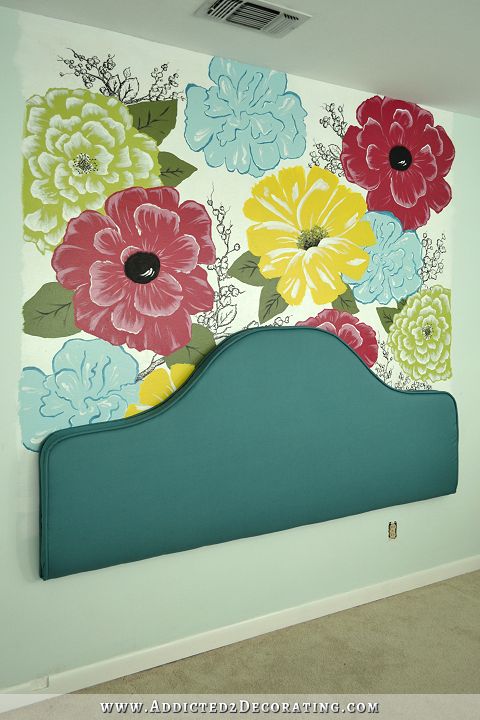
It’s looking fantastic and I love all the details such as the scalloped border on the bookshelves. Why oh why couldn’t you have been my aunt when I was a little girl :)??
Excellent. I cannot wait for the condo’s sale so you can have air and heat to work at your own home again!!!! Getting there!
It’s turning out to be gorgeous but then again you do nothing else! I thought I had read the bed was going to have the same scallop design on the bookcases? Did you change your mind? What color are you painting the bed and built ins?
The scallops are going on the front of the trundle bed. That’s the decorative facade I mentioned. All of the built-ins will be painted white so that the mural can be the star. 🙂
Umm wow! Great…awesome…fantastic work as always…. My daughter would be jealous if she saw this. She saw something similar when we moved into our new home 7 years ago…and we couldn’t figure out how to do all this so we went something generic that she wasn’t completely happy with but hey…she got a room. Now, I see this and I’m like wow…it actually is doable. Oh well…lets hope she never sees your blog…lol.
wow…this trundle is better built than one I purchased and use. You are to be commended for this and I can’t wait to see it finished!
Oh my gosh, oh my gosh! It’s fantastic. So fun to watch you transform her room!
Leftbrainer in action here 🙂 What is the difference between the main bed and the trundle that requires pocket halls in the supports for the trundle and not for the main platform?
Great job and a great tutorial as allways!
They’re both equally as secure, so it was really just a random decision. Basically, the bottom of the built-in will NEVER be seen by anyone…ever. So I didn’t see any need for pocket holes to make the screws completely disappear and make everything under there to look presentable. But the trundle is a separate, moveable piece. And I guess it’s possible that someone might, for some strange reason, flip it over and see then underside, so I did pocket holes to make it look a bit nicer. 🙂 They weren’t required, though. Pocket holes are great for things that will show (like the bookcase extensions), but for things that will be covered up and will never show, it’s just an extra step. If you’re toenailing screws in without pocket holes, they’ll be perfectly secure as long as you’re using long enough screws. For the ones that I toenailed in (on the daybed), I used 3-inch screws. For the pocket holes, I used 2-inch Kreg Jig screws, which is what’s required for that thickness of wood, according to their helpful little chart. So both are equally as secure, but one looks a bit prettier than the other. 🙂
Wow, you’re really motoring on this project!
Amazing progress. It’s looking fab! Good luck with the painting! 🙂
Wow!! Looks awesome already, can’t wait for the finished product!
Love it! Thought you were going to scallop the edges of the side rail of the bed? But glad you didnt I think that would have been too much with all the other details.
The scallops are going on the trundle bed, but that’s it.
You impress me with every thing you do!! Love this whole idea and to see it come together is so exciting!!
Along with all of your other fantastic remodeling, building, etc. I can’t believe that one person is so talented. God took extra time when he made you! I truly mean this. Kudos to you for your excellent skills, knowledge and fabulous decorating ideas. This is so beautiful – surely someone will pick you up for a televison show, or something. You are so much better than all the rest, and your skillfully written instructions are simply written for even a layman to follow. God bless you (but we know He already did!!!)
Applause. Applause. Applause. Truly going to be an awesome bedroom.
You are amazing!
Really a commendable project!
This is fabulous. I’m definitely going to save this post for future reference. Absolutely fantastic!
Looking awesome, Kristi!
Can I just say Thank you :0) for inspiring me everyday to go that extra mile. Amazing
Kristi, This is so amazing! I wish we were neighbors so I could come peek in and witness these builds first-hand, but this is the next best thing. (: I’m realizing that all of your framing cuts and bases (and everything) seems to be precision-fit and cut to perfection. Is that true? Sometimes with my mitre saw, I’m off by an 1/8th of an inch, and my framing leaves some gaps. Is this my rookie mistake? Or do glue and nails hide some almost-perfect fits?
Mine might be off by 1/16th inch, but once I get screws into them, they snug up against each other. Does your miter saw have a laser guide? Once I started using a miter saw with a laser guide (I’m on my second one now, so it’s been a few years now), my cuts got more precise.
Yes, I have a laser guide on mine, which I love! It’s been a while since I’ve used the saw, so I forget how much to accommodate for the saw blade, and which side it affects on the wood. I should probably just write out the accommodations and keep them on my garage wall for my “go-to” guide. Your reply makes me feel better, but I know I need to slow it down and take the time to measure more precisely as well. Thank you!
This is just looking soooo awesome. You are amazing, Kristi!
Girl. You are AMAZING.
Love it! But have questions- what happens when your Mom refinishes the floor, will the space underneath it not have any flooring? I’m thinking ahead as to what happens when your niece grows out of this furniture and/or your Mom wants to use the space for something else. Also what if you need to clean behind the bed, is there a way to move it?
It fits a twin size mattress. I asked my mom and brother if they wanted me to use an extra-long twin, and they said no. No one in my family is tall, and my brother sleeps on a twin just fine, so my niece should be fine with a twin as well for many years to come. And my mom is the one who wanted the built-ins. I had some other suggestions, but my mom and brother both really wanted this particular design with the built-ins. So as far as future use once my niece is gone…well, that’s up to my mom and brother. 🙂 And there’s no “behind” the bed. It’s literally built onto the wall. There’s “on top of” the bed decking, and there’s “below” the bed, but there’s no “behind” the bed. With the trundle bed rolled out, there’s 13.5 inches of space under there, so plenty of room for a vacuum or even for a person to crawl under there and retrieve something that got lost under there.
Beautiful work. I am curious…will your niece be able to grow with this bed? I can’t tell what the dimensions are by looking at the picture. You are absolutely amazing in all you do.
Yes. It’s a standard twin size bed, which is what my brother also sleeps on quite comfortably. I slept on a twin in college and when I lived in Turkey. We’re a family of shorties, so she should be just fine.
Your talent and skill is amazing. Awesome!
Wow! her bedroom is going to be awesome and perfect for a slumber party! But from some of the photos the bed looks kinda short if her head is facing the headboard. Is she supposed to sleep horizontal or is it just the way the depth looks in the pictures? I love your moms mural, I thought it was wallpaper.
It fits a twin size mattress. The bookcase extensions are at the head and foot of the bed.
Rebecca, this is a regular twin bed size with the side against the wall (or the headboard.)
As someone building/measuring challenged I’m thinking of trying something similar with an upholstered headboard and ikea bookcases.
I have to say I use to subscribe to a lot of diy/decorating blogs, you are the only one I currently subscribe to. You do actual quality work, not just sponsored posts or lamps made of duct tape.
Oh I wish I had a little girl, I have 4 girls, but none are little girls anymore, all grown ups with children of their own 🙁 Maybe one day I can do this for my granddaughter 🙂 Or maybe I will just decorate a room just for myself, it is so pretty! Congrats on a job (almost) done and very well done! Love all the colors, what a neat place for her to hang out with friends!
Your niece is going to love her bedroom. How special to have this done for her by her talented aunt and granny!
Oooh, this is turning out lovely! What about the drawer knobs? Maybe flower knobs?
http://www.amazon.com/Knobs-T16-Victorian-Polished-Cupboards/dp/B0087SUZKM
http://www.amazon.com/TILAN-Ceramic-Cabinet-Handles-Cabinets/dp/B00XIZV012/
Or leaves?
Also, if I may ask, you’ve been working amazingly fast on this room, compared to say, your living room – how come?
Those sure are pretty knobs!
Honestly, I have two reasons. First, I want her room to be finished by the time she goes back to school, and I think that’s only about three weeks away. But even more than that, it’s because I’m anxious to get it finished so that I can concentrate on my house. 🙂 I love my niece to pieces, and I’m so happy to do this for her. But at the same time, I’m getting tired of being away from my house and having to concentrate my efforts elsewhere. I went from spending a month working at the condo, then finishing up my bathroom at the house, and now I’m working somewhere else again. I just want to get it done, get all of my tools back to my house, and then have no more interruptions for the rest of the year while I very selfishly concentrate only on my own house. 😀 But right now, with all of my tools at my mom’s house, I can’t really do much at my house.
Ok, I am confused…..I thought you were ripping out the carpet under the bed, but in the pictures it appears to still be there. Did you just cut out the skinny parts where the end frames went?
Yes, I just cut out the skinny parts where the frame sits on the floor. Since it’s just a big open space under the bed, we didn’t see any reason to tear the carpet out from under there just yet. There’s plenty of room to get back there later, remove the carpet, and put down new flooring under there when the time comes.
I have two questions…
1) behind the scalloped edge of the bookcase – how will you ever dust in there, does the scalloped edge come off?
2) The receptacle plug behind the bed – it is now hidden and not very usable now, or are you using it for a “built-in” stereo system that will be one of the shelves?
(1) No, there wont’ be any dusting behind there. I’m adding crown moulding at the ceiling. It’ll be completely built in, and the top of the bookcase will be completely inaccessible, just like my kitchen cabinets that are built all the way to the ceiling and topped off with crown moulding at the ceiling. There’s absolutely no reason ever to get behind there, and certainly not to dust.
(2) The outlet will be used for sconces. Anything else she needs plugged in will have to go in one of the other outlets on the other walls.
Okay, the crown moulding makes sense! No need for dusting if it’s all enclosed.
I must have missed the blurb about the sconces, good idea!
Awesome as always. Such care and detail = selfless love. Blessings!
Your niece is a lucky young lady to have such a wonderful aunt and grandmother. That bed and wall decor is amazing. She will love it for years to come.
Look forward to seeing the finished result : ) I’m sure your niece will be so excited too!
I love the way this is coming together. Your niece is going to be one happy little girl.
I do have a thought regarding the painting that may, or may not, work for you. How about your Mom doing the painting? We know how talented she is with a paintbrush, the evidence is hanging in your living room, kitchen and on the wall in your niece’s room. I’m just not sure if she can paint built-ins … or at least paint them to your standards 🙂
I know nothing about building or power tools, so most of what you’re writing is Greek to me. But I can tel you that it looks fantastic!
My husband and I are building a built-in entertainment unit into a closet we tore out. The bottom of the built in will have two cupboards and a bank of three drawers in the middle. I have been SO stressed out about figuring out the right width for my drawers so that the slider hardware fits properly. I’m so glad I thought I’d take a look at some of your older built-in projects you had here. Your explanation about measuring for the drawer makes me feel so much better! Thank you!