Cheap Barn Door Hardware (The Real Thing!)
So I had this brilliant idea for my music room. 😀 And while I’m not quite ready to divulge the details of my brilliant idea, I will share with you that it requires some changes to my rolling doors. Specifically, it requires that the doors be installed as actually sliding barn doors rather than rolling doors as I had them before.
I had previously installed them as rolling doors using cheap items from the plumbing section of Home Depot.
The benefit of that design is that it’s really cheap. The drawback is that it’s virtually impossible to install the wheels on the bottom of the door perfectly straight, so as the doors are rolled back and forth, they can become misaligned. It’s not a big deal. I just simply gave them a little push to get them aligned again. But once I have my new grand idea in place, it will be much more difficult to push the doors back into alignment, and my doors could actually be very easily dinged and scraped when they become misaligned.
Are you curious? 😀 I won’t keep you in suspense too long. I promise! I hope to be able to share the details with you next week.
So anyway, for this design idea I have in mind, I had to find a cheap way to install my doors as actual sliding barn doors. Back when I first made and installed these doors, I checked just about every source I could find for barn door hardware, and the hardware needed for my double doors with a 10-foot span was anywhere from about $800 to $1200. I wasn’t going to spend that kind of money on door hardware, so that’s when I came up with my $60 rolling door option.
This time, I started my search at Home Depot and Lowe’s, and I found that they both now carry some pretty nice barn door hardware. But that’s just for one door. I have two doors, so I would need to purchase two packages and join two rails together. So again, that put me at around $340 for door hardware. That still seemed a bit excessive, especially since this hardware isn’t going to show once my new idea is in place.
And then I came across something that was about half that price. I bought everything I needed at Lowe’s. Home Depot carries these products also, but they don’t carry them in either of the stores here in Waco. But our Lowe’s carries them in stock here.
Y’all may already know about this cheap barn door hardware, but I had no idea this option existed! It’s a square tube rail, and the wheels that allow the door to slide back and forth actually roll inside the square tube. And the best part was the price. Everything I needed for my double doors with a 10-foot span cost right at $160. That’s insanely cheap compared to all of the other barn door hardware I had looked at for this kind of width!
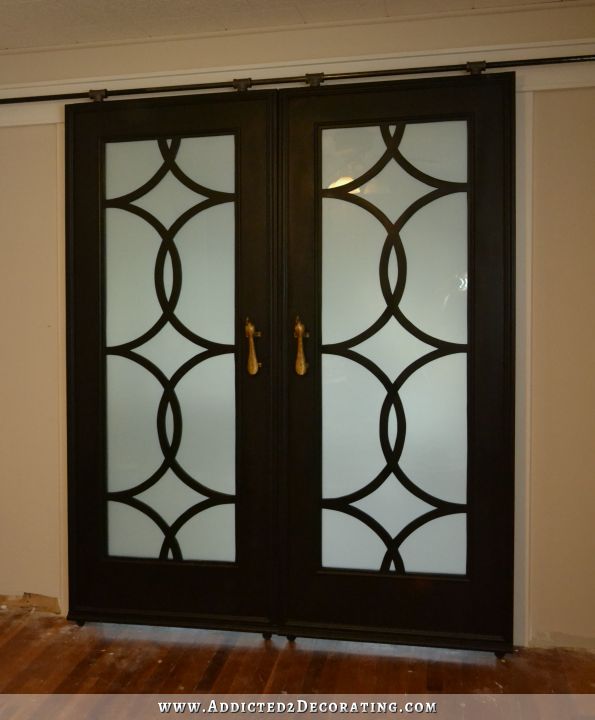
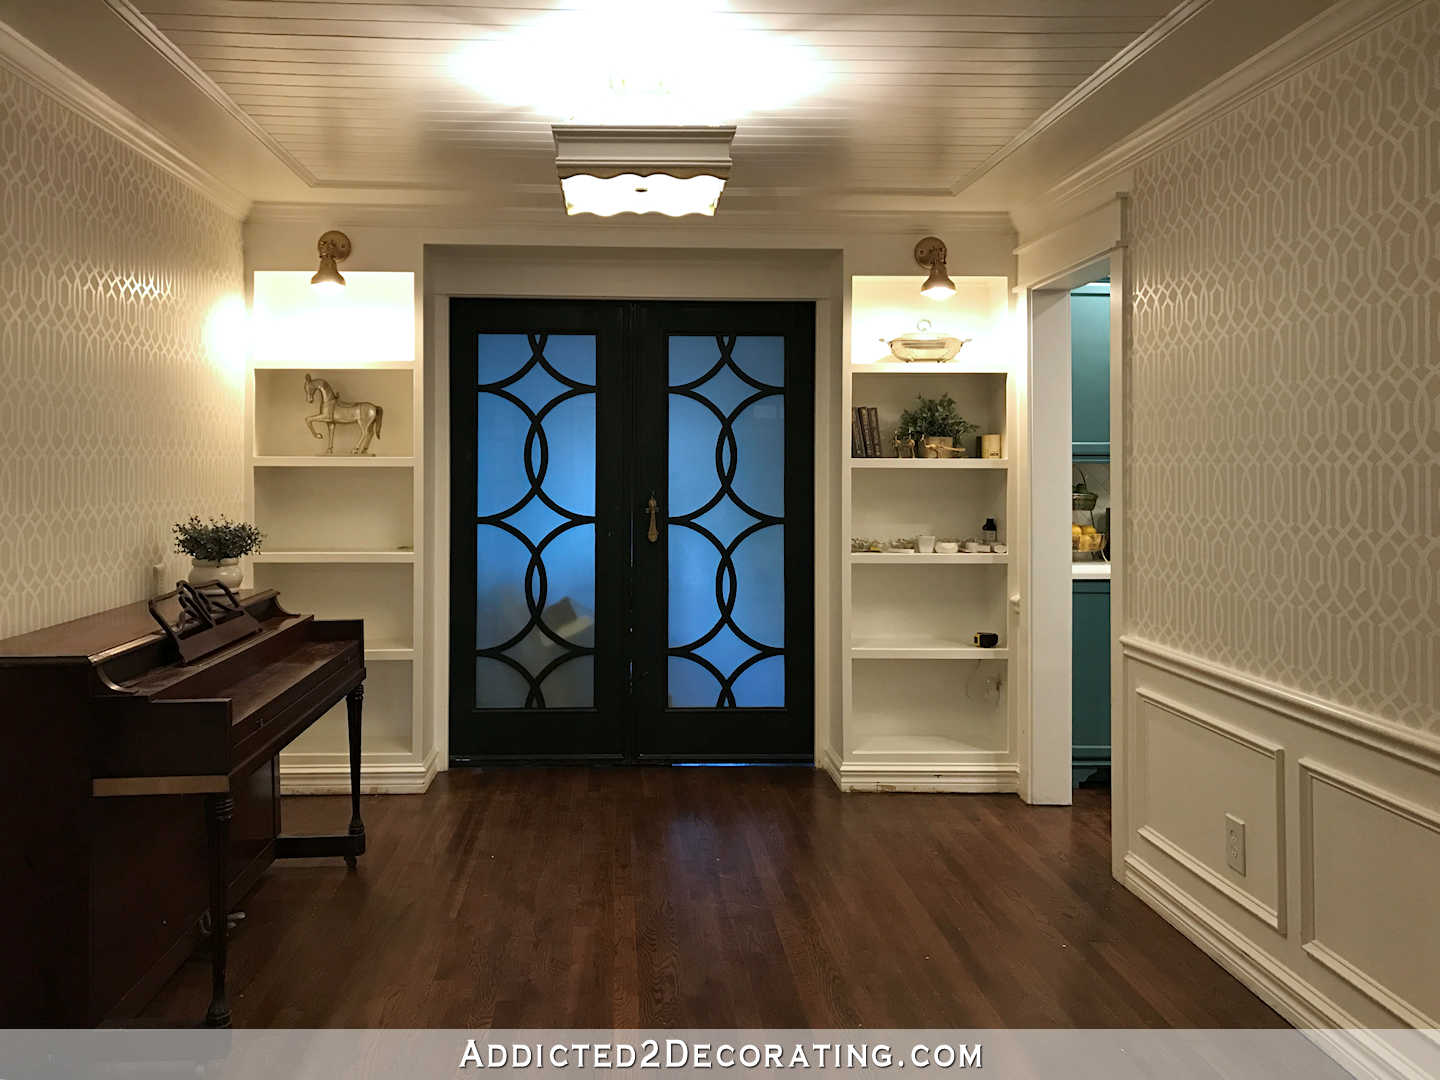
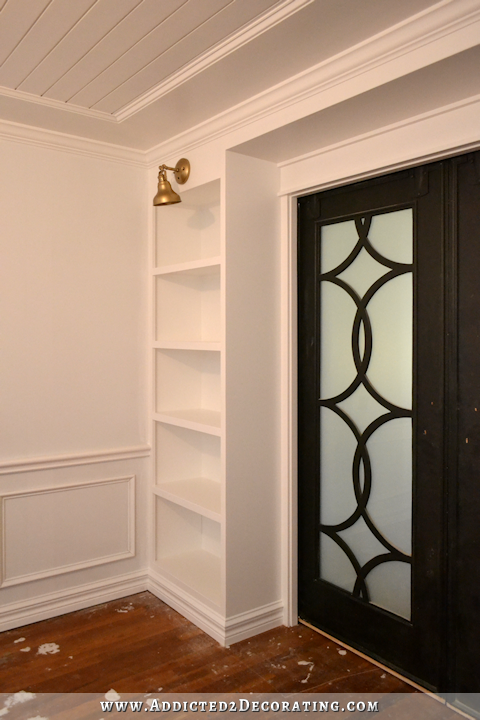
Here’s how it looks installed.
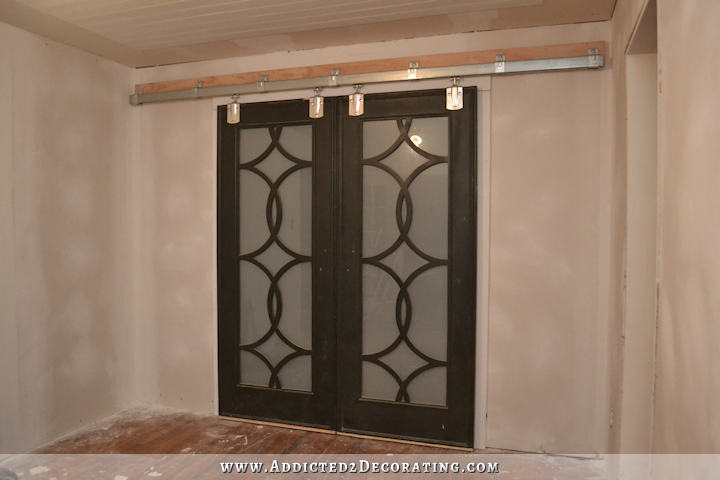
It doesn’t look pretty right now, but it’ll look better when it’s finished. 🙂
The great thing about this system is that all of the moving/rolling parts are actually inside the square rail. That means that this hardware can be painted any color you want, and there will be no wear and tear that will rub the paint off over time. I’ll be painting the door brackets black so that they’ll blend in with my doors, and everything else will be covered completely when everything is finished.
So here are the details of this barn door hardware, and how I installed it…
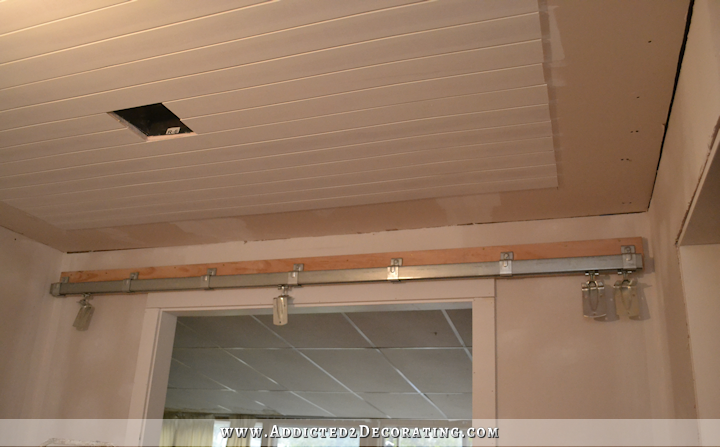
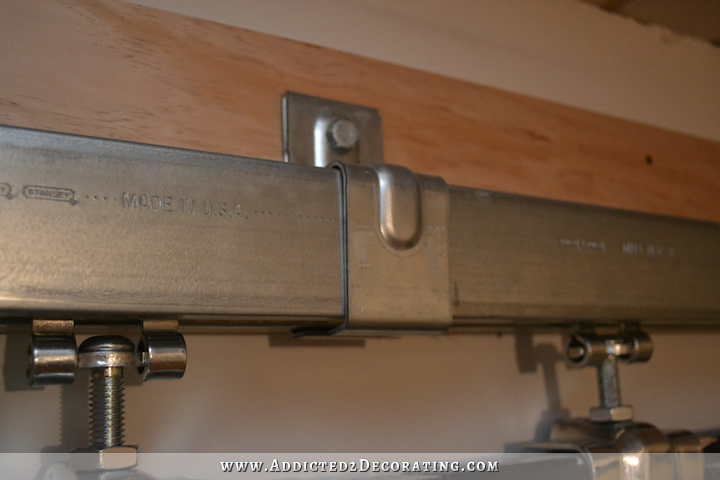
First, I installed very simple door casing around my door. Then above the top casing, I attached a 10-foot 1″ x 6″ piece of lumber using 3-inch framing nails. (Lots of them!) This was originally an exterior wall, so this wall is load-bearing, and this doorway has a solid wood header above it. My walls are also lined with shiplap underneath the drywall. So I shot the nails in at random, knowing that wherever I placed them, I’d be hitting solid wood. So if your situation is different (which is very likely), you definitely need to screw or nail this into studs.
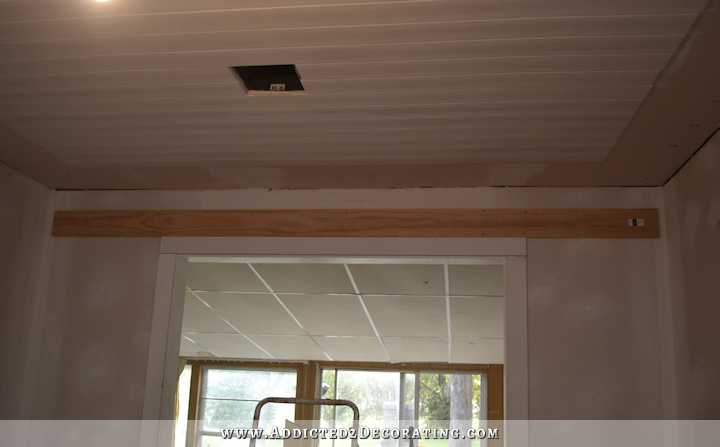
And then because my doors are thicker than standard doors, and I needed to be sure there was plenty of clearance for my doors to slide past the door casings, I added another 1″ x 6″ x 10′ piece of lumber on top of the first one, again attaching it with 3-inch framing nails. Before I attached this second board, I marked and measured where the bottom of the metal rail needed to be, and I stalled the board so that the bottom of the board would be perfectly lined up with the bottom of the rail.
And then I attached the rail to the 1″ x 6″ board. Because I was installing a 10-foot track on a wall that’s only three inches wider than the rail, I had to pre-assemble the wheel/door bracket assembly and place them into the track before installing the track.

This definitely made things more challenging. I was installing this by myself, and the whole thing was quite heavy. Those wheels move back and forth very easily, and so they kept sliding back and forth, throwing me off balance. Holding that rail up with one hand and trying to screw in the first screw was almost too much for me to do on my own, but I finally got it. In order to do it by myself, I had to mark and measure where the first lag screw needed to go (I started with the middle one), and then pre-drill the hole in advance. That way when I climbed up on the ladder and held the metal track in one hand, while holding the drill in the other, I knew exactly where that lag bolt needed to go. It was very difficult, and I definitely suggest having someone help you install this hardware.
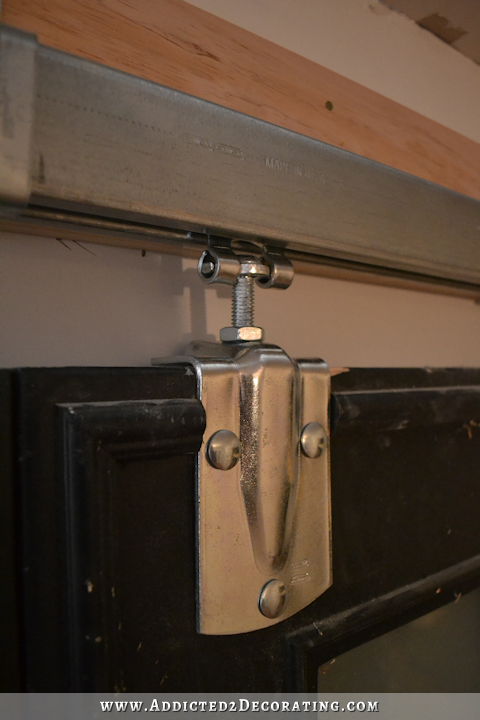
Here is what the track looks like. You can see here where the wheel assembly slides into the rail, and then through the bottom of the rail.
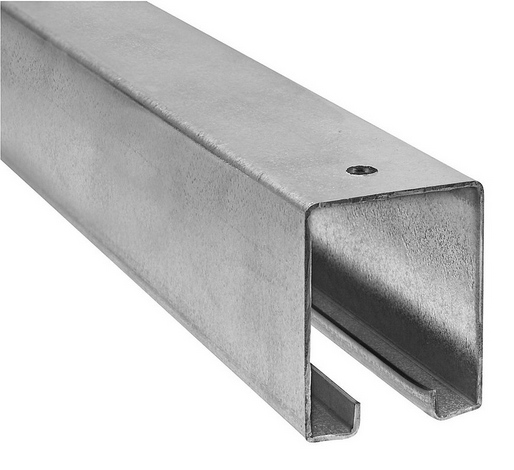
The rail is attached with these brackets. I had no idea how many were necessary, so on my 10-foot rail, I used a total of seven brackets. Those just slide right over the rail. They’re a pretty tight fit, but not so tight that it’s difficult to slide them into place.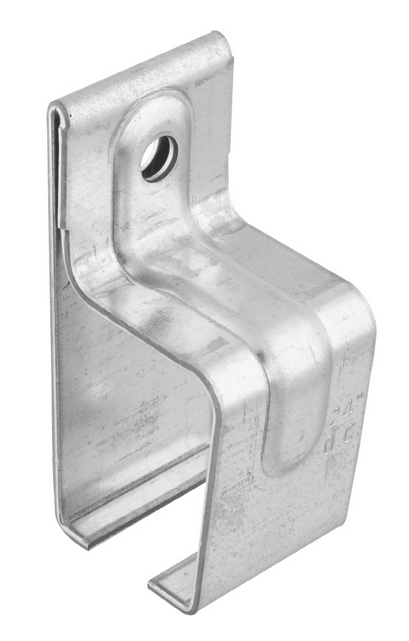
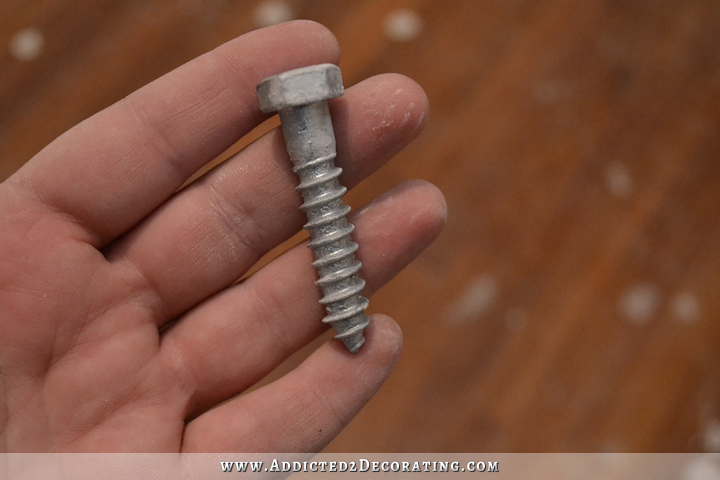
I attached those brackets with these large lag bolts. You definitely have to pre-drill your holes for these huge things, and you can buy a bit for your drill to screw these in.
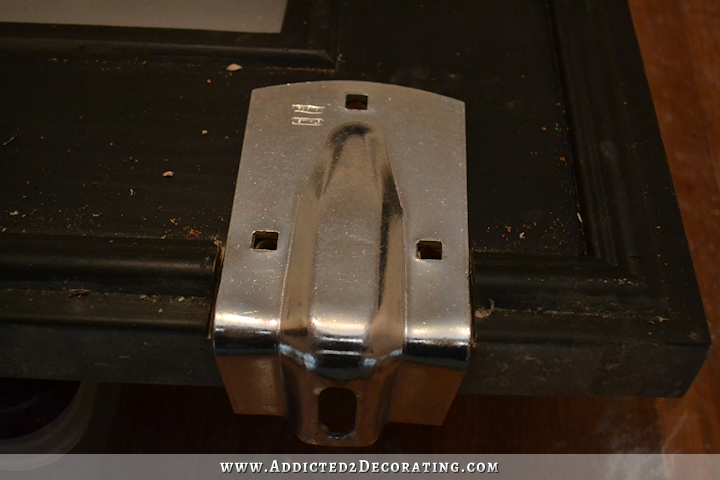
Here’s what the wheel assembly looks like…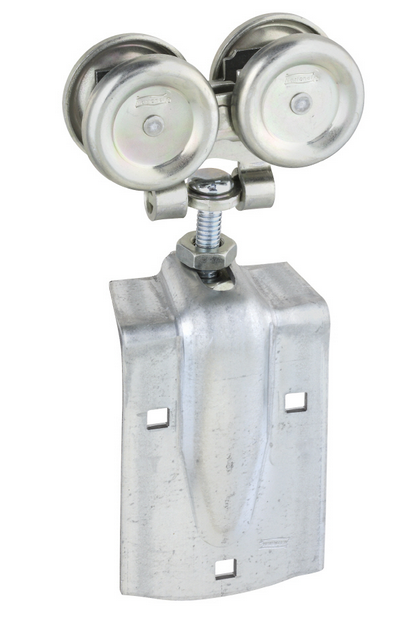
Our Lowe’s carries three different types of wheel assemblies. There’s one that’s rigid, one that’s adjustable, and then one that…well…I couldn’t figure it out so I have no idea how it installs or works. I got the one that’s adjustable, and it’s made up of five parts.
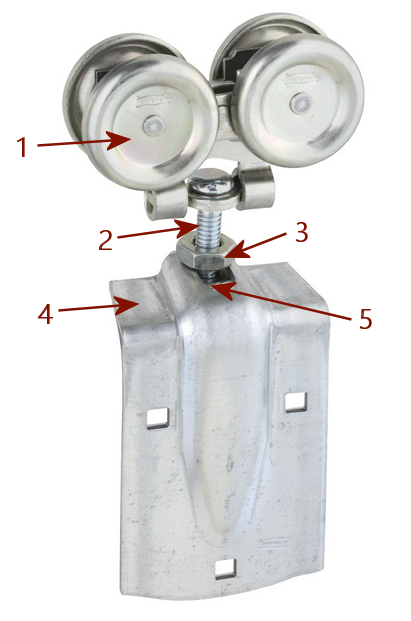
- The main piece with the wheels has a hole in the bottom where a big bolt slides through.
- The bolt slides through the hole in the wheel piece, and then through the bracket that attaches to the door.
- The top nut can be loosened to adjust the bolt back and forth in the slot. You can make the necessary adjustments after the door is installed so that the door hangs perfectly straight.
- The bracket attaches to the door (there are six additional nuts and bolts in the box to attach this bracket).
- And the bottom nut (not seen) holds the bolt onto the bracket.
When you buy these, you have to be very sure that all of the pieces are in the box — two wheel pieces, two brackets, and all of the necessary nuts and bolts. The Lowe’s here had about ten boxes, and only two of them had all of the parts.
In order to attach the brackets to my doors, I had to cut away part of the top decorative trim so that I had a flat surface for the brackets to attach to. I used my Dremel Mult-Max to cut through and remove the excess trim.
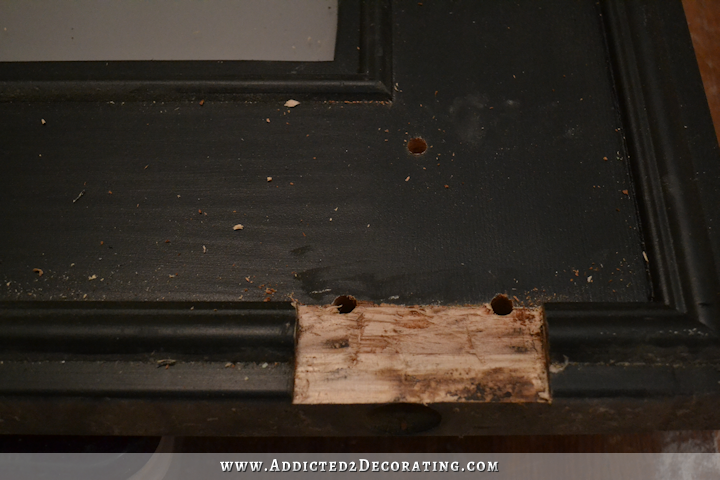
The bracket fit perfectly against the door. I also pre-drilled the holes for the bolts that would attach the bracket to the door.
So again, because I was installed a 10-foot rail on a 10-foot wall, I pre-assembled everything before installing the rail.
If you’re working on a much wider wall, then you won’t need to add the wheel/bracket assemblies before installing the track. You can simply install the track, and then attach the brackets to the doors and slide the wheels into the track on the end.
But I didn’t have that option, so after the track was installed, I placed a long 1″ x 6″ piece of lumber on the floor, and placed the door on top and leaned the door against the door casing. Then I slid the brackets in front of the door and into place, and placed the bolts into the pre-drilled holes. Then I was able to move my ladder to the back of the door, and add the nuts onto the bolts on back of the door. I tightened the nuts as tightly as I could with pliers. The bolts stick out about 1/2-inch from the back of the door, so I’ll probably eventually cut those off with my Dremel Multi-Max.
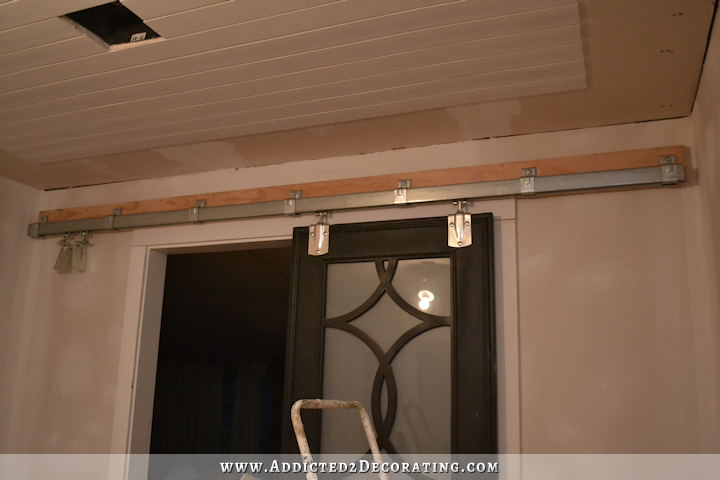
And then I repeated that process with the second door.
This hardware works perfectly. The wheels slide very easily and smoothly, and while it does make noise, it’s not too terribly noisy.
And as I mentioned, after everything is installed, adjustments can be made. If the door isn’t hanging perfectly straight, you can simply loosen the nut on top of the door bracket, and adjust the bolt (i.e., slide it more to the front or back of the slot) as needed until the door hangs straight. You can also adjust the height of the door by loosening that same nut, and using a pair of pliers to turn the actual bolt. The design of the bracket holds that bottom nut in place, so when you turn the actual bolt, the bolt will move up or down in that nut, adjusting the door as needed. As you can see, there’s about an inch of play in the height, but do note that if you want the option of adjusting the height of the door after installation, you need to drill a hole in the top of the door BEFORE installing the bracket so that the bolt can move up and down as needed for height adjustments.
And here’s a close-up view of how the bracket holds the track in place.
This hardware is really heavy duty, quality stuff. And again, you can always spray paint it black or oil-rubbed bronze if the silver color doesn’t work for you. Or you can built a wood cornice to hide the whole track if you don’t like the look of it at all.
But as far as the price and the durability of this hardware, I don’t think you can beat it. Again, I was looking at prices between $800 and $1200 for barn door hardware for double doors on a 10-foot span. This stuff came in at $160.
But mine is far from done. 🙂 I’ll hopefully be ready to share my big idea with you next week.
UPDATE: Let me stress… I will be painting my brackets black so that they’ll blend in with the doors, and the top hardware will not show in my final design. I’m simply sharing my process, as I always do, and wanted to tell those who are interested about this cheap barn door hardware option.
UPDATE #2: To see what this type of hardware would look like painted in a matte black, check out the first picture in this post at House of Hipsters. I have a different plan for mine, but I think that looks amazing!

Addicted 2 Decorating is where I share my DIY and decorating journey as I remodel and decorate the 1948 fixer upper that my husband, Matt, and I bought in 2013. Matt has M.S. and is unable to do physical work, so I do the majority of the work on the house by myself. You can learn more about me here.

This is amazing! I’ve been searching high and low for cheaper barn door hardware options. My trouble is I need bypass hardware. Have you had any luck seeing something on the cheaper side for a bypass? Thanks so much for taking the time to read this.
One option is this same track but the roller hardware stays on one side and the other side of the track holds the other door. 🙂
How do you come up with this stuff?!? You never cease to amaze me! Looks great 🙂
Thank you SO much for posting this! I love all of your ideas, and so enjoy your blog. Thank you for all the inspiration 🙂 and for sharing your home with us!
Can’t wait to see the next installment!!
Just wanted to share some other options people might not be aware of: These have really sleek lines without clunky door brackets.
http://www.amazon.com/Modern-European-Sliding-Double-Hardware/dp/B011890EFM/ref=sr_1_5?ie=UTF8&qid=1447429545&sr=8-5&keywords=T-Motorsports
http://www.amazon.com/gp/product/B00BGGI5WW/ref=as_li_tl?ie=UTF8&camp=1789&creative=390957&creativeASIN=B00BGGI5WW&linkCode=as2&tag=papdaides-20&linkId=H4TQHR3URYYSSLG2
Much nicer, thank you!
I did like the daintiness of your original hardware but this looks more authentic. I think you will love that! Great job, as always.
I’ll bet you’ll love the more dependable rolling mechanism. Nothing is worse than a sliding door that is touchy! FYI, Menards (if in your area) also carries a version of this hardware and the wheels attach to the top of the door so no hardware is actually visible on the front/back of the door. I used it for my master bath and it’s pretty sturdy and smooth rolling although not quite as heavy duty as yours looks. I’ll be building a cornice for mine too, unless you show me a better idea. I’ll be waiting to see what you do! Thanks for the inspiration.
Thanks for sharing this. I’ve been wanting to change my french-style double shed doors with sliding hardware, but I couldn’t find an economical alternative that was also simple and sturdy. This appears to be the right system!
One question, and please forgive me if you state it above and I didn’t see — are the doors held completely rigid? What I mean is, they don’t swing (dangle?), do they? I hope that makes sense.
I love the industrial look, even if you left them as is, they’d be beautiful.
I will be surprised if you ever get your home finished. You keep going back over the projects you have already completed. If you total up the money you have spent on hardware it is $220.00. I love your blog but I really wish you would not keep going back and redoing things. You seem to waste a lot of money.
But let’s be clear. It’s MY money and MY house. My money spending and house projects (whether I do them once or 100 times over) have absolutely no effect on anyone but me and my husband. So as long as we’re okay with it, I have no idea why anyone else should feel like they have a say in it.
Agreed!
Well said, Kristi.
I wish there was a like button just for this response!
100% in agreement Kristi. I think a do-over is another good decorating lesson you have taught us. Be brave, be bold and do it over if you don’t love it:)
AMEN!!!
This is a BIG part of why my house isn’t really decorated (and never really has been) Hubby criticizes pretty much everything I might suggest, or even express an opinion on. For example, we have a(n) (ugly) builder grade hanging light fixture hanging over our table in our kitchen. I guess I was okay with it initially (almost 20 years ago – hanging head in shame) but it became my worst nightmare to clean – it has a million (for lack of a better word) ridges that are glass, and literally in order to clean the @#$#$ thing, one has to get into each and EVERY “crease” and ridge – I’ve tried various methods, including using a Q-tip!!! Ugh!! I pointed out a fixture I liked, and asked hubby’s opinion, a immediately it’s “well, that wouldn’t look good in OUR house!!!
Recently he’s become addicted to watching HGTV, so he watches “Property Brothers”, “Fixer Upper”, “Flip or Flop”, you name it!! and so now he thinks he’s an expert on design – rolling eyes! And 18 months ago, he thought our golden oak kitchen cabinets were wonderful!!!!
I’m paralyzed by this man.
Kristi, your do overs have been an inspiration to me. Before I started reading your blog, I would spend months considering options. Now I am much more willing to try out my ideas and change it if I end up not liking it.
She would be spending money on hardware anyway, so really, it’s only $60.00 that is “wasted”. But, if this hardware wasn’t available at a reasonable cost at the time that she did the initial doors, it’s hardly “wasted”. She has been able to enjoy the doors for over a year.
I for one enjoy the re-do’s, as the project seems to get better and improve each time, even if I thought it was perfect the first time. Besides, I’ve been told that a creative person never gets done with a house. When they have completed all the rooms, it’s time to start over again! 🙂
I agree with Linda. It’s discouraging to have a interior designer that can’t make up their mind on their style.
I’m not an interior designer, and I’m not working for a client. I’m working on MY house, using MY money. I’m baffled that anyone thinks my money spending habits are their business, or that they should have a say in it.
Be baffled no longer Kristi! Some people have a recurring dialogue running through their head that money is a scarce resource or some such …. so they settle. Even when a few dollars and ‘happy doing what I love’ time is all that is needed to make something that lets their heart sing! I know because I used to do this. Having realised this thought was ever present, I now ask myself what I would do if money was not an issue …. If the answer is that I would change it, I set about finding a way to achieve the changes I crave. So please don’t be affronted at people for making comments about your habits, they can’t help themselves; smile gently to yourself and be happy you don’t have their hang-up about money. …. AND laugh out loud because you never have to settle! You get to do what you love … several times over if need be! Yay!
My comment was not about the money…only how many times you have changed your mind on almost everything!! I just don’t understand re-doing 2and 3 times. But as you said it’s your house and you are the one living there.
In your introduction you call yourself a interior designer and blogger…that’s where I got that. You say that. And I never mentioned how you spend your money. That part is your business for sure. But I expect an interio decorator to have a sense of style their sure of.
No, actually it says interior decorator.
And to finish my thought… I would presume that an interior decorator who was hired to decorate a space would come up with very clear ideas and concepts for the client. However, I’d also presume that one who is doing their own home allows themselves the luxury of time and experimentation, both options that you certainly wouldn’t put on the backs of clients.
One thing I am confident of. If Kristi does a job for a client, it is done professionally and well.
Making over her own “forever” home, is a labour of love and one that I have enjoyed watching, knowing that its being done right, from inside out, bottom to top. It WOULD BE wasteful to finish a home, taking it down to bare bones and back again, and then NOT love it.
I worked as an interior decorator. I’m not an interior designer. And working for clients is vastly different from working on my own home. When I worked for clients, they would tell me their ideas/wants/likes/dislikes, and I would put together a decorating plan. That plan would be implemented by me, as well as hired professionals like painters, wallpaper hangers, cabinet makers, etc. Projects were wrapped up in a matter of weeks. The longest I ever worked with a client was six months, and that was decorating her entire house. The major differences were that I wasn’t doing any of the hands-on work (no DIY projects in clients’ homes), and (this is the key) I had absolutely no emotional attachment to the homes I worked on.
Working on my own home is a vastly different experience. The obvious difference is that I’m DIYing almost everything myself (which so far has taken me two years, and I have several more to go, I’m sure). And when I’m working on my own house, I’m not an interior decorator (what I’m doing in my house is WAY beyond the scope of interior decorating), and I”m not a client. I’m just a homeowner with 10 years worth of ideas that I want to try out saved on my computer, and thousands more ideas available at my fingertips with Houzz and Pinterest. I don’t have “my style”. I like about 10 different styles, so trying to whittle down those thousands of ideas that I’ve collected over the last 10 years, and those 10 different styles that I love, into a cohesive design that fits into a few rooms of one house — a house that I’m VERY emotionally attached to — isn’t easy for me.
I know that there are interior decorators and designers with “signature styles,” and you can tell instantly when you see a room decorated by that person because it’s almost like they follow a formula that is specific to them. I was never one of those decorators. I had a different philosophy when it came to decorating for clients. My philosophy was that I wasn’t in their home to force MY style on them and their home. I was there to help them implement THEIR own style in a cohesive way. I could decorate someone’s home in a traditional style, contemporary style, or any style they wanted. MY style was irrelevant when it came my clients’ homes. So no, even after working as an interior decorator for seven years, I don’t have a style that’s my own. If anything, my seven years of client work made it even harder for me to develop “my style” because I realize how many amazing styles there are out there that I really like.
But now, I’m just a homeowner trying to take a horribly outdated house and turn it into my home by DIYing my way through each room. I have no deadline, and I have no concrete budget. And if I have to do a project over 10 times in order to be happy with it, that’s exactly what I’ll do. I’m the one who has to live with it, and I won’t settle for something I don’t like, or something that didn’t turn out like I had hoped, just so that I can reach some arbitrary finish line and say, “I’m done!” What’s the point in being done if I’m not happy with the finished product?
Thanks so much for another great tutorial, especially with the info for how to do it alone! Can’t wait to see it next week!
Ok. This drove me out of the shadows and I just have to comment. What Kristi said about it being her house and her money to do with as she wants is so true. But there’s another element to her process that really helps me and that is the fact that she takes it that one step further and corrects something she’s not happy with. How many of us have had to redo something… or just given up and accepted something we weren’t happy with? I want to say thank you Kristi for giving me the hope that I too can redo something that didn’t turn out the way I expected.
Completely agree. She has, in my mind, made it okay to go back and re-do something I just don’t love. She’s made me BRAVER! 🙂 🙂
I do find it reassuring. My husband just accuses me of doing things without considering them carefully enough, but really, sometimes you just have to SEE it to know.
Her web site now has plans for two methods of hanging sliding doors; it’s a win/win for her readers!
Wow, that’s a huge, beautiful difference! Though I’ve nowhere in my home to do barn doors, I am drawing up plans to build a shed 🙂
Looks GREAT! As an owner of an overhead door company and very familiar with track and rollers – from time to time you may want to spray some WD-40 (just a little LITTLE bit) around your rollers to keep the motion smooth. We usually suggest with the bi-yearly time changes 🙂 🙂 🙂
Kristi,
Just had to add my two cents here. How does one learn if not by doing? It is not an error to change one’s mind. Design is not stagnant, new products, new trends, the availability of new materials, new tools, and our own DIY ability and experience grows and changes with every project.
Hat’s off to you!
Diana
I think there is a silicone spray that would make sliding the doors easier and quiet.
Looks great and can’t wait to see the finished product.
Question…is there a reason the brackets can’t be installed on the other side of the door (facing the wall)? Seems like it’d be a much cleaner look. I love watching you make improvements and re-do’s (says the girl who’s hesitated to hang art 2 years after we finished remodeling because I don’t want to have to fill a hole if I change my mind!).
Use Command Hangers. You must have heard about them. They come in all sizes and really are as easy to use as the commercials show. If you have drywall it is also possible to hang things with a steel straight pin. I know, sounds impossible but it is not. You just carefully hammer the steel (must be steel) straight pin into the wall. It is amazing the weight it can hold. If you are worried about needing more strength use more than one. Just draw a light pencil line where you want to “nail” and put the pins in the wall. I do it all the time. I use it for hanging canvas’s, plates, and other decorative things.
We looked at that exact same hardware at our local Ace hardware store! We have a much smaller door we’re looking at doing, but it’s so useful to hear how your process went… and if you still like it after living with it I’d love to know more. And if you don’t love it… CHANGE IT! Please don’t let the myopic, bookkeeping, kvetchers stop you from making the house right, even if that means re-doing or altering what’s “done”. Not that you will of course, but still… here’s some “you go girl” support!
To me it makes total sense that change something that doesn’t sit just right, especially when we are not talking about big money here. As far as the comment about you changing your mind, so what? How many times have you had the opportunity to hang barn doors? And your doors are certainly not the typical barn door look so naturally you learn as you go. I personally like the way you work through problems and share the fixes. I for one rarely get any of my projects spot on the first time if they are things I haven’t tackled before so I feel that I am in good company????
I don’t care how many times you change something, as long as your end result is what you love. I would love to see the floor washed and cleaned. I know you feel that is a waste of time until all the dirty work is done, but to me it is no different than redoing the doors or the pony walls. I would just love to see them clean to get a good image of the rooms.Blessings
As I jhabve said before, You are absolutely amazing. What can’t you do? You do great work. Just let anybody say women can’t do a man’s job. Ha.
The wheels that would become misaligned would have driven me crazy after a while. What a great solution you’ve found! Looks great!
Adjust it as many times as you need! I just really appreciate that you take the time to share it all with us! I’ve learned so much from you. I just want to encourage you and let you know how much I enjoy reading your posts no matter what the topic. 🙂
I love the new hardware!!! And I for one am so glad you do what you do. I have learned so much from you in the short time I have found your blog. I think your amazing and I am glad that you follow your convictions. And it is your home and thank you for sharing it with us.
Hi Kristi,
Thanks for posting the info on the barn door hardware.
I loved your orginal hardware the daintyness and the rubbed bronze color worked with your doors. Your ability to dream up these ideas and execute them have me in awe.
Those doors are so absolutely stunning, I think that that the silver hardware and the industrial look of the barn door hardware detract from how beautiful the doors are perhaps bronzing the metal might help?
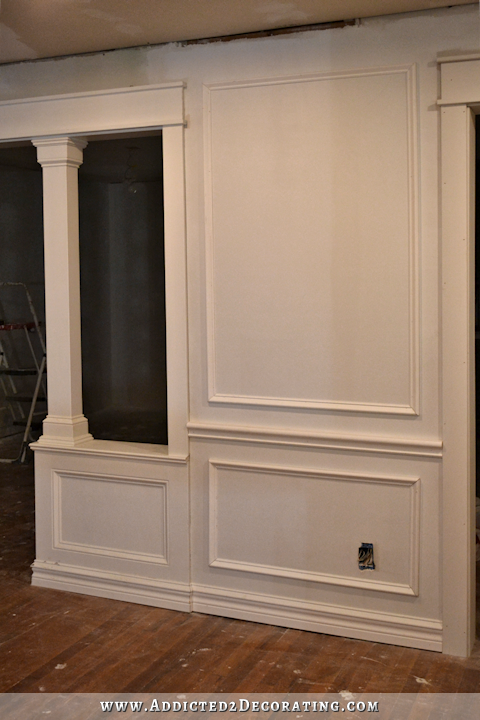
Also the ponywalls were stunning and looked perfect with wainscotting and the neo classical look that you had going on. Are you completly changing direction in your look ? Are you having a crisis of confidence? There are a lot of ideas and opinions out there I think you should trust your talent!
Love this! Would love to see you final pics! What type of paint do you recommend? Esp if the rails are galvanized?
Hi-Very cool posting regarding using the barn door brackets from Lowes. Surprisingly I’m planning to use the same products on a pool house project I’m working on. My question, do the wheel assemblies easily slide past the hanging brackets once it’s installed? When I looked at the display at Tractor Supply it seemed that the wheel assemblies would only slide as far as the brackets but not beyond. It doesn’t make sense this is the case so I’m curious.
Any additional info you can help me with is much appreciated. Oh, and ignore the naysayers regarding the work you’re doing on your house. People don’t get how the creative mind works and quite frankly………ITS NONE OF THEIR BUSINESS!
Thanks again-Colin
Sorry for the late reply, but yes, the wheels roll very easily past the brackets.
Where did you get those doors? I looked on this page and tried looking around on the blog but didn’t really even know where to look. They’re gorgeous!
I made the doors from old solid-wood 6-panel doors that I took out of my house. You can generally find similar ones at Habitat For Humanity ReStore. The door details are here:
https://www.addicted2decorating.com/finished-sliding-barn-door-style-french-doors.html
if you lined the track were the wheels roll with rubber you may reduce the noise.