Refinished and Painted Upright Piano (The Post Where I Eat My Words)
Well, it’s a good thing I’m writing this post before I eat breakfast, because I’ll be eating my words…sooooo many words that I’ll probably be quite full by the time I’m finished with this post. The good news is that I finished my piano. But it doesn’t look anything like what I had planned. And to be quite honest, I’m much happier with the way it turned out.
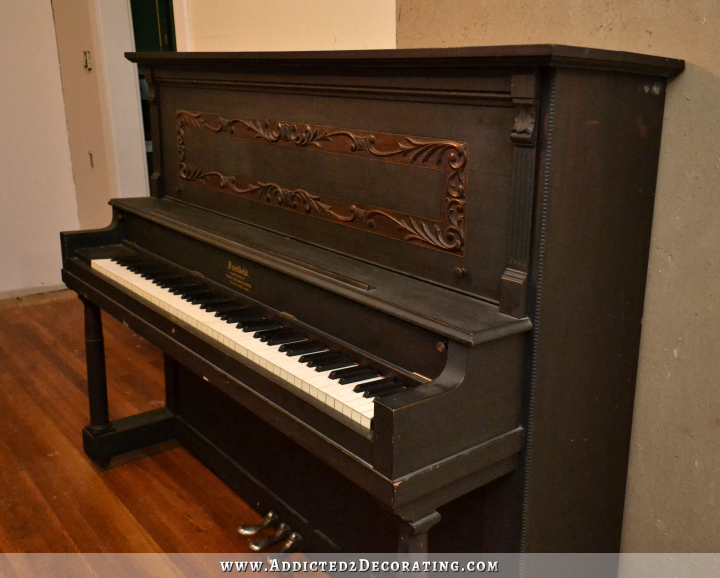
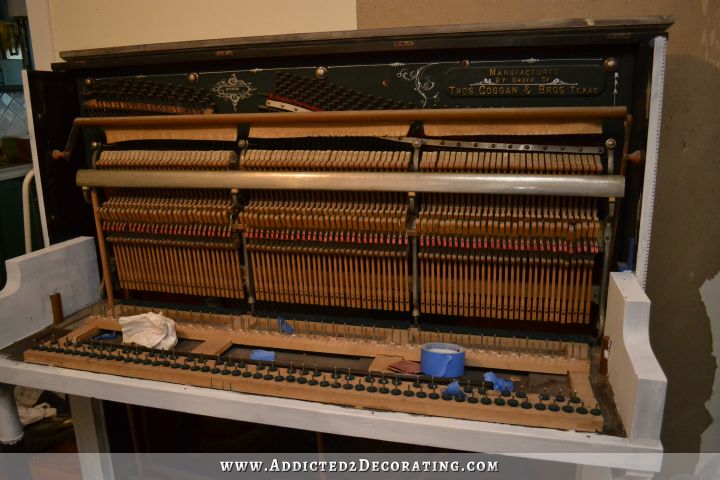
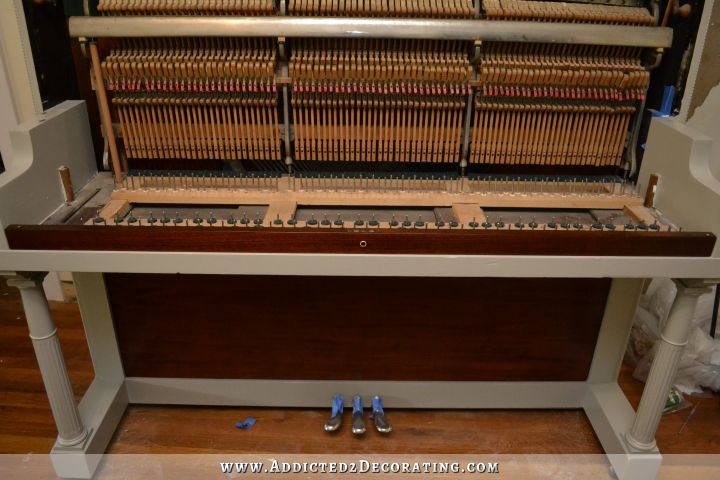
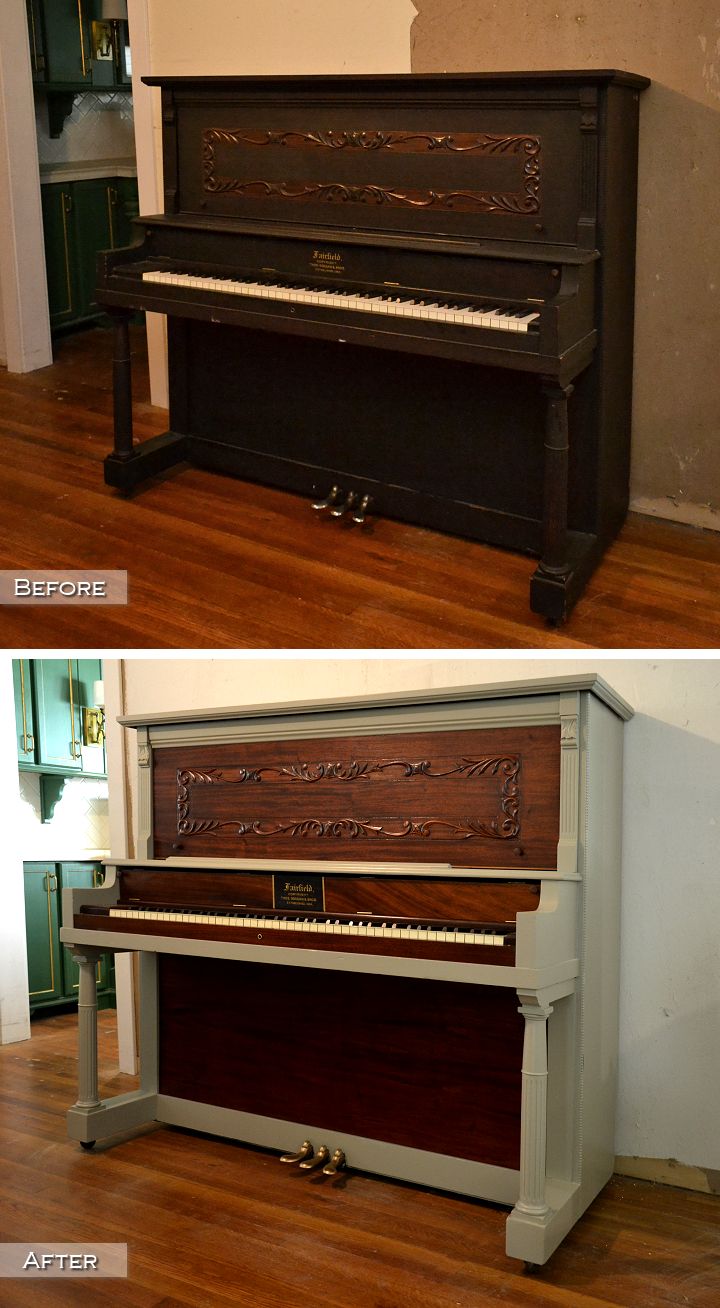
To refresh your memory, here’s what I started out with…
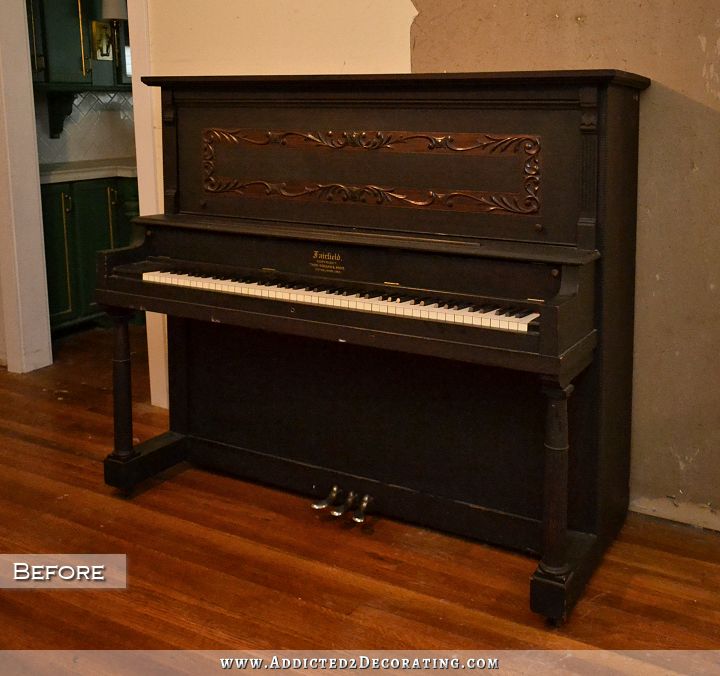
This piano is about 100 years old, and while it’s a fantastic piano with an interesting history, the finish was horrible. It was so thick that you couldn’t see any wood grain through it, and it was so old and rough that when I ran my fingernails over it, it kind of felt (and sounded) like parts of it were made of plastic.
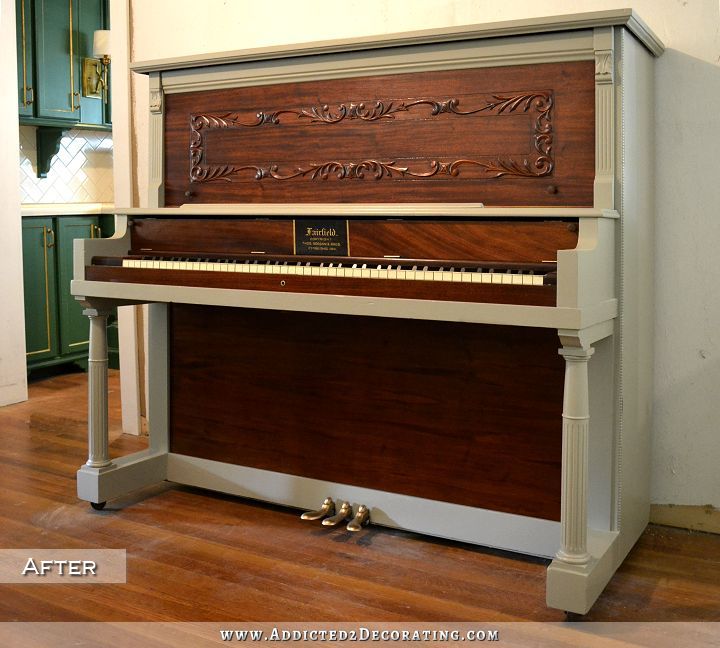
So after a week of working on it, let me show you how my refinished and painted upright piano now looks…
So which words shall I eat first? There are so many to choose from. 🙂
“This piano will either be yellow or green. I just can’t make up my mind. So majority rules on this one.”
“I don’t like gray. I don’t decorate with gray.”
“If I paint this piano, I’ll paint the whole thing.”
Ha! I really did have the best intentions. In fact, as soon as it became abundantly clear that yellow was the winner, I headed to Home Depot to have my custom color mixed. (I chose the lightest yellow.)
That quart of yellow paint is still sitting on my dining table, and obviously the piano isn’t yellow. So how did the gray thing happen?

Well, I couldn’t get the walnut veneer out of my head — all of that gorgeous real walnut veneer that would be hidden under one layer of oil-based primer and two coats of yellow paint. It just seemed so ridiculous. Because I like to keep things low cost, I’m generally working with cheap wood like pine. And what do I do with that cheap wood? I cover it with dark walnut stain, of course! I try to make the cheap wood not look so cheap by staining it to look like walnut.
And here I had real actual walnut (just veneer, but real walnut nonetheless), and I was going to coat it with paint? It just seemed so ridiculous.
I kept reading comments from some of you about how I should paint the piano, but stain the top. I just couldn’t picture it, and it seemed a little too similar to my buffet with the painted body and stained top. Others of you said to strip and stain the part with the carved design, and then paint the rest. Again, I just couldn’t picture that one, lone piece being natural wood while the rest was painted.
And then someone (thanks, Lori!!) gave me this link, and I just couldn’t stop looking at some of those gorgeous pianos. I had three that I really liked, but this one was my absolute favorite.
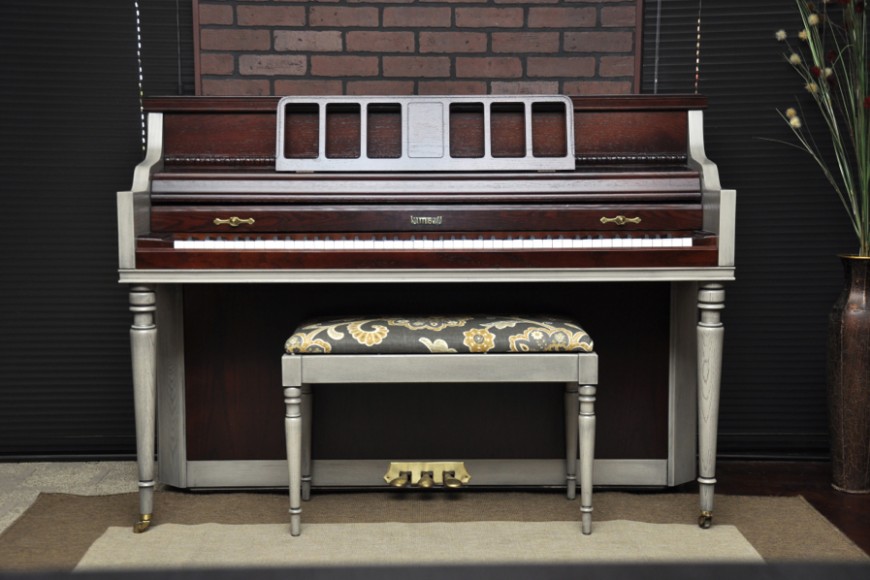
Yep, the gray one. They have one that’s white paint combined with natural wood, but it doesn’t look nearly as good (to me) as this gray one.
So I decided which sections I wanted natural wood and which ones I wanted painted. Then I disassembled my piano (which was way easier than I had anticipated) and set about stripping all of the old finish off the pieces I wanted to be natural wood. It was definitely not easy, but it also wasn’t too terribly difficult like I had imagined it would be.
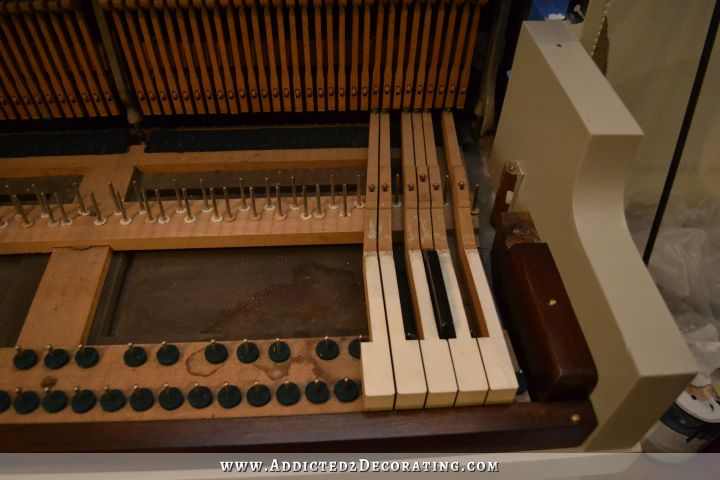
The most challenging part of the process was mixing a stain color to match the walnut. All of the large, flat areas were covered in walnut veneer, but the edges of the wood weren’t covered in veneer. Ugh. You can see the difference here…
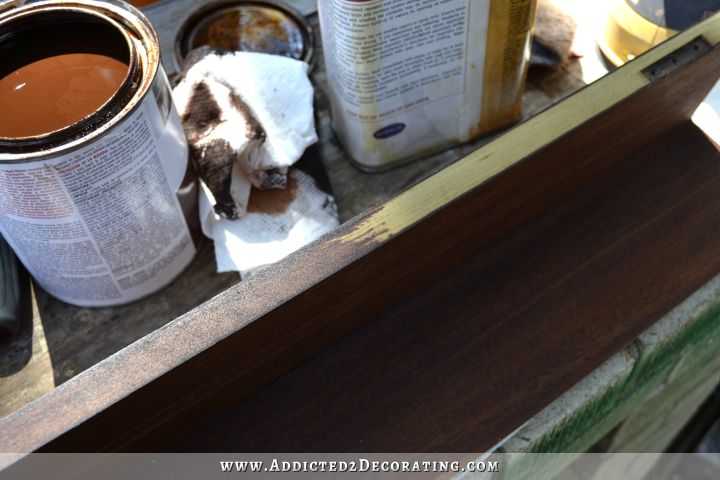
All of those large flat areas are walnut veneer with nothing but Waterlox. Those areas literally have no stain on them at all. They turned that gorgeous dark color just from one coat of Waterlox (a varnish-type of clear coat made from tung oil and resins). But see how the edge is yellow? That has Waterlox on it also, but the Waterlox did absolutely nothing for it except turn it an even brighter yellow and bring out some hideous green undertones.
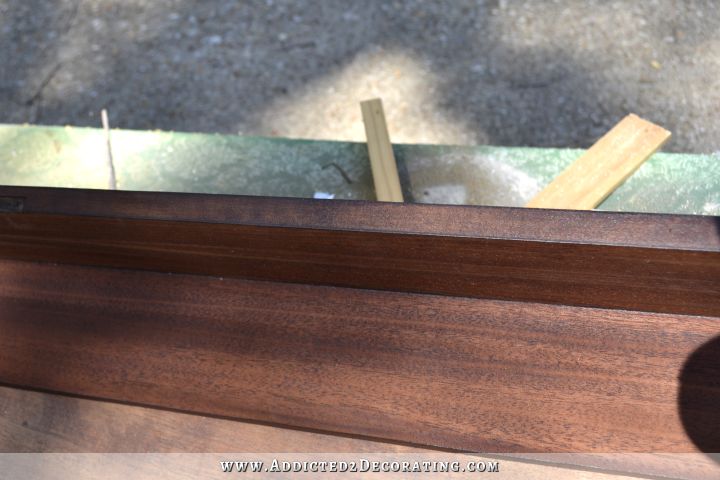
So I had to mix my own custom stain color to match. I ended up using a combination of Rust-Oleum Carrington and Traditional Cherry, but I have no idea about the ratio. It wasn’t perfect, but it blended pretty nicely.
I disassembled as much of the piano as possible. It actually wasn’t that difficult at all. Everything came apart with just a flat head screwdriver.
But interestingly, even as I was many hours into the whole stripping and refinishing process, I was still thinking that the painted parts were going to be yellow. But the more I stripped and refinished, the more I thought that I just couldn’t do it. Yellow with that gorgeous walnut? It just didn’t seem right. I didn’t think that yellow would complement the walnut at all. And I just couldn’t get the image of that gray and stained piano out of my head.
Ugh…gray. But the more I tried to think of another color that would work, the more convinced I became that gray was the only color that made sense.
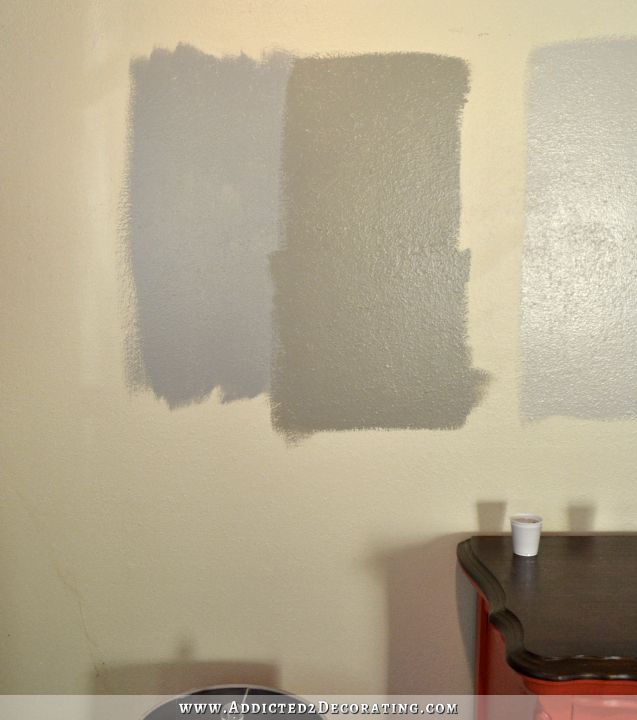
So I gathered some paints I had on hand and mixed my own paint color. I started with white (Polar Bear) and added equal amounts of black (Ultra Pure Black) and brown (Burley Wood). I ended up with a color that was very gray. The kind of gray that has blue undertones. Cold. Sterile. Institutional. All of the things I hate about gray.
But I didn’t give up. I just added quite a bit more brown, and then since the brown I had on hand had slight green undertones, I added just a touch of red to cut the cool look and warm it up a bit. That worked perfectly. You can see the difference here. The original gray is on the left, and the one I ended up using is on the right. (Pay no attention to the one on the far right. That wasn’t for the piano.)
So gray it was. Or I guess we could actually call it taupe since it has so much brown in it, right? But who am I kidding? That piano looks gray. And oddly enough, I love it.
Once all of the painting was done, and all of the natural wood pieces were sealed, and all of the non-walnut pieces and edges were stained, I was anxious to reassemble everything. The bottom panel just snaps right in. No tools necessary for that. Then I reattached the keyslip (the long wood piece that sits in front of the keys). Both of those pieces had the walnut veneer on the face, but the keyslip had to be stained on the top edge. I think it blends nicely, though.
Then I reattached the keyblocks, which are the blocks of wood that sit on either side of the keys. Neither of those were covered in walnut veneer, so I had to use my custom mix stain on those.
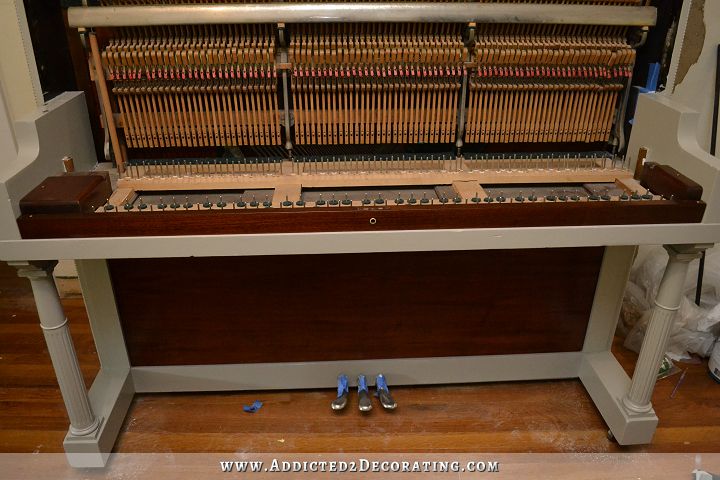
And then I was ready to put the keys back on. It was so fascinating to see how upright pianos are put together and how they work. I’ve played the piano since I was very young, but I had never seen the inner workings like this. They keys come off and go back on very easily, as long as you keep them in order.
As I removed mine, I numbered each one and put them in a box for safe keeping. When I was ready to reassemble, I lined them up on the floor by the piano in numerical order, which made reassembly very quick and easy.

And one more piece had to have the custom stain treatment — the low, long piece that sits right behind the keys and keyblocks, and to which the key cover hinges are attached. Once everything was put back together, I was so relieved to see how well that piece, the keyblocks, and the stained edges of the keyslip and key cover pieces all blended with the real walnut.
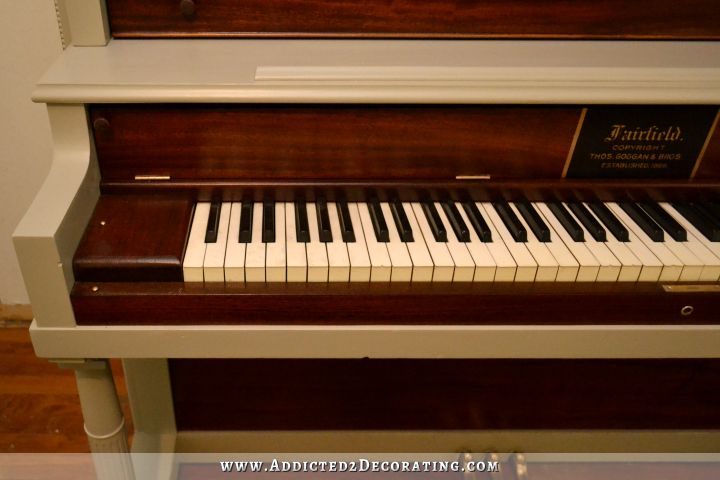
Before I started stripping these pieces, I made sure that I covered up the original manufacturer’s decal with painters tape so that it could be preserved.

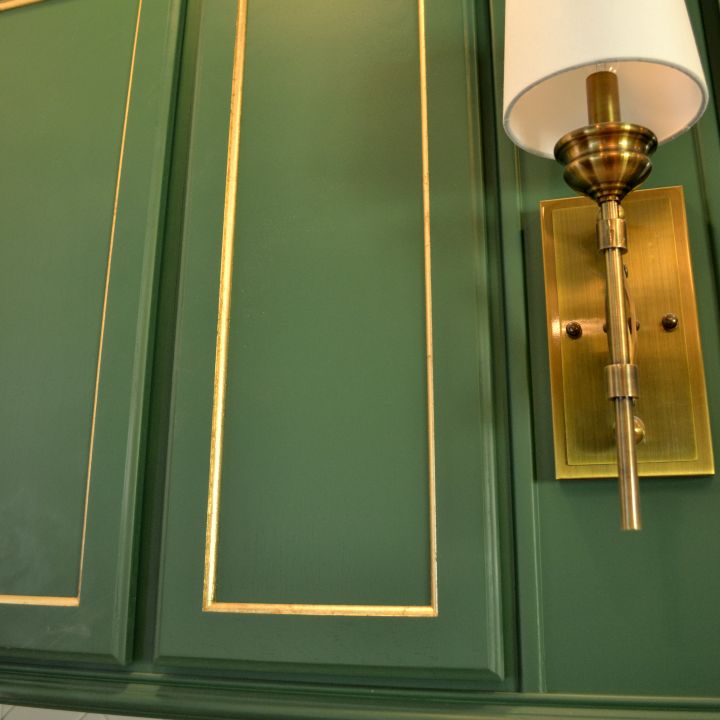
To “frame” the section with the decal and give it a finished look, I used painters tape to tape off a narrow stripe on each side, and painted it with liquid gold gilding that I bought at Michael’s. I was so surprised and ecstatic about how perfectly the gold gilding matched the original gold decal.

And the final finishing touch was the pedals. These old, worn, rusted pedals really detracted from the newly refinished and painted piano, so I decided that they needed a little refinishing as well.
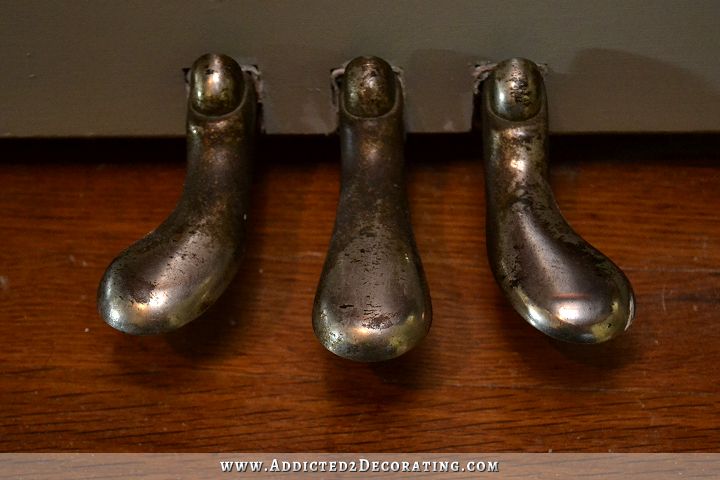
I used Rub ‘N Buff in antique gold to give them a new look. It actually didn’t make them look perfect and new, which I liked. This is, after all, a 100-year-old piano. But it did at least give them a consistent color and finish, and hide the awful rusted finish.

It was the perfect finishing touch, and Rub ‘N Buff is so quick and easy to use. Each pedal took me about two minutes, if even that long, and I just rubbed it on with my finger and buffed it with a paper towel.
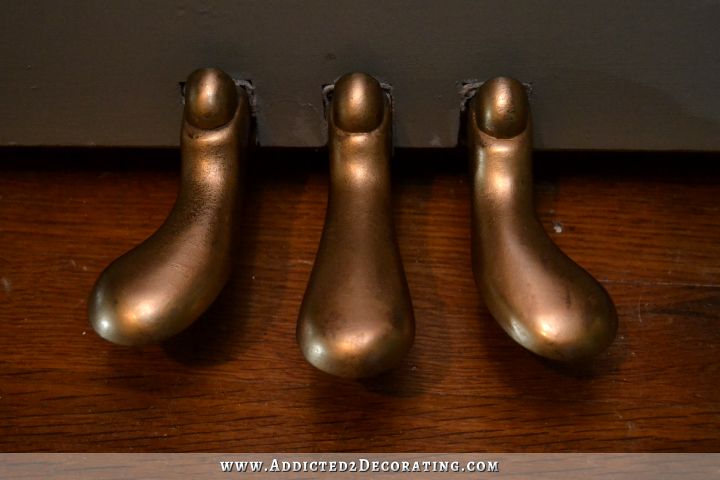
I actually used Rub ‘N Buff on all of the hinges and other small metal parts as well. All of those little finishing details add so much to the overall look.

And that’s the story of how my yellow piano ended up being natural walnut with gray.

And really, I like it so much better than I would have a yellow piano. I think this is much more appropriate for my house.

The natural walnut gives it an elegant look that complements my kitchen very nicely, while the painted areas keep the piano from looking too formal. It’s the perfect combination.

So I’m pretty confident that I made the right decision about the piano.
Now I just have to figure out what the heck I’m going to use that quart of yellow paint on. It’s too pretty to let it go to waste!

Addicted 2 Decorating is where I share my DIY and decorating journey as I remodel and decorate the 1948 fixer upper that my husband, Matt, and I bought in 2013. Matt has M.S. and is unable to do physical work, so I do the majority of the work on the house by myself. You can learn more about me here.
Just BEAUTIFUL! I think you must get your inspiration in an instant. I love that you can turn on a dime and complete a project change without going bonkers. I really thought you must have put a bit of green in your paint! I love the green undertone. It works with the cabinets. The wood is just gorgeous! Looking forward to seeing the music room unfold!
This came out absolutely stunning! I must admit I was not a fan of either the yellow or green paint ideas. I wasn’t a fan of painting it at all, but this is perfect. Beautiful job.
Ditto..you did a beautiful job and I feel like you honored the piano 🙂 Great imagination and Job!
I totally agree with your post. I think having two different colors on furniture so close together would have taken away from the look of your dining room. This looks elegant!! Keep up the good work Kristi….you rock!
How difficult was it too strip the upper portion of the piano with all of that detail? I would imagine getting all of that black goop out of those detailed scrolls would be nearly impossible? Do you have any tricks to share on this step? What chemical stripper did you use?
I don’t know about Kristi – but when I’ve tackled stuff like that I use a very fine steel wool soaked in stripper.
It has the advantage of giving the pieces a light sanding as well as being flexible enough to work into all the crevices.
And just let me add – I think the decision to go with the two tone finish was inspired. It seems respectful of the piece itself and less jarring to the eye than going green or yellow.
I am a fan of painted furniture but it just seemed to me that with the other brightly coloured pieces of furniture that will be visible in the same overall area (not to mention your kitchen) that the more restrained look you’ve chosen will fit in better overall.
That was definitely the hardest and most time-consuming part of stripping the pieces,but it wasn’t as bad as I thought it would be. I always use Klean Strip Premium Stripper. I’ve tried a couple of others, including Citristrip, which I hate. The Klean Strip works so fast. To get around all of the carved detailed areas, I let the stripper sit on it a few minutes, and then scrubbed it thoroughly with a really rough sponge (intended for scrubbing the film off of tile after installation). If I had some steel wool on hand, that’s what I would have used. But this really rough sponge worked very well. Once it was all scrubbed, I cleaned it up with a rag soaked in the Klean Strip After Wash, which I highly recommend. It works so much better than mineral spirits, or paint thinner, or turpentine, or acetone, or any of those other solvents. I don’t know what’s in the After Wash, but it works amazingly well. Once it was clean, I went back and did some very fine sanding in the detailed area. I just did this by hand using a folded up piece of 150-grit sandpaper to get into all of the crevices.
Kristi, have you ever used a toothbrush to strip detail work like that? I ask because I have a small box I need to clean up, and that’s what I was thinking of using.
So,very glad that you chose the paint and natural look….I think it looks stunning…I sure wasn’t a fan of your other ideas…you chose wisely..the wood look is always so wonderful and natural looking…keep up your great work…enjoy your blogs…Barbara
I, too, am so HAPPY you didn’t go with the yellow. You have made some very sophisticated choices in design choices for your home and I personally didn’t think the yellow would fit in. But the gray does! Good job!
Standing and applauding!!! Beautiful! You made the perfect choice.
I love it! So much better than the yellow or green. And much more suited to the style of your house. Classy and understate it’s an attention grabber but in a good way. You really did a fabulous job.
You did a stunning job(as usual).
How do you think the beautiful bird wall will look behind it?
Could you use yellow on the piano bench, somehow?
I think the bird wall will still look beautiful behind it. After all, it’s trees and birds, and what could go better with trees and birds than natural wood? 🙂
I haven’t found a piano bench yet, so I’m not sure about the color, but I’ll definitely be using that yellow in the room somewhere.
LOVE IT! I open up the email from your blog as soon as possible ! So fun keeping up with you!
LOVE IT! So glad you ate your words. 😉
What a great post about the natural decision-making process we go through when decorating. I love the final product, stunning and classic, yet refreshed and unique. Bravo!
That came out great. It will be a focal point without screaming at you (can you tell I’m not a fan of yellow). You did a beautiful job and I’m so pleased to see the gorgeous walnut shining through. Of course, my fireplace mantle is that color….
I think it looks stunning! Personally, I am not a fan of yellow and as for greens, I’m more into the sage and hunter spectrum end of greens instead of the brighter shades. So I’m glad you went this route instead. Great job.
Absolutely beautiful. So extremely proud that you kept some of that original walnut unpainted, respecting the age of the piece. You couldn’t have done better.
Simply stunning!
It is just beautiful!
It looks amazing! I would have never thought to paint some parts and leave others wood, but it’s stunning! I love a colorful piano, but I was a little concerned that it might be too much with your other painted pieces, maybe not, but I was having a hard time envisioning it. This is beautiful, unique, and I think still shows off the piano’s historical value since a lot of the wood is still showing. I think you created something really outstanding!
You nailed it! I really like the grays (just painted my bedroom light grey and I LOVE it!). Looks perfect on your piano
You continue to amaze me! Superior workmanship! And the piano definitely is now at its best! Kudos to you! Another wonderful job.
Wow. Soooo beautiful.
YES!! This was exactly the right choice! Perfect, Kristi! I kept looking at the bright, painted pianos and it just sorta cheapened the look. I am sooo happy you found the perfect balance here with this piano. It’s classy, warm and elegant. I love the walnut wood tones!
LOVE IT!!!!!!!!
Lovely ! I especially like the way you framed in the maker’s insignia. I have used the rub and buff wax on lots of things, too- love that stuff!
Thank you, thank you! I’m the violinist who was cringing about your decision to go with paint — and yellow or green, to boot. I’ll eat a few words myself: what you ended up deciding upon is gorgeous — so elegant and respectful of the piano’s amazing wood and its history. Bravo! It’s beautiful!!!
Looks good! Do you still foresee yourself stripping the whole thing in the future? I’m impressed with your stain blending! They look perfect…you wouldn’t be able to tell its two different finishes.
Actually I don’t simply because so many of the parts that I painted don’t have walnut veneer anyway, so if I go to the trouble of stripping them, then I’d have to go to the trouble of custom mixing a stain again. I didn’t mind staining a few non-walnut parts, but I’m afraid that if I get too many non-walnut parts covered in stain, then it’s going to start becoming very obvious that the pieces don’t exactly match. So I’m actually perfectly happy with keeping it like this — part natural wood and part painted — for as long as I have the piano. Now I can’t promise that it’ll stay gray, though. 🙂 But it’ll at least stay gray for the foreseeable future.
It’s beautiful! Absolutely beautiful! (And although my vote was for yellow, my real vote was for the walnut.)
Just gorgeous! You certainly made the right decision. The gray perfectly complements the stain and vice versa. I so was hoping you would refinish and not paint, but this is so perfect. Now start back playing and enjoy!
Great job!
Stunning!
Spectacular…. Such a great way to save that beautiful, Victorian-Edwardian decorative work.
Stunning!!! I was not a fan of yellow or green- this is amazing!!
I love that you did the combination of staining and paint. It turned out beautiful. Although, I was so excited to see the yellow. Looking forward to seeing the finished room. Have a Blessed Day.
Beautiful. I believe this design will last a lifetime.
Absolutely gorgeous! So respectful of the piano’s history!
This is a beautiful piano! You did a wonderful job on it. Way to go!!
After seeing the link to the pianos in the comments, I was crossing my fingers you’d come up with something similar. This is fantastic, the best of both worlds.
Gorgeous! I LOVE this! I think it is just perfect.
Gorgeous!
It looks beautiful. I thought you were nuts for painting a piano but it looks great!
Yep, you definitely made the right decision. I love how it turned out…GORGEOUS!!! And though you don’t like using gray, I think it’s a neutral that can be very sophisticated or casual. It’s very versatile.
Okay, I am not a fan of wood and paint in the same piece, but this looks good!
Thanks to Lori for giving you the link to other painted piano ideas!
Funny, I love gray but it would never have crossed my mind as the right choice for your piano! I love the result and think it’ll fit right in with all the other ideas in your music and adjacent rooms – it still is an eyecatcher, but not because of a bold colour! I guess you won’t go changing this look again, then? Because with the bold colour you considered that as a temporary solution?
This look is probably permanent. They yellow would have been temporary until I could save up to have the piano refinished. But now that I’ve done it myself, and in that process come to realize that so many of the parts of this piano actually aren’t covered in walnut veneer, I’m perfectly happy keeping it like it is. There’s just enough wood showing for my taste.
I love it – to see the natural w
MAGNIFICENT!!!
Very nice! Thanks for the inspiration to do something with my very 70’s piano! Have you played it?
Only very little because I can’t find any of my sheet music, and I don’t play by ear. I haven’t played in so long that I’ve forgotten every bit of music that I had memorized. But my mom gave me an old hymnal a few days ago, so I might bring that out and try my hand at some of those.
BRAVO!!!!!
It looks fabulous! Totally unexpected, but I’ve learned to expect the unexpected with you!
This is “FANTABULOUS”. I personally didn’t care for the yellow or green, but knew whatever you ended up with would be perfect! I LOVE keeping the walnut on some of it! Simply beautiful!
I really like how it turned out
I, too, wasn’t a fan of the yellow or green and voted for white or black, although totally preferring walnut, ha! When I saw that link Lori posted, I thought those would be a perfect compromise and so beautiful. I am with you about the gray, a Greige or Taupe is fine, and I painted my hallway bath just that, but not regular gray. I’ve been a civil servant employee for a long time and back in the day when I worked for the military, there was a lot of gray around. I automatically think of “Battleship Gray” and that’s probably my aversion to it. Perfect choice and beautifully executed Kristi.
I echo all the praise above on this gorgeous piano. I want to tell you how much inspiration you’ve given me. I am painting and antiqueing (sp?) a dining table and have been trying to use the free products in our retirement village woodshop. After having to use dark oak stain on the white enamel to “age” the wood, I didn’t like how it came out (maybe I used too much). So I drew on your past advice, and am going to paint over it and start again. Always before, I would have called
this a failure. But thanks to you, I call it “just part of the process”. You do such beautiful work, but your best advice for us do-it-yourselfers is showing us your entire process – from picturing what you THINK you want to the final product. A great big ol’ Texas THANK YOU!
Good for you for not giving up!! When it comes to DIY, I just look at everything as an opportunity to learn. If it turns out great, then wonderful! If it turns out terrible, then I’ve learned what not to do the next time, and why that method didn’t work out. 🙂 And learning those lessons, as frustrating as they may be, is what helps us grow in our skills and abilities.
Never expected this, but it is stunning! Kudos to your enormous creative talent!
For. Real. 🙂
I did love the yellow on the other pianos, but for this one, I do think the gray and walnut combination is better. It is more elegant and “updated traditional”, while the yellow was more upbeat and modern. Perhaps you could use the yellow on some sitting chairs for that room, echoing yellow in the wallpaper?
As soon as I saw Lori’s link in the original discussion, I had a feeling this project would go in a different direction. I’m glad! Thanks for including all your thought processes. That’s real DIY, yo.
And, you nailed it! Beautiful stain matching, beautiful gray color, beautiful result. Bravo!
(Also, those foot pedals look like fingers to me, and now I can’t see anything else!!)
That is what I thought too when I saw them- fingers with nails! Glad someone else saw it too. They sure look better after their manicure!
wow! inspired & gorgeous!
It is beautiful. It’s restrained, the two tones are lovely together. But, my taste in colors isn’t restrained. I agree with everyone else who voted no on the yellow. For your home, what you did is wonderful. But as a stand-alone, I loved the darker green. You and Thrift Diving are my instructors and inspirations.
So beautiful and classy looking. I agree with you, it seems to fit your home so much better. I couldn’t get my brains wrapped around a yellow piano in your home – but I’m not an expert so I keep my humble opinions to myself! 🙂 🙂 🙂
This is fantastic! I love it! How does it play?
I haven’t played it much yet. It needs to be tuned.
Love it!!! But I always love your finished projects, lol, so while it was unexpected, I’m not really surprised. 🙂
It is so gorgeous! I am so glad that you preserved some of that gorgeous walnut. It looks so amazing–hard to believe that it doesn’t even have stain on it. Now I understand why it is such an expensive, sought-after wood for high-end furniture, etc. The painted areas act almost like a picture frame, highlighting the beauty of the walnut areas even more than if the whole thing was walnut, I imagine. Now it looks like a valuable musical instrument. Painting it yellow would have made it look cute, but more like it was probably a junk piano and not valuable musically speaking, imho.
I can’t believe how quickly you get all these projects done– what is your secret? Does Matt do the cooking and laundry, LOL? Making dinner always seems to get in the way of my home improvement projects–thank goodness for frozen foods, I say!!
I do the cooking and the laundry also. 🙂 My secret is that I turned my blog into a full-time job, so I have all the time in the world to work on my projects. 😉
Gee, that looks pretty! I love that the paint highlights the decorative aspects of the piano. Beautiful work
Beautiful! Maybe you can use the yellow paint on the birds when you paint the wall.
I couldn’t comment on the yellow and green thing because it was just soooo sad to do that to a piano. But this I could live with! Makes the warm wood look even better. It’s a lovely choice with a beautiful result.
Absolutely gorgeous!
Stunning~! I just could not get into that yellow piano although I had to admit that of the two colors yellow was far by the better of the two and yellow is my least of all favorite colors by far …but this choice is stunning with a capital S! you nailed it and this is superb.
Standing “O” Bravo ! Bravo !Genius!!!! I have admired you and your abilities before but this, this well it is just brilliant, I just don’t have words I am stunned at the way your mind and talent works you are truly amazing!
BRAVO!! I have always lurked in the background continually amazed at your DIY talent. THIS project is my fav, it’s just stunning!
I am going to be honest, first glance I didn’t like the way it looked. Design is personal so, I know that there are trends that I am simply not going to dig. But, let me eat my words. …by the end of the post I changed my opinion. I actually like the way it looks.
The piano looks beautiful and sophisticated! I still love the idea of a yellow piano-maybe I will do mine!! I would love to see yellow in that room in smaller proportions, maybe a side table, frames, or how about an old fashioned coat/umbrella stand for guests to use? I am so excited to see these rooms come together.
You are fierce! I love your confidence in totally going for it–whatever it is. And flexible to change your mind on a dime! I was a fan of paint/stain combination and love how you executed it. I was nervous when you said you took the piano apart, but I saw the after picture, so I knew it would all come back together again!! :). Your talents amaze me!!
You made a smart choice. The piano looks better, yet what made it special in the first place (the carving) was kept original. As a piano player, I hate to see pianos painted bright colors.
The crowning jewel of the room!!!Me thinks you are a whisper, you “heard” the piece speak to you and you brought its dreams to life. Totally cant see this piano ever looking any other way now!!! So dressed up with a little fun and funky mixed in!!! Great job!!
Looks beautiful, Kristi! Great job!
Love it!
Absolutely beautiful, and I have to echo everyone else here in saying that this looks so much nicer than a brightly coloured look would have done!
GORGEOUS!!! I had hoped you would decide to just refinish the piano, staining the whole thing, but I think this is actually prettier. Amazing talent and courage!
Great choice! Very subtle and yet makes a statement at the same time. I love it!
you did an amazing job, as always.
Absolutely beautiful. Love how it turned out and love that you trust your instincts so well. Well done.
Absolutely love it! Great job.
Absolutely gorgeous.
Wow, what a nice surprise. I was on board with the painting idea, but I love the way the paint and stain combination brings out the best in this piece. The paint highlights the nice classical elements in the legs, pilasters, and bead molding. And it also serves as a neutral frame for the gorgeous wood. I think this will look fantastic with the bird mural. It’s a very sophisticated look.
Absolutely beautiful! I love the combination. You are so amazing!
You are the smartest cookie!! I am pleased with your work.
Absolutely stunning and gorgeous!!! This was a really great surprise and color choice, and it works beautifully. The piano looks amazing and I think this color is the perfect blend for your kitchen, entryway and dining room. You must be so proud of your achievement…..well done Kristi.
I love all the walnut veneer. So glad it’s not yellow or green. I’m eager to see what you do with the yellow paint.
Smashing! Gorgeous! Love you saved the walnut look! Can’t wait to see the music and dining room come together. Bravo!
Wow! Best choice! I was one of the yellow votes! I love it!
Kristi, you eat your words with such grace. I think the piano looks STUNNING! It never would have occurred to me to do something like that. The result is amazing. More inspiration for me.
Genius!
I’m blown away, it’s so beautiful I can’t stop looking at the pictures! Way to go, you should have a tv show!
Looks beautiful…as usual. I’m trying to paint…or something, my cheapy dining table and chairs. No luck…it has giant brush strokes and looks…dumb and even more cheap. Suggestions?
OMG! I love it! It looks soo goood! I am so glad you didn’t paint it yellow. LOL! but that is just me. It is such a beautiful piano and you’re right the walnut is gorgoeous. Great job!!
This is SO much better than the other ideas! I know it wasn’t my decision, but my heart hurt for the lovely walnut in the piano :^)
Good going Kristi!
J
Your piano looks spectacular! Love the colors you chose!
WOW! Looks fabulous!!
Hi Kristi, I would have commented much earlier but I am having internet problems. My computers are all wacko as is our cable tv. Please do not be insulted by this remark, but when I saw the piano my first reactions was our little girl is growing up! I absolutely love it. I see in this piece the same taste level that was present in the kitchen. I was afraid your house would end up looking like a childs playhouse with bright colors everywhere that did not connect to much of anything. I cannot wait to see what you have planned for this room. I know what I would do. The piano, your guitar on a stand in the corner and a comfy chair to lounge in with maybe an ottoman, and a floor lamp so you can read. It could be your “girl cave”. Blessings
I am speechless! I agree with every one. Len hit it on the head. This work is beyond what one would expect. It appears to have been done by a restoration craftsman/woman of old. Such attention to authentication and detail. Astonishing OK, I’ll stop gushing!
I absolutely love it! It’s different and unique with just enough of the original shining through to honor the vintage soul of the piece.
So much better than the yellow or any other bright colors! The demure color gives the sophistication that music has to offer. Also, this gray is respectful of the antiquity of this instrument. To have painted this instrument a bright color would have lowered the grandeur… in my opinion. The lighter tone really makes it easier to see the detailing and the beauty of the instrument. Beautiful! I really enjoy your posts~
It’s beautiful i like it much better than either the green or the yellow those pianos are props this one looks like an instrument to be played i also like that you honored the past good job
Your work is pretty amazing! You made a marvelous job in making the old piano turned into something different and wonderful.
I just received a second hand piano that needs some cosmetic work. I’ve painted numerous pieces of furniture. I’m not worried about painting/staining the piano but disassembling the piano terrifies me to my core. Removing the keys sounds scary. I’m afraid I’ll mess up something of utter importance to the mechanics of the piano.
Thank you for sending this to me Kristi, I love it!!
Wow! This is amazingly stunning