Dining Room Crown Molding Progress, Problems & Solutions
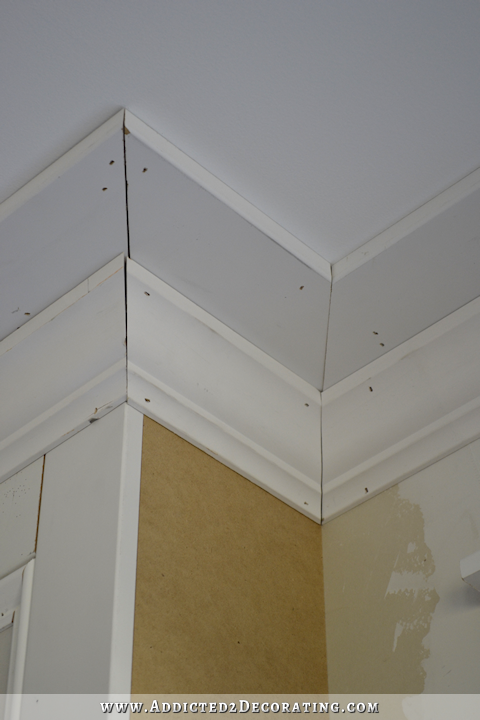
I finally got all of my the crown molding installed in the dining room and entryway, but let me tell you, it was one of the most infuriating projects I’ve ever done. There were temper tantrums, tears and lots of yelling. But it’s installed. It’s not pretty at all (not yet, at least), but at least the entire perimeter of the room has crown molding on it.
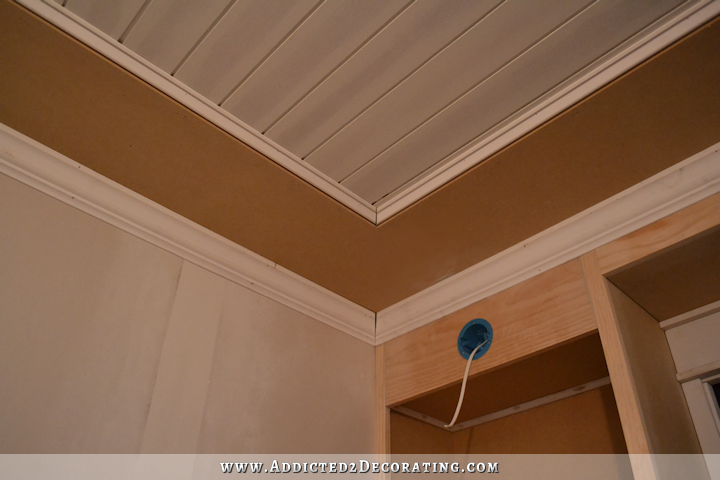
I wanted to do the crown molding in this room the same way that I did the crown in the bathroom, with the 1″ MDF boards around the perimeter of the ceiling, and then the crown molding installed against that wood.
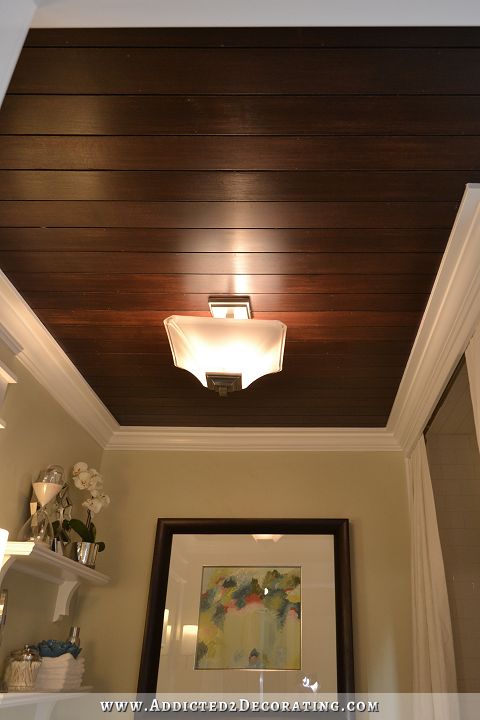
In the bathroom, I use 1″ x 6″ MDF boards, but I wanted to use 1″ x 8″ in the front rooms for a slightly larger reveal since it was going in a much bigger room.
That part went smoothly for the most part. I installed it with construction adhesive (Loctite) and 16-gauge finishing nails. My corners weren’t perfect because my none of my rooms have perfect 90-degree-angle corners, but I never bother to measure angles before cutting. I just cut everything at 45-degrees and hope for the best. That’s what wood filler and caulk are for, right? 🙂
Then I was ready to cut the crown molding. I don’t know if you remember, but when I cut the crown for the music room, everything went perfectly. If I remember correctly, I had that crown cut and installed in about an hour.
I couldn’t believe it! I used my Kreg Crown Pro* crown molding jig, and things couldn’t have gone any smoother. Yes, I still had tiny gaps, because again, I never measure the exact angle of my corners, and it’s doubtful that any corners in my house are perfect 90-degree angles. You can measure your exact angles to get more precise cuts, but I don’t mind the small cracks because they’re easily filled with caulk.
So when it came time to install the crown in the front rooms, I expected the same quick and easy process. I felt like I had really found my groove when working with and installing crown molding, so things should go pretty smoothly, right?
Wrong.
First of all, I remember someone commenting on my music room crown molding post about how you should always cope your inside angles because that’s the correct way to install crown, and it’s far superior to my way of cutting both pieces at an angle using the Kreg Crown Pro, and it’s really pretty easy. I thought, “
Using a coping saw is easy?!? Lies. All lies. 🙂 Seriously, I tried and tried and tried to get that stupid saw to cut through the crown molding (I’m using finger joint pine crown, not MDF), and it was the most infuriating thing I’ve ever tried. It just kind of chewed up the wood, rather than cutting it smoothly. So I dismissed that idea pretty quickly.
And for the record, I’ve never had an issue with my crown expanding and contracting to the point where my caulk cracks and leaves gaps in the corners where I have both pieces cut at 45-degree angles. So I decided to stick with the method that actually works for me, and cut everything using my Kreg Crown Pro.
But on this particular day, even that method wasn’t working for me. I cut my pieces for my inside corner, and I swear to you, I was left with a gap of more than a half inch!
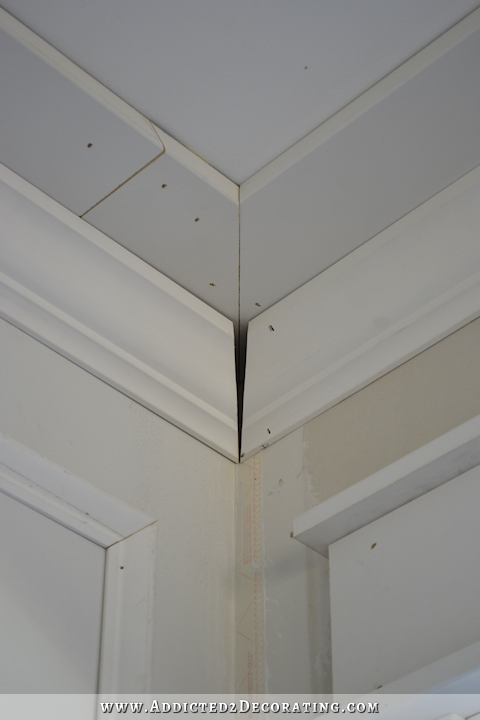
I’m okay with small gaps that can be filled with caulk, but this was far beyond ANYTHING that caulk could fix!
I was so frustrated, but I thought maybe I just had my saw set on the wrong angle. I’ve had that happen before, where I thought it was set on 45-degrees, and instead it was set on 40-degrees or something like that.
So I checked. It was set on 45-degrees. That wasn’t the problem.
So I decided to actually check the angle of my corner, which is the proper way to use a Kreg Crown Pro, but it’s a step I almost always skip. The angle was 89 degrees. Just as I had suspected, it wasn’t a perfect 90-degree angle, but it certainly wasn’t off enough to account for a more-than-half-inch gap like that!
I decided to just move on. I’m pretty good at fixing bad mistakes like that, and even though it’s way more than caulk can fix, I could fix it using other methods, like cutting angled wedges to glue into the gaps before wood filling, sanding, and caulking.
It still wasn’t pretty, but I’ve had enough experience fixing my own major screw ups that I know it’ll look just fine when it’s all finished.
So I decided that it must have just been a fluke of a mistake that caused it, and just move on to the next one.
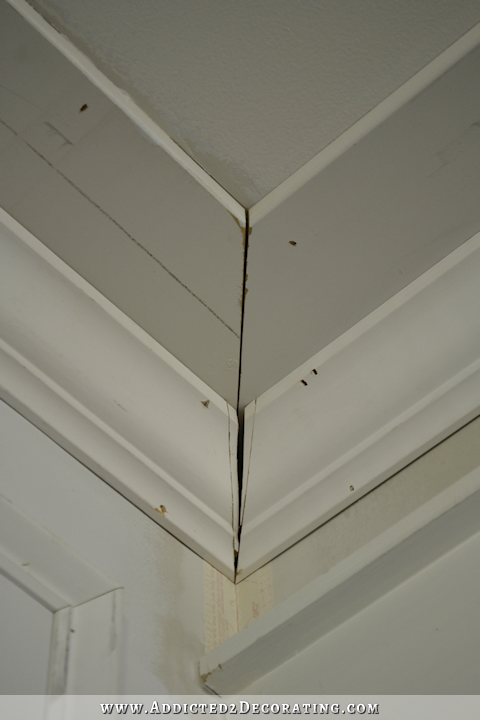
But the same thing happened.

Y’all, by this time, I was almost in tears. I couldn’t figure out what the heck was going on! Why was the music room so easy for me, and yet I couldn’t even get one corner in this room right?! I checked my saw again, checked the angle of the corner again, and nothing was making sense. I thought perhaps I had accidentally purchased a different crown molding this time, with a different spring angle than the last, so I measured the spring angle. It was the exact same as the music room. I tried making some small adjustments to the saw, but nothing I did
I can’t even express to you how discouraged I was. I thought I had the crown molding thing figured out, and here I was doing everything I knew to do, and I couldn’t even get one corner to look halfway decent. I got online, watched the video on how to use the Kreg Crown Pro again to see if I had missed something. Nope. I was doing everything right, and yet it wasn’t working.
I tried a third corner. Same thing. More discouragement. More frustration. And this time, just pure anger. I wanted to throw my nail gun through a window so badly.
After yelling to Matt at the top of my lungs, “I’M NEVER DOING CROWN MOLDING AGAIN!!! NEVERRRRR!!!!” I went into the bedroom and threw myself on the bed for a good cry and a good, old-fashioned temper tantrum.
About 30 minutes later, it dawned on me that when I was getting my saw and everything ready to cut the crown molding, I accidentally pushed my Kreg Crown Pro jig off of my work table and onto the concrete garage floor not once, but twice. And the second time, it hit my pile of scrap lumber on the way down. When it fell, the settings must have gotten jarred!
So I headed out to the garage to check the actual jig, and sure enough, the spring angle on the Kreg Crown Pro was set to 45-degrees. The spring angle on my crown molding was 38 degrees. UGH!!! I couldn’t believe that I had checked everything else, but it never dawned on me until that moment (and after cutting three of the corners for the room, and after lots of tears and frustration) to check the actual settings on the Kreg jig. I just took for granted that it was all set up as it should be since I had used it for the music room, and I was using the exact same crown molding for these rooms.
I set it to the correct 38-degree spring angle, and sure enough, things fit together as they should (or as good as they ever will for someone who refuses to measure the actual angles of the corners of her rooms). 🙂
Let’s just say that this was a huge lesson learned for me. Contrary to what I yelled at Matt at the height of my frustration, I will continue to do my own crown molding. But from here on out, I will check every single setting on my saw AND on my Kreg Crown Pro before I get started cutting and installing crown molding in any other room of my house. It’s amazing how well tools work when they’re actually set properly. 🙂

Addicted 2 Decorating is where I share my DIY and decorating journey as I remodel and decorate the 1948 fixer upper that my husband, Matt, and I bought in 2013. Matt has M.S. and is unable to do physical work, so I do the majority of the work on the house by myself. You can learn more about me here.


Way to go, sometimes we just have to walk away and most of the time we will know what we need to da when we walk back! Keep up the fabulous work i cannot wait to see the finished look!
Some pro tips here. Check you saw for plumb first. I do not advise a coped joint on crown to novices. To understand the upside down and backwards, just envision the saw bed as the ceiling. Do not try to fit your joints to a measured drop on the wall. Install two pieces at the same time. If you need to, push both pieces up or down on the wall until the joints contact. Then install the crown in a straight line between the joints. If you need to make a joint mid length on long walls use a 45 degree overlap. Better to sand overlap material than fill gaps. Fill gaps over 1/8″ with a hard drying filler, and a flexible latex caulk for along the wall and in tighter joints. Good luck and enjoy! – Pro finisher for forty years,
My dad always said measure three times and check your saws just as much. You are an inspiration and due to your blog my husband and I are going to venture into finishing pur basement by ourselves!
Crown molding is worth it, so persevere. I’m going to be fighting for CM in our next remodel because my husband is all enamored with the timber frame look. Really . . . I’m going to have me some pretty CM!
If it makes you feel any better, I’ve been avoiding a simple plumbing job for weeks (replacing the bathroom faucet) because I have a similar relationship with screw-on and compression-type fittings. I know most people have absolutely no problem with them, but EVERY DANG FITTING I try to put together with threads leaks. Doesn’t matter how much teflon tape I use–or pipe dope. They just leak. That turns what should be a 1-hour job (at max) into 2-3 hours of swearing, frustration, and lost time.
Couple that with our old home, which almost invariably ends-up making every project more work than you intended. A simple electrical job a couple weeks ago (adding a plug) turned into me questioning whether the entire circuit was wired incorrectly to begin with. 🙂
I sincerely appreciate that you make the same mistakes as the rest of us and ADMIT it in your blog…very refreshing. Every week I look forward to reading your blog. I can’t wait to read your dining room table blog!!!
Seriously, I’m so sorry you had to go thru all that BUT I’m also thankful you share the real deal! We’ve been “re-doing” in our house for two months (kitchen) and I can proudly say I’d be a great contender in the Olympics as a Hammer Tosser. 😉
That sounds like a giant pain in the patootie but after a good screaming fit, you figured it out! Way to go persistence! I’m sure it will look great when you are done with the fillers and paint. Take a day to relax.
I remember the hardest thing about crown molding is that you have to cut upside down and backwards.
So that’s what I was hearing!!! And I just thought it was the rocket testing at McGregor that was rattling our windows. 🙂 I’m glad you didn’t give up. It is going to be beautiful.
I’m SO thankful I found your blog while searching for DIY lamp projects! Your brutal honesty and humor in describing your decorating adventures have me giggling and/or crying right along with you. Every time I open my email and see a new post from you is like Christmas 🙂 Keep up the great work!!!!
I did crown molding on our kitchen cabinets this weekend and have decided that you’re not really putting up crown molding unless you yell, “What the ——!?!” at least once due to a cut coming out completely off from what you thought it would be.
But it does look so fancy up there, it’s worth it. =)
Hey Kristi,
I can totally relate to the frustration of things going wrong (seemingly without reason) while working on molding. I’ve told my husband that the biggest “risk” to our marriage is when we try to DIY crown – it truly brings out the worst in me. Lol. Great job, as always, and thank you for sharing your trials and tenacity.
You just had to clear your head with a good ole tantrum and screaming fit to solve your problem!! Everything is looking good! On “This Old House” their professional installing the crown molding did his coping with a dremel saw. He said it was much faster and cleaner. It looked like magic!
Usually I immediately get defensive and say, “I will never purchase this item because it is a sponsored item and you can’t tell me what I will buy!!” But when I see this and realize how much crown I eventually want in my house, $30 is a killer deal to make it go easier. So thank you. One day…in the far future…my house will have all the rooms completely finished a little easier. 🙂 Glad to see that you figured out the problem. It’s going to look great.
Thanks for posting this, Kristie! I am sure glad that I read through until the happy ending because I bought my hubby a Kreg Crown Pro for Christmas, based on your earlier recommendations! I was getting worried when I saw your earlier pictures, LOL! Before the Kreg, my husband had such a hard time installing Crown molding in the dining room that he’s been procrastinating on doing the rest of the first floor! I will mention to him to double-check his settings when he does get his courage back up to try! Glad you figured it out and didn’t give up!
By the way: when I was buying the Kreg, the “helpful man in the big-box store” told me that the Kreg will help a novice look like a pro when installing crown molding! He said that he has installed thousands of feet of Crown molding in his career, and, when I asked him for any tips, he mentioned that he would make himself a “jig” of sorts to hold the other end of the crown during installation by attaching 2 pvc pipes together and standing them vertically upright–one was almost up to the ceiling height and the other cut to the height where the bottom of the crown should be when installed. He rested one end of the crown on that and moved it around the room as he worked. It sounds like a great idea to me for a “one-man” installation. I will suggest my hubby try it next time so I don’t have to stand there holding up the other end–BORING! He didn’t tell me what diameter pvc pipe he used, but it was probably 3″ or so to stay upright without tipping (or larger depending on the dimension of the crown.)Pvc is pretty inexpensive, so it might be worth a try. Just thought I’d share.
Yes, I agree that sometimes a good loud tantrum is completely called for. Did you scared Boo and Peeve? (And Matt?)
My husband and I have learned (the hard way!) to never hang wallpaper or install crowne molding together. That may be the reason we will be celebrating our 38th anniversary this spring
Oh you poor thing. I could just feel your frustration reading the post. Glad you got it sorted out eventually.
I think this is why I don’t remodel things myself. Besides the fact that I seem to be mathematically challenged and then make all kinds of stupid mistakes, once I start to see red I cannot do any more figuring. I do what you do and it does seem to work lol. Have a fit, cry, holler, then finally lay there and try to just calm down and THEN it comes to me what I am doing wrong. I keep thinking in the future this will train me to forego the fit part of it and become a better person, ha! I never seem to be able to get past the getting angry part because I take so long getting things done anyway it makes me angry that I finally chose to do this today and now I’m not getting anywhere and making a mess too. Well I’m glad you figured it out. It would be nice to have another building companion to just say “will you look at what I’m doing and where it is I’m going wrong, because I can’t see it right now?”
My husband is a crown nut! He puts in the first long piece on the short end of a wall corner. Then he first put up and butts up the next length on the next adjacent wall measures the end that will be touching the the first corner he put up and used a coping saw to cut a reverse French Curve and buts it up to the corner pices. No gaps ever and half as many cuts. In a rectangular room only one coping cut per corner on one piece of crown.
Kristi your upper arms must look ammmmaaazzzzing with nice muscles from all your overhead work! You go girl!
Oh, I feel for you! That must have been awful. I just wanted to tell you how inspiring you are to me (even though I own no power tools and live in an urban apartment where I’m not allowed to do anything beyond painting). But I’ve started fixing up one room quite a bit, and am planning to stencil a design on an armoire door. Somehow you give me the “I can do that” attitude for projects. Thank you. 🙂
Im just getting ready to put CM in my living and dining rooms. I appreciate your candor every DIY project can come with hair pulling.
I really do recommend the Kreg Crown Pro jig. It makes it amazingly easy…as long as you have the settings right. 😉
Not that you want to hear this now that you have changed your mind, but I think that the bold black and white stripe you had in mind looked great and is your taste and style and works great with the other rooms you have “finished”. One more thing, I think you will regret not going with your first choice. Don’t let people tell you that “they” think something isn’t right for your home. First instincts and first decisions are usually the best and most satisfying in the end. One thing that wouldn’t hurt is to buy a pair of cheap black and white striped draperies to hang there once the trim and room is painted to just see if you still like how it looks…keep the receipt and tags and return them later…or get everything else done first and worry about draperies last. Finish the trim and painting and get all the furniture in place, then decide what type draperies to go with. I think that will make your decision easier and save you a lot of time and money too. Putting the horse before the cart never turns out good, if you know what I mean.
Why wouldn’t you take the extra 2 seconds to measure your corners? The tool is under $10 and lets you get it right the first time.
Actually, the tool comes with the Kreg Crown Pro. I don’t do it because my corners are never so off that it makes much of a difference in the finished product.
I’m excited to find out that there is a jig for crown molding!! This has always been a place I fear to tread, but no more! Thanks for the great post.
Interesting post. I did crown in my last house and it was a very frustrating thing using the miter box. All my friends tell me it easy peasy. phhhhhht. Not for me. And I swore off crown for one house and now into the second one that can beneift from it. I recently saw this Kreg crown thingy in Lowes so I looked it up online and ONE person said it was not working for them and I thought ummmmm hmmmm knew it. LOL and wrote it off. That was enough to scare me off because honestly a bad crown molding experience can scar you for life. Well now reading your post my interest is peaked once again. Thanks…I think I will try it.
Another method that can greatly minimize errors and gaps is to cut a test piece for every corner. This allows you to make small adjustments in your cut, and then hold the pieces to the corner for testing. Once you have the test pieces fitting together nicely, temporarily tack them in place, so you can make easy length measurements. This adds time, but will produce very results.
You are a rockstar! Your writing is so raw and real. Loved it! Then I read your summary bio and wow! You are admirable & filled with courage! Good luck on the journey.