Part 1 – DIY Butcherblock Style Countertop Made From Red Oak Solid Hardwood Flooring
I made some serious progress on one of the biggest pantry projects yesterday — my butcherblock style countertops that I made out of the same red oak solid hardwood flooring that I have on my floors throughout my house.
Here’s a peek at how they look so far…
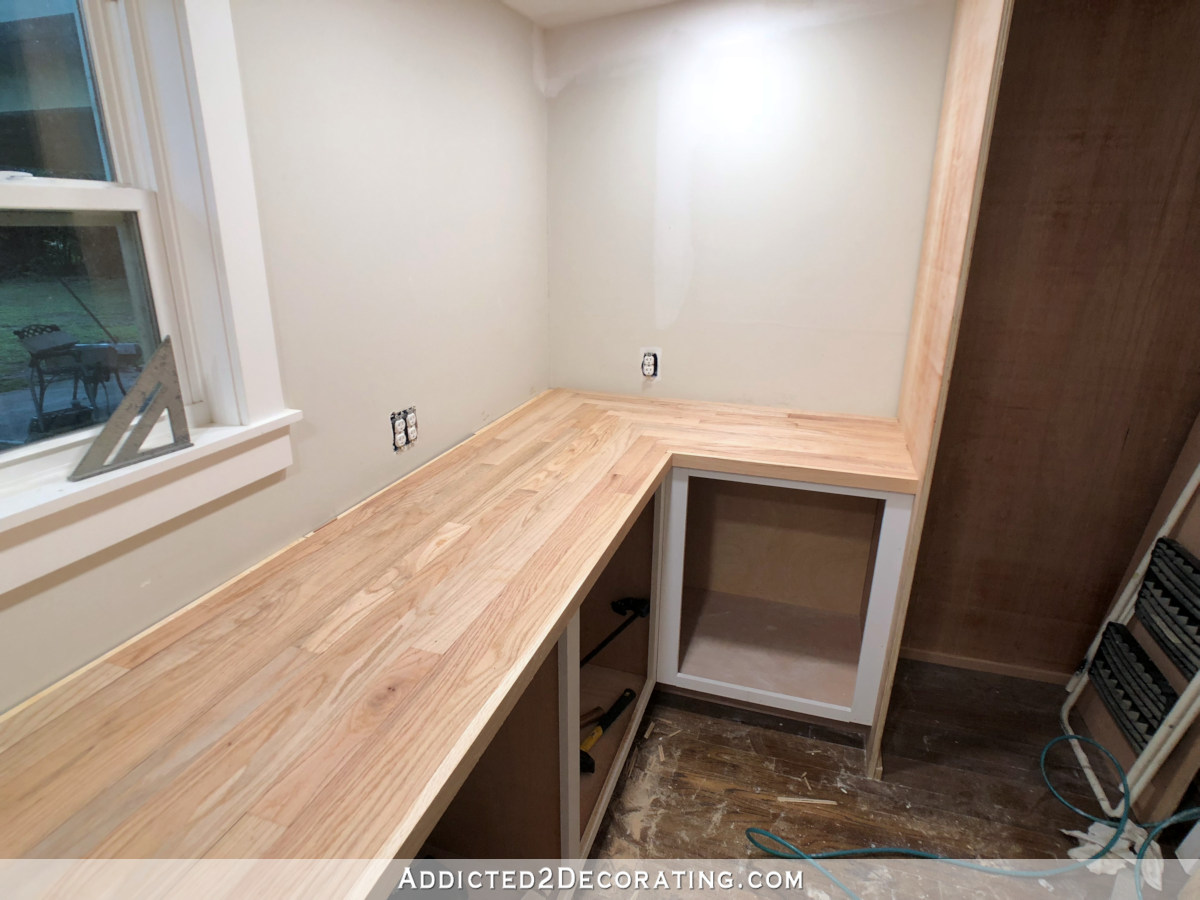
They haven’t been filled or sanded or stained or sealed, so they’re still very rough. But I’m thrilled with how they’re turning out so far! (And yes, I know some of you are cringing at my unprotected floor. 🙂 I’m not worried about it. It’s tough and can stand up to a little sawdust and drywall mud.)
In deciding what I wanted to do with the countertops in the pantry, I considered several options. I considered real butcherblock, but the prices were just way more than what I wanted to pay for a pantry. I considered doing concrete since I have several bags of concrete left over from my kitchen countertops, but that idea didn’t excite me. I really wanted wood.
Then it dawned on me that actual hardwood flooring could easily be used as a countertop. And the very same red oak hardwood flooring that I have throughout my house just happens to be something that Home Depot keeps in stock locally. So I grabbed two bundles (this is what I used, and it came to about $120 for both bundles) and let them acclimate to my house for about a week before getting started.
Before building the countertop, this is what the cabinet looked like…
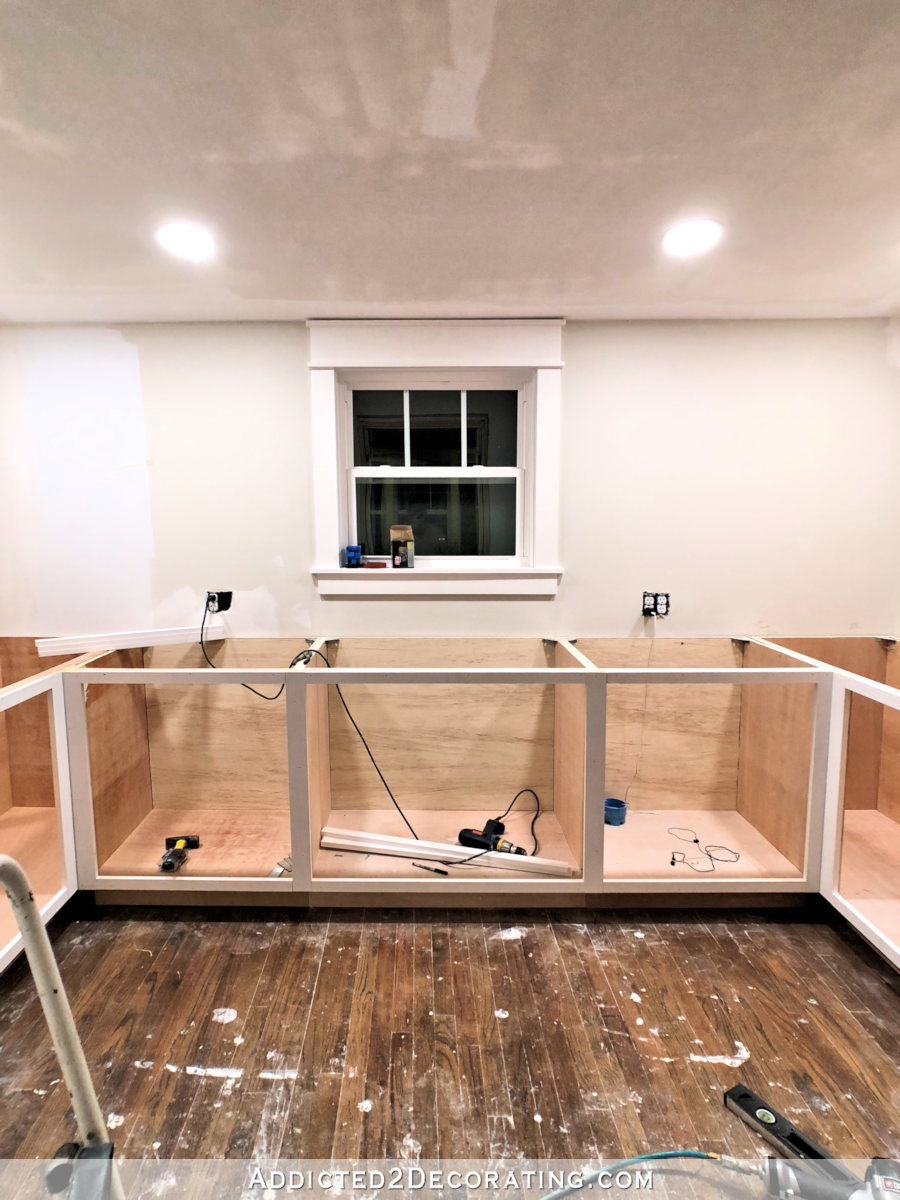
(FYI, I’ll have a tutorial on the cabinets very soon.)
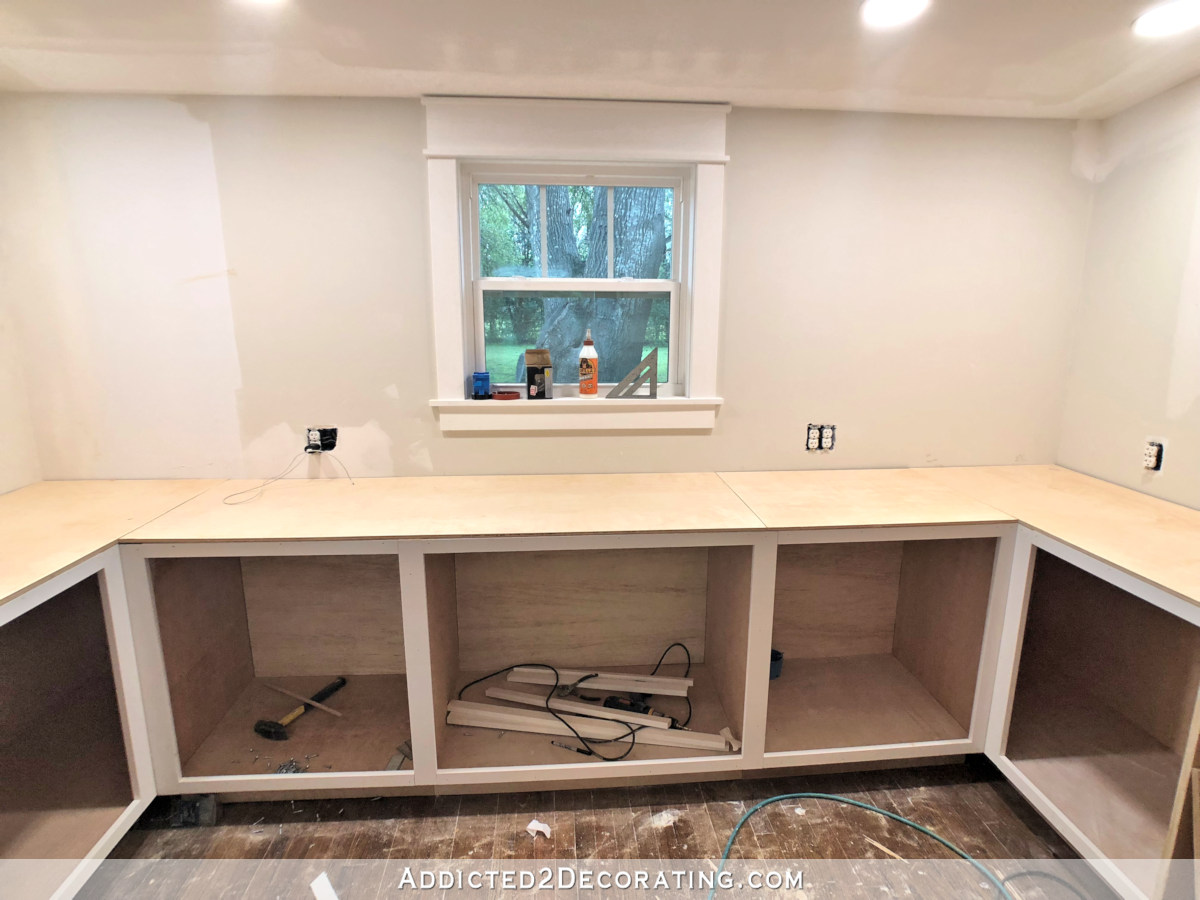
So to build the countertop, I started by cutting 1/2-inch plywood to cover the tops of the cabinets, making sure that the edge of the plywood was flush with the front trim on the cabinets. I nailed that plywood into place using 16-gauge nails in my nail gun.
Then I was ready to start on the actual oak boards. I started on the edges towards the front of the cabinets, and for those strips, I cut off the tongue using my table saw and placed the groove edge towards the wall. Then I used a framing square to square them in the corner, and glued and nailed them into place.
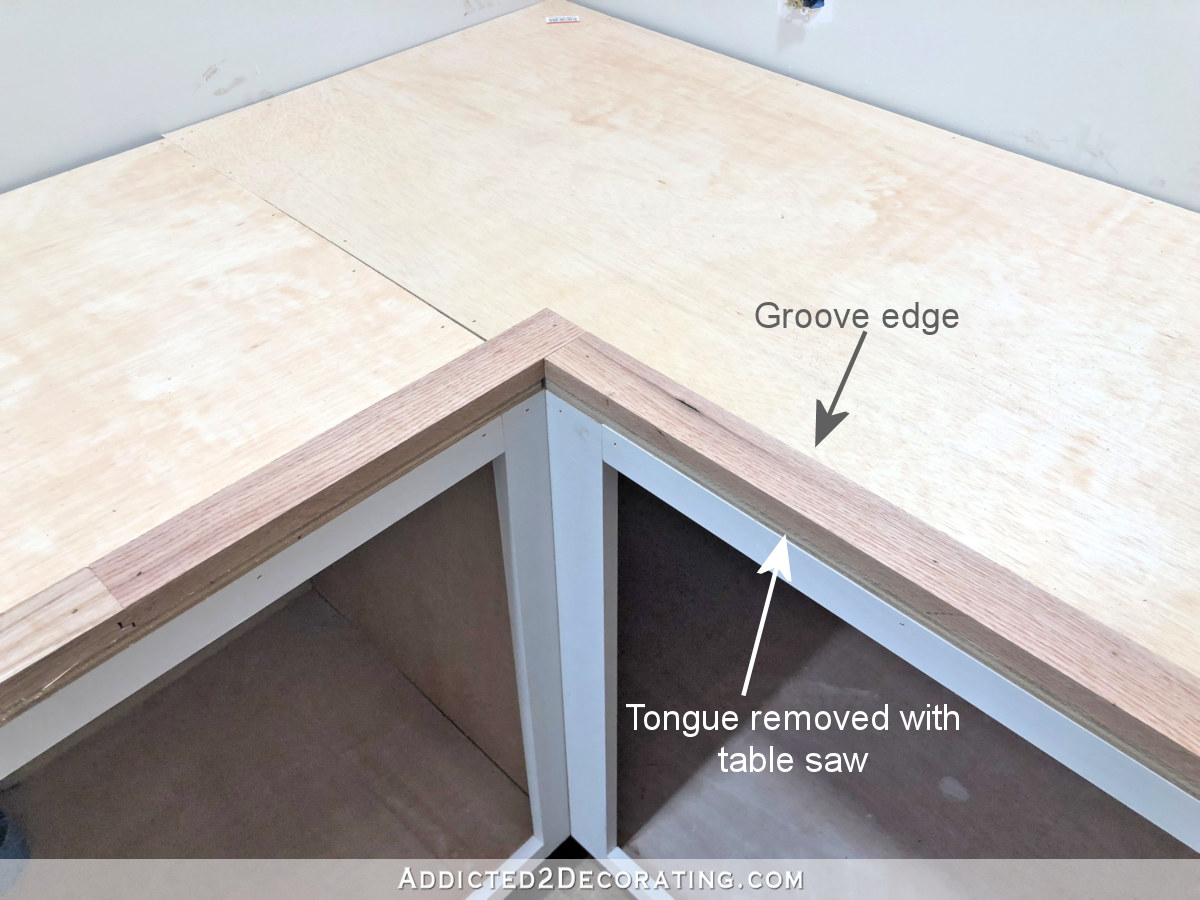
I face-nailed these boards using 16-gauge nails, but I tried to use as few nails as possible.
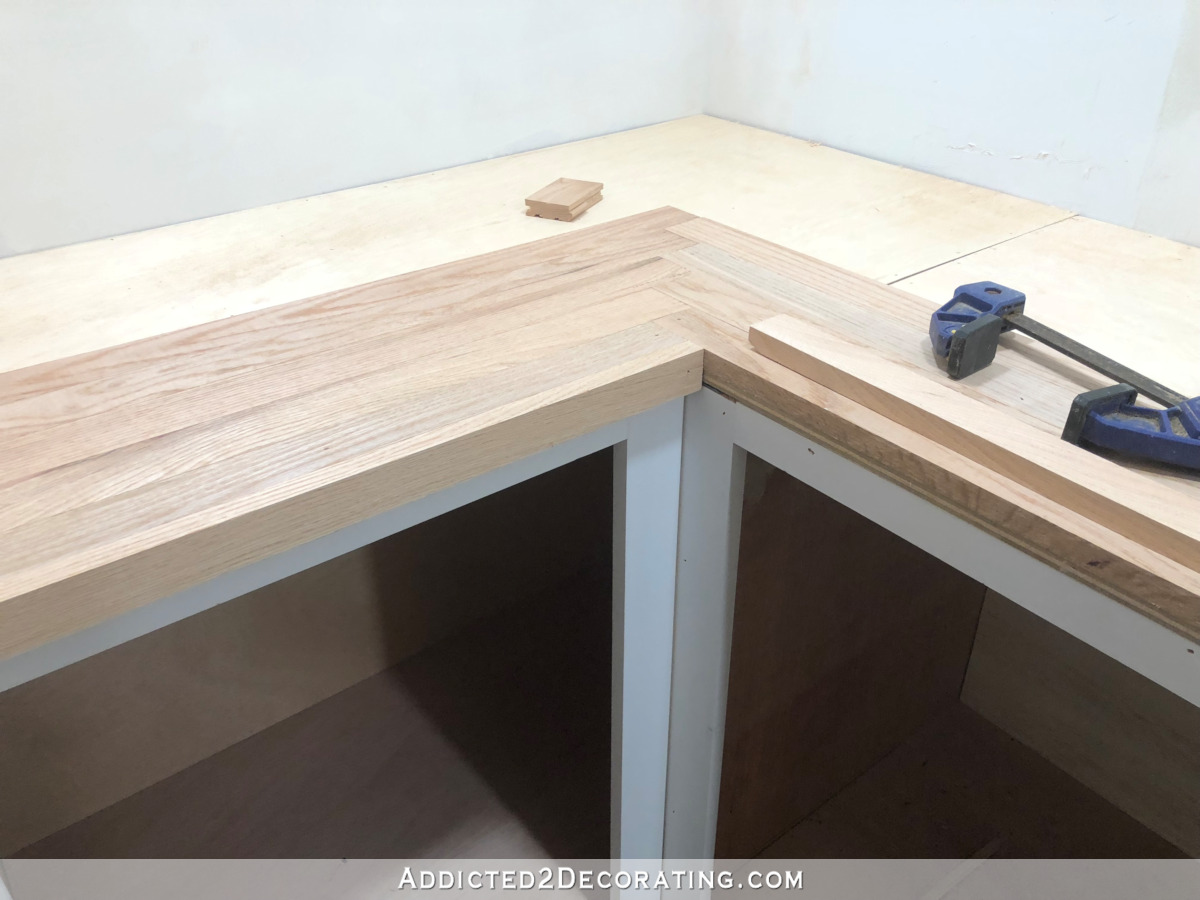
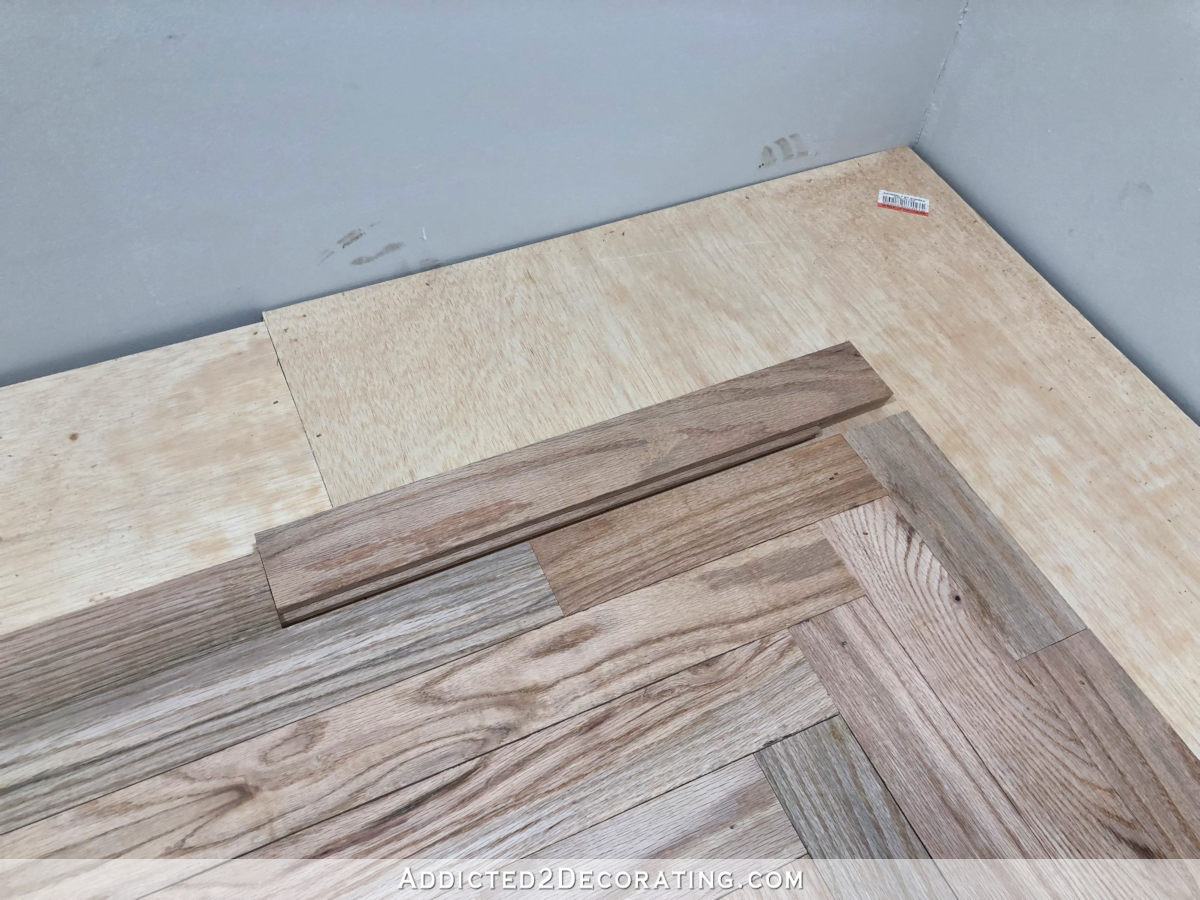
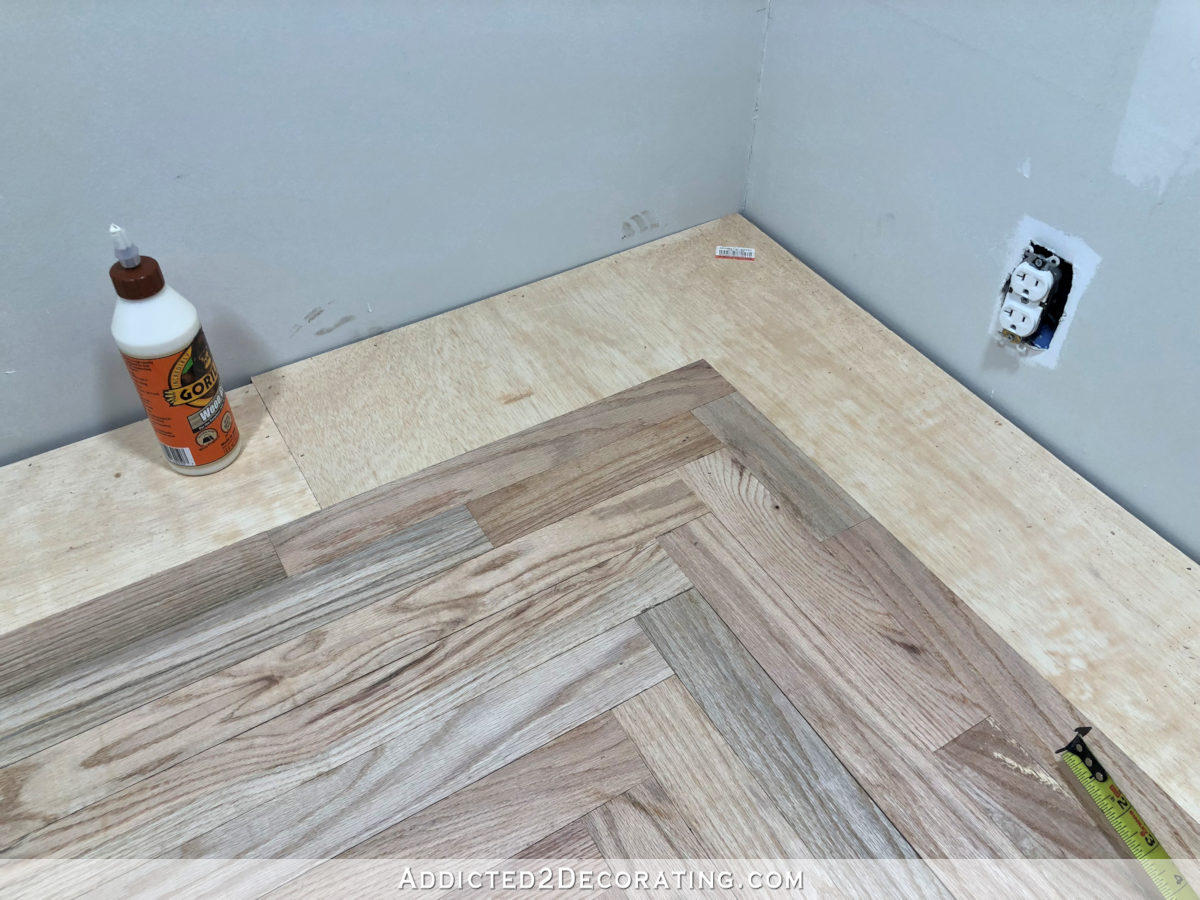
On the corners, I did a herringbone pattern where the boards met.
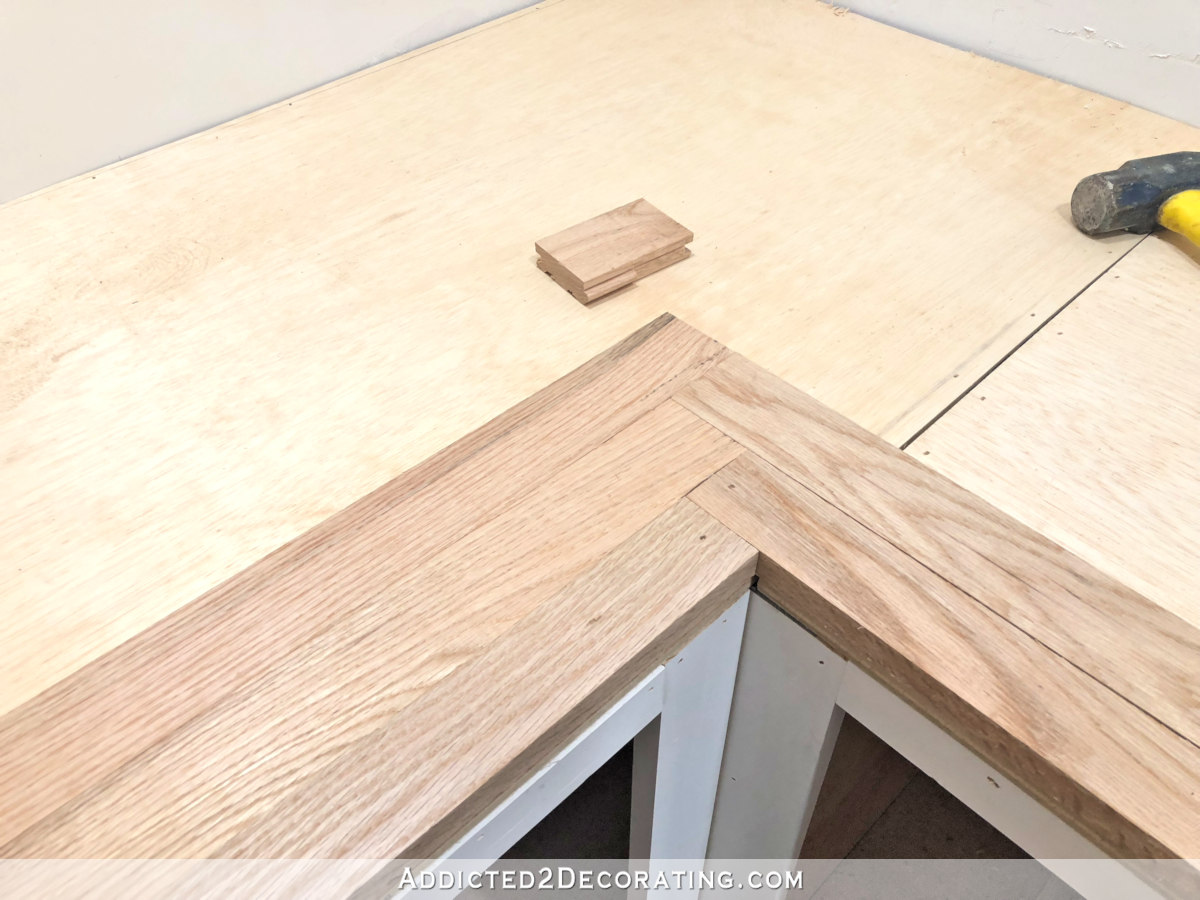
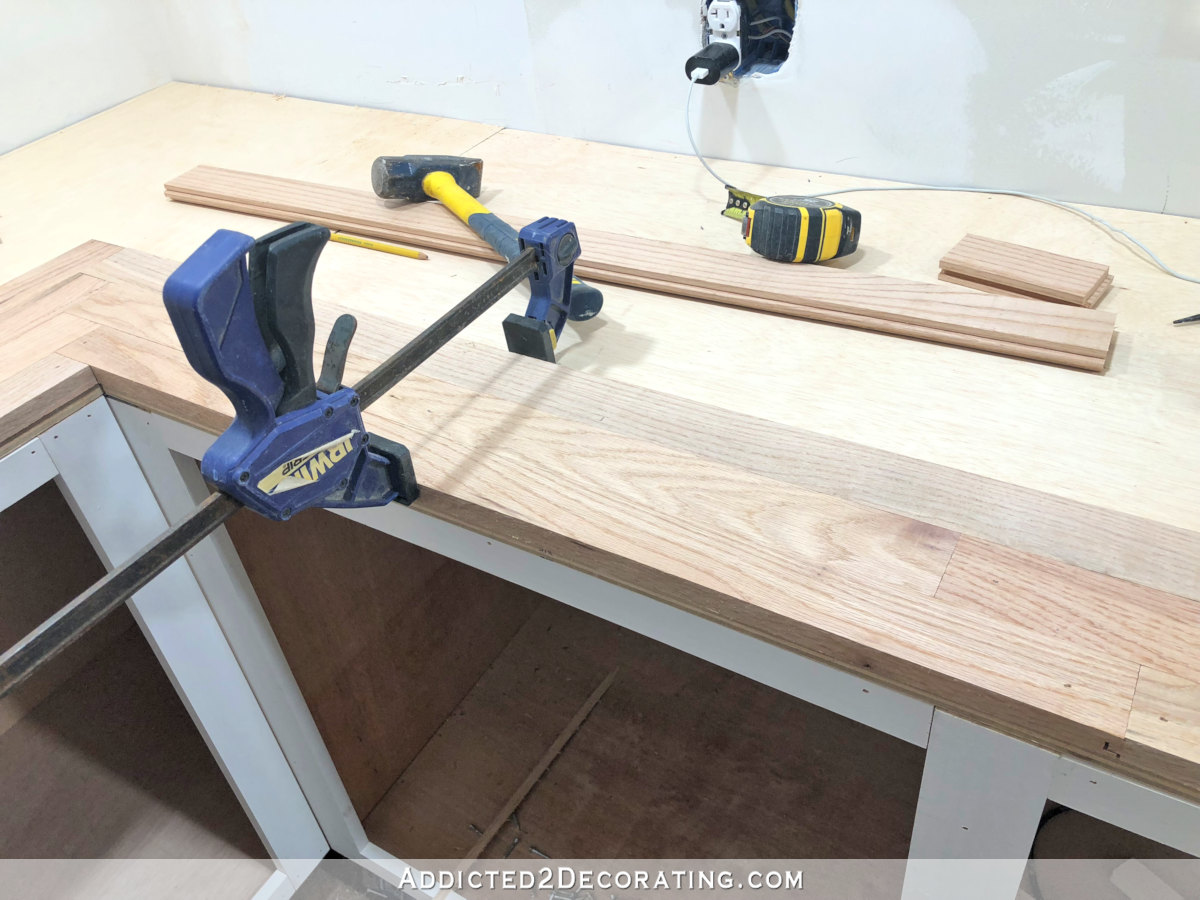
And on about three of the long boards, they were so bowed that I had to use a clamp to snug them up close enough so that there wasn’t a big gap so that I could nail them into place. But most of the boards fit together just fine without the use of a clamp.
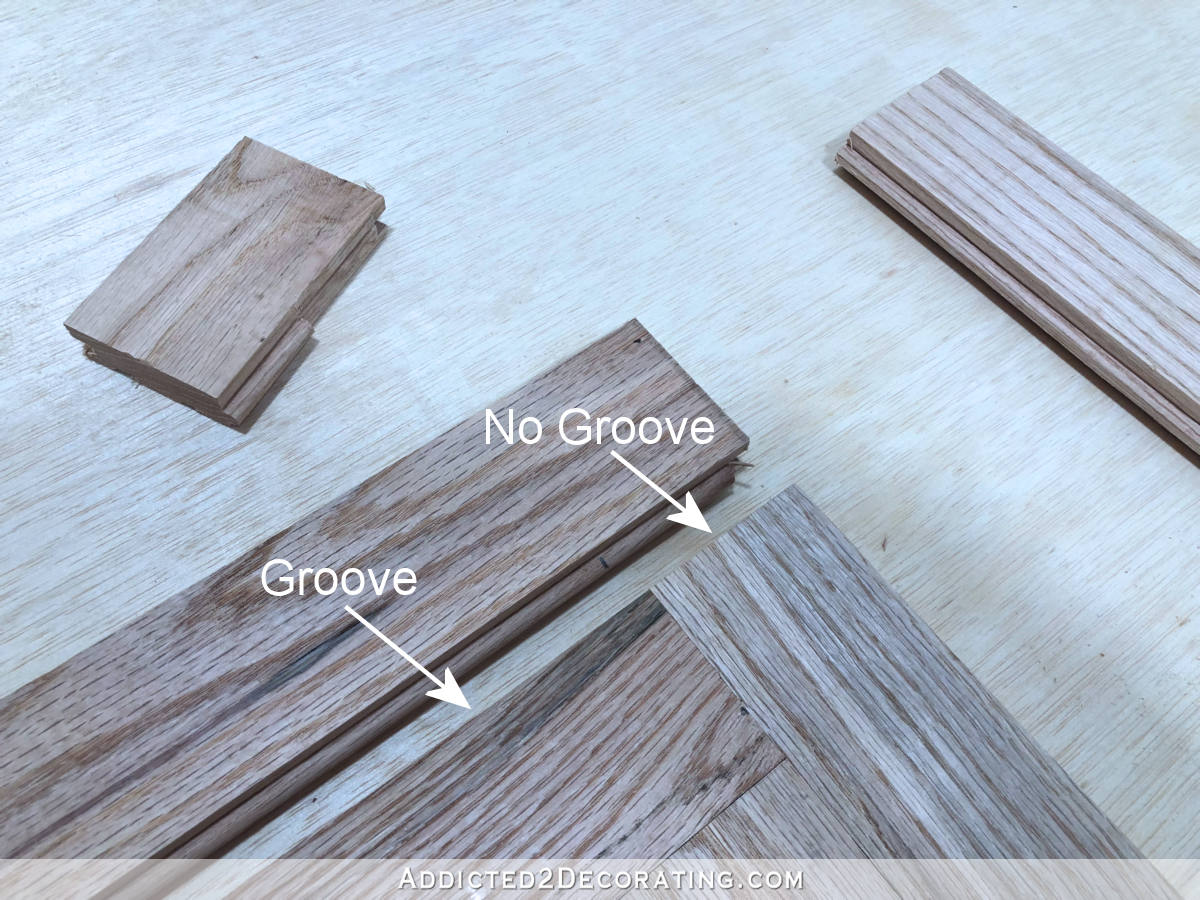
One small challenge was getting the boards to fit together on the herringbone area where the perpendicular boards fit together. Since there was no groove on the cut ends of the boards, I had to use my jigsaw to trim the tongue off of the board so that they would fit together.
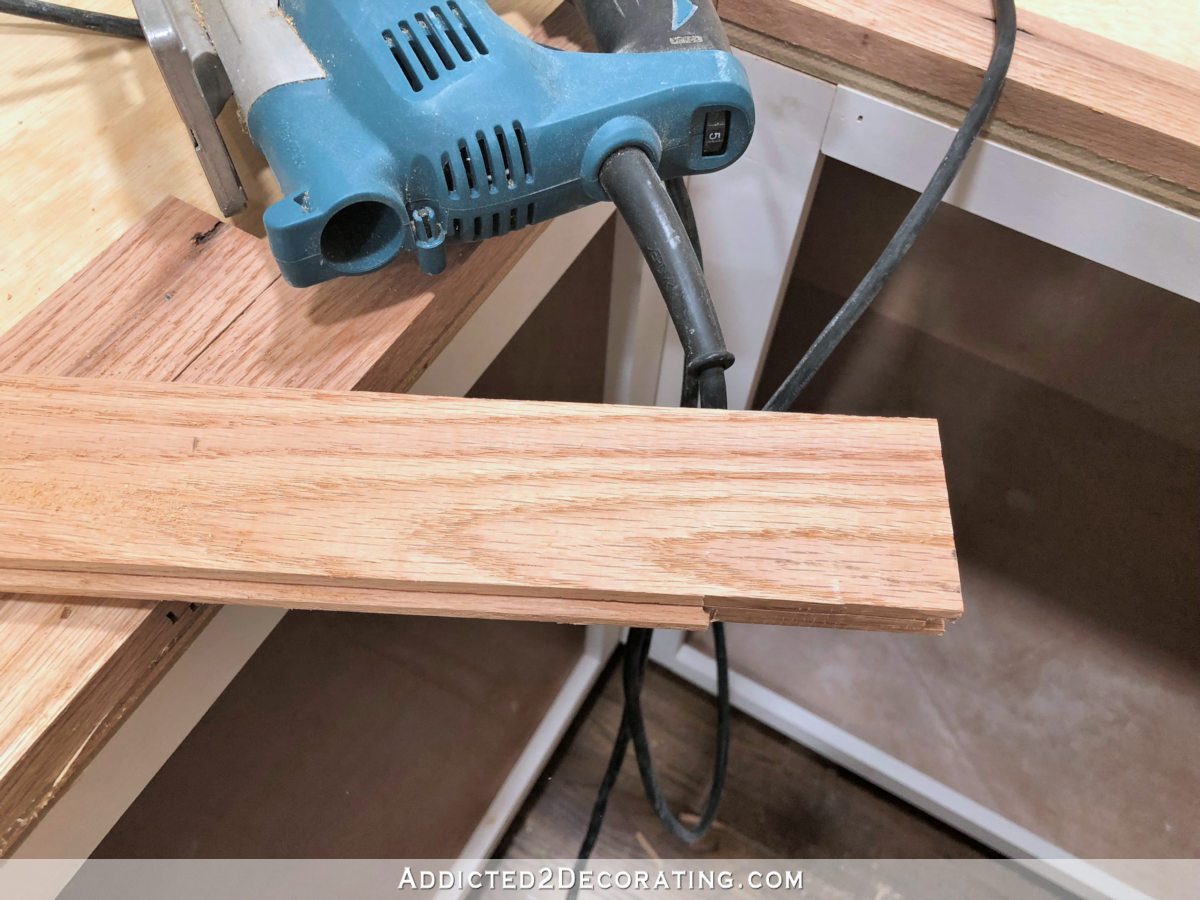
I found that it worked better if I cut the tongue off at an angle rather than trying to cut right along side the face of the board. That way my blade stayed away from the face of the board and I didn’t run the risk of damaging the face or the top edge that would show. Cutting it at an angle didn’t leave the edge of the board very pretty, but it didn’t show once it was in place.
To attach each board, I used a pretty thick bead of wood glue on the plywood, and also put a bead of wood glue all along the tongue. Then I tapped it into place using a hammer, making sure not to damage the edge of the board. And again, I only face-nailed when absolutely necessary.
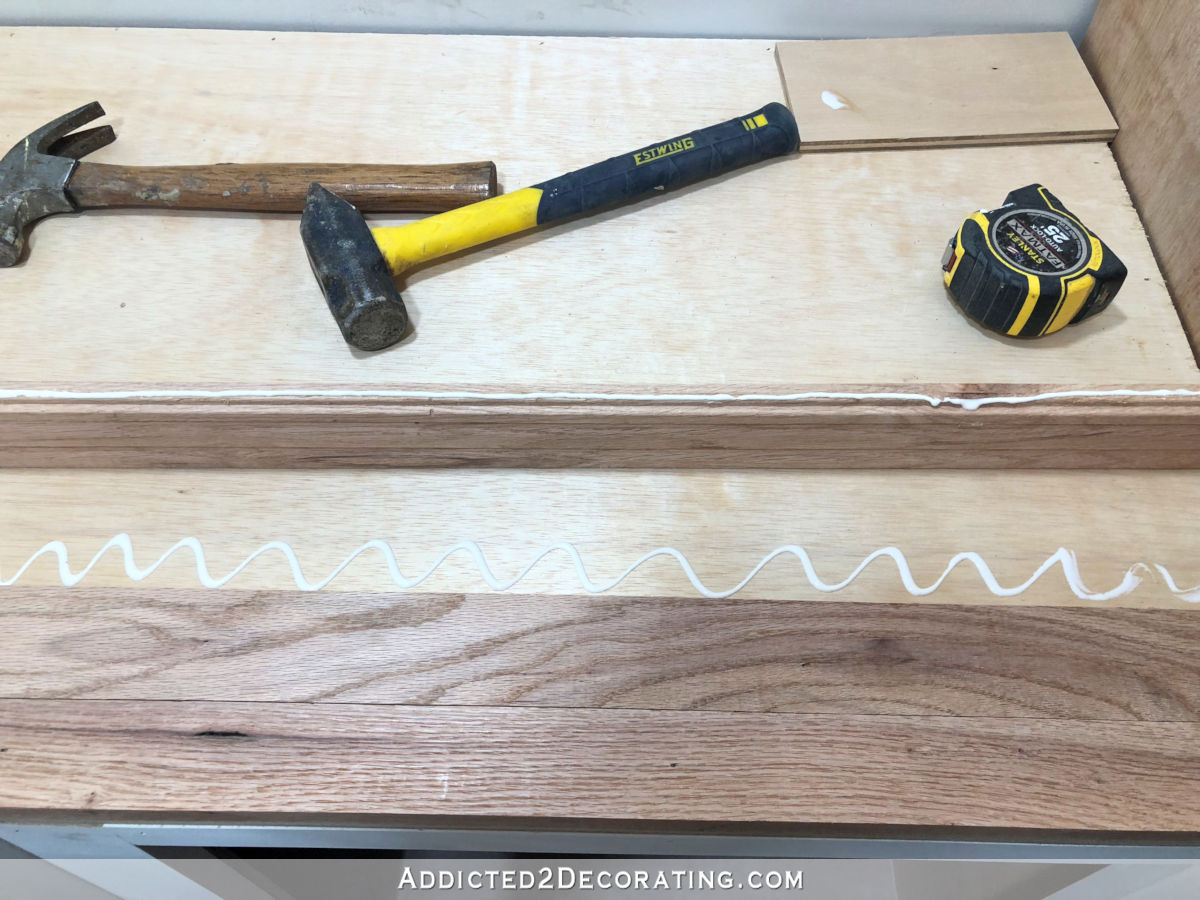
After I got a few rows done, I decided to go ahead and finish the front edges of the countertop. I used red oak 1″ x 2″ boards for this, and simply cut them to length and then glued and nailed them to the front edge of the boards. Here you can see how that gave the countertop a nice finished look. The left side has the front trim, while the right side doesn’t…
And here’s the rest of the countertop with the front trim added…
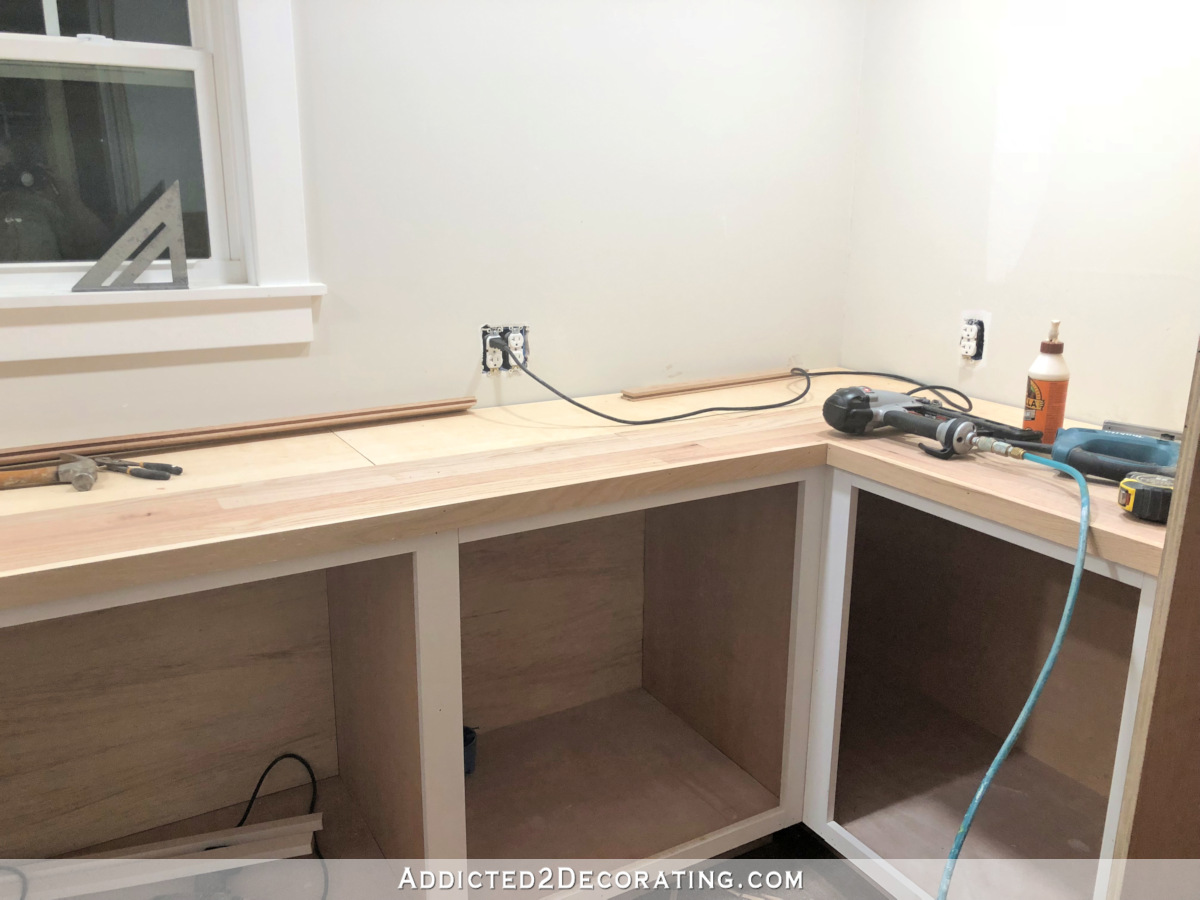
So after doing a couple of rows and guessing at what I was doing as I went along, I finally came up with a system that really sped things up and streamlined the process.
I started each new row on the left side next to the freezer cabinet, gluing a whole uncut piece into place. (The bundles come with random lengths, anywhere from 12 inches to 60 inches).
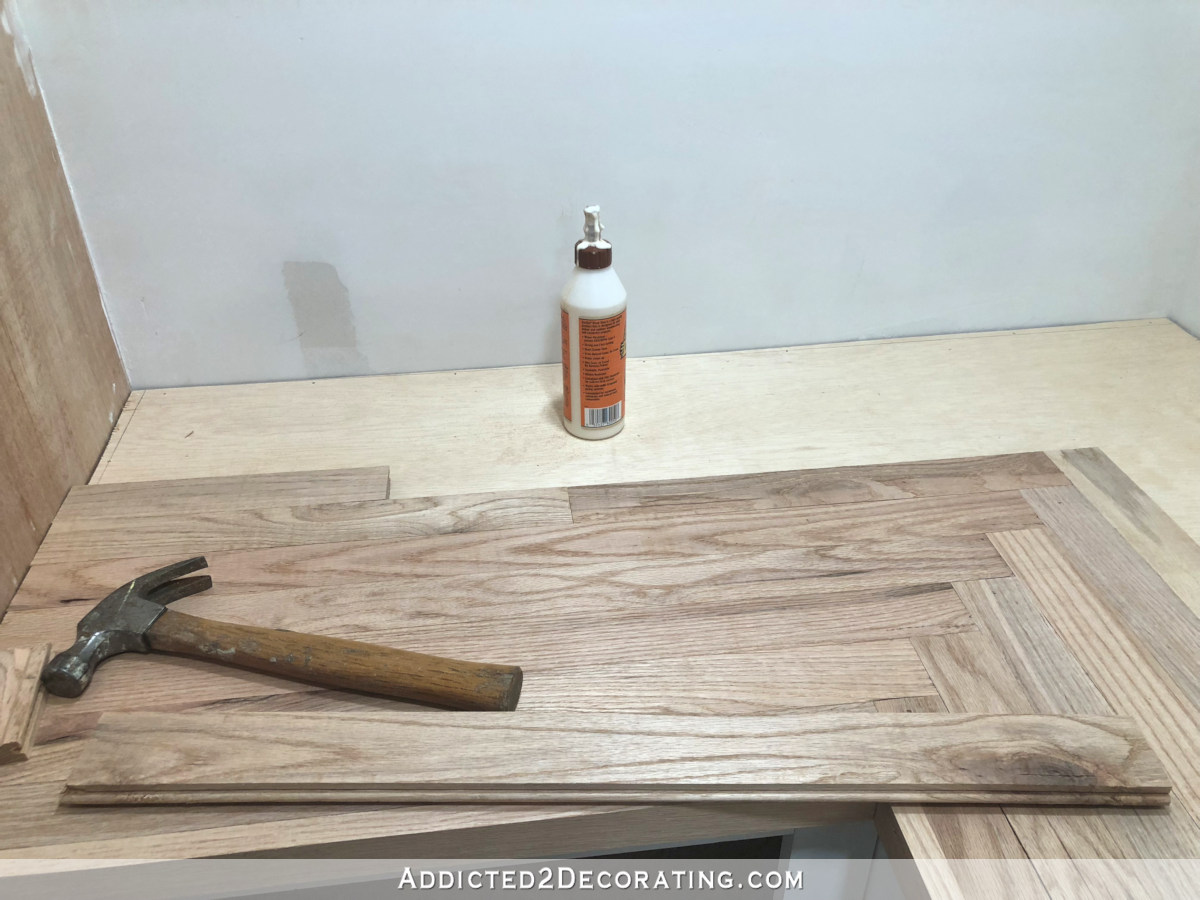
Then I measured for the piece to cover the rest of that side…
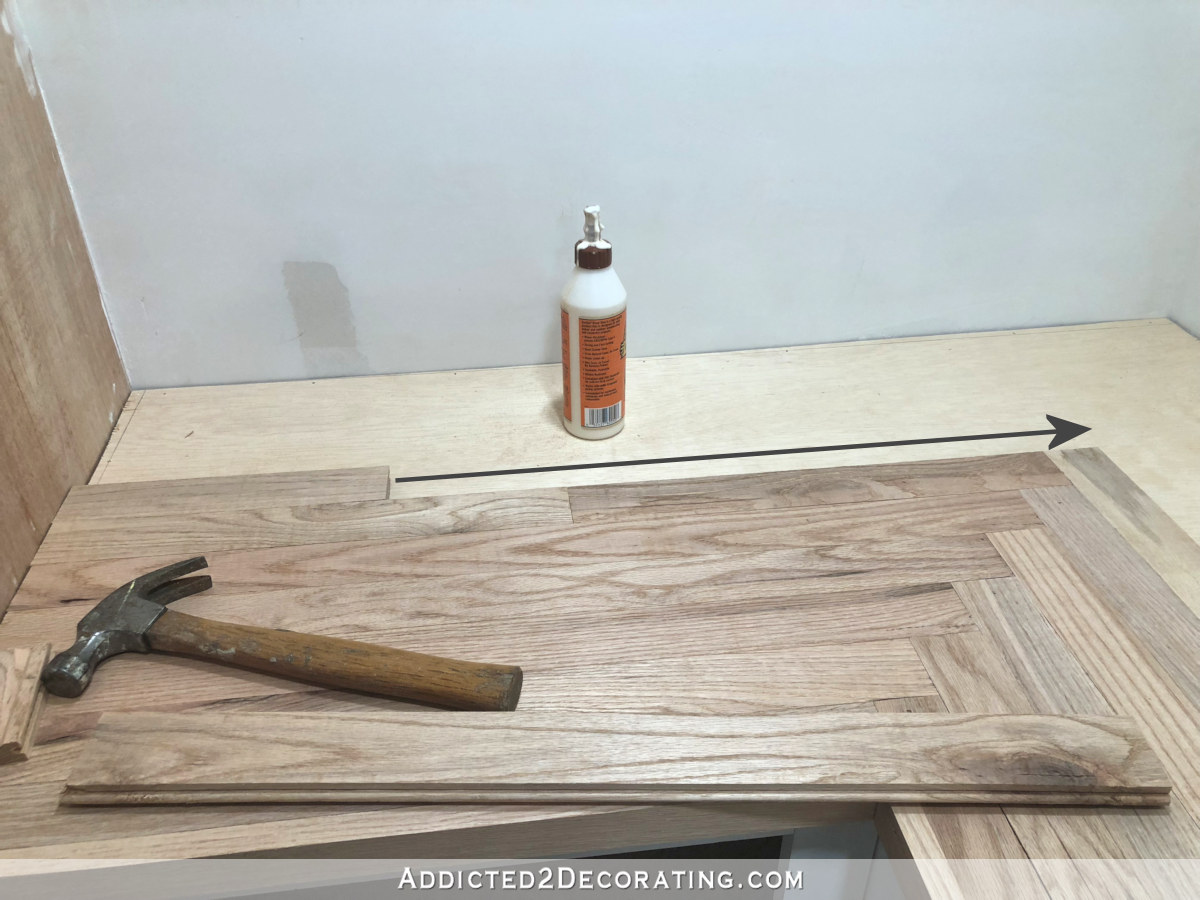
Before gluing that final side piece on, I removed the tongue from the last 2.5 inches of the board…
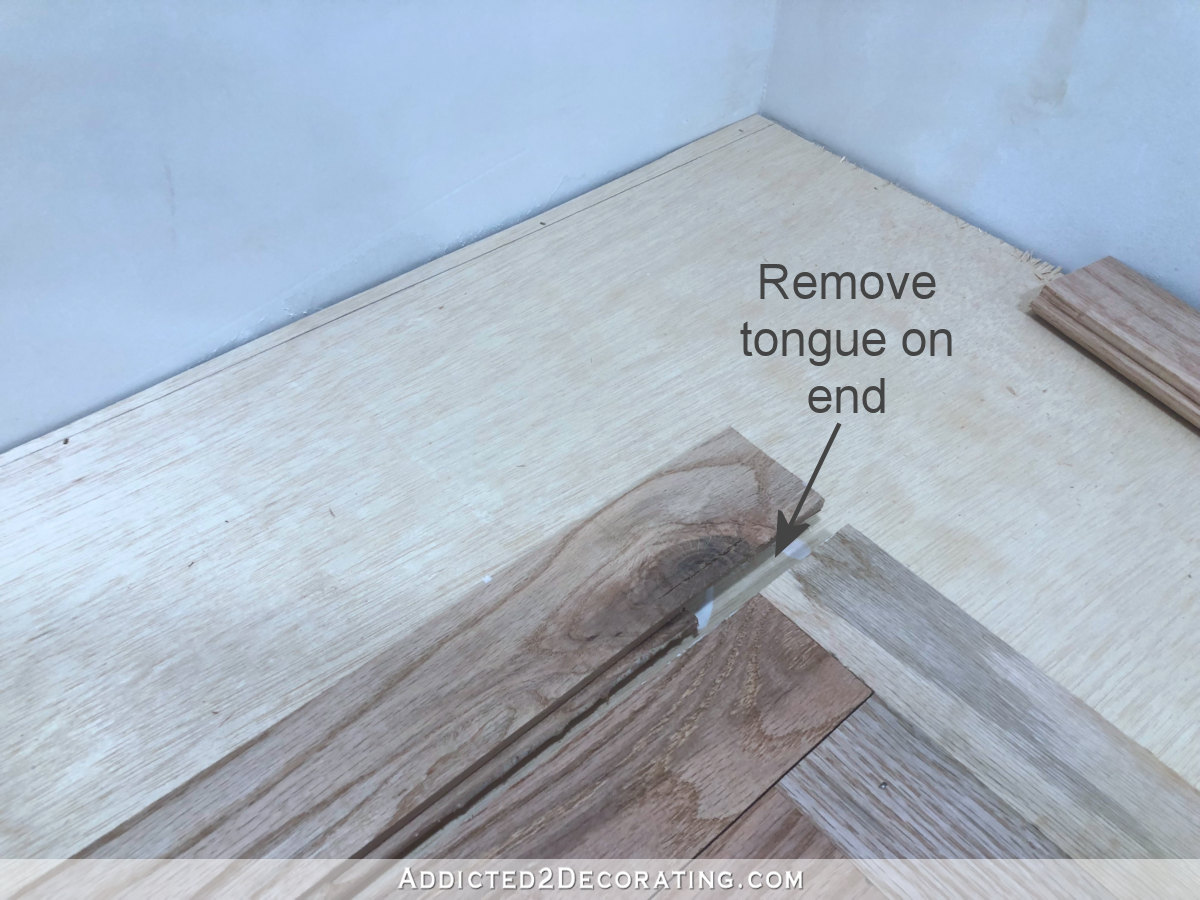
…and then I glued it into place, face nailing only if necessary.
Next I started on the back row. These boards come with a tongue on one edge and a groove on the other (obviously). But they also come with a tongue on one end and a groove on the other. I tried to keep these end tongues and grooves intact as much as possible because they are useful in keeping the ends together, but the first board on the back row needed the end tongue trimmed off before it was attached. I just cut it of using my miter saw. Then I also had to trim off the last 2.5 inches of the tongue on the edge before I could glue the board into place…
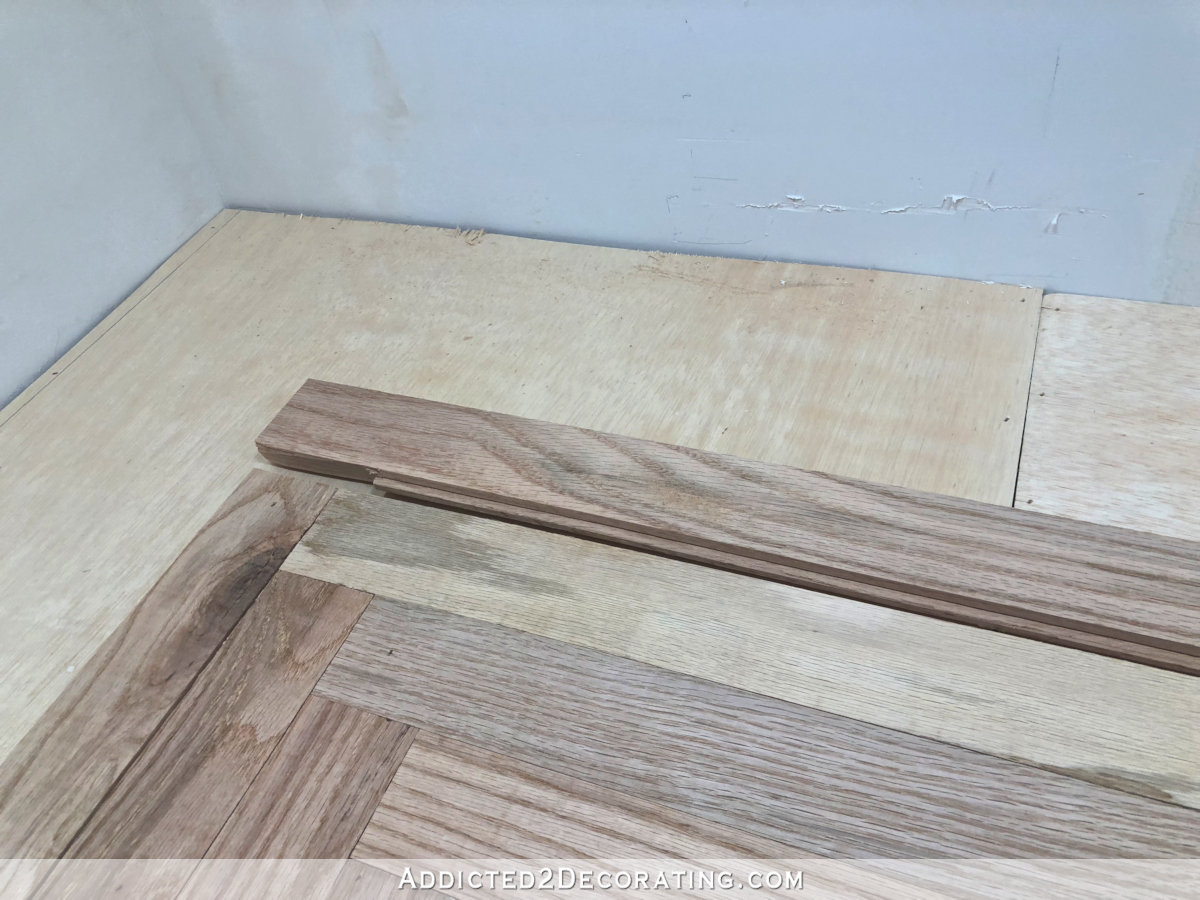
And on each board, I used a very liberal amount of glue on the plywood as well as the tongue.
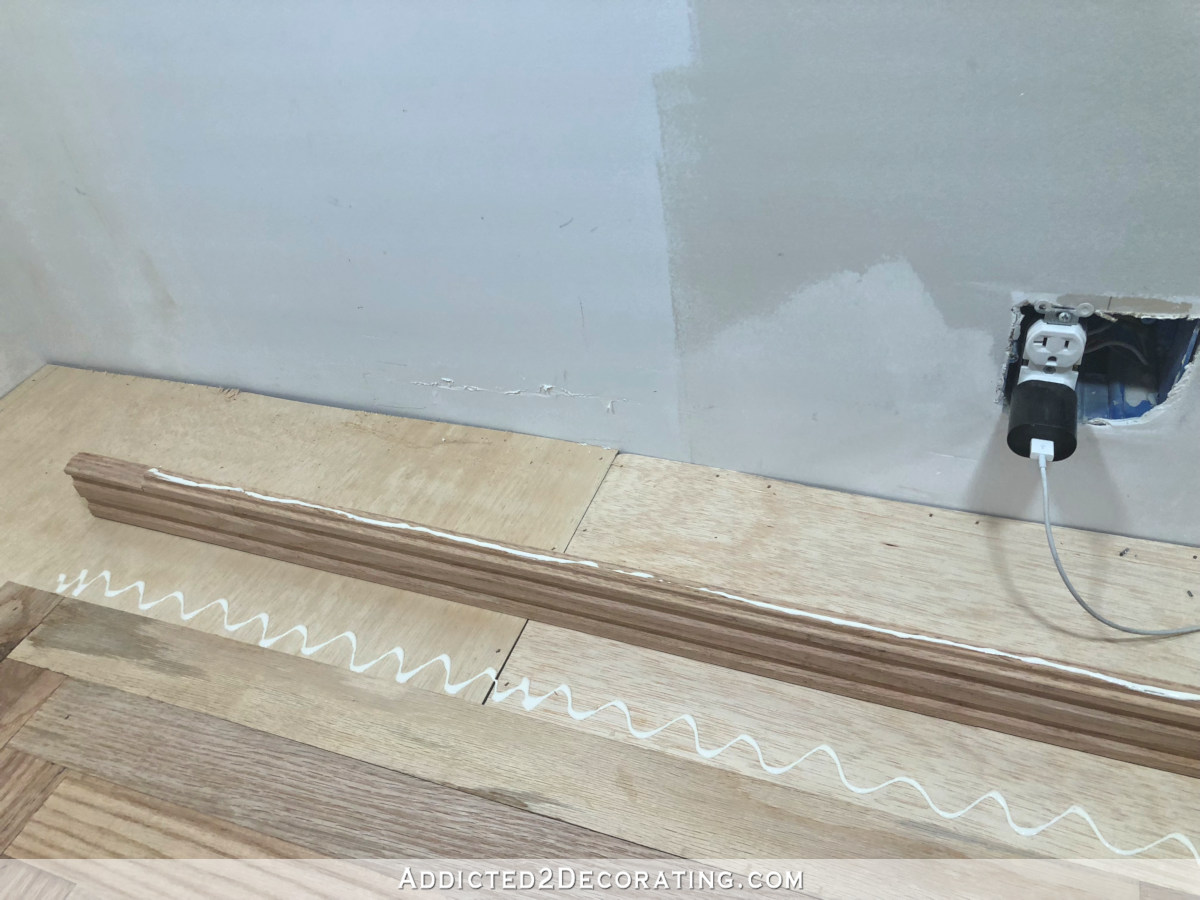
I worked my way across the back, using whole, uncut boards, until I was about one board-length from the end.
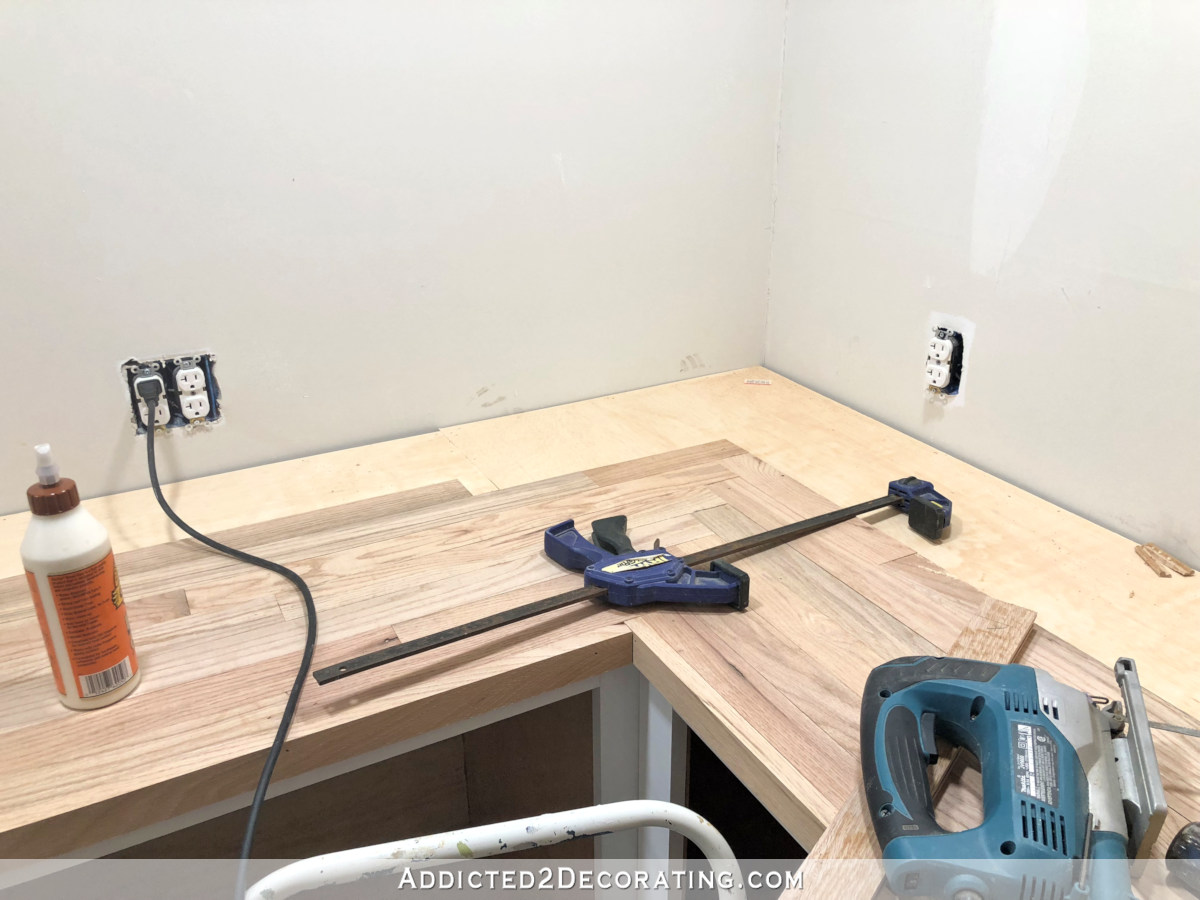
Again, this “one board length” measure is so random because the boards in the bundle are so varied in length, so I just kind of guesstimated based on the boards I had left, as well as where the existing joints in the boards were. I like the joints to be very staggered, and never want joints in adjoining rows to fall too close to each other. So based on the lengths of the boards I had left, as well as where the the joints in the previous row fell, I just guesstimated that I’d want to end that row with a board that was about 18 inches long. It’s purely subjective. This isn’t rocket science here. 😀
So when I was one board length from the end of the back row, I stopped and worked on the right side. I used whole, uncut pieces to cover as much as I could…
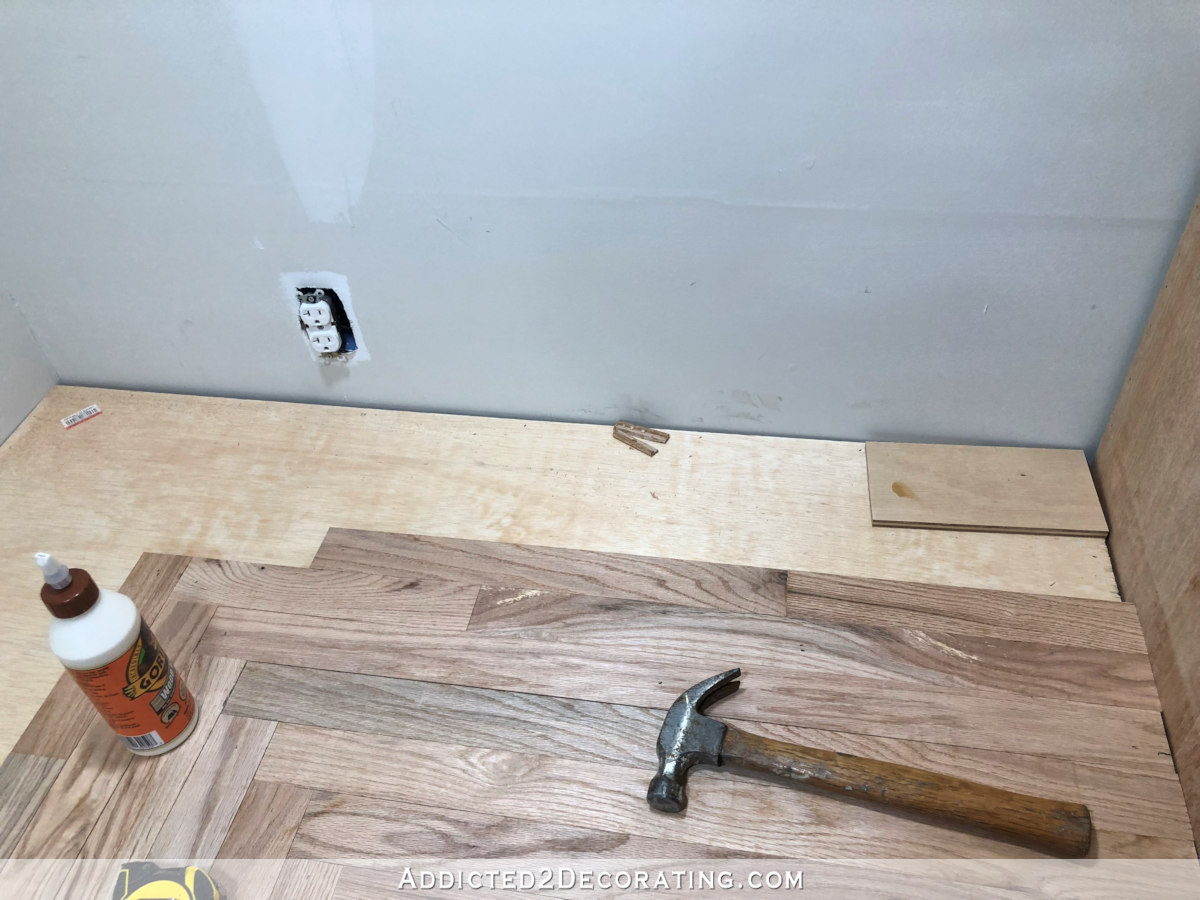
And then I cut the final piece to length, and then trimmed off the last 2.5 inches of the tongue before gluing it into place.
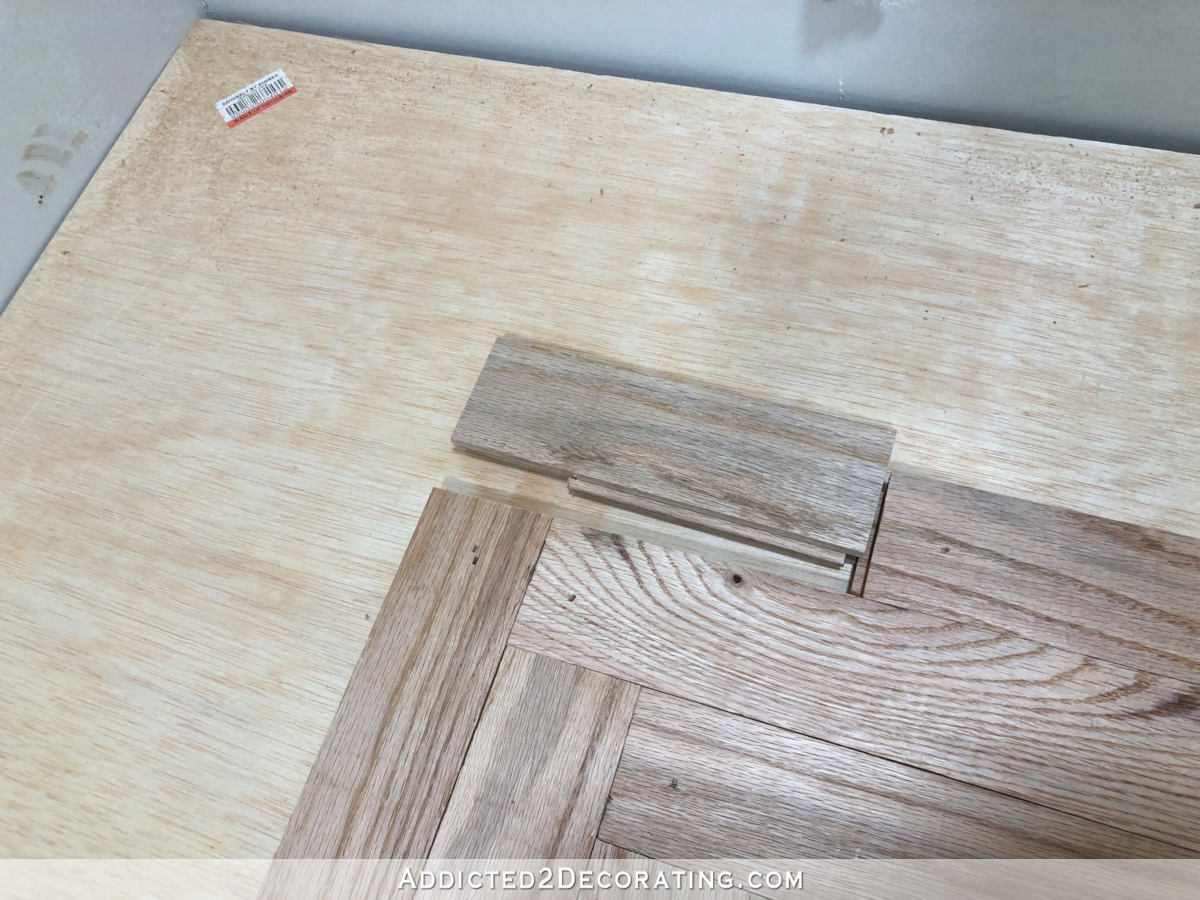
Here’s that right side row finished…
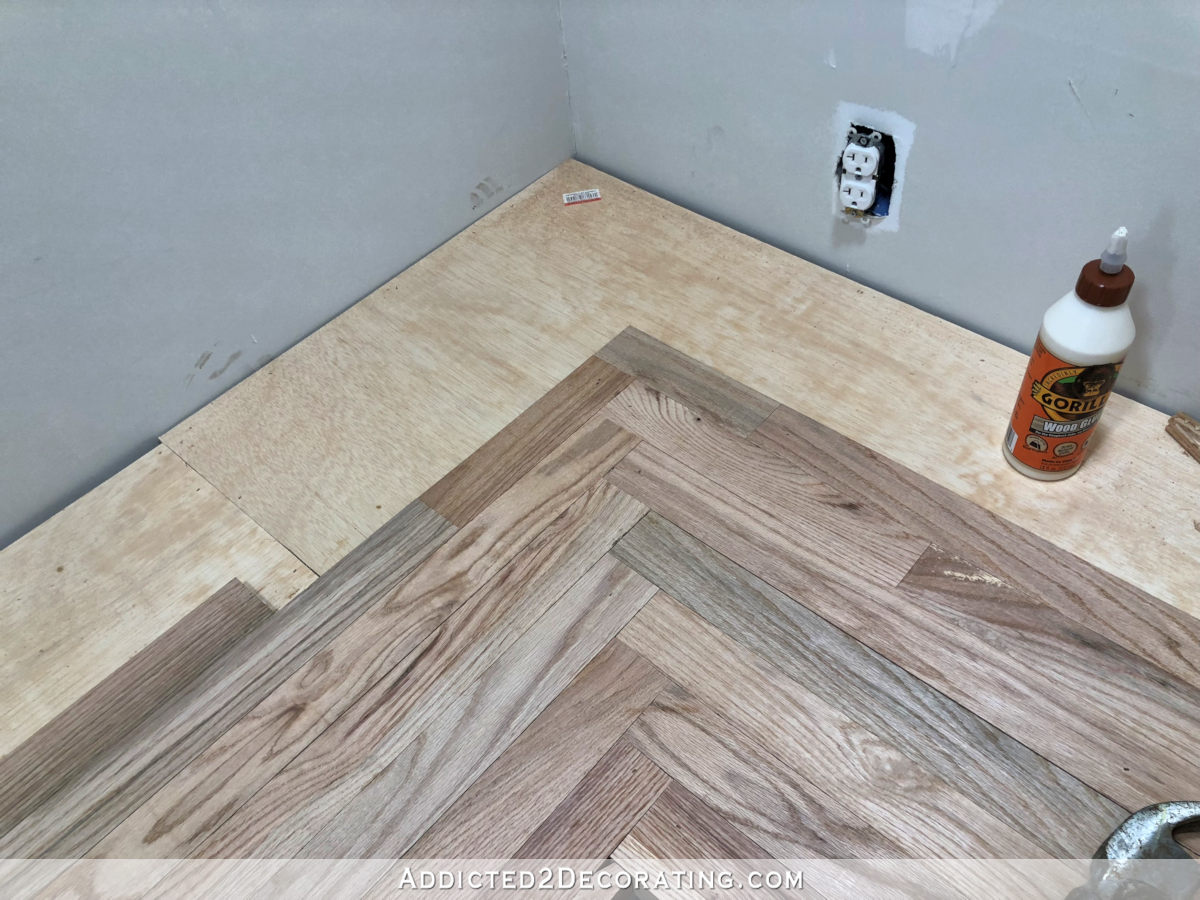
Then with that side row finished, I went back and finished up the back row. I measured the needed length, cut off the last 2.5 inches of the tongue, and glued it into place.
And that finished up one entire row all the way around.
And after repeating that process about 12 -15 times, I had a countertop!
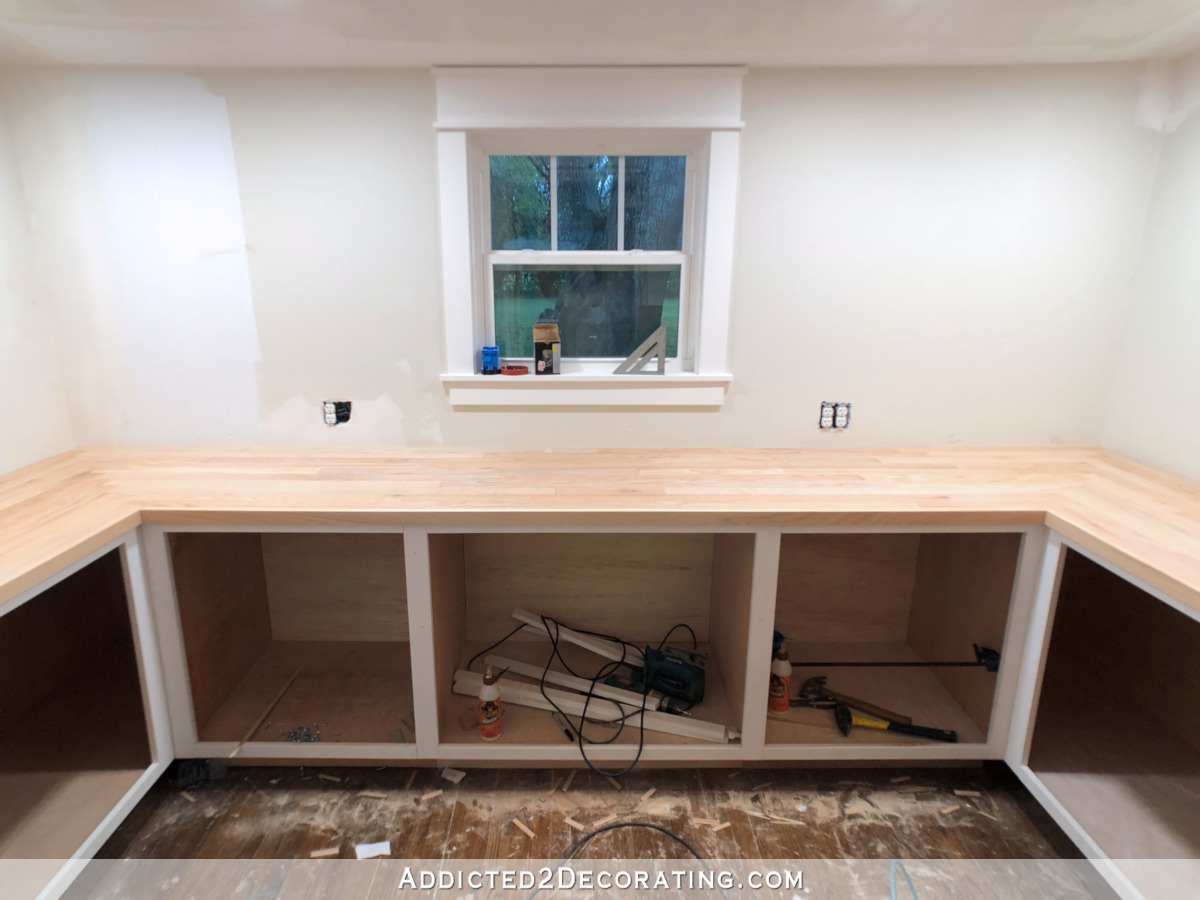
I still have to do the very last row right up against the wall. I didn’t get that finished last night because that final row will require the boards to be ripped on my table saw. I finished these other rows at about 11:30 last night, and that was way too late to use my table saw (which I use outside) to cut the final row, so I had to leave it unfinished for now.

But the main part is finished, and I’m so happy with how it turned out!
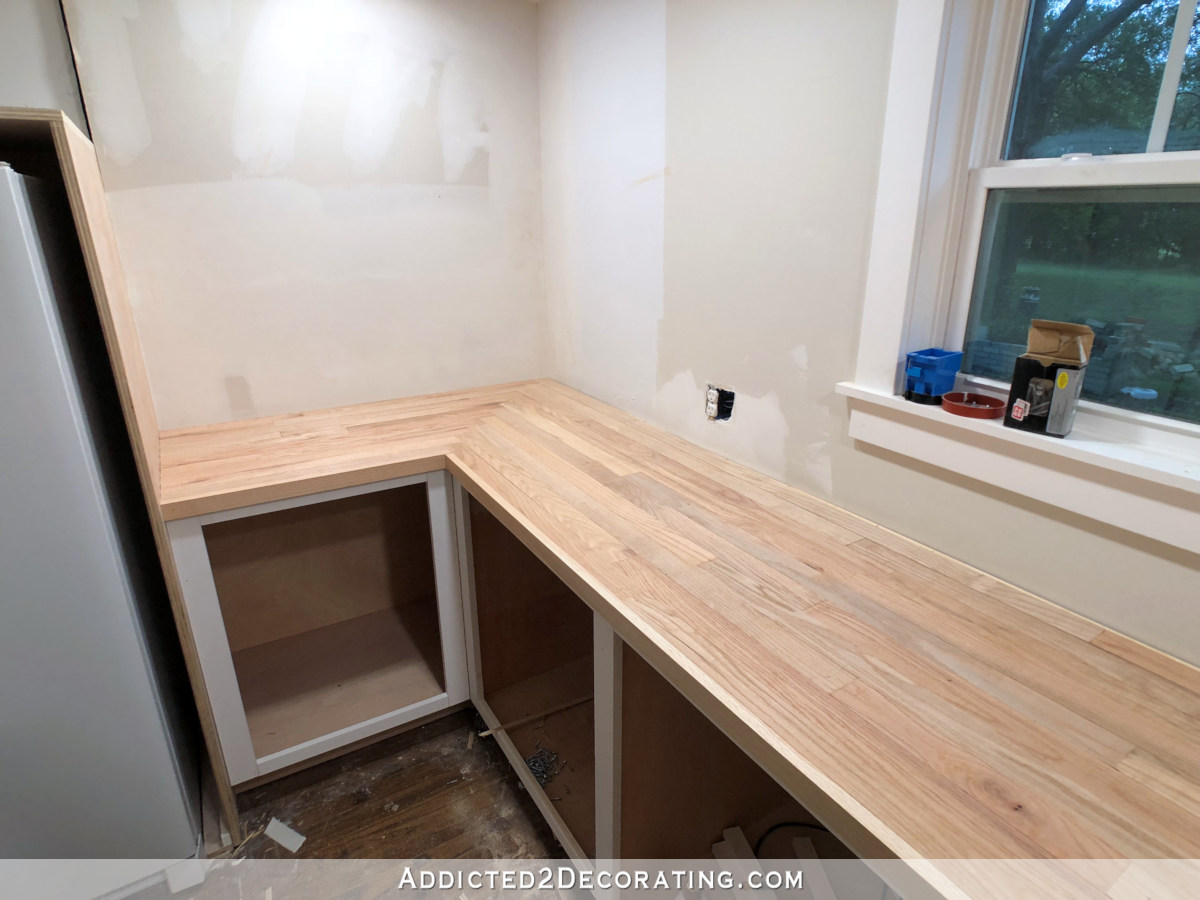
Of course, it’s not finished finished. I still have to do a whole lot of wood filling, sanding, and sealing before the countertop is actually finished. And I’m still not sure if I’m going to stain it, or just use mineral oil on it like I did on my oak butcherblock countertops at the condo. I’ll probably test out a few finishes on the leftover boards before deciding what to do in here.
So stay tuned for Part 2 of this project to see what I end up with. Unfortunately, that will be either Friday or next week, because it didn’t dawn on me until yesterday afternoon that I can’t use just any wood filler from Home Depot on this countertop. I need actual red oak wood filler, so I had to order it on Amazon, and it won’t be here until Thursday. But I have plenty to keep me busy until then.
UPDATE: You can find Part 2 of this oak countertop project here: My Finished DIY Butcherblock-Style Countertop Made From Red Oak Hardwood Flooring


Love it!! Definitely try a few finishes and compare them with a sample of your tiles. I can’t tell if a natural finish will be too red against the greens and blues in your tiles. Anyway, I’m so excited with your progress! This is great! I can’t believe how much you are getting done. You’re amazing!
This is going to be the most glorious pantry evah! I love how this is turning out!
AMAZING! I am seriously speechless!
Just lovely!
You are one amazing chick! Love your thought process and how you make it work.
These look amazing already! What a smart way to make butcher block counter tops!!
That is a great tutorial, thank you!
Flooring for the counter top?! Who does that? Kristi, of course. And it looks fabulous! I especially love the herringbone in the corners.
What a fabulous idea! You are truly amazing!!
Absolutely beautiful! I love the way you turned the corners!
Really, really neat. You really are such a hard worker. Thanks for sharing the process with us. I like it.
You are so gifted!! Not only are you able to create but you have the vision to begin! I marvel at what you’re able to accomplish.Just Wow!
WOW!!! Seriously – WOW!!!
Kristi, I have only recently found your blog, and I am totally hooked! I can’t wait to see what you’ve done every day – I check pretty obsessively! Anyway, I just wanted to suggest Waterlox for your countertop. I recently used it for my new butcher block counters, and it’s GORGEOUS! A little time consuming, but it was easy steps and a lot of waiting for it to dry. Just a suggestion!
Wow, gorgeous! I love the herringbone detail. Do you think these would hold up in a kitchen if they were sealed really well?
You know, it’s funny. I’ve made so many different types of wood countertops over the years, and inevitably someone asks me if the countertop would be good for kitchens. I’ve always answered no in the past because I’ve always used soft woods — pine 2 x 3’s, pine fence pickets, cedar 2 x 4’s. None of those would have been appropriate for a kitchen countertop.
This is a different story, though. I actually think this would work really well as a kitchen countertop. It’s oak, which is a hard wood, and it’s thick wood that can be sanded if there’s a stain. My countertops at the condo were oak, and they were gorgeous and very durable. My only suggestions would be to waterproof the plywood before installing the floor boards over the top. I’d personally use that pink stuff that rolls on like paint that you use under tile in a shower. I can’t remember the name, but I used it as a water proofing sealer under the tile on the tub surround in my hallway bathroom, and I also used it to seal the concrete subfloor in the breakfast room before installing the plywood and hardwood flooring.
Oooh, that is gonna look AWESOME! You are one clever woman.
We attached left over red oak flooring to the tops of our workbenches in the workshop. It’s super durable and pretty to boot! Love the herringbone, great idea!
So, so, pretty! I don’t think I would have ever looked at the counter top and thought flooring either, genius for thinking of that. I can’t wait to see it completed.
I love your counter top!
i don’t know who else would have thought of the special corner detail. Fabulous! I can’t wait to see the end result.
Butch block countertops with REAL wood in my new kitchen. CHECK.
Thank you Kristi for thinking outside of the box AND for sharing with your cheer leading squad
Looks fabulous! Do you have to worry about contraction/expansion with this being a countertop? Will you leave a small gap at the wall for that? I have been looking at Rubio Monocoat finishes on Instagram. I would love if someone like you could give me a real opinion of this product. The finishes look amazing. Can’t wait to see the finale!
I used Rubio monocoat clear finish on my dining room table. I put it on two years ago and the finish is awesome. My table is reclaimed wood and it was recommended that coasters should be used to avoid damaging the table. I could not see doing that. Used the Rubio and any spills just bead up. No damage to the table. I test it every now and then. Still working!
I love Rubio monocoat. I used it to finish my floors upstairs. Three kids under 8, and two dogs later, and they still look as nice as I finished them 6 months ago. I’m excited to see how they stand up over time. They sell a special soap for mopping that strengthens the finish over time as well. Not to mention that I liked how quickly we could move furniture back on it and the smell wasn’t too powerful either.
I wondered too about any contraction/expansion concerns when glueing down the wood flooring.
Glueing and nailing are common installation methods. Just think you need a “expansion” gap.
I did leave a small gap at the wall for expansion and contraction, but I’m not really concerned about it since it’s such a small area.
Incredible!! I just got up the nerve to use a Ryobi circular saw today for the first time and here you are building complicated cabinets and countertops that are going to be to die for. Can’t wait to see the finished room.
I’m excited for you! A circular saw is such a useful tool. You’ll be so glad you worked up the courage to use one!
Thanks. This is one of the few tools that intimidate me. I was only cutting up some old molding to burn but it’s a start 🙂
That’s so cool! We have an entryway cabinet run with formica currently as the counter and I have ideas down the road to top it with wood. I’ve considered just covering it with a thin plywood skin but this is a definite contender now.
The herringbone …divine. Mic drop.
Looks great. I will be stunning against the tile. Have you considered a tung oil finish? You can get with with a color mixed in like light or dark walnut or just natural.
I’ve never tried tung oil, but I did use mineral oil on my butcherblock countertop in the condo kitchen. It was gorgeous.
I actually am using it for the first time to refinish some oak chairs. I tested it on a new piece of scrap oak and it looks great and is easy to apply. I am using the Watco tung oil with the light walnut finish. I still have to finish sanding the original finish off the chairs before I restain them. The chairs are new but came with a wire-brushed natural finish that I didn’t like the feel of so I am smoothing them down and refinishing them.
That is beautiful and will only get better with however you decide to finish it. I’m imagining your tiles as the backsplash and it will be amazing.
When we moved to this house, I was ecstatic to have a closet with shelves as a pantry! Your pantry looks like a castle!!! So gorgeous already. Can’t wait to see the final product.
Gosh, that is beautiful wood. You did a great job!
I was really skeptical when you said you were making your countertops out of flooring. I dated a guy who “DIYed” his whole kitchen, and he did new countertops out of laminate flooring. And it looked exactly like….laminate flooring…on a counter.. Haha! Yours is beautiful, of course. Like Theresa P says, I’m interested to see it with different stains because I too have a hard time picturing the red oak with your cool-hued tiles. I wonder if a finish similar to what you did on your entryway console table would look good?
I’m sure you’ve thought about it, but I was thinking resin, with maybe tiny veins of the gold, only, the rest clear. You are amazing! This is beautiful, already
Amazing! And of course it’s now abundantly clear why you had to go to all that trouble to make sure your walls were square. It’s a lot harder to hide out-of-square walls with a beautiful herringbone pattern like that than if you had just cut a diagonal seam for your corners, but the trouble was clearly oh-so-worth it to fix right!
These look fantastic! You have me wondering, now, if this wouldn’t be an inexpensive way for me to make some changes I want to my kitchen.
I’m curious though… Why did you choose to glue like crazy instead of just using a thicker plywood and a flooring stapler/nailer?
I considered using the flooring nailer for about five minutes before I realized that it would probably be more trouble than it’s worth. With the countertop only being 24 inches from the wall, and a flooring nailer being so big, I just thought it would have been really awkward trying to use it. Not to mention that they’re made to use while standing, so in order to really get a good impact, I would have had to stand on the countertop to use it. All of that up and down on a ladder to get down, cut the board, get back up there, nail it on, over and over, just seemed like too much. I’m sure someone stronger and with a more accurate hammer swing could use a floor nailer on a countertop while standing on the floor, but I just envisioned misfired nails all over the place.
I have the worst case of pantry envy ever!! My puny little pantry with the wire covered shelving I despise looks so sorry compared to yours…its just sad 🙁 You are freaking amazing girl!
Awesome counter treatment! I thought when I saw the first photo that you had continued the same treatment up the sides of the freezer cabinet and the one opposite it. That would be interesting!
Anyway, enjoying the progress and looking forward to what’s next!
Mark
On your recommendation, I’ve been following the One Room Challenge. There’s many great ideas there, and clearly beautiful spaces will result, but following the other participants’ progress has made me respect your work all the more. Most posts boil down to “I’ve been shopping; look what I bought!” and/or “I hired professionals to install this stuff; look what they’ve done!” Few are true DIYers and even fewer are actually creating the design elements like you do by building your own cabinets, crafting the countertops and producing the backspash tiles. And you do all of this by yourself and with significant family responsibilities to boot. Hats off to you!
I agree! Some of the DIY blogs I’ve followed for a few years have become more “look what I hired out” than doing it themselves. Frustrating to see the change. I appreciate all that you do Kristi.
I agree! And, I can’t wait to see the finished product.
Also, I’m thinking you might want to do another ORC for say-the powder room by the garage!
LOVE, LOVE, LOVE everything you do!
I read every single word. Not because i do anything with wood but because it is so impressive. I do this kind of figure-it-out-as-you-go work with fabric so I know there must have been a fair amount of frustration in your project! Beautiful counter.
Your countertop is beyond beautiful. I don’t think a professional finish carpenter would have done as well. Have you ever tried Odie’s Oil? I stumbled onto it while reading woodworkers forums. There are some great videos online of it being used on live edge slabs. I used it when I refinished a set of mid century nesting tables and I love it. It is pretty spendy but a tiny bit goes a long way. There is even a chart showing cost comparisons using other products. I can’t wait for the next update.
I’ve never heard of it. I’ll have to look up those videos!
Awesome! Never would have thought of flooring! Hubs made ours out of 2×6 boards, but we were going for a “work table” look. I like yours way better already! I am constantly telling him (and showing him) what you’ve done, all by yourself. Of course he probably is thinking that I should be more like you so he won’t have to do it! I tried that, but he was constantly nit-picking so I gave up.
When you were a kid did you eat Wheaties?
When I saw you were going to make your own tiles in the One Room Challenge I said…OK…I gotta keep an eye on this gal!! I fell in LOVE with your kitchen cabinet color. I said…
we could be friends. And now you have made this awesome counter top. When you lay your head down at night how do you turn your brain off? What a Wonder Woman!!!! Can’t wait to see what’s next in this pantry which will be the envy of every person who has at best a closet for a pantry .
So super smart!
Absolutely love this look. In 1965, hubs & I helped my Dad lay an oak floor in the living room. But . . .it was mixed red & white oak and it was bundles of “shorts”. No piece was over 36″ long. It was my job to handle the layout so no two seams were within 6″ of each other.
I need a new countertop and this gives me lots of ideas. My walls aren’t square in my old house so a herringbone pattern might work well!
Kristi, you are beyond awesome. The way you approach challenges and find creative solutions is just amazing, and I look forward to every post showing your progress. A question about the tiles (and maybe you’ve already answered but I missed it) what is your plan for turning the corners? Are you making half-tiles? Or can the tiles be cut? Can’t wait to see them installed!
With a new blade on my tile saw, they’ll cut just fine.
not sure why you didn’t start at the back and work forward. very impressive
Whether working from back to front, or front to back, the last row that I installed would have to be partial boards ripped to a very thin width on my table saw. A general rule of decorating, building, designing, etc., is that you always put the nicest materials, products, items in the most visible places. The most visible place on a countertop is the front edge and the front part of the countertop, so you don’t want to put ripped pieces of wood in the most visible place. You want nice, whole pieces in the most visible place, with the remnants or partial pieces in the least visible place.
It looks fantastic. You are very talented. I’m inspired by your work.
Wow that’s a lot of progress, you are just amazing!
It looks really good! We built our kitchen countertops from unfinished maple flooring two years ago. We just did butted up joints (not mitred) at the corners, but your herringbone joint is genius. We finished ours with hardwax oil, and the finish has held up REALLY well to a lot of usage from 4 kids and 2 adults. We do have some expansion and shrinkage of the counters depending on the season, which means that in the winter we have some cracks, but we live in a climate with really cold snowy winters and hot summers. I don’t know how much of an issue that is in a place like Texas.
Quite a while ago you were saying that you just couldn’t get started on the pantry and didn’t know why. I suggested it was because you didn’t like what you envisioned and to wait until you did…well, I was wrong…it wasn’t the layout you needed to change…you just needed to wait to see how to do those gorgeous tiles! The fact you’ve done so, so much in the room already proves that the tiles are definitely the right thing for you…that was your inspiration. Girl, when you get inspired you are a whirlwind! I love what you’ve done so far…and your countertops are great. Way to go. As others I too cannot wait to see the final picture. God bless.
I know you decided not to paint the cabinets purple, but I wondered what you might think of staining the countertop with a purple stain and if it would cover the redness to go with the tiles. Just a thought.
Wow!!!!!!! This is going to be a stunning pantry.
I like it. But how long do you have according to the one room challenge contest to get this done? Does it have to be done by end of October?
Final room reveals are November 8th. It’s not a competition, and I’m only a guest participant (as opposed to one of the official participants), so there’s nothing lost if I don’t actually finish the room by then. I’m going to do my best, but I won’t beat myself up if it’s not completely finished by November 8th. I’ll know I did the best I could, and at least I got a ton of work done on a room that I’ve been putting off for a year-and-a-half. 🙂
Looking amazing! Just wondering…without stain, won’t the counter/flooring end up being the orange color that your floors used to be (which you weren’t fond of)before you stained them?
My floors turned really orange because I used an oil-based sealer on them. I won’t be using anything oil-based on my countertops. Red oak still does have a slight pink/orange undertone, but I’m going to try to bleach them and see if that removes some of that undertone.
Kristi, these are beautiful. I have a question, as I am intrigued with the flooring for counter tops. Is is possible to use that glossy epoxy stuff that you did on the tiles on this? Not the stain/paint part, just the clear stuff to keep it protected? And if so, do you have to prep the wood first with something? I’m trying to figure out if this is a possibility for something for my daughter.
Yes, you can certainly use epoxy resin over wood countertops. I would recommend purchasing one that’s actually made for countertops or big projects, though. The ArtResin that I use probably wouldn’t be the best option for countertops. I see people on Instagram making wood and resin dining tables, and they use a brand called Ecopoxy. That seems like a good options.
As far as treating the wood first, I think that depends on the brand of resin you use. Some brands suggest sealing porous objects first before pouring resin on them, because if they’re not sealed first, they can release bubbles in the resin. Other brands don’t seem to require that step. The Instagram accounts that I follow that make those resin and wood dining tables don’t seem to prep the wood before pouring the resin. It looks like they just pour the Ecopoxy directly onto the bare wood.
Oooh, I love the countertops! You did a fabulous job as always! Can’t wait to see the finished product!
Did you build the boxes for the cabinets yourself? I’m wanting to do that as my kitchen cabinets are falling apart. And on a smaller level, I want to do a built in buffet in my dinning room with custom built cabinets because I want to utilize the complete section. Do you have instructions on how to build the cabinet frames and faces?
LOVE IT!!! Your skills are amazing!! I look forward to every blog post. It’s going to be beautiful just like everything else you’ve done in your home. 🙂
I did a countertop very similar with oak flooring(very old) in the same style minus the tng with a 34 degree join connecting each plank. was wondering if you found the corners where peices overlap as apposed to a mitre were not much fun to sand due to light scratches when inadvertently sanding against grain corners. even in the 220-400 grit range the tiny scratches didn’t sit down until I polished countertop. owner wanted just clear coat n high gloss so that was definitely a factor 2.
I used a rotary sander on the whole thing, and didn’t notice anything like that on mine.
OMG! You have saved my kitchen remodel. We ordered a custom white oak countertop, and after it was in the house a few days, the boards separated, and it took 7 months to get it. This is a lifesaver, and you are a genius!
Thanks for the tips. I’m totally going to look into wood flooring for a light use countertop.
Great job! Love the teal colors you chose, too! Looks amazing!