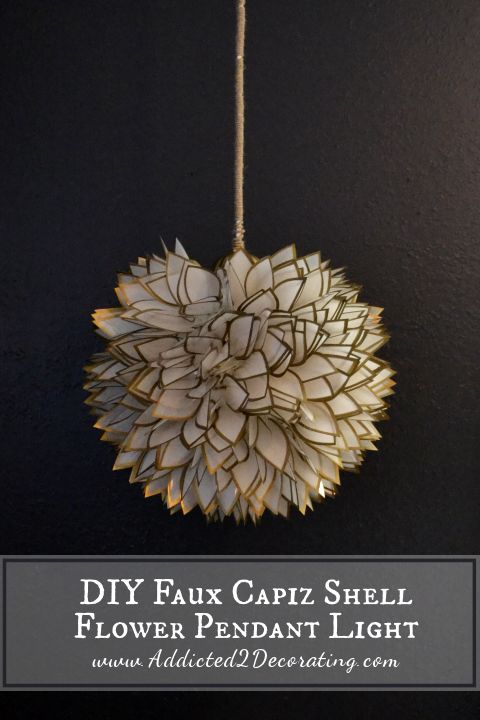
DIY Faux Capiz Shell Flower Pendant Light
I’m halfway through with Master To-Do List Item #89 — find or make bedside lighting for our bedroom. I made a faux capiz shell flower pendant light.
This was one of the most time-consuming projects I’ve done, but I just worked on it a little bit each day. Some people read or crochet in the evenings to unwind and relax. I cut out petals for my pendant light. 🙂
I still need to make one more, so it’s a good thing I find the process relaxing and enjoyable!
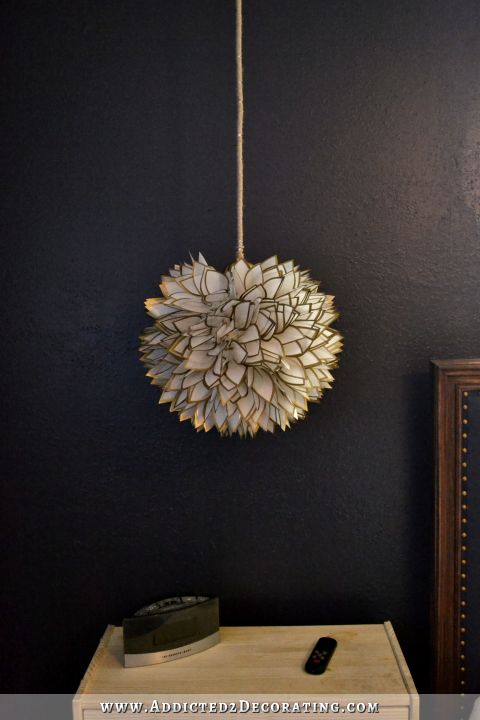
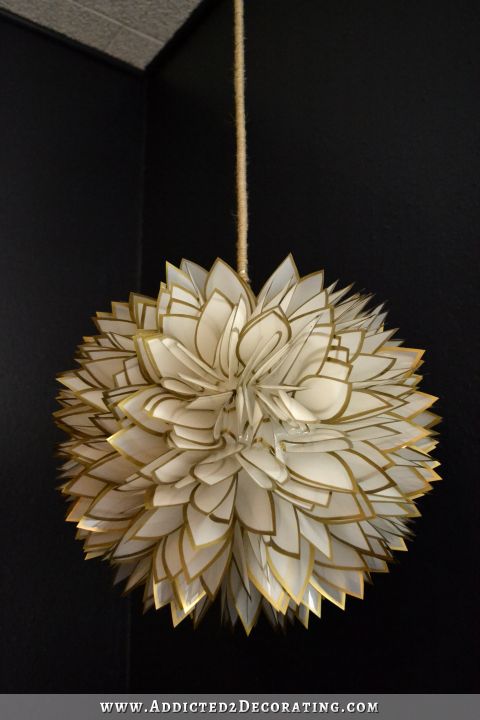
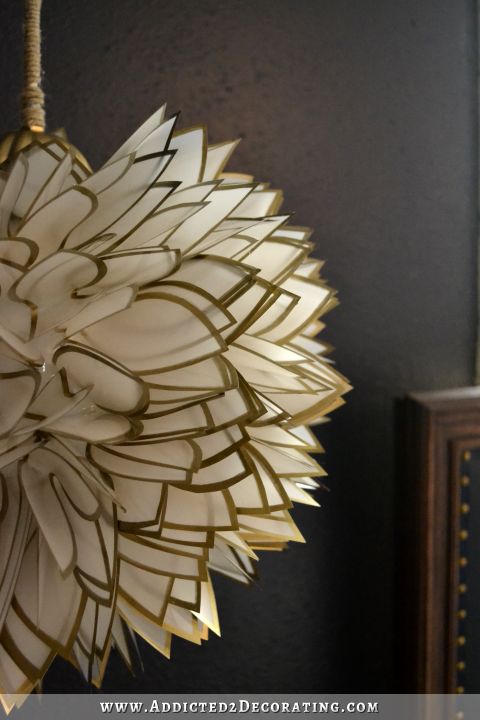
I love how it turned out! It’s the perfect size for a bedside pendant light (about 16 inches diameter), and it puts out a beautiful amount of light for evening use.
Here’s how I made it…
My mom used to have two of these faux capiz shell lights in her living room…

When we redecorated her house a few years back, she took them down and put them in storage. I found them about a year ago, and asked if I could have them. I couldn’t really decide if they were vintage enough to be really awesome, or if they were just outdated, so I held onto them to see if inspiration would strike. It was the scalloped edge and the fact that the faux capiz shell shade didn’t completely hide the glass globe inside that finally pushed me into the “outdated” camp.
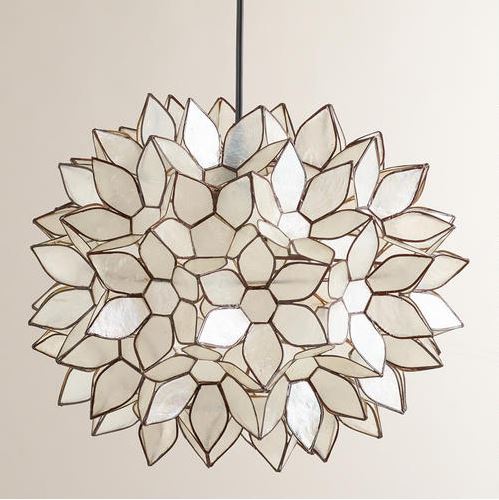
While I love just about any type of chandelier or pendant light made with capiz shells, my favorite ones are the round flower lights. I had hoped to find something in my price range that I could just buy, but everything in my price range seemed a little lacking to me. This one from World Market was one of the cheapest ones, but it seemed really skimpy on petals, and I didn’t like that you can see the metal cage through the petals. Plus, you have to purchase a light kit separately, which seems strange to me. For two lights, I’d still be paying at least $330.
So I decided to use the glass globe and the shade holder from my mom’s old lights and create my own. (If you don’t have lighting parts you can recycle, I found shade holders here, and I always see these glass globe shades at ReStore. Just be sure you’re getting the right size holder for your shade since the openings come in different sizes.)

It took me a while to find the perfect material to make my petals. At first I thought of wax paper. Remember a while back when faux capiz shell chandeliers made out of wax paper were all the rage? Well, I tried it. And I can almost assure you that all of those wax paper chandeliers made a few years ago have since been thrown in the garbage. Even with four sheets of wax paper ironed together, those petals were still way too flimsy and delicate. I can’t imagine how a chandelier made from wax paper could be cleaned.
So then I thought vellum might work. I did lots of scrapbooking back in the day, and I remember that vellum came in different thicknesses. Unfortunately I could only find the super thin vellum, which wouldn’t have been any more durable than wax paper.
I was about to give up, and then I realized that I actually had something that would work — Gila frosted privacy window film! It’s thick, durable, and made from plastic.
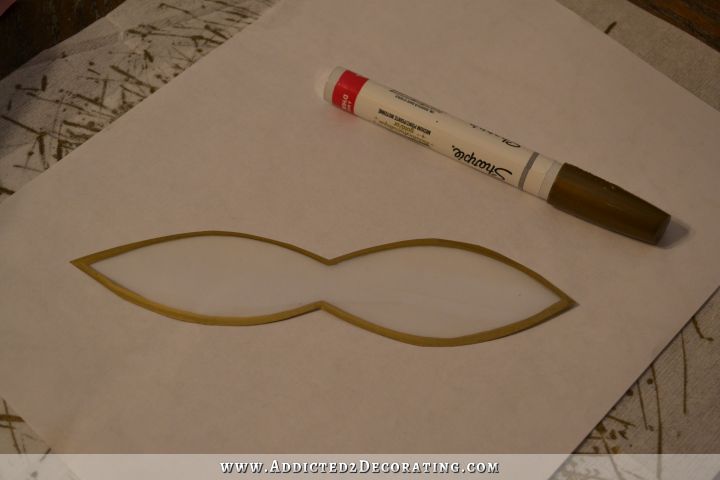
So I created my petal pattern and got busy tracing and cutting out petals. I tried several different patterns — whole flowers, single petals — and finally decided that the double petal pattern worked the best. I just traced them onto the dull side of the film with a pencil. (The other side is shiny plastic.)
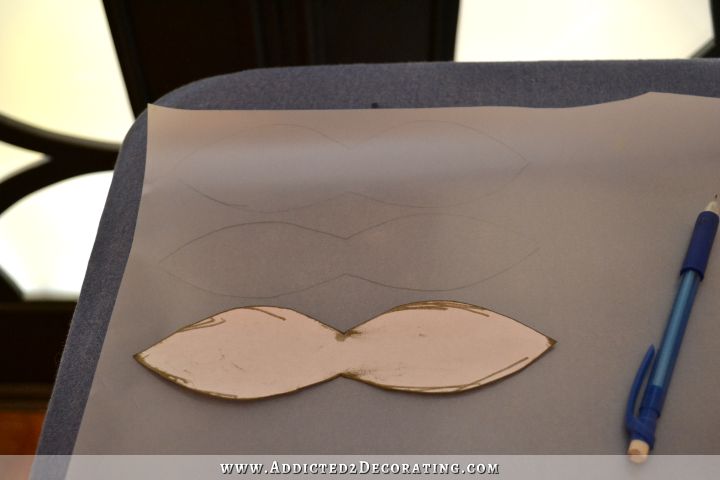
Then I cut them out and outlined the edges on both sides with a gold Sharpie paint pen. I used the oil-based paint pen, not the water-based paint pen. I did try the regular felt-tip Sharpie in gold, but the color wasn’t as vibrant and metallic, and the ink ran out way too fast. The oil-based paint pen lasted way longer, and the color was perfect. I ended up using two paint pens for the entire light.
I propped the glass globe upside down on a plastic container, and started gluing on the petals. I just folded the pieces in half, put a bead of high temp hot glue on the crease, and stuck them to the glass globe as randomly as possible I didn’t want any noticeable patterns in the way I attached them. It took way more window film than I anticipated to cover the entire globe. For this light, I used about one-and-a-half packages of window film.

I didn’t want this light hanging by a chain with the wire exposed like the original light had, so I rummaged through my lighting supplies and found two IKEA Hemma cords that I had purchased several years ago on Ebay.
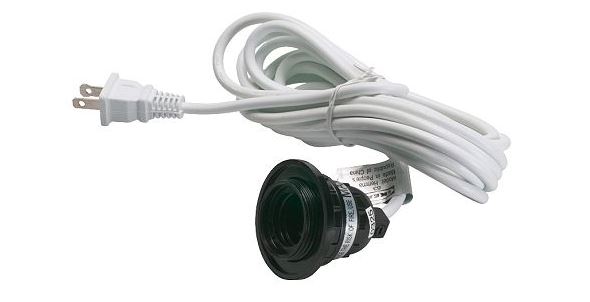
I love those round cords, but the light socket wouldn’t fit my light. So I cut the light socket off, and rewired it to a regular socket that would fit my shade holder. I finished the light by giving the shade holder a coat of antique gold paint, and then wrapping the white cord in jute.

I was a bit nervous that all of the gold edges on the petals might create some really crazy shadows, but this light casts no shadows at all. It creates such a beautiful light for evening and late night use when I don’t want super bright lights.

I used high temp hot glue to attach the petals, so I was fairly certain that this light would be fine with a regular incandescent bulb (although I probably wouldn’t use anything more than 60 watts). However, I didn’t want to take the chance after all of that work, so I used a 60-watt replacement LED light bulb instead. It’s only 9.5 watts, so the light stays very cool to the touch regardless of how long the light stays on.
I love how it turned out! Now I just have to make one more. 🙂
Just a note about the wall color…
I know it looks like I have #86 (paint the walls) finished. I don’t. I started and got about 1/3 of the way done, but haven’t finished. And if you’re wondering why in the world I would choose a navy blue headboard to go in a navy blue room, keep in mind that the window wall will eventually have light colored linen draperies. So my navy blue headboard will be against very light, natural-colored linen and not a navy blue wall. 🙂
My IKEA bedside tables also need some work. But that’s a project for another day.

Addicted 2 Decorating is where I share my DIY and decorating journey as I remodel and decorate the 1948 fixer upper that my husband, Matt, and I bought in 2013. Matt has M.S. and is unable to do physical work, so I do the majority of the work on the house by myself. You can learn more about me here.


Redoing bedside tables is restful, right? I’m very curious to see what you do with them as I have one of the same. Unfinished for almost a year now. 🙂
YES please! I painted mine, but they need the top “beefed up” IMO. Bet you have some fun plans for them!
Your light/shade is gorgeous. What patience! And I love the dark walls against the dark headboard with the linen drapes…can totally see that!
I’ve been looking at Capiz Shell Lights a bunch lately after I saw someone’s closet makeover I liked (but didn’t like the light fixture). So it was crazy opening my Feedly this morning and seeing this. I’m eyeing something similar to that World Market one, but it was an absolute treat to see your DIY approach!
You are amazing.. and creative..That is so time consuming . I don’t think I’d have the patients to do that.. Looks good..!!
LOVE your light – brilliant! (and I did notice the pun after the fact)
So, you said “I love those round cords, but the light socket wouldn’t fit my light. So I cut the light socket off, and rewired it to a regular socket that would fit my shade holder. ” And skipped right over that detail – how did you rewire it to a regular socket???
Could you please detail that part when doing the next light???
I will try to remember to get photos of that on the next one. But wiring a socket is super simple! Inside the cord are two wires — a black and a white. On the socket are two screws — a gold and a silver. Simply attach the black wire to the gold screw, and the white wire to the silver screw. That’s it!
Enlightening response (ha ha couldn’t resist) – thanks that is super simple! Appreciate your tutelage so mush!!
Wow, the light looks fabulous. It such a statement one-of-a-kind piece. I just wouldn’t like to dust it though. You never ceased to amaze me with your creative and awesome DIY designs Kristi.
I love your no -nonsense and honest approach. I feel you represent the real folks out there who can’t afford to change out a rug and pillows each season. I also like the fact that ,in my experience, you actually respond to emails/questions. Other blogs I follow apparently do not have time for their readers. I digress.. I love the light and inspiration, but I did want to ask how you will clean this since you pointed that out about older DIY attempts at capiz lights.
The plastic is very durable. I would use an upholstery brush attachment on my vacuum to “dust” it.
You could also use a blow dryer, on low temp and slow air setting, to blow dust off.
Gorgeous! I love it when you find a way to make these lights for less – I love having custom, expensive looking things, but I can’t spend the money. I love tedious crafting though! Beautiful job.
I LOVE this. I’ve wanted a capiz shell like forever. Even bought the wax paper to make one but never did. Maybe I will try this one.
very beautiful and stunning with that dark blue background! one question though: How do you plan to dust that lamp? any idea?
Vacuum cleaner + upholstery brush attachment. That should do the trick. 🙂
Looks nice with the wall colour.
I can’t wait to see what you’ll do with the bedside tables. You’ve been keeping us in suspense quite a while!
Wow, gorgeous. I think that is one of my favourite projects that you did.
Since I need to update the electricity in my bedroom, I think I will make sure to add it done so I can make two lights similar to yours.
Thanks for sharing.
Absolutely lovely! Looks expensive and high-end too. I have a bedroom with a purple wall that this would look stunning in. And scissors and hot glue I can handle. But I agree with an earlier comment – please share how you rewired a socket. I’m also wondering how you turn on the light. Is it connected to an on/off switch or do you have to plug it in to use it and unplug it to turn it off?
I had to smile when you said this was a project you work on to relax. For some of us (me anyway), this will be a major project! So impressed with everything you do.
Wiring a socket couldn’t be easier! Inside the cord are two wires — a black and a white. On the socket are two screws — a gold and a silver. Simply attach the black wire to the gold screw, and the white wire to the silver screw. And you’re done!
The light plugs in now, but I might hardwire it later, after the ceilin is redrywalled.
Oh NO!
MORE CEILING DRYWALL?!!!??!!!
You did it again! Geez, am I impressed. I just might give this a try. I’m like Lynne, I need a little more information on rewiring the light and what is the size of the petals you made? I know size will vary according to other specs, I just wondered about your size so I have an idea of scale, please. Great job as usual!
Each petal is about 2.5 inches long.
As far as wiring, there are only two wires inside the cord — a black wire and a white wire. On the light socket there are two screws — a gold screw and a silver screw. You simply attach the black wire to the gold screw, and the white wire to the silver screw,and you’re done!
Beautiful!
It’s beautiful! It still make me nervous about a fire happening, sorry.
What about this would be a fire hazard? The LED bulb uses 9.5 watts of electricity, and is cool to the touch even after being on for hours. And if you go to Lowe’s and look at lamp shades, you’ll find that most of them are lined with plastic…and those are the ones meant to be used with incandescent bulbs that burn hot. The only thing that could be a fire hazard about this light is if I wired it incorrectly or poorly, and I didn’t.
I didn’t think Carol was accusing you personally of doing anything to possibly cause a fire with your lamp. To me, it sounds more as if this is a project that is merely outside her comfort zone.
wow, what a good idea!!! love it!!!
Love it! Looks like you bought it at an expensive shop! You are endlessly creative and I love it!!
KUDOS on using an LED bulb. It won’t get hot, the bulb lasts about 18 years, and should cost you about a dollar a year in electricity to burn. I’ve changed out all the bulbs in my dad’s house to LED (He’s turn 100 on March 28th, 2015, and I care for him in his home because he won’t go to my home.) As soon as I move back to my home, I’m looking forward to changing out all the bulbs there! They’re such a smart choice.
Thank you for sharing another inspirational project. The lamp turned out fabulous. You have an incredible ability to conceptualize. I am always amazed. How much did it end up costing for the lamp and will it be a little more for the second one due to needing to purchase additional supplies?
The two lights will use a total of three packages of window film at about $20 each. I had everything else on hand except for the jute and paint pens. So each light will come to about $40.
So beautiful!!! You are amazing:-)
~It’s lovely~ Great Job!
One simple solution to having to unplug it is to add an inline switch. They are made for regular lamp wire though so you would have to be sure to find one that would accommodate that thicker wire. They couldn’t be simpler either. Just cut one if the two wires (the white or the black, ) where it will be comfortable to reach, insert the switch and you are done. I just did that to hang a beautiful chandalier where I didn’t have a ceiling box. I just converted it to a swag lamp and added the switch. I have done this in a previous house where none of the bedrooms had ceiling lights.
This is amazing. I want to try this too. I have been looking for some lighting ideas and this is pretty awesome. Thanks for sharing this. Could you show the round thing you glued the petals onto? I at first thought you were gluing them onto your mom’s half circle shade. I want to make sure I understand what to use. Thanks!
I forgot to take a picture of it before I started gluing petals on, but the whole thing — cord, shade holder, and glass shade — look almost identical to this, except that my glass shade was white instead of clear.
http://www.culturedliving.com/pendantlightingroundglasspendantlight.html#.VND-lXvIWio
And you can purchase the parts for a fraction of that price. I always see round glass shades at ReStore.
Thank you so much for responding! I can’t wait to find one.
Awesome! Love the idea of using the window film. They are gorgeous!
Love them but I have a question how are they hanging? Are they hard wired in or plugged in?
It plugs in. Right now it’s hanging from a hook that screws into the ceiling. It came with the Hemma cord. I’ll probably hardwire them after the room has new drywall on the ceiling.
Oh, Kristi, that is drop-dead gorgeous! It looks like you spent hundreds of dollar for that light. Wow. Once again, blown away by your ingenuity and energy!
That looks amazing and I love the gold outline on each petal – adds a lot to it!
This is beautiful!
For those who are nervous about the wiring part, or can’t find a ball fixture another way to do this is to buy a mason jar wiring kit (cheap and every where, just google or Etsy). It’s all done, either plug in or hardwire, you can get either & you just screw the lid with wiring and a bulb (LED is best of course) into a mason jar.
From there, build a ball out of chicken wire (use thick gloves, lesson learned), around the mason jar if you want ball shape, then K’s petals and the rest of her instructions, which are brilliant !
Another day…..another project! I’ve come to expect that of you. Your light certainly does make a statement and does look very pretty against the dark walls. I love the way you figure out how to mimic something you admire without spending a fortune. Do you plan to put your “spoon” mirror in your bedroom? I think it would certainly blend well with the lights. I have noticed that your walls have some sort of texture to them. The drywall that I am used to has a very smooth finish. Do you have an additional layer over the drywall? I noticed the same thing in your living room. Just curious as to the difference in stuff. Have fun making your next light, it will be nice to see a pic of the whole wall with the bed and both lights. I just love seeing all your before and afters. Blessings
When I lived in Texas all the houses had knock – down texture on the walls.
Ok…I have to say, you are one of the most talented designer/diy’er that I have come across. You have such a huge gift. Love following your blog.
I LOVE this light. Your energy, talent, skill and determination are incredible. I was going to make a rectangular fake capiz light using the wax paper, but never did. Do you think i could make a rectangle light with square “shells” using the window film? i’m thinking of making one similar to the one sold at West Elm. Appreciate your input.
Beautiful light! Thanks for the side note about the wall color, I thought I had missed a painting post somewhere! Will the light colored linen draperies be hanging behind your new lights? These shades stand out great in front of the navy blue, but will they get lost in front of a neutral color background? I love your fearlessness about jumping into new projects and totally understand the desire to make something pretty after all the bathroom demo : )
That is a beautiful light. I always admire your creativity and patience.
Have you thought of using laminated paper (like rice paper or wax paper)?
Fabulous! You never cease to amaze me 🙂
I am wondering about the jute cord. I want to do this to a hanging lamp but the jute I bought was too stiff. Where did you get the jute for the cord and what kind is it? Also, did you attach it with the hot glue gun as well? Thanks!
Would you share the dimensions of your petals? Or maybe a printable pattern? This is lovely. I’d like to make for my daughter
I love the light. Will you share the dimensions of yor petals or a printable pattern?
My goodness! You are so talented… The light looks amazing!
Gorgeous!!! I still can’t seem to visualize where it plugs in at…..I see your cord you used to rewire the light, which is hanging up, but I don’t see any cord going down to plug into a wall socket….sorry to have to ask : (
Now that is a beauty queen for sure!!!
You are amazing!
Blessings,
J
I seriously can’t get over how much I love this. !!!!!!!!! Beautiful
Christie – wow! I love your lamp!! Brilliant! I would NEVER have thought of making that! Gotta tell you, I cannot wait for your emails. I enjoy (and am a little bit jealous!) your explanations about your thought process, but I am really amazed at your abilities. Anyway, I adore your lamp!
Will you share a printable pattern of your petals?
Thank yoy
I too would love if you would share a printable pattern of your petals. 🙂
Thanks so much.
I’ve just spent about an hour ogling over your blog! Seriously, my jaw literally dropped a few times. You’re amazingly talented!!