DIY Painted Bathtub Follow-Up: Your Questions Answered
Well, there must be loads of ugly bathtubs out there 🙂 , because my post yesterday on “How To Paint A Bathtub” really struck a chord with a lot of you! And of course, many of you had some follow up questions about the product, the process, the supplies, and much more. So instead of answering those questions individually through comments, emails, and Facebook comments, I thought I’d just lump them all into one post so that they’re all easy to find for future reference.
First, I’ll answer a question that actually made me angry.
Isn’t the tub in the “after” picture a new/different tub?
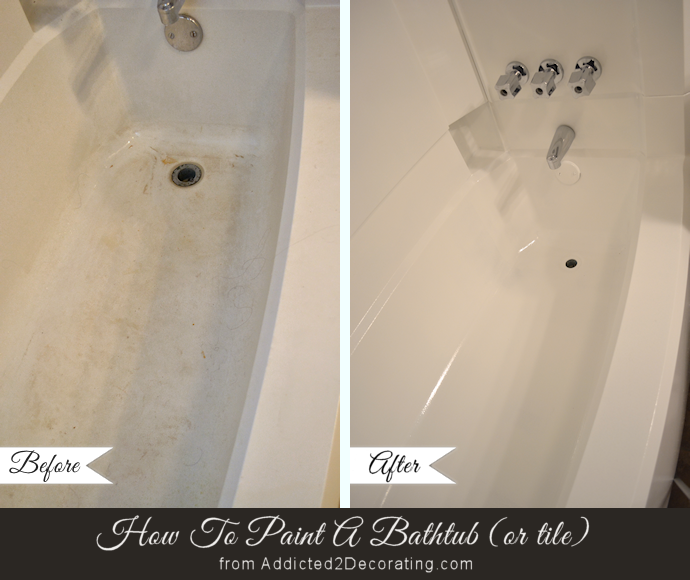
I actually had four…make that FIVE…different people insinuate that I’m just a big ‘ole liar who actually replaced my old tub with a new tub, and tried to pass off the new tub as a painted tub. The first one didn’t even ask the question. She just wrote a comment that said, “The one on the right is a brand new tub! Look at the picture closely, people!” To that I say…
Are you out of your mind?
It is the exact same tub! In the “after” picture, the reason the two drains look different is because I painted them!!! I couldn’t get the drains off, so I painted them!
But seriously…I’m a DIY blogger, which means that if I had replaced the tub with a brand new tub, I would have DIYed that process. I probably would have done it all by myself, with no help from anyone else, just like I do all of my other projects around my condo and on my blog. And I would have written a blog post about it!! What possible motivation could there be for me to lie about painting a bathtub? That’s probably one of the dumbest things I’ve ever heard.
Okay, now that I’ve got that off my chest, let’s move on to the legitimate questions from the actual normal, rational people among us…
What material is your bathtub made of?
My own bathtub and surround are fiberglass. But the Rust-Oleum Tub & Tile Refinishing Kit can be used on ceramic, porcelain, fiberglass, and acrylic.
Were all of the prep steps recommended, or did you just do them for good measure?
Every one of the prep steps that I did (washing the tub with water and bleach, scrubbing the tub with Comet, scrubbing the tub with Lime Away and a scouring pad, and sanding the tub with 400/600 wet/dry sandpaper) were all listed on the package. I didn’t add any of my own steps. I simply followed the instructions on the box to a “T”. The top of the box also lists all of the supplies that you’ll need for the process, so there’s no guess work.
How long did the fumes hang around?
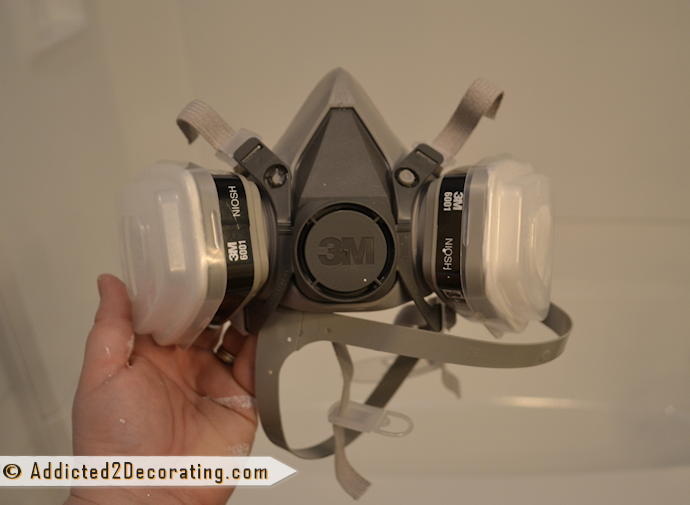
As I mentioned, the fumes were so incredibly strong that even with a breathing mask, they still made my eyes burn and water. 🙂 The lady at Rust-Oleum had warned me, though, so I was prepared. (Please don’t use this product without one of these masks!!!)
But to answer the question…
I finished doing the second coat of paint around 2:00am (yes, I’m a late night DIYer) 🙂 . My bathroom doesn’t have a window, but I didn’t want the fumes to permeate the condo any more than already had, so I turned on the ceiling fan, turned on the ceiling vent fan, closed the bathroom door, and shoved a towel in the space between the door and the floor.
By 7:30am the next morning, the fumes had dissipated to the point where I could be in the bathroom comfortably without the breathing mask. By that time, the fumes were very mild, and were just about as strong as if I had simply polyurethaned something in there. At that point, Matt didn’t have any issues with the fumes either, and he is very sensitive to fumes.
Did you have any chips in the tub at all?
Fortunately, I didn’t have any chips or cracks in my tub. However, I know that many of you probably will have to deal with chips and/or cracks, and there are steps listed on the instructions on how to take care of those. It recommends using a patching compound such as Liquid Steel. I’ve never heard of that product, but I imagine that any of the metal/fiberglass patching products from your local home improvement store would work. I know I’ve seen small-ish containers of Bondo at Home Depot, and there may be others as well.
Can you use the tub at all during the 3-day curing time?
Nope. You’re not supposed to get any water on the tub at all. The finish is pretty durable as soon as it’s dry, so you don’t have to walk on eggshells around your newly painted tub. I even stood in my tub about an hour after painting the first coat, and then I even sat on the edge of the tub and scooted across the edge with my bum, and the paint was completely unaffected. But to give the paint the best possible chance of performing at its best, I’m going to follow directions and not use the tub for three complete days.
So if you’re a one-bathroom household, that could certainly pose a challenge.
What if you want the finish as smooth as possible? What type of brush or roller would you recommend?
If you want a perfectly smooth finish, I honestly wouldn’t recommend using a brush OR a roller. The paint starts off very thin and runny, but it gets “sticky” very quickly. It’s a self-leveling product, but I still don’t think you’d get a perfectly smooth finish with any kind of brush or roller.
For a perfectly smooth finish, I’d recommend buying, borrowing, or renting a sprayer. I think this product would do amazingly well with a sprayer. If I use the product again, I’m definitely going to try to get my hands on a sprayer. The finish would be absolutely beautiful!
How do you think this paint would work in a sprayer? Would it be more prone to drips and runs?
The instructions tell you how to mix the paint if you’re going to use it in a sprayer. I personally think that would be the absolute best way to use it. You’d get a gorgeous, factory-like finish with a sprayer. Of course, you do have to know how to use a sprayer. 🙂 Just like spray paint, if you’re a newbie, you definitely might get some runs and drips. But if you know what you’re doing with a sprayer (e.g., you understand not to put it on too thick, and to do smooth, even motions, etc.), then it would work beautifully.
How long do you have to work with the paint once the two parts are mixed?
The instructions say to use the paint within six hours of mixing the Part A and Part B together.
On tile, what kind of brush would you use?
If I were painting large, flat sections of tile, and I didn’t have access to a sprayer, I would absolutely use a roller. Of course, I would use the brush first on the areas where I needed to “cut in” (i.e., areas where the roller won’t reach, such as corners), and then follow up with the roller on the large areas.
Would this work on faux (cultured) marble?
I actually called Rust-Oleum to ask this question. Their answer…this product isn’t made for cultured marble. 🙁 BUT…that obviously hasn’t stopped some other daring DIYers from trying it. So the official answer from Rust-Oleum is “no”, but I’m generally the kind of DIYer who uses that information more as a suggestion than a rule. 🙂
How much did this project cost?
Rust-Oleum provided the refinishing kits at no charge for my bathroom. But my tub and surround required two of the kits, so if I had purchased them myself, that would have cost about $52 for the two kits (they’re $25.97 each at Home Depot).
The rest of the supplies (brush, roller, roller covers, Comet, Lime Away, scouring pad, sandpaper, etc.) cost me about $75, including the $30 breathing mask. But I bought everything new. In other words, I generally have Comet on hand at home, but I was completely out, so I bought a new huge container of it. I generally have scouring pads at home, but I had just thrown out my last one, so I bought a new package of seven (and only needed one for the project). I actually have a 6.5″ roller cage, but I saw this new kind and wanted one, because I’m a sucker for shiny new products. I actually already own two of the breathing masks, but because I’m an irresponsible DIYer who can’t seem to keep up with the shiny new tools that I buy, I couldn’t find either of them. (And those are $30 each!)
So in other words, it’s very likely that you’ll already have some of the supplies on hand, especially if you do DIY projects regularly.
Can you use this product on a bathroom sink?
The box says that it can be used on ceramic, porcelain, fiberglass, and acrylic. Since most sinks are made of one of those things (unless you have a cultured marble sink), then yep, you can go for it!
What kind of cleaner can you use on the painted bathtub?
I’ve actually looked all over for this information, and I can’t find it anywhere. I do remember years ago, I had a client who had her tubs professionally sprayed, and they told her that she shouldn’t use any types of harsh abrasive cleaners on it (like Comet or Ajax). Just keep in mind that it is a painted surface.
How long will the finish last?
Again, it is a painted surface, so common sense will tell you that it won’t last forever. But I think the amount of time that it’ll last is completely dependent upon each household, and the wear and abuse that you dish out to your bathtub.
I think this question is probably impossible to answer…almost like, “How long will the finish on a painted coffee table last?” Obviously that answer would be much different for a single woman than it would be for a married couple with five young boys. 🙂
Can you use this bathtub paint on garden tubs with jets?
I called Rust-Oleum about this question also. 🙂 Short answer…YES! You just want to be really sure that you tape off the jets prior to applying the paint so that the paint doesn’t get on/in the jets.
Phew! I think I got all of the questions answered, but if I’ve forgotten something, or if you’ve thought of another questions, just leave it in the comments below and I’ll add it to this post.
And if you missed the original post (or the video that I added later in the day), you can see that here.

Addicted 2 Decorating is where I share my DIY and decorating journey as I remodel and decorate the 1948 fixer upper that my husband, Matt, and I bought in 2013. Matt has M.S. and is unable to do physical work, so I do the majority of the work on the house by myself. You can learn more about me here.
is that a new bathtub? lol.. i kid i kid.. good job..
After 2 coats I feel a rough spot. Can I send before the 3rd coat?
I would certainly try it if I were you, but just make sure it’s thoroughly dry before trying to sand. If you’re unsure, it might be best to contact the manufacturer’s customer service number.
Curious if a suction-backed bath mat can be used post refinishing? Or, can you texture the bottom of the tub? Seems like the tub bottom will be really slick. Thanks so much for posting this!
Yes it can I did this to my tub and it was slick had no issues with the paint post suction bath mat.
Whoever made those comments about this being a new tub, and insinuating that you are a fake hasn’t been following you through this process, or any other. Kristi, you have tons of fans who you have inspired, me being only one of them. Keep up the good work. You are a great inspiration!
If I were to do this to a sink that had been previously painted (but is now hideous) would I have to remove that layer of paint first?
This is awesome Kristi, keep doing what you are doing, inspiring all of us.XO
Not trying to be snarky, really, but I’d love to see an update with pics in 6 months and again in a year. I’m so tempted but read some negative reviews on Amazon.
I truly do believe without a doubt it looks as amazing as the pics portray. Can’t believe the comment that someone would think you replaced the tub. That would be blog suicide for sure, lol. 😉
I’m definitely anxious to see how it holds up! I’m hoping that we won’t still be here in six months, but if we are, I’ll post an update.
Any updates to report? I used this kit on my 40 yr old porcelain tub. I followed the instructions explicitly. The paint started bubbling up & peeling in less than 3 months. And the bright white turned yellow.
One reviewer suggested that sanding your tub down to a fine polish offers no grip for the paint to hold on to.
I’d like to know how your results are holding up.
Well, it’s been a while, and I know you said you hoped not to be there in 6 months, so I’ll presume you’ve moved but, how long were you there and how well did it hold up? I’m very curious. Considering doing ours but, really would like to know how it held up and how well it cleaned without any comet, etc? Also, I would expect the paint to be sturdier than just if one painted a table tho, since it is an epoxy based paint so hopefully that gives it a little more length of days?
Always, Always to helpful. Thanks again for sharing your awesomeness with all of us in the learning world.
What a spectacular job on your tub! 🙂 and all of the thorough follow-up. How quickly you move through your projects is totally inspiring! Especially since you do it all YOURSELF 🙂 Thanks for inspiring me to make my home, mine! Hope you get that home you are shooting for 😉
Thanks for answering all these questions. My husband read both of your posts and he said to tell your readers that if you use a sprayer to make sure you clean it up ‘Pronto Tonto’ after use because once that paint and hardener start to dry, you can easily ruin your expensive paint sprayer. Interesting and I’m hoping I talked my husband into giving this a try in our tub.
Nice job, Kristi! I discovered your blog a few months ago and have been following you ever since. Ignore the snarky, mean-spirited naysayers. I absolutely love what you’ve done with your condo and can’t wait to see what you will be doing in your new house when you move. Like Jan, asked I, too, was wondering about the use of a suction mat. I’m wondering if it would pull the paint up. Does Rustoleum mention this at all?
I watched the video the other day and I’m still amazed at the results. I kind of understand how someone unfamiliar with you might think it was a different tub. There’s something about the lighting and angle on the after picture that makes the ledge look wider until you really focus on it. Ironically if you look closer, as your naysayer suggested, it becomes clear it’s the same tub! LOL
I wish you had shown this tutorial while I still had my old townhouse with the awful yellowed tubs. With the market the way it was when I sold it there was no way I was putting the money into replacing them but now I know they could have looked so much better! Still good to know for the future!
“Awful yellow”? Come on! That’s vintage 70’s “Harvest Gold” and yes it’s pretty darn awful. I’ve got one that I plan to repaint with this kit. Thanks to this blog, I’m alot more confident about taking it on.
You are hilarious! I can’t think of a better way to respond to those who thought you weren’t being honest about the tub. “Are you out of your mind?” – LOL! I love the detail and time you take to answer everyone’s questions and share your experience. This is awesome and all your effort is so appreciated. Sharon
I’mma tell you what though, I used one of those same kits on my bathtub, sink, and toilet, because I wanted to change it from white to almond, and I wanted the fixtures to all match. And about…less than three months in? Yeah, bubbling, flaking, peeling off. I get to get all toxic again and redo it, probably at least twice a year. It’s uglier now than it was before I painted it, and I’m not in a hurry to do it again as I’ll get nearly poisoned again trying to do it.
I laughed so loud when I read, “I couldn’t get the drain off SO I painted over it”~That sounded like something I would do!
P.S. It looks amazing!
Great post! Would love to try on my cultured marble vanity with integrated sinks. It is from 1974! My sister had her tub and wall tiles professionally done and while beautiful it was $800.00.
I’m just about speechless that anyone would think you just plopped in a brand new tub! Those comments only prove what a great finish this Rustoleum product provides. Saw you in a pic on another blog from the Rustoleum conference and wanted to let you know you look fabulous!
Hi Kristi, The tub looks AWESOME!! You are very brave to DIY that ! I’d be so nervous. And to all those RUDE commentors….BOO to them…..If they were true loyal readers then they should KNOW that you would never try to pull one over on anybody…. How dare they! Thanks so much for all your great ideas and sharing your talent with us!
I know it made you mad but the Rustoleum people will be tickled to hear that people accused you of passing off a new tub as your painted tub!
I moved into a house where the owner had recently painted the bathtub, I suppose doing it the same way you did it, and it is holding up beautifully. I expect it to remain looking smooth and white for a very long time, if that helps to answer the longevity questions asked by so many. 🙂
Kathy,
Thanks for the long term update! It seems like if it is installed right it will hold up a long time. Anyone who has peeling issues must have done it wrong.
There are great reviews on Amazon and even some where people came back months later to say it was holding up great. One question what did you clean your brush with? Some of the reviews say you have to throw the brush away ~~ impossible to clean.
I so enjoyed reading about this project. We replaced all our bathrooms several years ago but had I seen this prior to all that expense I probably would have attempted to complete this. It is absolutely beautiful and and love ALL your projects. Look forward to getting post daily. Thanks and have a wonderful day.
Great Post! I love the way you responded to the people who were insulting and accusing you! You go girl!
I love reading about EVERYTHING you do to your house that makes it so beautiful. You have inspired me to start fixing up my own house, Thank you Kristi!!! Keep posting more, I love it!!!
Be flattered! Because it looks perfect! And they can’t imagine they could get results like that doing it theirselves! It’s brave, daring and looks so clean and crisp! I am impressed!
That’s really amazing, I can’t believe how beautiful that turned out!
PS Thanks for the super detailed tutorial and Q&A 🙂
I have to lol at the comments about it being a different tub. I think it’s because the angle is kind of different in the second pic. My brother did this with his tub but unfortunately, within several months the area near the drain peeled off:(
Maude
Hi Kristi, any thoughts on caulking? Our tub needs to be recaulked, so I’m wondering if this should be done before or after painting.
Great question! I totally forgot to mention that! The instructions say to remove all caulk before painting, so the re-caulking would need to be done after painting.
Wow – thanks for the speedy reply! Now I just have to figure out where to shower for a few days 😉
You have to remove the caulk? Does it recommend an easy way to do that?
You just have to scrape it out with something like a utility knife.
I’m interested in knowing if you ever find out about cleaning procedures. I also have a question, what was the clean-up for the brushes etc. I have a sprayer and am trying to decide if it will be worth it to use it. I don’t want to ruin it if the clean up isn’t effective.
Love this! Currently moving into a big, totally unupdated (hmm, there’s probably a more correct way to say that…) home. The shower and tub have a goldenrod surround and is hideous. I’ve been trying to think of clever ways to decorate that would make the color look intentional. This is waay better.
I’ve been refinishing tubs professionally for 14 years, and here’s what I have observed: That kit has been around at least 10 years. If you follow all the directions to the letter, you may get about a year of no peeling. Then it starts discoloring all by itself, and any areas where soap might concentrate start to flake and peel. The real issue here is that consumer-friendly bathtub refinishing products are so “watered down” to be safe for untrained DIYers that they lack the durability of a professionally applied, commercial-grade product. Once it starts peeling (and it WILL), you will have to strip it off using an even nastier paint stripper, or pay a pro $75 to strip it, plus the regular refinishing fee. I, too, am a DIYer. But unless you are going to sell the place right away, this is a project better left to a pro. I look forward to your 6 month follow-up. Nice blog!!
Please post an update on how the tub is holding up. I’ve been sitting on a box of Rustoelum waiting until they day I get enough nerve to try it out. You’re pictures make me think it will be fabulous but I’m wondering about the longevity of the product.
I am wondering how this could be tinted to paint a design on my tile and tub surround.
Hi Kristi,
What did you paint the drain with? My drain is rusted also, so I may have to replace it. Thanks so much.
I used the Rust-Oleum Tub & Tile paint on the drains as well.
Please update us on the tub!
We moved out of the condo in mid-October, and the paint was holding up just fine. No chipping, cracking, peeling. And this was the only bathroom I used to shower, so it was in regular use from the time I painted it until we moved out.
Great job! Naturally someone who does this professionally is going to poo poo it. I remember reading comments like that when you could start buying cheaper glasses online. In the end, I wouldn’t care if it peels. It would still cost less to redo it every few years than to buy a new one or pay someone else to do it. Besides, my sister did hers and it’s been several years.
You know, I’m seriously considering this. I have the UGLIEST brownish yellow tub, toilet and sink on the planet. Then to top it off, the tile on the floor is that too! It looks like French’s mustard vomited all over the place.
I’m willing to bet this could be done with my sink and toilet too! This is so going to be a total project for me. I can hardly stand it. I am like totally wanting to Home Depot right now and get those kits. I can certainly identify with getting stuff done. lol!
Hi. So glad I found your blog. You are such an inspiration! Just wanted to see how this finish is holding up on the tub…any problems yet? Thanks much, Ragan
PS….I am thinking of installing a solid glass backsplash….any hints to painting the back (probably a uniform French blue)? I can’t handle the $256 glass paint.
We haven’t lived there in a year. It looks great still, but that doesn’t really give you an idea of how it would look with daily use. So I’m probably not much help there.
On the backsplash, I would suggest using either Martha Stewart craft paint or Folk Art multi surface paint. Both are available at Michael’s, and both are made to be used on various surfaces, including glass. Give them at least 24 hours (more is better) before handling/installing the backsplash, and the paint will be very durable.
Thanks much for the reply. I will go check those paints out…although husband is skeptical about the whole idea of a glass backsplash. We will see if I prevail! Can’t wait for your next project….my fav blog by far!
Hello!! Soooo my husband and I are wanting to do this and I had a question now that it has been a little over a year out…. How has she held up? (The tub, that is? lol) Still looking good?
Can you change the color of the tub when you paint it- ours is black, so can it be painted white?
I was wanting to do this but I have a fiberglass tub, which flexes, and the box says to not use this product on flexible materials. How long has it been since you’ve done this project and have you experienced cracking? Thanks!
Hello, good job. wondering do you think I could paint a white tub black?? thanks Crystal
Will this work on a 1970’s mustard yellow bathtub, or will it show through?
It should work, but it might take three coats.
How’s it holding up 2 years later? I have a lovely whirled peas colored main bath and would love to see it white.
I moved into my home 5 years ago and it has a ceramic/steel tub that was sprayed. I have no clue with what or what cleaners were used on it. It has been peeling away hard sheets of paint since I have been here. My big problem is getting all the paint off so I can apply the Rust-oleum. If anyone has any ideas holler. Thanks and your tub looks very good, I also do all my own DIY.
I think the smell is enough to scare me off. Just put in a 4-piece shower stall
in the basement. Looks great. Think I’ll crack out the old pink tub upstairs
and install a 4-piece unit. Probably easier….won’t have to work like a maniac
so fast as I would with painting. More expensive, but if I tried the paint job,
for sure, I’d end up busting up the tub anyway and throwing it away.
Glad painting worked for you, though. Pity the person who buys your condo.
The problem really isn’t solved….just covered up.
What do you use to clean the tub? My husband painted our tub, and is afraid for me to use any products, and I don’t have any idea what to use.
You can use a non-abrasive cleaner. I think it gives more details on the tub and tile paint package label.
Hi. I’m so glad to found your blog. You are such an idea! Please post an information, how the tub is holding up.
Do you remember the name of the paint color on your wall?
It’s Mythic Forest by Behr.
Thank you!
What about a clearcoat?
How did you clean your brushes after using this product?
Thank you for this. I have a tub like this that I am going to pain and like you, I can’t get the drain and its connector off. I love the paint it idea. I thought that was what you had done. Now if mine can come out this good, I am in good shape.
Does this come in different colors? My home was built in 1964 and has a pink tub, toilet, and sinks. The second bathroom has blue shower, toilet and sink. I’d like to match the colors if possible.
It comes in different neutral colors, but I don’t think it comes in colors like the ones you’re wanting.
Hi Kristi! I just finished my second coat on shower tile and will be doing a third. My question is, what’s the best way to carefully sand down a few drips before the last coat without compromising the adhesion of the first two layers? Thanks!
I would sand it very, very lightly with some super fine sandpaper. I’d try 400-grit first, and again, very lightly. If that doesn’t work, then you could try 22o-grit. Then be sure to wipe up any dust with a barely-damp cloth and let it dry thoroughly before applying the last coat. Just use a very light hand and lots of patience.
Not sure if you are still answering questions….if so, can you tell me whether you think this product will work on a fibreglass tub and surround which has a textured finish?