DIY Painted Hardwood Floor – Offset Striped Design – Part 1
I have finally made some progress on my painted hardwood floor in the guest bedroom, and I’m really excited about the offset striped design is turning out. Here’s a peek at the progress so far…
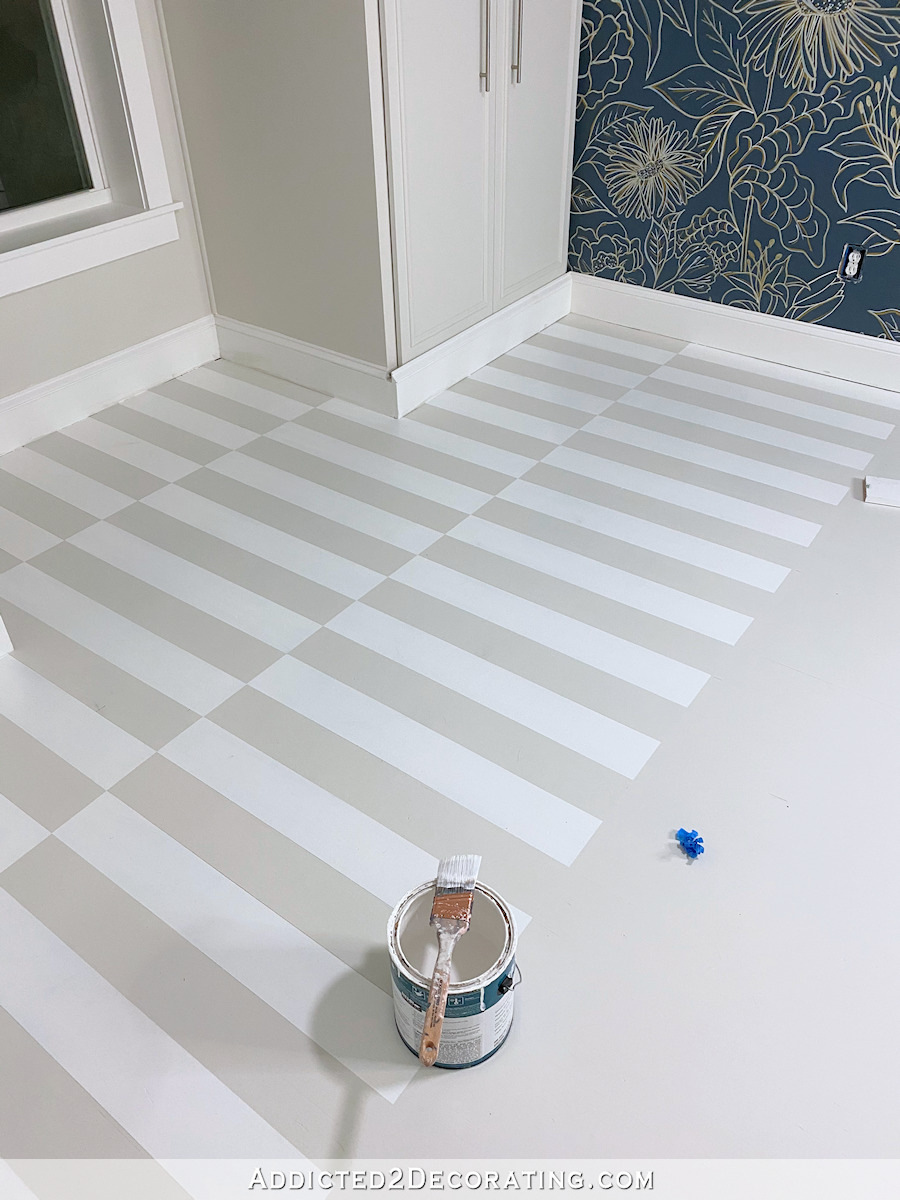
That picture was taken pretty late last night, so it’s a bit dark. I’ll get better daytime pictures when the floor is finished. But in the meantime, I’ll start at the beginning and show you the steps I’ve taken to do this painted hardwood floor design.
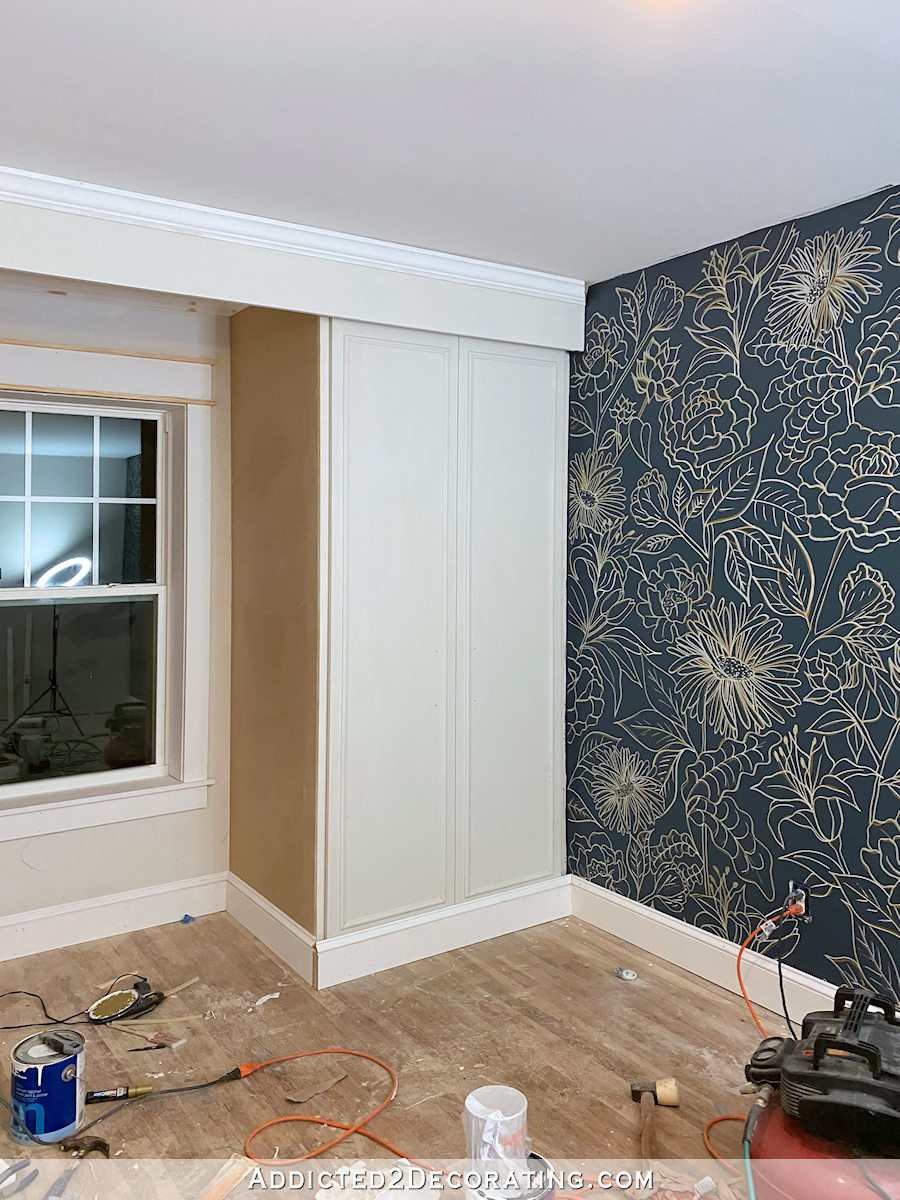
This floor is around 70 years old, so it has seen better days. It has stains on it, plus it has some gaps between some of the boards. So I started off by filling some of the bigger gaps. My goal here wasn’t to make the floor perfectly smooth. Had I wanted that, I would have done a full-trowel wood filler that is specifically made for hardwood floors. That’s the type that I used on the studio floor. The full-trowel wood filler for hardwood floors also comes in different colors so that you can match the species of wood floor you’re using so that it looks the same as the wood after it’s stained and sealed.
But my goal here was simply to fill in some of the bigger gaps before priming and painting. My goal wasn’t perfection, and since I was painting the floor, I also didn’t need to use species-appropriate wood filler. I just used the same DAP Plastic Wood filler that I use on all of my projects.
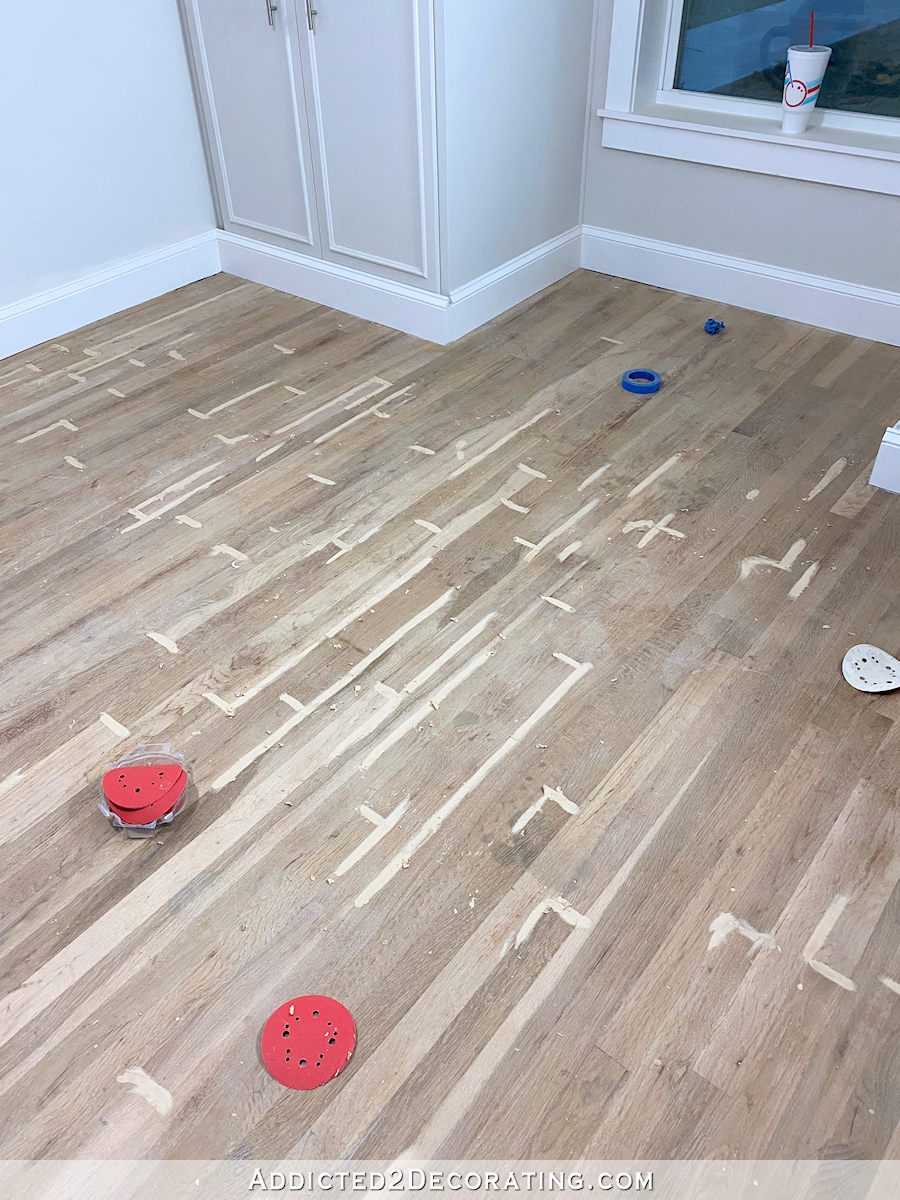
After that dried, I did a quick sanding with my little 5-inch rotary sander.
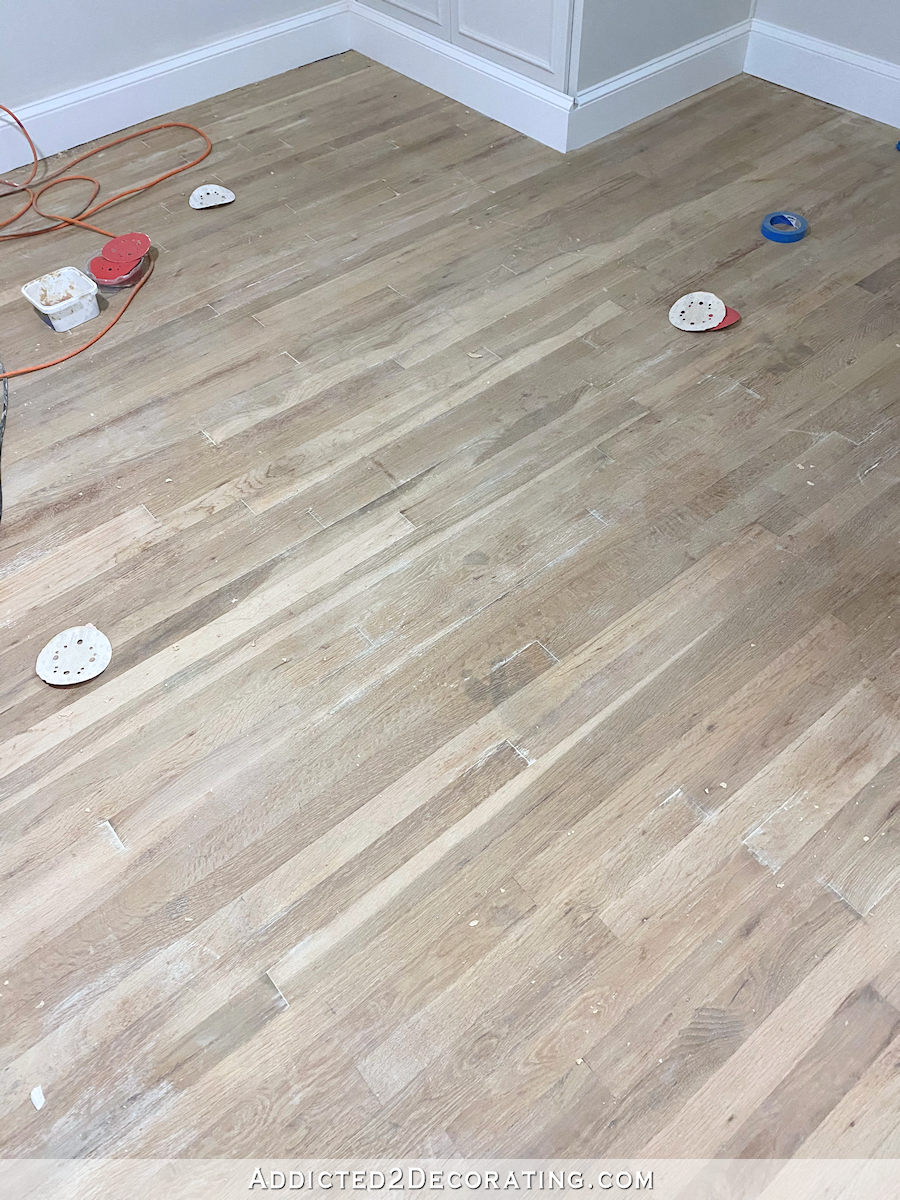
Once all of that dust was vacuumed up, I was ready to prime. I used a little 6-inch roller that is made for smooth surfaces to roll on the primer. Since I was needing to cover stains, some of which were oil from a bag of dog food that had spilled onto the unsealed wood floor, I used an oil-based primer. My absolute favorite go-to primer is oil-based Zinsser Cover Stain. I’ve never met a stain that this primer won’t cover.

Here’s how it looked after most of the floor was covered in the primer…
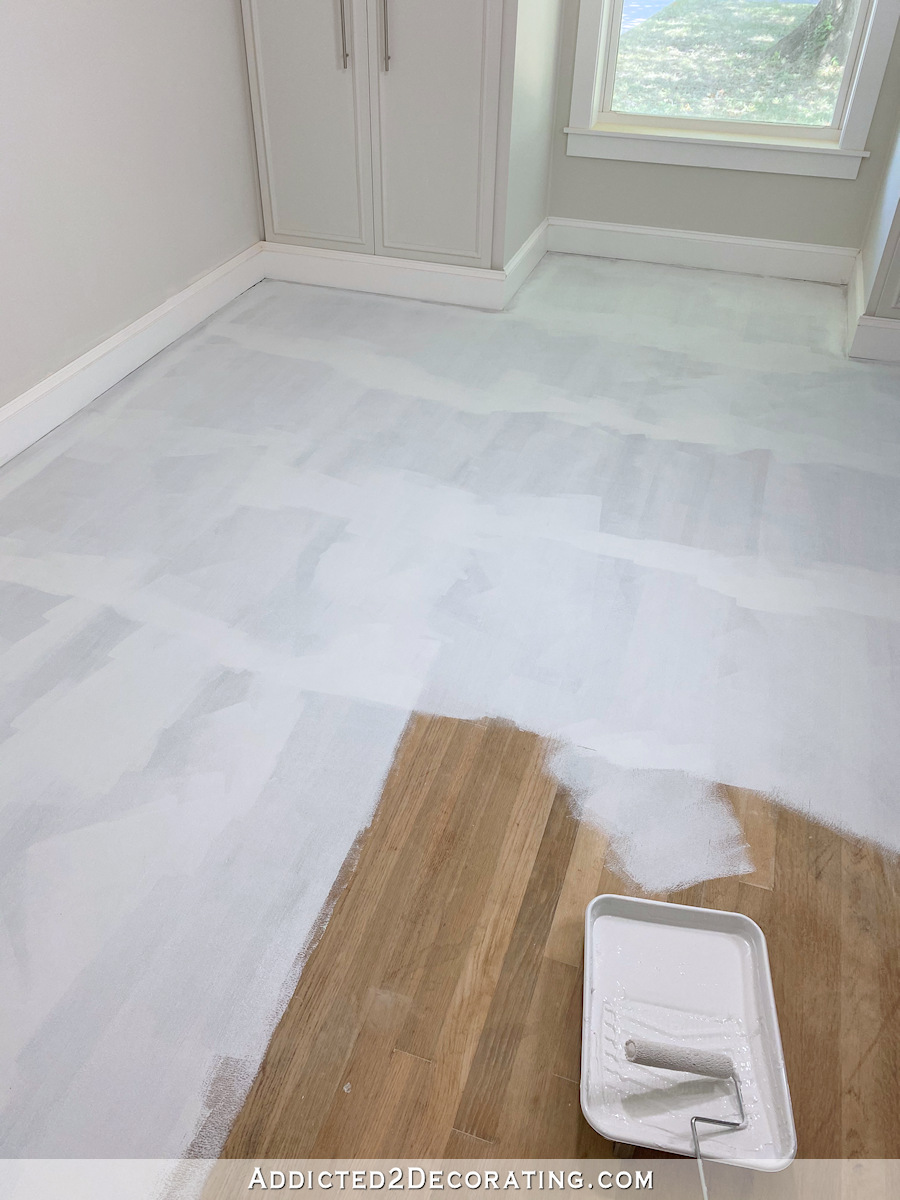
I let the primer dry overnight, and then sanded it by hand with 150-grit sandpaper. That sounds really laborious, but the room is small, so it went fairly quickly. And one of my favorite things about the Zinsser Cover Stain oil-based primer is how beautifully it sands. When it’s dry enough to be sanded, it sands to an amazingly smooth finish, and the primer that sands off is like a fine chalk dust consistency. If it pills up on your sandpaper, you know it needs more time to dry.
After sanding and vacuuming up the dust, I was ready to put the first coat of paint on. I didn’t use any special floor paint. I’m going to rely on my clear topcoat to give the floor the durability and protection it will need. So I used the exact same paint that I used on the walls — Benjamin Moore Ben paint in an eggshell finish. The color is Classic Gray. I applied this paint with a six-inch roller for smooth surfaces.
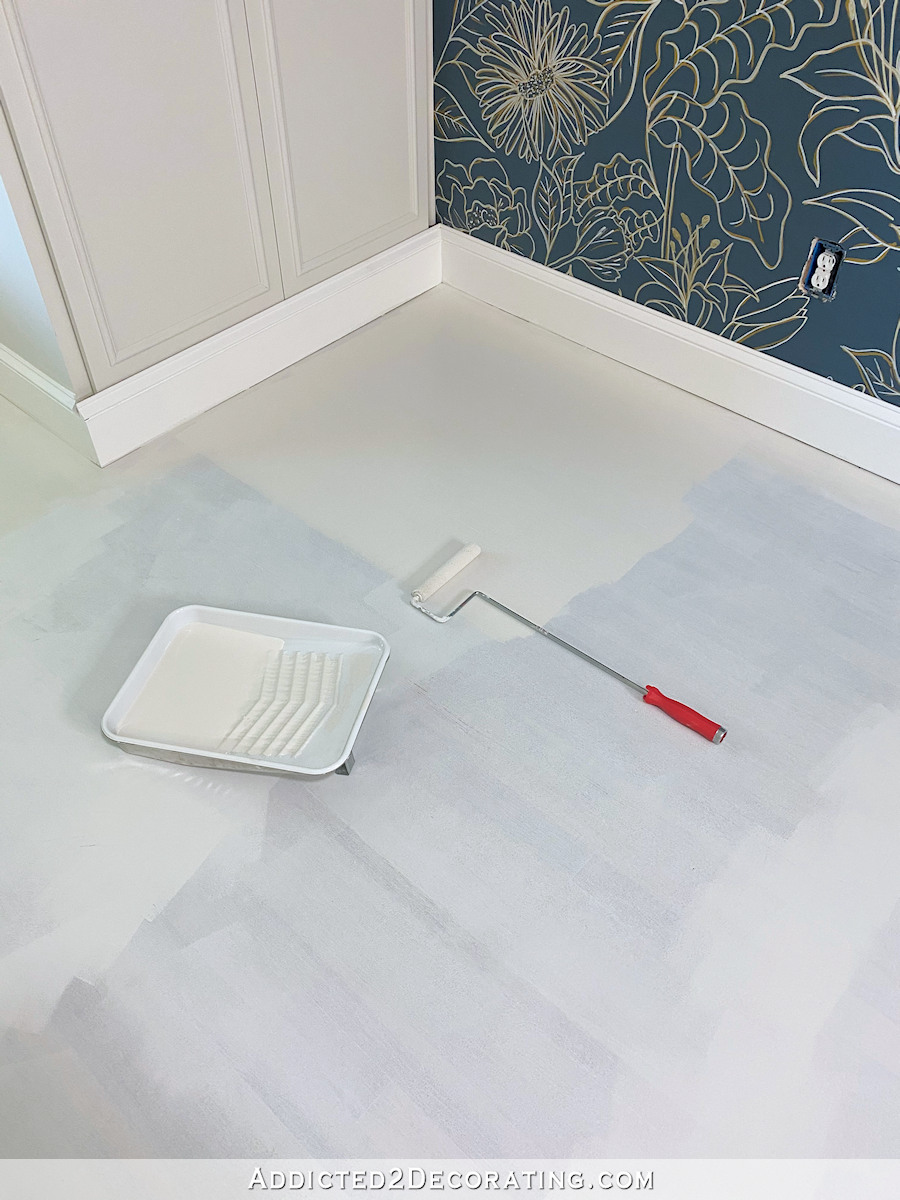
And after two coats of the Classic Gray, and letting the floor dry overnight, here’s how it looked…
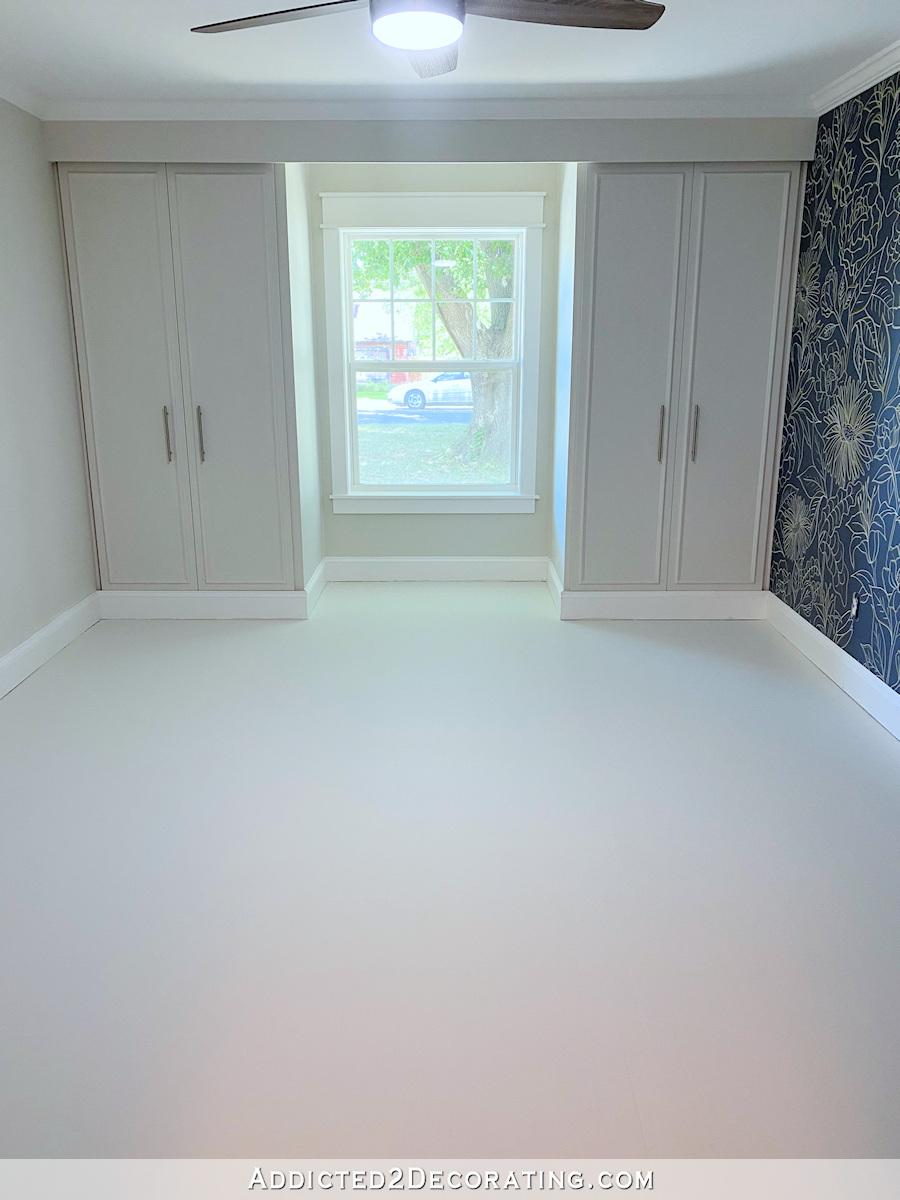
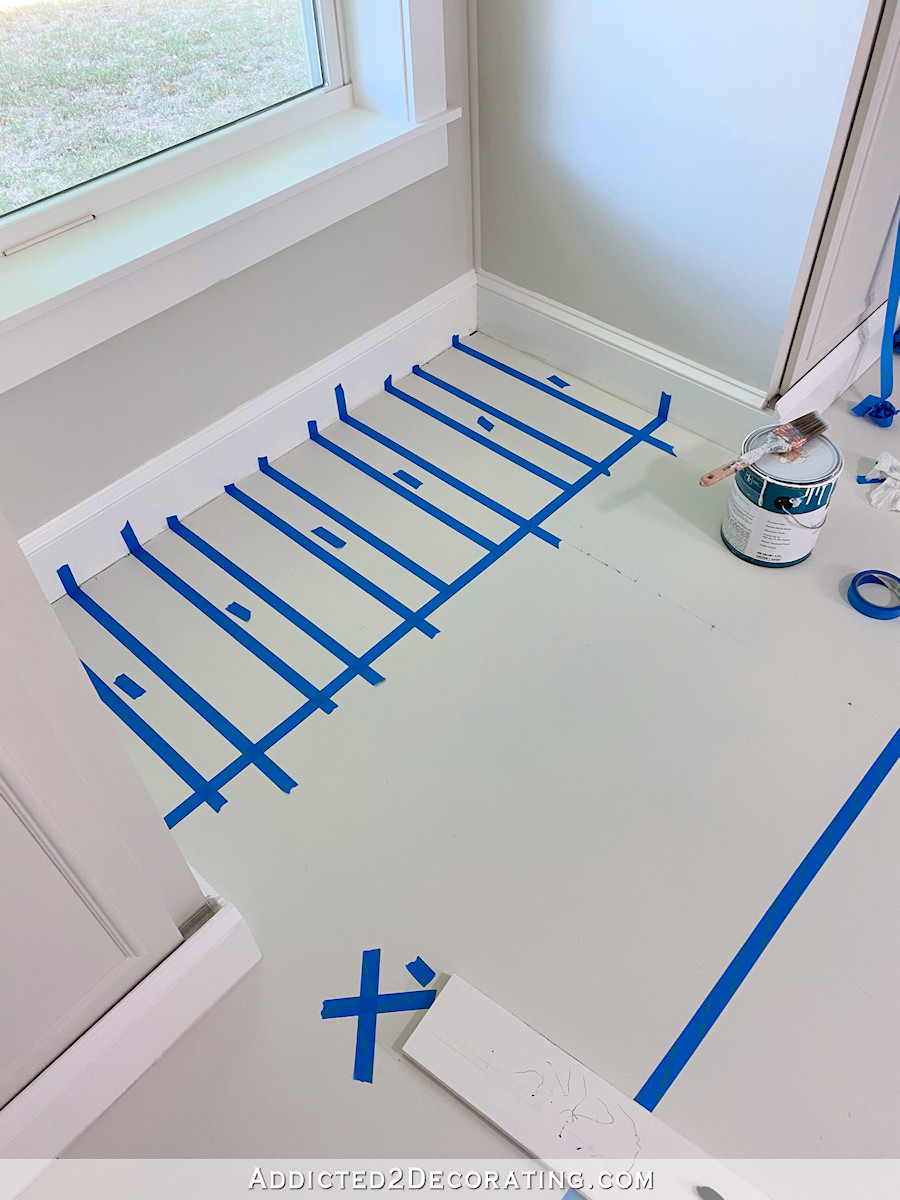
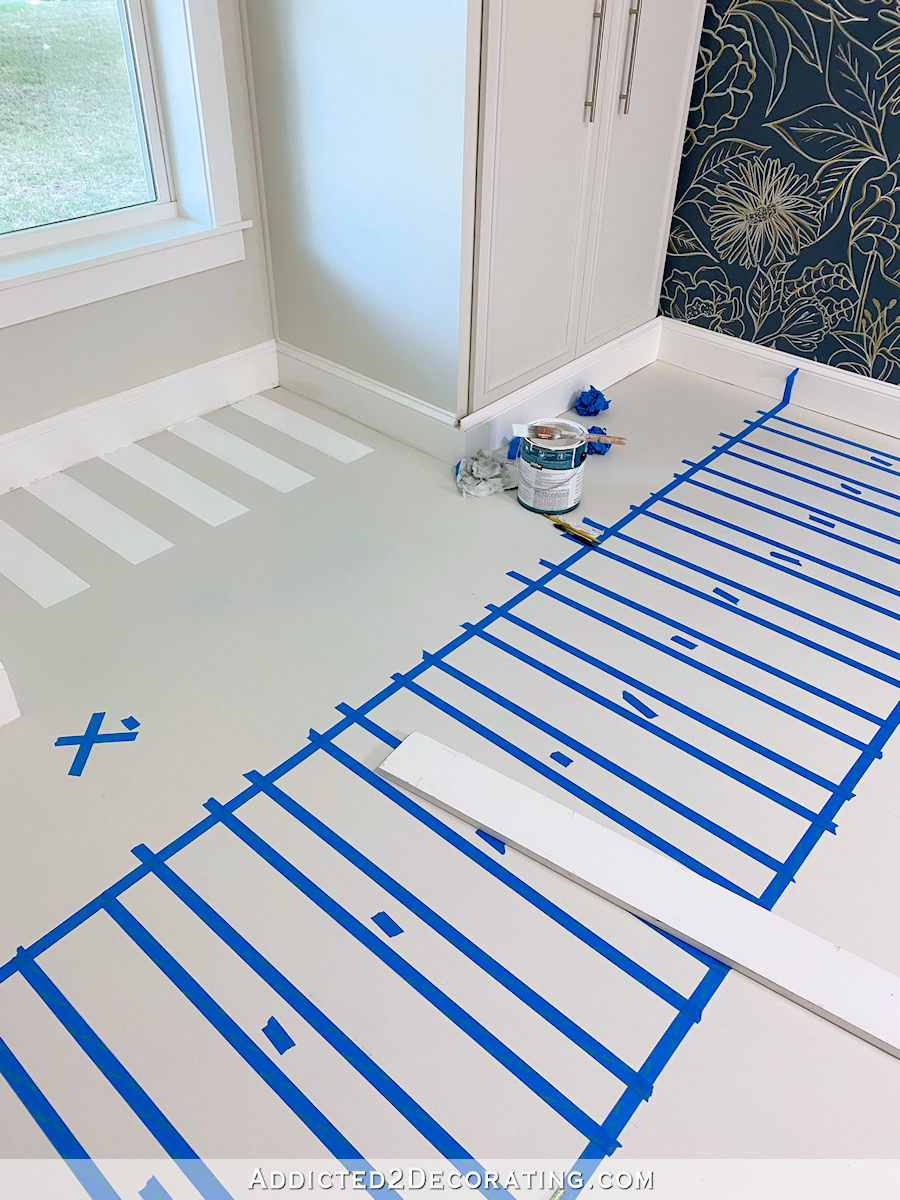
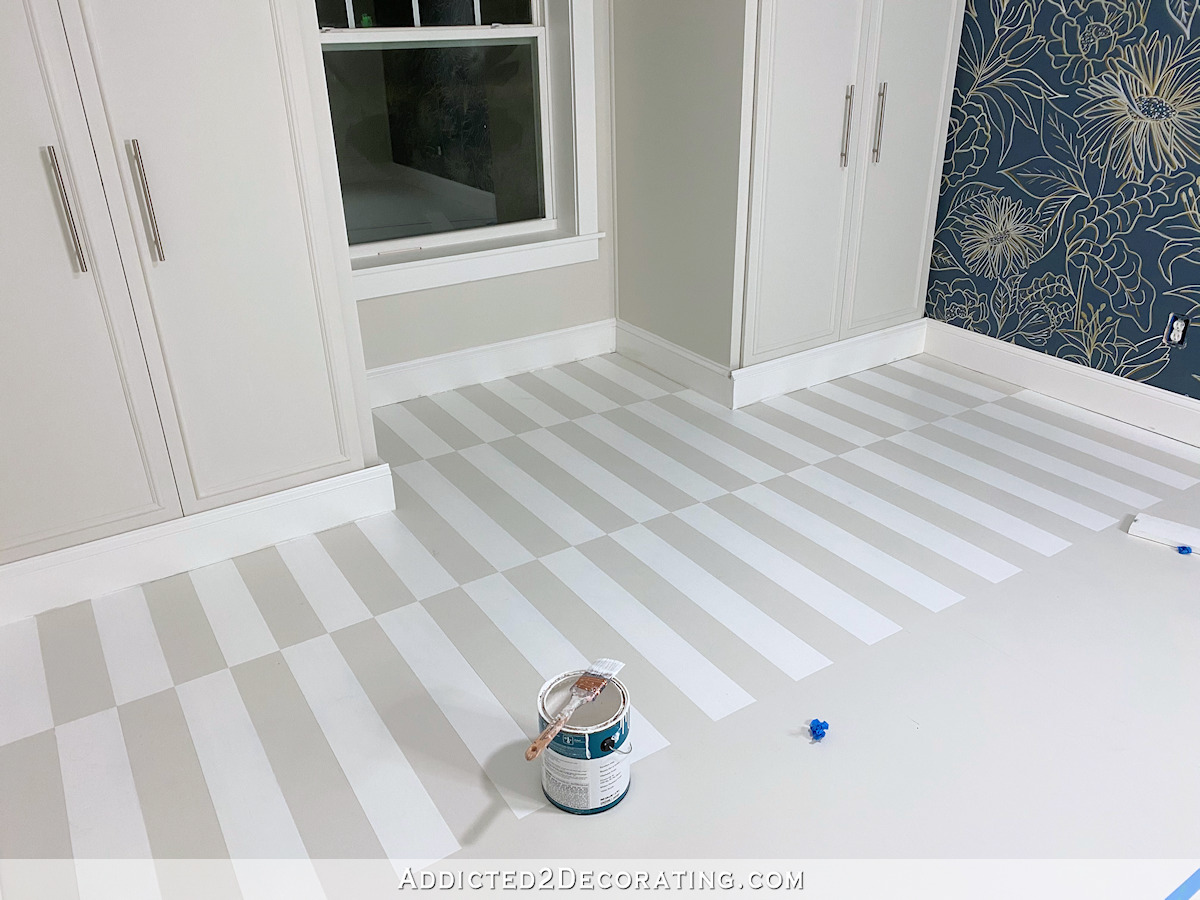
Then I was ready to start marking off the design. I started by measuring and marking the center of the accent wall using my measuring tape and a pencil. Then I placed painters tape along that line. In order to do the offset striped design, the plan was to mark off 30-inch-wide sections, and paint every other section first. Then I would go back and paint the other sections.
So you can see that I placed an “X” to the left of the first piece of tape. That was to indicate that that section was not to be painted in this first round of painting. So the strip of painters tape was placed to the left of my penciled line down the center of the room since I would be painting the section to the right of the tape.
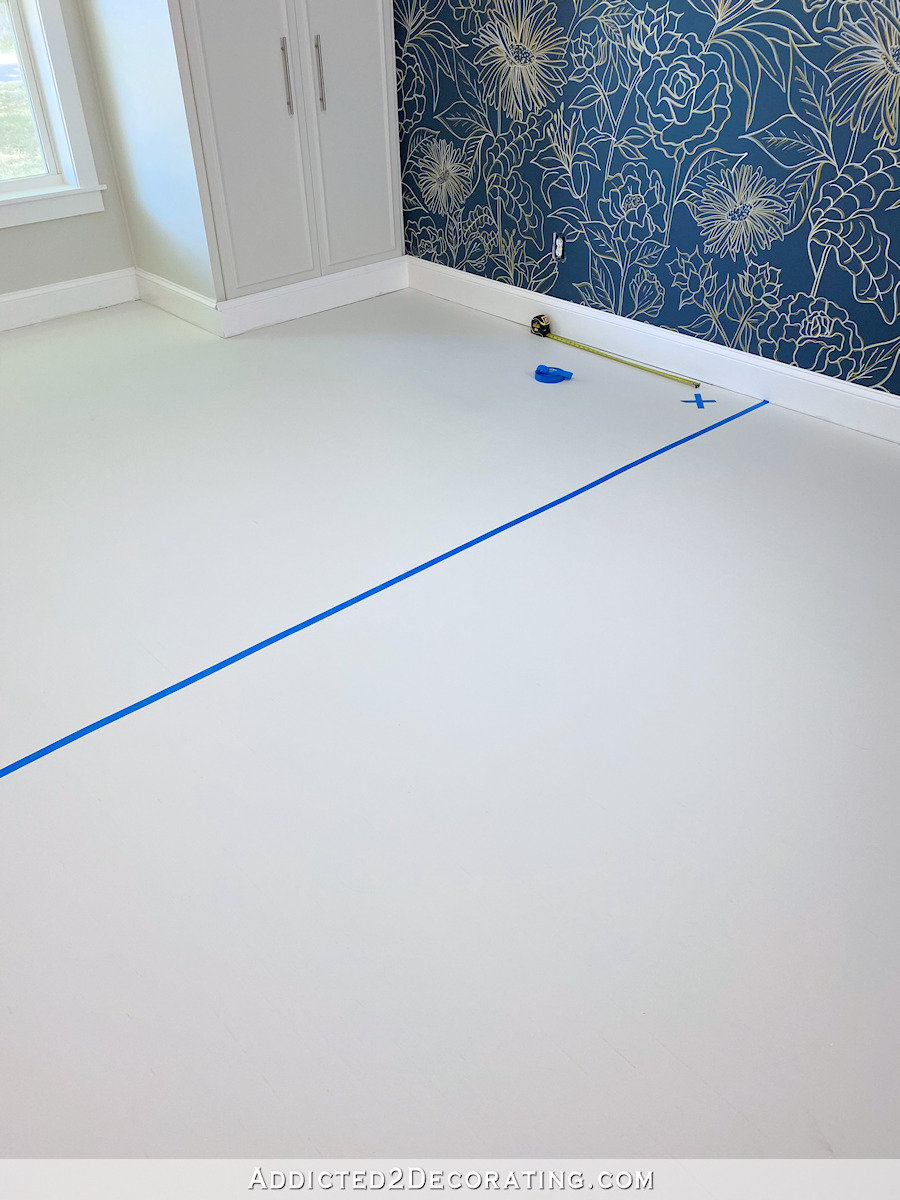
And from that center mark, I continued marking sections every 30 inches going towards the window, and placing the “X” on every other section that would be skipped initially. So from the center of the room going towards the window, that left me with two sections that I would paint initially. And again, keep in mind that on the sections that would be painted initially, the tape had to go to the outside of the penciled lines.
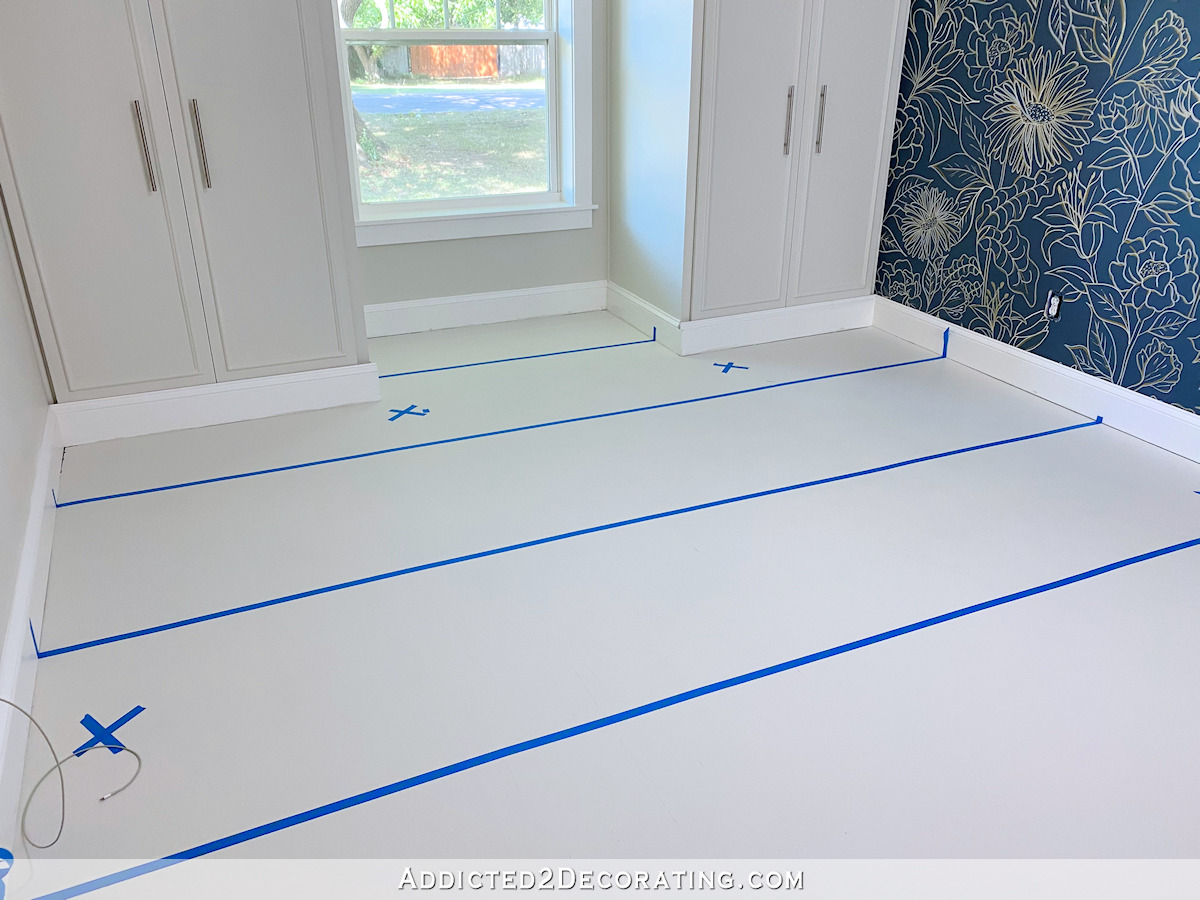
With those initial sections taped off, I was ready to mark off the stripes in each section. I started by making one mark down the center of the room using the actual floor boards (which were barely visible at this point, but I could still see some of them) as a guide for this mark. So using a straight edge (i.e., a scrap piece of lumber) and a pencil, I followed the line of the floor boards for the initial mark. I enhanced that mark so you can see it here…
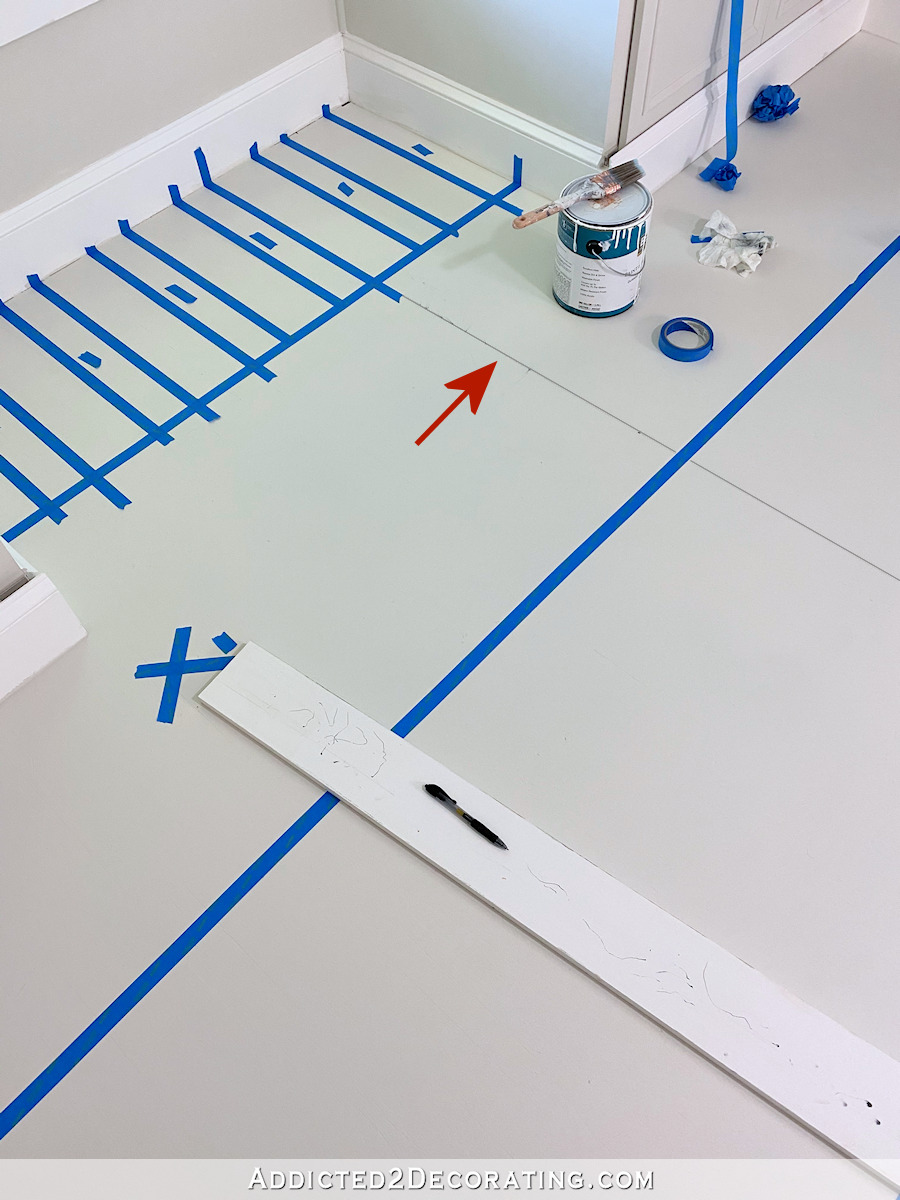
And then using that initial mark as a starting point, and using a scrap piece of 1″ x 5″ lumber, I marked off the stripes in the first and third sections…
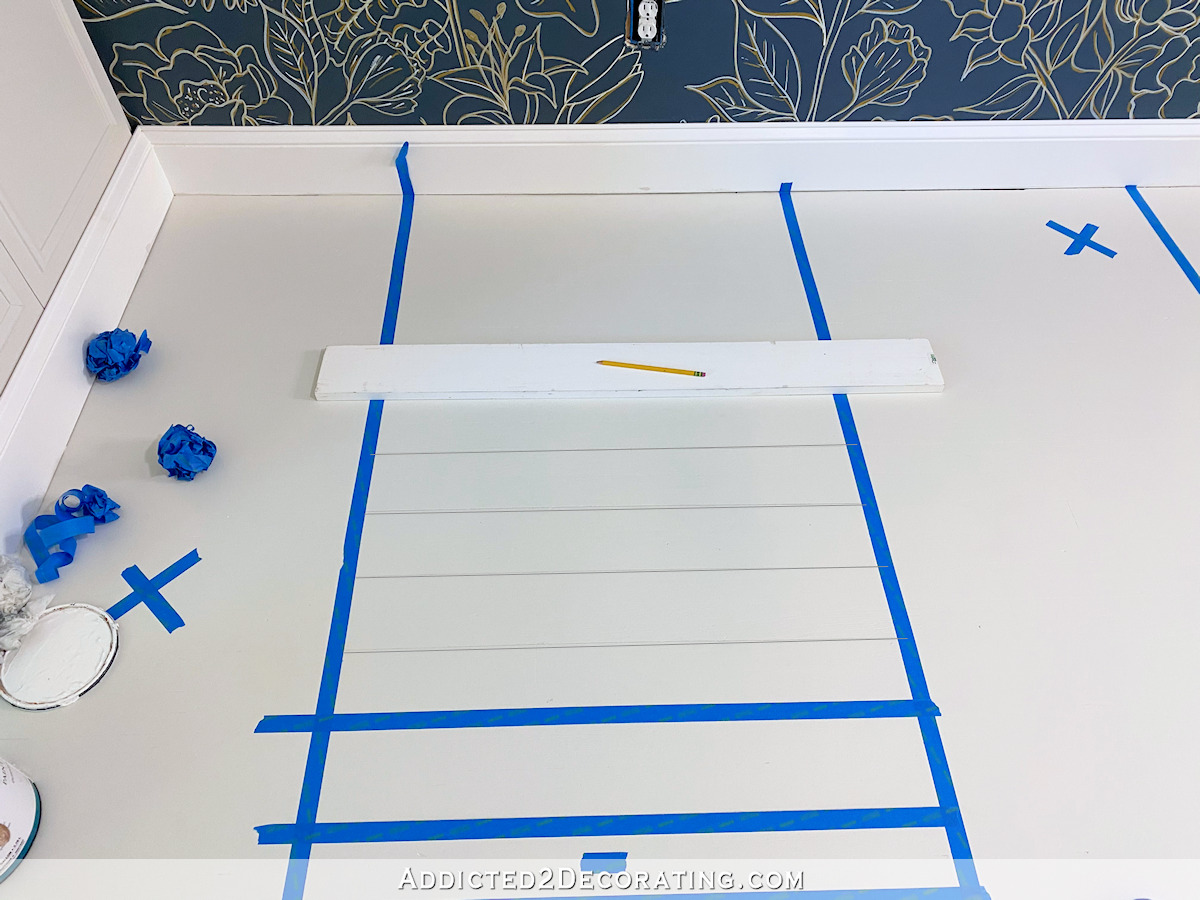
And then I used those lines to tape off every other stripe…
For these stripes, I used the same paint that I used on the trim in the room — Behr Premium Plus in a satin finish. The color is Polar Bear. I brushed on two coats of paint for the stripes. Here’s that first section after the tape was removed…
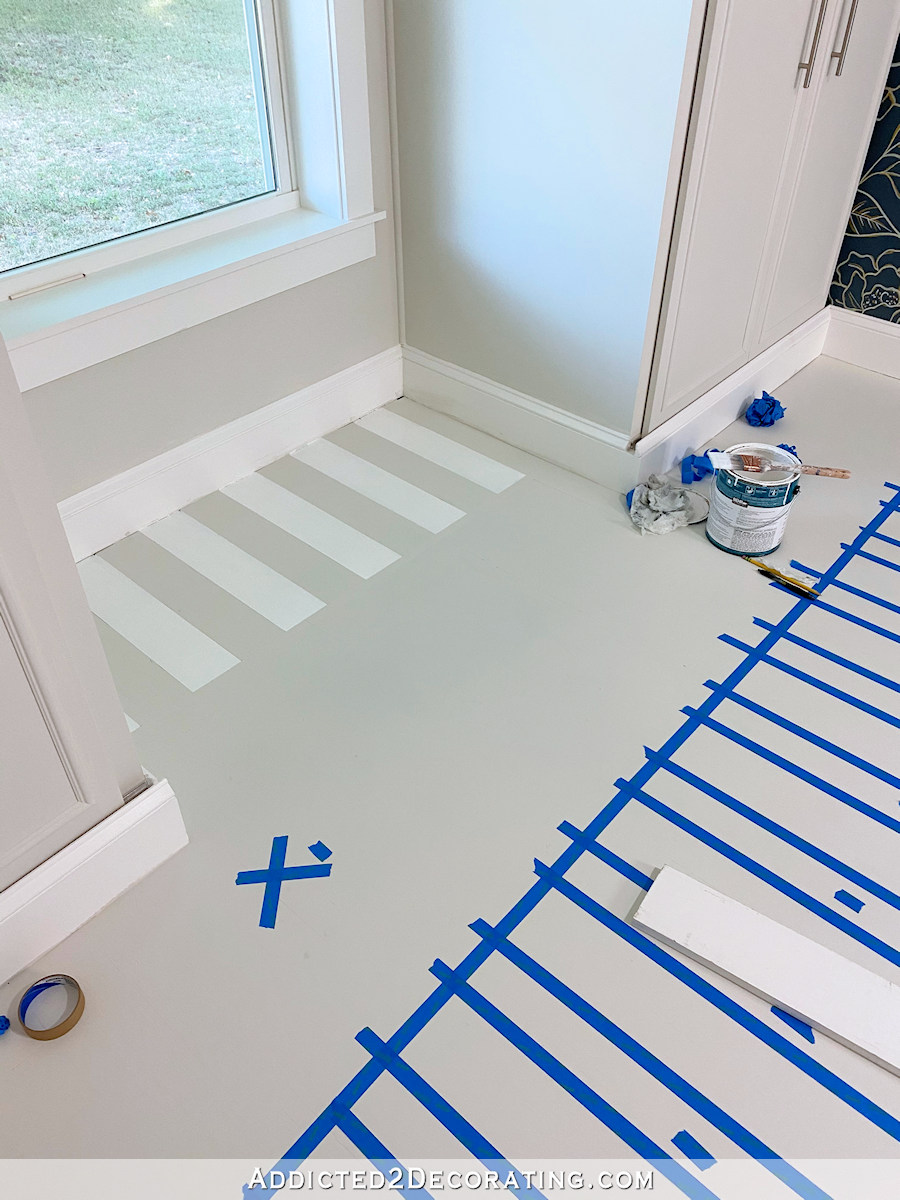
Skipping the second section, I moved on to the third section and made sure I taped it off the exact way, meaning that the white stripes had to line up.
And after two coats of white paint brushed onto the stripes in the third section, here’s how that looked with the tape removed…
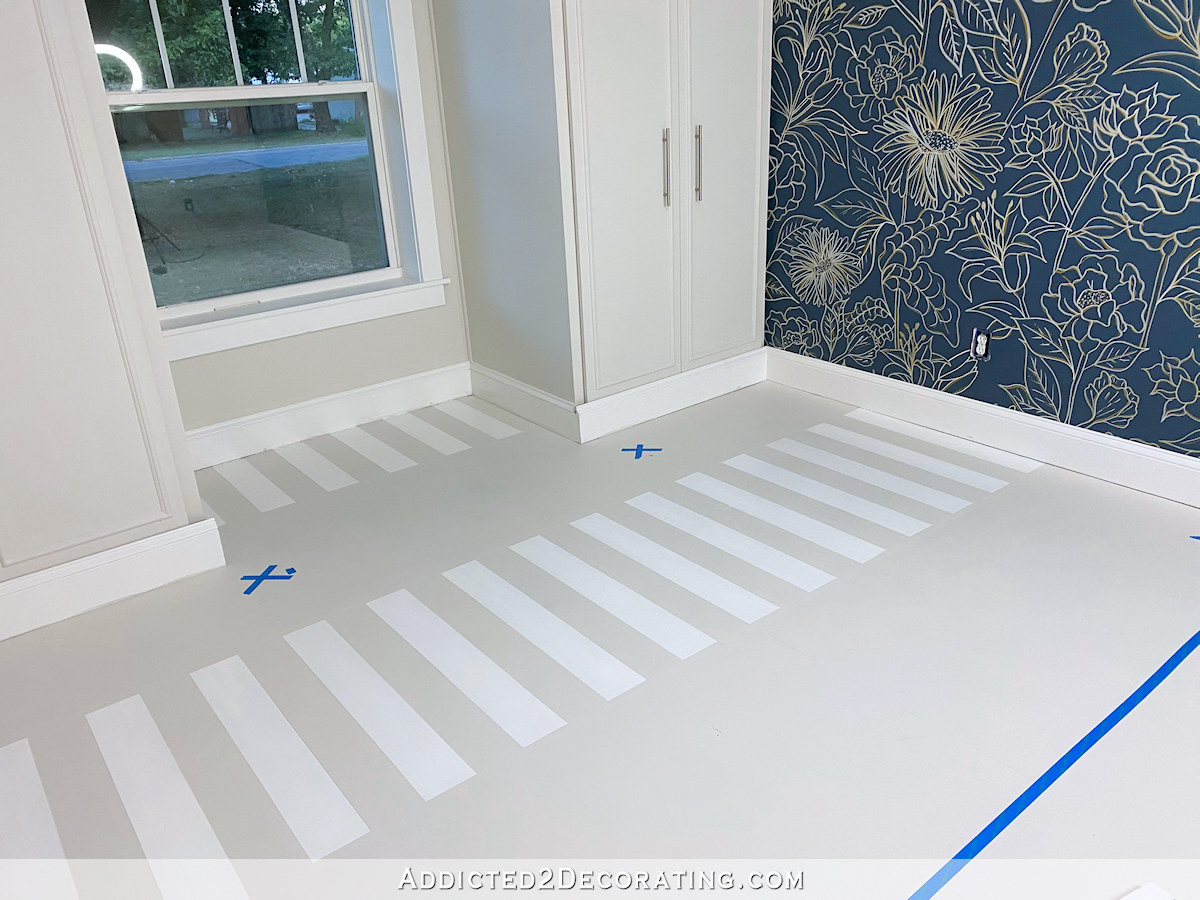
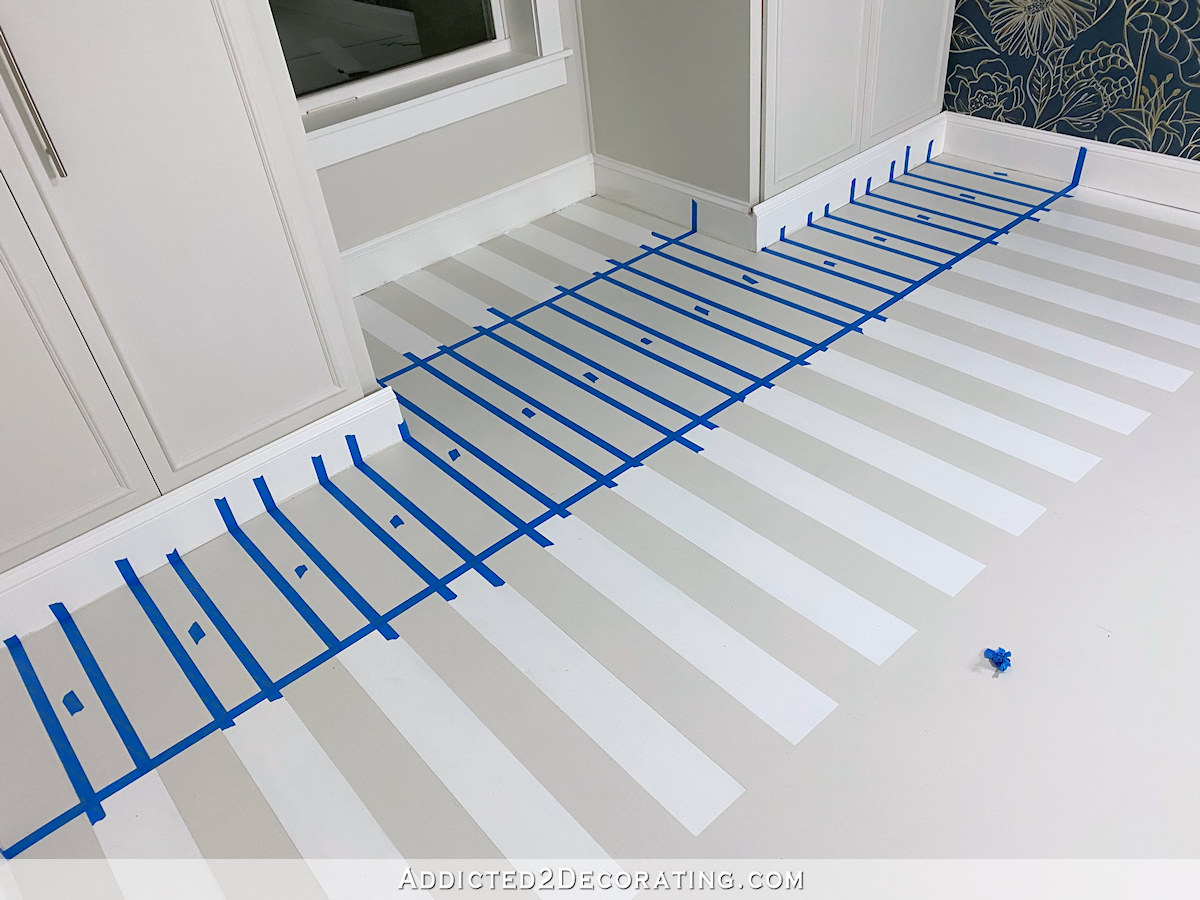
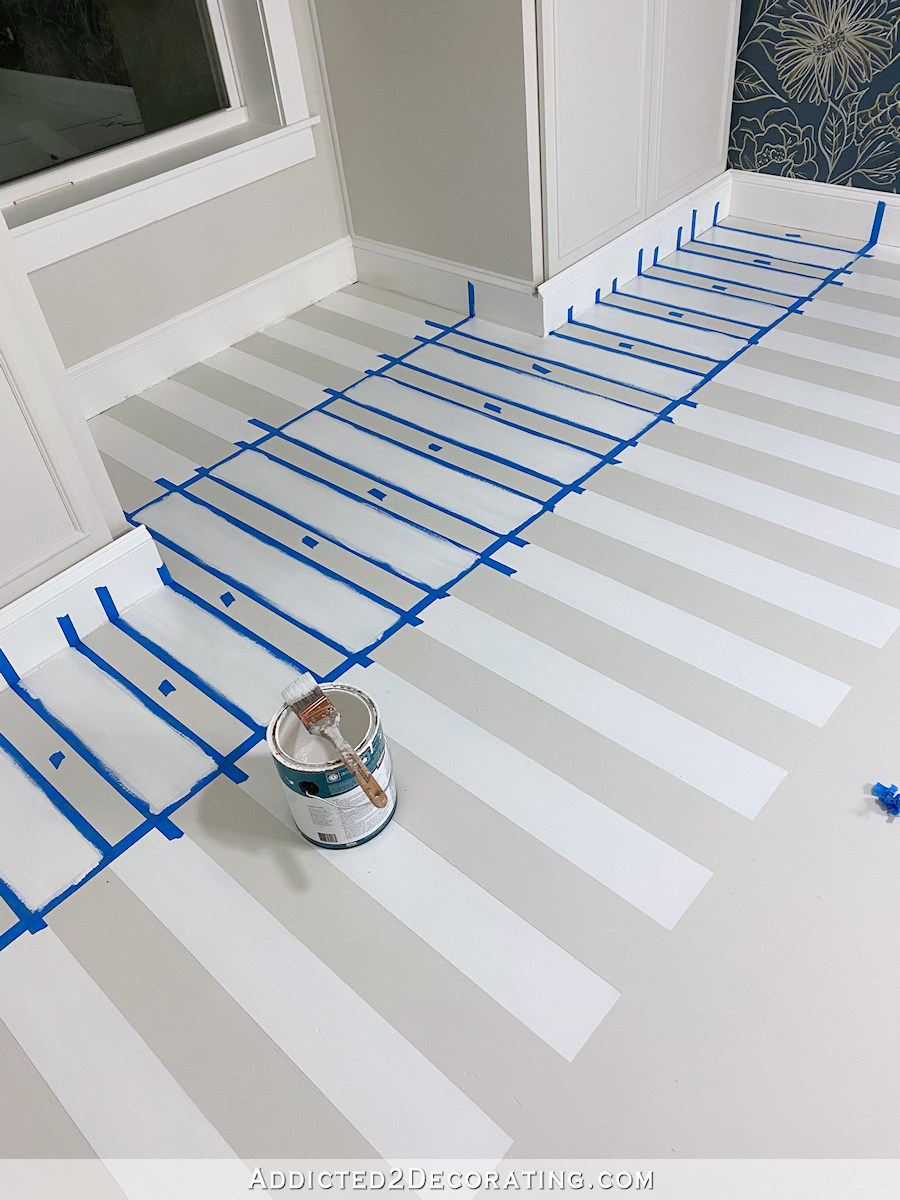
I had planned to do the odd sections on the entire floor and then go back and do the even sections, but I don’t have the patience for that. 😀 I was too anxious to fill in the second section and see how it was going to look, so once the first and third section were dry enough (they had dried overnight), I taped off the second section. These even sections are much easier and faster to do because there’s no line drawing necessary. I simply used the existing stripes on the bordering sections to tape off this section. Of course, I made sure that the stripes to be painted on this section were offset from the bordering sections.
And just like the other ones, I brushed two coats of paint onto these stripes.
And once the tape was removed, here’s how that looked…
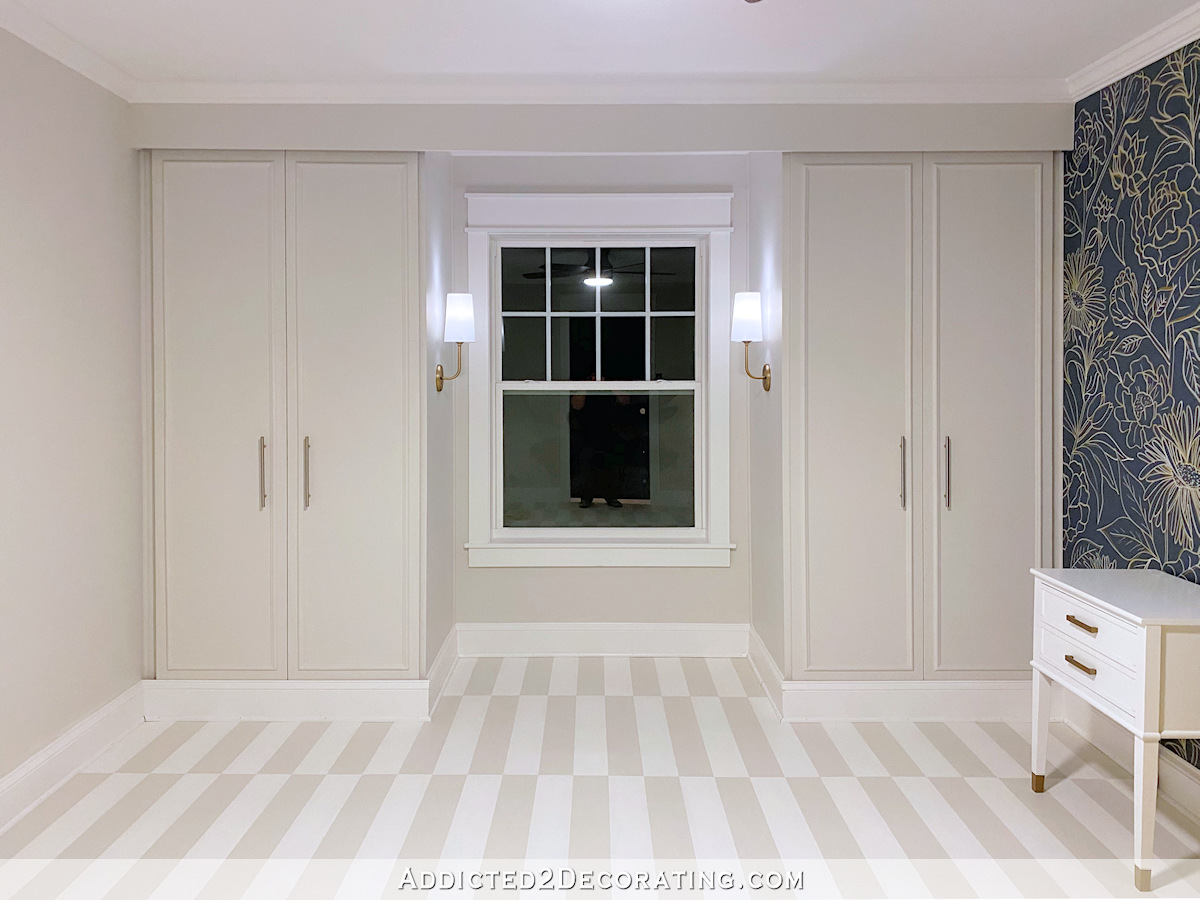
I’m loving it so far! I think it gives the floor enough pattern and interest without competing with the wall. And once the bed, dresser, and bedside tables are in, the floor will be even more in the background, much like an area rug.
It’ll probably take a few more days to finish. I have about five more sections to paint, and then I’ll need to let it dry for a couple of days before applying the topcoat. But hopefully I’ll have a finished floor by the end of the week! That would be perfect timing because I think the fabric for the upholstered bed is supposed to be here at the end of this week or early next week. And in the meantime, I still need to make decisions on the bedside tables and the dresser. But it’s coming along!

Addicted 2 Decorating is where I share my DIY and decorating journey as I remodel and decorate the 1948 fixer upper that my husband, Matt, and I bought in 2013. Matt has M.S. and is unable to do physical work, so I do the majority of the work on the house by myself. You can learn more about me here.

I love the floor design! It’s just enough to create some interest without taking away from that beautiful wall. Can’t wait to see the room finished, furnished, and accessorized!
I know I have to stop and trust your process because I almost always love your final product but I have to admit, I’m a little put off by this pattern on the floor mixing with that showstopper wall mural.
I’m sure in the end we’ll all stand back and say “oh, okay, yes it makes sense now” but right now I’m just not seeing your vision.
I’m with you on this. Love both applications but wonder if this will detract from the epic wall treatment.
I agree with Christina & Pam. The wall is fabulous but in my humble opinion, I don’t like the floor. But I have a good reason! Those offset stripes would slip my vertigo into high gear & I’d be on the floor in 2 steps! My son has a rug with wavy stripes & I must hold on to the couch to get to my recliner!
A word of advice:
Don’t grow old…it’s hell! 😉
I’m wondering what exactly will you use as the top coat and final finish on this lovely floor.
I love painted floors and this pattern is epic. Glad to see you do a clear topcoat. I have found doing 2 coats top coat gives an amazing finish with extra protection. Have a great week
I love your work and everything you do! My question is how do you do all that work on the floor? Do you get on your hands and knees, sit on floor and scoot around, sit on a low stool? I would love to do this, but find it hard to work that low to the floor!
I just crawl around on my hands and knees. 😀 I’ve been doing stuff like that for so long that I guess I’m just used to it. Heck, I used to make my draperies on the floor before I made my awesome studio tables! 😀
Just one question . . . how does your back feel? Can’t imagine crawling around putting all that tape down and then painting. But then I’m over 70!
Ha! It’s just a little stiff this morning, but it’ll loosen up once I start working on the floor again today. 😀
I really like it, Kristi! Would you have to have shoe molding? From the photo it doesn’t look like it would be necessary! Beautiful job!
I will do show molding once the floor is painted and sealed. I left that for last so that I could paint as far to the baseboards as possible but still give myself that 3/4″ of wiggle room that will be covered by the shoe molding or quarter round.
That looks amazing! Super cool 🙂
Your designs are always amazing, and I love the pattern on this floor. The colors are subtle enough not to compete with the show-stopping accent wall. As you mentioned, when the room is furnished, the floor will blend in beautifully.
How are your knees holding up with all this floor work?
My knees are fine. My back is a little sore this morning, though. 😀 But it’ll be fine once I start working again.
Wow oh Wow! I love your design. I do have a question. Have you already painted your baseboards? If not are you going to brush or spray them with your critter gun. If you use your critter spray gun does it produce a lot of over spray. I have installed baseboards to paint and I’m debating which direction to go.
Once I’m done with the floor, I’ll install the shoe molding (or quarter round) along the floor against the baseboards. I do plan to paint those pieces before I install them, and then after they’re installed, I’ll just need to do some quick touchups. The baseboards are already painted.
I don’t use my Critter to paint trim because there is overspray when using it, and I find it so tedious and tiresome to have to do all of that taping and papering off on the floors and walls. It’s much faster to just brush on the paint.
Once again, I stand in awe of you. I thought I had talents, but I am at the nursery school level compared to you! You should be SOOOOO PROUD of yourself for all of the work you do! Other than HGTV, I do not know of any female who is as capable as you are, or who owns so many power tools and knows how to use them!!
You know, if you ever wanted to, you could make a lot of money working for others. People are always looking for excellent workmanship AND ideas. As a female, it would be great to hire someone who I know I could trust to do the job right.
Regardless, thank you for another fascinating post! I am impressed, as always. And I love the geometric floor with the floral wall! They complement each other beautifully!
See, I would have done the primer and a finish coat followed by a topcoat and said good enough for a guest room. But Kristi says nope, gonna fake the look of a popular rug design and crawl on the floor for days to do it! I guess it’s my age and the fact that I’ve gone all in for guest rooms in the past and they are barely used. I am thinking of turning one into a sewing/craft room and the other in to a gym.
Kristie, you have come such a long way with your style with this house. It is so elegant now, yet still fun. I love what you are doing. The living room, this room. Just gorgeous.
Love it! The simple geometric design in soft colors is the perfect foil for the wonderful accent wall. You are so patient with the painstaking work required to do these different designs.
So beautiful…. but my back and knees are hurting just thinking of what you’re going through 😀👍🏻
It’s looking amazing! I shared you site with my granddaughter because she is currently dealing with having pulled up damaged carpet and found the hardwoods are old and scared. I hope she’ll love your blog as much as I do. BTW, I finally bought a Critter paint sprayer so I’m excited to try it out soon.
Love, love, love, love, love!!!!!! So beautiful – thanks Kristi for taking us on the journey, have a spectacular week.
The floor looks absolutely stunning!! I love the base color and the design you made. It looks like an incredible amount of work but it’s super nice!
beautiful ……
This looks amazing! I LOVE IT! You may not want to leave that room after you finish it… 😉
The floor is beautiful! How do you (both) feel about sleeping in a bedroom again soon? (And having back your breakfast room)? 🙂
You know, it’s funny. I thought we would be chomping at the bit to get back into a bedroom, but to be honest, Matt LOVES being in the breakfast room. It’s such a bright room with so much natural light. It’s right there by the kitchen and my studio, which is great for him since he spends quite a bit of time in bed, he’s closer to the areas of the house where I spend so much time. In fact, he likes it so much that he even asked me if there’s any way we could convert the breakfast room into our master bedroom. 😀 The answer is no, of course. There’s no way that would work. But all of that to say that Matt has actually enjoyed being in the breakfast room, and hasn’t been anxious to move. I’d actually bet that he’ll miss it once we’re moved into the bedroom and he spends much more time “tucked away” in an area further from the kitchen and my studio. Of course, for a while, he’ll be fine because I’ll be just right outside finishing the hallway, and then in the next room finishing our home gym. But after that, when I’m spending more time during the day in a different part of the house, he might actually start missing the breakfast room-turned-bedroom. 😀
I see that a daybed in the studio is going to be an essential for Matt!
That daybed sounds like a good idea! 😀
But on an easier solution, have you ever thought about getting some kind of communication system? A couple of simple Echo devices from Amazon could do the trick – they are wireless, cost peanuts, sound is decent, and you can simply talk from one end of the house to the other, no need to even do as much as click a button! Installation is basically just plugging them in, too, and setting your account once.
Not sure if you will even see the comment, it’s been a week! 😀
I love that idea! I’m going to tell Matt to start looking into that. He does most of our Amazon buying. 😄
That’s amazing. One question that comes to mind for me if I tried this in my home. I have multiple pets the same as you. How do you keep pet hair from getting in the paint while it’s in the drying stage.
Since this area of our home is a construction zone right now, they pretty much stay away. There are no comfy places in the hallway or soon-to-be home gym for them the sleep, and there’s not enough room for Cooper to play in those areas right now, so when I’m in there working, they’re elsewhere. We have Cooper’s bed in the pantry right now, so when I’m working, he’s generally in there (right next to the breakfast room) keeping Matt company. And the cats are obsessed with my studio. So they haven’t been a problem for me at all.
I was not so sure about that design as I don’t really like it in the bold black and white (Ikea) rug I’ve seen. But your version looks so perfect because of the subtle colours – I love it! And I love the combo with this accent wall (which is fantastic btw). I’m totally there with you that with furniture the floor pattern will be more in the background and not disturbing the look, but enhancing it. I hope you can take enough breaks for your body to stay positive during this paint job!!
Beautiful! Classic and subtle, but gives a wow factor!
How fun! Carpet look and hardwood performance. A bit like the painted cloths from colonial times, but with a modern twist. I don’t think the floor and walls have to match, or even go together so very much, even for a perfect look. Floors hide under all the other things, so a fun peek-a-boo is just right.
Oooh, this looks so gorgeous! I am loving it!
You have extraordinary talent . As was mentioned nobody does it like you!
Wow, Kristi! I can’t wait to see this all done and decorated! You have a vision for end results like no one I have ever known! I am totally envious!. I love the colors, too! You know I love Classic Gray… so much so that we are painting our whole renovated house in Classic Gray… courtesy of seeing in your home and falling in love with it! But can we talk about that beautiful wall… <3
WOW!!!!
Love this! I am tearing out carpet to find not hardwood but good old osb. Do you think I could add plywood 1/4” with wood filler and get a good result?
Again love what you are doing!
If there’s any way that you can do 1/2-inch plywood, I think that could work. I’m no so sure about 1/4-inch for a floor. Also, if I were going to use plywood for a finished floor, I wouldn’t use it in whole pieces. I would cut it into squares, or possibly into planks like this: https://www.pinterest.com/pin/25966135341311245/
You know …… when you first described what you were going to do with the floor, I was sure it would look much too busy. But …… I LOVE IT !! It so compliments your patterned wall.
Without a doubt you have a great eye and vision.
Can’t wait to see the room fully completed and accessorized. Great job!!
I don’t care for your floor! I think it distracts from the wall. I know how to restore wood floors, so that one can keep the original hardwood look. Sorry to be negative, but I have also spent years on my hands and knees and I am now 80 years old. I also paint designs on some of the floors I restore: it is my signature when I do a restoration. If I was tech savvy, I would send some pictures, but some of my designs have art deco, mice eating cheese, and arts and craft scenes, border rug patterns. Just being honest.
The floor looks great! What are you going to use for your top coat?
I think the floor is really fabulous. So many homes have floors that show off the wood grain. But this is unique, and honestly, it looks sharp as hell. I’ve never seen a hardwood substrate turned into a floor like this.
Well done.