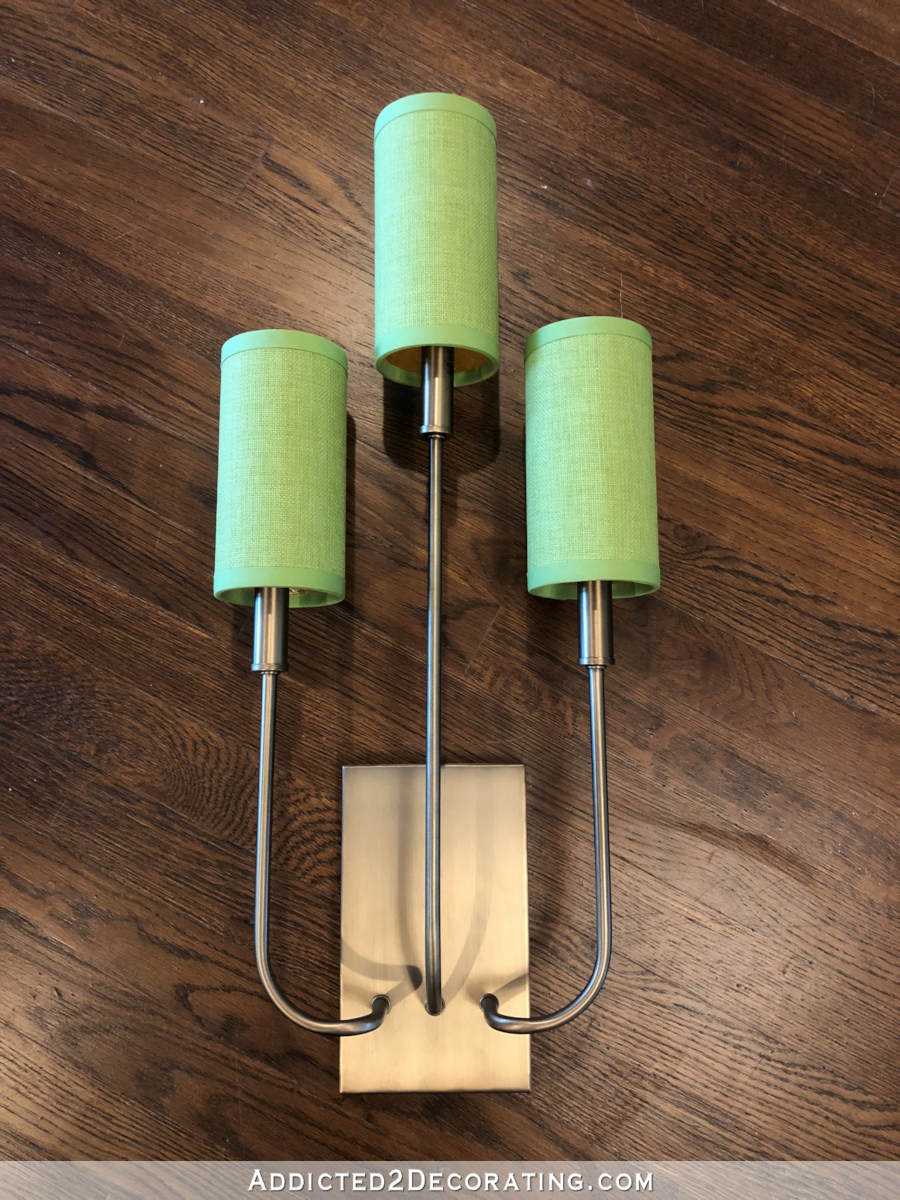
DIY Wall Sconce Shades (Made From Cardboard Mailing Tubes)
If you have ever wanted to add some DIY wall sconce shades to a fixture that came without them, this little tutorial is for you! 🙂
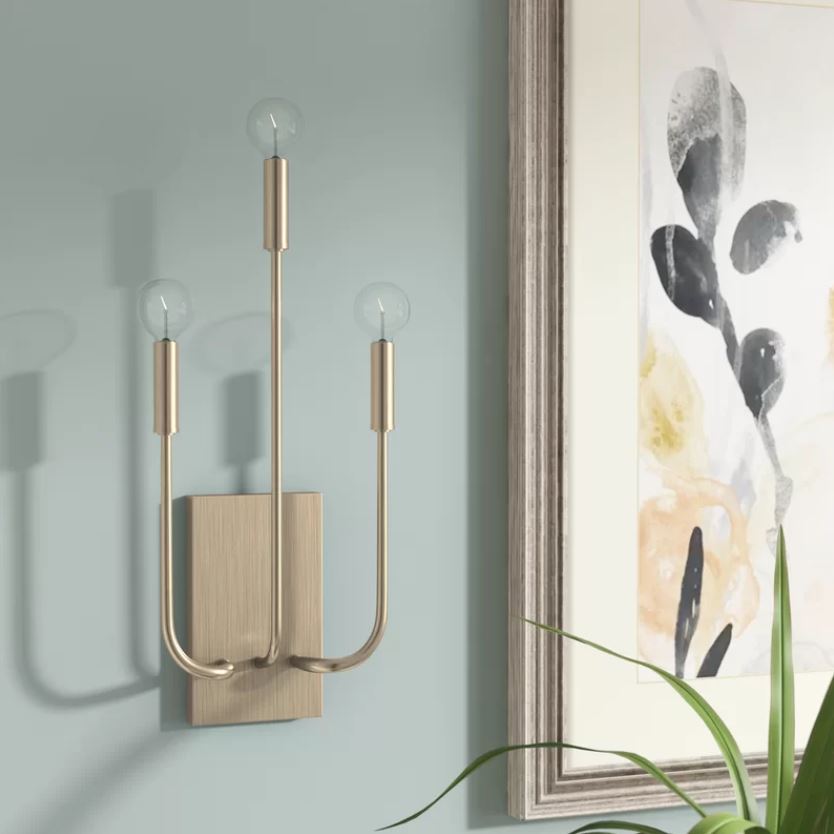
I recently purchased two of these 3-light wall sconces from Wayfair. (You can find the sconce here.)
I’m not quite ready to share where I’ll be using them. You’ll have to stay tuned for that. 🙂
But I don’t like bare bulb light fixtures, so I’ve been searching and searching for the perfect shades to fit the sconces. The problem is that the arms of the sconce are very close together, so anything that flares out at all won’t work. And since the arms are so long and slender, standard height chandelier shades looked ridiculous. I needed shades that were tall, slim and cylindrical in shape. I also wanted fabric shades (not glass) that had the bulb clips in them. Add up all of those requirements, and what you’ve got are wall sconce shades that really don’t exist. My only option was to make my own.
How To Make Your Own DIY Wall Sconce Shades
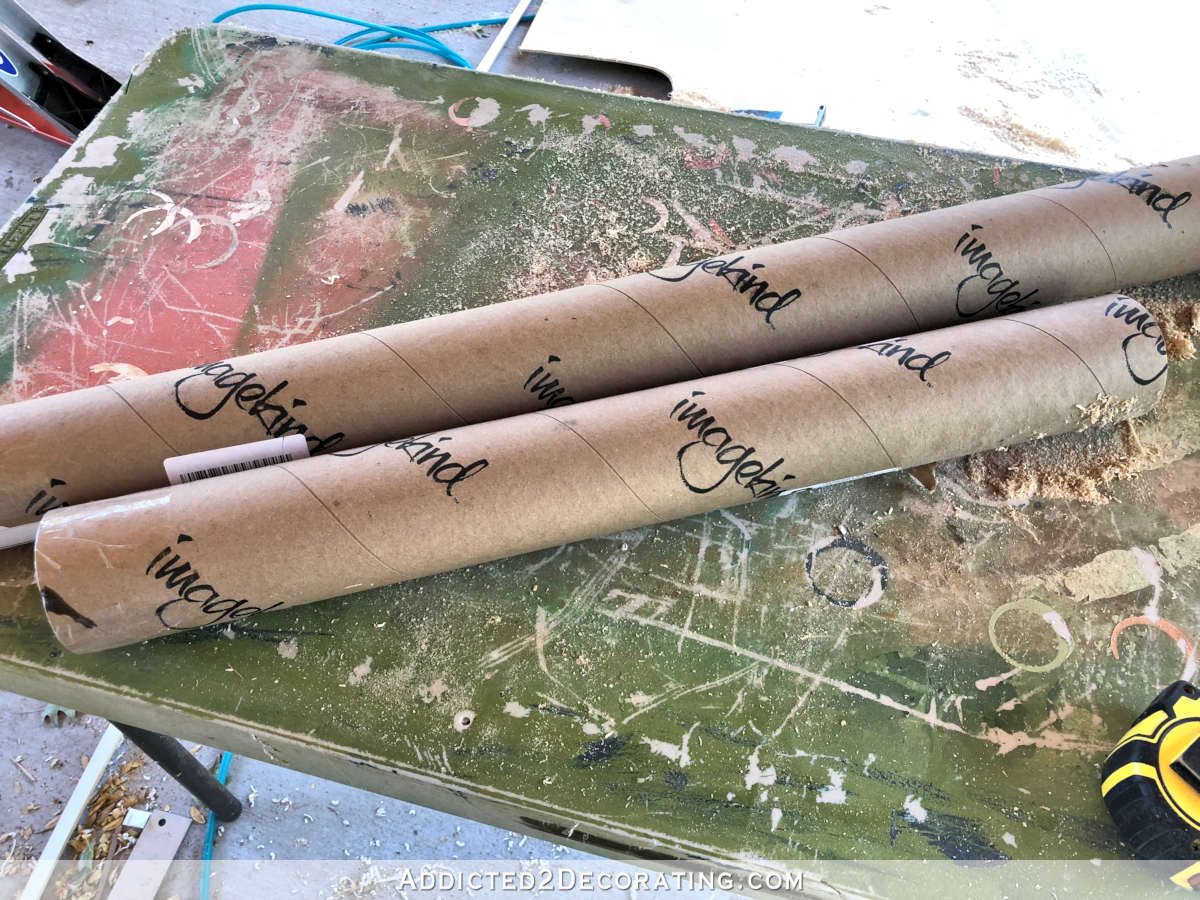
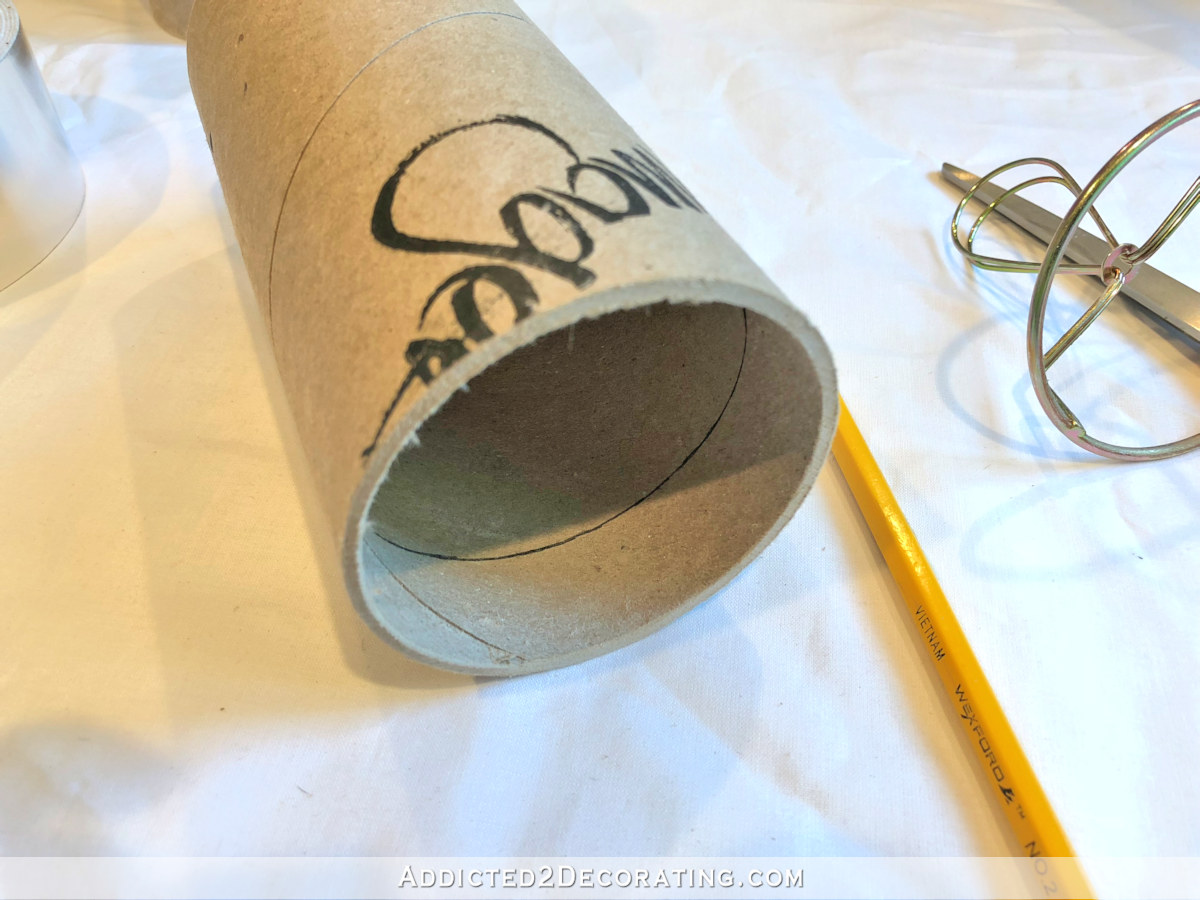
After giving much thought to what I could use to make the perfect DIY wall sconce shades, I came across these cardboard mailing tubes. They are just over 3 inches in diameter, and the inside is actually exactly three inches in diameter. They were perfect for my shades!
The cardboard is very thick, so I used my miter saw to cut it.
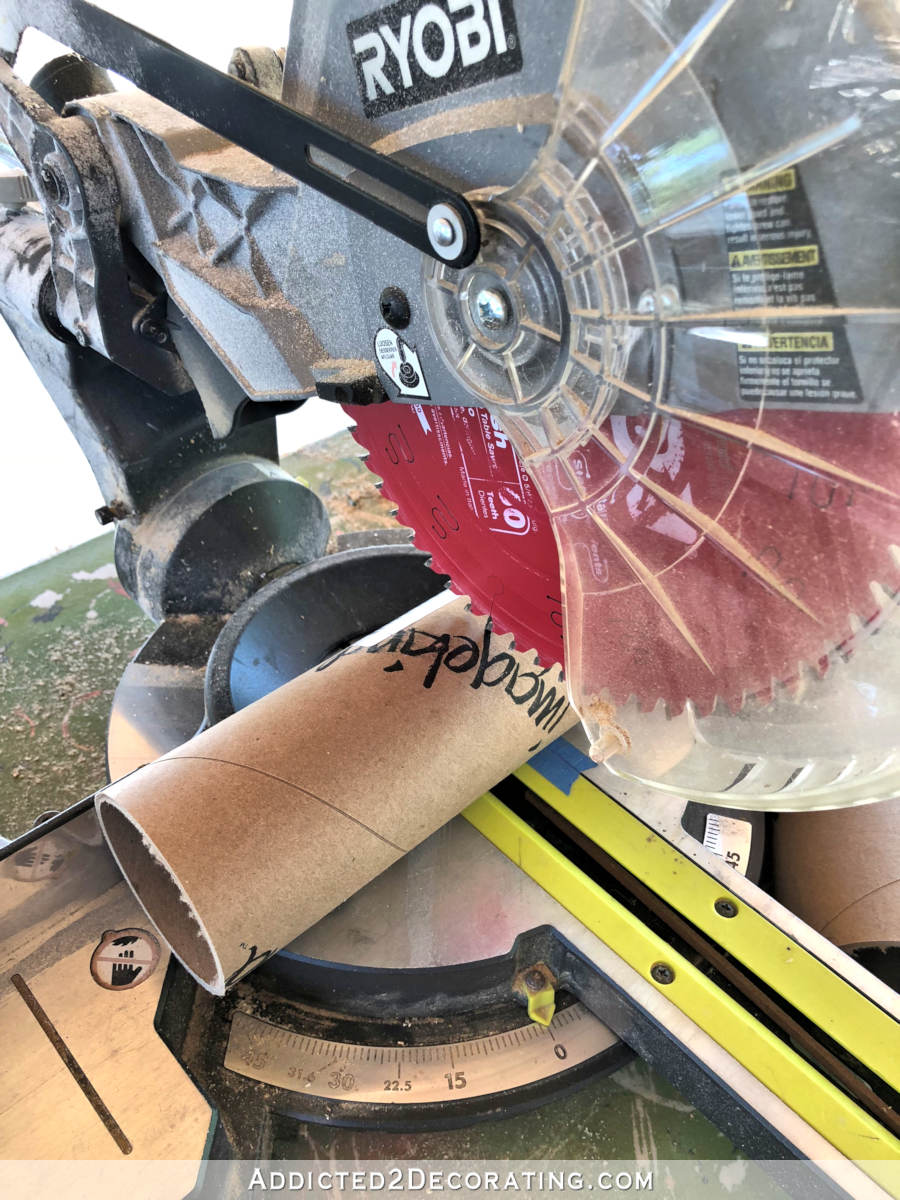
I had just enough to make six shades that are 6.5 inches tall. After cutting them, I used some 220-grit sandpaper to clean up the cut edges.
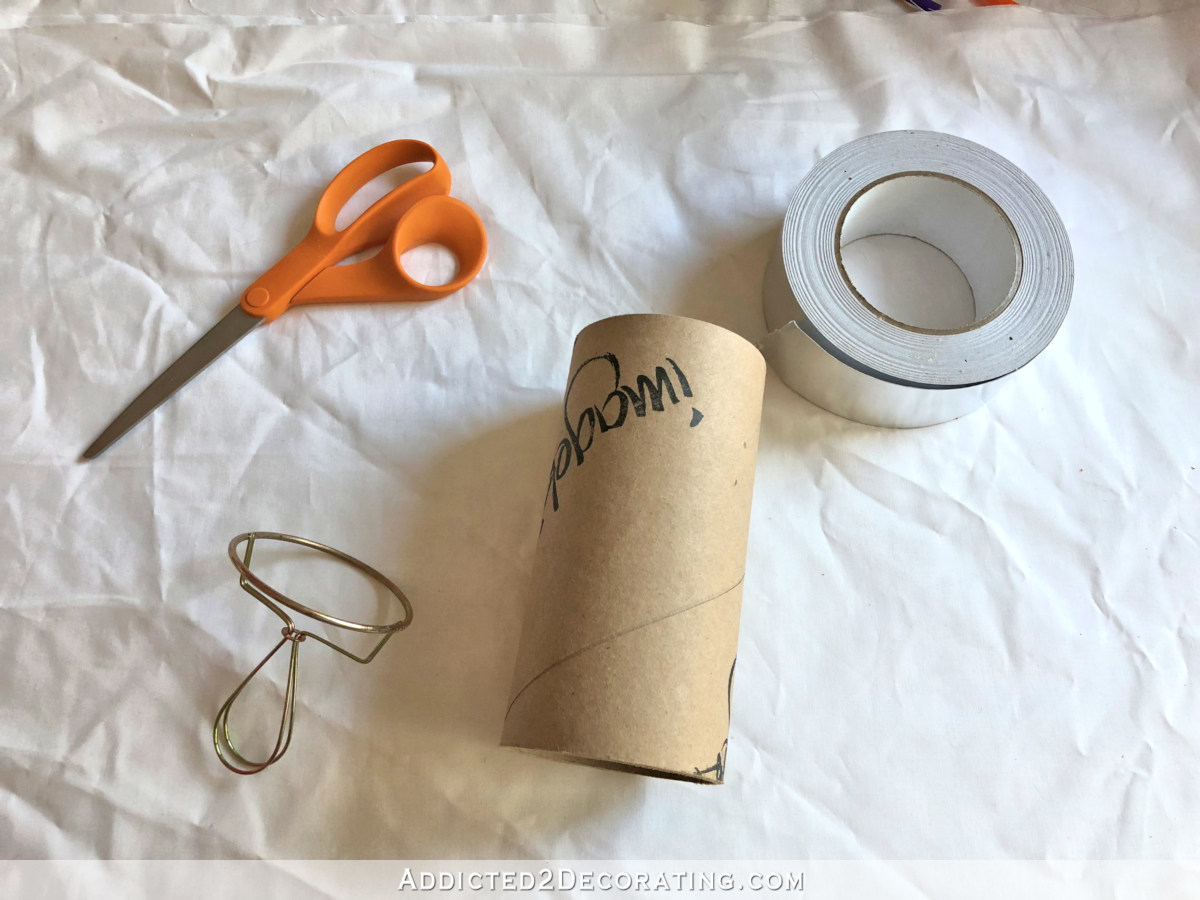
I still needed the clip rings to fit inside that actually hold the shades to the bulbs. I found some little shades at Lowe’s that had the perfect size rings. They were just under $4 each, but I rummaged through the stacks of shades to find as many of them as I could that didn’t have wrappers and were filthy and/or dented, and then I asked if they’d sell those at a discount. I ended up getting them for $2 each, which is actually cheaper than I found the ring clips sold separately online.
So after taking apart the chandelier shades from Lowe’s, I was ready to put the clip rings into the mailing tube shades.
I didn’t want the rings right at the top of the shades, so I used painters tape just around the top edge as a spacer…

And then marked the edge of the tape with a pencil.
Then I used that pencil mark as a guide for placing the clip ring.
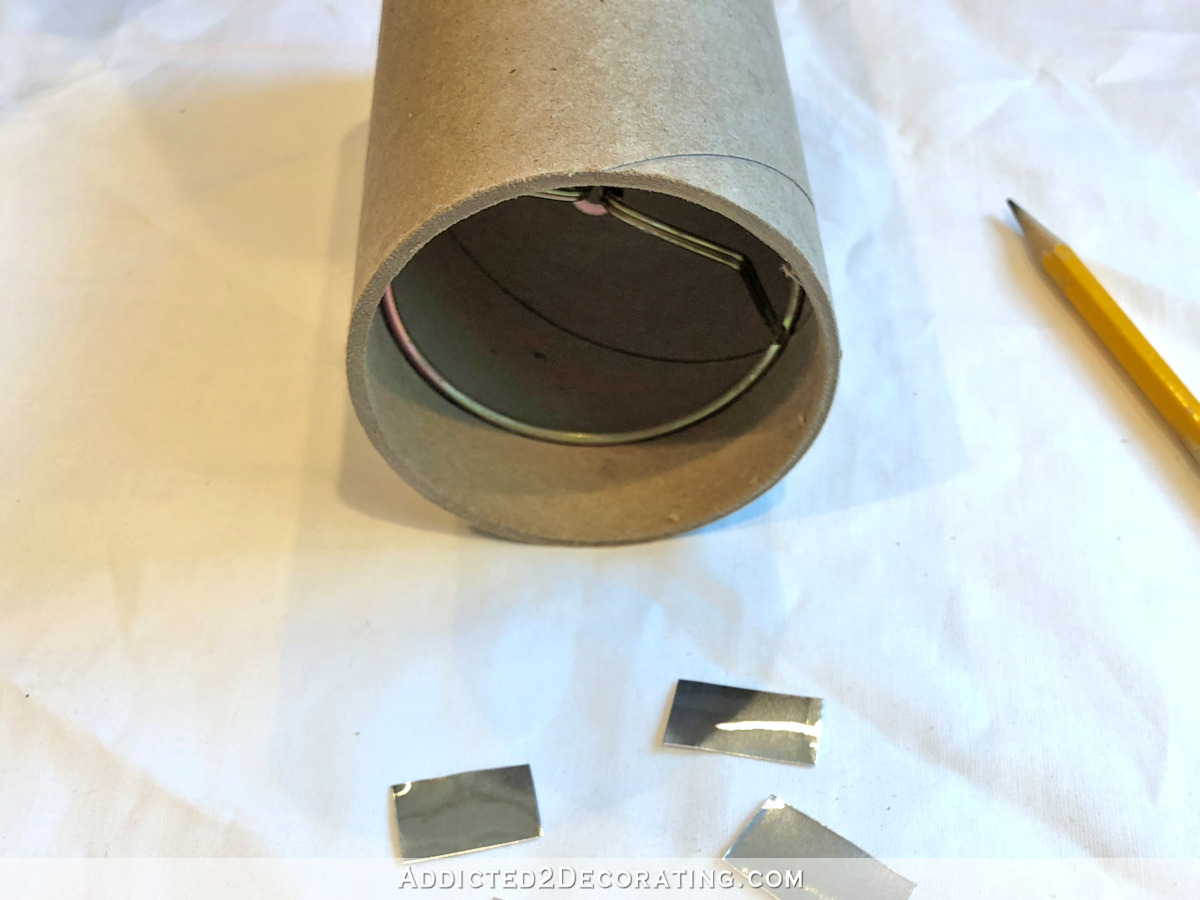
I rummaged around my stash of supplies to find the strongest tape I had, and that happened to be aluminum foil tape, which is used on HVAC ducts or (in my case) solar tube installations. That stuff is some of the strongest and stickiest tape I’ve ever used, so I was sure it would hold the ring perfectly in place. I cut it into small pieces to make it easier to handle and used eight small pieces to hold each ring in place.

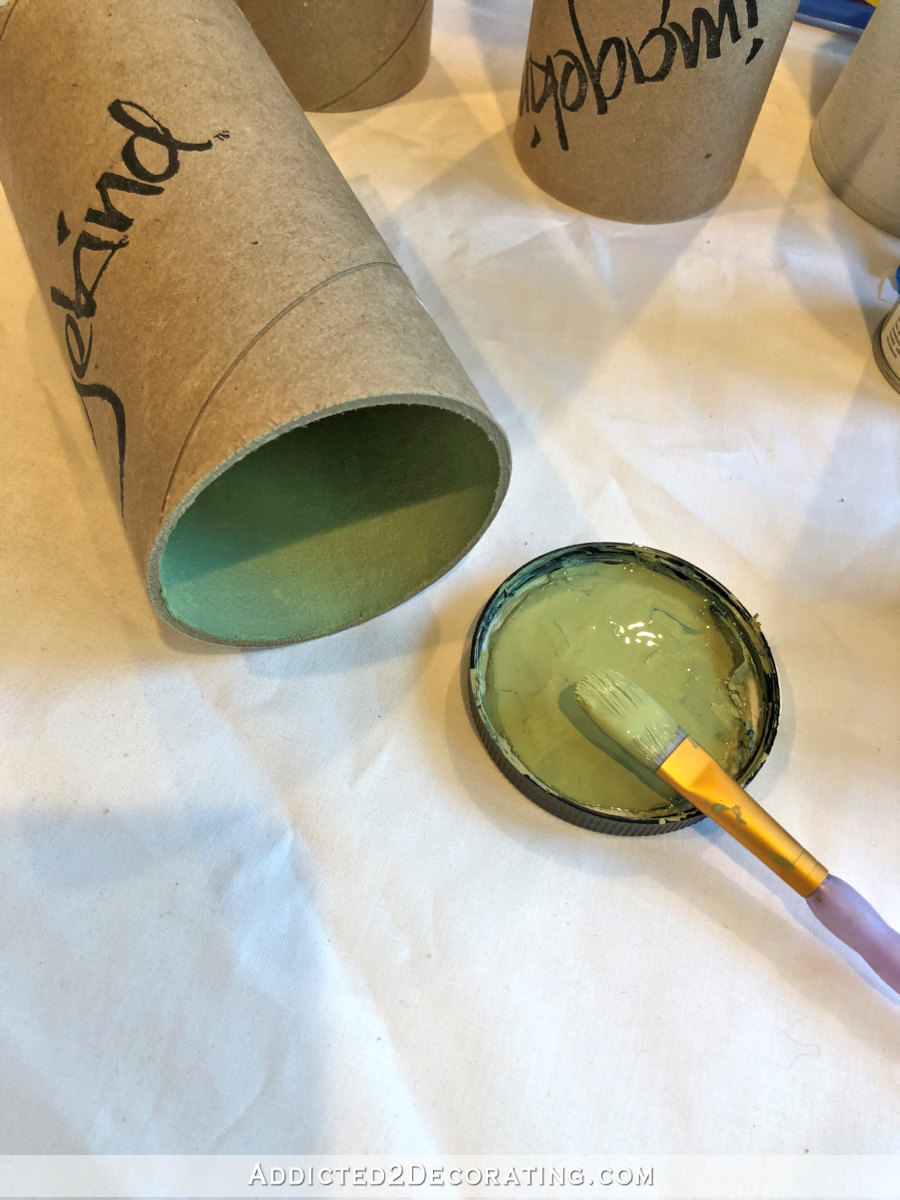
With the ring and tape in place, I painted the inside of the tubes with two coats of paint. The color wasn’t important. I only needed the paint to seal the cardboard and make it less porous.
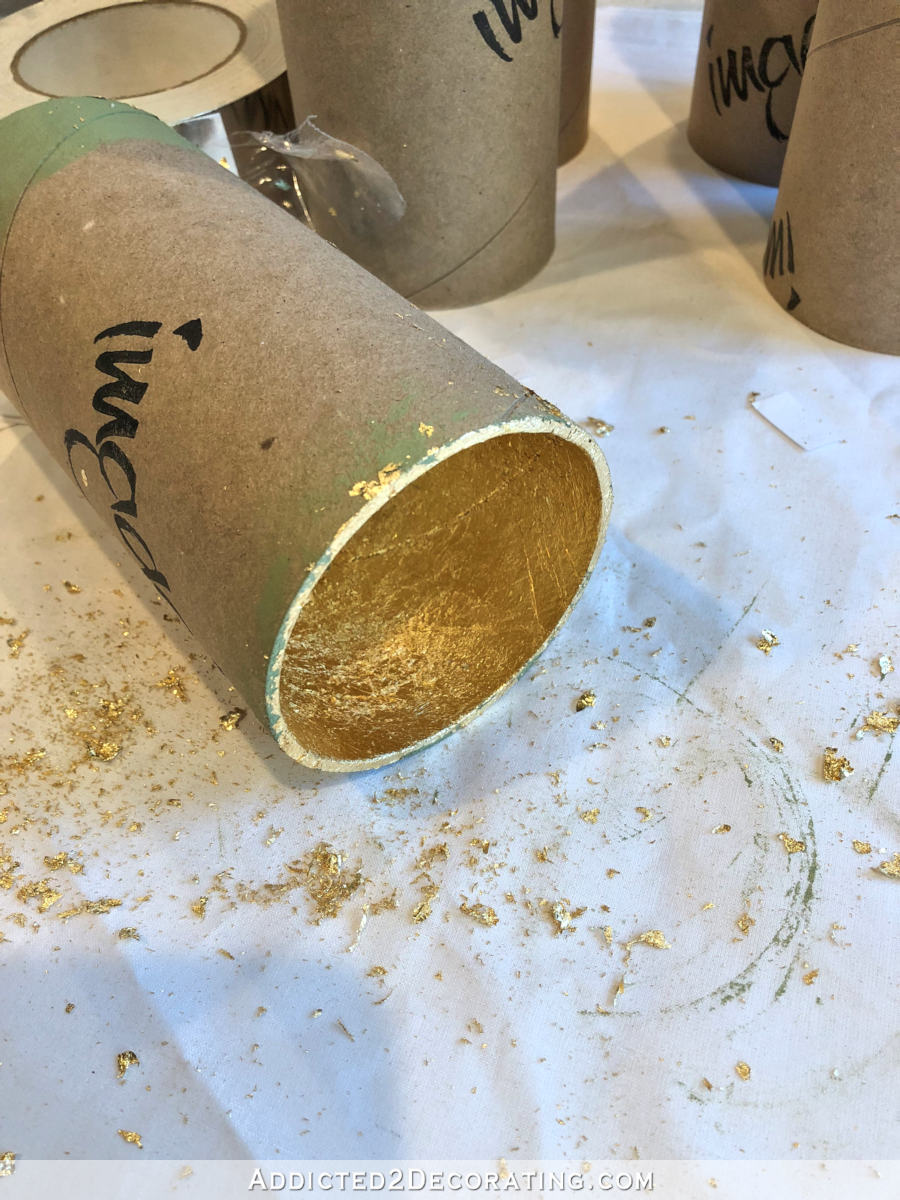
When the paint was completely dry, I used spray-on adhesive for metal leaf, and then gold leafed the inside. It was a tight fit and not the easiest thing I’ve ever gold leafed, but with some patience, I finally got the entire inside surfaces covered.
I covered the outside of the wall sconce shades with a thick canvas that has a linen look. I cut the pieces so that they would wrap around the shade and lap over about 1/2 inch. I placed a strip of permanent fabric tape along the vertical edge of the fabric and placed it on the shade.
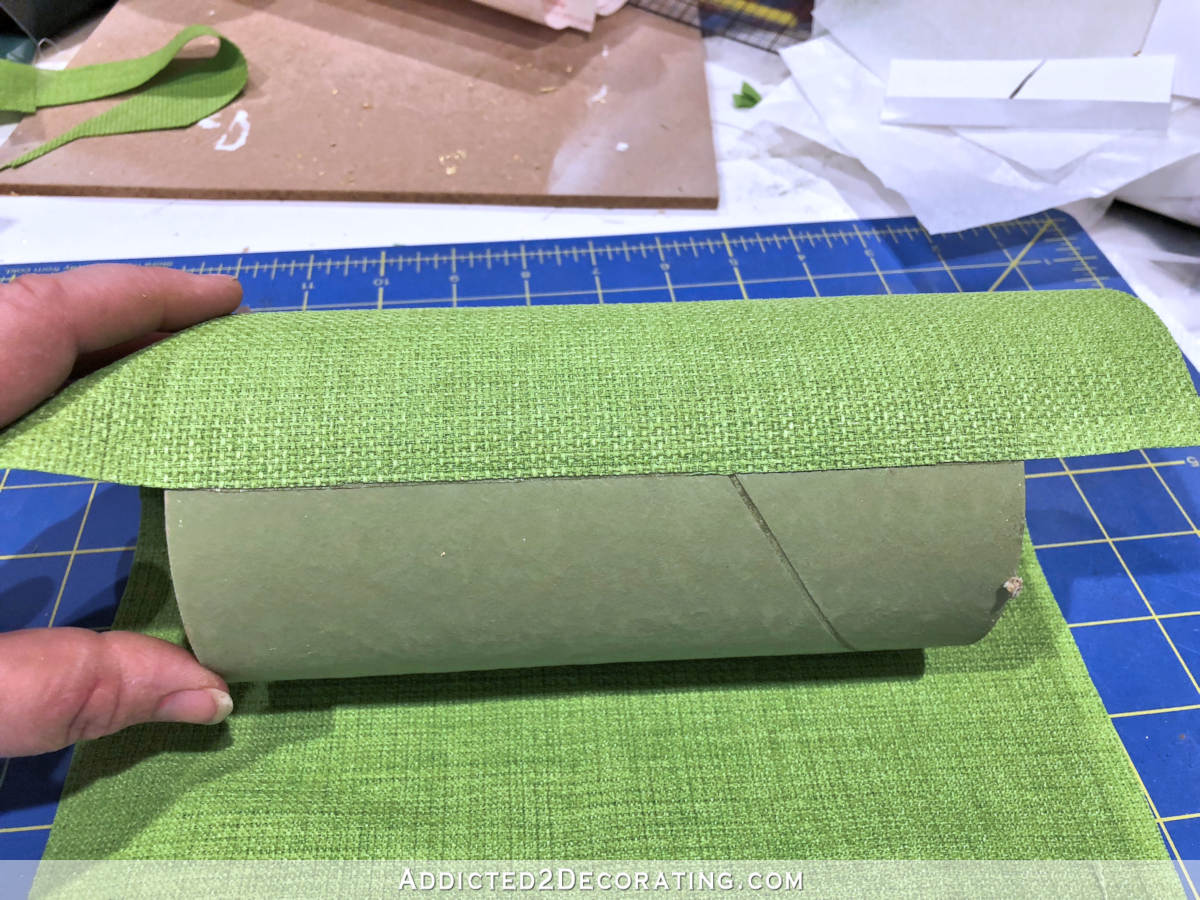
On the other end of the fabric, I placed another piece of fabric tape close to the edge.
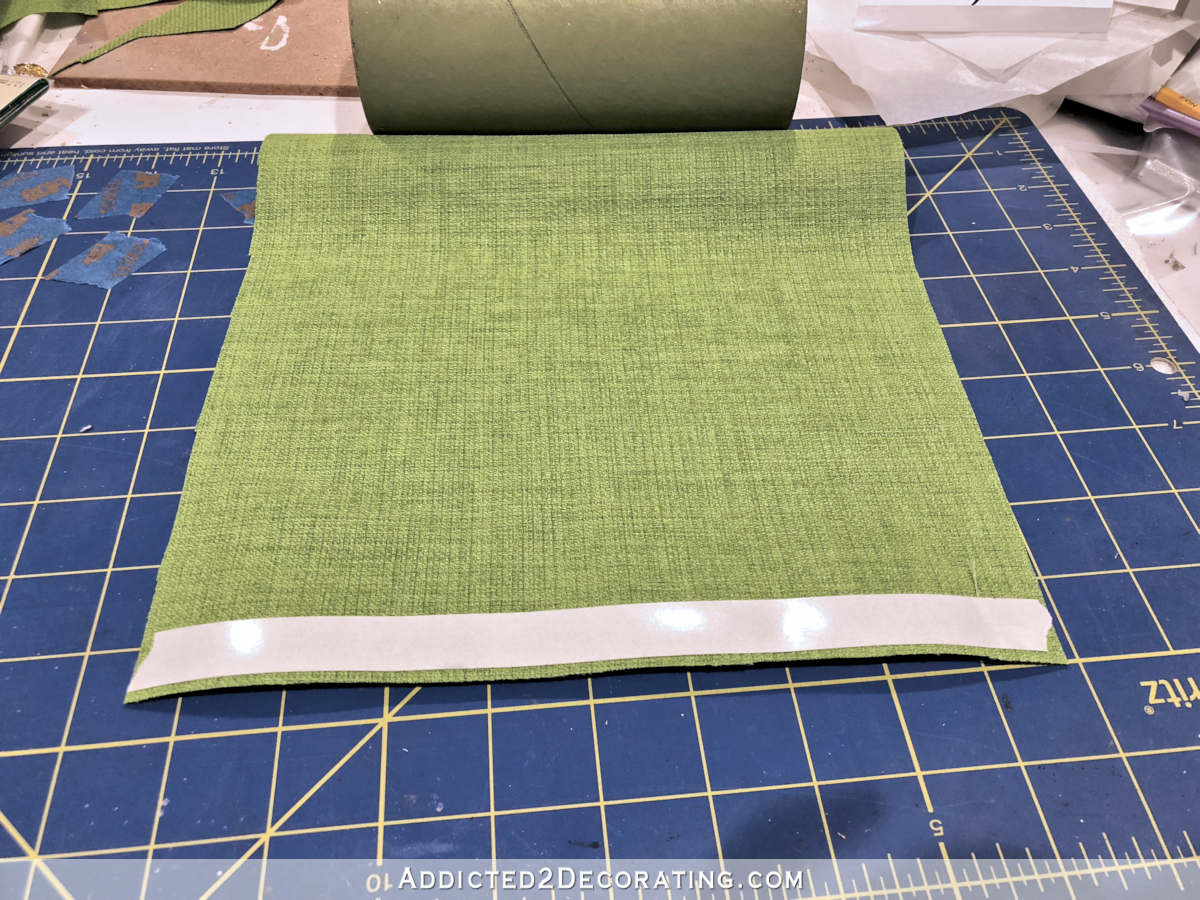
And then I trimmed the fabric right along the edge of the tape.

Then I finished wrapping the fabric and secured it.
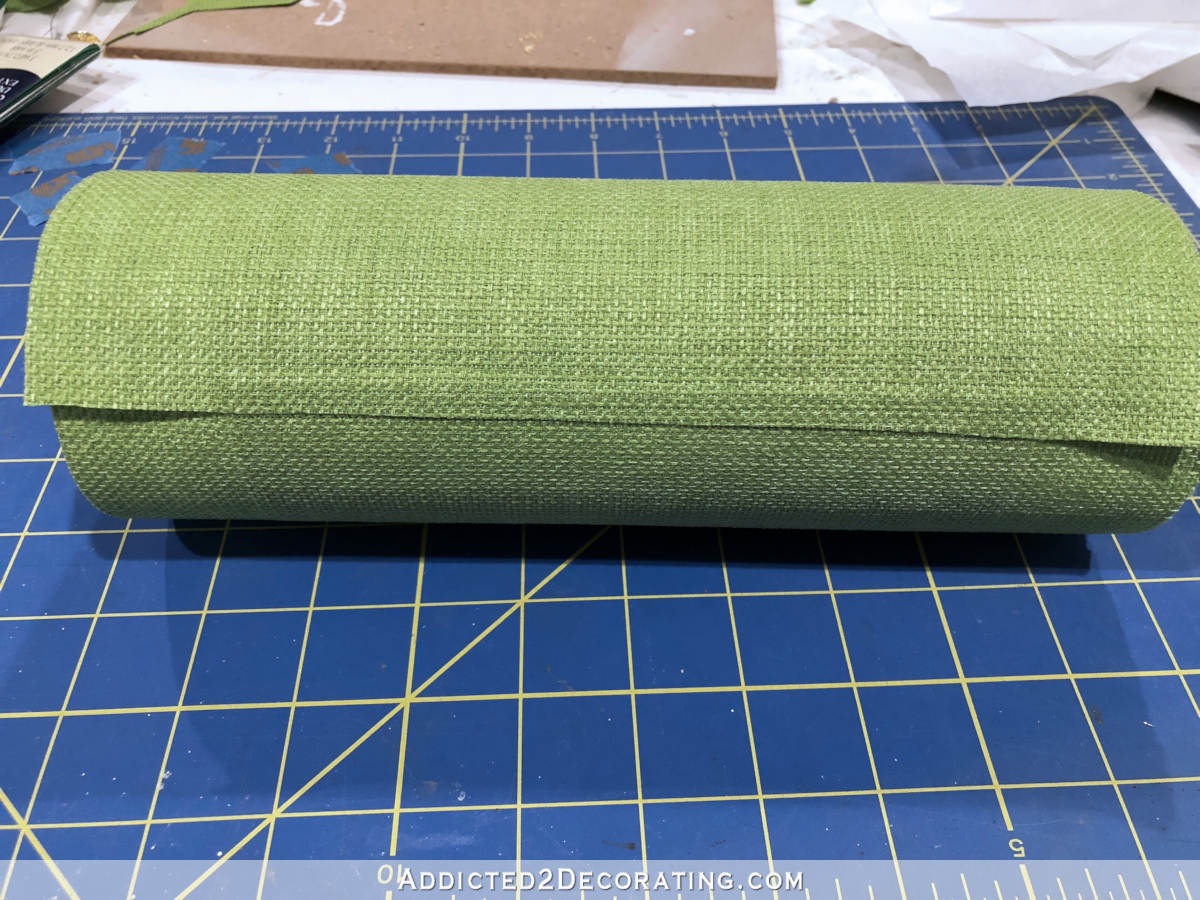
Wrapping it this way eliminated any bulk that would have been there had I folded the edge of the fabric, and with the tape right along the edge of the fabric, it will prevent the fabric from unraveling.
I finished the shades by trimming off the excess fabric and then attaching matching bias tape around the top and the bottom of the shades to cover the cut edges. I first wrapped it around the outside of the shade, attaching the ends with hot glue. Then I wrapped the bias tape around the edges and to the inside of the shade, securing it with fabric tape.
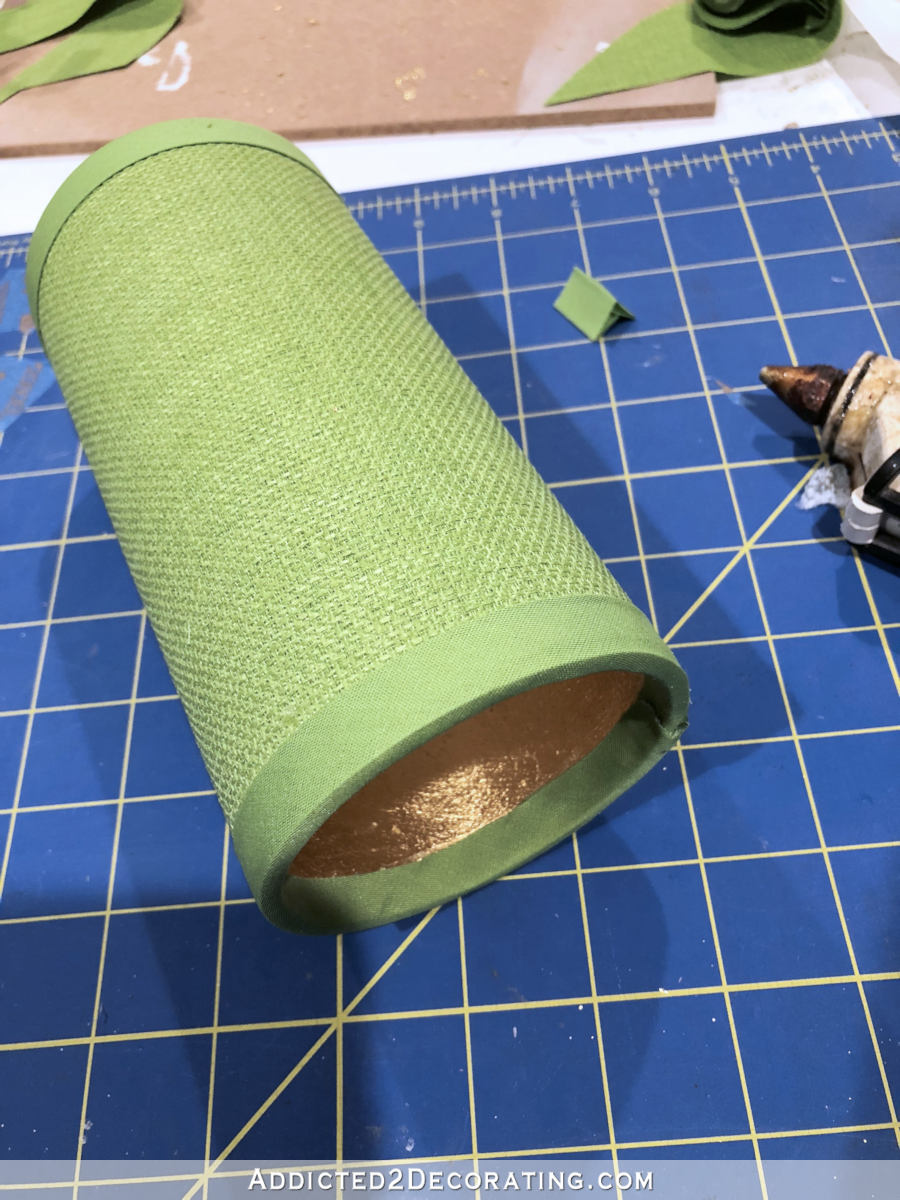
And that’s it! I repeated that five times, and now I have the perfectly shaped and perfectly sized shades for my sconces.
NOTE: I use LED bulbs, which barely get warm to the touch, so there’s no fire hazard with these DIY wall sconce shades.

Addicted 2 Decorating is where I share my DIY and decorating journey as I remodel and decorate the 1948 fixer upper that my husband, Matt, and I bought in 2013. Matt has M.S. and is unable to do physical work, so I do the majority of the work on the house by myself. You can learn more about me here.
Very cool!
Amazing! As always!
Yes, that is what I was going to say! “Amazing as always!”
WOW!! Thosee are perfect!! Wonder what the woodbutcher would say when I wanted to use his saw to cut cardboard ;^) ;^)
Thanks for a GREAT idea!!
Blessings,
J
You can use saws to cut so much more than wood. We’ve cut down landscape fabric on ours to be the size we needed to line some garden boxes. I’ve cut contact paper down to 12 inch legths so I could easily use it in my craft cutter for stencils for pumpkin carving. I’ve also used it for vinyl rolls. That thing is so dang versatile!
I’ve made vellum envelopes for my wedding. In the process, we chopped a roll to the width required on the band saw no problem. I was not going to pay $$$ for one of too many components in an invitation’s price. I also had the advantage of getting “snowed in” shortly after getting the roll, (local area shuts down with +1″ of snow) so I had a day cleared to knock out the project.
Too funny….I meant that as a joke!! Y’all are great though…I can stash your ideas along with Kristi’s for when I need to cut something out of the ordinary!!!
Have a blessed week.
J
I’m sure you’ll get lots of these comments, fire hazzered, i’m not saying that, but a quick spray of fire retardant would put your mind at ease.Xx
I use LED bulbs. They barely get warm to the touch.
Brilliant! Love the look, very excited to see where they are going. Hope you have a fabuolous productive weekend.Xx
Ery creative but will much light shine through?
None. The light will come from the top and the bottom.
Looks cool, but I hope those bulbs don’t get hot or could be a fire hazard.
I use LED bulbs, which barely get warm to the touch.
super cute as super clever!
Very cool! This is the kind of elbow grease & fabric type of project that fits my budget 🙂 I got some really good tips from your tutorial – for example I never knew permanent fabric tape existed.
Aren’t bare bulbs unpleasant? They’re all over the internet and so I got one for way up high in my vaulted-ceiling kitchen and it STILL is harsh on my eyeballs. Exposed candelabra bulbs seem to be ok on a chandelier as they aren’t that bright individually, but any single bulb exposed is terrible if you want it bright enough to be task lighting rather than mood. My taste for lighting runs a bit modern and I’m replacing the super basic fixtures around my house at the moment, so it’s a real chore to find something with a frosted glass or fabric shade that looks how I want (and is affordable).
Perfect! — and attention to detail= 👌
Love your non-rushed clean work
But—- WHERE ARE YOU PUTTING THEM??? Do tell🤣
I bet she putting them in entry way!
Love the look!
I LOVE THEM!!! I think you are placing them in your kitchen between the glass cabinets (that don’t have any glass in them yet…) Am I right??? I love your projects actually I just love any and everything you do! 🙂
Brilliant! you are amazing – I never would have thought of doing this and the result is 100% improvement for the light fixture. These are now the cutest fixtures ever!
Well done, you! Can’t wait to see wher they go. Green shades…hhmmm…kitchen is possibility, or breakfast room?
So clever, and the sconces look so much better with the shades!
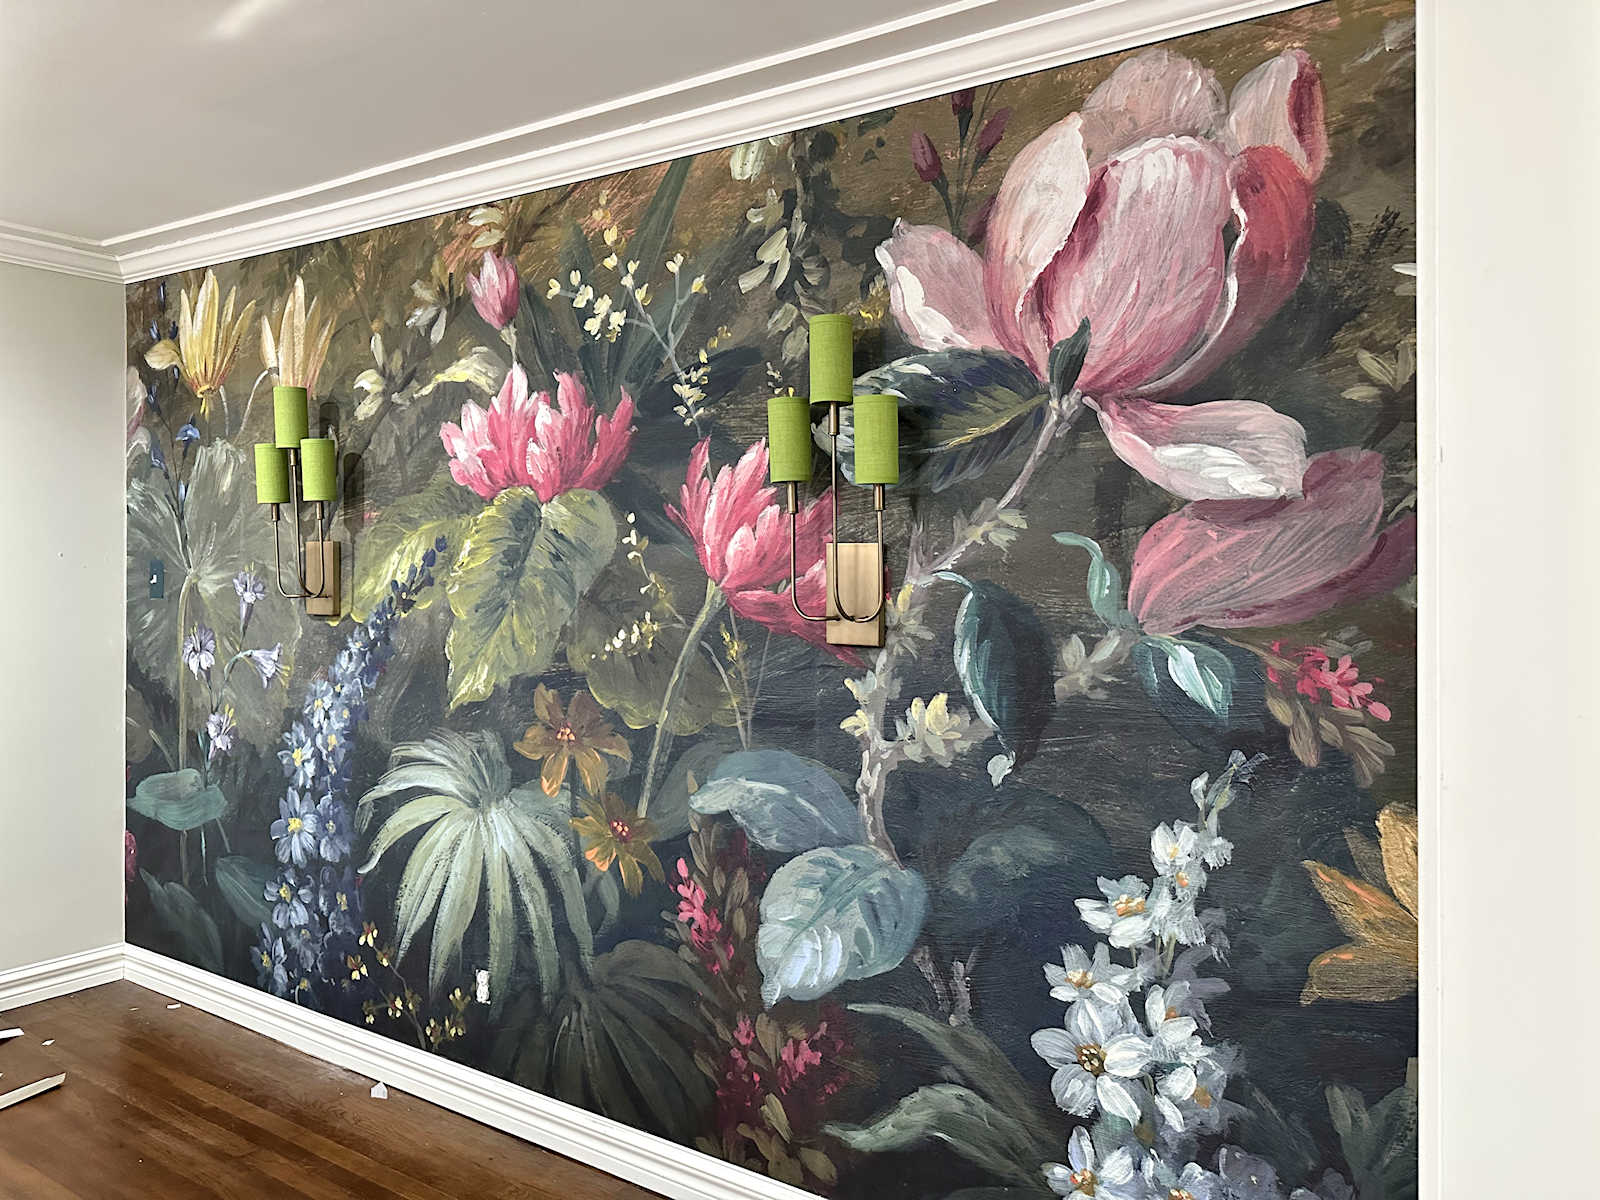
I think they will go in the music room on the wall with the floral painting.
Your attention to detail is amazing!
Great work, Kristi. I love the spare clean look of them. Fun to ponder where you will put them. And good to confirm you are real. I saw a human finger that must belong to you!
Looks great – love your ingenuity!
Another wonderful idea. Your mind must be spinning at warp speed. I remember when you first bought this house. I cringed and thought why and how could it be fixed. Your transformation is unbelievable and so stunning it’s hard to believe where it started. I wake up every morning hoping to get my decorating fix for the day. Your ideas have given members of my family so much help. They say we’re did you figure that out. I have to give you all the credit. What a brilliant mind to come up with some of your ideas.thank you for all of your hard work. It is appreciated by all of your readers.
Wow! They look amazing and as always… you made them to perfection.
Holy moly, is there anything you can’t do, woman? These are amazing.
DITTO… she is something else…SO CREATIVE..!!! I wish I could be like her…!!!
They do look amazing and actually your last note on today’s blog addressed exactly my question – what type of bulbs and are the papers shades so close to the bulbs, a fire hazard? Trust Kristi to address that issue! I think that the shades really add a lot of pizzazz to the fixture. great!
Gorgeous! I am in awe!
OK, so this is no less than AMAZING! I never even heard of permanent fabric tape or that type of canvas. Would fabric stores carry that canvas? And I love the sconces! I’m saving this idea!
It’s an outdoor canvas fabric that I found at Joann Fabrics.
Thanks, Kristi!
Many years ago I had a similar problem, a chandelier with bare bulbs that were too harsh to my eye. I made lampshades from poster board, and am still using them today! Great job, we are all on the edge of our seats to see where you are going to install them, lo!
Once again, you amaze and dazzle me! It would have taken me a bunch of trials and errors to come up with the mailing tubes – but it seemed as though you nailed it quickly! My first thought would have been to try and create a wire cage framework, but how to do that if you don’t know soldering? Of course I would have been wanting the light to shine through the shade, which would make the process harder. And it really isn’t that big of a deal, right? The fixtures are meant to be accent lighting — duh! (That was me talking to myself, lol! )
Your creativity and the ideas you come up with astound me post after post! I wish I had a fraction of your talent.
Heck yeah , you go Girl!
Awesome, and they look so fabulous.
They look very nice but I do have a question. Why use gold leaf on the inside instead of some kind of shiny gold paint? Isn’t gold leaf quite expensive? I’ve never used it so I am not sure of that.
I had about 50 sheets of gold leaf on hand, but didn’t have any gold paint. I try to make use of what I have on hand for projects before before buying something new. But gold leaf is gold in color only. It’s not real gold. 🙂 So it’s generally not too expensive. You can get a package of 25 or so sheets for around $10 at Hobby Lobby, and if you shop smart with one of their coupons, you can get it for half that price.
I do a lot better than that price buying on eBay. Usually buying 100 sheets direct shipping from China. 😁 Right now there’s 100 sheets of 24k for $14.96. 2.2″ x 2.5″. It’s small but real gold. I 💘 gilding things. You want to resin everything; I want to put gold leaf on it!
Amazing!
Beautiful job! Too late for this project, but if ever in need of sturdy cardboard cylinders again, ask your local newspaper or commercial printer. The paper roll cores make spectacular art projects. I painted an army of 3-4 foot tall nutcrackers for Christmas over ten years ago and they’re still sturdy as ever. Usually free for the asking.
I have never seen that permanent fabric tape. Where can I find it? I am saving this post for the tutorial because I need to cover some existing shades, and I think the idea can be adapted.
There’s many different brands and sizes on Amazon and also can be found in your local fabric/craft store.
This is the one I use, and I buy it at Joann Fabric.
Permanent Fabric Tape
Wow!! Please let them be for your entryway 🙂
I always enjoy your DIY projects, but this may well be my favorite. It’s clever, stylish, and original. Love it!
Where does that brilliant creativity come from? So impressed with your talent and skills, a little jealous too 😂. Can’t wait to see where you put them.
The ever-so-clever Kristi strikes again! Love that scone (too) and am hopping over to see the size for a space I have. Thanks for the link.
I love the lamps. Because of the shape, the finished product reminds me a little bit of Lumiere from Beauty and the Beast 🙂 I hope they’re going in the entryway to say “Be…Our…Guest!” haha!
I also love your taste in fabric! The fabrics you choose always have the best texture, makes a big difference!
You are something else!!! (That’s a compliment!!)
Brilliant. Just brilliant.
Amazing idea. You will never cease to amaze us. Period. The end!
I’ve been wracking my brain trying to think of what I would want to learn at your house, and now I have it! I’d like to make lighting fixtures. Start with simple and put the fixture together from start to finish. Maybe even use brass or other metals. Making fixtures similar to this
https://www.etsy.com/listing/268725320/brass-sconce-dean-transitional-wall?ref=user_profile
Genius! I love the way your ideas spark my own thinking outside the box.
Very pretty! But do the shades allow any light to escape?
Wow! Kristi, the shades look amazing! Fantastic job, so creative and the price saving (if you could find anything similar) is huge! Well done, as usual.
I just want to tell you Thank you for the creative inspiration. Everything you do is gorgeous.
wow! looks awesome and i’ve loved the suspense! And you can use some of those battery led remote candelabra bulbs from amazon just for funzies until you get those sconces wired!
Hey I see this was from 2018, but do you remember the name of the sconce? I clicked on your link and nothing, I feel like I searched Wayfair from top to bottom and couldn’t find…
So impressive. I’m hoping to re-fabric some old shades. Thank you