Easy DIY Vanity Mirror With Sconces
Yesterday I got another project checked off of my bathroom remodel “to do” list. I made a very easy DIY vanity mirror with sconces incorporated into the design.
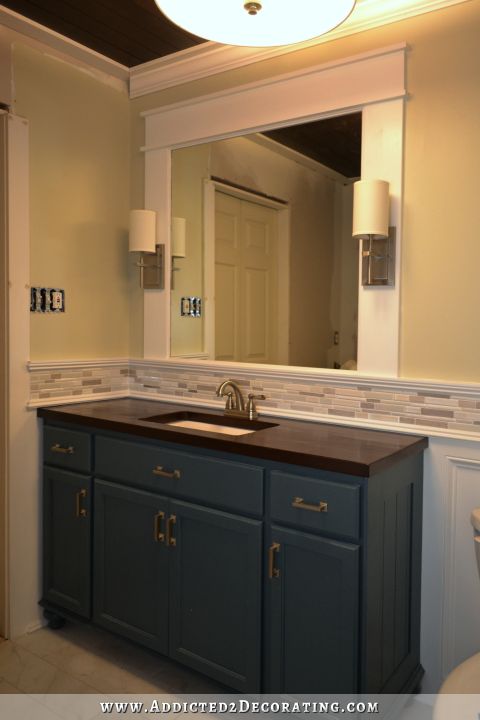
When I switched gears from a temporary bathroom makeover to the long term bathroom remodel, I decided that with the larger vanity, I also wanted a really large mirror since large mirrors make a small bathroom feel so much bigger. But I didn’t want to just hang a decorative framed mirror on the wall and call it good. I wanted something that would integrate with the whole design of the room (and my house), and I also wanted the sconces incorporated into the mirror design. So I decided to frame out the mirror the same way that I’m framing out all of my doors, and add the sconces onto the frame of the mirror. Here’s how it turned out…
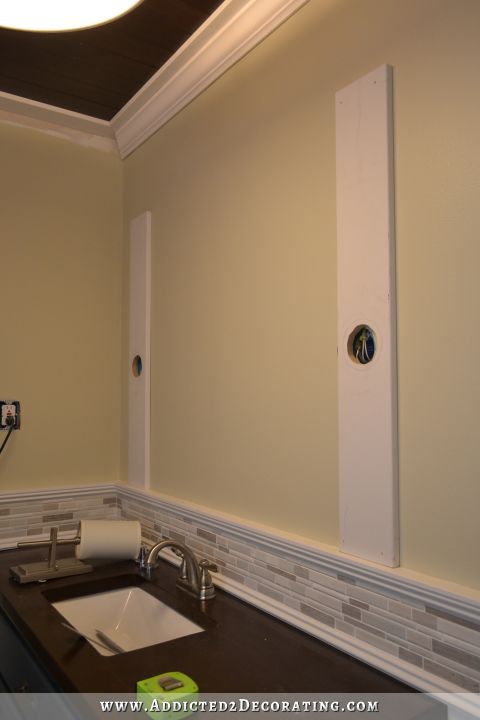
This was so unbelievably easy to do. I already had my junction boxes in place for the sconces. I put those in way back before I installed the new drywall. So all I had to do was cut the holes in the frame pieces to match up with the junction boxes. l cut the side pieces to length (I used 1 x 6’s for the sides), then marked where the holes should go, and used an extra junction box as a pattern for the holes.
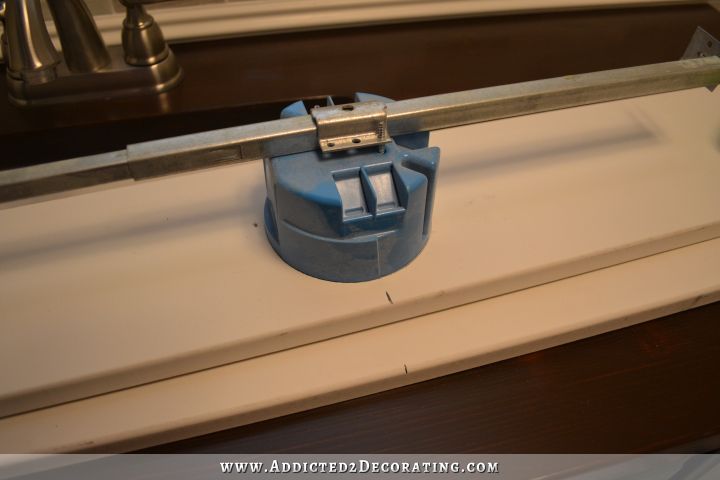
Then I used my jigsaw to cut out the holes. I attached them to the wall with construction adhesive and 2-inch finishing nails.
Then I built the top piece out of one 1 x 6, cut to the exact width of the mirror frame, and two 1 x 2’s, cut to that same width plus one inch. I put this top piece together on the floor, using wood glue and 2-inch finishing nails.
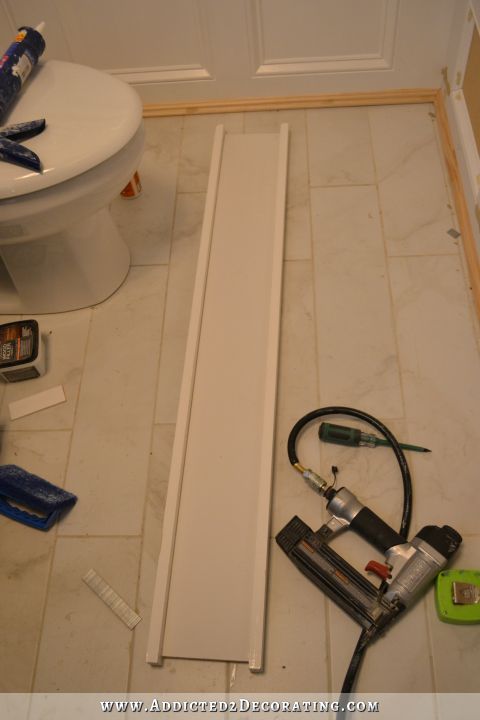
And then attached it to the wall above the side pieces using construction adhesive and 2-inch finishing nails.
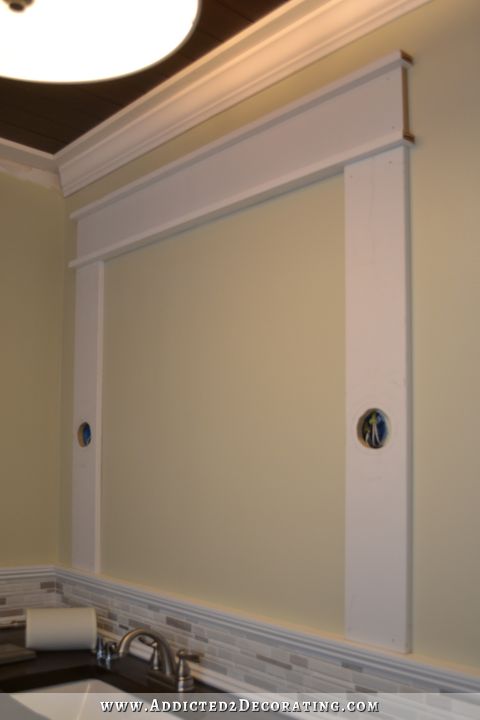
Then I used wood filler on the nail holes and sanded those smooth after it was dry. I caulked all of the joints, and then primed the whole frame (again, with my favorite oil-based primer — Zinsser Cover Stain) and painted it with my trim color (Behr Polar Bear).
At that point, I could finally install the sconces. I had the mirror cut at a local glass and mirror company, and adhered it to the wall using mirror mastic. (Don’t ever use regular construction adhesive for mirrors! Glues that are not made for mirrors can affect the silver reflective backing on mirrors.)
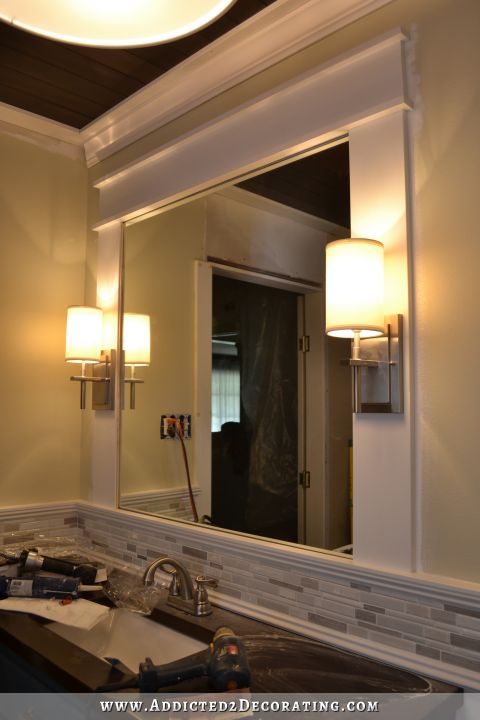
And to finish up the construction, and cover up the edges of the mirror, I attached some tiny trim all the way around the inside edge of the mirror frame. (Don’t forget to paint the back of the trim before attaching it! Some of it WILL reflect in the mirror.)
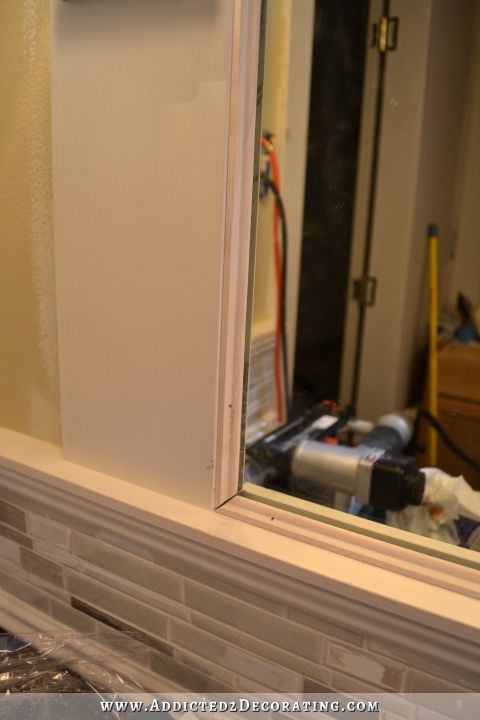
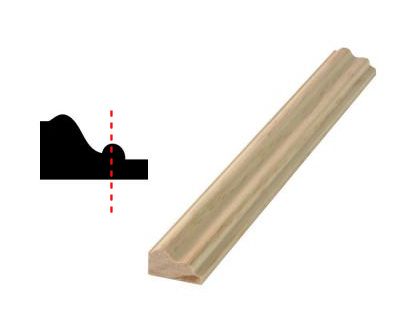
I wish I could give you a name/link for that trim, but I couldn’t find anything that would work, so I basically ended up making my own. I had some scraps of the panel moulding left over from the wainscoting. That moulding looks like this…

So I used my table saw to cut off a small edge from that moulding to use on the mirror.
It worked out perfectly! I have used that table saw constantly since I got it. I honestly have no idea how I went so long without one!
Anyway, with a little more wood filling, sanding, priming, and painting on that small trim, it was finished.
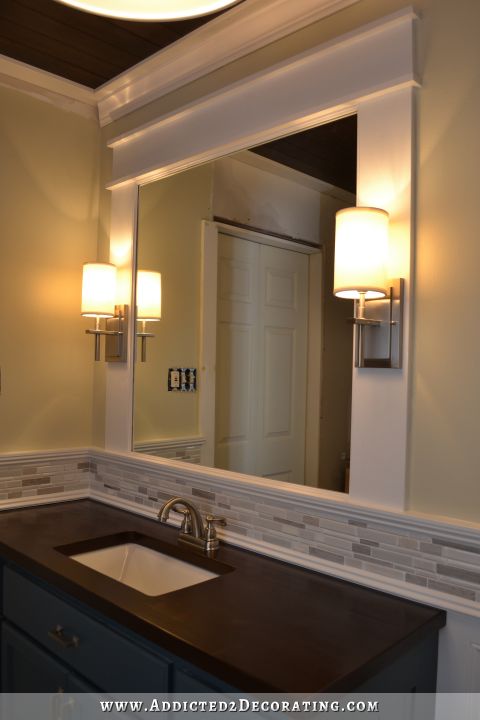
I love the simple design, and how the sconces are incorporated into the frame. But most of all, I love how much bigger this room feels now that the mirror is installed!
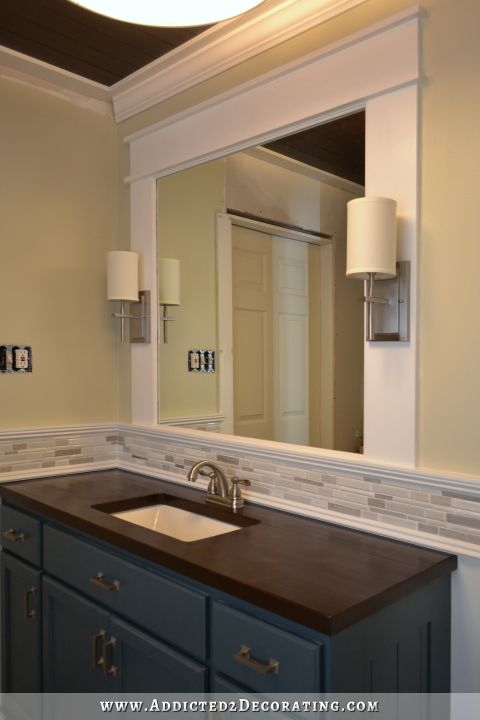
Of course, now it reflects all of my unfinished projects. 🙂 I really need to get those doors finished, and you’ll notice that I still have some crown moulding missing. I can’t install that until I build the linen storage built-in since the crown will wrap around that built-in.
There’s still plenty to do, but at least my list is getting shorter!

Addicted 2 Decorating is where I share my DIY and decorating journey as I remodel and decorate the 1948 fixer upper that my husband, Matt, and I bought in 2013. Matt has M.S. and is unable to do physical work, so I do the majority of the work on the house by myself. You can learn more about me here.

Oh wow – love the bathroom mirror with the built in lights and the trim that echoes your door trim. It has a real highly finished classic look to it. Keep up the fab work!
You did it again! I do believe this is the proverbial “frosting on the cake”. Love it!
I LOVE the mirror. We are planning on a master bath redo this summer and a large framed mirror is part of my wish. Never thought of adding the lights to the mirror! Love this.
Now there’s a mirror I really like!
Omg I was really sad when you said you were not using the oval mirror, But whoa this is beautiful! Good call, it is all coming together and looking great!
Looks smashing!! I love how it will match your trim used elsewhere in your home….great job Kristi, great job!!!
Huge success Kristi! I love it. On a side note–did you get your toilets switched out over the weekend?
I didn’t get to it I’m actually hoping to get that done this morning.
Very classy!
Love it and pure genius using the same style molding as the doors!
…beautiful…classy…forever…you will never tire of this.
Again I’m blown away by your design and talent! LOVE your bathroom! I’m always showing my husband your pictures and sharing your blog in the morning with him. It’s become our morning ritual. I can’t decide what part of your bathroom I love the most. Thanks for sharing all your hard work.
You are unbelievable…!!! it looks fantastic…!!!
WOW! WOW! WOW!….Can you tell I love it!…That looks fabulous Dahling!!!
Beautiful. Just beautiful. Everything looks so good together. What a pro!
Kristi, it looks great! A technical question – how do you manage to fill, caulk, prime, paint, then touch up the wall around the frame (there is white primer or paint on the wall on one of the pictures), then caulk, prime, and paint the trim? And all this in one day. What is the required time between the coats, or for the filler to dry, so you can sand it?
Oh, this wasn’t a one-day project. I finished it yesterday, but you’ll notice in the fourth picture down, the tub skirt isn’t finished. I started this mirror project on Sunday, while I was also working on the tub skirt.
But I do manage to get quite a bit of those things done in one day because the products I use are very quick drying. The only exception is when I need to use wood filler on the joints. I pile that up, so it takes several hours (I usually try to leave it overnight) to dry before sanding. But on regular wood filling (e.g., nail holes), that dries within about 30 minutes. The caulk I use is DAP Alex Fast Dry, and it dries within about 30 minutes and can be painted in an hour. The primer I use (Zinsser oil-based Cover Stain) takes about an hour (two or three if it’s really humid day) to dry, and then can be painted. And the Behr paint I use dries and can be recoated in about an hour. So if I get an early start on a project, it really is possible to get it all done in a day, especially if the humidity is low that day. But these projects generally are spread out over a couple of days.
It makes sense. I didn’t pay attention to the unfinished tub skirt 🙂
OK, I think I am going to declare a Kristi Day and ask everyone who follows you to stop what they are doing at a certain time that day and bow down before you. Honestly, everything you do is fabulous, but this blew me away. It is something that you never see, so creative and beautiful. I can’t stand much more creativity, LOl. Just so you know, I just had painter paint my guest suite. It too has a small bath, with no outside light. The mirror over the vanity was a Carolina framed mirror that I have had forever and love. I will not be putting it back up. I am coping exactly what you did. The sconces are there, so I just have to disconnect them and reconnect them. I cannot wait to do this next week, as soon as my husband goes back to Cincinnati. I love, love love this. Blessings
Kristi! Wow, what a difference…love it love it…wonder woman at it again..
So impressive…it’s absolutely gorgeous! It looks like it came right off the pages of a magazine.
It looks like it should be IN the pages of a magazine—all of them!
And the cover…..
Really, really lovely!
You may have answered this in the past but just how did a young woman like you are learn to do so many things?? I have often said if I had been a man I would have been a carpenter. Didn’t occur to me to BE ONE!
So beautiful! You inspire me – thank you for sharing your talent.
I guess your list is getting shorter. That mirror and lamps look great and I agree that they make the bathroom appear larger. You’re in the home stretch now…
This is AMAZING! Bravo! I see you working on that beautiful floor and all I can think is that if it were me, I would have globbed caulk, glue or shot a nail into it! I need to cover everything with heavy cardboard before I tackle a project! And I’m the tidy one in this marriage! Hubs can make a mess getting ready to start a project, kinda clutzy. ;-/!
Kristi, you simply blow me away! I have been in some very large, beautiful, gorgeous homes, but they seem to take on that “sterile perfect” look, if that makes any sense at all. Your work creates a beautiful, warm, inviting atmosphere, IS perfect, but perfect in such a different way! All I can think is it is because you focus on the most tiny of details and put YOURSELF into the project. It comes out perfectly, but not sterile perfect. I would take your home ANY day over a huge place! Be prepared for someone to enter your bathroom and not emerge for hours! 🙂
Beautiful Kristi. Now that you have the main mirror up, are you any closer to deciding what will go on the wall of the linen corner behind the door?
I love watching how you plan all aspects of a room and then seeing them come together step by step with everything working so beautifully together.
Yep, now that I have a more serene wall color, I’ve decided to go with the tile on the open shelves. I don’t think it’ll look too busy now.
Congratulations Kristi1 Mirror looks fantastic. Perfect with the vanity. I had no idea that a big mirror makes a small bathroom look bigger. I will remember that because I have small bathrooms. Looking forward to Monday’s post. I cant wait to see what you accomplish over the weekend. Are you going to let Peeve help you this weekend?
I think she’s lost interest in this project. 😀 She was only interested as long as I was keeping the door closed and wouldn’t let her in. Now that the doors stay open and she can come and go as she pleases, she’s not interested. 😀
Kristi, I LOVE this mirror!! One of my favorite projects that you’ve done. Your bathroom is looking fantastic!
Looks so nice.
I absolutely love this bathroom makeover! I have been looking for an idea for my bathroom mirror and this is it!! Thanks for sharing your makeovers with us.
WOW, that is GORGEOUS!!!!! LOVE it! It’s just perfect for the room; you’ve knocked another out of the ball park, great job, Kristi!
I am so impressed with all the custom work you have done. Your finished rooms look amazing! This bathroom is truly up to the standard of your kitchen renovation. How much do you think it would have cost to have a contractor come in and do this bathroom remodel for you? Do you think you are saving 50% or more? Gorgeous job! I really love the paneling and the floor tile.
I would think I’m saving at least 50%, but I really have no idea.
Absolutely beautiful …..love the mirror and the sconces!!!! Great job.
Beautiful work. Love, love sconces on the sides of a bathroom mirror. So flattering.
Have you seen this? http://www.valsparcolorforall.com/ I was so moved by it. It is a must-see for anyone but especially for a color-lover like you. 🙂
I love that! Matt is actually partially color blind. I’d love to get him some of those glasses, but wow…$400! Maybe one day.
Kristi, I’m in awe of your talent!! I knew a plain old large mirror over your vanity was not your style, so I was eager to see what you would come up with. WOW!!!!!! So simple yet SOOOOO elegant!!!!! Can’t wait for your next post!!!
Don’t hate me. I LOVE everything you do and look forward to your daily posts. There was something that looked off to me about the mirror and it’s those shades. They don’t seem to go at all but it’s probably just the lighting in the photo. Otherwise I think it looks great! You’re amazing.
I don’t hate you! I actually agree with you 🙂 I’m planning to recover the shade with another fabric. They turn way too yellow when the lights are on. I just haven’t decided what I want to cover them with (or even had a chance to look).
I feel like a huge dork because I am WAY too excited you replied to me. It’s like talking to a celebrity! Lol, can’t wait to see the finished project!!!
That bathroom is fit for a princess!!! I would LOVE to go in a bathroom like that!! Kristi you are doing a tremendous, wonderful job. (Each evening I tell my husband what you blogged in your remodel!) A very interesting topic of conversation. WOW, WOW, WOO, HOO!!! Way to go!!! I am a fan!!!
Kristine / Pearland
I love everything about this bathroom! My hubby and I just did a complete demo of our guest bath and I have been following and copying just about everything you have done. Your bathroom will have a twin. I’m wondering what you are doing about towel bars? I have always hated the look and they take up too much wall space. What I did in our master bath is hang two large white command hooks high up inside the shower for two towels to dry. You can’t see them when the curtain is open. I have open storage shelving like you are building to display clean towels. What are your plans for wet towels?
Kristi!
I LOVE IT! But please, do something fun/”Kristi-fy” with those boring sconce shades!
WOW! So beautiful. Nicely executed. We’ve been in Vegas so this morning I’m catching up – love the new paint choice and the bathtub surround. As a side note, our hotel suite bathroom had double doors..we thought of you and chuckled because now we’re noticing every little piece of decorative molding on every surface! We knew we always loved molding – but now we look at it through different lenses 🙂
Hmm. Radio silent today. You aren’t going to pull another April Fool’s joke on us, are you?
I think the sconces are too low. They almost look centered. The height of the shade and the size of the base seem similar in size so they sort of over power the area. Perhaps once you have changed the shade it will change things.
Hi kristi, I posted before but it didn’t come through. I am not getting your posts every day as before. I have no idea what happened. I had to do a search for you. Actually, I was ready to track you down in Waco because i thought something happened to you or Matt when I stopped getting your blogs. Then I searched and there you were. Whew! But, is there a problem with the powers to be that disperse your blogs? I re-signed up but still nothing. Can you shed any light? I always look for you first thing every day so this is a tad upsetting. Thanks, Maggie
Maggie, some time ago my yahoo mailer sent Kristi’s update to the spam folder. I had to tell it it is not spam 🙂 Did you check yours?
Hi, I don’t use Yahoo, but I will check the spam folder anyway. Thanks. This is awful, I look forward to reading about all these fantastic projects. She’s my hero.
The mirror and scones look really beautiful and classic. You are so creative and talented. Thank you for sharing your thought process through all of this, too.
I love love love how you explain the process! Thanks for sharing!
Gorgeous, stunning, classic and your mirror definitely has the wow factor. I love it and I really love the way you incorporated the sconces into the frame….you are truly brilliant Kristi.
I love you mirror frame-great job! Am planning out our bathroom remodel and would love to try this. My problem is our basement bathroom, which we are going to remodel, was previously remodeled in the 80′ s (you get the picture!) is long & skinny, carpeted, etc., with a low ceiling. Am afraid the mirror frame will overpower the.”smallness” of the room. Any suggestions?!
I personally think a large mirror in a small bathroom is a great thing. It’ll make the room feel so much bigger.
perfect
It looks amazing! Did you use mdf to frame this mirror? If not, what kind of wood did you choose? Thanks!
Yes, I used pre-primed MDF boards.
Hi there, I do not see mention of your window that is now a framed pic.
How did you deal with that?
Sorry if I missed it somewhere.
Ramona
I removed the window and drywalled over it.