Entryway Credenza Makeover – From Distressed To Refined
After a forced two-week break, I have finally finished my first project for the month! Something tells me I’m not going to make it through my August to-do list. 🙂
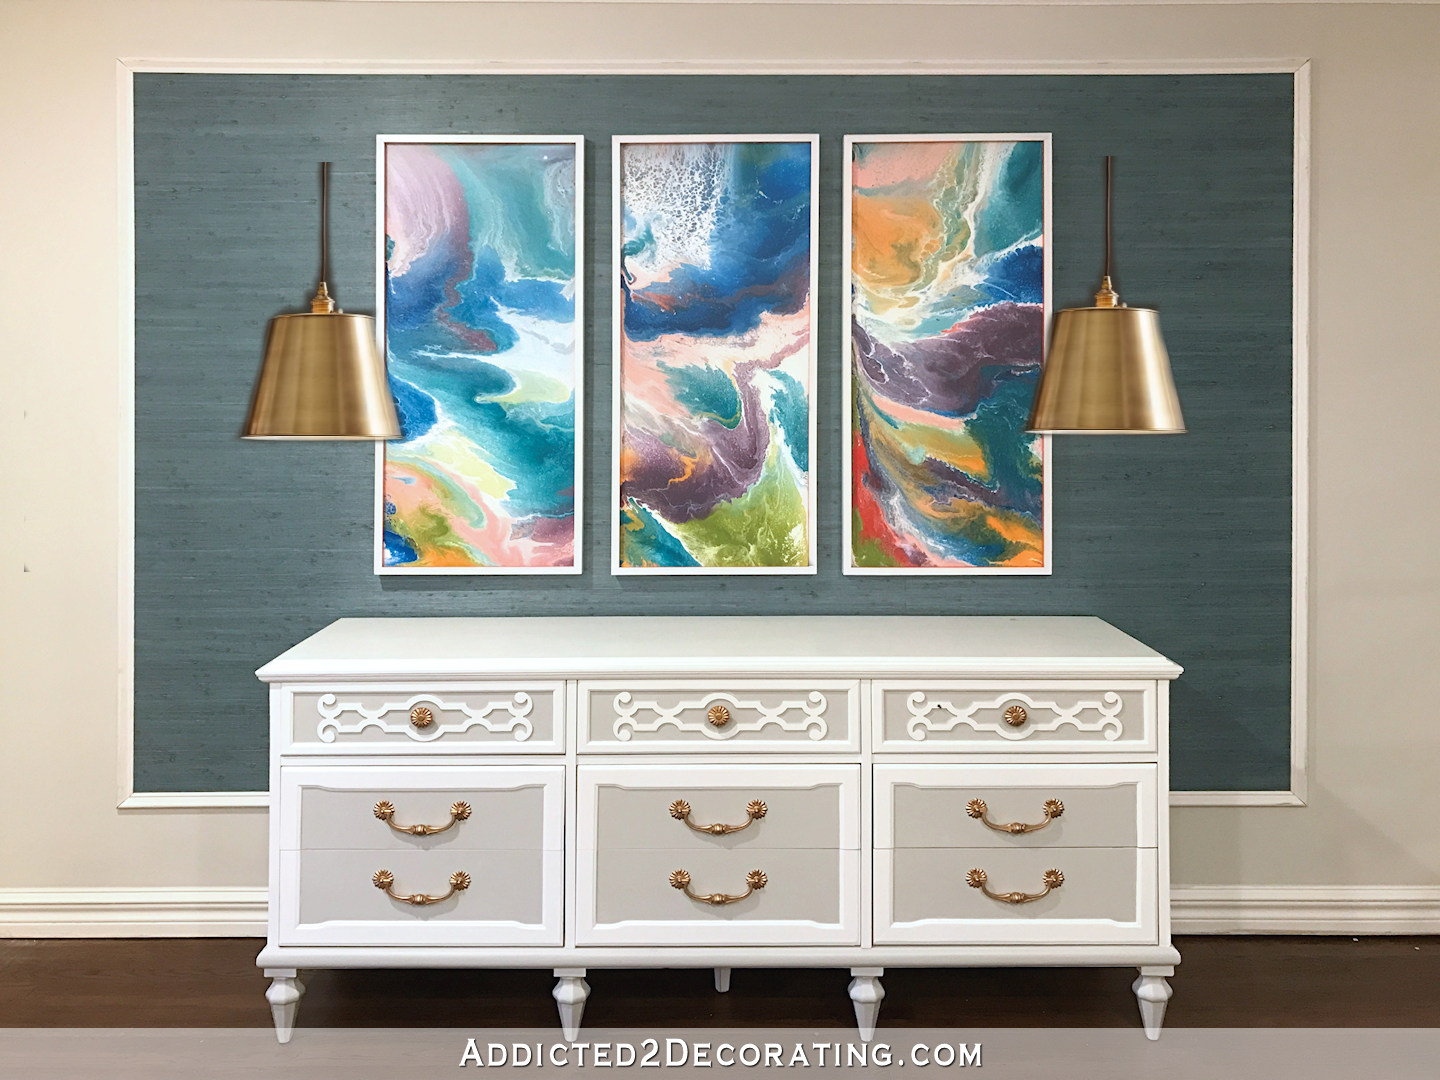
At the end of June, I purchased a “new” credenza (yes, I know it’s a dresser 🙂 ) from a local resale shop. It’s one of those places that buys up old furniture, slaps a coat of white chalk paint on everything, and marks up the price 400% because it’s been “refinished”.
This is what it looked like when I purchased it…
The picture doesn’t show just how awful the finish was. It had drips and runs everywhere, and the entire surface was very rough.
But I loved the overall look of the dresser, and was especially drawn to the design on the upper drawers and the shape of the feet, so I paid their ridiculously inflated price for it knowing that I’d have to refinish it.
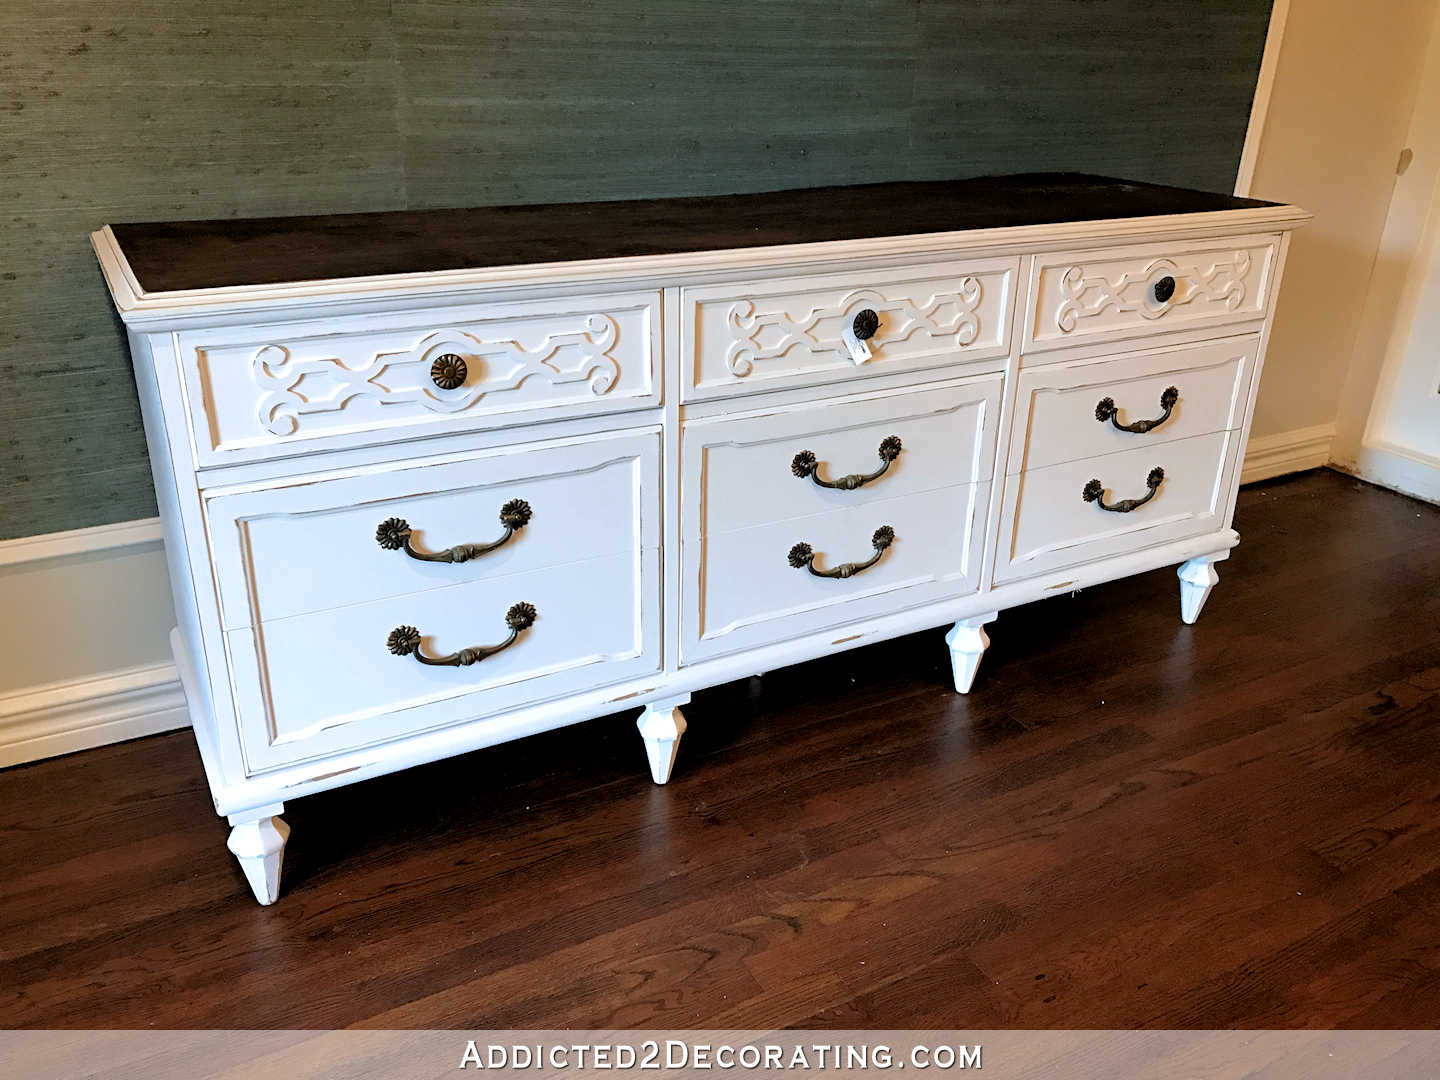
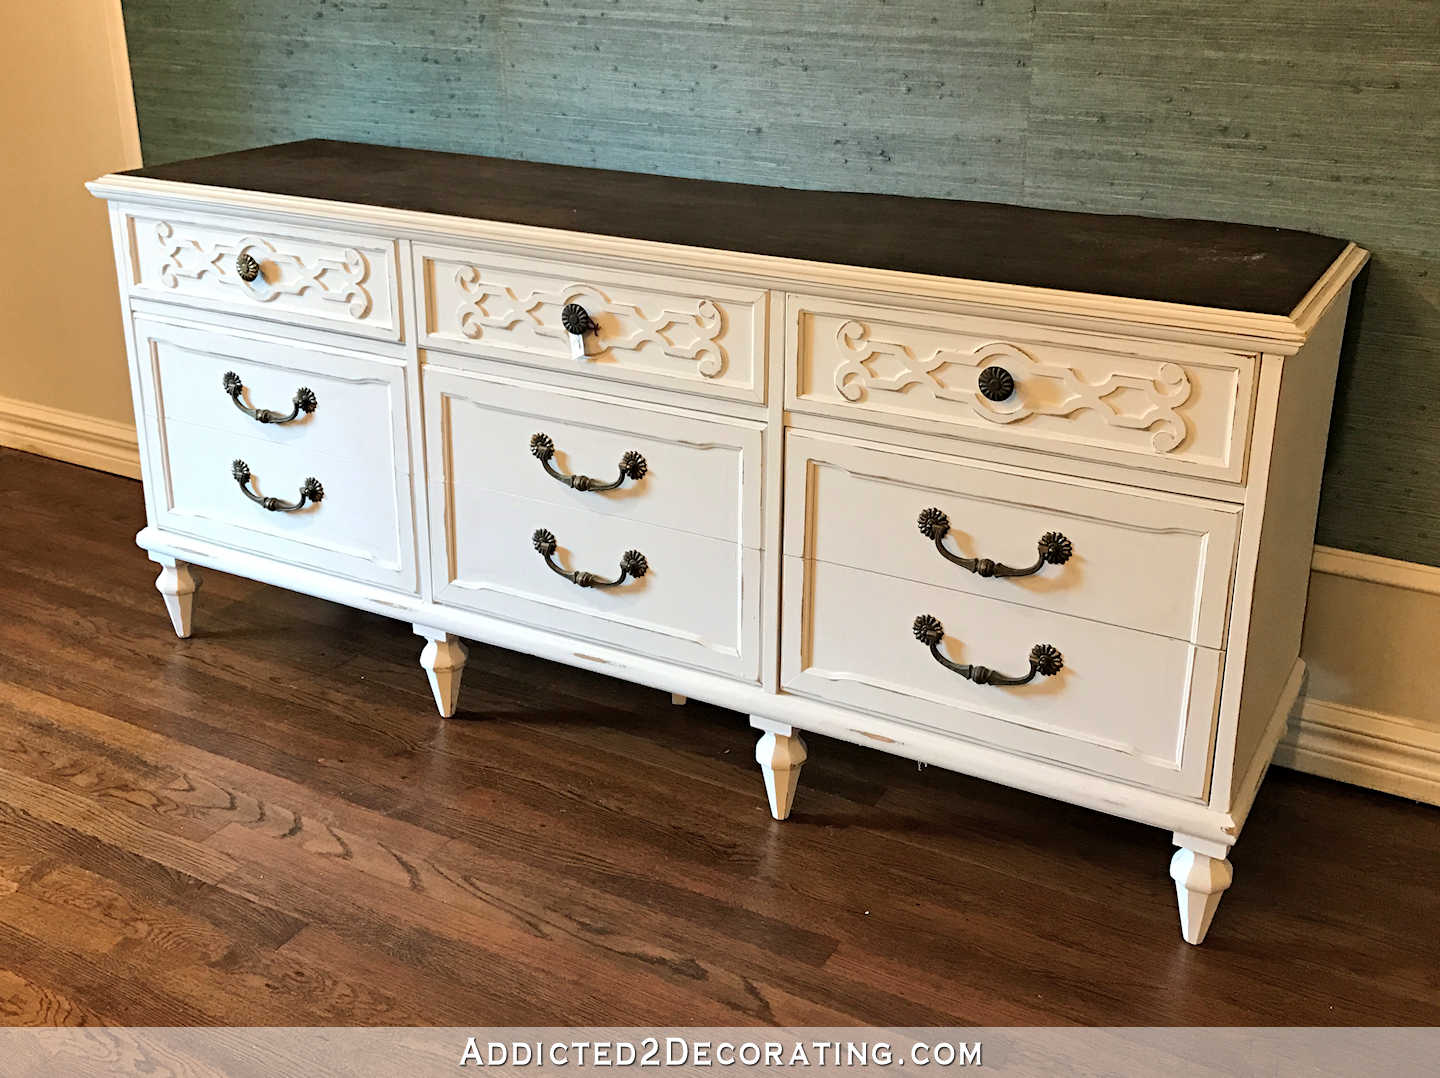
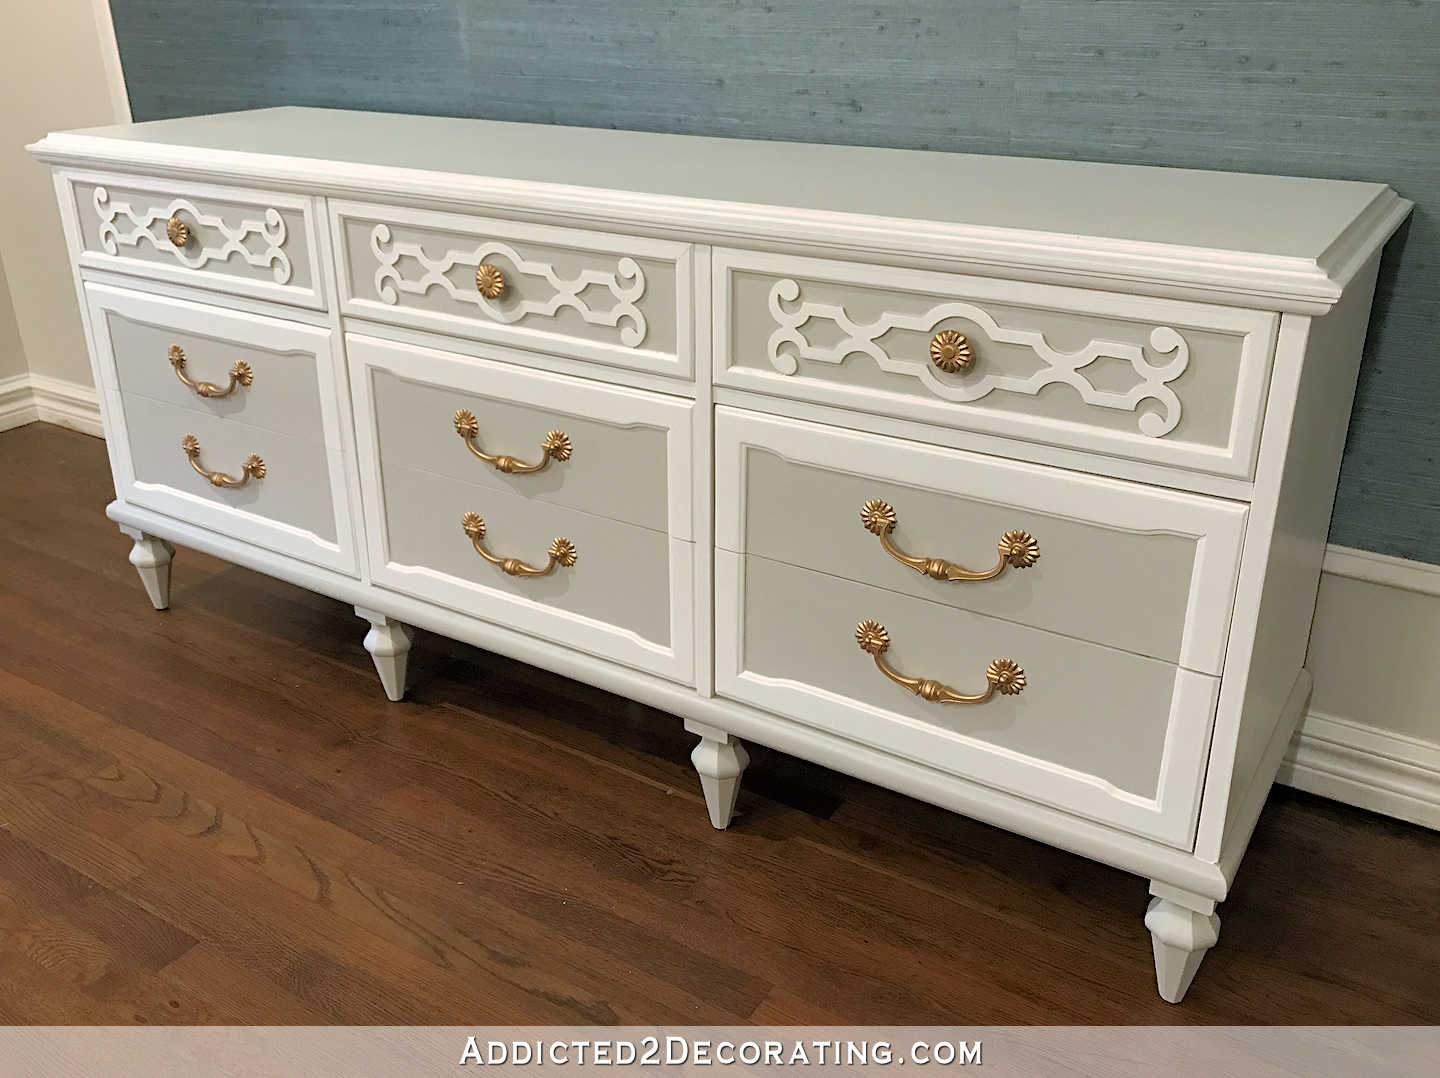
So I spent the last two days sanding down that awful drippy, clumpy, brush stroke-covered chalk paint finish as best I could. Then I gave it two fresh coats of Behr Polar Bear (my favorite white), and then accented the drawers with some Sherwin Williams Repose Gray.

The new look is definitely more my style. The details on this dresser were way too pretty to hide under that awful rustic/distressed look. This dresser needed a more refined look, in my humble opinion.
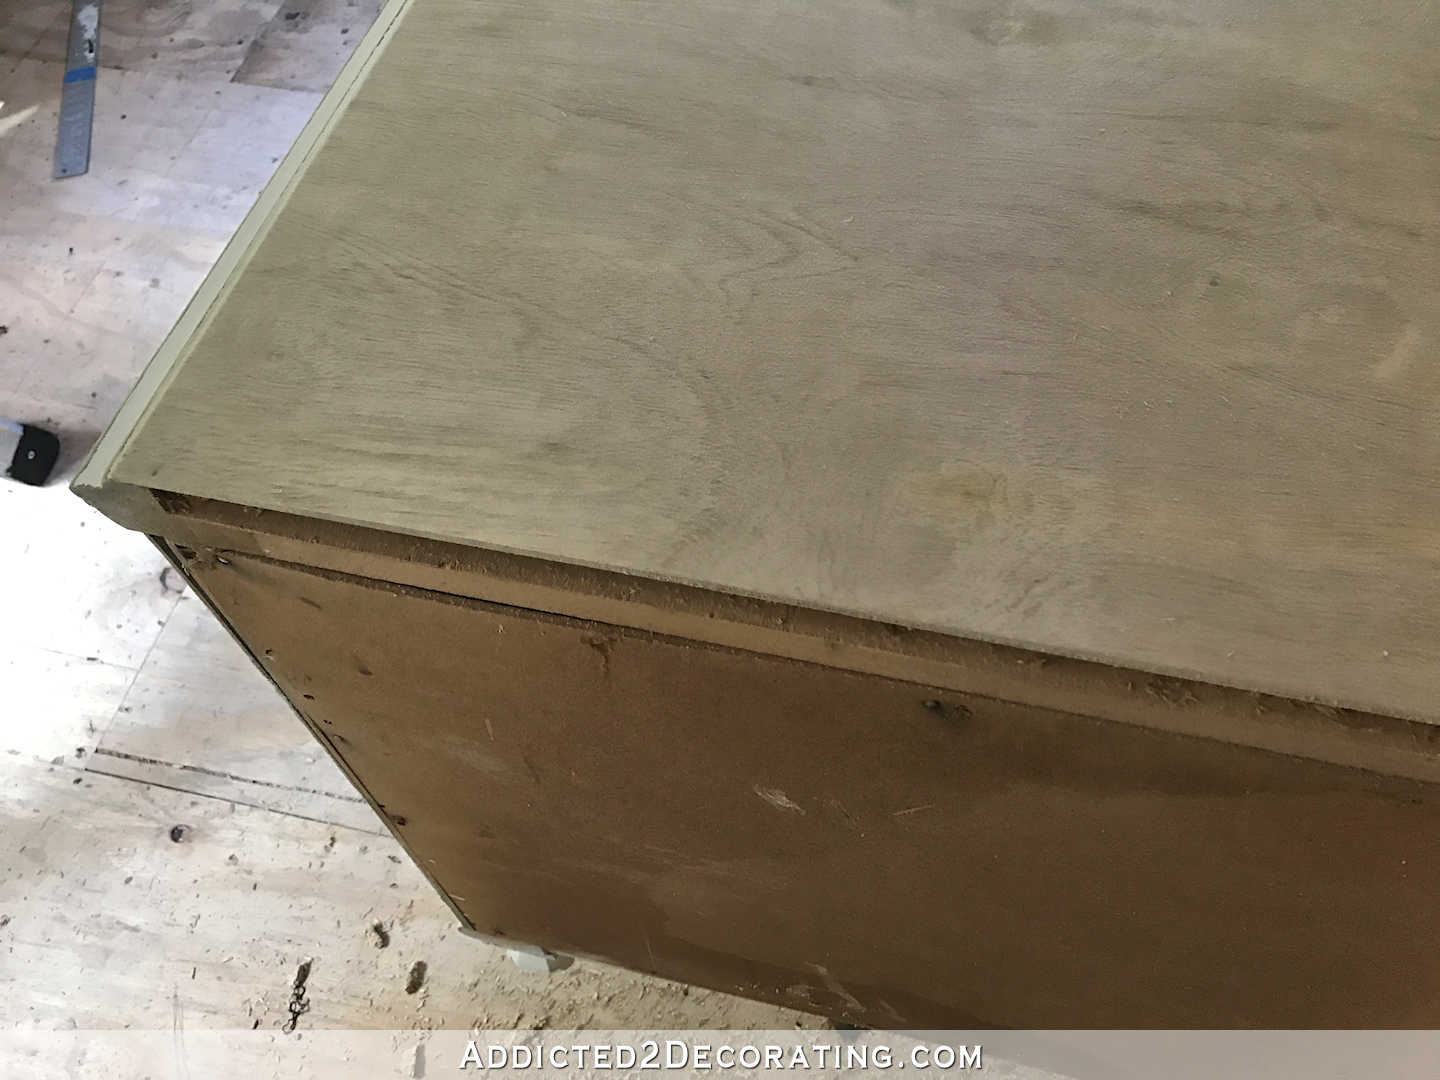
What I didn’t count on was that I’d have to redo the entire top. When I saw the dresser in the shop, there were all kinds of decorative items displayed on top, with what I realize now were two big mirrors strategically placed.
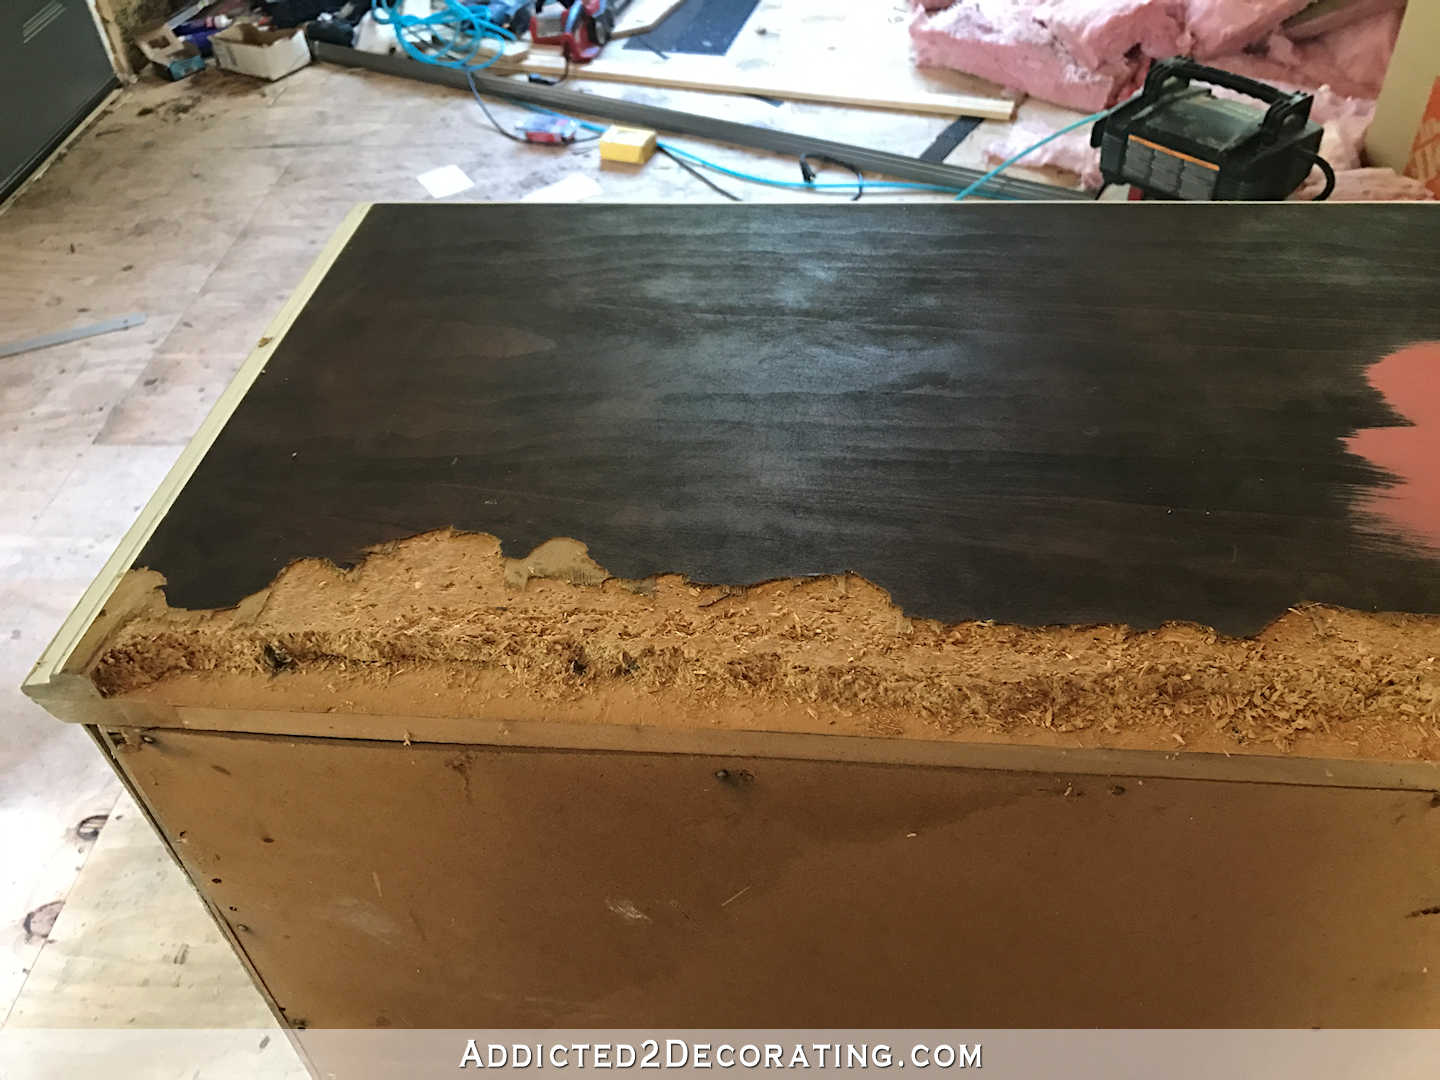
The part of the top that I could see looked just fine. It wasn’t until they delivered it to my house that I saw that the top had severe water damage to the point that the particle board under the veneer had swollen to almost double its thickness in some areas and had become very brittle, and the veneer, which was barely hanging onto the brittle particle board, was very warped. It never dawned on me that they would have covered up so much damage by strategically placing large, heavy merchandise so that it hid the damage. I can’t imagine being a shop owner and being okay with something like that leaving the store.
This isn’t a great picture, but it’s the only one I have where you can kind of see the damage I’m talking about on right side of the top towards the back. See how warped and bubbled up the veneer is? And the damage to the particle board underneath made the particle board unsalvageable.
So I peeled off all of the warped veneer, and then chipped away all of the swollen, brittle particle board underneath.
I didn’t want to go to the trouble of completely replacing the top, which would have required ordering new wood veneer online and waiting at least two days for it to arrive. So my simple solution was to just cover the entire top, from the innermost edges of the routed design on the front and side edges, with a new layer of 1/4″ plywood. I used contact cement to adhere the plywood to the old top.
That did leave me with an area roughly 1.5″ x 18″ with no support under the new plywood top, but since it was right on the back edge of the top, I didn’t worry about it. I never place items that far back on the top, and even if I did, the 1/4″ plywood is strong enough to hold any decorative item I’d ever place on the top of a dresser.
I sanded the edges so that they were very smooth and the edges were rounded just a bit. And then since I knew I would be painting the whole thing rather than staining, I caulked where the plywood met the old top to mimic a continuous routed edge look. I think it turned out pretty well.
The original pulls were dark and heavy looking…
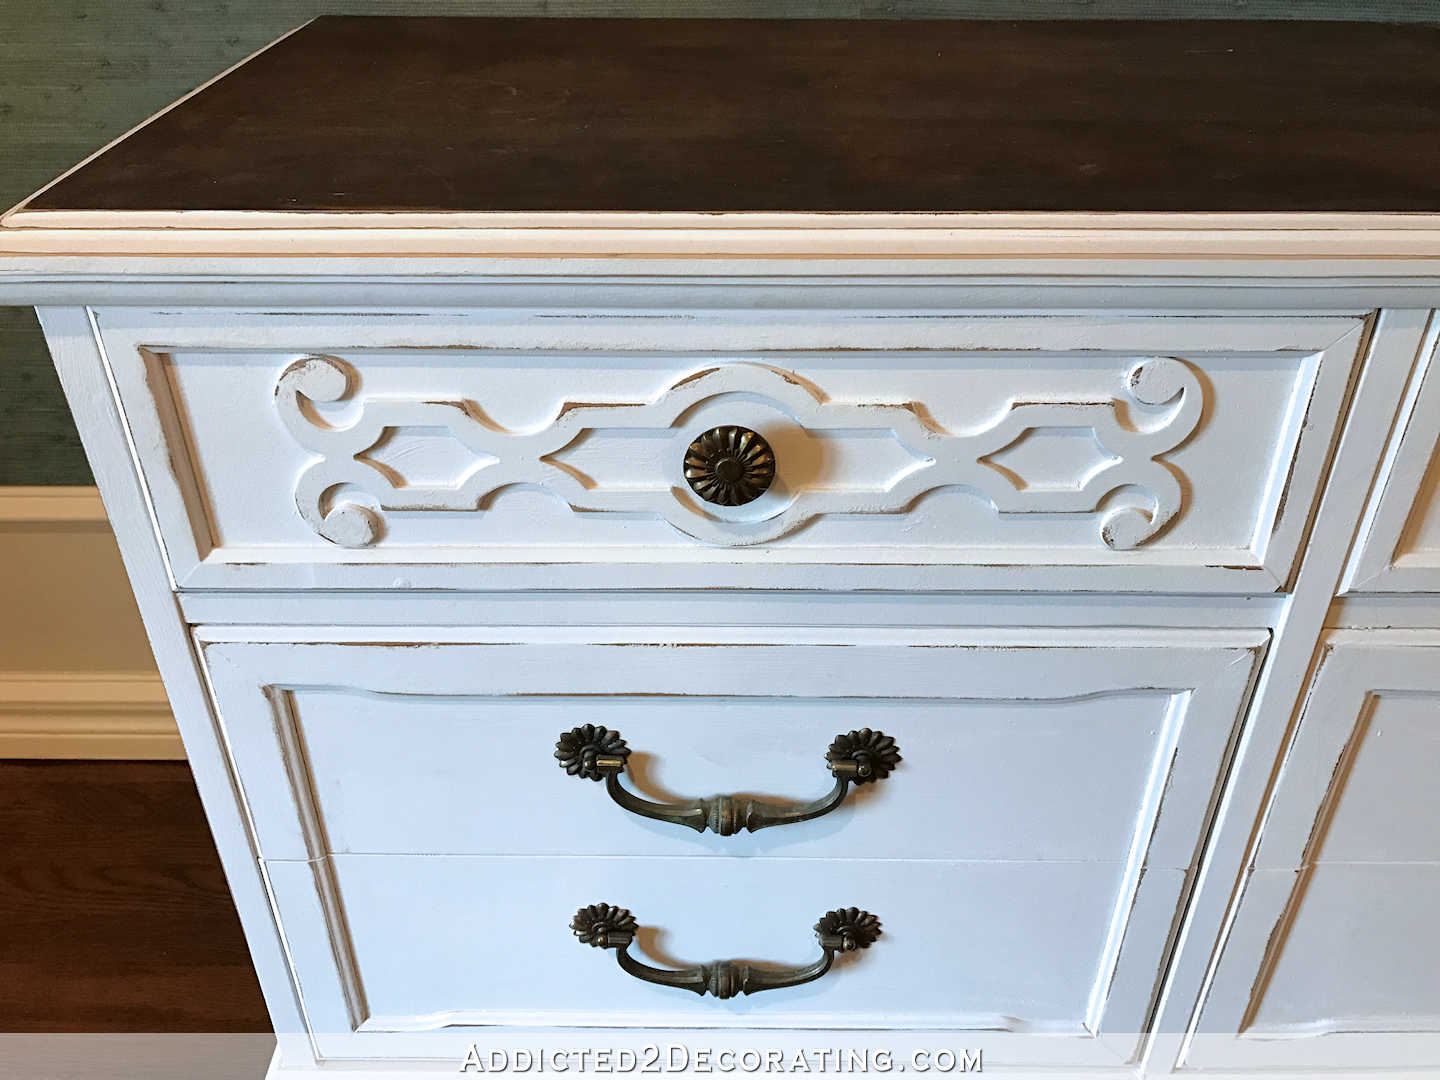
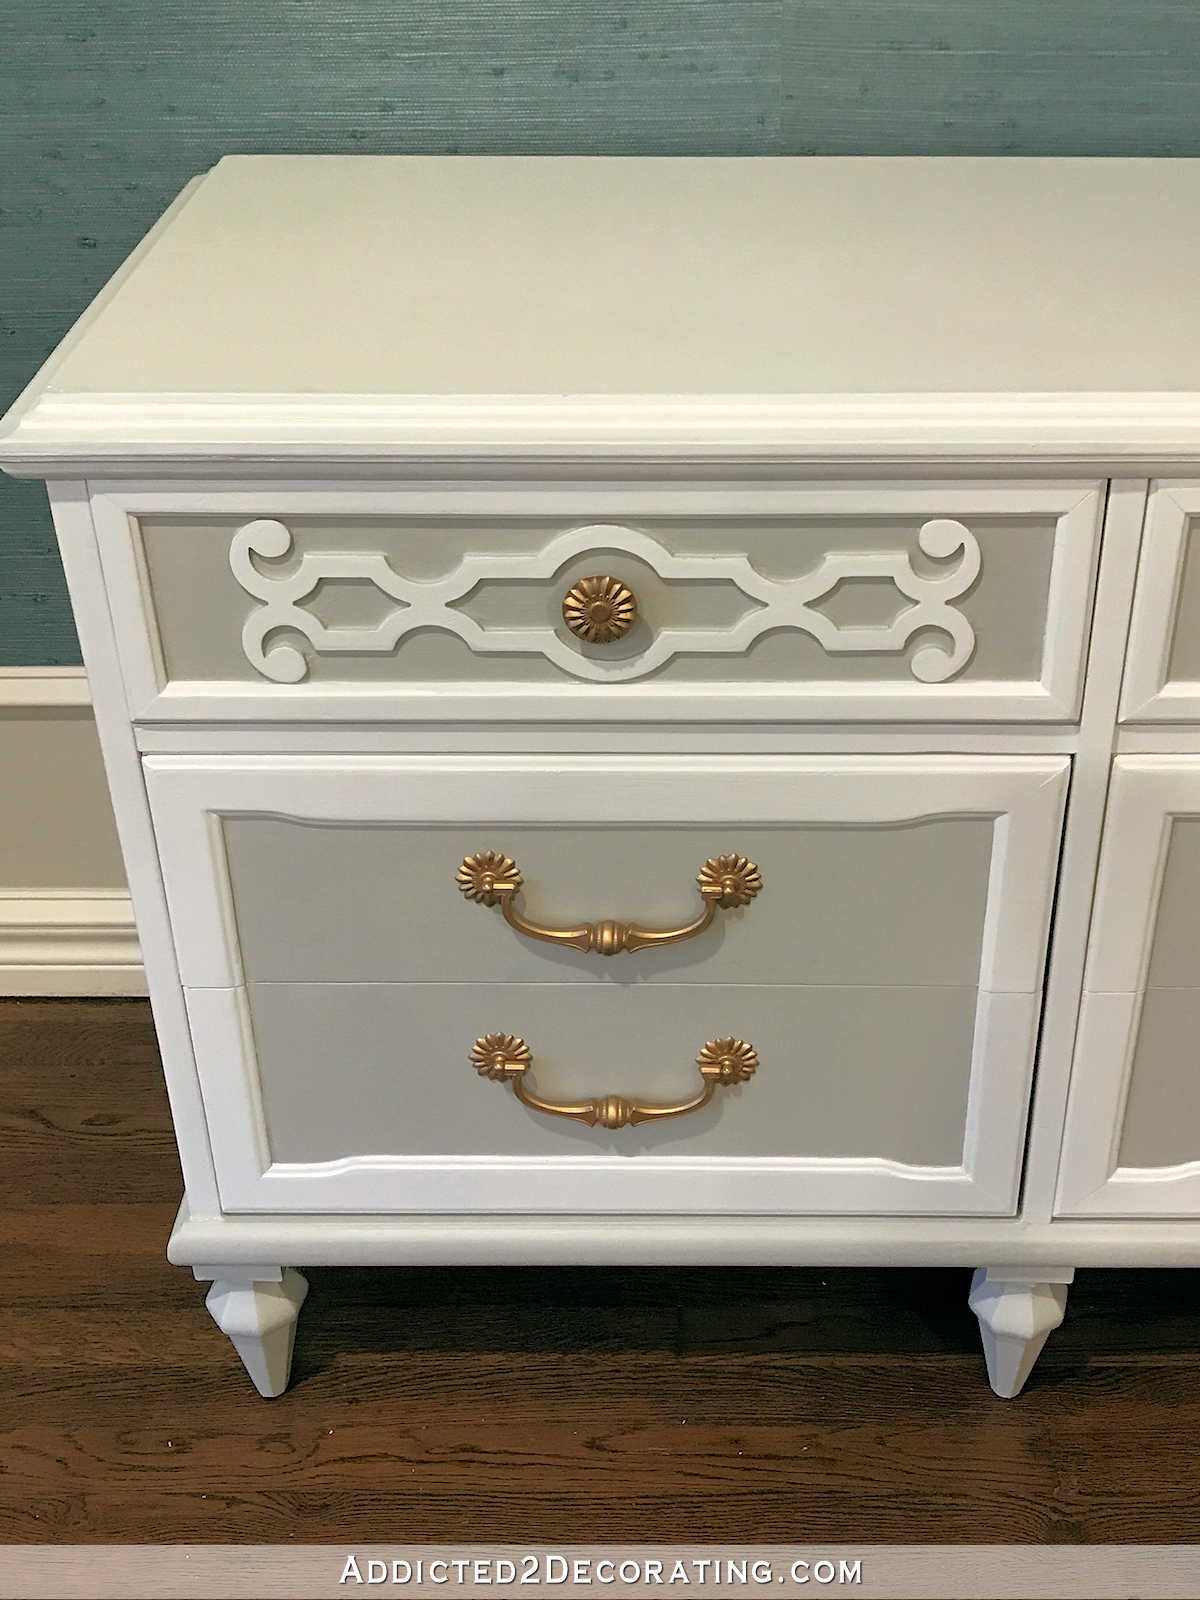
I may eventually get new pulls — something a bit simpler and less bulky in design. But for now, I just lightened up the look of the existing pulls with Rub ‘N Buff in antique gold.
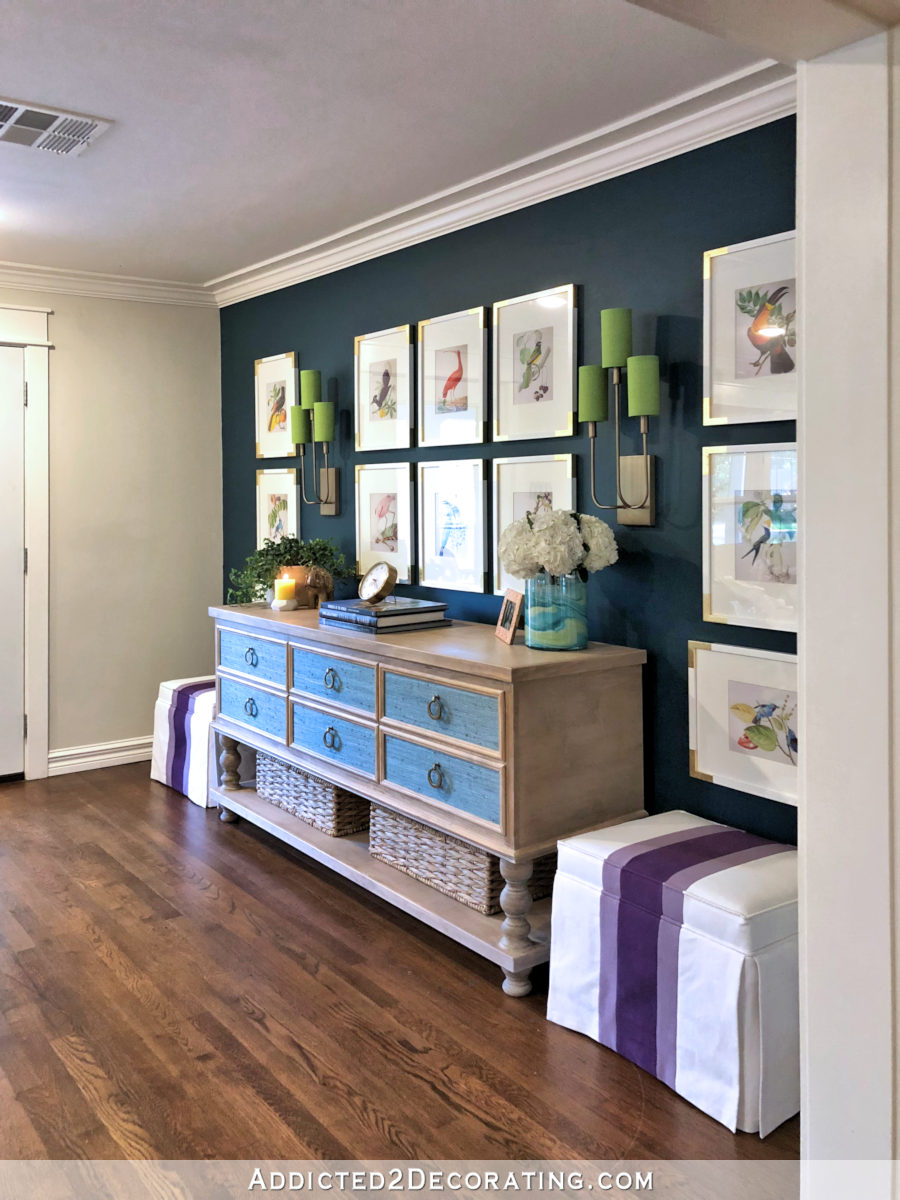
I’m very pleased with how this turned out. The finish on it before just didn’t do this piece justice, and the damaged top was just awful. There’s no way I could have been satisfied with that in my entryway.
But now she’s all cleaned up with a new top, fresh paint, and shiny hardware.

So it took me 17 days to get my first item crossed off of this month’s to-do list. Oh well. It’s a marathon, not a sprint. Right? 🙂

Addicted 2 Decorating is where I share my DIY and decorating journey as I remodel and decorate the 1948 fixer upper that my husband, Matt, and I bought in 2013. Matt has M.S. and is unable to do physical work, so I do the majority of the work on the house by myself. You can learn more about me here.

You have amazing skills, not to mention, stick-to-itness and stamina. Just wow.
I’m amazed how beautiful this has turned out! I do not like the colour of the pulls so much, but that is entirely a question of personal colour preference and I have to admit that the overall look with it is still great (I might have gone for silver…) But you had the right idea about what this piece needed and finished it perfectly (I simply love the combination of grey and white!). It’s outrageous, though, that the shop not only refinished it so badly but deceived you about the top. I’m glad you were able to make the repairs and don’t have to cover vast areas of the top with decorations yourself 🙂
On a different note, I’m happy to hear that you are feeling better – hope it’ll stay like this now!!
All spiffed up and it looks like it’s smiling! Great job.
Looks beautiful. Would you have bought it anyway if you knew the top was so damaged?
I would have, but at a reduced price. And I always like to know how much work I’m in for before purchasing a piece of furniture. I don’t like surprises after I’ve already paid for it (and paid extra for delivery).
You should complain to that store– their actions border on fraud!
How lovely, Kristi! I love the way you handled the damaged top- you are so clever! I know you’re busy, but would you feel better if you wrote a letter to the shop owner? I think it’s terrible that they were okay selling it in such poor condition. We have a local store called Not Too Shabby where they sell Annie Sloan products and teach classes and the pieces they sell are top notch- finished beautifully. Retailers like yours do a great disservice to other shops that value quality finished pieces.
I agree. Shades of Amber in Monument CO is an Annie Sloan retailer and they are trained by Annie herself. Never, ever have I seen a piece of furniture in that condition there.
I would send this blog post to the shop owner so she can see the condition of the product she was selling.
It looks beautiful and I love how it compliments your stenciled wall.
I love it! What a disaster that top was! You really did a great job of making it work.
I really do like how you polished the “antiquing” off the original pulls and shined them up. I think the drawer hardware is gorgeous! I also think the “credenza” that you re-made is gorgeous. And you made the best of a bad situation by replacing the top of the credenza. So is the new top 1/4 inches higher than the old top? It’s my understanding that the particleboard is still under there but you artfully caulked it underneath?
Anyway, it looks fantastic. Yay Kristi!
Yes, the top is now 1/4″ higher, and the original wood veneer and particleboard top are under the new plywood. I just caulked around the edges of the plywood to create a seamless transition from the original routed edge to the edge of the plywood.
Lovely, what kind of finish did you use (satin, semi gloss, etc)
I used satin on both colors.
Looks wonderful! And it’s perfect for the entry! Shame on the store owner for trying to hide that terrible damage. Your fix looks great, and you would never even guess it had been repaired- flawless job! 🙂
PS- I forgot to mention that I bet the detail on the top drawers looks amazing with the stencil work you did in the next room. Can’t wait to see a long shot with both in view!
Oy! Good point! I had forgotten! You’re right. Can’t wait to see a full shot of that!
I adore it! It looks so beautiful!
Great job Kristi! How did you paint the top drawers – which colour first, and how did you cut the edge between the two colours. It is quite intricate detail.
I painted the white first, and then went back with the gray. On the top drawers with the detailed design, I used a small artist brush to paint the gray, and it took three coats. It was quite tedious. 🙂 The lower drawers were obviously much easier since there was no fretwork design to paint around. I cut in with the small art brush, and then painted the gray with my 2″ Purdy paintbrush on those lower drawers.
Do you brush or spray the white
I used a roller for smooth surfaces on the top, and then brushed the rest.
You’ve done an amazing job refinishing the credenza Kristi. It looks way better now. Shame on the store owner for covering up the top with decor pieces in th showroom and not admitting to you that it was damaged and offering you a discounted price for it. Bad customer service and bad ethics!!!!!! But you have done an amazing job fixing it and transforming it. Well done!
So. Much. Better. That’s all. 🙂
1,000% Better! That top was atrocious! Kristi’s mad skills at work again! I had a similar experience with a table I bought from a secondhand store, not being able to see the ugliness in the somewhat bad lighting of the shop. But my item was only $40, and I wanted to shorten the legs and have a “lived through a lot” look anyway. Still, I wasn’t happy to see the finish on the top that was not evident until I got it home. Oh well – I learned a lesson there. It’s just here until my grandkids get a bit older and learn what a coaster is. LOL.
Glad to hear you are feeling so much better again. Don’t fret too much about not accomplishing your goals for the month. You’ll get there!
Impeccable job! Please let us know how you painted the details on the drawers and the trim. I have a piece of furniture that I want to paint blue and cream but it has a lot of details and I’m nervous about getting white paint on the areas that should be blue!
I painted the white first, and the I went back with the gray. I did the gray on the top drawers with a small art brush, and it took three coats of gray. It was very tedious. 🙂
Was wondering how you did this – would have been cool if that trim could have been removed before painting and then replacing. – thanks
Muccccch better than the way it looked when you purchased it! Can’t believe they covered up all that damage on the top. Not a good way to do business. Certainly not the way to get repeat customers.
Could you cut a small strip of MDF or some other wood and glue it in between the 1/4″ plywood and the dresser? Or is it still too rough in there to go that route? Not trying to fill in the area entirely but just give a little more support. I know sooner or later I’d forget about that weak point and damage it. Probably when I tried to move it away from the wall for some reason months or years later.
Anyway, as I said, fab work!
It turned out beautiful!! I would probably not shop at that store again considering their shoddy practices. I’ve tried to like the weathered/distressed look but I just can’t wrap my mind around it for my own house. I like yours much better.
It looks amazing. Is it for sale? 😉 I’d love to have something like that in my home.
Looks fantastic!!!
Just simply love it! It looks beautiful now!!
Beautiful! Does Rub ‘n Buff adhere well?
My experience is that it adheres very well on porous surfaces, but not so well on non-porous, shiny surfaces. I wasn’t sure it would work on these pulls, but they are old and the shine had worn off. The finish was kind of like a lightly etched feel, so I took a chance that the Rub ‘N Buff would work. And it did!
Beautifully done and shame on that store owner. I would have a hard time not putting a complaint in to them.
Agree with what everyone else is saying about how beautiful the credenza makeover turned out, and how skeevy it was of the person at the shop to camouflage the damage the way they did. They did that so you’d not ask for a discount on their horribly “refinished,” overpriced dresser. I know the marketplace is “caveat emptor,” but let’s get real — they used shady and unethical business practices to entice customers to buy that dresser. I detest that type of dishonesty. Luckily for the dresser, it ended up with such a highly skilled refinisher as you and was given a glorious facelift!
I too would love to know how you did the two-tone paint job — if you painted the white on first, or last. I’ve got two nightstands and a 9-drawer dresser that could benefit from this Kristi treatment, but I’m thinking of using a muddied aqua/turquoise color with white, and silver hardware with a tiny bit of an aged finish, so will await details on your paint technique!
I painted the white first, and the did the gray on the top drawers with a small art brush. It took three coats, so it was pretty tedious.
For rub n buff, I remember it’s a wax product. Do you have to seal or anything to protect it’s shine? I ‘ve used it but to modify a clock face that’s behind glass.
I’ve never used a protective coating on it, except for my green kitchen cabinets. It did’t seem to make much of a difference, so I don’t think I’d go to the trouble in the future.
Wow! Looks great! You always have great vision!
I love this piece as much as any I’ve i’e seen. I’m on the hunt.
Woah…I can’t believe they sold that like that and tried to deceive the buyer. That’s ridiculous! drips and runs? wow. Regardless it looks AMAZING now! I love what you did with it. I am working with chipping veneer right now as well….NOT FUN! Your solution is great! The colors you chose are very nice:) It will look beautiful in your entry way!
Refined! That’s what your style is, refined. Not elegantly formal, but classically refined. I love it.
You go!!!
Thanks for showing details of how you did this. Once again your project dovetails with my doing an antique piece from my parent’s estate that had the same water damage, bubbling veneer. You are such a support to all of us novice DIY’rs. Thanks so much for helping us learn, grow our confidence.
So glad you’re feeling better! It’s a shame that you had to overpay for a piece you had to re-finish, but as always, it looks lovely. I personally would write a Yelp review to warn future buyers about the store owner’s deceptive staging. Not everyone knows how to refinish a top like you. It’s one thing to buy a piece that you know you plan to refresh with paint. It’s another to find damage that wasn’t disclosed or was hidden. At the very least, it should have been discounted to reflect the damage.
I think polished nickel would look best on the hardware…i think farmhouse is a much better look for this house..
Farmhouse? My house is a 1940s/50s ranch style house located in the city, and there’s absolutely nothing farmhouse style inside my house. I personally wish the farmhouse decorating craze would go away, with the exception of actual farmhouses.
Painted cabinets. Raw stained wood. Burlap. Baskets. Rustic-farmhouse. HUGE difference…
This is just gorgeous, Kristi!! Excellent job😍
Lovely colors and look! You did a great job and put in a lot of work on this piece. I like the gold hardware color and that they smile. It has a mid-century vibe in my opinion. The paintings, though, take it to another dimension, very nice. It seems that the neutrals in the credenza would harmonize well with other colors as well, perhaps peaches and greens, fall colors. Great work!
You are a genius!
I am assuming you did not finish the credenza with a top coat/polyurethane?
I want to paint my dresser and was thinking I should finish with a protector however, I read your article on the nightmare Miniwax polycrylic…
I’ve also heard that from several others regarding Miniwax. I thought I found the solution in General Finishes top coat, however that is a water based polyurethane and I’m concerned about yellowing of a white color.
So, can I leave a dresser with just a satin paint?
Thank you
I didn’t topcoat mine, but I probably will end up doing that. Latex paint just seems to always remain a slight bit tacky, so things placed on top stick to it just a bit. It’s not so bad if you let it cure really well before placing items on it, but that could take up to 30 days. But it’s just easier and faster to do a clear water-based topcoat. I’ve used General Finishes many times. It’s my favorite, and I’ve never had it yellow over light colors.
Beautiful work! Modern and vintage at the same time-perfect combination.