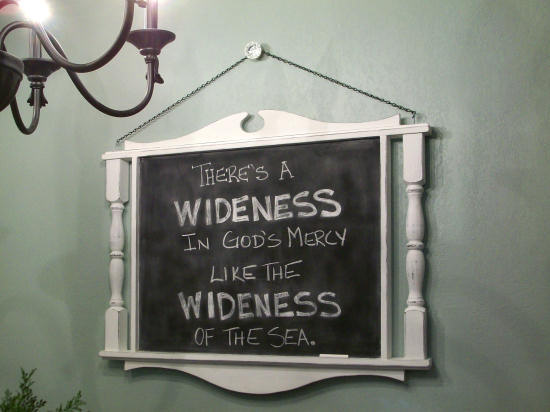
Fancy Chalkboard
I needed something to go on the wall beside John & Alice’s breakfast table. I considered a plate wall, but that seemed a bit too plain. Artwork seemed too predictable. Then I thought of a chalkboard.
I know what you’re thinking…a chalkboard is nothing if not predictable! And perhaps a bit boring!
Well, hopefully I sidestepped the “boring” part with this one…

I had seen this chalkboard design well over a year ago, and saved it in my inspiration file on my hard drive. That was long before the days of Pinterest, and of course, I failed to save the source.

But I always hoped that I’d have a reason to make it, and this seemed like the perfect time. I love how it turned out, and I like the touch of whimsy it adds to the room.

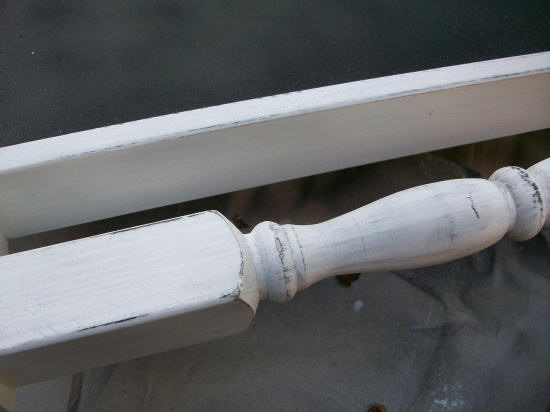
I lightly distressed the finish to give it some age and character.

It hangs from a thin black chain, which is hooked onto a glass door knob. I love the black chain. I’m not sold on the glass doorknob. Perhaps I’ll look for something better.

The project really wasn’t difficult at all, and it only cost about $35. The chalkboard measures approximately 39”w X 32”h.

If you’d like to make your own, but need a little guidance, I’ve got you covered!
Project Cost:
Approximately $35.
Tools & Materials:
- Two pieces of 1″ x 3″ lumber, 39″ long each,
- Two pieces of 1″ x 3″ lumber, 24″ long each,
- Two pieces lattice, 39″ long each,
- One piece of 1/2″ MDF or plywood, approx. 8″ x 34″,
- Wood glue,
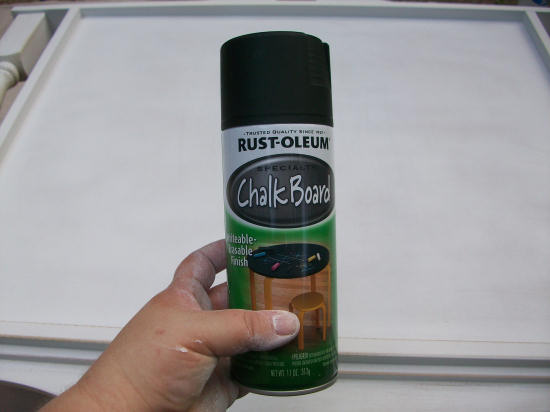
- Chalkboard paint,
- Spray primer,
- White paint,
- Screw hooks,
- 4-foot section of small black chain,
- Two staircase spindles,
- One piece of 1/2″ MDF, cut to 24″ x 29″,
- Nail gun with 1.5″ finishing nails (if you don’t have a nail gun, you can assemble the mantel with finish nails and a hammer),
- Miter saw,
- Jigsaw,
- 150-grit sandpaper,
- Paint brush.
Instructions:
I started with a piece of 1/2″ MDF cut to approximately 24″ x 29″. This would be the actual chalkboard portion.

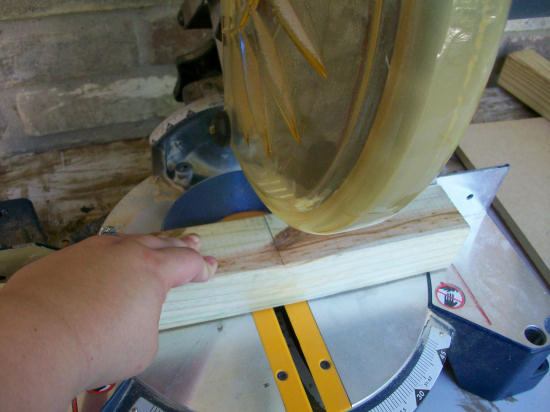
On one of the short sides, I used my measuring tape to mark the center.
Then I placed one of the spindles on the MDF, with the center of the spindle lined up with the mark on the center of the MDF. I then used my pencil to mark the cut lines on the top and bottom of the spindle. (It needed to be the exact height as the MDF.) I repeated the same thing with the other spindle.

Using my miter saw, I cut the spindles on the pencil marks.
Next, using my miter saw, I cut two lengths of 1″ x 3″ lumber to 39″ in length. Then I cut two more pieces to 24″ in length. (I used pre-primed MDF boards, but solid wood lumber could be used as well.) I also cut two lengths of lattice, 39″ in length. (not shown)

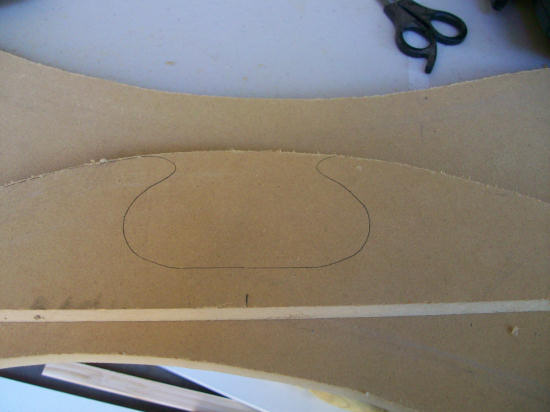
The last pieces that needed to be cut were the top and bottom scroll details. I used a scrap piece of 1/2″ MDF for these.
I wanted my design to be about 34″ wide, so I taped two sheets of paper together so that they were 17″ wide (exactly 1/2 the width of my scroll design).

Then I drew half of my design on the paper.
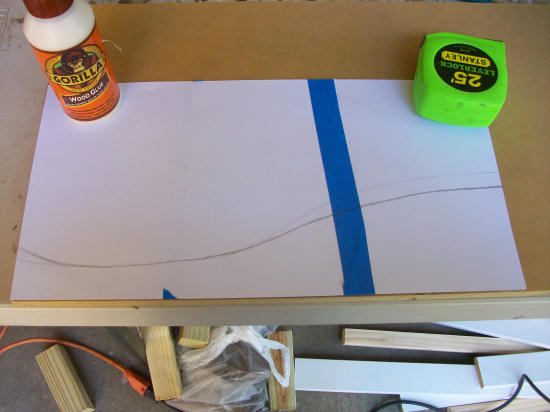
After cutting out the template, I lined up the edge of the template with the center of the MDF, and traced the left half of the scroll design.
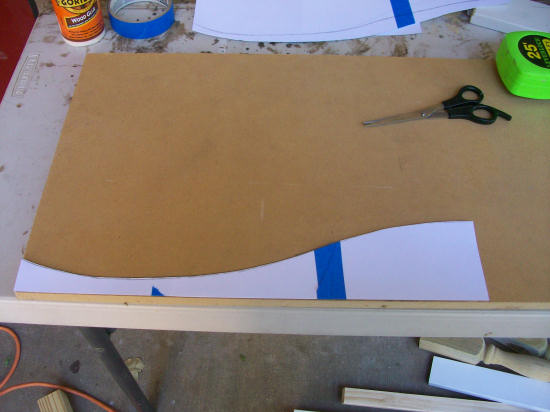
Then I flipped the pattern and traced the right side of the design. This ensured that both sides of the scroll design were exactly the same. I also traced the design on the opposite edge of the MDF since I needed one for the top and one for the bottom of my chalkboard.
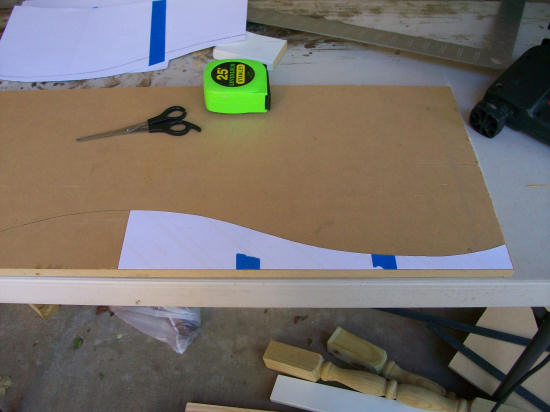
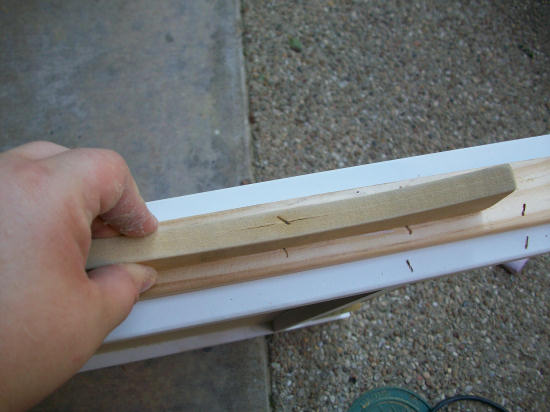
I used my scroll saw to cut out both pieces.
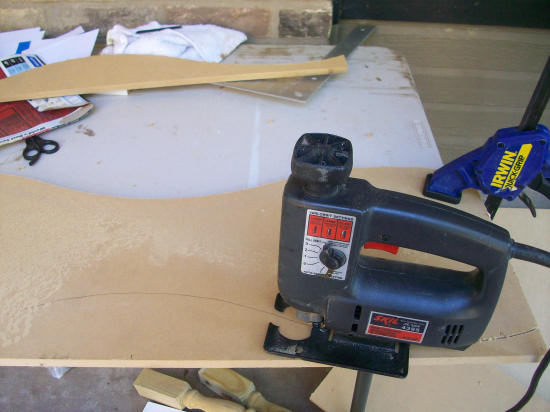
For the top scroll, I cut out a little fancy detail, and traced that onto my cut scroll.
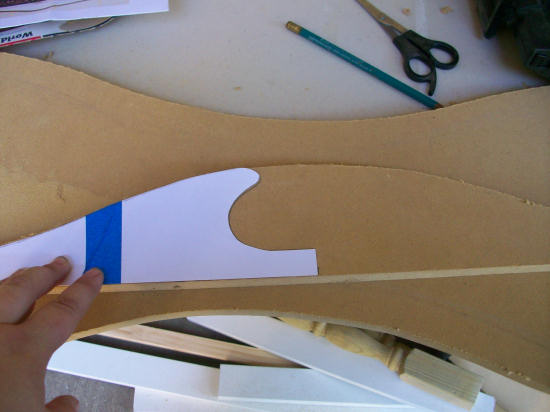
Flipping the pattern just like before, so that both sides were exactly the same. Then I cut out the detail with my jigsaw (and a new blade!).
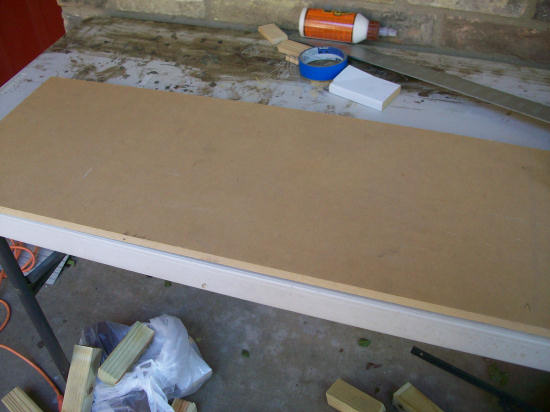
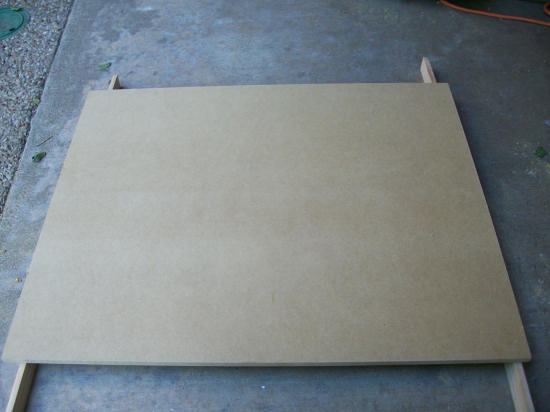
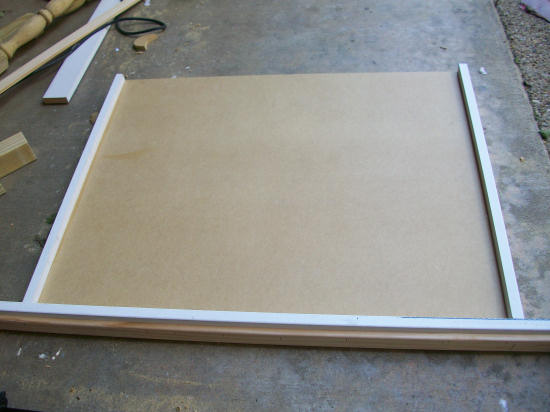
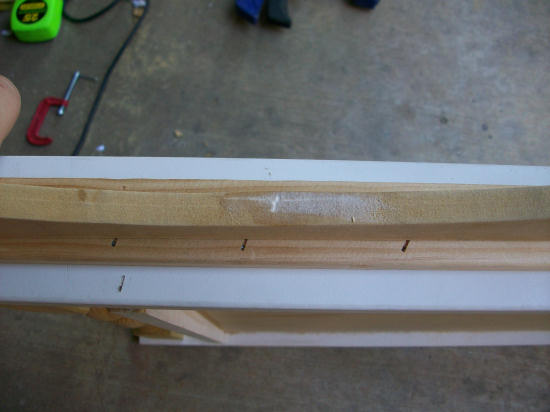
With all of the pieces cut, I was ready to assemble the chalkboard. Using my two pieces of lattice as support, I stood the lattice on edge, and then rested the MDF on top.
Using wood glue and nail gun, I attached the 24-inch pieces of 1″ x 3″ lumber to the sides of the MDF to form a frame.
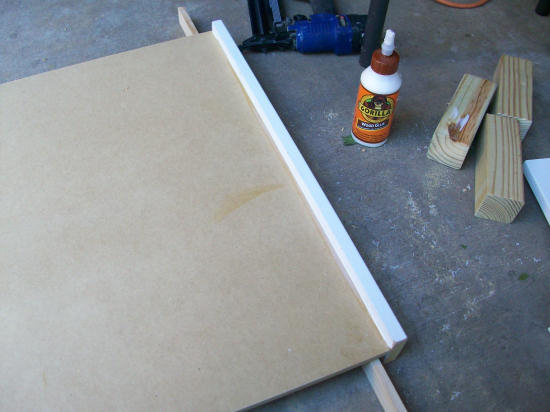
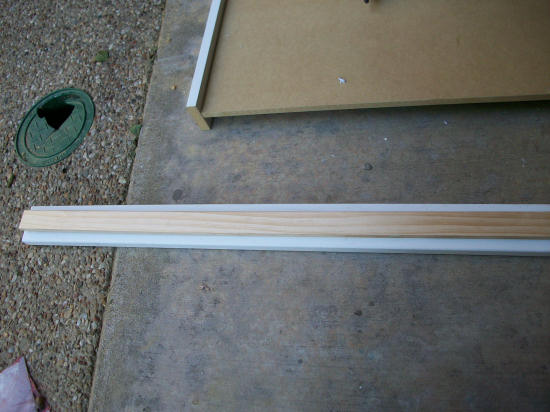
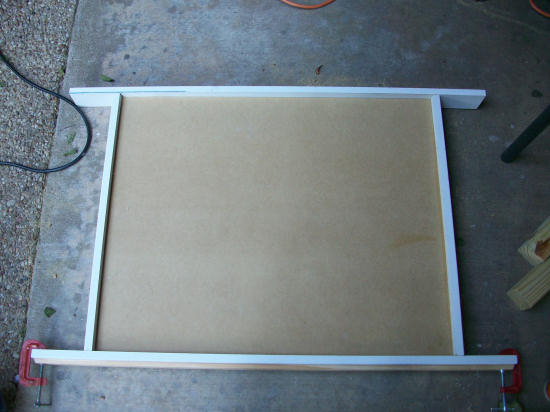
On the longer pieces of 1″ x 3″ for the top and bottom, I glued the strips of lattice onto the middle…
And then attached them to the MDF with wood glue and nail gun.
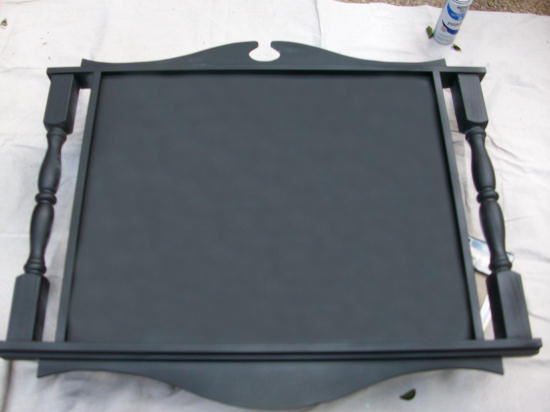
After repeating this on the top and the bottom, the chalkboard looked like this…
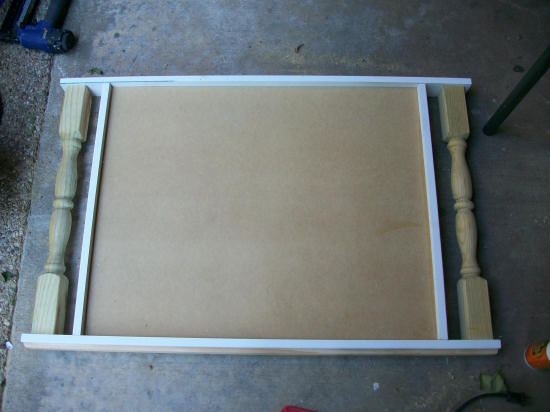
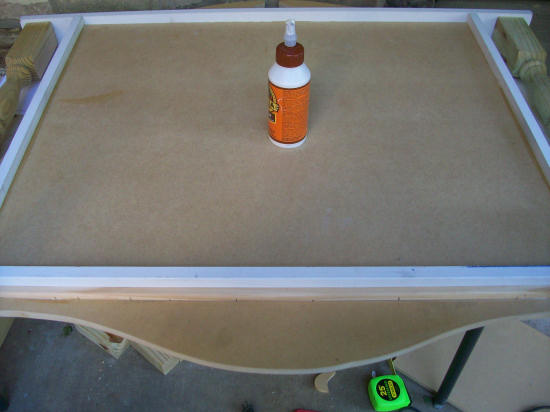
Next, I slid the spindles between the 1″ x 3″ lumber, and nailed them into place on the top and bottom.
The last pieces to attach were the top and bottom scroll details.
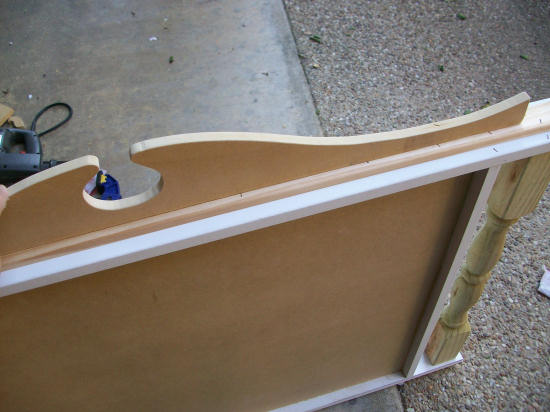
I attached them using wood glue, and then one nail on each side.
Because the nail split the wood just a bit, I filled it with wood glue to stop it from splitting more in the future.
I repeated the same thing with the bottom scroll detail, and then set it aside to let all of the glue dry completely.
At this point, the basic construction was finished. I sanded all of the edges with 150-grit sandpaper, and gave some extra attention to sanding the spindles because they were very rough.

Next, I used a spray primer over the entire chalkboard.
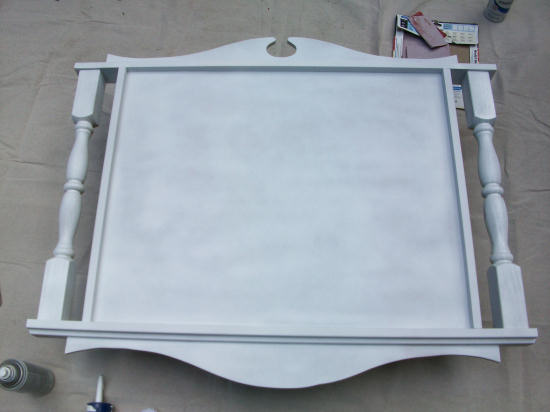
I did two coats of primer, but between coats, I used latex caulk to fill in all of the nail holes, and fill in any cracks where pieces of wood met.

I used a spray chalkboard paint (although I really wish I had used the brush-on kind).
When I had enough coats of chalkboard paint on the main chalkboard area, i used the rest of the chalkboard paint on the other areas. I did this to provide a nice black undercoat for the white paint so that I could do some distressing on the white finish and let some black show through.
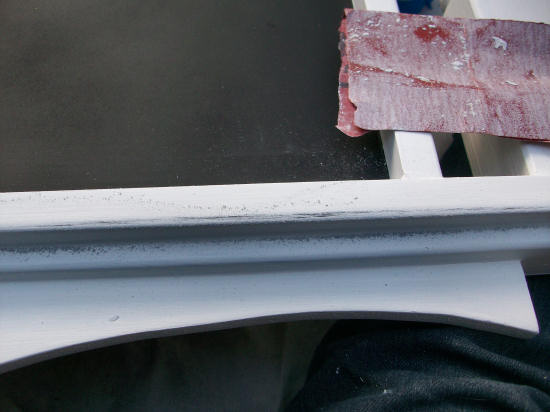
When the chalkboard paint was dry, I painted all of the non-chalkboard areas with white paint (I used a paint brush and brushed on the paint). When it was dry, I lightly sanded some of the edges and corners to give the chalkboard an aged finish.
The last step was to add the screw hooks on the top, one at each end, and attach some chain. I didn’t actually hang the chalkboard by the chain. The chalkboard is hung with screws that are screwed into drywall anchors. The chain is just decorative.
Helpful Hints:
I wasn’t really pleased with the finish of the spray-on chalkboard paint. It seemed blotchy and uneven, and the chalk didn’t erase easily. I’ve had much better success with the brush-on chalkboard paint in the past.

Addicted 2 Decorating is where I share my DIY and decorating journey as I remodel and decorate the 1948 fixer upper that my husband, Matt, and I bought in 2013. Matt has M.S. and is unable to do physical work, so I do the majority of the work on the house by myself. You can learn more about me here.
I never tire of a good chalkboard idea. I love how it turned out!
Do you happen to know what that wall color is??? PS. Just pinned this chalkboard…love the idea.
The wall color is called Rainwater. It's a Martha Stewart color from Home Depot. (I had it color matched in Behr paint.)
I love the glass knob – keep it!
That is great! I just may have to make one myself!
LOOOOOOOVE the chalkboard!!! Oh my goodness was a cool idea! Will be saving this one 🙂
LOOOOOOOVE the chalkboard!!! Oh my goodness was a cool idea! Will be saving this one 🙂
I really love the idea of the DIY chalkboard. another choice someone could use is a bold, creative work of art such as ones that artist Stephanie Hirsch creates: http://www.clos-ettetoo.com/blogs/clos-ette-favorites/3476662-clos-ette-favorite-stephanie-hirsch
That IS a fancy (and unpredictable!) new chalkboard! I just found your blog via Centsational Girl, so I'm new to it, but I love all your inspiring ideas so far!
I love the glass knob idea! Don't change it.
I am lovin on this chalkboard. I have some artwork that I have hung in previous homes and I was thinking on taking the print out and then painting the frames white and distressing them to hang EMPTY on the walls but HMMMMM maybe one needs to be a chalkboard in the kitchen. Thanks as always for your GREAT ideas.
I think your chalkboard is very charming and anything but predictable! It is very unique and I imagine all your guests will enjoy it as well. Can't wait to see what you do with the chair. Hope you are having a great week! 🙂
Adorable… I'd love for you to share it at my link party.
thirtysixthavenue.com
This is awesome! I still have a thing for chalkboards and have a bunch around my home. Nothing live changeable art!
I love, love that Frederick William Faber quote.
Barbara Jean
Love your chalkboard!!!
blessings barbara jean
Just. Gorgeous. 🙂
It's lovely, but I think the doorknob-as-hook is actually my favorite part! It really complements the more rustic feel of the distressing and the simple black chain.
I love this project so much I featured it at my weekly Hookin' Up with HoH Link Party! Congrats!
Feel free to stop by and grab a button!
xoxo
Allison @ House of Hepworths
i love how this turned out! awesome!! i would love for you to link it up at our link party,
amy
http://www.Sistersofthewildwest.blogspot.com
New follower here!! This project turned out fantastic!!! I love the framing around the chalkboard!….I have been browsing through your other DIY projects, and you have me HOOKED!!! I can't wait to see what you come up with next!!!!
http://www.balancingthedream.blogspot.com
A great idea- this would work well in so many rooms
Great idea for present our daily thoughts. I really appreciate it..
Really fancy chalkboard and very good idea to teach our child at home..
Great Chalkboard – got my wheels turning – you could do this as a painted or fabric covered magnet board too- love the architectural element you added to an otherwise overdone chalkboard idea!
Love this chalkboard and am planning on sweet talking my hubby to make me one for my weekly menu/grocery needs. You mentioned you used the spray on chalk but wished you had used the brush on kind. Can you explain why? I have never worked with chalk paint yet but am looking forward to it!! I would think the brush on wouldn’t give it a smooth finish for writing on a lot. Any tips on this would be great! Thanks!
I also LOVE the knob!!