My Utility Closet Finally Has A Countertop!
Well it has taken about two years (give or take a month or two), but my utility closet is almost finished, and I finally have a countertop!
(By the way, I apologize for the dark pictures. Two of the three light bulbs in my hallway light were burned out, and I didn’t have any extras on hand.)

I decided to stain the countertop, and when the good people at Rustoleum said that would send me samples of their new wood care products, I jumped at that chance! So when my Rustoleum wood stain and matte finish polyurethane arrived yesterday, I scrapped my original plans for the afternoon and made my little countertop instead. Sadly, I ran out of time, so I still haven’t polyurethaned the countertop. I’ll do that today, and I’m so anxious to try out the matte finish polyurethane! Did I tell you that Rustoleum’s new polyurethane requires soap and water cleanup? Yep! It’s true! Soap and water!
So you’ll have to wait bit longer to see the countertop with its pretty matte finish, but for now, I’ll show you how I made this wood countertop with the faux routed edge. Doesn’t it look like it has a pretty double ogee edge?
Anyway, I’ve used a similar process before to make a table top, and it turned out beautifully. So if you need a countertop, desk top, or table top, you might give this a try. It’s pretty inexpensive and easy!
I started out with a piece of cabinet grade plywood. I used my circular saw to cut it to the correct size.

Now let me say that I’m cheap (you know that), so instead of purchasing a full piece of plywood and cutting it to the right size that would fully cover the depth of my cabinets plus give the the appropriate amount of overhang at the front, I instead used a cheap quarter piece of plywood (called a Handy Panel at Home Depot). It was exactly 24″ deep, so I had to get creative. I used this 1/4″ X 2″ piece of wood to attach to the front…

I attached it with wood glue and my nail gun.

Then I took this pretty piece of moulding…

Here’s a picture of the profile. Sorry for the blur. My camera wanted to focus on anything and everything except the edge of the moulding.

And with the thin side up, I attached that piece of moulding to the front edge of the countertop. Using the thin side up gives the impression that the countertop is a thick piece of wood with a routed edge.

Next I needed to take care of these gaps.

So I used thin strips of wood (I’m not even sure what these are called, or what their intended purpose is) to create a “frame” around the edge to cover the gaps. Yes, actual carpenters, I know you’re shaking your head right now. But we non-carpenter DIY types have to make do with our less-than-perfect wood cutting skills.
🙂

Here’s a peek at the other side.

Next, I used wood filler to fill in any cracks between the wood pieces on the front edge, and to fill in any nail holes.

On areas like this, I really lay it on thick, let it dry completely, and then use my electric sander to sand it down until it’s perfectly smooth. On the other areas (nail holes), I just sand those by hand.

With all of that finished, I was finally ready for stain!

I really love the color they sent me called Early American. It has just the right amount of red in it for my taste. (I’m not a fan of stains that have lots of red, like cherry).

I was less than thrilled with the particular piece of plywood that I chose. Once it was stained, it looked a bit splotchy (I assure you, that’s the wood, not the stain). It’s just so hard to know how a piece of wood is going to look once it’s stained! You can pick a piece that looks so smooth, with very little grain in its unfinished state, but as soon as you get stain on it, you see grain and pattern in it that wasn’t visible before. But in the whole scheme of things, I’m okay with it. I doubt that anyone else will scrutinize my countertop like I do.

I just love how that moulding on the front edge give it the appearance of a double ogee edge. Fancy schmancy! 😀
By the way, this is the same technique I used when I remade John & Alice’s breakfast table…
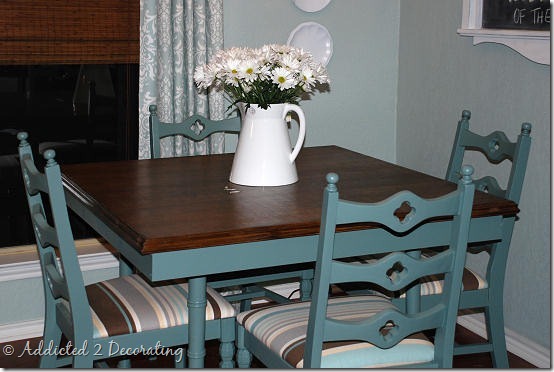
So you can see how easily you can create beautiful countertops, table tops, and desk tops with just a piece of plywood and a bit of pretty moulding!

Addicted 2 Decorating is where I share my DIY and decorating journey as I remodel and decorate the 1948 fixer upper that my husband, Matt, and I bought in 2013. Matt has M.S. and is unable to do physical work, so I do the majority of the work on the house by myself. You can learn more about me here.


Kristi – what a great idea! The plywood looks so rich (would never guess)! Can’t wait to see the whole room!
Kelly
What a great way to finish the edge! I might have to steal that sometime because it’s so simple and smart!!! It really gives a finished look. We were so “thrifty” with our laundry room makeover ~ we put threw some old fence boards through the planer, stained them and nailed them onto a base for a counter above our washer and dryer. Hey, it works for us!
Cheers to progress, Kristi! It’s shaping up to be a great little space!
Oh, this is awesome! I’m looking for an inexpensive way to make a top for a repurposed cabinet which I’m turning into a kitchen island. I was looking at butcher block but it’s way too much. I can make a top like this and use cutting boards. Your counter looks great! Got to pin this one! Thank you! 😉
Wow, that’s pretty cool. 🙂
Kristi its perfect! Great job … <3 It
Brooke
I love it! This may be a way for me to have wood countertops in the kitchen without the cost of butcher block. BTW, try using Minwax wood conditioner on the wood prior to staining. It helps even out the stain. We use it on pine since it tends to blotch up when staining. Will be pinning this!
I saw on a show once that if you use a wood conditioner before staining, you won’t get that blotchiness. Personally I’ve never used it, so I can’t tell you if it works or not. Great job anyway!
Hi Kristi,
There are two things you can do before you stain wood, especially pine. First, wipe the wood down with mineral spirits. It evaporates quickly but while it’s wet you’ll be able to see how the wood grain will look once you put stain on. You can get the same effect from water but that raises the grain and you’ll have to sand lightly to smooth the surface. The mineral spirits will also remove any oils and leaves a clean surface.
The second thing is to apply a wash coat of dewaxed shellac. This seals the wood and reduces the blotchiness that you get when staining woods like pine that have a lot of resin. Zinsser SealCoat is 100% dewaxed shellac so you don’t need to mix flakes. Shellac is also a great way to “pop the grain” of any pretty woods that you use and can be used under any finish.
I’m starting to csodiner this more and more as real Granite is out of the question at this point. A friend of mine just did her countertops but I haven’t seen them in person yet. We are finishing up our kitchen remodel and still have to do flooring, backsplash & countertops. I’ve painted our underlayment right now. My problem is deciding on the faux granite countertop colors as my cabinets are black. I need to go with a light color for my countertops. How did you decide on your colors? Trial and error? Take a sample of granite into the craft store and try to match up the colors? Thanks for your post!
Ok, now that it’s done I can admit that every time you showed pics of this project, I couldn’t actually see what the heck it was going to look like! Yes, I’m obviously brain damaged. Now that I see it, it looks fabulous! I love the colours and I’m so glad you’ve finally got that area almost finished!
How’s your healthy lifestyle thing going????
Oh, that’s funny! Well, I’m glad it makes sense now. It’s such a tiny space, so taking pictures of it is quite a challenge!
The healthy lifestyle is going great! We’ve completed 31 days! I’ve made all of our meals…no meals out, no Dr. Pepper. I don’t even crave that junk anymore! Now if I can just find a time to exercise. 🙂
This is really so neat! I would have never thought to use the moulding to make a double ogee edge. That is genius! I am definitely going to try this on a project. I usually just use some kind of decorative trim, but this makes it look so much more dressed up! If I were you, I would be in and out of that utility room all day admiring it, then I would make everyone else go in and look at it to see how it turned out. (maybe that is just me) .
Very well done. This is the exact way I would’ve done it. I wonder if you had sealed the wood before staining, if it would’ve made a difference. It’s odd that it would show up like that. Until you mentioned it, I thought that was the look you were going for. It’s not splotchy, it looks quite nice, like a sort of marble effect design.
Looks great! And I love the table too.
-Erin
diyonthecheap.blogspot.com
It looks great! I love wood counter tops! Your walls are wonderful!
Debbie
I think it came out great, the trim is the perfect touch…and the plywood is a great thrifty option…any chance maybe another coat of the stain would cover up some of the splotchiness? It might make it too dark for your taste though too. Just a thought. Can’t wait to see your whole space!
Karah
I actually did put two more coats of stain on it, and I think it looks much better. I like the darker, richer color. The splotchiness irritated me at first, but I’m over it now. I think anyone walking through the hallway would pay much less attention to it than I do. 🙂
I love this! I have a small cabinet in my kitchen that doesn’t have a top and I hate it! Every time I look at it I cringe but I need the storage. Just yesterday I was wondering what I could do that is cheap and will get me through until I can redo the kitchen. Also, as I was painting my kitchen this weekend I picked up my sweater from the back of my chair and thought about the argyle pattern and how much I love it. Then I thought, “I need to put this on a wall somewhere.” And here you have already done it. Not sure what I am going to do yet but it will come to me!
I like the counter top, but I am more interested in the argyle on the walls! I am a HUGE fan of argyle. Did you paint that? Would love to hear what you did.
Hi Kristi! I read your blog often, but have never commented (I went to Baylor, as a fun aside, as did my daughter who was a 2012 grad). I happened to be reading your kitchen counter re-do and in the “you may also like” section, it suggested I look at your Utility Closet countertop. You mention being less than happy with the countertop, so I have to tell you about a product I found through another blog: Cabot Polystain. It is a miracle product! I could not find it in the city of Houston, but I found it online at Hardware World. Here’s where I found out about it first: http://www.bowerpowerblog.com/2009/03/slain-with-polystain/, Here’s another site that mentions it: http://itsgreattobehome.net/2009/04/10/along-came-poly/. We are in a relatively new house that was well built, including built in cabinets in the kitchen, but they did a terrible job staining and applying polyurethane—and I want them to look better and LAST! I have thought about trying every possible fix, and none seemed like a great option (and I have been DIYing for many a year, and have refinished an untold number of pieces of furniture). Well, I tried the polystain inside the cabinet to see if it would work, and boy does it! As Katie at BowerPower talks about, you just coat and re-coat until you get the desired effect. I only wish I had found this sooner and had to tell you about it! I was more than skeptical, but thought it had to be worth a try and now I’m half way done. My cabinets look like they should have all along, and they will hold up to the grease and grime of a working kitchen.
You do a great job–I really enjoy your blog!
Cathy, that is great to know! I’ve actually heard about that product before, and I think I’ve even seen it in person, but now I can’t remember where. I’ll definitely look into it!! I’d love for that countertop to not look so blotchy. I used the exact same stain and polyurethane on my kitchen countertops, and they didn’t look blotchy at all. The difference? I used wood conditioner on the kitchen countertops. I guess I’m a big believer in wood conditioner now. 🙂 Thanks again for the info!!
In Oz, we can buy a product called “Stain Sealer”. It makes the stain soak in evenly and deal with all the staining pine and ply issues. I have used it prior to stain alone and under what we call stain and varnish in one, the latter a product I did not like but that’s another story