Kitchen Flooring Progress & Design Decision (And My Plan For The Old Wood Flooring)
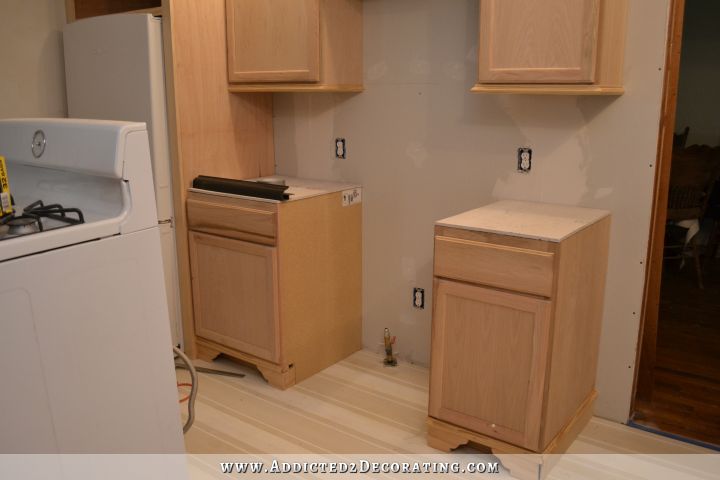
It took me all of yesterday, but I finally got all of the old wood flooring removed from the kitchen, and I got all of the old, rusty nails removed from about 2/3 of it. At one point, my kitchen looked like a death trap, with old boards scattered everywhere, and old, rusty nails just waiting to attack. (I started on the far side of the room and worked towards the door where I’m standing in this picture, and then started working my way back the other way removing nails from the boards.)
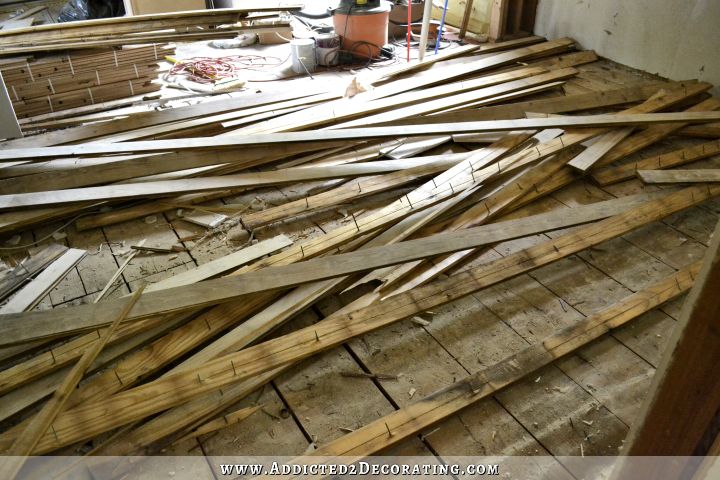
The good news is that my subfloors aren’t nearly as bad and I thought they would be. I had expected really wide gaps all over the floor, but it turns out that most of the boards only have very small gaps between. There are a few wide gaps, like the one at the bottom center of the picture above, but I just put those out of my mind and get on with the work that needs to be done.
I had planned on beginning the installation of the new wood floor tomorrow, but it looks like that will have to be postponed by one day. After calling all of the equipment rental places in town, I learned that not one single place rents out the nail guns that you use to install hardwood flooring, so I ended up having to buy one. I ended up buying the cheapest one I could find on Amazon.*

It has consistently good ratings on Amazon, so I felt okay with going with the cheapest one. Plus, my money for this remodel is dwindling fast, and I have very little wiggle room for unexpected surprise expenses at this point, so I really had no choice but to buy the cheapest one. I had expected to have to spent between $60 and $80 to rent a nailer for two days, so the extra $50 wasn’t too much of a blow to the budget.
I’ll let y’all know how it works out. I ordered it yesterday, and I’m an Amazon Prime member, so it should get here by tomorrow at the latest. But many of our purchases get here in one day, so maybe I’ll be surprised and have nail gun on my front porch today! That would be nice!
Now as far as the kitchen floor, I’ve decided to keep with my original plan. I’m going to install the boards straight (no fancy pattern with installation), and I’m going to paint stripes. Yes, I’m painting my brand new wood floor. 🙂
A few people have asked, “What’s the point of putting down new flooring if you’re just going to paint it?” Well, the point is that now I’ll have new, solid flooring, rather than 65-year-old wood boards that have random holes from old plumbing that need to be patched, warped areas, stains that can’t be removed no matter how much I sand them, boards that need to be repaired/replaced with new wood, and wide gaps between the boards.
I’ve had my heart set on the painted stripes, and I finally decided that I’m not going to let the fact that it’s new wood get in the way of my vision for this room, especially when paint can be easily sanded off and refinished if I ever get tired of it. So far, this is my favorite design for a painted striped floor.
 Painted striped hardwood floor, from House Beautiful
Now as far as the old flooring goes, I mentioned before that I’m keeping it, and that I would find a use for it. I wouldn’t dream of throwing out that much tongue and groove wood when so much of it is salvageable!
So what am I going to use it for? My hallway ceiling! And that’s where I’ll get creative with the pattern when I install it. Right now, I’m leaning towards a straightforward herringbone pattern, like this one from Domestic Charm.
Of course, mine probably won’t look that perfect since I’m using old, very imperfect wood. (Can I officially call it “reclaimed” wood if it came out of my own house? I’m a little fuzzy on the rules of the usage of that term.) 🙂
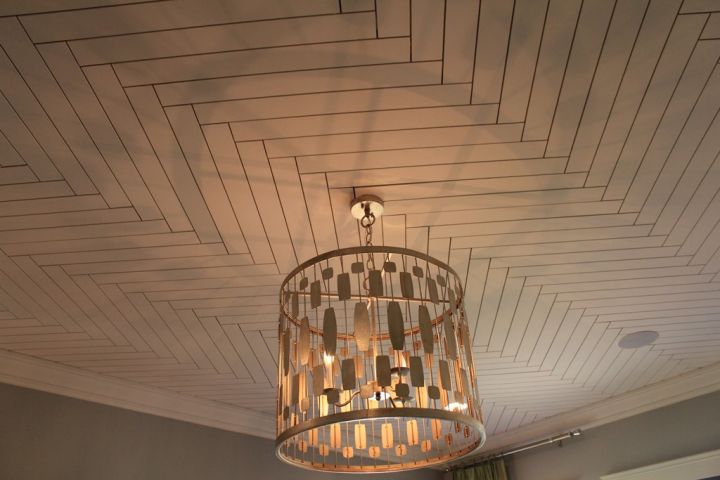
You know, I was thinking about this yesterday. For all of my talk about herringbone and how much I love it, still the only things I have in my house so far with a herringbone pattern are my watercolor “tile” lamps that sit in my entryway.

I love the pattern so much that I’m so afraid I’m going to go overboard with, so I’m have a hard time committing to anything major (flooring, backsplash, etc.) with the pattern on it. But then again, I’ve only just begun on this house. By the time I’m finished, we may all be referring to this house as The Herringbone House. 🙂
(*This post contains affiliate links.)

Addicted 2 Decorating is where I share my DIY and decorating journey as I remodel and decorate the 1948 fixer upper that my husband, Matt, and I bought in 2013. Matt has M.S. and is unable to do physical work, so I do the majority of the work on the house by myself. You can learn more about me here.

Well the herringbone will be on the ceiling so it won’t be “in your face”. Are you going to treat the wood or bleach it out at all? Are you going to make it lighter somehow?
Old wood on the ceiling in a herringbone pattern will look AMAZING! I can’t wait to see it!
Ooooh, that plan for the ceiling sounds very cool – can’t wait to see that project unfold!
Of course, I’m looking forward to seeing the painted floor done as well. And if you should actually tire of it one day with the new wood flooring beneath it, you’ll have the option of stripping and re-finishing it. Didn’t sound like that was so with the old floor.
Nice idea. Hallways are generally so meh.
I love your blog and I’m so impressed with all the things you’ve taken on by yourself! Very impressive. Keep up the good work – it’s so inspiring!
So glad you’ve made your decisions. Perhaps you can resale your nail gun after using, but then since your house isn’t finish, you might think about keeping it long enough to decide what you’re going to do to the sunroom floor, and if you add on a larger master bath and walk-in closet. I know I’m getting too far ahead. So glad your new kitchen is starting from scratch so there will be NO surprises in the future.
Oh bless your heart! *I* just installed brand new hardwood flooring in my kitchen. (yes, myself, with my new nail gun!) Red oak, random width plank. It matches the rest of the flooring in my 65+ year old house. HOWEVER, I, too, am planning to either paint it or stencil it or stain it in a pattern — diamonds? stripes? Because I know that even if I were able to match the “honey oak” color of my old floors, the floor in the kitchen would look NEW and the rest of it would look old w/tons of patina, ie, scratches, dents and gaps between boards. I thought about trying to install the new flooring in an imperfect manner, so it would match the old floor better. Nope, no can do. My perfectionistic tendencies just wouldn’t let me do that. 😉 So excited to see how your floors turn out, Kristi. And I am SO glad you decided to do your kitchen right now as I am doing mine!!! (but dang girl, you work SO much faster than me!) But I got 20 years on ya…so I deserve some slack, yes? 😀
Hi Julie. Where did you buy your red oak in random width planks? I am hoping to use the same thing in my house! Thanks. 🙂
I would consider keeping the reclaimed wood for a ‘reclaimed wood project’. Ceilings are very difficult to work on (I have very weak arms). I love the pattern and I think it would end up being gorgeous (a definite houzz post) but would consider using a thinner materiel like the hardboard cut into strips.
I’ve been wanting more pattern; I visit the lamp often as I’m trying to figure out a way to duplicate that. I love how it looks like opalescence.
I live the hearingbone soo much…I vote (if there is one) on using it on the breakfast room wall as a focal point. :-).
I believe you are insane, Friend!
I’m thankful that you share with us how you mull over ideas and your decision process. As for painting new flooring,,,,well if you think about it, people buy brand new moulding and paint it all of the time, right? 😉
Wow! You did all that work! Then, you still have energy to think about the stripe pattern, and ceiling pattern. Way to go. You are truly amazing.
Don’t forget to put down a barrier between the sub floor and your new wood flooring. And check for any squeaky floor boards and screw those down. Learned that one the hard way. 🙂
Your house will look so unique to you when it’s completed. Just curious … have you sold your former condo yet, maybe I missed that post? It looked to pretty after your remodeling efforts.
Herringbone is a beautiful pattern- if you don’t want “too much” of it, maybe do a basket weave variation? No mitered corners, just straight cuts and a planned layout? Maybe stain in SLIGHTLY different shades to accentuate the pattern? Whatever you do will be fabulous!!
My above comment was for the ceiling, not your new floor
Oh,the plans for your entryway ceiling are fabulous! Do it while you are young! Lol!
Somewhere along the line of my own (lately) very busy life, I lost track of your decision to pull up the old kitchen flooring and replace it with new! — ~:O Anywhooo… I ADORE your plan to use to old flooring for a herringbone pattern on your hallway ceiling!!! How freakin’ awesome it that!?!? <3 LUV, Luv, luv!!! ~:D
Don’t you have to put something between the sub floor and new flooring?
I would be afraid of those gaps and moisture ruining my new floor. What
is your plan for that?
Good Grief! How do you manage to hold a job? With all that you do at home, you have to be in pain & exhausted while you are at work.
Love your ceiling idea. And I can’t wait to see the painted floors.
This is her job. She is a DIY’er that blogs. Full time.
I can’t wait to see your painted floor. Its what you’ve talked about for a long time and I’m glad you’re sticking with the plan. I’m sure you’ll love it! As for the reclaimed wood on the ceiling – AWESOME! That should be stunning and a great way to reuse what you already have.
Kudos on the decision to paint the new wood floor! That’s what you have always said you wanted to do in that room, so I for one think you should do it! Who cares if it’s new wood? But please do put some kind of moisture barrier over the subfloor before putting down the new flooring. We did that when we remodeled, thank goodness.
As for the painted stripes in the kitchen, are you going to run the kitchen flooring parallel with the old flooring, or change direction and go perpendicular to it? Stripes running lengthwise down the kitchen, or crosswise? I’ve always read that to broaden a narrow room, run the stripes crosswise. Will the kitchen flooring run into the breakfast room, or will there be a break at the doorway from the kitchen into the breakfast room? I’m curious to know how you’re going to do it!
I love the striped pattern you chose for the floor! I’m very interested to see the colors you choose to coordinate with your cabinets!! Keep up the good work! You work so hard, I’m exhausted just reading about it! :o)
What about renting a planer to even out the old tongue and groove a bit before putting it on the ceiling? It’ll help with “sanding” it as well 🙂
Have you decided what paint you’re going to be using? I used Benjamin Moore breakthrough in umber white and painted my new oak flooring. It has held up fabulous! And I have animals! It looks fantastic. Just a tip if you’re wondering what paint/brand/etc to use. I would be happy to give you more info or send pics if you want! Kitchen is looking great and I am enjoying watching it develop!
Love it, love it love it !!!!! Did I mention I love both ideas?!!!!!
I simply love the striped floor idea. I am also excited to see how the hall way ceiling will look. I seem to remeber you were going to hav3 painted doors in the hall also. I love that ou give as much decorating thought to a hall as you do a regular room, (I still have a crush on your Argyle wall in the condo!)
Love, love, love the patterned ceiling plan!! Can’t wait to see it–it’ll be amazing!
Do you have a Home Depot near you? That’s where we rented a flooring gun.
Yay! I’m so glad that you’ve gone back to your idea of painting stripes on the kitchen floor! I think it will add such a personal fun touch to the room! Can’t wait to see it! Great idea for reclaiming (I think you can use that term) the old floor for the ceiling! The herringbone will be another individualized touch! Great thinking! Hugs, Leena
Fantastic blog. I simply love the striped floor idea, which gives a stunning touch. Kitchen is looking great and I am enjoying watching it develop! Your house will look so unique to you when it is completed.