Watercolor Tile Herringbone Table Lamps – Finished!
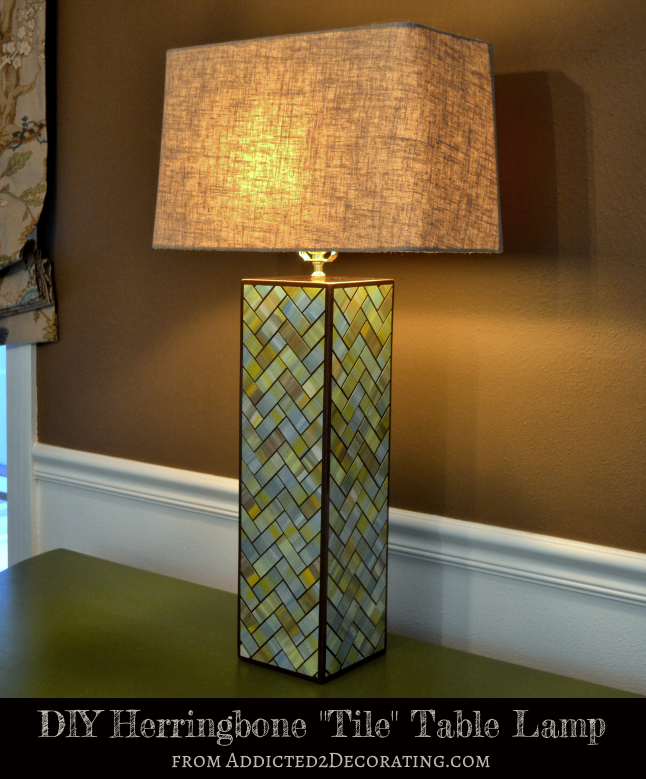
My DIY table lamps with the watercolor herringbone faux tile design are finished! Here’s how they turned out…
Please note: This is Part 2 of this project. If you missed Part 1 of this project, you can see it here: DIY Table Lamp With Herringbone Watercolor Paper “Tiles” – Part 1
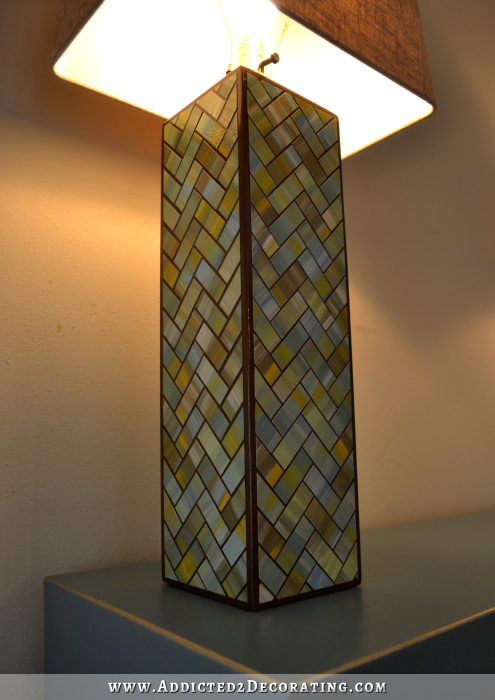
When I left off on this project, I had two sides of one lamp base finished, and it looked like this…
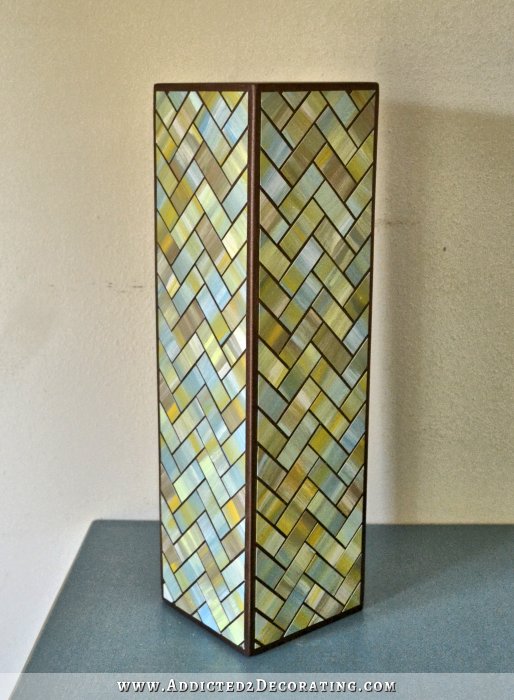
So I finished up the herringbone design on the other two sides, and then did all four sides of the second lamp base. And because I know that inquiring minds will want to know this information, I timed myself when I applied the “tiles” to one whole side of the lamp, and it took me about 40 minutes per side. That doesn’t include the time it took to cut all of the pieces.
That time could have been easily cut in half if I could find an adhesive that doesn’t require constant watching and pressing down until it’s pretty much dry. Mod Podge causes the paper to initially curl, so I’d put on a couple of pieces, and then go back to all of the pieces I already attached, and press them down again. This was such a time-wasting activity. If any of you know of an adhesive that works well with thick paper that sticks immediately and doesn’t require this constant attention until it’s dry, I’d love to know about it!!
When the Mod Podge was completely dry, I sprayed the bases with Triple Thick Glaze from Rust-Oleum.
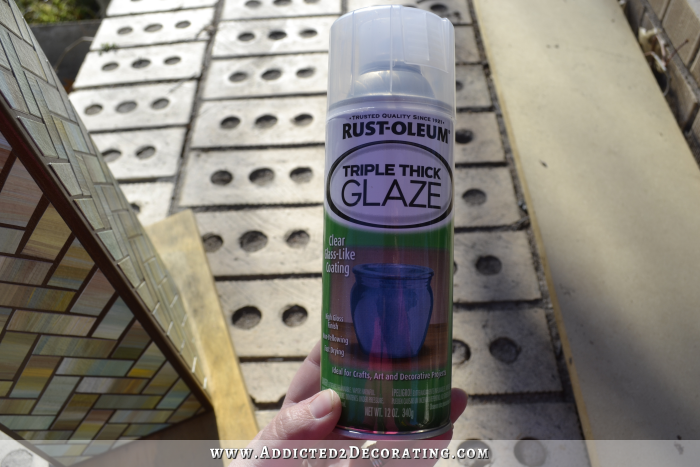
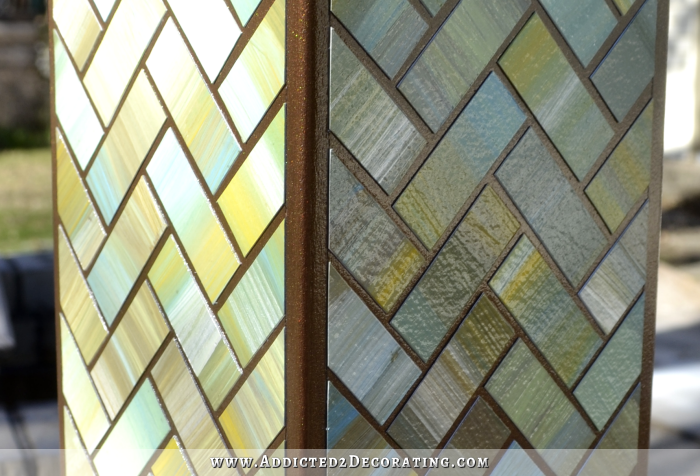
This stuff is amazing!!! The finish was very hard to photograph, but in person they have a really shiny, glossy finish. You can kind of see the shine here…
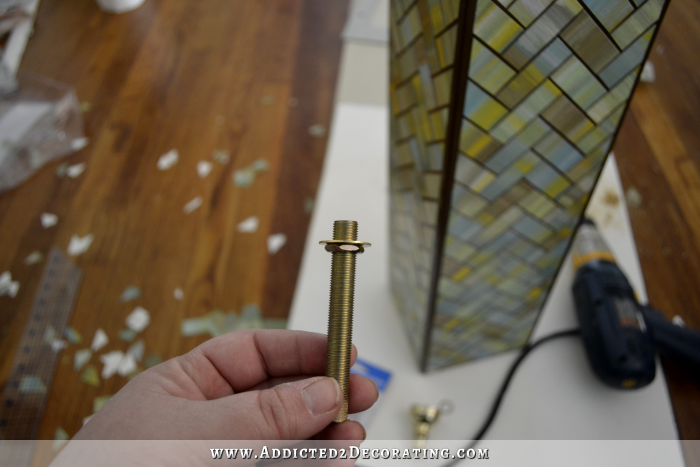
When they were dry, I was ready to wire them and turn these boxes into actual lamps. For this, I purchased one 3-way socket kit (affiliate link), a package of 1/8-IP nuts and washers, and a package of two 3-inch 1/8-IP threaded nipples. I started by drilling a 3/8-inch hole right in the center of the top of the base.

Next I threaded a nut and washer onto a threaded nipple. (Note: The nut isn’t threaded down far enough in this picture. It needs to be about 1.25 inches down.)
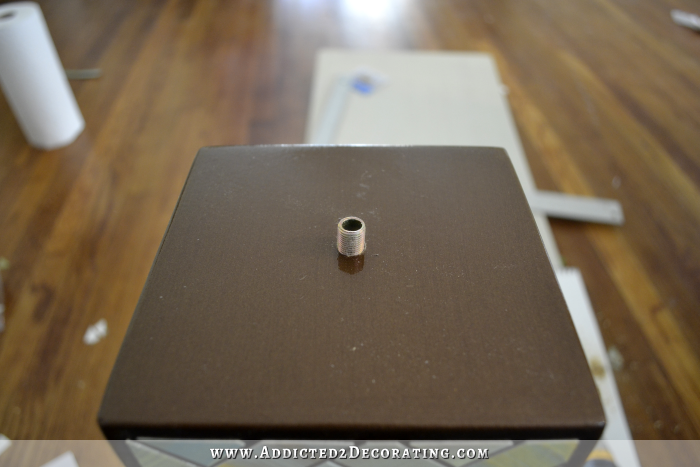
Then I turned the lamp base over so that I could reach inside the base, and threaded the nipple up through the hole as far as I could until the washer was resting on the inside of top of the lamp base.
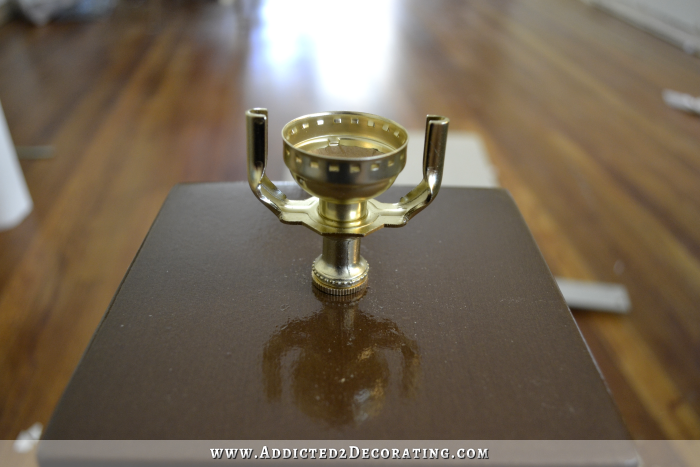
And on top, I added the pieces from the lamp kit — nut, neck, harp base, and light socket cap. All of those pieces just screwed together.
Then I had to choose which side of my lamp base would be the front, and which would be the back. On the back, I drilled a 1/4-inch hole in the center about 1/2-inch from the bottom and ran the cord through the hole to the inside of the lamp base.

And then I ran the wire up through the nipple, and through all of the pieces on the top of the base. Once the wire was threaded all the way out the top, I tied an underwriter’s knot in the wire.
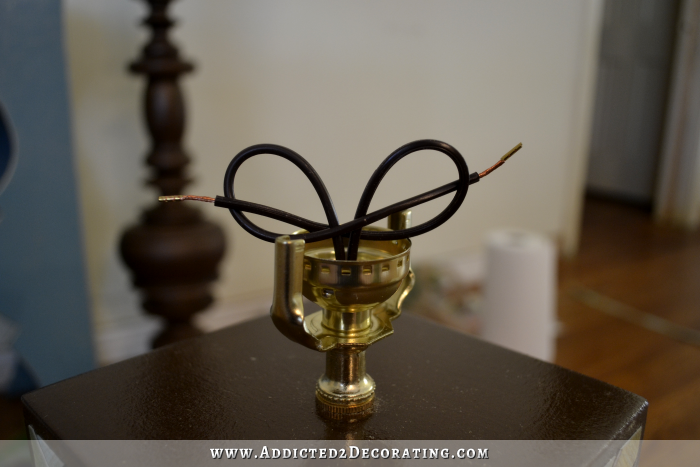
I removed the metal cover from the socket to expose the two screws. Then I attached the ribbed wire to the silver screw, and the smooth wire to the gold screw, and tightened both screws so that the wires were secure.
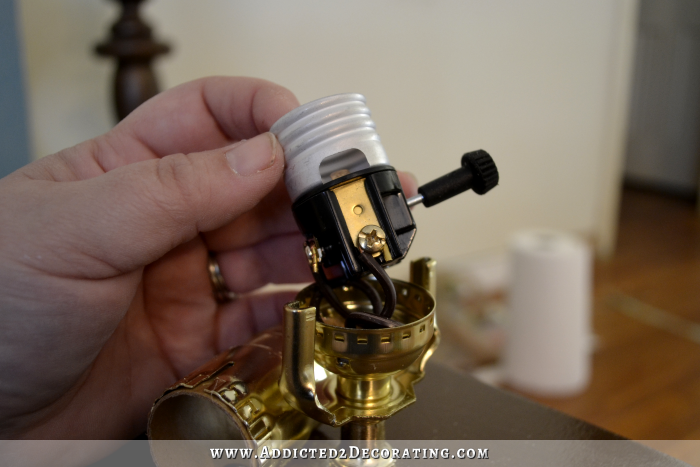
And finally, I slid the metal cover over the socket…
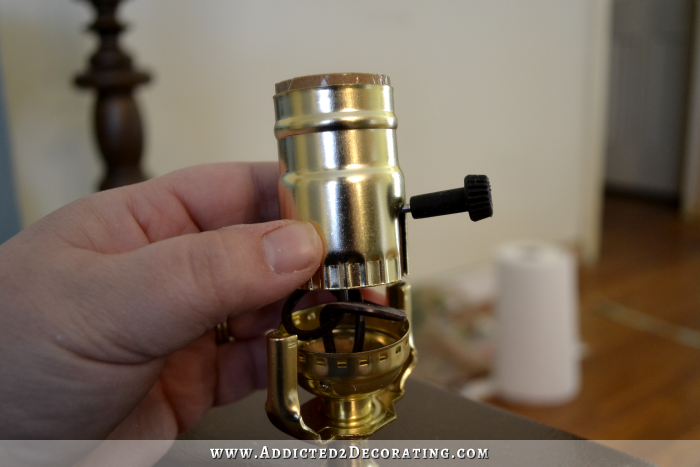
…and snapped it into place on the socket base.
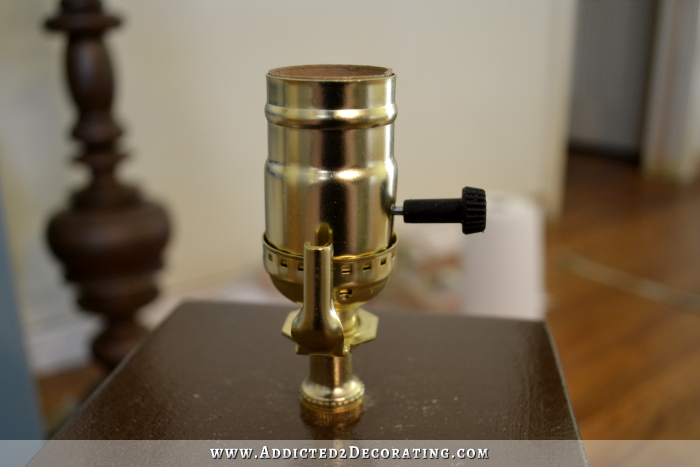
Then it was ready for a harp, light bulb, and lamp shade!

I bought the shades at Lowe’s for about $25 each. It was more than I had intended to spend on lamp shades, but rectangular shades are harder to find, and cost more than plain round shades.
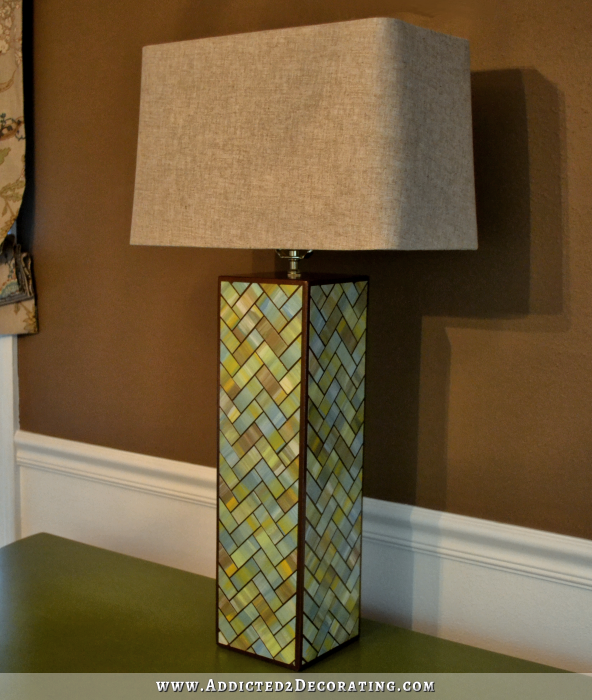
I really love how they turned out, and Matt says that these lamps are his favorite things I’ve ever made. He just kept looking at them yesterday and saying, “Wow! I can’t believe you made those.” 😀
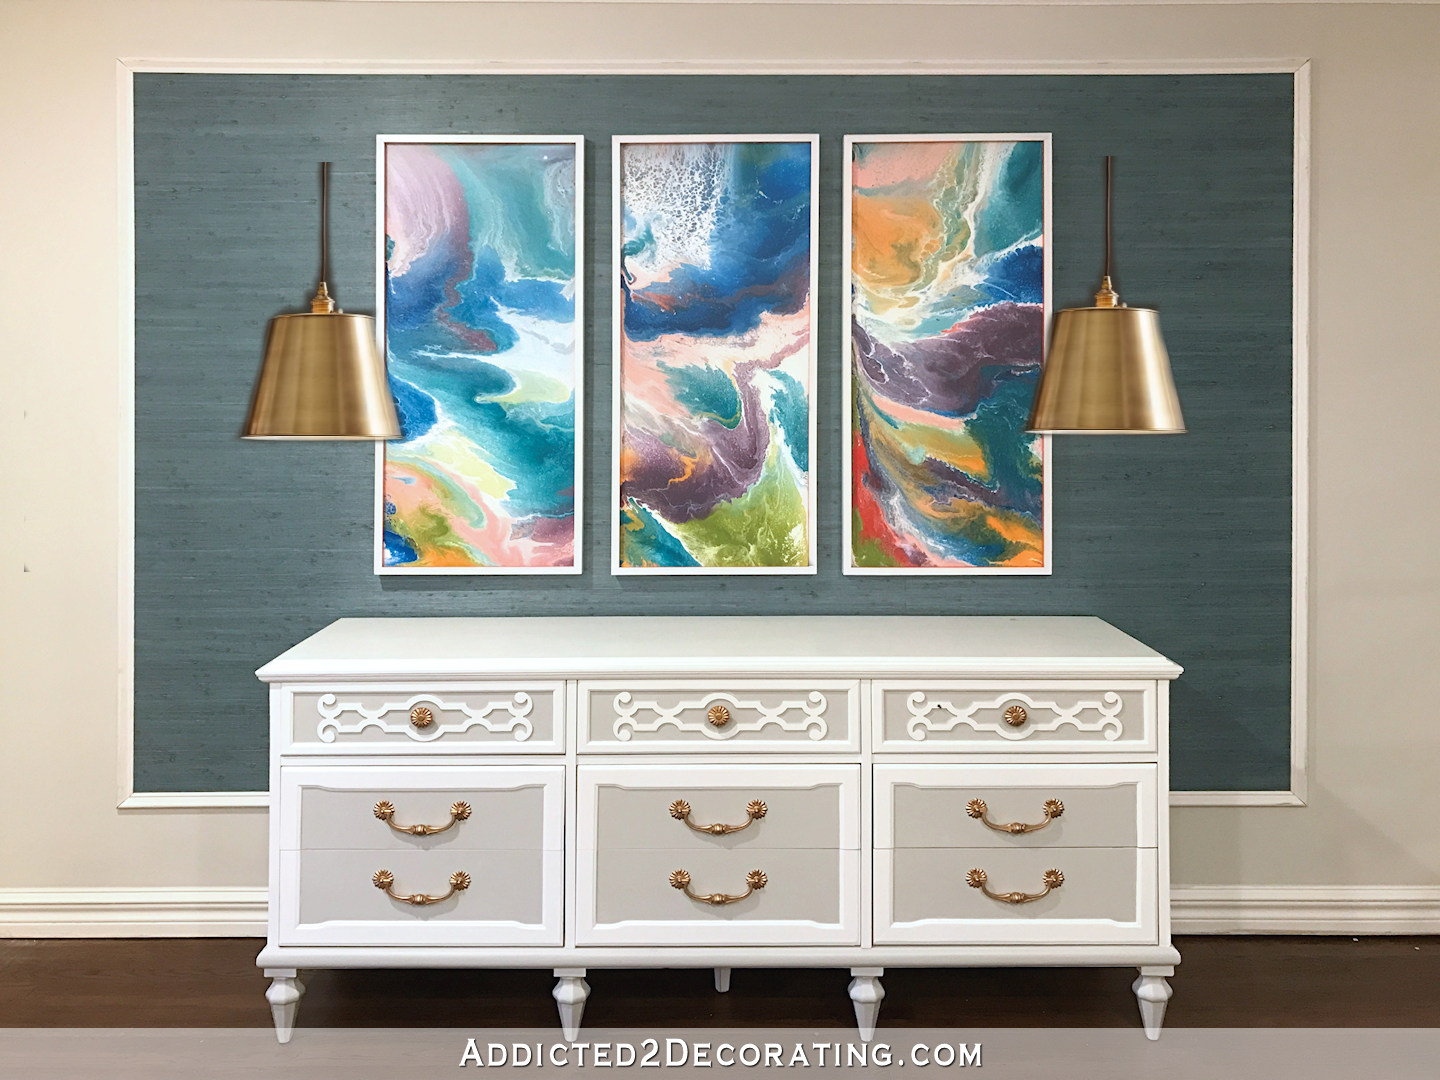
I placed one of the lamps on the green credenza to snap the photos above, just because the console table wall in the entryway is still so incomplete and ugly. The bland paint on the walls, along with the lack of baseboards, is very distracting.
But because I know at least a couple of you will ask, here’s a peek of what they look like on the console table.

The table is 64 inches wide (four inches wider than I am tall :-D) so it’s definitely wide enough to accommodate two lamps. Now I just need to find or make something really spectacular to fill that big expanse of wall above the table. I have some ideas rolling around in my head, but I haven’t settled on one particular idea just yet. Of course, first I need to paint and install baseboards. I’ve kind of gotten ahead of myself here. 🙂
Here’s how the cost breaks down for these two lamps:
- MDF: on hand (scraps from the console table)
- Watercolor paper: on hand
- Acrylic paints: $10
- Lamp kits: $24 ($12 each)
- Lamp shades: $50 ($25 each)
- Extra lamp parts: $6
- TOTAL: $90 for two lamps
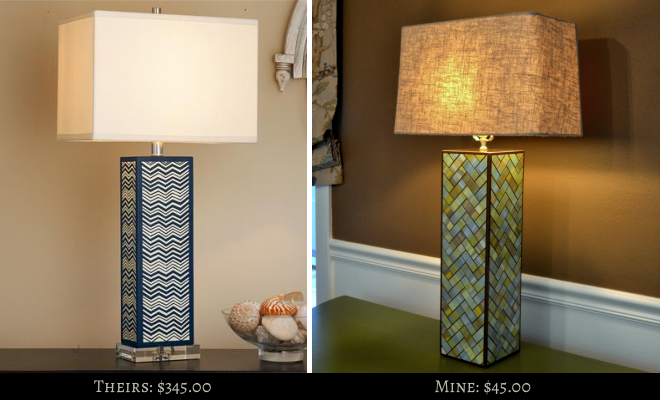
Not too bad, right? Especially considering that the lamp I used as my inspiration for this project was $345.00!

Addicted 2 Decorating is where I share my DIY and decorating journey as I remodel and decorate the 1948 fixer upper that my husband, Matt, and I bought in 2013. Matt has M.S. and is unable to do physical work, so I do the majority of the work on the house by myself. You can learn more about me here.

beautiful!!!
I like the ones that you made better then the store bought ones great job
So do I.
I love this idea, but had a very hard time with the layout of the design. Any tips?
Kristi – as always – this turned out amazing! I think I agree with Matt – this might be my favourite project – that is until the next one rolls around! Congrats on a fabulous job!!
What can I say – I am amazed as always. Congratulations!
I like them better than the inspiration piece!
I hesitate to say this, but there’s just one teensy thing I don’t like- the bottom of the harp showing. See how in the inspiration pic there’s a piece between the top of the base and the bottom of the socket? That socket and harp showing would kinda drive me crazy. Until I found another project to work on to distract me!
Yep, I need a longer neck and a shorter harp. 🙂 But for now, I’m okay with it this way. For some reason, it doesn’t really bother me with that little bit showing. I might fix it in the future, though.
Kristi – BRAVO!! That lamp is lovely – you do a rocken job on this project. I am actually going to make one for my hallway. Thank you for sharing – this is going to be perfect.
GORGEOUS! I love them!
Freaking gorgeous!!
Honestly, your lamps are much more beautiful than the one that inspired you. I am still planning my knockoff of your awesome herringbone tray. You are very talented!!! Thanks for sharing your passion with the less artistic folks of the world 😉
I love these! They are absolutely beautiful.
This whole project turned out fabulous! You said this is in your entry way correct…. If so a mirror with your touch and a few accent pieces would complete it!!!!
Outstanding – the shade is perfect for the base. Colors right own. Thank you for sharing
Absolutely stunning! So beautiful and creative!
Beautiful! Your projects are very creative & inspirational. I hate to say that I’m mathematically challenged & hesitant to try some DIY projects. Although I’m hoping to purchase a home within the next 6 months & may need to try my hand at some.
Thanks for all your inspiration!
Those look like real mosaic tiles. I am blown away…
WOW! I SO want to make lamps now! All kinds of them!! ~:)
Absolutely gorgeous!
You would never know that was scrap paper and paint. I am so inspired by your creativity!
Ooh la la you nailed it!
Fantastic job….again! I will keep checking back to see if anyone knows of that super adhesive product you’ve asked them to share with you. If there is such a beast and you try it Kristi..do share your thoughts!
Keep em coming!
Beautiful statement pieces. Great tutorial. I would try harps that are 1/2″ -1″shorter and see if there is enough post for your liking before extending the post. The other enhancement I would try would be to get triple thick glass cut and beveled for a base, sized a bit larger then the tiled block. I think the resulting blue green transparency of the thick glass would really set off the beautiful tilework and add additional stability to the tall lamps. Great job!!
I didn’t even think about looking into having glass cut for the bases! I did look for the acrylic bases, and the ones I found run about $50 each!! That was NOT gonna happen. 😀
Acrylic wouldn’t give you that blue green color that thick glass gives either. I wonder if the glazier might have scrap pieces on hand that could be cut. I also would check craigslist for store glass shelves for sale. Once again though, great job.
One thing I might add about the glass (good suggestion, BTW) is that plate glass cannot be easily cut, so I would definitely go to a glazier, which would have all the cutting and smoothing tools.
I really like your idea, That would put the perfect finishing touch on this. 🙂
Your lamps are prettier than the inspiration piece. Love the colors!!! Awesome idea!!!
They look amazing!
Absolutely beautiful! You are so creative and you inspire so many people (including me)! Thanks Kristi for sharing.
You rock girl! I absolutely love your projects, they really are inspiring. 🙂 What I love most about your work is that it looks really, really good when it’s done. I like to call a lot of my projects rustic…lol.
These look fantastic!! I’m amazed at how much the paper looks like tile. Just beautiful!
As always….the reveal is worth waiting for. Absolutely beautiful, Kristi! I am so inspired!
i love the lampshade choice! The whole project is fabulous. I’m thinking about how cool it would be to make a floor lamp with this process. Also want to tell you that i follow a lot of blogs and your blog is one of the few that actually writes about projects you’ve made. It seems that many bloggers are reposting things from the web, just passing on someone else’s projects. I will be dropping them, but will be keeping yours!
Love them, and the lamp shade is perfect. Lamps are gettting so expense. Glad your able to show people a cheaper way to make their own.
I honestly like yours much better than the inspiration. Yours seem to have more depth and texture!
Your work is amazing, love the lamps. You should consider a show, the world needs more of you!!! You could be the next, Martha.
I so agree, a show with you would be awesome!
Wow wow and more wows! LOVE them! They are waaaay more beautiful than the inspirational piece. I cannot say enough about them. I would love to make them…..just have to accomplish the woodwork which I don’t know if I can….but thank you so so much for sharing how you did this! I love the inspiration you give. It gives me hope that I could actually fix up my house someday to look beautiful!
Kristi, You are crazy-talented. Just curious, how did you learn to do all of this “stuff”?
Gorgeous!
Seriously awe inspiring!
Fantastic! Way better than the example lamp!
Wow it turned out really amazing ♥ I can’t wait until i can try to make my own lol. I love how you used paper to make the “Tiles” and the texture is just perfect. Thank you for sharing!
These turned out fantastic!!!! Great job.
Absolutely beautiful! I love all your projects & look forward to each one.
In regards to your adhesive issue, I am a mixed media artist which means adhering items to canvas etc and needing the assurance of archival quality for my artwork. The adhesion product I use is Golden brand gel. Gel comes in several types, soft, medium and heavy depending on your needs. You would probably have to play around and find the one that suits you best. Apply the gel to the item and also what you are adhering it to, place the object on then gel over the top being careful to squish out any air bubbles beneath. They will never come off. Artistically speaking, Modge Podge is a no-no.
http://www.goldenpaints.com/products/medsadds/gels/gelreview.php
I love these lamps. I’ve been following the whole process. But I have no clue where to begin on doing a herringbone pattern. Do you have a previous tutorial on how to lay out the herringbone pattern?
https://www.addicted2decorating.com/watercolor-tile-herringbone-table-lamp-base-part-1.html
Absolutely gorgeous!!! I asked Rod last night if he had seen your post. He said he had and he is planning to go over to see the lamps in person. So expect visitors. 🙂 I’m so proud of you. You never cease to amaze me.
Your lamps look so much richer and nicer than your inspiration lamp! Nice job!
I LOVE these! Amazing! I am going to have to do this for our family room. Find the right lamp is so difficult. Thanks for the inspiration!
Wow I love these lamps! I thought the “tiles” were real tiles and was so surprised they were paper!! I think they turned out beautiful!! and so creative too – keep up the great work. Love your blog too!! Very inspirational!!
Wow! They turned out really gorgeous, more beautiful than your inspiration piece.
I don’t know if a spray adhesive would’ve held the pieces down better or not. I love Modge Podge but you do need to keep smoothing things down until it is set.
Your finished lamps are totally amazing and I can understand why your husband is in awe! I think the shine from the finish makes them really look like glass tiles – my favorite! Well done and I’m eagerly looking forward to your next project.
I love yours so much more than the ones that inspired you!!
Worth the wait!! Stunning!! Your finishing work and attention to detail is astounding. I grow impatient half way through my projects and rush the end. I think it’s crazy cool that you create such works of art without spending a fortune. I share your projects with my walking buddy almost daily. I’m beginning to feel like a stalker! ;-D
Could you tell me I please what weight of watercolor paper you used? Like 140 or 300? Or brand? … I is a great project!
Linda, I used 140lb paper on this project.
GORGEOUS! Truly stunning. I love how you “tiles” look like glass tiles.
I am just a humble reader but am constantly amazed at your level of creativity combined with frugality. So inspired!
I would like to put in an order for two please! Do you need my address?? 🙂
THESE ARE AMAZING!!! They look stunning with your sofa table! You really never cease to amaze me!! Keep it coming girlfriend!!! Thanks!!
Wow! Those are Fantastic! Would have never in a million years guessed they were a DIY!
I have been eyeing these lamps from Stray Dog http://www.straydogdesigns.com/products/detail/artichoke_lamp/ for some time now , at $750.00 for one of these babys something I will never be able to afford, and they are made of paper mache, thats some expensive paper! I have been racking my brain trying to figure out how to make something similar myself. Have any ideas? You are the right person to ask! Thanks, and again great job!
I love that lamp, Jeanna!
Here’s how I would make it:
Start with a wood footed plate. I see these sometimes at Hobby Lobby and discount stores like Ross and Marshall’s. Be sure to drill a hole through the middle for the threaded lamp pipe.
Then on top of the plate, glue a big square of floral foam, and carve it into the general pear shape.
Next take some cardboard, and cut out all of the little petals (not sure what those are called on an artichoke). Adhere them to the foam pear shape with hot glue or another strong adhesive.
Once all of the petals are on, go over the entire thing — base included — with one or two layers of papier mache. When dry, spray paint it in the color you want, and then clear coat with the Triple Thick Glaze from Rust-Oleum.
Then you can add the threaded lamp pipe through the middle and turn it into an amazing lamp!
Shoot…now I want to try it!! 😀
You are a genius! That’s it! This will totally work! I am gonna go and grab all the supplies, I am so exited to try this! Didn’t know about the Rust-Oleum triple thick glaze , that would make it look sooo good. You should give it a try I know yours would be fantastic! Thanks so much for your help, my brain can finally rest 🙂
the petals on the artichoke lamp remind me of paper egg carton bits. maybe cutting some of those up might work?
These are fantastic! Slow down girl, don’t you ever become exhausted? I love the high sheen you put on them. Just stunning!
I was just looking for an acrylic base for a giant seashell and I remembered this place sells acrylic bases fairly cheap… they have a beveled edge (but might also have ones with straight edges), 1″ thick, 6″ x 6″ for $20… http://thefixturezone.com/acsqbeba.html and if you only go 3/4″ thick, I think it drops the price to under $10. A base would really finish off your gorgeous lamps nicely!
🙂
If you glued a piece of blue-green paper on the bottom, would it reflect throughout the base and make it that color?
OR, someone could just cut a piece of the MDF for a base and paint it the bronze of the edges. Wonder what that would look like. hmmmmm. Great ideas here!
Gorgeous!
They look like stained glass, so pretty! And I like yours so much more than your inspiration lamps
Those lamps are AMAZING! And much prettier than the inspiration lamps. You could also make a few quick bucks by selling some of the water colors that you used to make the ’tiles’. I loved them!
Absolutely gorgeous!
You are absolutely amazing. I am in awe of your creative abilities. These look so much better that the inspiration lamp.
Stunning! I am definitely going to try the “tile” project on something!!!
Yes you can!!! your lamps are so Chic, adorable, look like 1000$ each 🙂 I’m chocked, Matt is right. best regards!
couldn’t
Every bit as smashing as I thought they’d be. The rectangular shades add just the right touch. Brava!
This is why I love your blog. We have different styles, but I always learn from you. You know what you want to do, and are so creative and able to think of a way to make it happen. I appreciate that you let us into your mind as you work through the designs, too. It helps to see that a professional interior designer is human!
YES! (that’s the name of the glue) Yes! The all purpose Stickflat glue. I haven’t used it for projects like this. This glue will NOT die either. I’ve had the same tub for YEARS! I just add a little water, stir… done. Or if you like it thick, don’t. Obviously a fresh jar will be different. But SO worth having in my arsenal of adhesives. I would still coat with Mod Podge and then clear coat like you have, but to adhere- YES! is your glue. 😀
I am just in awe of these lamps….B-E-A-U-T-I-F-U-L! Is there anything you can’t do?!?
I have to echo Melissa, I like yours better, they have a lovely warmth. I am glad you did not brush Mod Podge over those tiles, thanks for the info on the great glaze.
Admire your patience! Funny I thought the base was the lamp! Super cool
Wow Kristi- stunning. I can’t believe what a high end look you were able to achieve. Amazing. Pinning- I would love to try a DIY lamp one day. Thanks for the tutorial!
Wow! I honestly thought these were TILES! So shocked when I saw you had made it with paper. BEAUTIFUL! I love yours way more than the commercial version shown as inspiration. Thank you for sharing this really neat project.
Absolutely gorgeous. You make me think I could do it myself! You are the most creative and talented person ever!
Beautiful and I like them better than the inspirational lamp. Such and inspiration.
There are not enough words in the dictionary to describe the beauty of this project! Fabulous just doesn’t quite do it this time around! As always, thanks for sharing.
I SOOooo Love them !!
Seriously beautiful. Love your can do attitude!
These are so beautiful. I like your version better than the one you used for inspiration!
You are seriously amazing! where do you come up with all these great ideas?! LOVE these!
Oh c’mon! Is there anything you can’t do???? Geez, These lamps are fabulous and I feel so lazy now! Kristin you amaze me. But I gotta say, you made this look so easy and “doable” that I think I might give it a try! Thanks again for a great tutorial.
That’s awesome, and I’m amazed that the pattern was made with paper – at first glance I thought they were tile.
These lamps are beautiful!
Just about the time I think you have wowed me beyond anything else you top it off….these lamps are fantastic…you rock Kristi. Not only in your talent for the innovative designs you come up with but the way you make them so inexpensive. You inspire all who come here I am sure. Matt is a lucky man to have such a talented wife….I don’t see how you have time to share with us all that you do….but my thanks that you do share all.
Kristi, you keep wowing all of us—including Matt—with your ability to turn your visualization into reality. Besides the fact that these lamps are stunning examples of that talent, you have the rare skill of being able to instruct and inspire others to do the same.
I have a request: At some point, could you write a few words on how to choose or make a lampshade for a lamp—size, shape, etc.? Though I can make a lamp, I haven’t the foggiest idea what to do about a shade. Thanks.
Wow! These are beautiful!!
I love, love, love these lamps. The colors would match perfectly in my dining room and when you showed the half finished base it made me think how beautiful a wall sconce would look. I just wish I could figure out how to make one that light could shine through.
Thank you for the inspiration
I love them! The “inspiration” pics did nada for me….your finished product is beautiful! Unique and one of a kind and again, beautiful! Yours should be the inspiration pic.
Kristi, I love how your mind works. The only thing you copied from the inspiration lamp is the size and shape. Your’s looks hundred$ more expensive, as I have come to expect from you. Now, please spend a chunk of money to save a ton of money. Buy 3-way cfl bulbs, or better yet 3-way led bulbs (I’m adamant about not wasting power.) It will save you a ton, and you will definitely want to leave these lamps turned on. Remember, lamps are the jewels of the home and should be turned on to create little pools of light and a wonderfully inviting atmosphere. Forget making the neck of the lamp longer. Once you have the right bulb, see if there is enough room to change to shorter harps and move the shade down to the top of the lamp base so the neck doesn’t show. It seems every new project is my favorite until the next time. LOL.
Love these! I love the close-up of the tiles, they look amazing!
I like your lamp way better than the inspiration lamp!
Wow! Gorgeous!
Freakin’ amazing!
These look amazing! It does not even look like paper!
Very nice! These would be so easy to adapt for other Craftsman style decor projects for my home. Again, you blow me away with your creative ideas taking something that looks complicated and making it easy to do!
Deb
Wow, what a project! I too much prefer your lamp and what a deal! Really, really nice!
I’m with Matt — I can’t believe you made those! Wow! is right! I absolutely love them!
These turned out beautifully! I still can’t believe it’s paper and not tile work – amazing! Great look for your table and SO much prettier than the inspiration lamp! Hugs, Leena
absolutely incredible!!! I love this, and yours is so much prettier.
This is my favorite ever. Impressive. Much better than inspiration piece. Love your blog . Don’t let the negative bunnies get to you. You have a great eye.
Kristi, Don’t do another thing to those lamps. They are perfect just like they are. The shade set is perfect. People will be seeing the lamp from above, if I’m right about the size. Your lamps FAR outshine the overpriced ones and are more substantial. Move on – you’ve got this covered!
Simply AWESOME! I don’t know why I am always so stunned at your DIY reveals. You think I’d know by now that everything you set your mind to is going to be amazing. And I ALWAYS think your version of the inspiration piece is better. Great job!
Once again I am gobsmacked! (love that word to capture my incredulousness)I am so impressed with how that adds colour and texture to the space. That triple glaze is brilliant! Wowza
I’m always amazed at how quickly you go from “i want to do this…” to “It’s done!” My hubby and I get paralyzed by indecision, wondering if we’ll find a better way/better materials after we do something, to the point where it takes us months to finish what should be a simple, one day project.
Beautiful!! With the shiny finish your paper tiles look like iridescent glass tiles!
I’m with Matt. These are my very favorite project of yours. You need to enter these in some kind of contest!! I’m amazed at the endless great projects you crank out day after day. Where can I purchase some of that stamina? 😉
Go girl! You are amazing! Awesome job! Thank you for sharing!
Gorgeous! Love those lamps!
Absolutely gorgeous!! Are you taking orders????? Please????
These lamps are spectacular. Love, love, love the colors you picked.
Traci
Beautiful! I love them!
See that, I knew you could make your own lamps! As lots of people have commented, your lamps are better than the inspiration lamps. My favorite part is that they look like they’re covered in stained glass!
I have already purchased the triple glaze you use. I have a proct planned this weekend. Thank you for sharing so completely. I love your work.
Wow! I am almost lost for words over what to say about these lamps (I know – ME – lost for words?). They are AMAZING! I was astonished to see the tiles were made from PAPER, they actually look like real stained glass tiles. No wonder Matt (and the rest of us) are amazed by them! Love those rectangular shades, too, and they look so beautiful on that gorgeous console table. Again, I bow down to your talent ‘I’m not worthy’ style!
Question: I’ve seen several comments from readers and you about the bottom of the harp showing on these lamps, and just have to ask, how does one determine a correct “fit”? At what level or angle do we view the lamp and make the determination that the fit is correct, or off? Do we crouch down and look at the bottom of the lamp shade exactly at eye level, and if we can see the bottom of the socket/harp then adjustments need to be made? If so, exactly what adjustments should be made? Would adding a longer neck be a simple way to fix the problem? I’m curious about this as I have a couple lamps I need to rewire, and want to be sure I do it right.
All I can say is WOW! Those lamps are stunning! I agree with some other people that I like yours better than the store lamps. Great job!
Good grief those are truly stunning. LIke a lot of others, I thought you were gluing real tiles done . I must feel great to have a full month or two fo working on fun pretty projects, from setting up the living room, the mirror, the new ottoman, that stunning table to this. Over the top, Kristi! This is why you are one of only four blogs I ready anymore. No one tops your creativity. Take a bow!
I know you made those lamps for the blue table, but the lamp you photographed on the green one is STUNNING!! It pulls the colors from the roman shade, plus highlights the green on the table, and the brown on the wall. Maybe one on the blue console and one on the green dresser. I know you like things in pairs, but the lamp is GORGEOUS in the living room against the window wall.
This are so pretty! I love the shiny effect with the colors and the rectangular shades too, well worth the cost!
So much prettier than the inspiration piece, your lamps make it look plain by comparison..beautiful!
Rock’n’Roll awesome. These are beautiful and so much prettier than the $300?? This is my favorite project so far. Thanks for sharing all the beautiful things you make. You are a genius.
Gorgeous lamps, Kristi! Would you please post the dimensions for those of us who may want to make one? Height, width, etc. Is there a rule of thumb for sizing the shade to the lamp base? thanks for sharing your projects, I am continually amazed not only at your design mind but at the speed with which you finish a project from original inspiration to completion. The blend of creative mind with handy skills is a winning combination. You are an artist, and your home is your canvas!
Amazing! I liked the way you made the lamp. It’s beautiful designed table lamp. You are a very creative person. Thanks for sharing your creativity. Its just awesome. I will try to do the same, can’t make it like you but I’ll definitely try and share with you.
What gorgeous lamps! I agree with the comment that your lamps are beautiful just as they are. Regarding the criticism about the socket base showing: With the rectangular bases and shades, the socket adds a rounded, almost sculptural, element that is very pleasing to the eye.(Rules made to be broken, etc.) The lamps are stunning, and Kristi deserves all the praise for her creativity and skill used to bring this idea to a beautiful conclusion. You really are an inspiration, Kristi. Thank you for allowing us into this part of your life.
Lav
Love lamps! congratulations!
Beautiful project! I love your lamp. And I really appreciate the idea of making one this way. I like the way you present a project and show ways readers can take that and use it with their own colors, etc.
i gotta make these. u are amazing. the most beautiful lamps. could you possibly list the paint colors you used for the “tiles”? the colors you used are just perfect for my living room.
that seriously looks amazing! great job!
Wow, those are amazing. I can’t believe they started as watercolor paper! It really looks like glass or ceramic tiles. I’m surprised you are still able to impress Matt! I would have thought he’d come to expect the amazing whenever you pull out the power tools! ; )
I think I’ve made this comment before, but you are just insanely talented. I absolutely love how you share your entire process, from inspiration to execution to reveal. I’m sure you know this but you really could do a book with these projects.
A book! Oh wow, yes!!! You could definitely make a HUGE contribution to the world of home art literature with your abilities! I certainly hope this will be in your future! The lamps are truly beautiful!
LOVE LOVE LOVE THOSE LAMPS FROM TOP TO BOTTOM!
Oh my goodness…the lamps are gorgeous! You are unbelievably talented!
OMG! Those lamps are so gorgeous! This is my new favorite thing!!!
Ok kristie. You have officially become a designer rock star. Those lamps are beyond beautiful. If you haven’t thought of this. Please copyright. Then entry these into design, decorator etc contests. I just am floored how insane these are. Cheers
Dear Kristie:
Where did you ever learn to be so resourceful, inventive, creative, willing to try anything? How did you come to acquire these skills??? Is this totally God given or does this run in your family? Your ability to create such beautiful things in the home is truly unbelievable & amazing! I am not trying to “flatter” you, but please continue to do what you do. Not only do you get to enjoy the benefits of your own home, but we do as well as being inspired and encouraged – Thank you so much! Your creations never cease to “boggle my brain” and amaze me (OK, sometimes I get a little jealous, but I get over it – ha, ha)! You are truly a master craftsman(woman). Thank you again!!!
God Bless You,
Sincerely,
Kristine / Pearland, Texas
(P.S. – As soon as we can carve out the time, my husband and I are looking forward to making your cedar bathroom counter top together!)
My husband and I are using this to make a base for our night stands. Can’t wait to see how they turn out! Love the lamps!!
Oh my, I think yours are much prettier than the expensive store ones!
I saw those lamps for the first time a day or so ago and I thought to myself- now those cost a pretty penny! I absolutely in a million years would have never guessed they were DIY but really they are works of art. And as others have remarked they are much prettier than the inspiration lamps. I decorate with a lot of color too. I wish so much I could hire you to help me.
Your lamp is gorgeous! Like many others, I was expecting ceramic tile or glass, not painted paper.
I never comment on decorating sites- but this is simply fantastic!
I am stunned over how amazing these “tiles” look.
cheers
I have to admit, I like yours better. I’ll be giving this project a go. Thanks for the inspiration 🙂
I didn’t read all the comments to see if anyone else told you this, but if you use Sobo glue, it is like very thick Mod Podge or Elmers, and holds very fast and won’t require you to keep holding the paper while it sticks. Your project will go much faster and you will be a happy camper. Nice job!
these came out beautiful and look better and more expensive than the inspiration lamp.
Yours are definitely more beautiful than the inspiration ones.
I enjoyed walking down memory lane with you. Saw alot of projects l had never seen before and marvel at your patience!!