My Crash Course In Bathroom Vanity Plumbing
I have had a crash course in bathroom vanity plumbing over the last few days, and I’ve learned so much, so I wanted to pass along what I’ve learned to you. I know some of you are going to laugh at me for not even knowing this information in the first place, but when I say that plumbing is my least favorite thing and I avoid it if and when possible, I mean it. I’d rather wire an entire house five times over before plumbing a house. Seriously, other than the basics, like cleaning out a P-trap. replacing a garbage disposal on the kitchen sink, or replacing a wax ring on a toilet, I just avoid plumbing at all costs. And because I avoid it, I’ve never really learned much about it.
*This post contains affiliate links.
Well, my avoidance of plumbing all these years left me at a tremendous disadvantage as I’m trying to purchase all of the parts necessary to plumb the bathroom sinks once I have the vanities built and the countertops are installed. I shared with you the other day that I finally found bathroom sinks that will work with the vanity style, which is going to look like a table with the area underneath completely open. So I needed a shallow sink, and the only one I could find with the correct dimensions was one that didn’t have an overflow drain.
In my search for sinks, I kept coming across descriptions that said what kind of drain needed to be used with each sink. This sink needed a drain with overflow. That sink needed a drain without overflow. I knew it had to do with the overflow drain, but I honestly couldn’t visualize how that would affect the little drain that you install in the hole in the bottom of the sink. What difference did it make?
Well, now I get it. I just needed a visual to help me out. (I’m very much a visual learner.) So I opened up the box for the bathroom faucet that I bought, took the drain out of the packaging, and tried to install it in one of the sinks that just arrived two days ago. And then it all made sense.
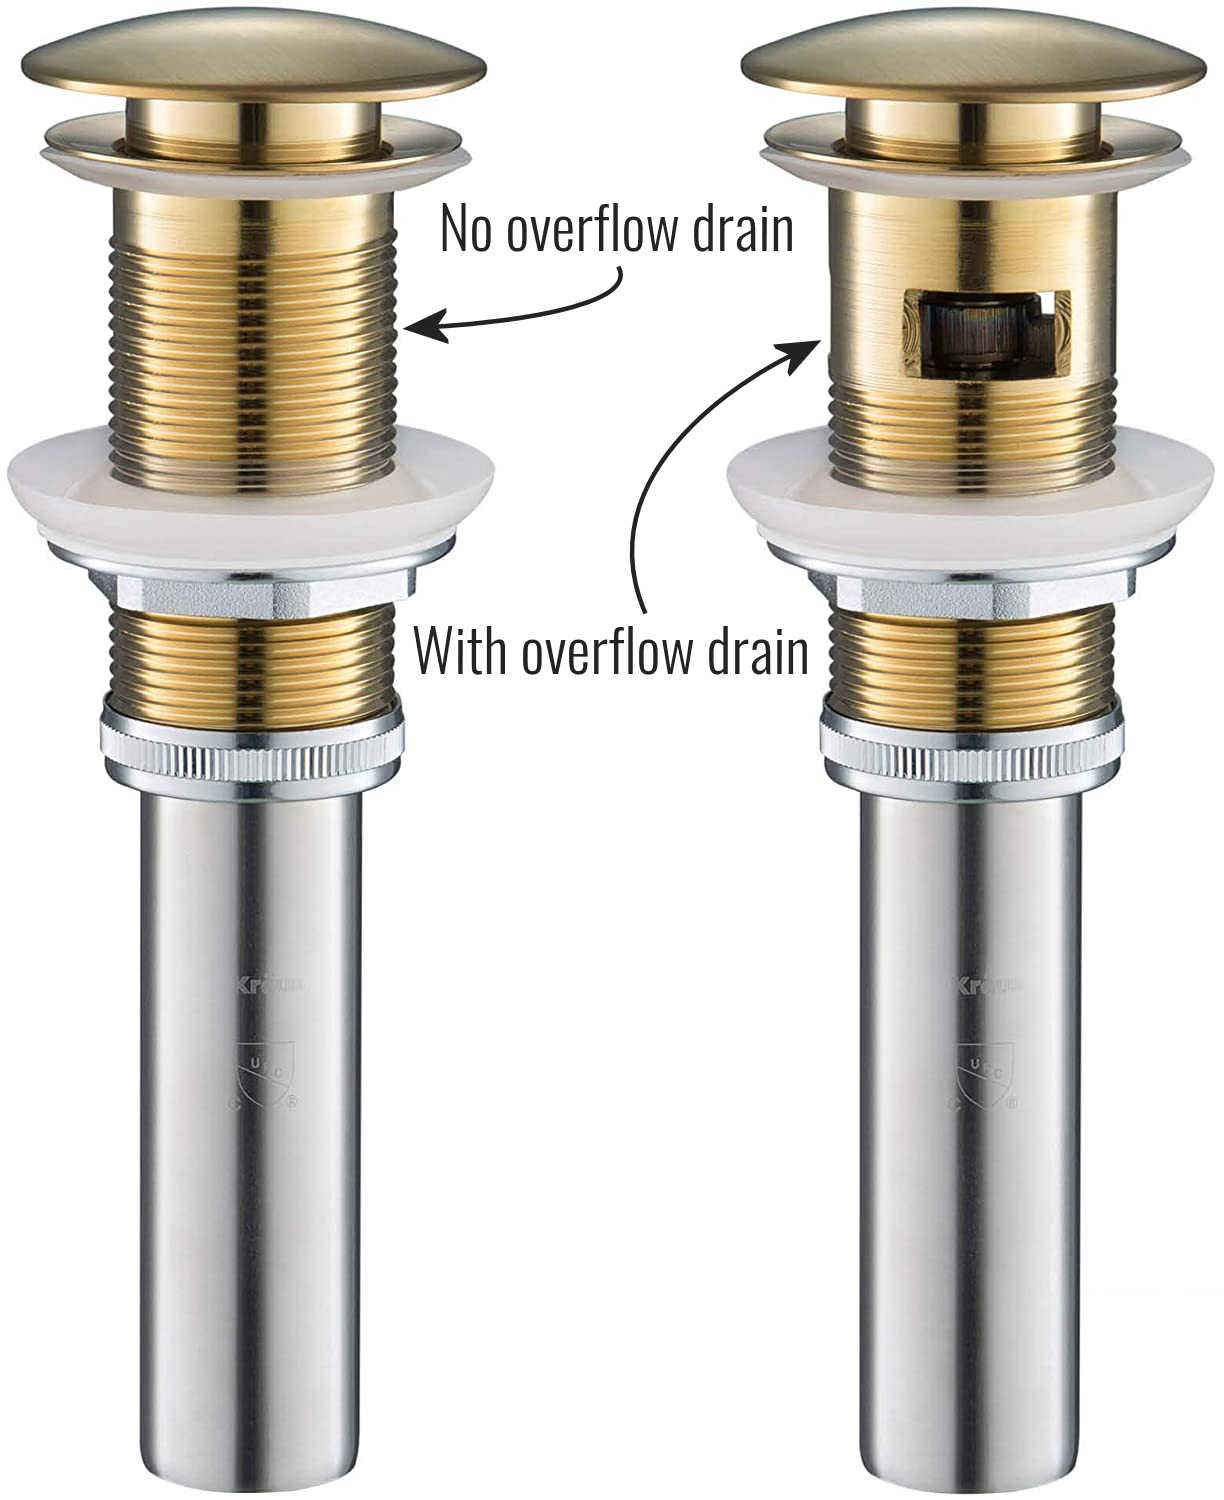
Here’s what the drain looks like from the top view of the sink…
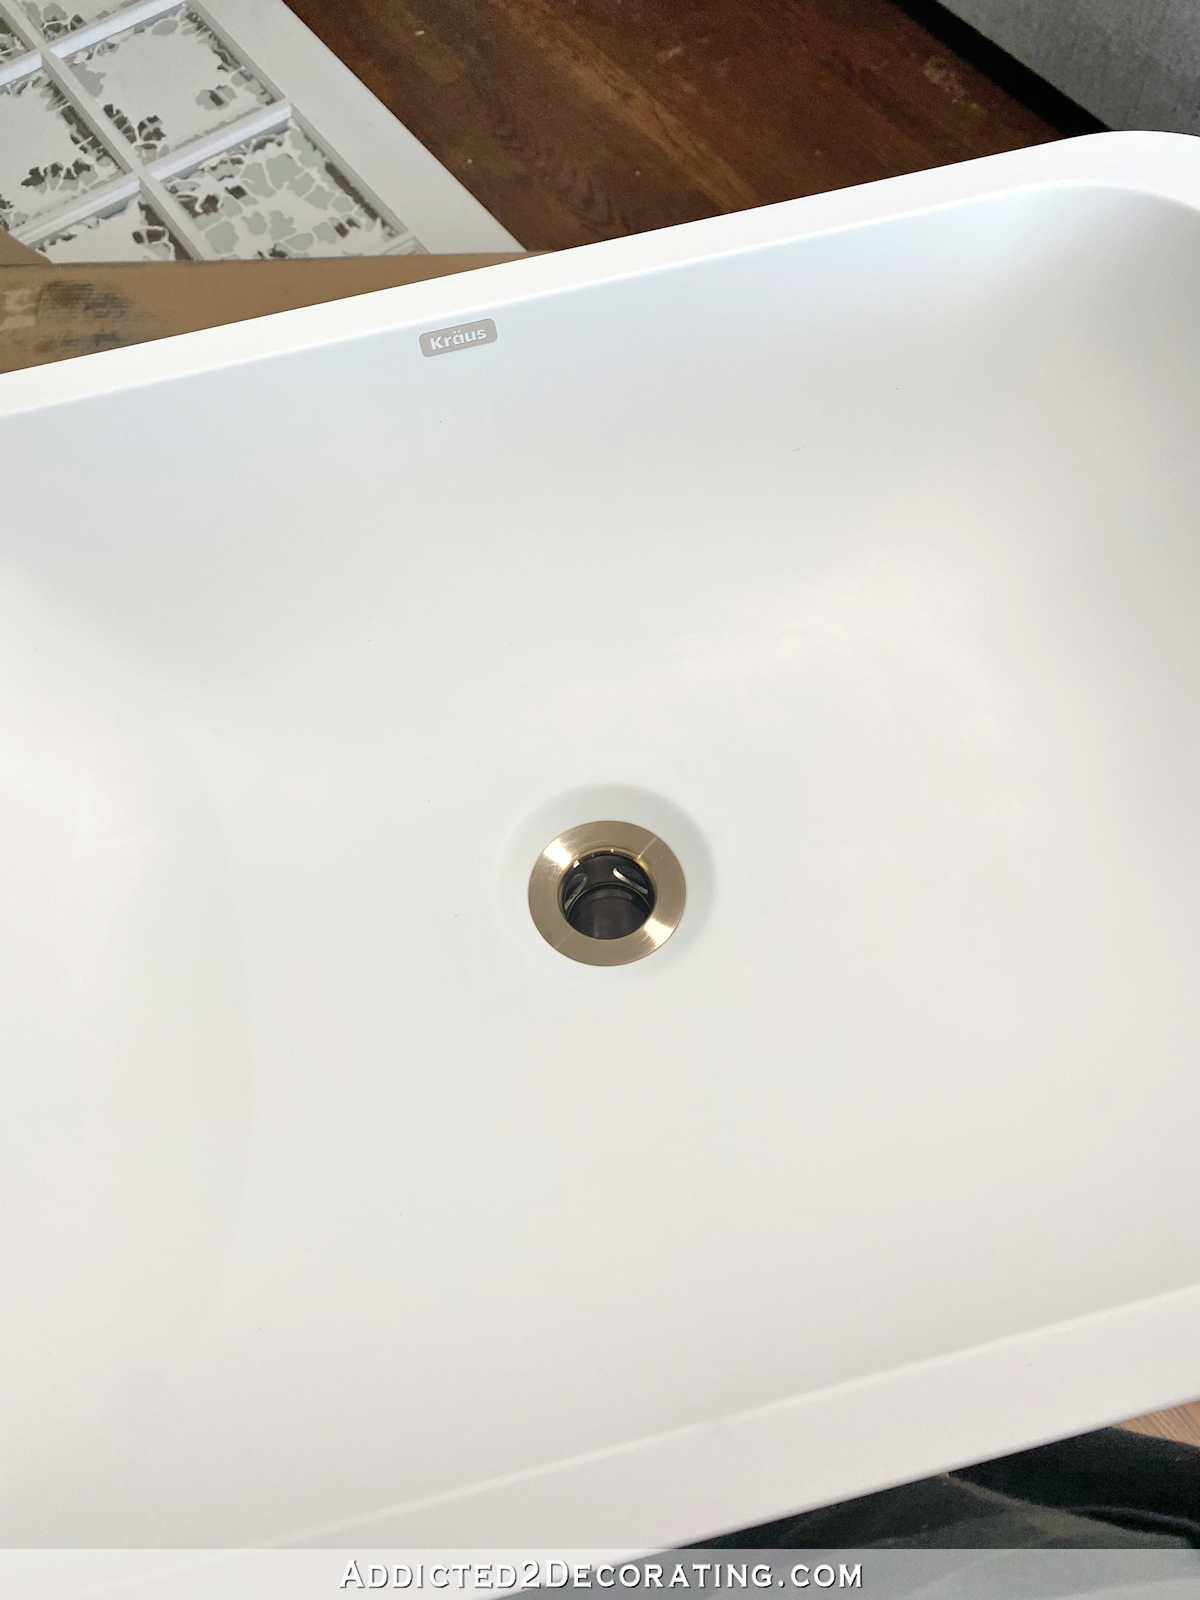
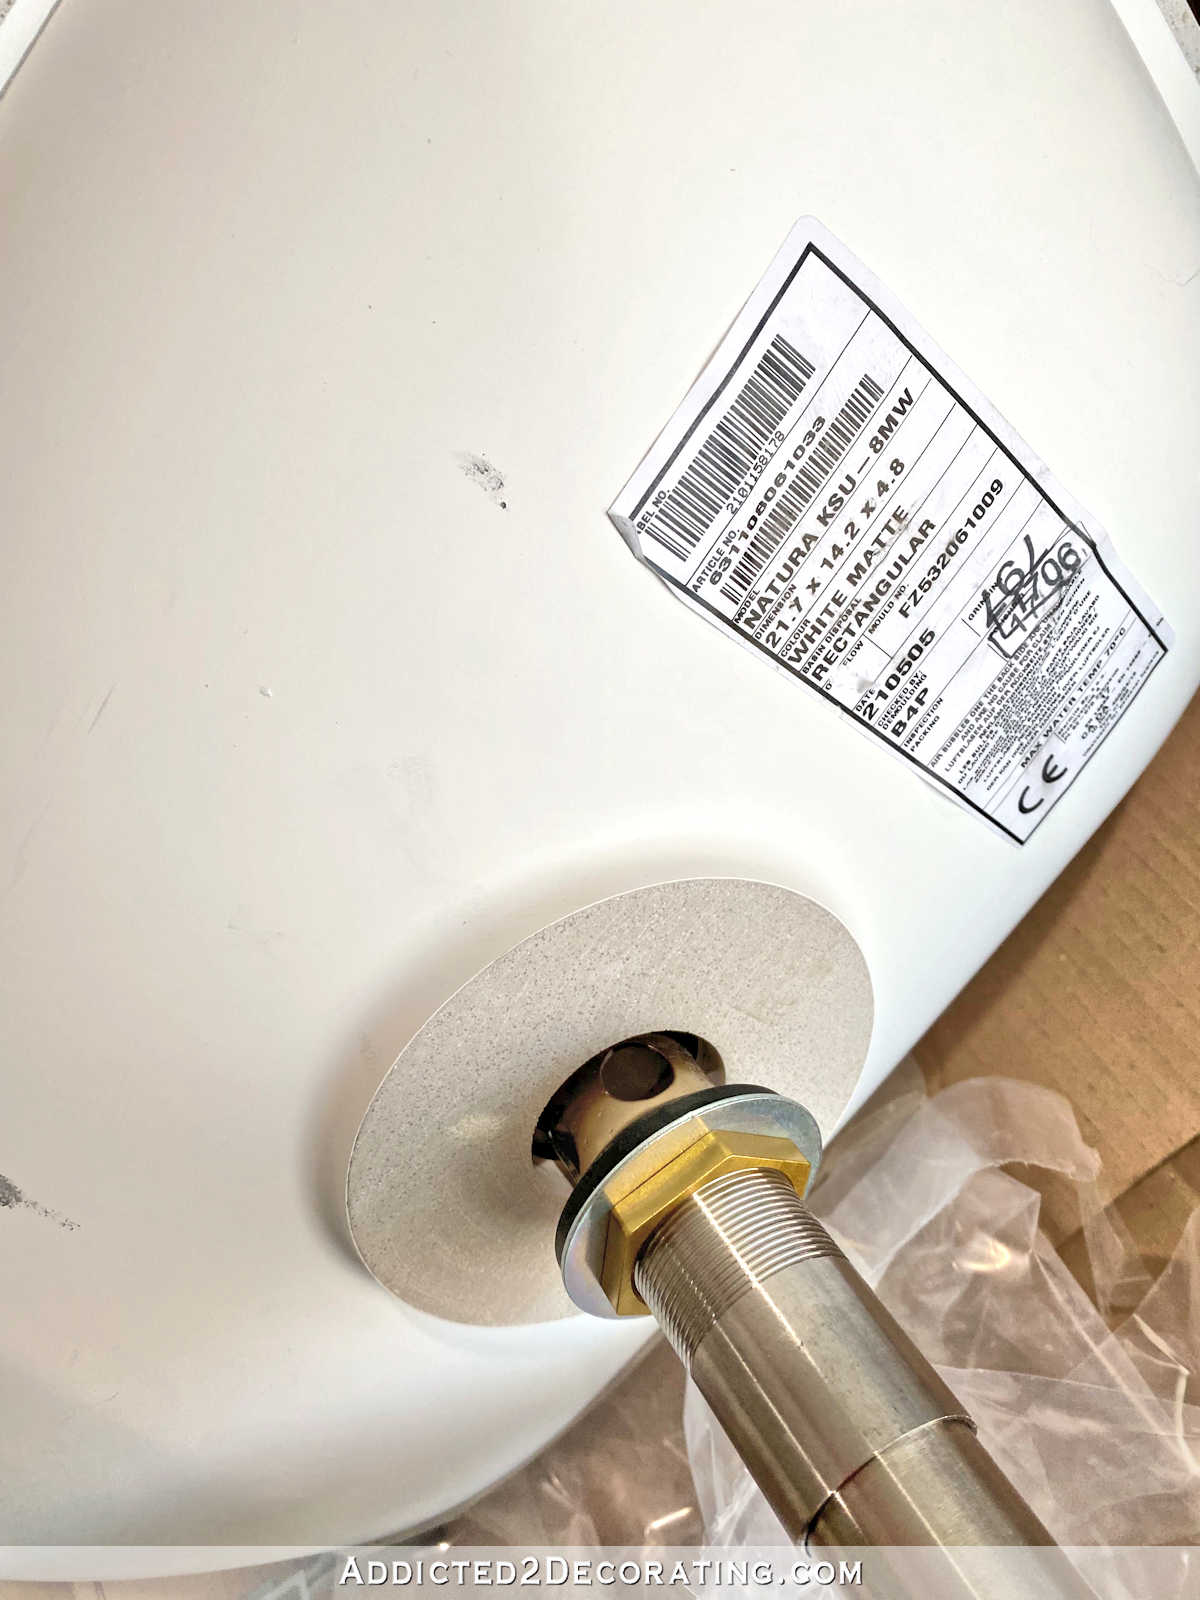
That looks fine, right? Perfectly normal. But when you look at it from underneath, you can see that even with the nut tightened all the way, there’s about a 1-inch gap between the gasket and the bottom of the sink. And there are holes there through which water would obviously flow. I don’t know much about plumbing, but I do know enough to understand that these holes would be a huge problem. 😀
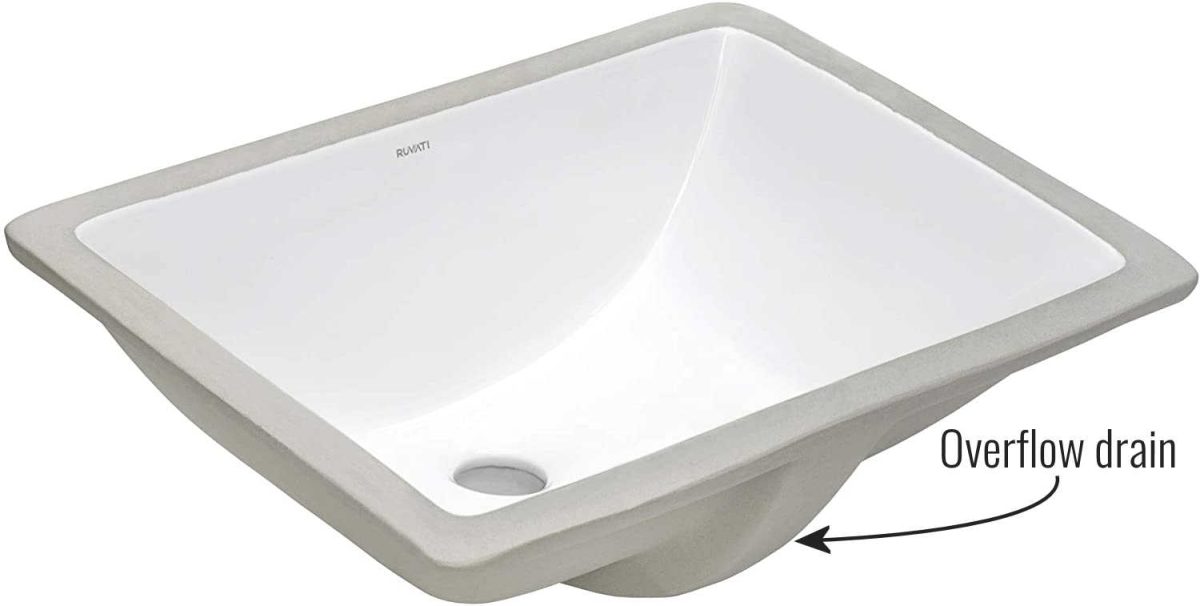
It all made sense to me then, and I had just never paid attention to these details before because, again, I avoid plumbing at all costs. But most sinks have an overflow drain that runs along the outside of the sink bowl like this…
And if you flip the sink over so that you’re looking at the bottom, you can see how that overflow drain runs right to the main drain, creating about a 1-inch space between the inside bottom of the sink bowl and the bottom of the main drain underneath the sink. That gap is where those holes in the drain reside so that water can flow through the overflow drain hole, down underneath the sink bowl, and into those holes in the drain.
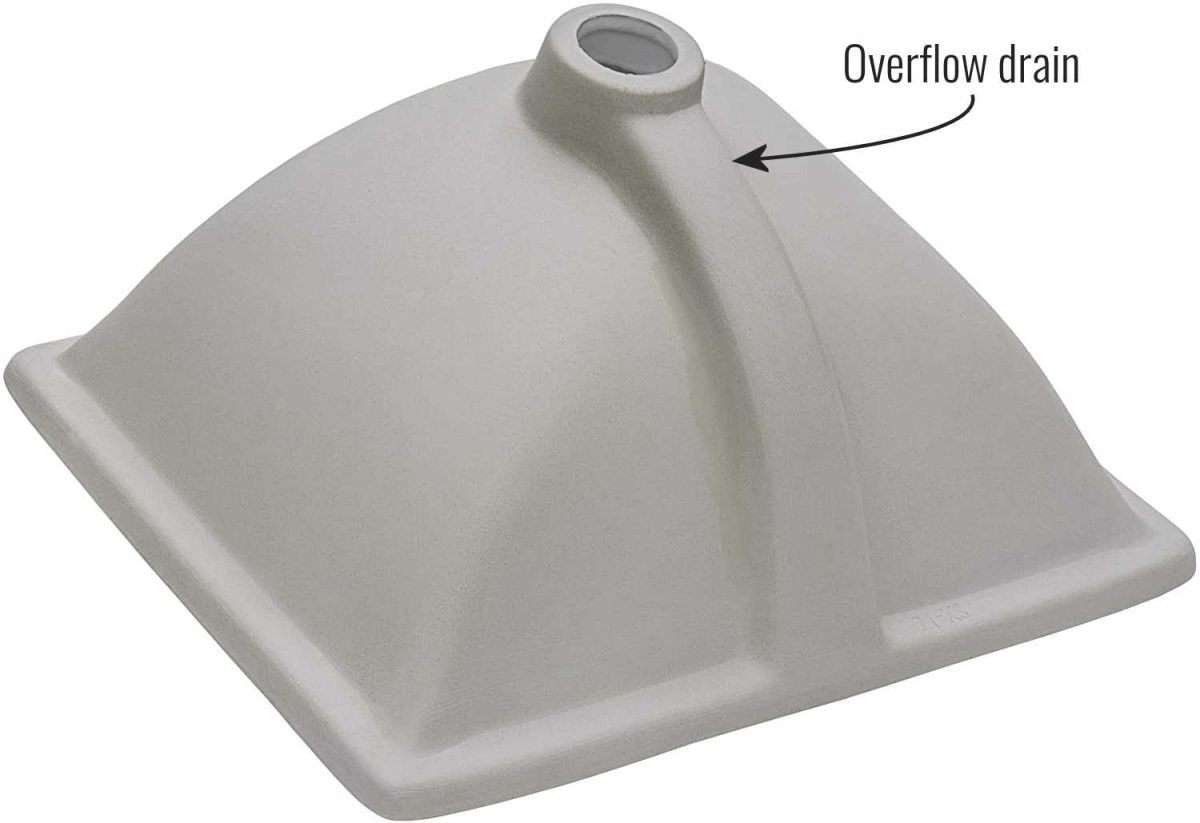
So when you have a sink that doesn’t have an overflow drain, you don’t need that extra space with the extra hole(s) in the drain. When you have a sink with an overflow drain, you need that extra space with the extra hole(s) in the drain.
I know some of you are saying, “Well, duh! How could you not know this after 30 years of DIYing, Kristi??” I know, I know. But again, that’s 30 years of DIYing anything and everything except plumbing. 😀 This has all been new to me over the last two days.
So after realizing the difference, and realizing that the drains that came with my faucets won’t work with the new sinks, I had to order new ones. Since I bought Kraus sinks, I went with Kraus popup drains in brushed gold so that I can be sure they’ll fit the sinks, and I made sure to get the ones that are for sinks with no overflow drains.
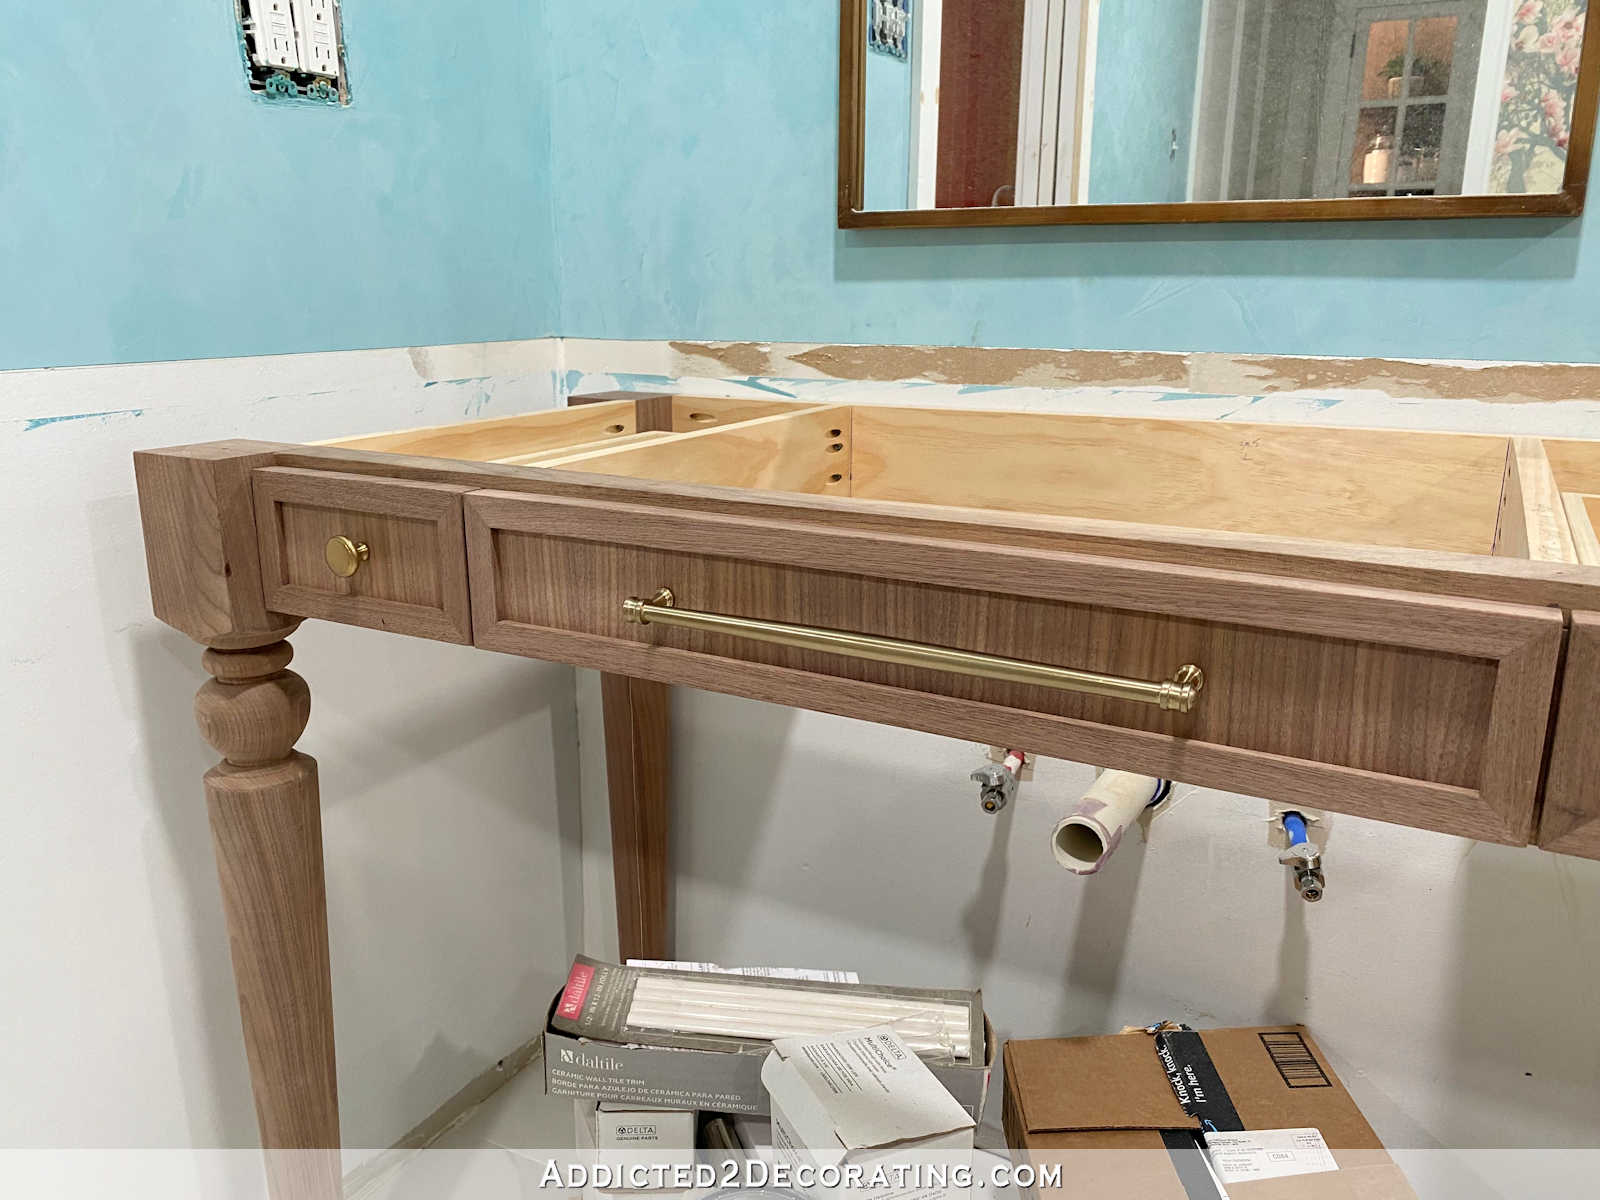
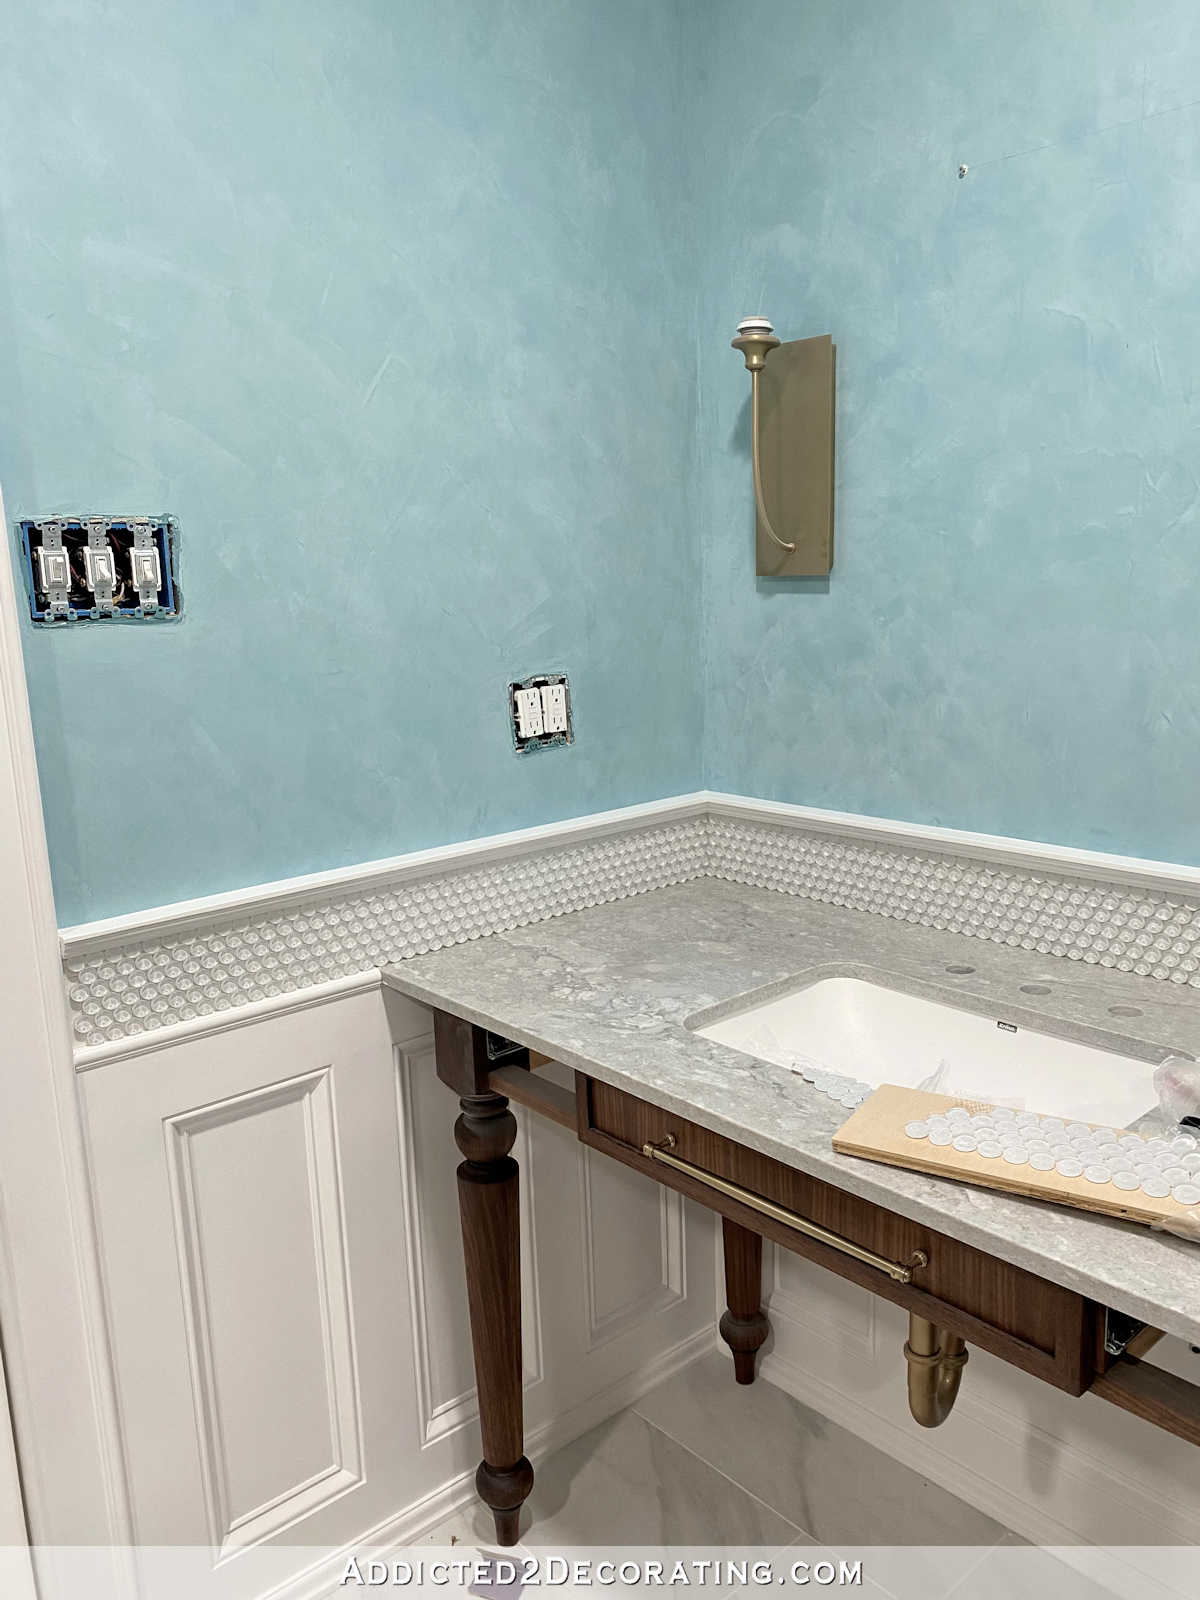
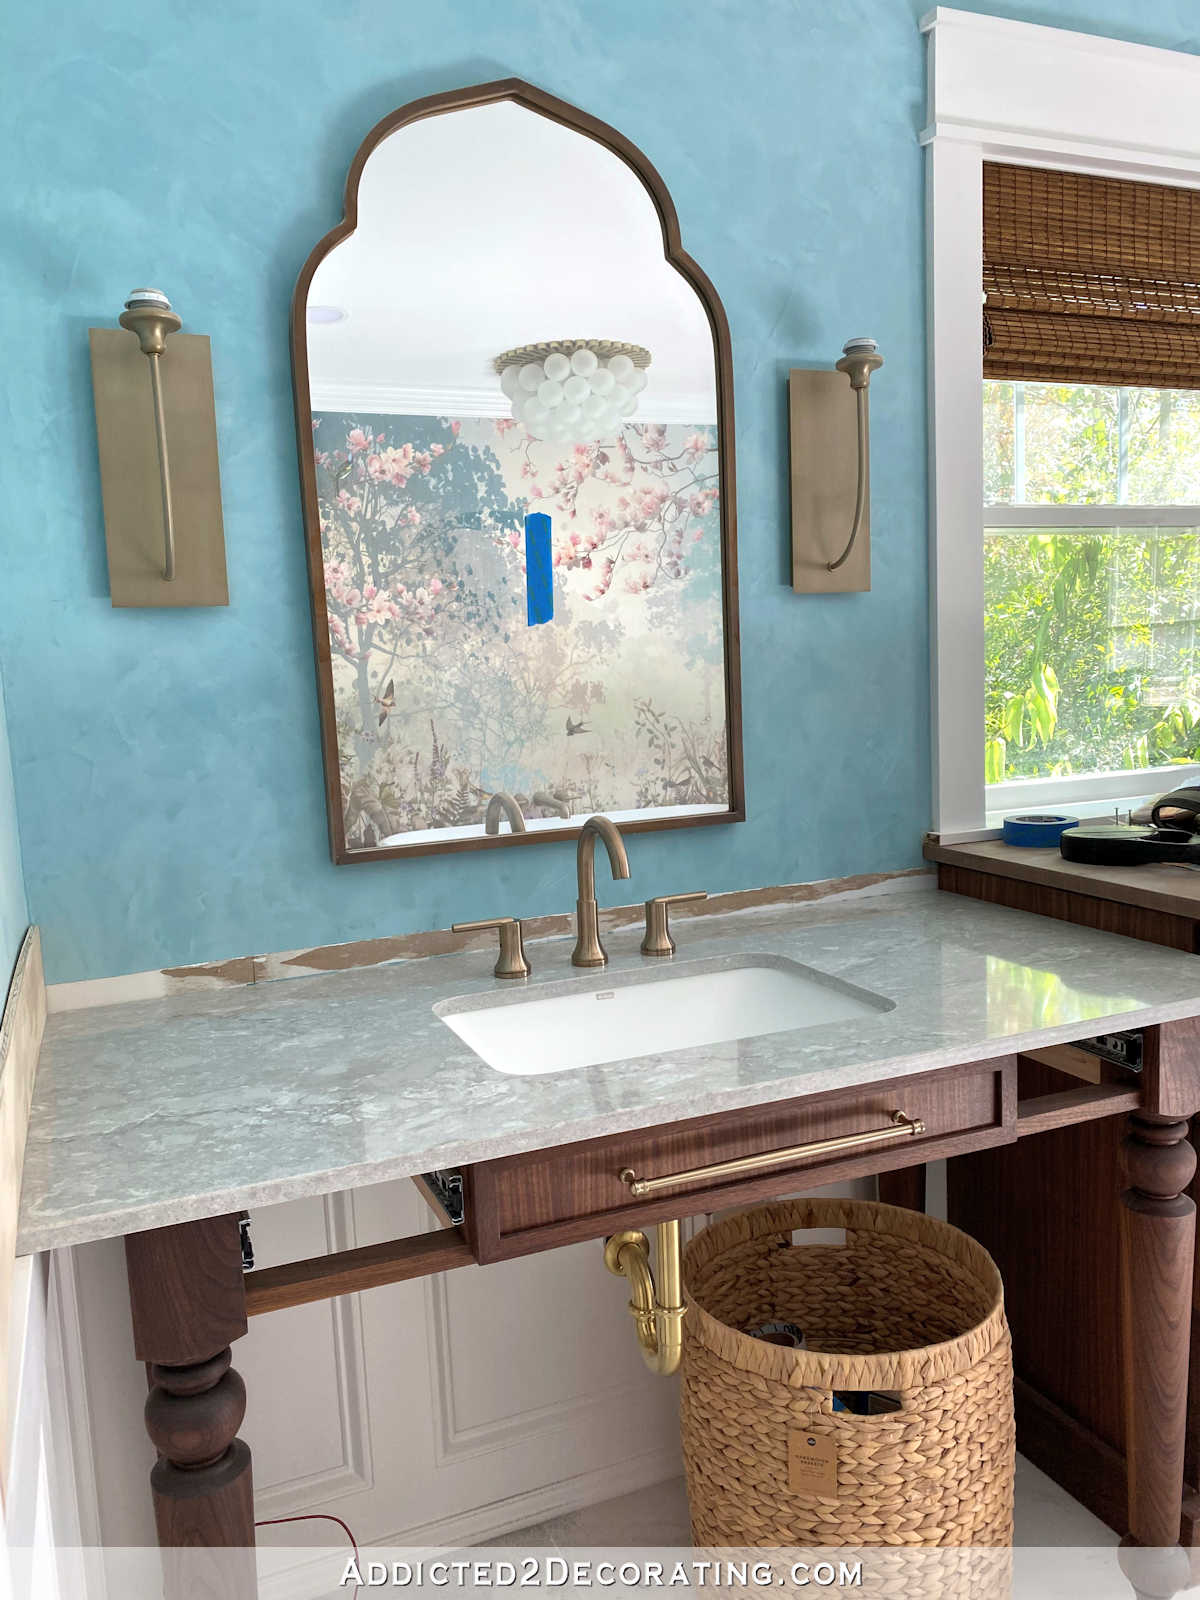
Next I had to make a decision about the plumbing underneath since it will all be visible on a table-style vanity that is open underneath.
I thought about going with this kind of bottle trap, but the more I read, the more I realized that while there are some good things about bottle traps (like how clean and minimal and modern they look), there are some drawbacks to this design as well.
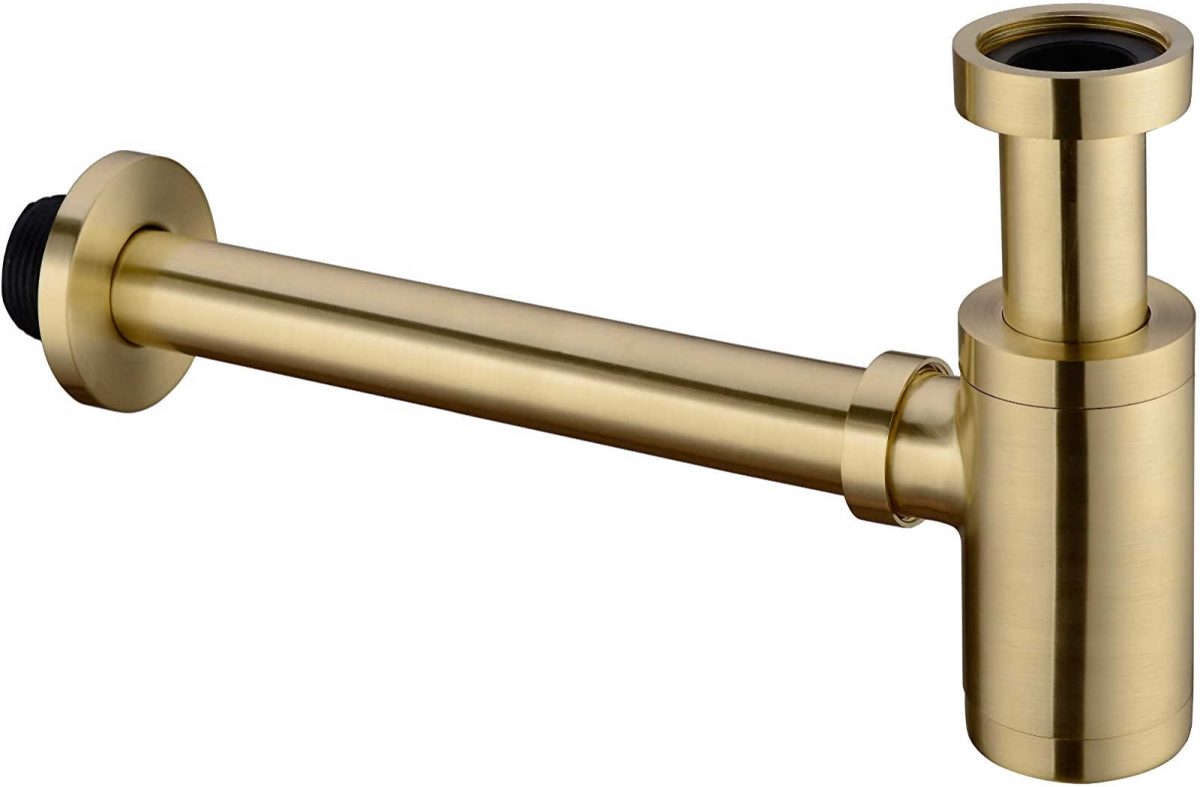
First of all, I’m completely unclear about whether these even meet building code in the U.S. I came across so many plumbing/building forums where plumbers and builders insisted that these don’t meet code in the U.S., but people still buy them because they look nice. So honestly, I have no idea.
But that wasn’t really my main issue with them. The main thing that stopped me from going with the bottle trap design is that it has fewer movable/adjustable joints in it than a regular P-trap does. You can see that the design is a very rigid 90-degree angle. So according to customer reviews, if the drain in your sink is not perfectly lined up with the pipe coming out of your wall, it’s going to be very difficult to install, it’ll be difficult to get a good seal between the two pipes, and it just looks “off” after it’s installed. It’s just a very unforgiving design, from what I read.
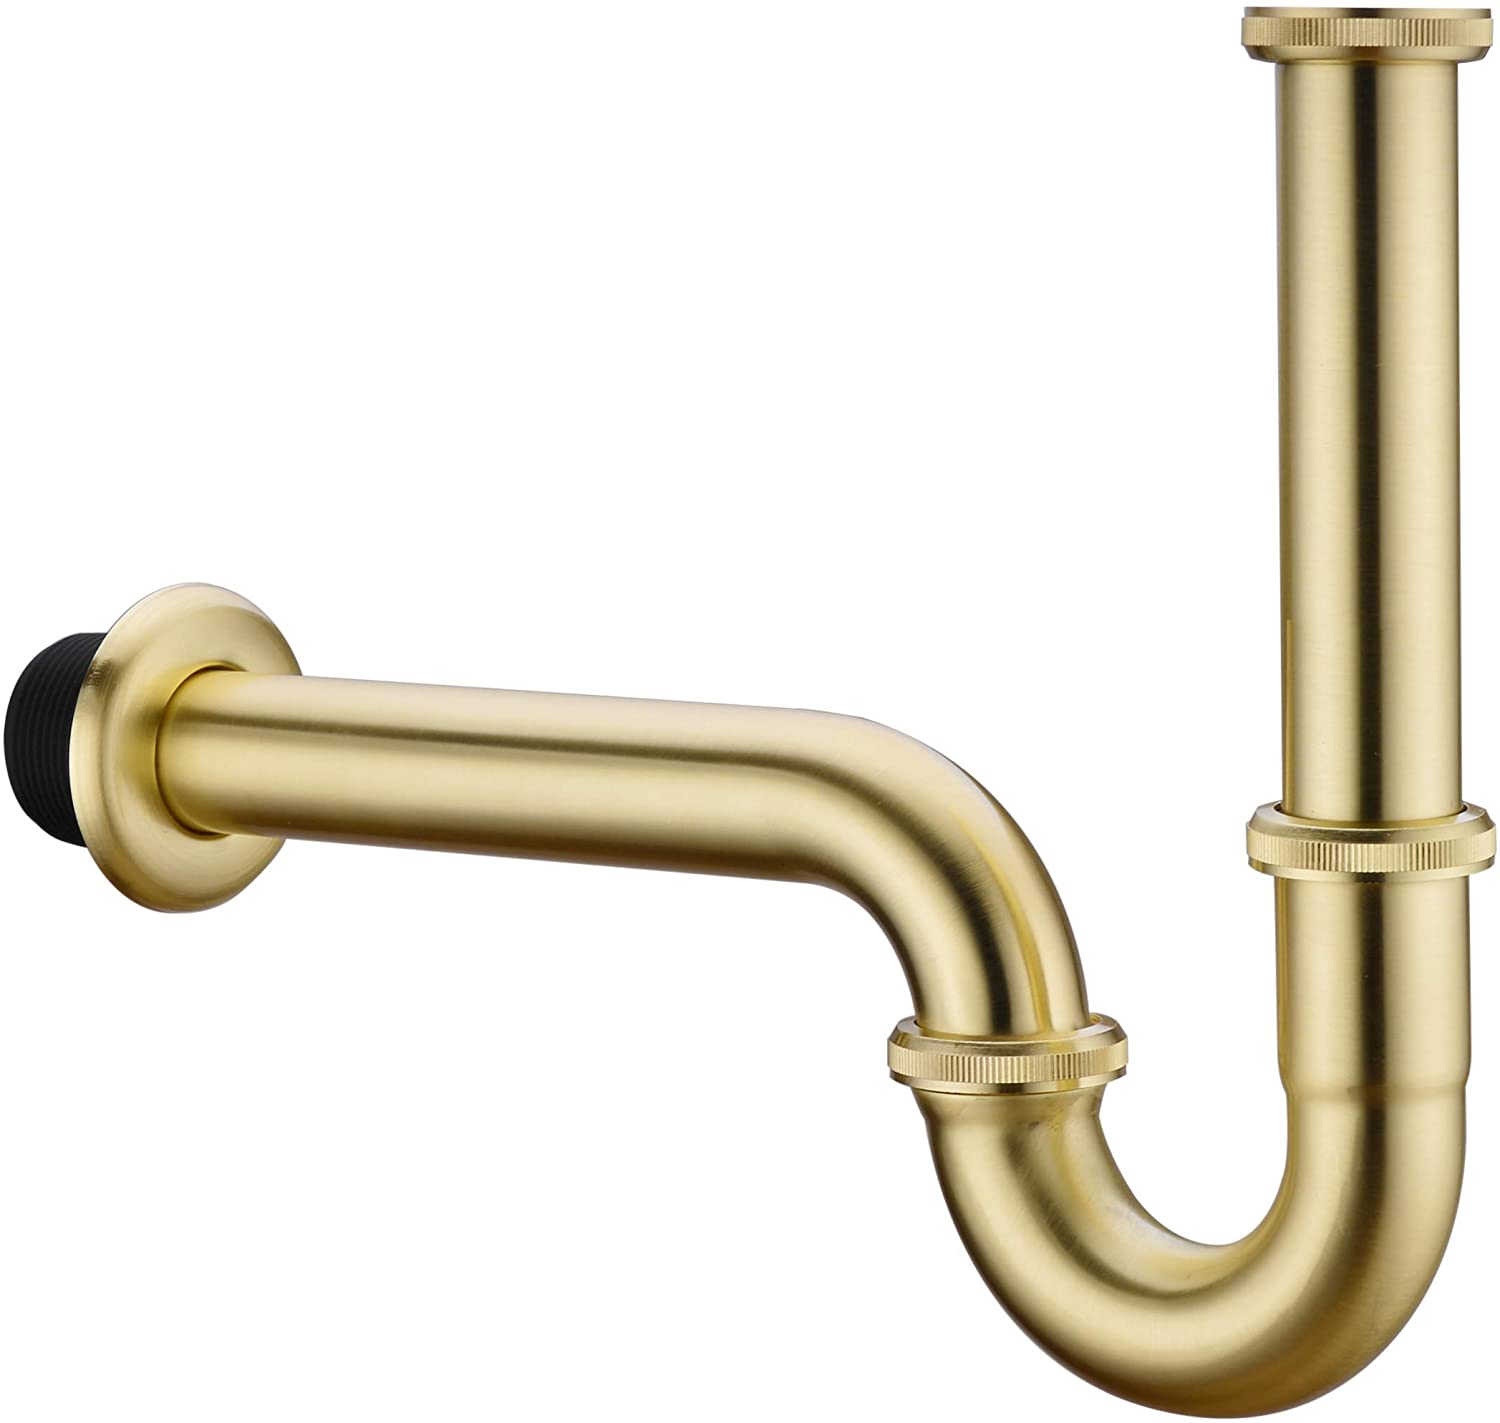
So after hours of reading and researching and considering all of the available options over the last few days, I finally decided to go with a standard P-trap design in a brushed gold finish. Since this design has more joints for more flexibility, it’s a lot easier to install if the sink drain isn’t perfectly lined up with the pipe in the wall. And I think it still looks nice.
Never in my life did I think I’d be spending so much time researching these details of bathroom vanity plumbing parts. I had no idea that the decision making process for these things would be so difficult and would keep me up at night worrying about if this thing would properly connect to that thing, or if I’d be left with a leaking mess under my sinks. It’s been a whole crash course in bathroom sink plumbing, but I think I’ve finally figured out what the heck I’m doing. 😀

Addicted 2 Decorating is where I share my DIY and decorating journey as I remodel and decorate the 1948 fixer upper that my husband, Matt, and I bought in 2013. Matt has M.S. and is unable to do physical work, so I do the majority of the work on the house by myself. You can learn more about me here.

These are things I have never thought of. But so interesting and glad I know it now! I know lots of “off the wall” things. People are constantly surprised at what I know. I smile and say “I read”.
Kristi, I know this is off topic, but when trimming out interior door frames, is a plinth at the bottom necessary, or does it look wrong without them? Thank you
I never use plinth blocks on my door trim. It really depends on what types of trim you’re using and whether it will look strange for your baseboards to butt up against the door facing. For example, if you’re using a 1″ lumber (like a 1″ x 5″) as baseboards, but you’re using a trim on the door facing that is thinner than the 1″ lumber baseboards, then it will look strange for them to butt up against each other. So it would be preferable to use a plinth block at the bottom.
I only ever use 1″ lumber (specifically 1 x 4’s) to trim my doors, so whether I use 1″ lumber or a more detailed baseboard (which are always thinner than 1″ lumber) they look fine butted up against each other, so a plinth isn’t necessary.
Of course, some people just really like the look of a plinth block as an added detail, so they’ll use them whether they’re needed or not. And that’s perfectly fine, too. But the main thing is just to see how the two trims (door facing and baseboards) work butted up against each other. If they don’t work together and don’t look right, then use a plinth.
Good afternoon,
Have you attended classes/courses to be able to accomplish all you have completed? Or, have you taught yourself by researching the internet?
I’ve never attended classes/courses. I’m mostly self-taught. But over the years, I have had individual people teach me things, like my brother-in-law, who taught me the basics of wiring a room. I always expand my knowledge with extra reading and research on my own, though.
Wow, who knew 🤷♀️ Not me either, but very interesting and does make perfect sense.
Just wondering…what did you find out with the suggestion about Ikea plumbing? Was that something that would work with your sink/vanity set up? I think it said it wouldn’t show as much? Thanks for the lesson…I had no idea either, and I usually do the ordering of parts.
My husband is like you…electric…no problem….plumbing, always a problem!
I looked into the IKEA one, and also found another one that was very similar to it with the brand name Duravit. The issue I couldn’t figure out was what kind of drain works with those. All the bathroom sink drains that I found were a minimum of 8 inches long, so I couldn’t figure out how that IKEA p-trap attaches so closely to the sink. I know it must be a special drain, but I couldn’t find any info on it. In the end, I decided that I didn’t want plastic pipes showing anyway, so I went with the brushed gold metal p-trap.
One of the things that I recently realized after talking to my daughter who lived in Germany a couple times, is that the German appliances and other stuff for the home may not fit properly in American homes. They have kitchens that go with them when they move. Many other places in the world do the same thing. Not us, we anchor those kitchens in and it takes dynamite to move them. This is why my Bosch DW doesn’t fit in my kitchen. It is 2″ shorter front to back than American made DW. FYI, Bosch DWs have slanted tines in the bottom! Just try to put a pitcher or vase in it!
Glad you got the pipes you needed to plumb everything! Going to be gorgeous!
As always, very interesting and informative! Thank you for sharing!
I enjoyed your blog very much today. Very interesting to me.
2 wks ago i thought i would change the dated faucets in my bathroom. All pix looked easy enough. So when faucets arrived I undid my old plumbing and proceeded to carry on. Whoa Surprise!!!! not so simple. Shut off valve stuck and wouldn’t turn off, they use quick connect and I didn’t have that in my plumbing arrangement. Ugh, so many trips to Home Depot I should get a job there. Long story short, I had to update my underneath plumbing and become YOUTUBES newest student
Bottle traps are not approved because they rely on an internal partition for the water seal that prevents the sewer gases from entering the property.
Pro tip— just because an item is available at a big box store, doesn’t mean that it is legal or approved for installation.
It sounds very much like the Hepvo valve used in many RVs in place of the p-trap.
This is useful to know! Thanks for sharing.