C.O.P. – DIY Pan and Skillet Organizer
This weekend I got one more C.O.P. (cleaning, organizing, purging) project done in my kitchen. This one didn’t require any purging or cleaning, but I definitely needed some organization in the cabinet to the right of my stove where I keep my skillets and lids. After looking at ready-made, store-bought options for skillet and pan organization, I finally decided to make a DIY pan organizer. Here’s how my organized cabinet turned out…
While I love a good pull-out organizer, I decided to keep the design of this DIY pan organizer very simple. After all, only have four skillets and two lids that I store in this cabinet (my pots and pans and the lids that fit those are in the cabinet to the left of the stove), so I didn’t need anything elaborate in this cabinet. I just didn’t want them stacked anymore.
So let me back up and show you what I started out with and how I made this DIY pan organizer.
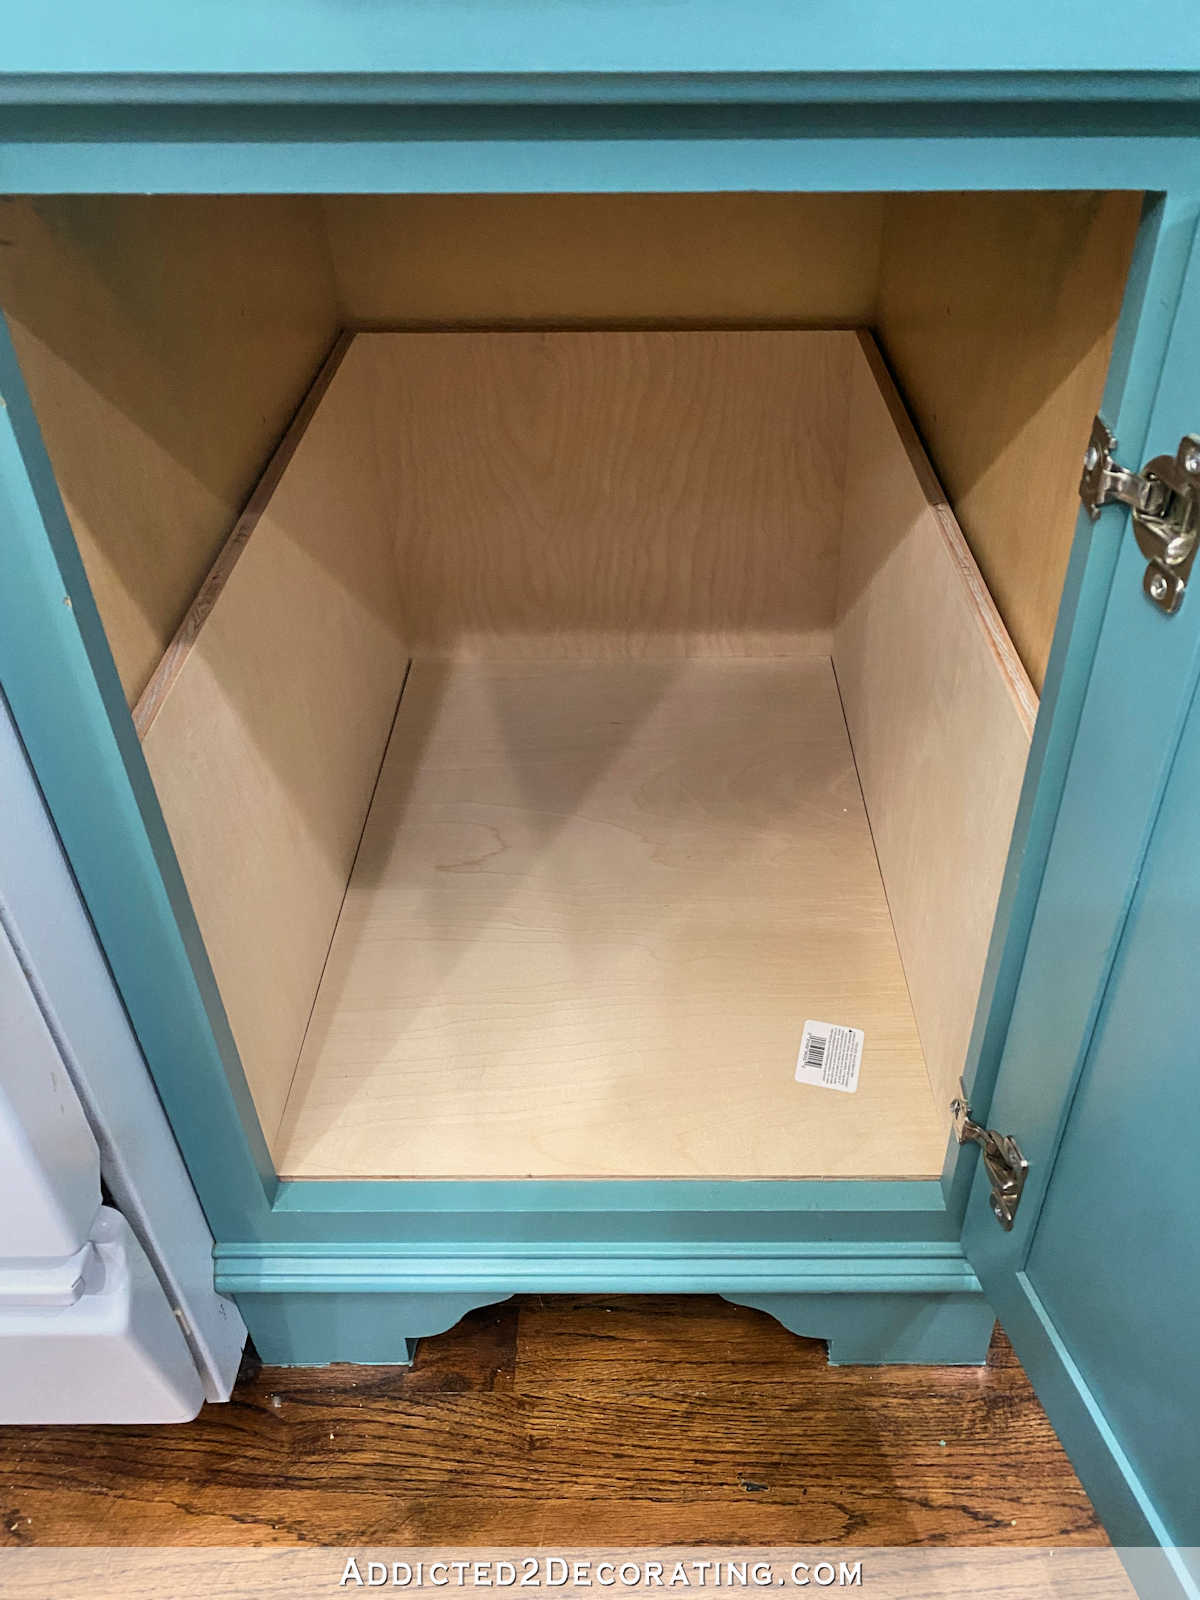
First, here’s a look at what I started out with…
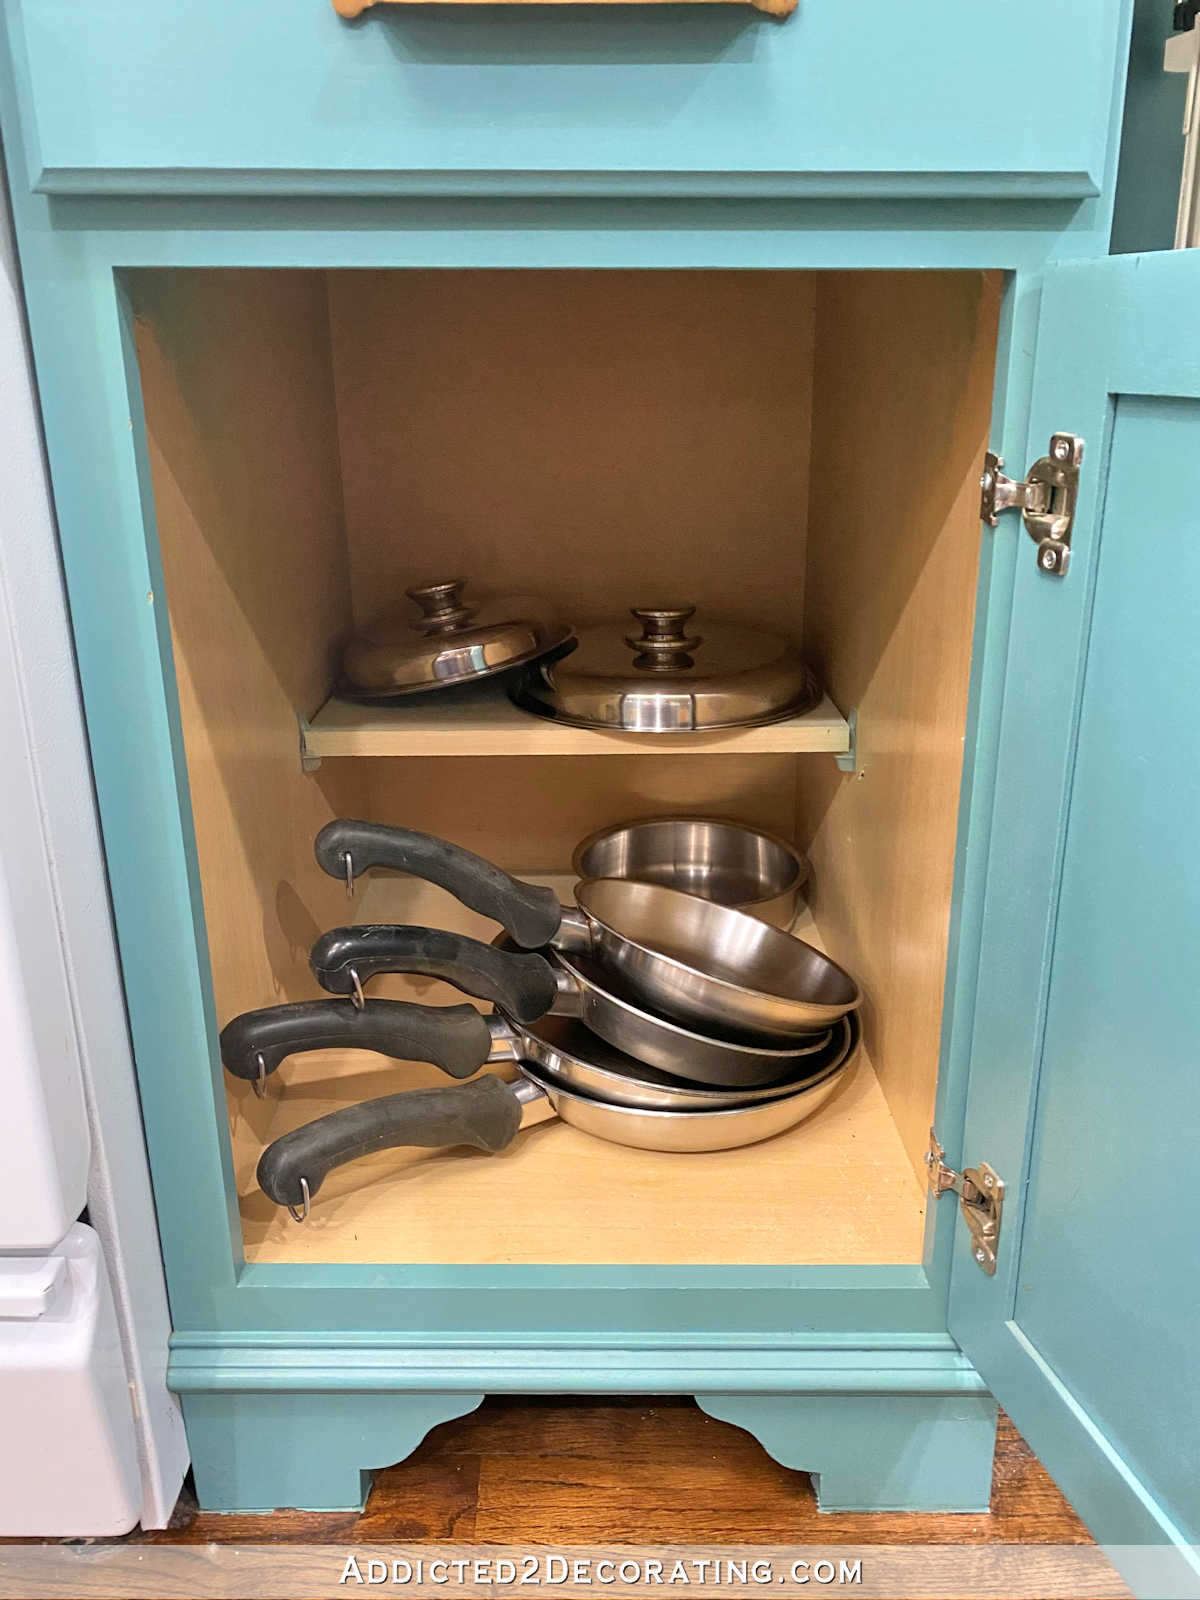
Again, it wasn’t horrible. In fact, of all of the cabinets and drawers before their organizational makeovers, this one is probably the neatest. But I still hated having the skillets stacked like that. I wanted to be able to reach in and grab exactly what I needed without having to shuffle things around.
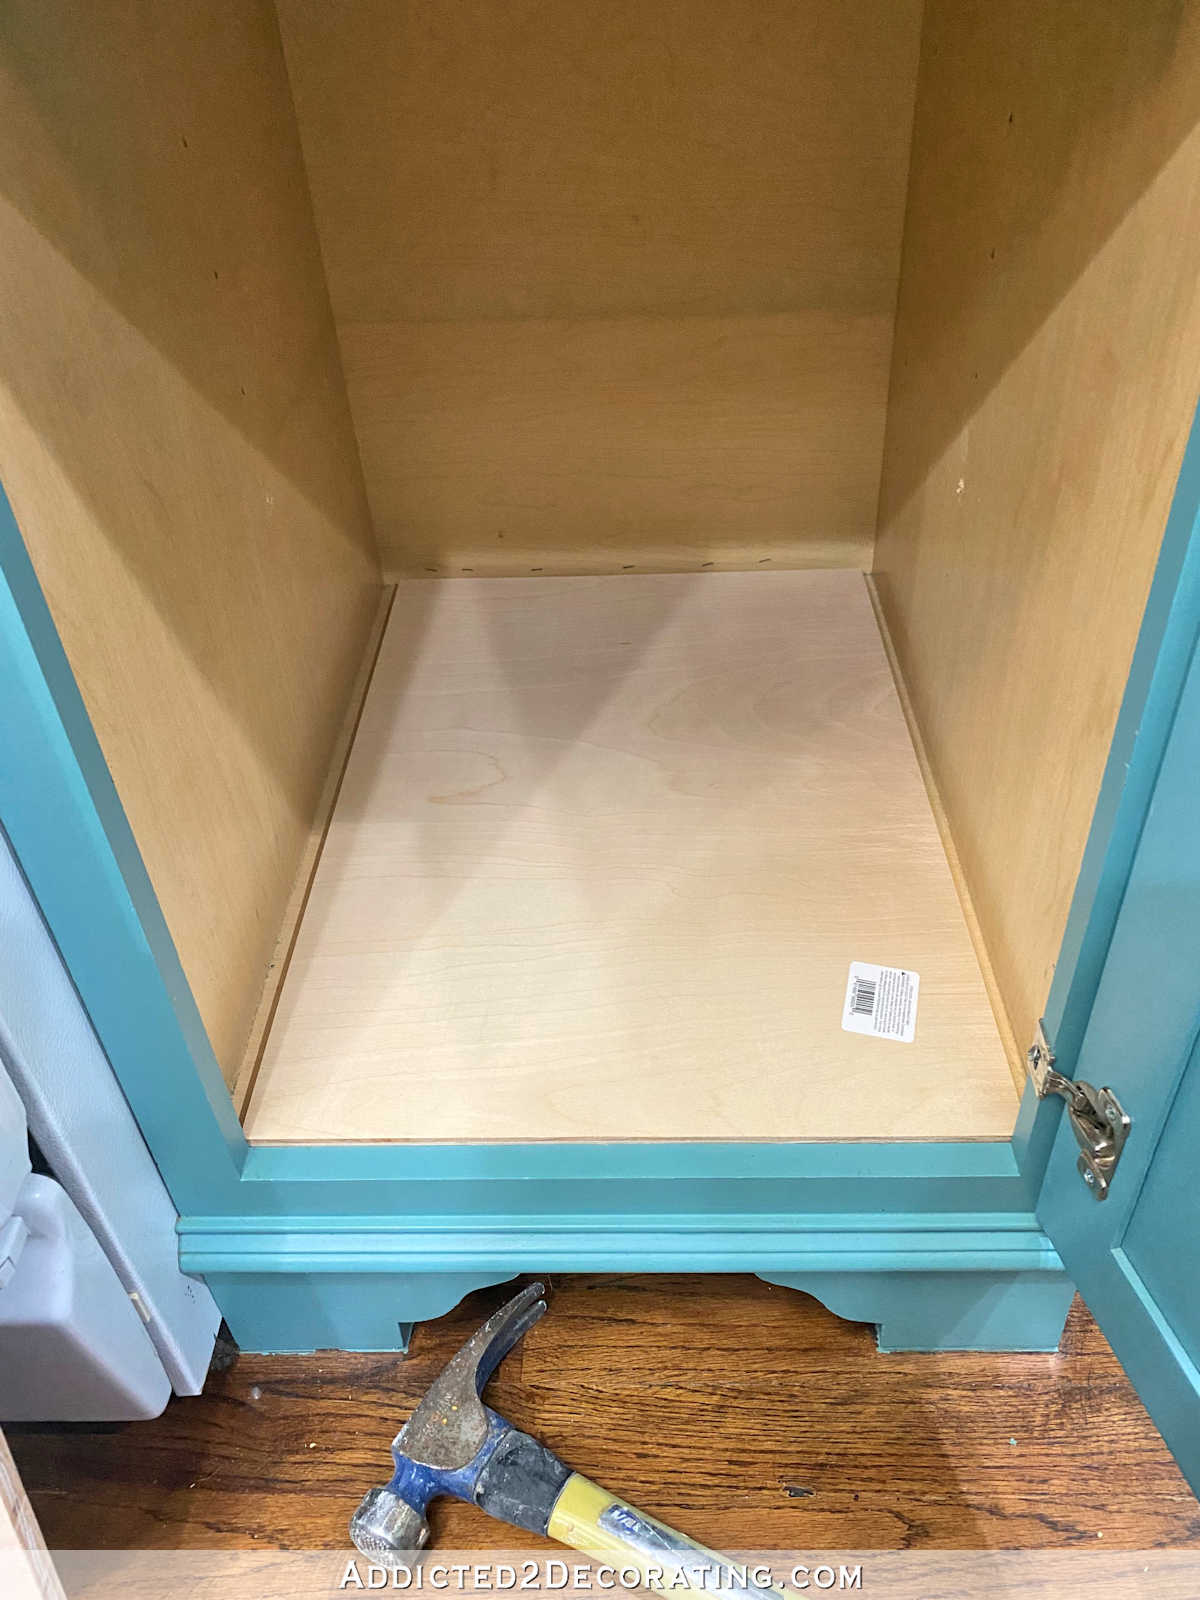
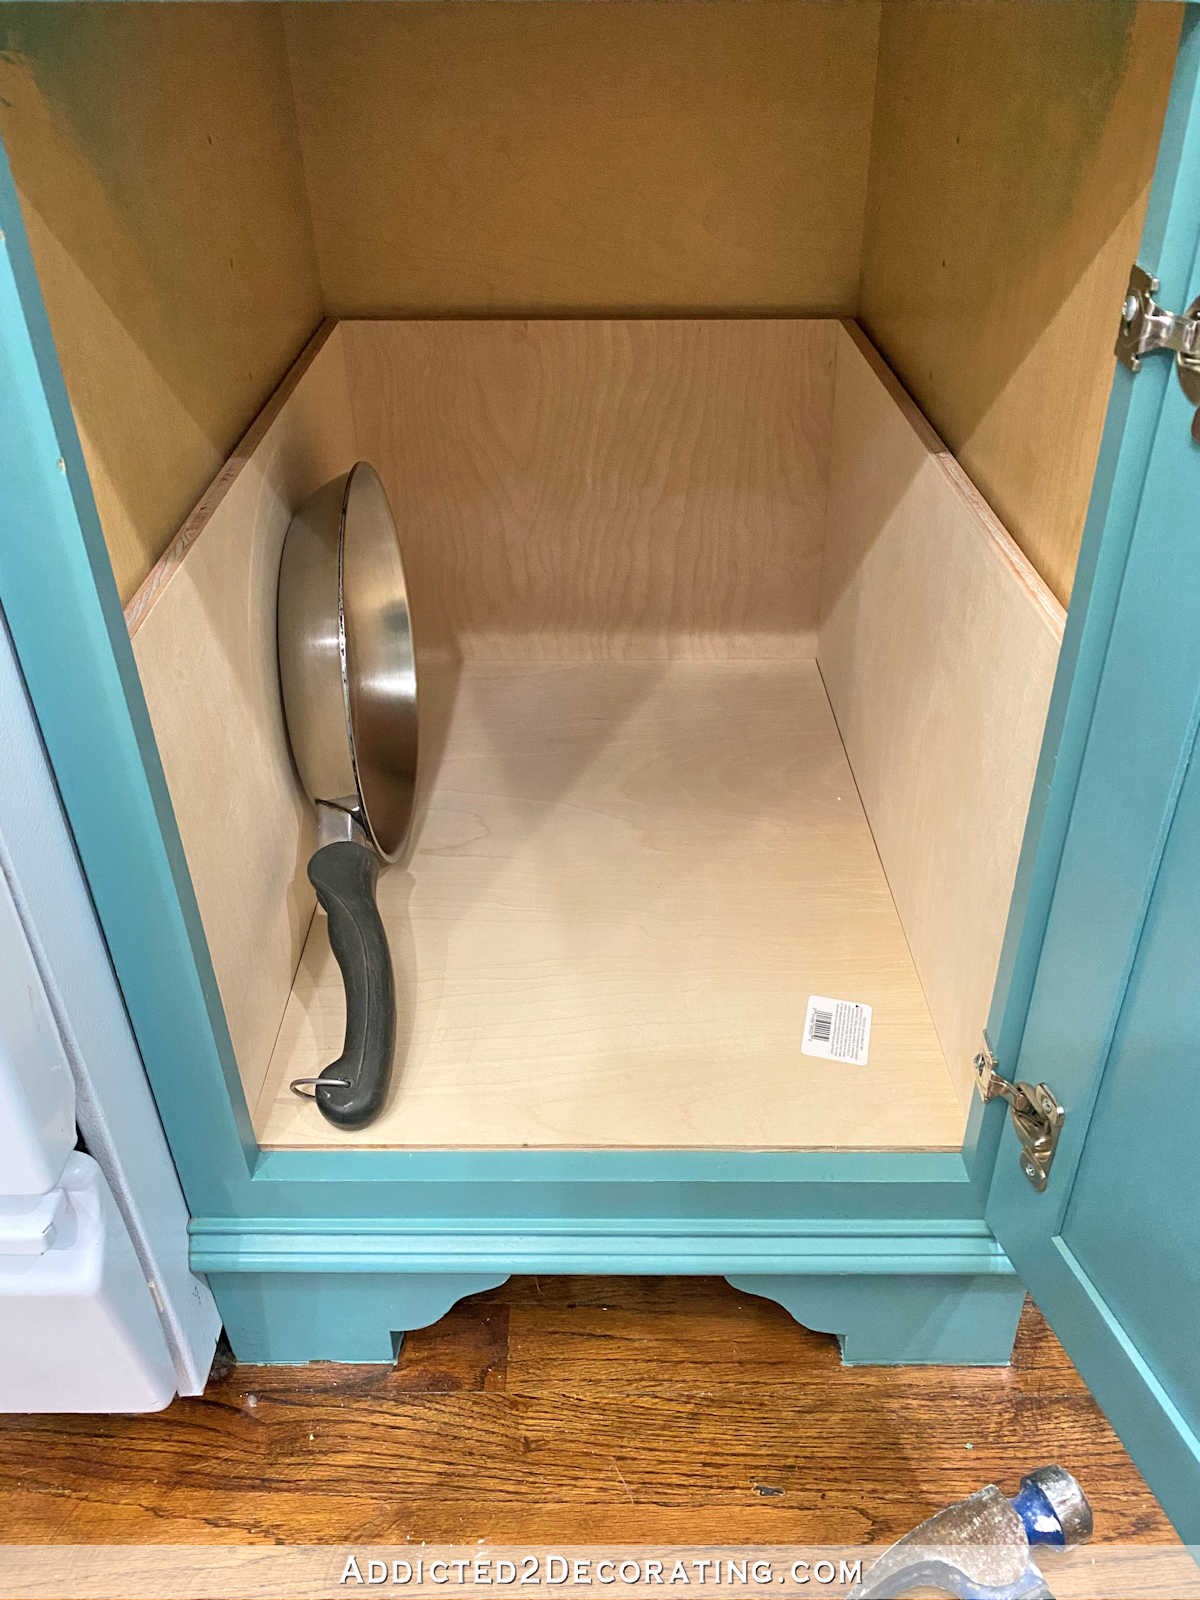
So after emptying out the cabinet and taking measurements of the inside, I then used my table saw to cut a piece of 1/2-inch plywood to fit into the bottom of the cabinet, leaving a 1/2-inch space on both sides and the back.
Next, I cut a piece of plywood to fit the width of the back that was 12 inches high (I measured the width of my widest skillet and added a couple of inches).
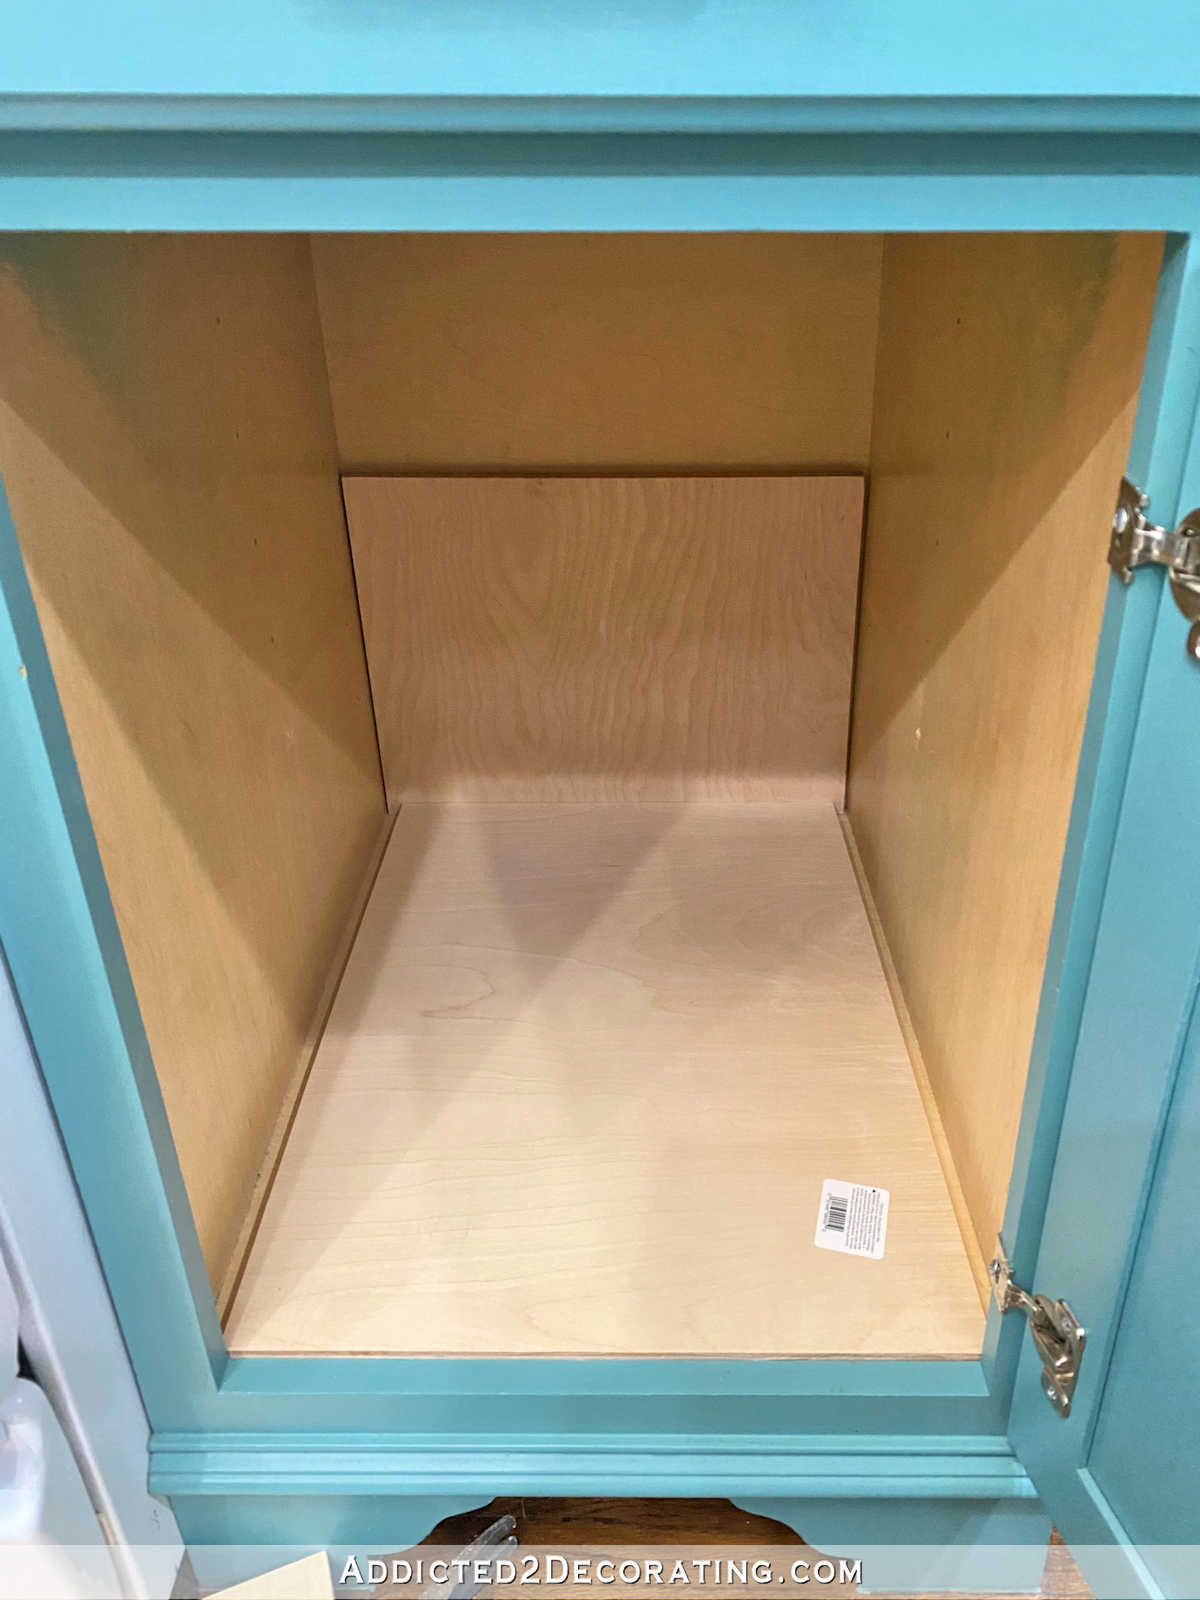
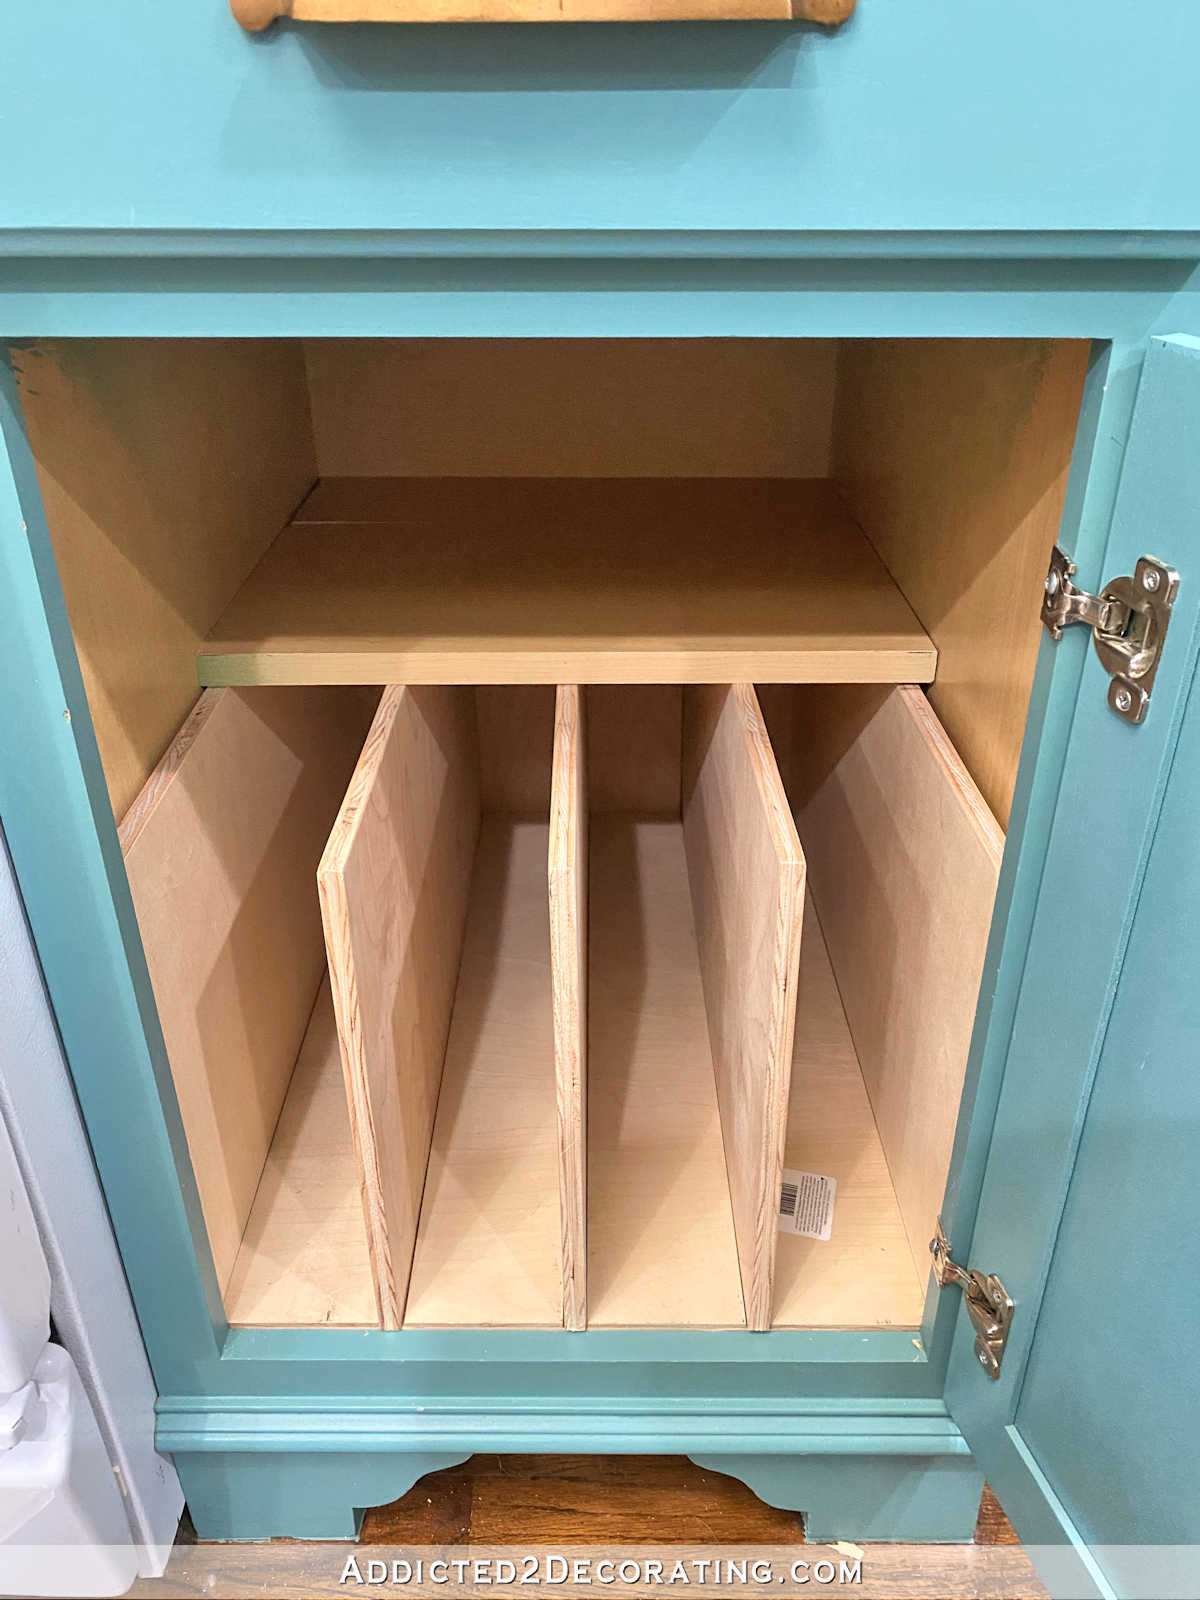
And then I cut two pieces for the sides that were also 12 inches high. After fitting all of those pieces into the cabinet, it looked like this. At this point, I was just dry fitting the pieces of my DIY pan organizer, so none of these pieces were actually attached to anything.
Next I determined how much space would be needed for each skillet. I decided to just create four spaces of equal width for my four skillets. I probably could have made five spaces, but since these skillets are the only thing that I store in here, and I’ve had the same cookware for 19 years, I didn’t see a need for an additional space.
So after measuring and marking where the dividers needed to go, I took the bottom piece and the back piece to my table saw and cut dadoes into those pieces, which are basically channels into which the dividers (also cut out of 1/2-inch plywood) will sit.
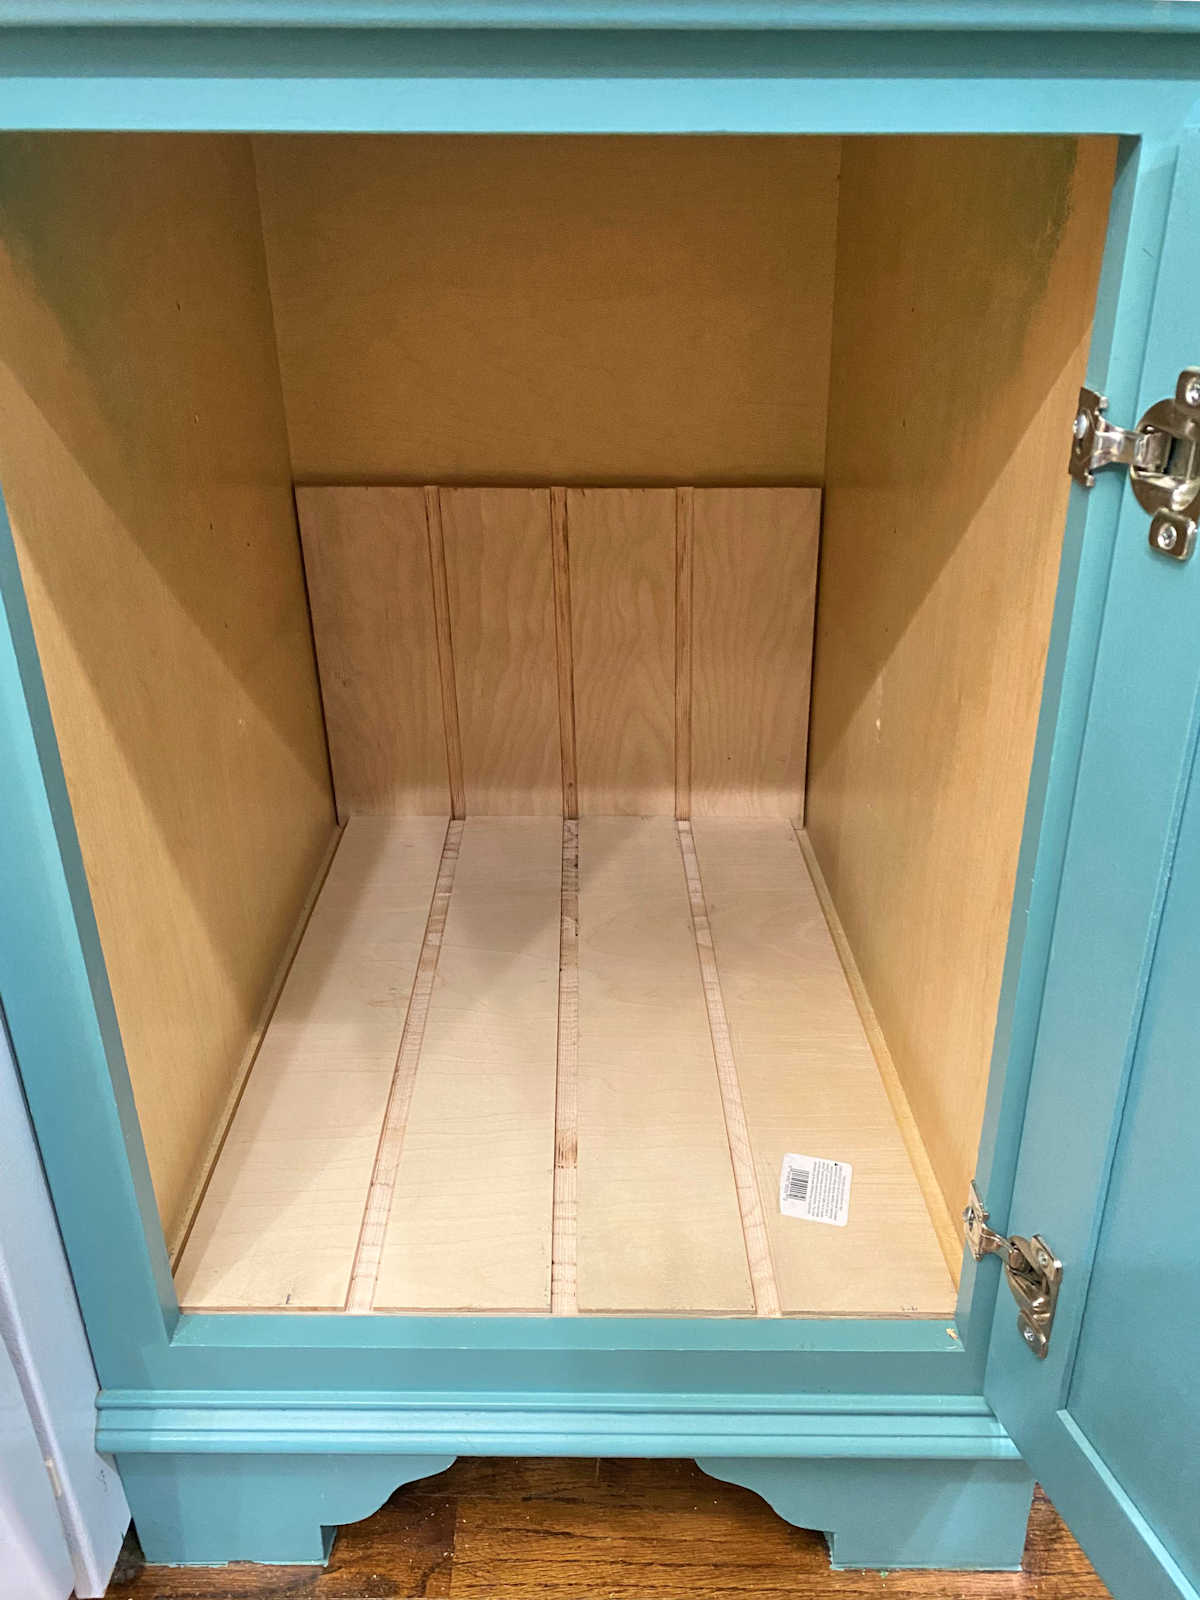
Cutting dadoes does not require any fancy attachments on your table saw. While you can buy dado blades that will cut a wide channel in one pass, I don’t cut dadoes enough to spend money on those. Instead, I simply marked where I want my dado (channel) to go (mine needed to be 1/2-inch wide to accommodate the 1/2-inch plywood separators), and then set my table saw so that the blade was sticking up 1/4 inch. And then I made several passes over the blade, moving the fence of the saw over about 1/8-inch minus a hair with each pass, until I’ve created the 1/2-inch channel needed. Each channel required about 6 passes over the table saw blade.
If you do not own a table saw, there are two other alternatives:
- You can use a router with a straight bit to cut the channels, or
- If you don’t have either of those tools, you can use square dowel rods and glue them to the surface of the bottom and back pieces of plywood in order to create the channels into which the divider pieces of plywood can sit.
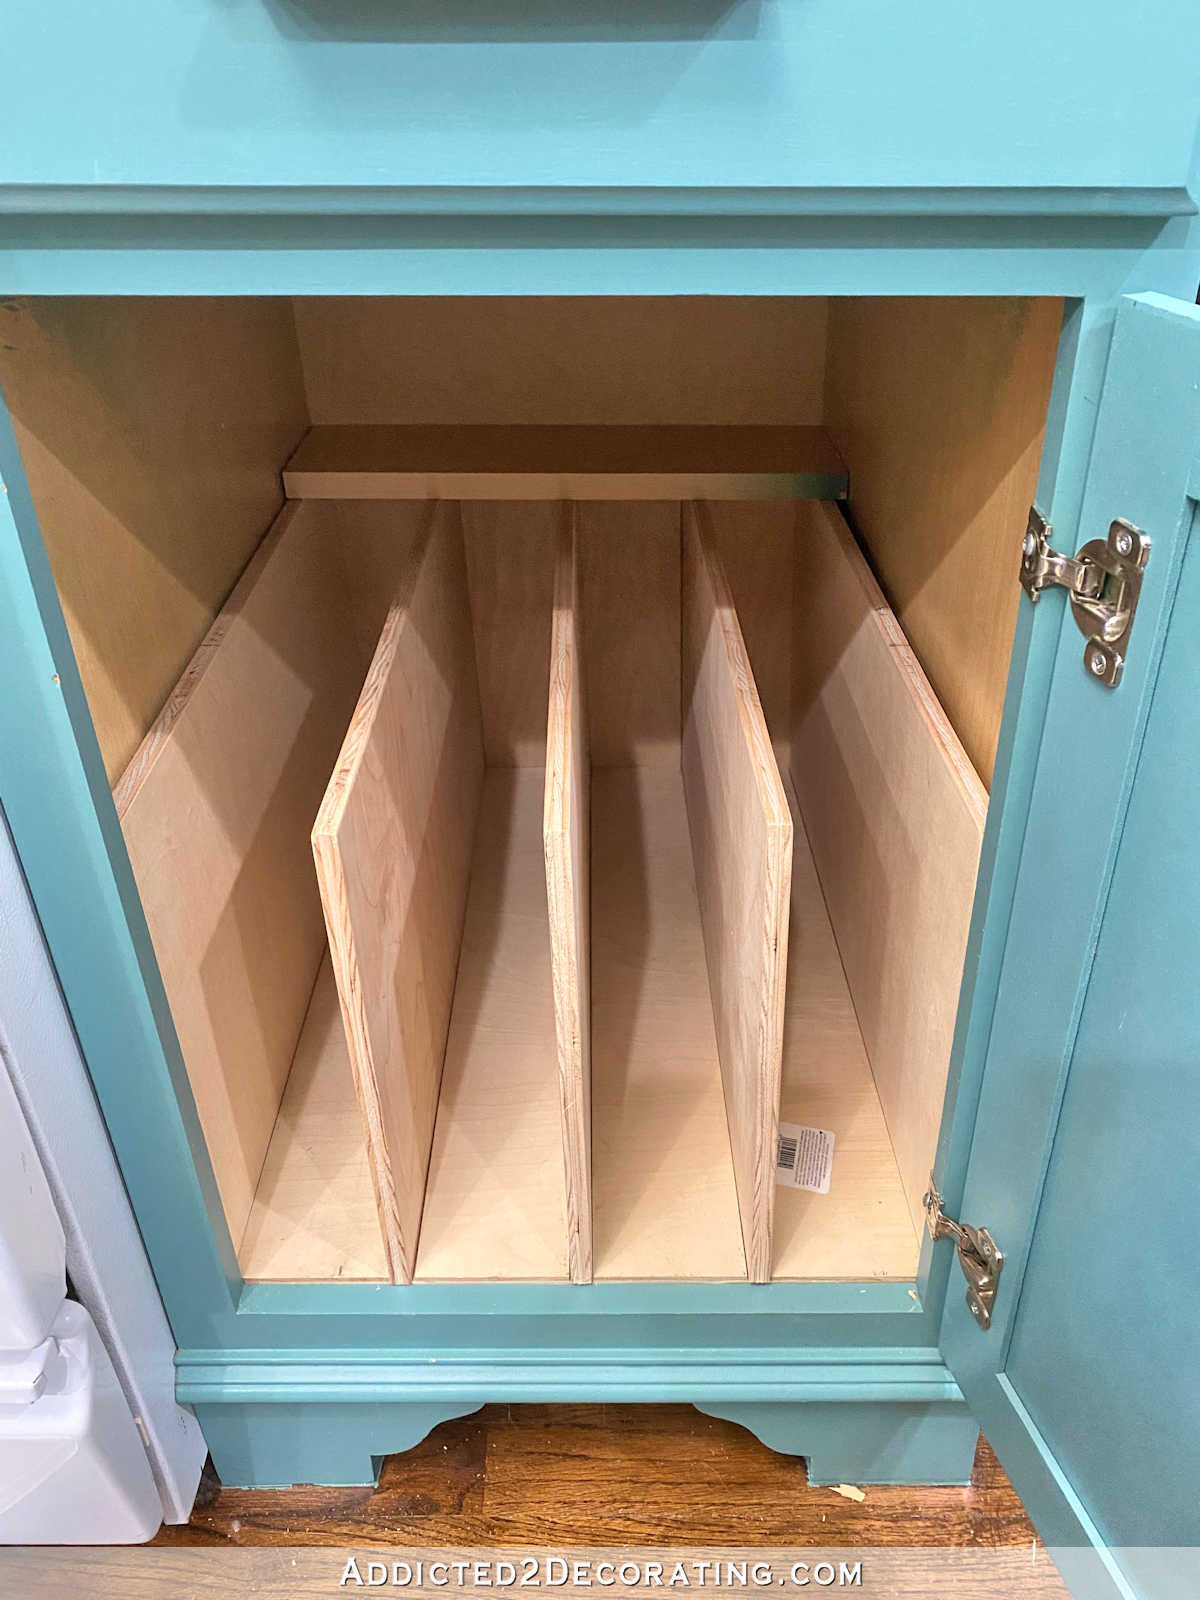
Once the bottom and back pieces were lined up in the cabinet, I placed the side pieces back in the cabinet, and then cut the dividers that fit inside the channels I had just cut. It took me a couple of tries to get the height of the dividers just right, but I placed a piece of lumber cut to width and placed on top in the back to help me determine when everything was the same height. Since it was very hard (impossible, really) to reach back there and take accurate measurements, I simply took those three dividers to the table saw and cut about a blade width off each time until they were the perfect height.
I wanted to keep the top shelf that was originally in the cabinet, but I wanted it to be deeper. So I used two extra shelves that I had from the back wall of cabinets (those shelves are all being replaced with 3/4-inch plywood so they’ll all match), and I cut them so that that the shelf sits about 6 inches closer to the front of the cabinet than it did originally. Then I marked where the edge of that shelf ended on the edges of the side pieces and the divider pieces.
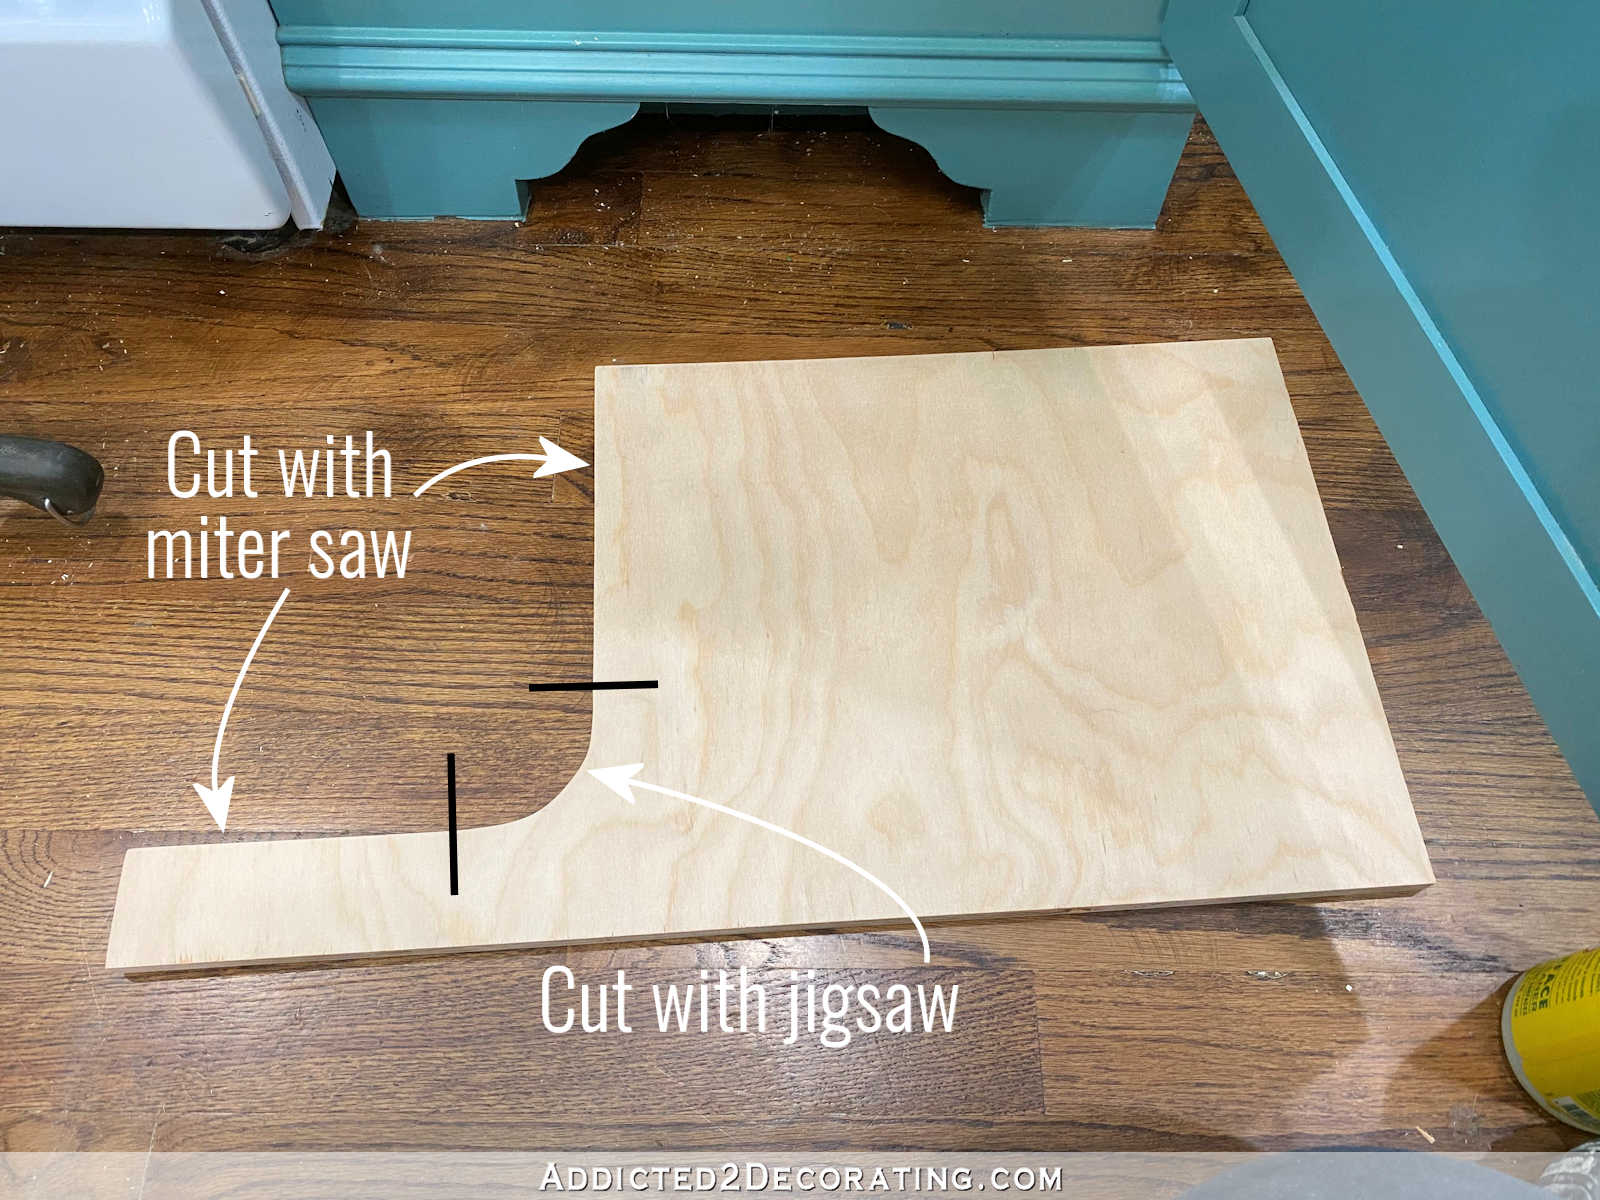
Using that mark, I cut the side pieces and divider pieces as shown below. I used a straight edge to mark the straight lines, and a quart paint can to mark the curve. Then I used my miter saw to cut the straight areas (or you could use a table saw), and then used my jigsaw to cut the curves.
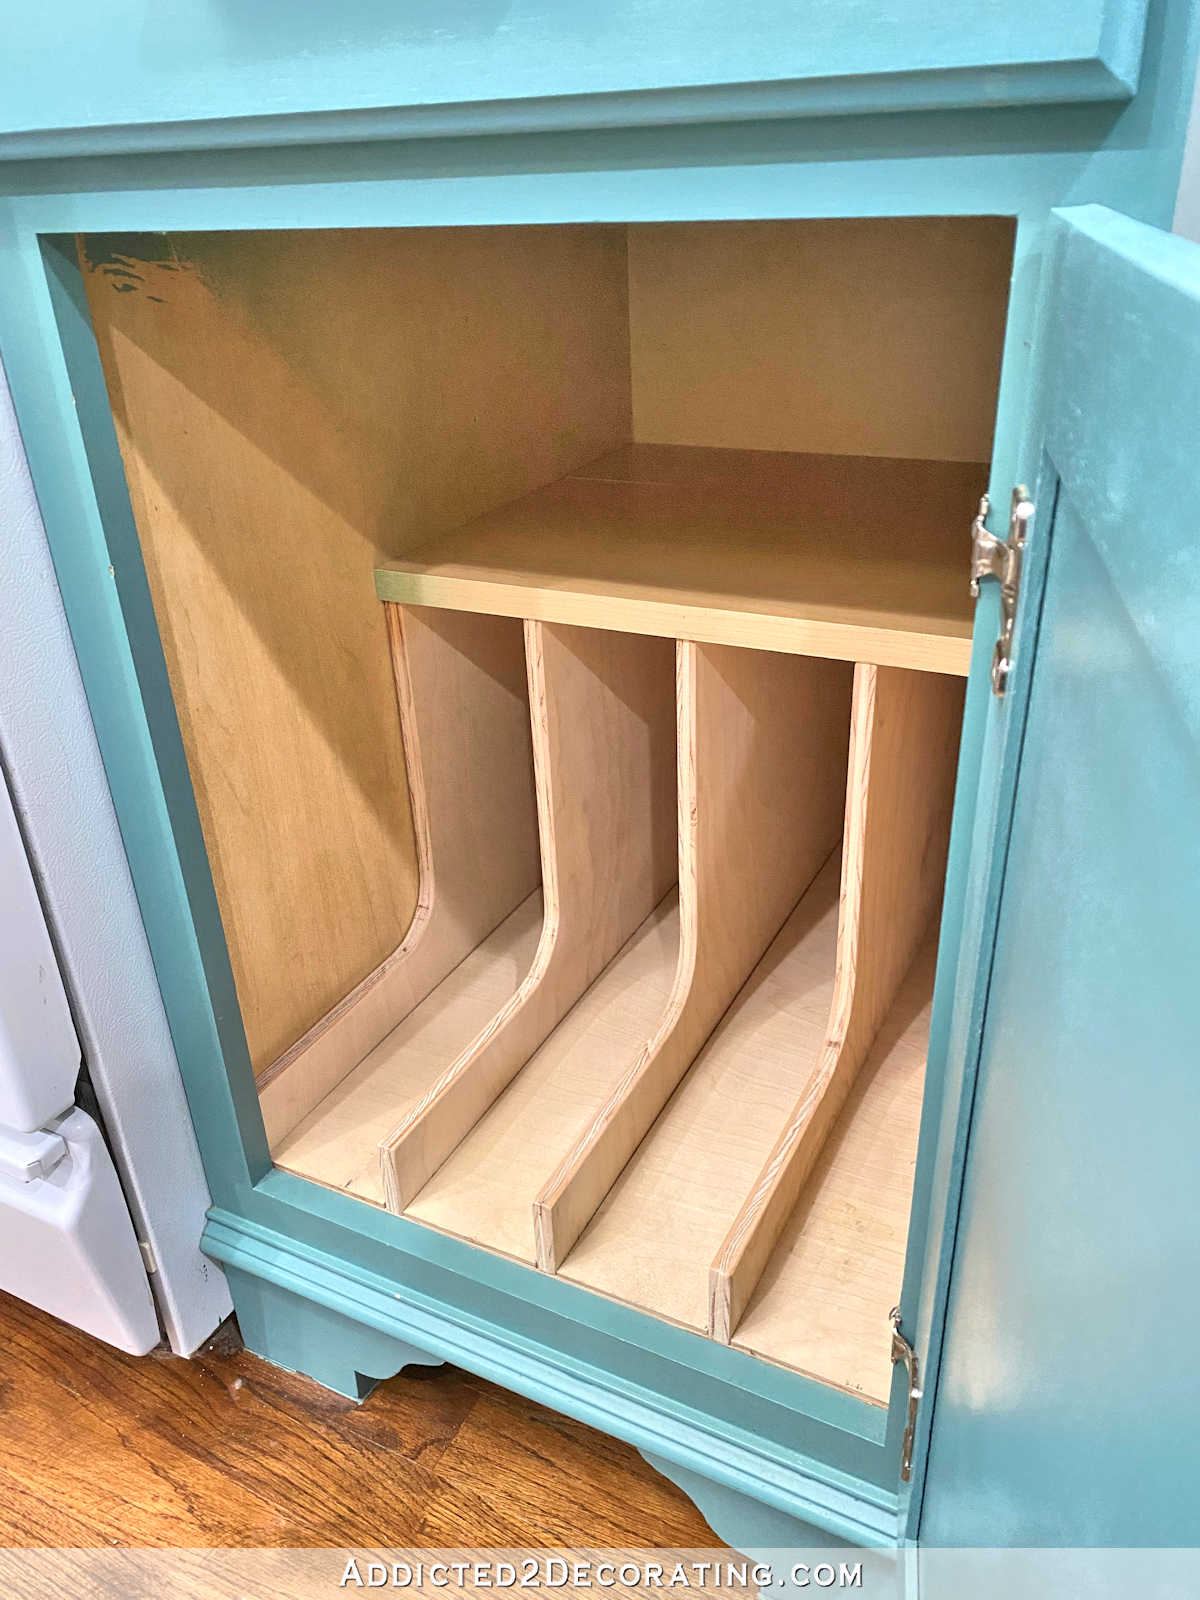
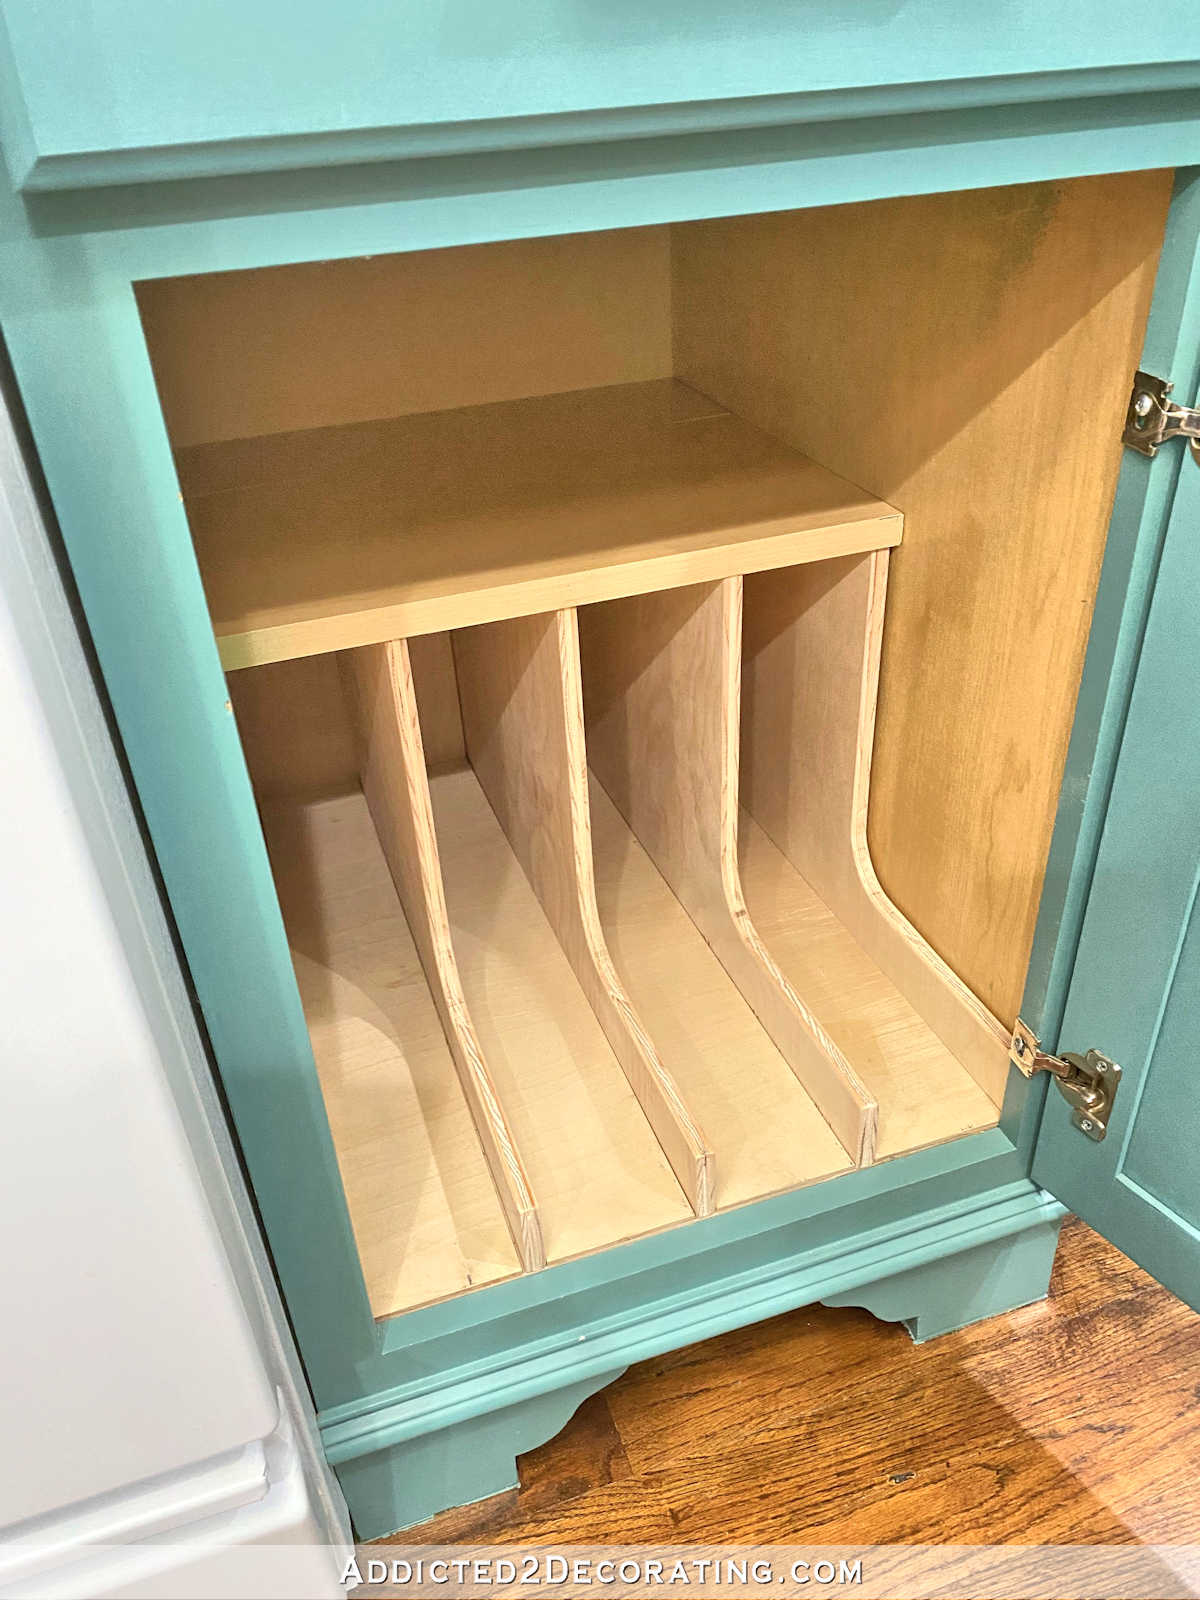
And when the sides and dividers were put back into place, and the shelf placed on top, this is what it looked like.

When I was sure that everything would fit, I just needed to use some wood glue in the channels, and well as on the sides of the back piece, and glue the side pieces to the back piece, and glue the dividers into place.
To be clear, the pieces are all attached to each other using wood glue, but nothing is actually attached to the cabinet. So if I ever need to disassemble and remove this, the cabinet will be unaffected.
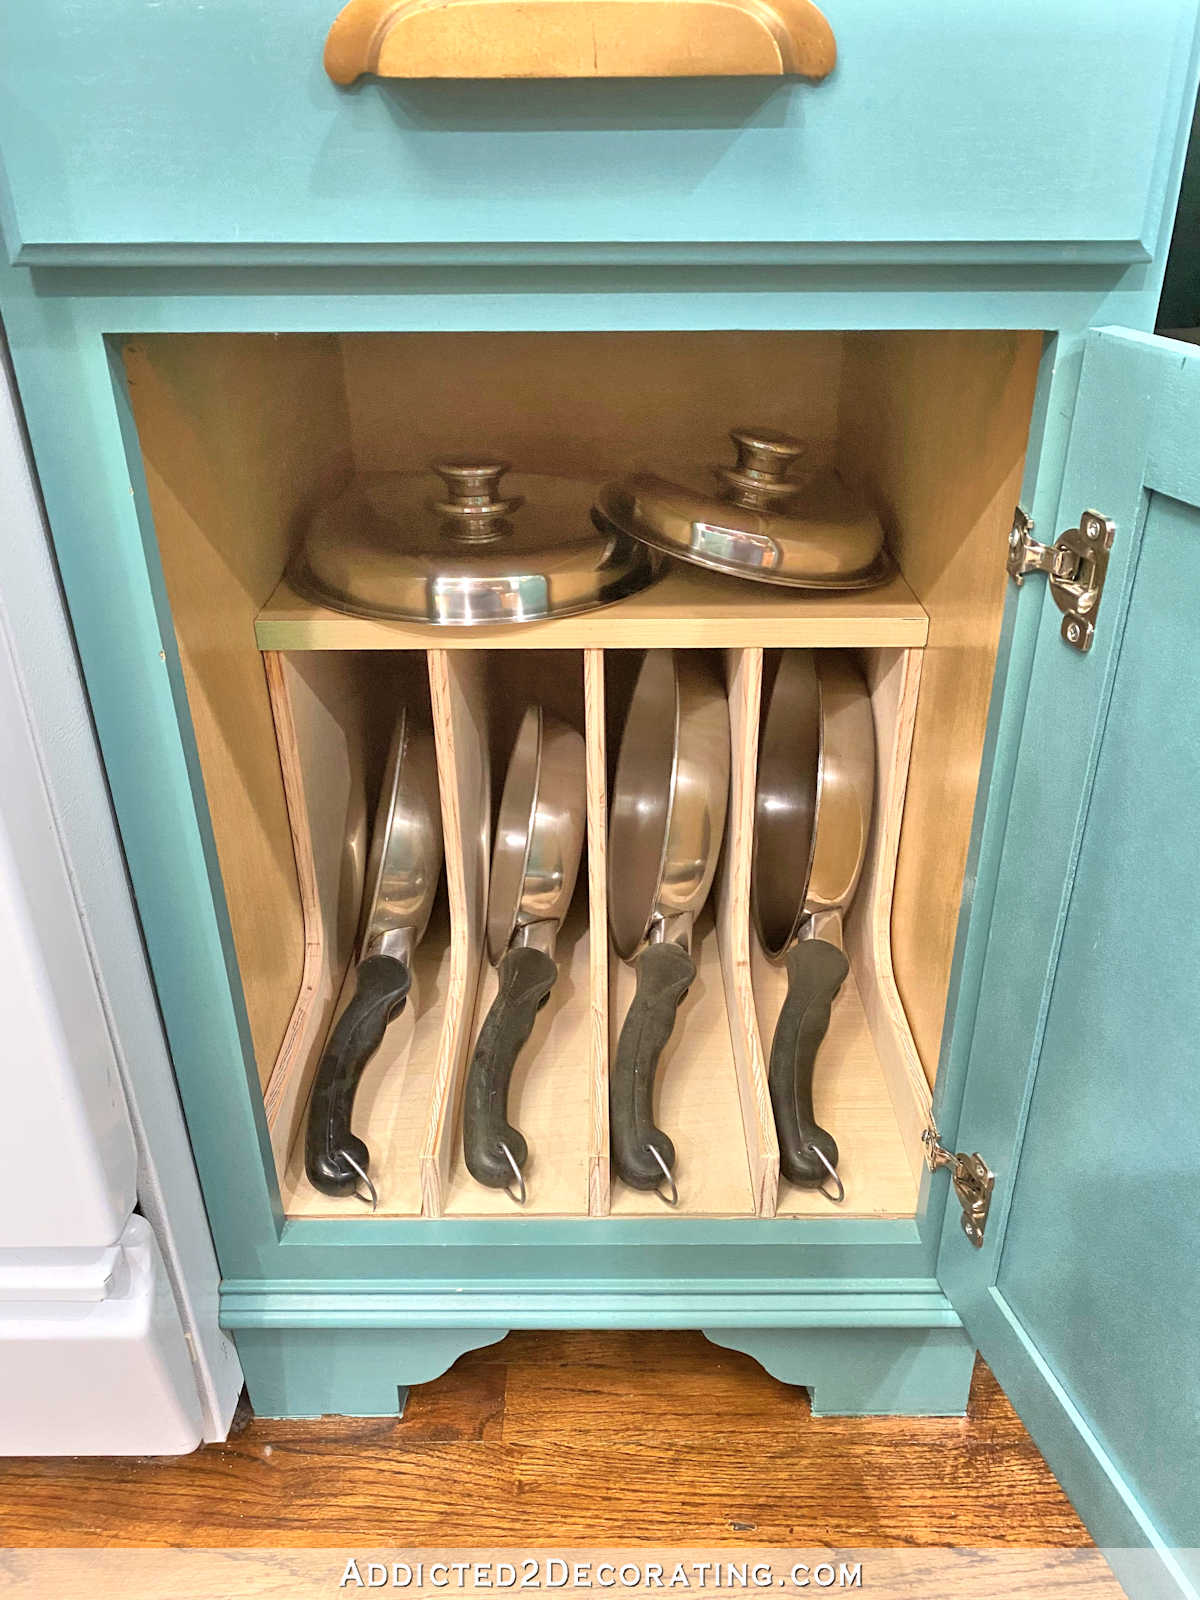
And here it is with my skillets and lids in place.
I had originally considered making something to go on the inside of the door to hold the lids. But since I only have two skillet lids, I’m okay with them sitting on that shelf, especially now that I brought that shelf forward about 6 inches. Before, that shelf was so far back in the cabinet that it was a pain to see anything on the shelf, much less reach those items. But now that the shelf sits forward about six inches, those lids are plainly visible when I open the cabinet door, and they’re very easy to reach.

So one by one, I’m working my way through my kitchen cabinets and drawers and getting them organized and customized specifically for how I used them. And I have to admit, I can see why highly organized people get so much satisfaction out of organization. This was such a simple and basic project, and yet after it was finished, I can’t even tell you how many times I went into my kitchen just to open this cabinet door and look at my organized skillets. 😀 Customized organization is so incredibly satisfying, and kind of addictive!
As soon as I’ve worked my way through all of my kitchen cabinets and drawers, I’ll give y’all a “tour” of all of them in one post. But until then, if you’d like to see the other organization I’ve added to my kitchen, you can see those here:
- Organizing Under The Kitchen Sink
- Putting Systems In Place For Refrigerator And Freezer Organization
- DIY Kitchen Utensil Drawer Dividers
- DIY Pull-Out Shelves For Pots And Pans Organization
- Kitchen Organization – DIY Tiered Spice Drawer Insert

Addicted 2 Decorating is where I share my DIY and decorating journey as I remodel and decorate the 1948 fixer upper that my husband, Matt, and I bought in 2013. Matt has M.S. and is unable to do physical work, so I do the majority of the work on the house by myself. You can learn more about me here.
Great job. Simple made me laugh.
I’m using non-stick pans, which means that stacking them is not only annoying but is also ruining them. And having a stack of pans stored low means you have to crouch to get what you need out (rather hard on the knees). Years ago I bought this: https://www.ikea.com/us/en/p/variera-pot-lid-organizer-stainless-steel-70154800/ (it’s supposed to be for lids, but works great for pans as well). One of the best systems I have in my kitchen, after using it for nearly a decade I still love it! One hand-retrieval and putting back, without needing to do more than just bend my back for a moment!
Need to say though, I doubt this would work for heavy pans, so don’t try this at home kids! 😀
Anyway, you are going to love storing the pans vertically!
Phoebe, thanks so much for posting that link! I had been looking at this product on Amazon but $15 was just too much!
I have a ton of AccuQuilt dies to organize. The one from the company is way too expensive so I have been looking for another solution. This expandable rack is perfect!
Glad to hear this! Sometimes the most perfect solution is one that was actually designed for something else! 😀
This looks great and is so very functional! The curved divider is so nice! Love it! Like you, I hate having to hassle with things that are stacked, so this is right up my alley. Wish I could make one but I don’t have the tools or the skill set to do it, though I understand your great directions.
You are so clever Kristie! I admire your can-do attitude. What do you think of using a handheld small router to cut the channels in the bottom and back pieces? I don’t have a table saw…yet!
That would work perfectly! In fact, that’s one of two other ways you can make a channel for the divider pieces of plywood, so I need to update the post with this info. Thanks for the reminder!
Wow, that was a zippy reply! Thank you for being so quick. I’m glad to hear that the router will work. My routing skills are better than my sawing skills (still have all fingers to be clear). Thanks Kristi!
IKEA magazine holders are quick fix for peeps with less DIY skills.
what does the other cabinet with deep pots look like?
Yes; inquiring minds want to know!
You can see it here. I only keep my four most-used pans in that cabinet. The rest of my cookware, like my 5-quart and 8-quart pots, are stored in the pantry since I only use them a couple of times a year.
https://www.addicted2decorating.com/diy-pull-out-shelves-pots-pans-organizer.html
Love the skillet dividers. I did something similar to the cabinet above my fridge for my cookie sheets.