My Hallway Cabinet Is FINISHED!!
I have spent the last three days with one singular goal in mind — to finish my hallway cabinet.
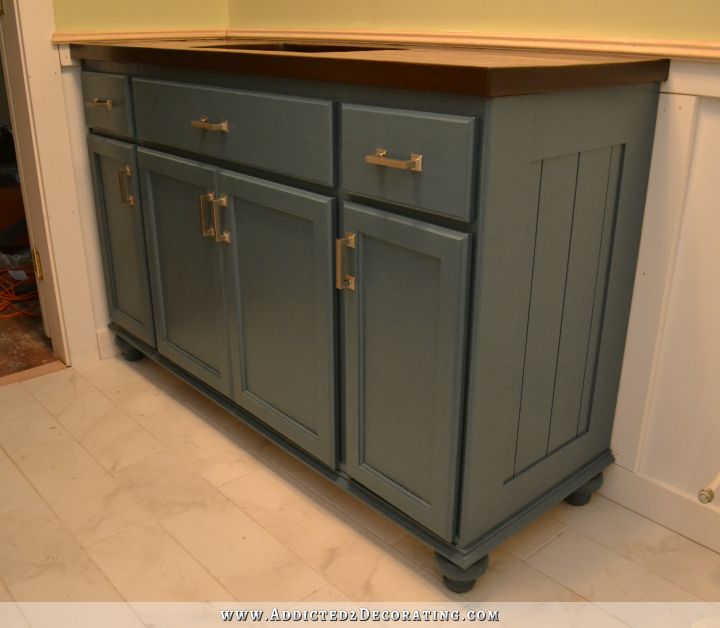
Do you even remember this cabinet that I started building last September? Did you remember that it wasn’t finished? I had certainly tried my hardest to forget about it, but since I have to walk through this hallway several times a day, it was pretty impossible to forget. The unfinished cabinet stood there as a daily reminder of my failure and frustration. But now…IT’S DONE!!
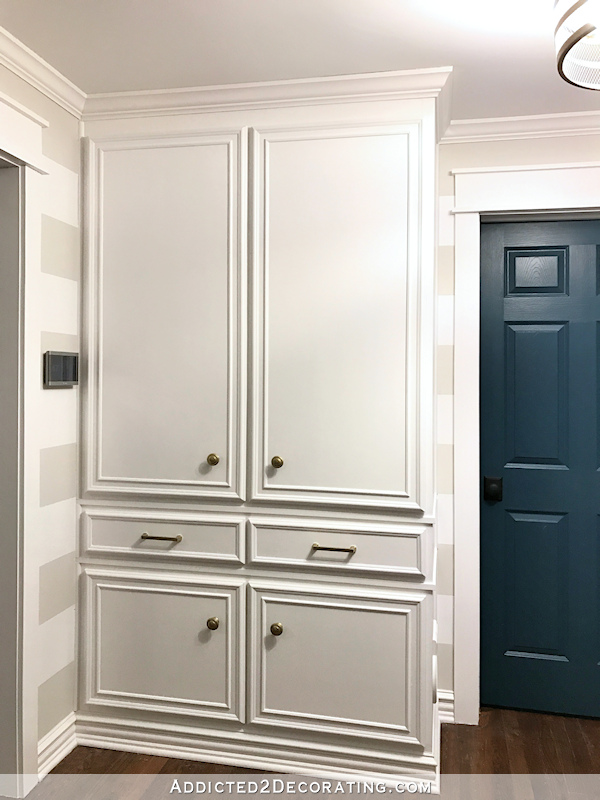
It had been almost finished once before, with chunkier moulding between the sections, and one wide drawer in the middle with two rows of moulding just like the doors…

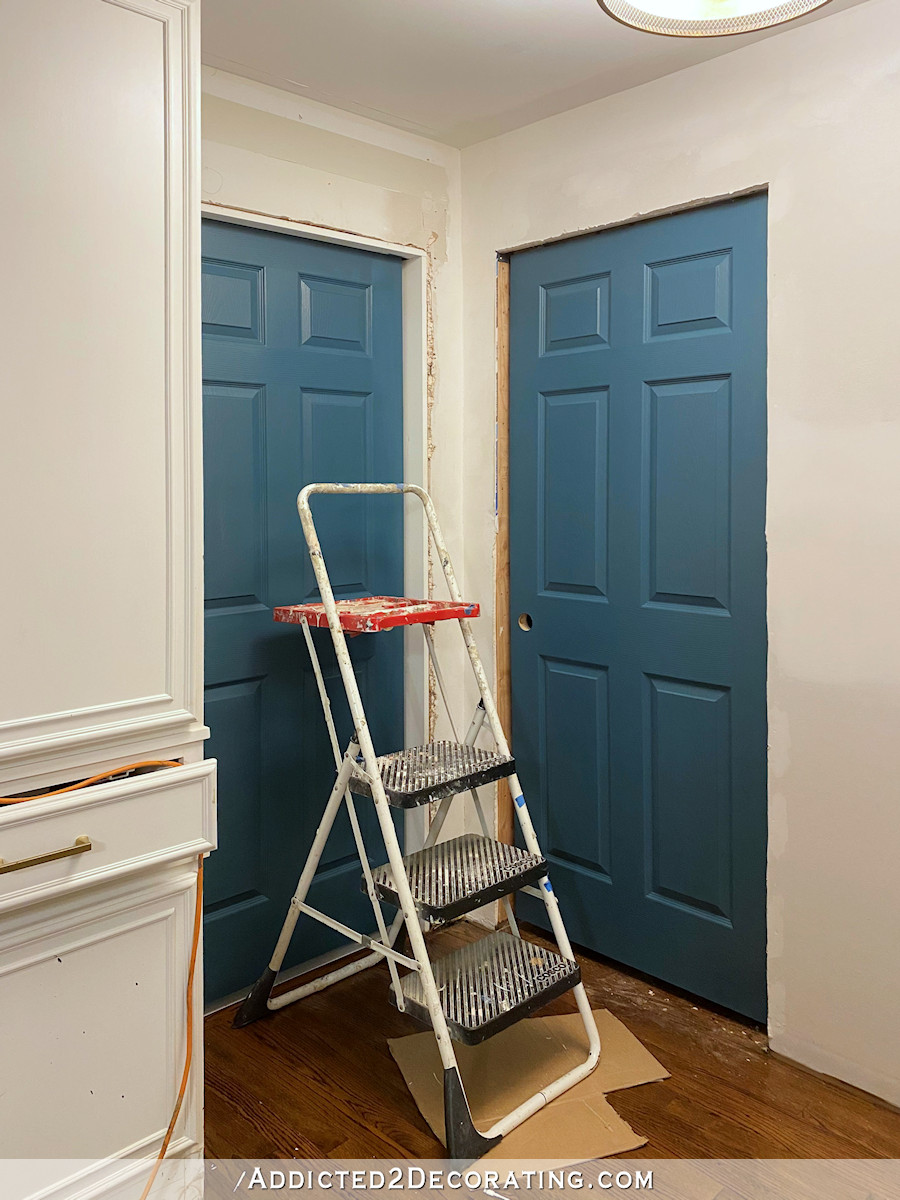
And then I realized that since I failed to put a spacer between the cabinet and the wall, the left cabinet door wouldn’t open all the way because it hit the thermostat. I considered moving the thermostat until I realized that once the casing was installed around the cased opening between the hallway and the music room, I wouldn’t be able to open the drawer all the way either. So the cabinet had to move over about 3/4 inch.
Talk about major frustration! I removed the crown moulding and baseboards, and my brother and I moved the (very heavy) cabinet away from the wall, added a spacer (which was a 1″ x 2″ x 8′ piece of lumber sandwiched between the cabinet and the wall), and then shoved the cabinet back into place. I placed the wide side of the spacer against the wall so that the thin side (i.e., the 1″ side, which is actually only 3/4″ thick) gave just enough space between the wall and the cabinet so that the doors would open to a full 90-degree angle (or slightly more) and the drawer would open completely.
![]()
Sounds simple, right? That’s what I thought, too! But as you can see above, adding that spacer meant that I had to completely replace the moulding between the sections, as well as the crown moulding and baseboards, since all of those were now 3/4″ too short. But moving the cabinet away from the wall and then back into place also threw everything out of alignment just enough so that the drawer wouldn’t close all the way on the left side anymore. The drawer would be closed on the right side, but would be sitting away from the cabinet on the left about 1/4 inch. I tried every which way to make adjustments with no success.
So I gave up. I’ll admit it. I totally let this cabinet defeat me for about three-and-a-half months.
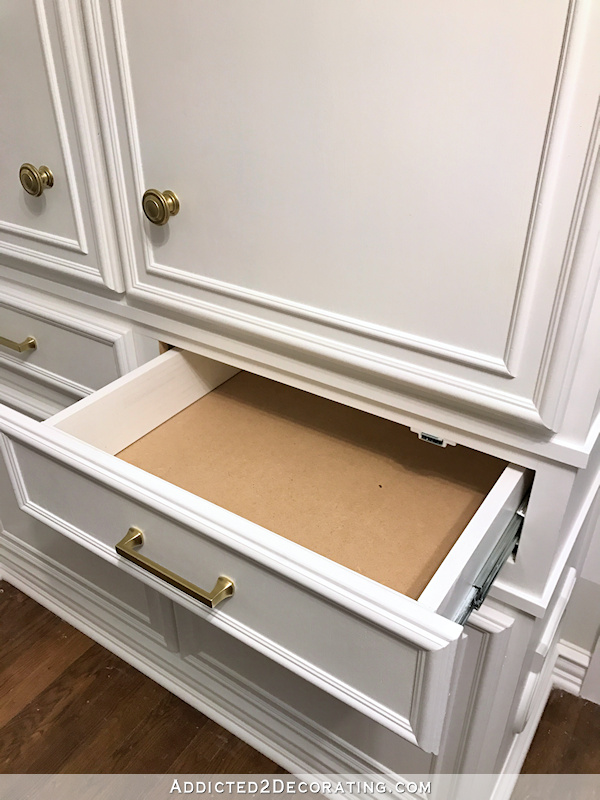
But this past weekend, I was determined to get it done. I removed the one big drawer, separated the drawer section into two sections, and made two brand new drawers.
I’m glad it happened this way, because these drawers are constructed better than the original drawer. (See that little magnet catch? That’s a remnant from one of my 50+ ideas and adjustments I tried to make that other drawer work. I forgot to remove it.)
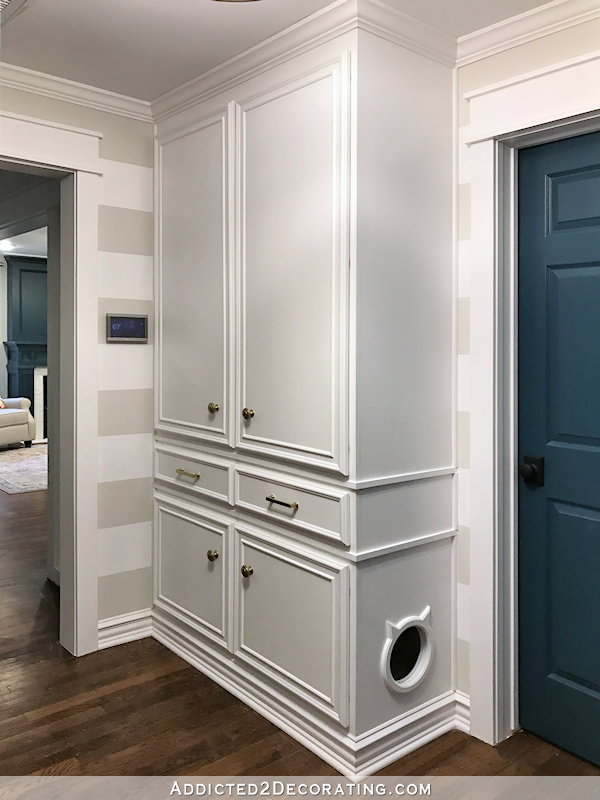
The bottom section is pretty much the same as it was before, except that it’s completely finished now. I used three coats of General Finishes High Performance Topcoat on the plywood (my new absolute favorite water-based clear coat, which I buy right here), sanding between coats for a smooth finish, and then caulked the corners. I didn’t caulk the corners in the upper section, but since this lower section is specifically for Peeve’s litter box, I didn’t want to take any chance of cat litter getting caught in those small cracks. I also put an LED light in there that comes on automatically when it gets dark enough.

The litter box is a Petmate top entry litter box (I bought it here). I removed the lid, and then used my jigsaw to cut a large opening in the side where she enters. So she goes through the hole in the side of the cabinet (trimmed out with a cute Kitty Pass tunnel, which I bought here), and walks directly into her box. I placed the litter box on a Gorilla Grip cat litter mat (found here), which does an excellent job of getting all of the loose cat litter off of her paws before she exits the cabinet. That way she doesn’t track cat litter onto the floor outside the cabinet, although I really should move it so that it covers all of the exposed cabinet “floor” close to the side entry on the cabinet.
The top section is now usable cabinet space with the addition of two adjustable shelves on each side. The shelves are simply 3/4″ plywood, cut to fit, with 1″ x 2″ lumber nailed to the front edge to give it a clean, finished look. I gave those two coats of the General Finishes topcoat, sanding with 220-grit sandpaper between coats for a very smooth finish.

This project definitely taught me some very valuable lessons. First and foremost, always, always put a spacer between any cabinet, bookshelf, or anything else that will be built up against a wall, even if it doesn’t seem like the spacer is needed.
I should have learned that lesson from my kitchen. On the peninsula, I put the cabinets right up against the side wall on the right. That was before that wall had a cased opening, so having a drawer right next to the wall was no problem.
Later I added the cased opening, then added the 1″ x 4″ casing around the opening. The next time I tried to open that small drawer to the right of the dishwasher, it wouldn’t open all the way because it hit the casing! So I have one small drawer in my kitchen that can never be removed, and will only open about 3/4 of the way. A spacer would have prevented that problem.
So yes, I should have known better. But when I got started on this hallway cabinet project, it just completely slipped my mind. I can assure you that it’ll never happen again! 🙂 I guess sometimes I have to make a mistake a couple of times before I learn from it. Evidently the kitchen drawer didn’t cause me enough inconvenience and/or frustration to make me remember the importance of a spacer, but this hallway cabinet caused me so much frustration that I’m certain to never forget the importance of a spacer again.
I’m so relieved I can finally cross this project off of my list!

Addicted 2 Decorating is where I share my DIY and decorating journey as I remodel and decorate the 1948 fixer upper that my husband, Matt, and I bought in 2013. Matt has M.S. and is unable to do physical work, so I do the majority of the work on the house by myself. You can learn more about me here.
This hallway has been on my top to list for a couple of years! lol I’m so glad that it is finished, and it looks so beautiful!!!
Yayyyy for finished projects! And it looks great (again)! Love the hidden litter box.
Mark
It looks amazing!
Great job.
I’m perpetually in awe at the stuff you tackle, and how you never let little snags get in your way, or prevent you from ending up with something spectacular, unique, interesting, and practical.
Great job Kristi, what a relief you must feel to get this cabinet finished. It’s looks amazing, you have done a great job……and how nice to get yet another item checked off your to do list. You are definitely powering along this month. Well done!
This really looks nice! I love the peaks through to the living room in some of the pictures. Will you be putting a coat closet in the mudroom for coats?
Yes, there will be both an enclosed closet as well as wall hooks in there.
Also, now you can update the hallway on your house tour to indicate it is finished!
Congratulations, the hallway looks great and works great too! Love that little kitty opening and what a neat idea for a litterbox! What’s next, lol?
I have to ask, is there a light in the kitty bathroom?? 🙂
There is, she said she put an LED in there that comes on when it’s dark.
Lol….that girl thinks of everything 🙂
It’s in the article.
Sorrry, I havent had time to read it yet. I just scrolled through the pictures to show my husband.
Is there any chance you could show the spacer and talk about it a little? I love your work and that’s the only part I’m a little confused about and would like to know what it is and how you did it.
I added more detail about the spacer to the post. Hopefully that will clear up any confusion. It’s basically just an 8-foot-long 1″ x 2″ piece of wood sandwiched between the wall and the cabinet, and nailed to the side of the cabinet so that it “reads” as part of the cabinet. You can’t see it at all in the finished cabinet because I used lots of wood filler to fill in any gaps and sanded it smooth, so it just looks like part of the cabinet. But the picture I added to the post was taken before I added the wood filler, so you can see it pretty clearly.
You’re the best!
You are amazing!!!!! If something gets to me, I can wait forever before tackling it again. You did it and completed it too.
Looks great! I have a question about the kitty pass thru – I have a small hutch that we converted to a cat box holder – similar to your cabinet. When I look at the cat door on Amazon it looks like it is made for a wall depth of about 4″ thick. How did you get it to fit the 1/2″ wood instead? Thanks!
I used my table saw to cut it down. It comes apart in three pieces–the the cat head side, the tail side, and a PVC piece that connects the two. The PVC can be cut to size very easily on the table saw. I think I ended up needing it to be 1.25″ thick for the cabinet.
Had to laugh when you admitted you had made the same mistake before…me too! When drawing floorplans for a room I always KEEP the “failures”, with notations on why they didn’t work. Saves coming up with the same unworkable idea twice.
Is there still stuff in that kitchen drawer?
Yes, it’s perfect for knives.
I love this cabinet and the way it looks in your hallway. I’m so happy for you that it is finished and you can use it for the purpose you built it. That little kitty door just make me smile and your litter area is genius for keeping the area clean. Well done and congrats on marking off another item on your list before the end of January!
Way to go!!
Great job, Kristi! As always, your work is impeccable.
I’m impressed with your woodworking skills. Have you ever done a post on your tool/work room? I’d love to see where you work and what tools you have. Dang! I would love to be able to build like that. Good job!!
I’m afraid you’d be sorely disappointed. I actually don’t have a workroom/workshop right now, although I do have one planned for the future. So now if I want to use my tools, I have to either do it in the very unfinished studio with extension cords run into the kitchen (since I still don’t have electricity in the studio), or I have to drag my tools onto the front porch. During this time of year when the sun goes down so early, I can only work in my studio until about 5:30pm before it’s too dark to see and safely use my tools (although I have worked by the light of my iPhone on a few occasions, which I wouldn’t recommend). One day, I will have a nice workshop in the back yard, but that’s probably at least two years away.
HAHA All the more impressive. It would be helpful to list what tools you have. I saw your range hood and how smart was that?! I would not have thought to build around the old one. Ingenuity saves a bundle. Thank you.
Has Peeve been using her new bathroom?
She has! I think she likes the privacy. 🙂
It looks fab! Congrats on crossing another item off your to-do list!
It looks fab! Congrats on crossing another item off your to-do list! I am surprised though that Peeve didn’t photo bomb her area. I love seeing her in your pics. Especially the one of your entry where she’s eyeballing that plant and trying to figure out how to get to it.
Absolutely beautiful and inspired kitty litter compartment.
I know this has been bugging you, happy it is completed!
Fabulous! I’m just about to find organization to come and pick up my secretary that is in the hallway – then something like you have created would be great to have there. How deep is your cabinet?
It’s 18 inches deep. That’s the outside dimension.
You’re really getting started fast in January, marking things off your list. Congratulations on another job well done.
Love it. We have kitty litter all over the laundry. I might (I say might cos I am not handy like you) turn a cupboard into a litter box like that.
LOOKS FANTASTIC….!!!!!
Excellent job! I know it feels great to cross that off your list. And that is my favorite topcoat too.
Beautiful workmanship…as always, Kristi.
Looks great. I love the two drawers.
On another topic — I just bought a critter sprayer. I AM IN LOVE!! This has to be the best sprayer out there. It will make an upcoming job so much easier, and hopefully cut down on the whining I do when it comes to finishing pieces.
Oh, yay! I’m so glad you like it!!
I love it. It looks awesome!! It’s the perfect use of space and the hidden kitty litter box is gold 🙂 It looks amazing!
I know it was extra work for you, but in looking back at the pictures, the two drawers looks so much cohesive now than just one long one. JMHO 😉
Much *more cohesive…..
Do you just pull out the litter box every day to clean it? I want to do something like this in a nook outside my bathroom in my condo–currently there’s an Ikea cabinet there (left from the prior owner), with doors up top and two drawers below. My cat’s litter box is currently in a large walk-in closet off the foyer. There’s plenty of space there, but the litter box gets dust everywhere, which means I don’t want to use the closet for coats and things. My older cat doesn’t like the enclosed litter boxes, and I’m already bad at cleaning the litter box frequently. Having to deal with the enclosed litter box just makes it more of a pain.
I would love to reclaim the large front closet for coats and other storage that won’t get covered in litter dust. I think the nook outside my bathroom would be perfect for something exactly like what you have. I have the Litter Genie (highly, highly recommend it!!!) that could also in. Ideally though the litter box area would be on a pull-out drawer or shelf, making it super easy to clean. I don’t know if that makes it too complicated though.
Yes, I just pull it out. It’s not heavy at all. I did consider the pull out drawer idea, but then you have to deal with needing to pull everything out, including the drawer, so that you can vacuum under there and clean out the litter that will inevitably fall beneath the drawer. I wanted as smooth as surface as possible, with no cracks, crevices, or added components that can catch kitty litter and need to be cleaned regularly.
I can see this being the first thing you think about when you start on the pantry! lol
LOL, I just left a comment on another post, asking to see the inside of the cabinet – then I found this post via Pinterest! Sorry to hear you had issues with the build, but I think it came out perfect in the end! I like the 2 drawers better than the single big drawer; there’s so much space in the top cabinet! And I LOVE the bottom section for the litter box! This is so perfect! My house has a single narrow hall, but if I had the space I would copy this in a heartbeat!