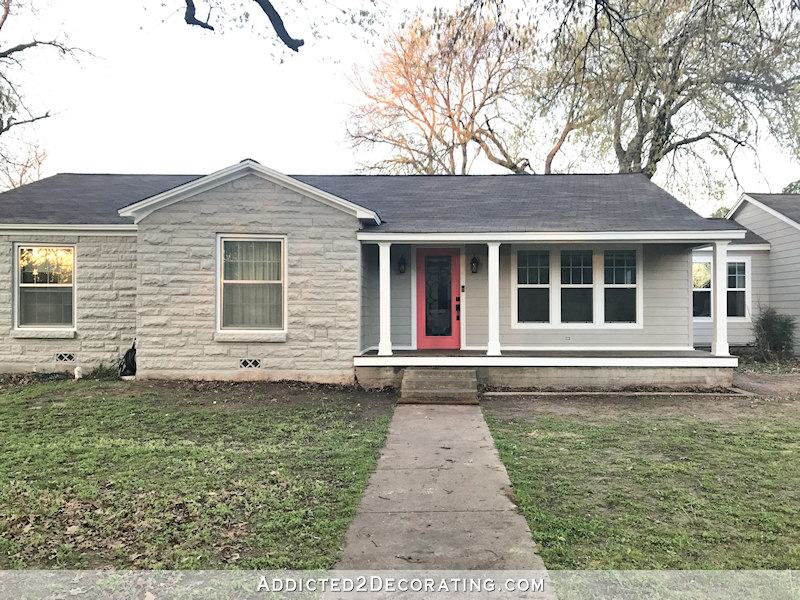
Finished Front Porch Columns (And A Few New Photos Of The Front Exterior)
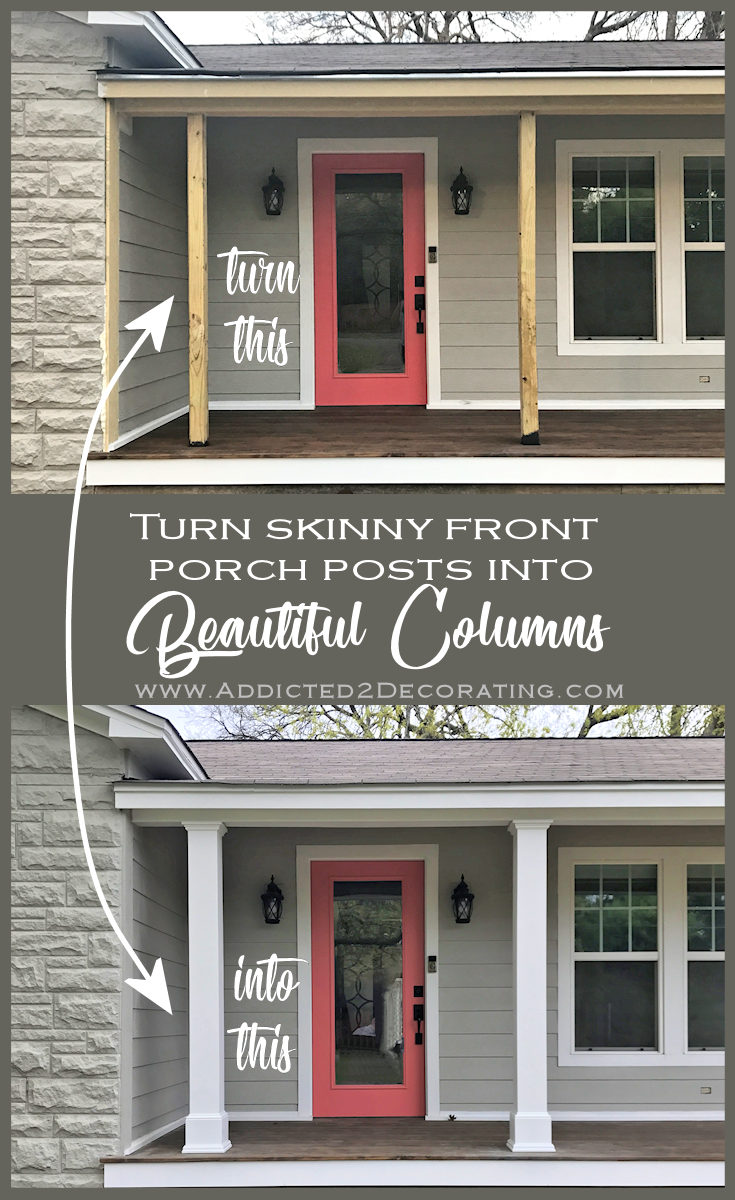
My front porch columns are finished! If you missed the first two posts about this project, you can find them here:
- Part 1 – How to wrap front porch posts (turn skimpy posts into pretty columns)
- Part 2 – My big porch column mistake, and how I fixed it.
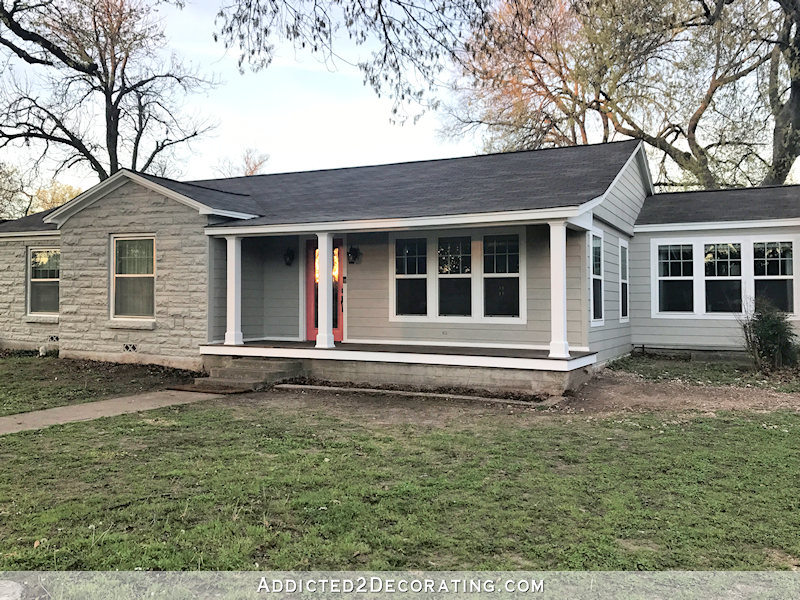
So after working for two days to correct that setback and get them all primed and painted, here’s how they turned out…
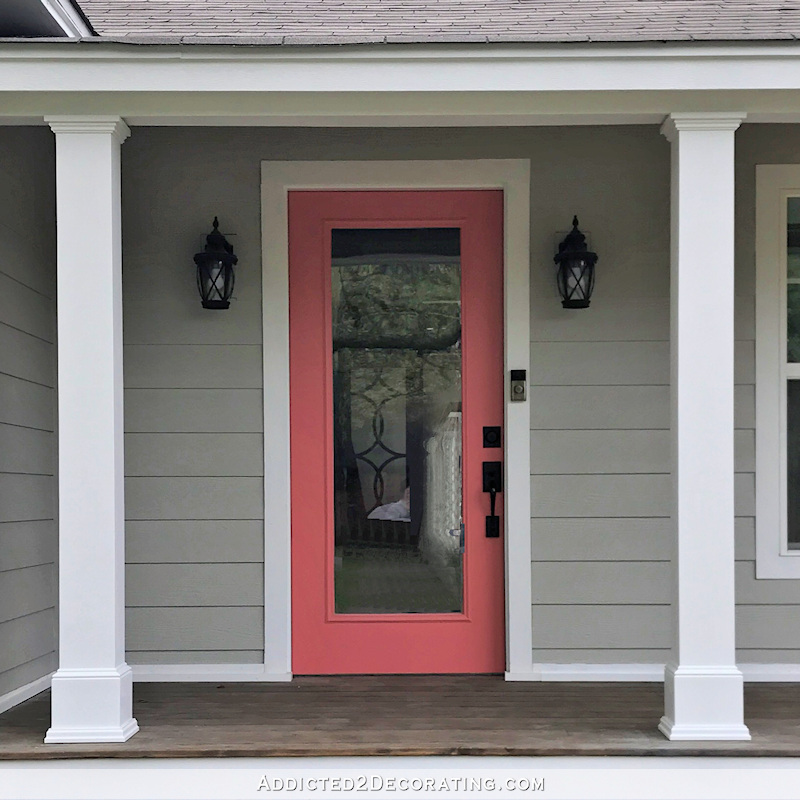
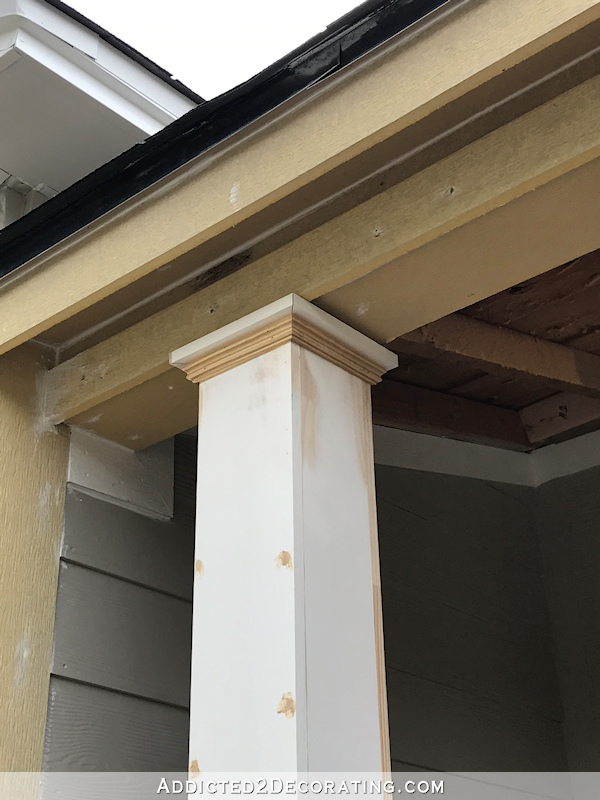
Quite an improvement from skinny, bare 4″ x 4″ posts, right?
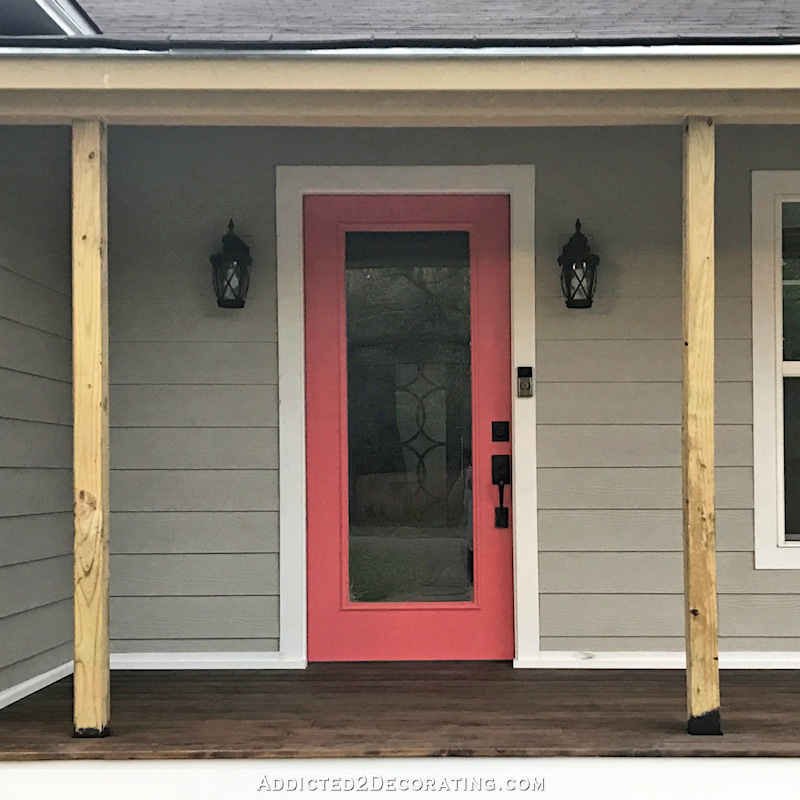
This porch has had bare posts since the day we bought the house. It’s amazing the difference it made to wrap them!
I kept the tops very simple and attached some panel moulding to a 1″ x 2″ piece of wood with wood glue and a few tiny finishing nails. Once the glue dried, I cut the pieces to fit around the tops of the columns, mitered on the corners.
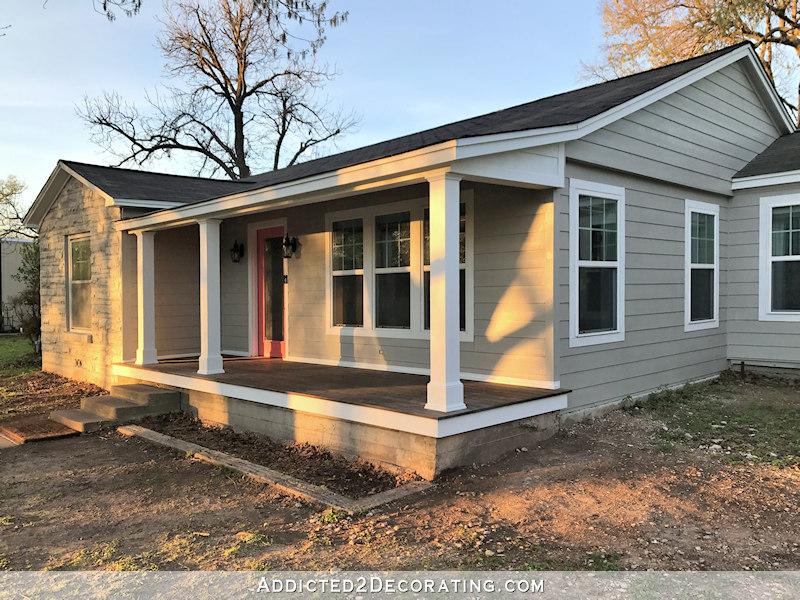
The columns may be done, but by no means does this mean that the front porch is finished. There’s still a long list of things to do, and that’s even before I get to landscaping (which is desperately needed, as you can see). The porch still has no ceiling, I still need to decide what to do with the concrete around the base of the porch, and I still need to build new steps with handrails.
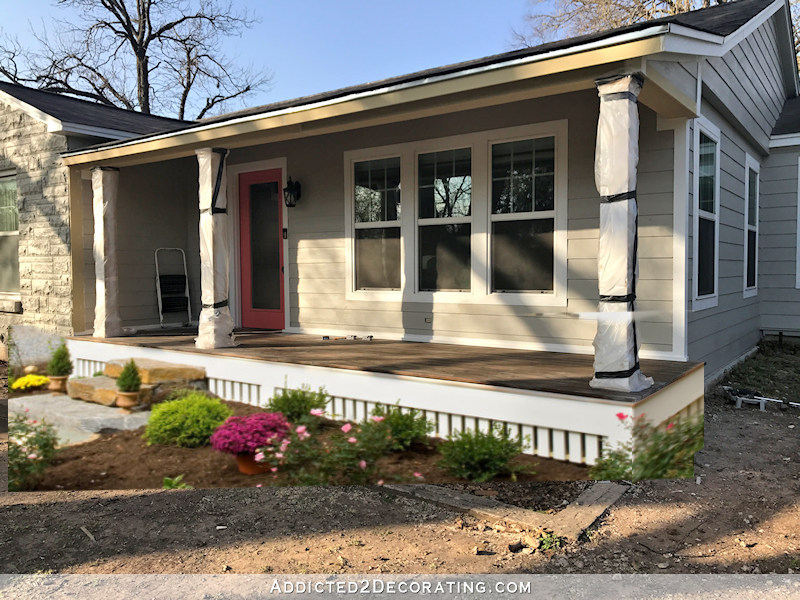
And as far as the concrete around the base of the porch goes, I have a picture to show you exactly why doing nothing isn’t an option. Last night after getting everything finished, I hosed off all of the dust from the porch, and then stood back to take a picture. Here’s what the concrete looked like, and what it looks like every time it rains…
Since it’s not sealed, it turns dark when it gets wet. And since it never gets wet evenly, it turns into this ugly light gray/dark brown patchwork eyesore. So again, doing nothing isn’t an option.
After discussing three different options in this post last week, I decided to do some mock ups with my photo editing software. I actually fully expected to like the stone look the best, but my favorite ended up being this non-lattice simple white trim. Unfortunately, I didn’t have a picture of the finished columns when I did this, and I didn’t take the time to do a new mock up with the finished columns, so you’ll have to use your imagination. 🙂
But regardless of the direction I go with that, it’ll have to wait until the new steps and handrails are finished.
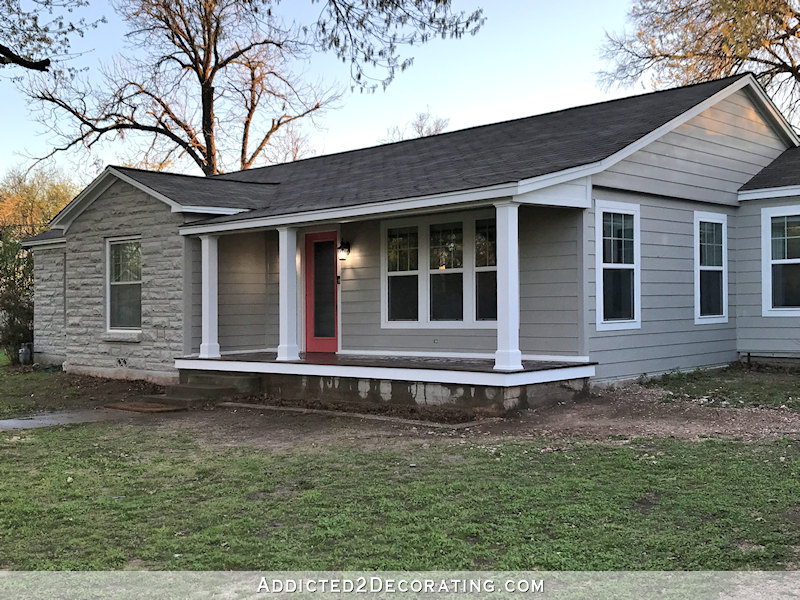
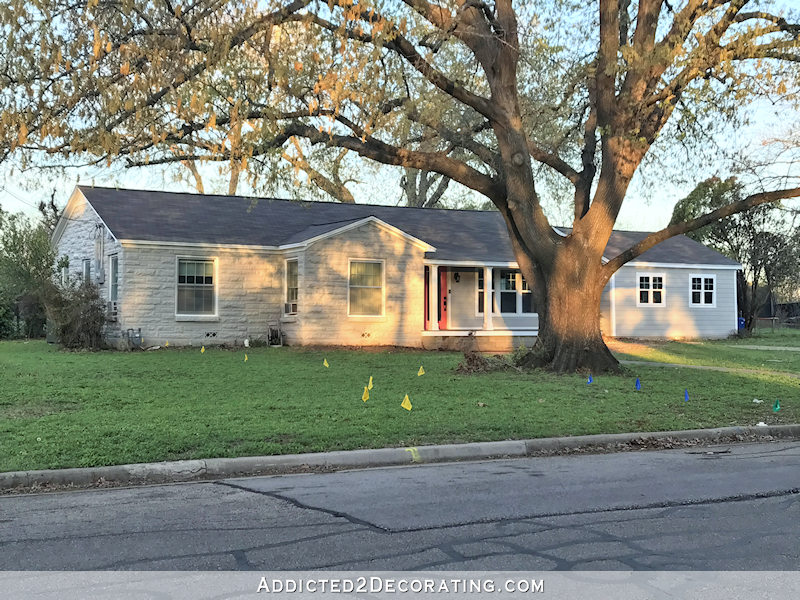
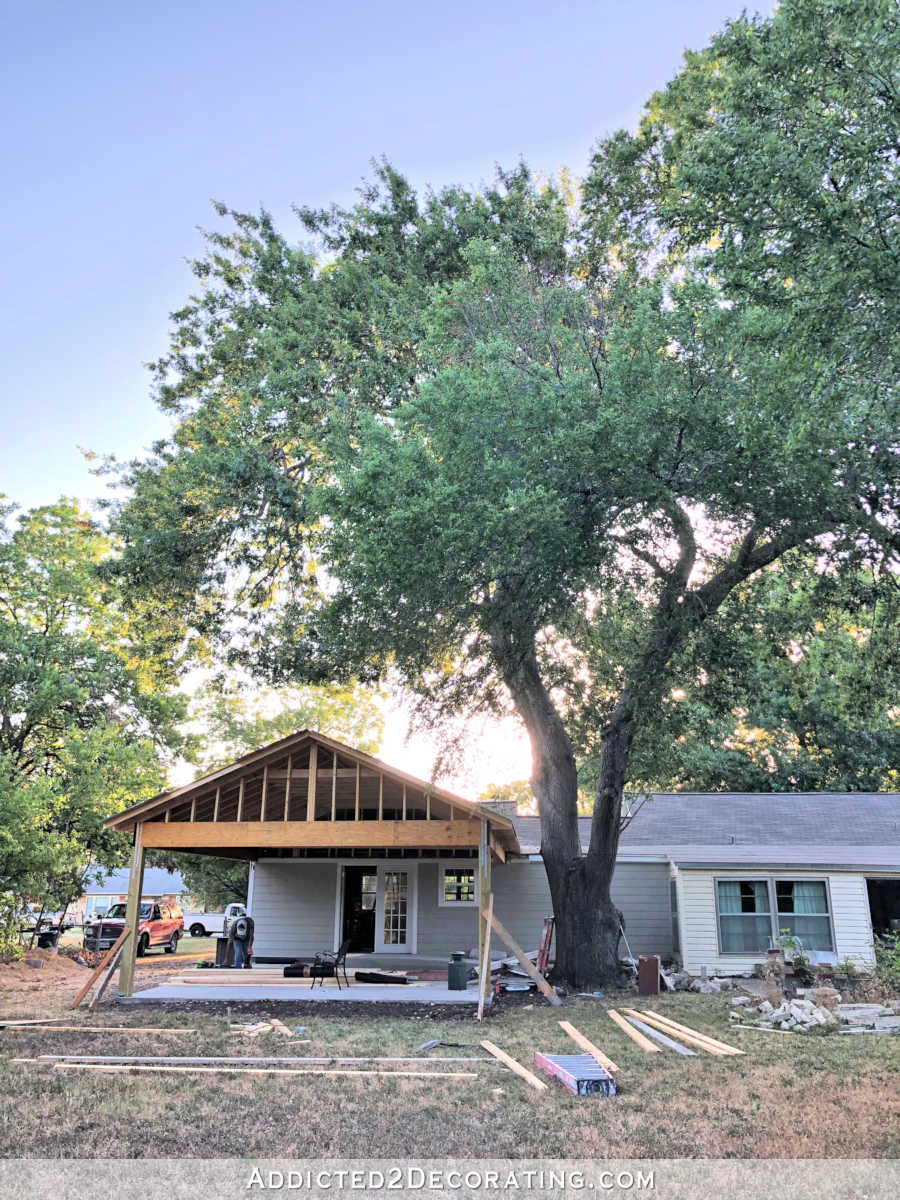
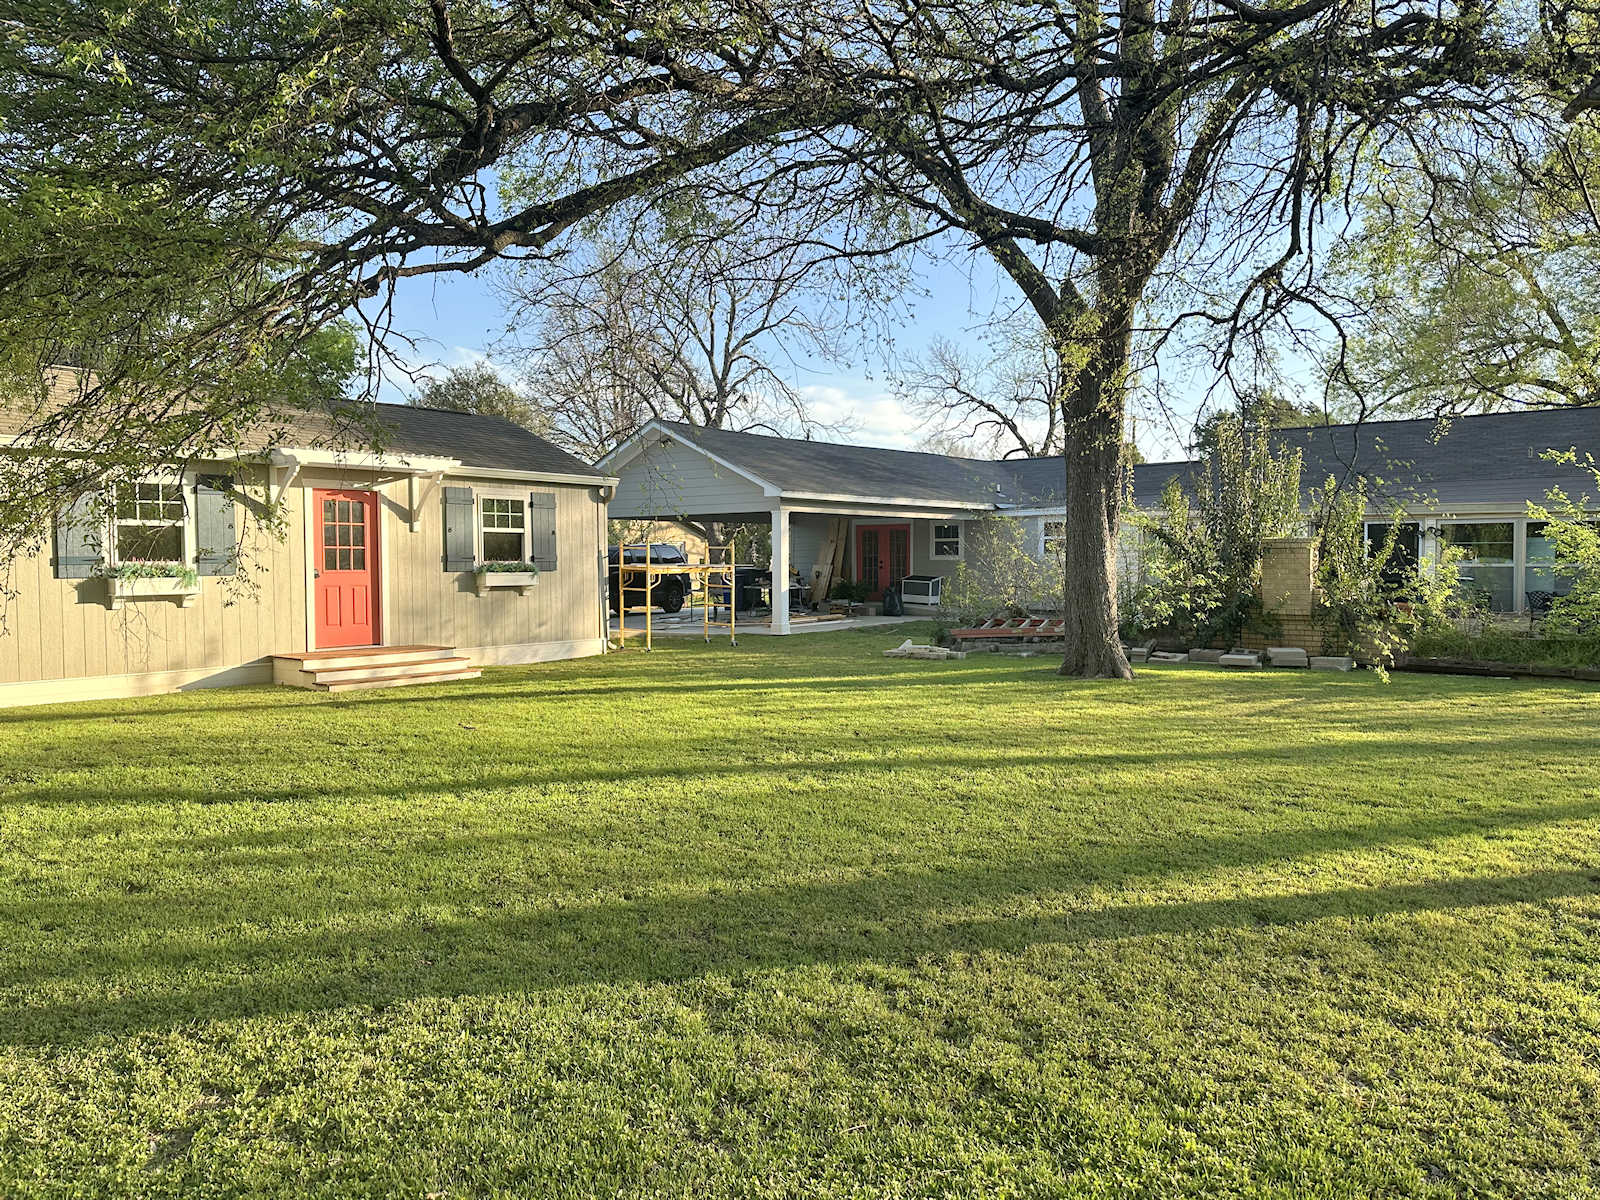
So there’s still lots to do, but it feels great to finally be making some headway on the exterior of the house! Here’s a look at the progress so far…
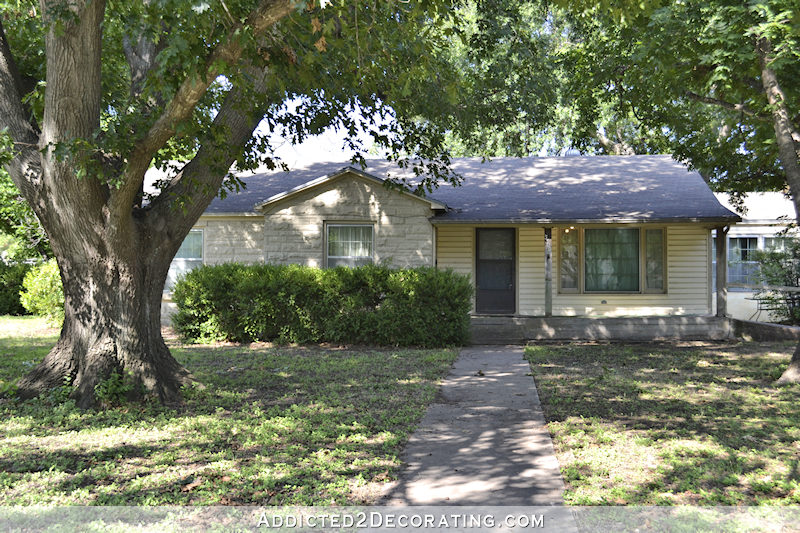
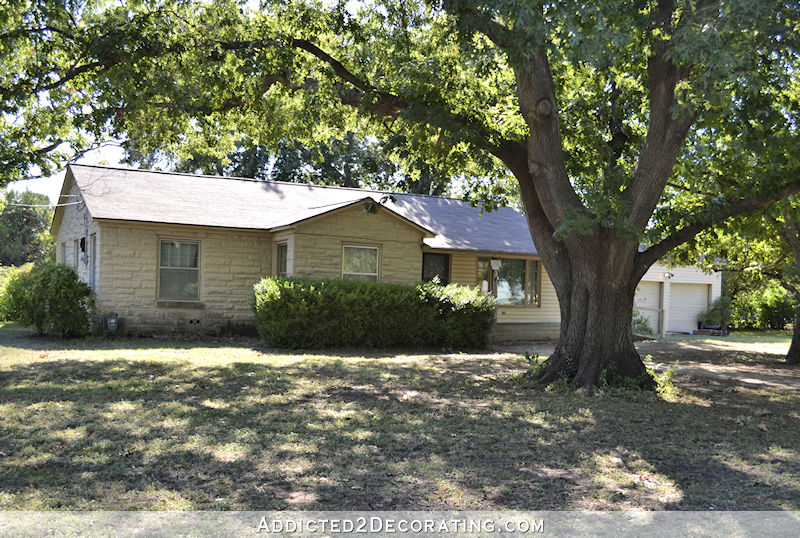
When we bought the house, the main part of the front exterior looked like this…
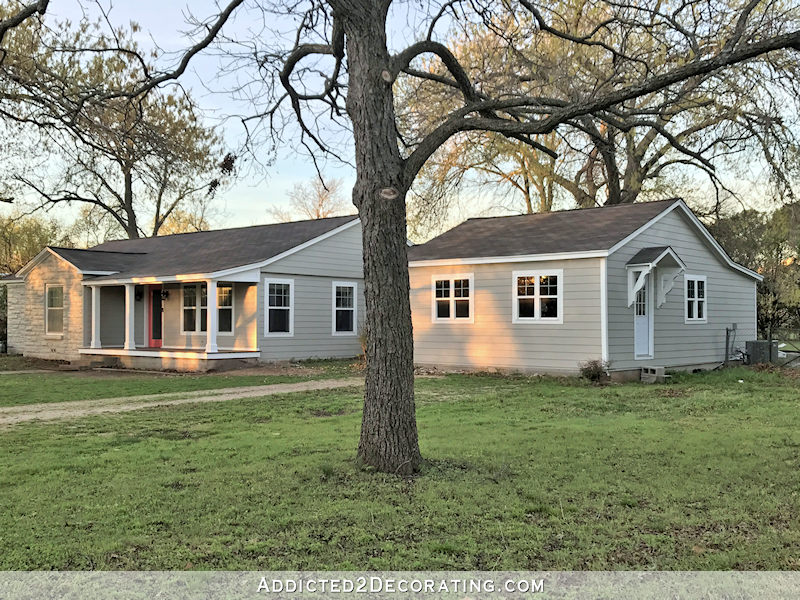
And now it looks like this…
The windows to the left of the front door are still the original windows. I’m hoping that we can at least get the three remaining original windows on the front of the house replaced this year. That will leave just the three remaining original windows on the left side of the house.
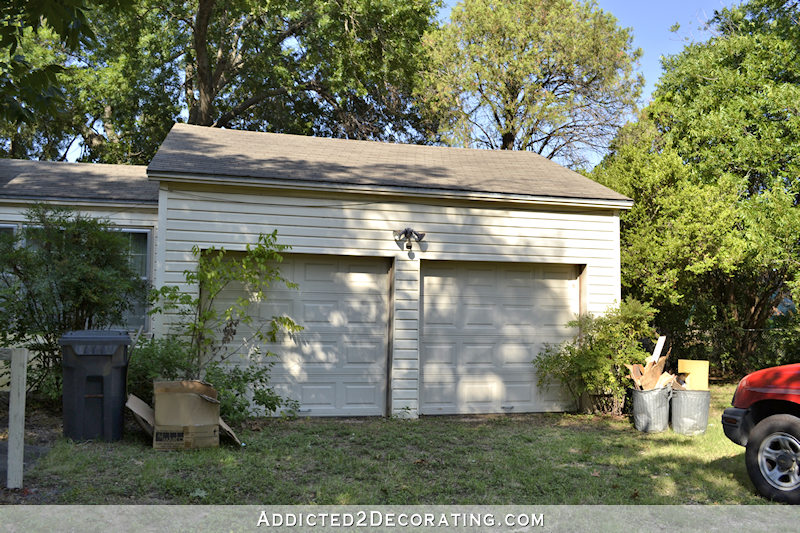
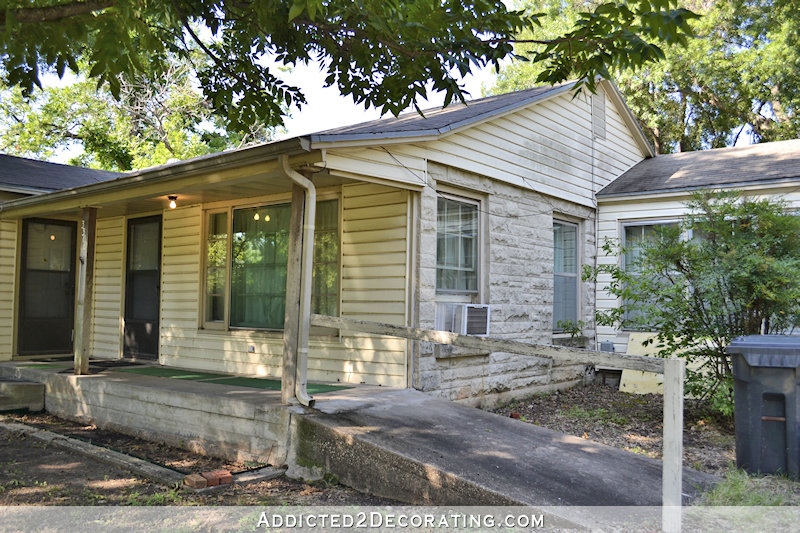
The porch area is probably the most changed area of the front of the house (followed closely by the garage). Here’s a great view of what the porch looked like originally, with its two doors, original windows, concrete porch floor, ramp, and vinyl siding. The side wall was also covered in stone, which has since been removed…

And here’s how that looks now…
The view from this angle (the stone side of the house) is the least changed since we bought the house. Here’s the original view…
And here’s how it looks now…
We’ve still got two windows with window unit air conditioners in them, and I’m afraid to even attempt to take them out because I’m pretty sure that neither of those windows will actually close. So until we can get new windows, the window units have to stay, even thought they’re not used anymore.
One of the best “before” pictures I have of the front of our house is actually the one I found on Google Maps. The quality of the picture isn’t the best, but the view of the entire front of the house is pretty great, although it looks a little squished horizontally.
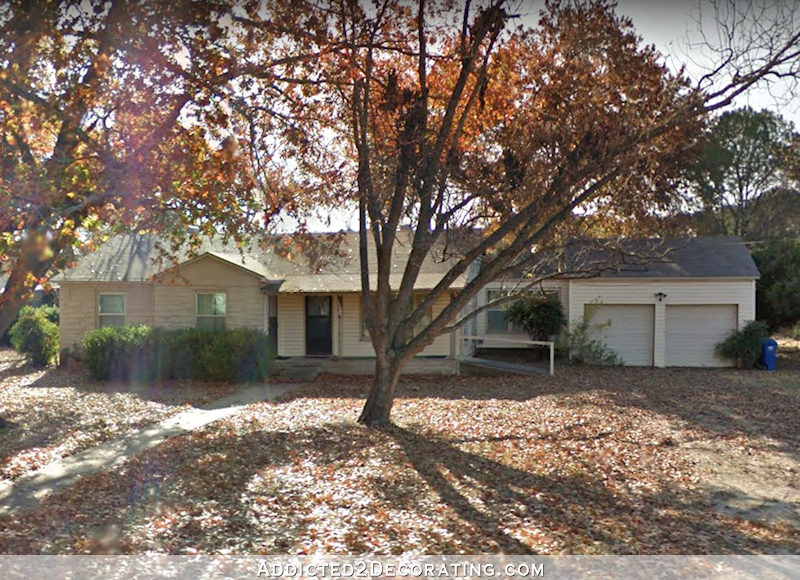
So much has changed since then. We got rid of the leaning (and dying) pecan tree. The garage is now my studio. We got all new siding and a new house paint color. The ramp and railing are completely gone. We got new windows on half of the house. The extra second door on the front porch has been removed and covered over. And I’m sure there’s more that I’m missing.

Unfortunately, I can’t find a “before” picture from the other angle showing the side of the studio, but that’s the side of the house that’s the most changed. I started out with a sad little garage with doors so narrow that I could barely fit my not-so-big car inside, and a dark and dirty front porch area…
…and now, those areas look like this…

One thing I do plan to change is the paint color on the vertical trim pieces on the corners of the studio. After getting the columns finished, I noticed that the vertical white trim just seemed too busy, and was competing with the columns. You might notice that I already painted the vertical trim pieces on either end of the porch, and I think it looks so much better. I had hoped to get the rest of the vertical trim painted, but I ran out of time. And that will make it more cohesive with the other side of the house since the stone doesn’t have vertical white trim pieces on the corners.
So it’s getting there! There’s still so much to do, but it’s come a long way since we bought the house.

Addicted 2 Decorating is where I share my DIY and decorating journey as I remodel and decorate the 1948 fixer upper that my husband, Matt, and I bought in 2013. Matt has M.S. and is unable to do physical work, so I do the majority of the work on the house by myself. You can learn more about me here.

From the Google pic to now it looks like you stretched your front porch! What a magician you are!!😜
You have to be so proud !!!
Wow. Just found your blog via Google search for ideas on my porch. I love that you bumped out the columns to make the door centered, so smart! Probably a blessing you figured out the rain damage early on vs years later with dry rot. I cant wait to see what you do over the concrete stairs! Doesnt even look like the same house not having all the bushes near the house really gives a clean view while making design choices. Amazing!!
It looks so great. Love the idea for the porch skirt. You are really amazing and a great inspiration!
Your house looks amazing! You are the prime example of how a good house that needs a lot of TLC can turn into a great house with tons of character and beauty…one project at a time. If I looked at a house like yours I would be so overwhelmed with the amount of work it needs that I’d have to just move on. But I am so happy that you are resurrecting this beauty. I loathe new construction homes…they just look so temporary! Keep up the good work!
You have so much to be proud of. Great job.
Right after you said, “Here’s what the concrete looked like, and what it looks like every time it rains…”, there came up a picture of a whole lot of rusty rebar. I could not figure out what you had photographed that would look like that. Took a second to realize that it wasn’t your picture! LOLOLOL
Love how the house is morphing into something wonderful!
I am in love and so jealous that I dont have a front porch! The trim over the cement is going to look amazing. Will you paint the cement black like you did under the porch flooor boards?
I’ll either do that, or I’ll use a concrete stain and stain it really dark. Since it’s obviously so porous, I think it would take stain really well. And since stain penetrates the concrete, it wouldn’t peel off in the future like paint might. But I’ll need to do a bit of research on both option and see which one makes the most sense. But either way, it will be very dark before I put the trim over it.
I love this idea of a concrete stain! The columns and porch are so beautiful, I think a skirt in front of the concrete will just compete. If it was my house I would leave the concrete as I personally don’t think the water thing is an issue – everything looks different when it rains, but the picture further down that you posted with everything dry looks nice to me!
It’s like night and day! I wouldn’t have bought the house as it originally looked. It’s so beautiful now!!!
You are Amazing!!
Ditto
Wow! The improvements are stunning! You should be so proud of your talent and hard work!! 😊😊😊😊
Awesome Kristi. I was going to comment on those vertical trim boards, glad you could see that they needed painted. The trim against the house porch floor catches my eye too.
A pergola like trellis over the studio windows would be cute, connect those two windows and add some dimension to that side of the house. ( I love a pergola)
Landscaping is going be the home run! I’m so jealous of that huge amazing tree. Please don’t skimp on the landscaping, go big go bold!
I’m actually planning on a trellis over the breakfast room windows. They’ll need something like that since there’s no enough room there to do the shutters and window boxes that I plan for the studio windows. And Matt and I were discussing this morning that we need a grand landscaping plan for that area in front of the breakfast room windows, but I’m at a loss. I know I want some sort of fountain/bird bath with gently flowing water and other things like that that will attract the birds, but other than that, I’m clueless. 😀 Landscaping is definitely not my thing, so I’m sure I’ll have to call in a pro for help.
We have a bubble rock fountain that the birds just love. And we gets lots of compliments on it from people who pass by.
Here’s a website
http://www.bluethumbponds.com/bubbling-rocks.html
I love that! That’s the very type of thing I’m hoping to have in that little area. I’d love to sit at that window at the breakfast room table and watch birds.
Birds love moving water as opposed to still water. And they want a hiding place nearby (bush/tree) where they can go to dry off after a bath. Just a bit of FYI! (They also love misters or light sprays!)
I’m glad you’re thinking of doing the bubble fountain for the birds! The trellis will be great for giving them a place close by they can fly to, so they can get away from predators. But, I do have to tell this story. I was at a friend’s house once in East TX, watching the hummingbirds feed at the porch overhang, and we saw a big, black rat snake hang his head off the edge of the porch and grab a little hummingbird!! It was pretty freaky, so I guess you might have to watch out for sneaky snakes!!
Great work – I know there’s much more you want to do, but it’s already night and day!
Mark
It’s a wonderful transformation. Good job!!!
Well done Kristi, it’s really beautiful. And once again you’re proving your eye for detail by painting those vertical trim boards. Also quite loved the mock up of those vertical boards on the porch foundation. What do you know – my least favorite of the options you posted but it does indeed look quite charming!
BTW, hope to see you pop one of these what-it-looks-like-now pictures from today’s post into your “current” Front Exterior & Front Yard” house tour post. It just keeps getting better and better! 🙂
Stunning difference…amazed how a new porch and new addition turned this very sad and neglected house into your sweet palace! “jello” and happy for you and Matt!
I wasn’t much of a believer in the non-lattice simple white trim for your porch but the mock up looks pretty good, I have to admit!
Looking good, Miss Kristi!
Two things… what are you plans for gutters and downspouts?
and two…. you might want to look into down there, but a couple different landscaping companies near me offer a landscaping master plan for $75-$100 (that was the price for just the front of my house.) (You get it all back if you buy your product from them.) This way you know what you’re working toward and as the budget and your time allows you can add in pieces. It was well worth it to pay them. I got some of my plants from them because they had unusual varieties, but I got the main pieces from my home improvement center (or late in the season when everything’s on clearance!)
You’re doing great…Keep on keeping on!!
For a little longer, I’m ignoring the gutter and downspout issue. 😃 I hate the thought of adding a downspout and having it wreck the look of my column, but I know I have to address the issue eventually.
A rain chain would be a good option, they are less abstrusive from a distance.
I do love a rain chain! I was looking at them just the other day and found two that I really like. It seems like the water splashes a lot, though, so I wasn’t sure if they actually do a good job at directing the water away.
I saw on Ask this old house where they set a planter at the bottom, with the chain going in to it, and filled it with river stones. You could include in that a smaller pot with a trailing plant, like Asparagus Fern, to soften the look. The rain water went through the rocks and out several drainage holes drilled into the bottom of the big pot.
We’ve had them next to a porch, and splash wasn’t a problem. They do usually have gravel/rocks at the base and in the ground a French drain type tubing to direct the water away from the foundation a ft or two.
I was just going to suggest the very same thing. A rain chain and French drain, you most definitely want to divert that water far, far away from the house!
Just beautiful! I’ll bet your neighbors are happy too. Can you make that non-lattice trim to cover the concrete foundation out of that same plastic wood you used to trim your column bases?
I’d definitely use the PVC boards. I don’t think real wood would last long at all that close to the ground unless it’s pressure treated. But even then, it wouldn’t last as long as PVC.
That skirt idea is adorable…would be so cute at a beach cottage, where sand wouldn’t be a problem. But do you really want to clean dirt and leaves off/out of it? Hosing it off won’t be great if it just hits the dirt and splatters up mud. And the leaves will get stuck in the slats. Unless you have pebbles/stones covering the ground. But the leaves would still be an issue, no?
How would you attach the PVC to the concrete? I was thinking construction adhesive. Old concrete like that I would not want to drill into and cause more problems. Also how wide should the boards be? I was thinking 3″ or 4″, but perhaps best to mock some up with cardboard and see what looks best on your own porch.
Kristi,
you are really doing a great job. I love that you are doing the outside. I bet the neighbors compliment you !!
What a fantastic transformation! I can’t wait to see what you do next.
Wonderful job amazed at your work ethic.
On the side question, in one of the pictures I see little coloured flage, when on holiday in Florida we noticed them and assumed they mark cables or pipes, can you please tell.
I’m in the uk
Lez, the little flags are used to mark the utility lines like electrical, gas or cable before construction.
Yes, what Shannon said. 🙂 I’m planning to have a landscape pro come out very soon to come up with a plan for me, hopefully including an irrigation system. Any time you plan a project that will include digging, there’s a number you call and they’ll notify the various utility companies to come out and mark the lines for you. So far, they’ve marked the gas, sewer and water lines for me. I’m guessing that’s all of them, because they were supposed to all be marked by yesterday.
Electric lines🙂
We’re in an old part of town. We don’t have underground electric lines. Our electric lines are all on poles about 20 feet high.
Thank you all. At one place we went through they all had the flags I fact so many we thought it was some sort of celebration lol.
Looks great! Can you tell me what photo editing software you use? My house has a dark barn red steel roof and we are going to be replacing the siding this summer. I’ve been looking for software to use so I can do some color coordination with the siding and the roof. I don’t think im going to have many options.
Most of the big paint companies have on-line programs in which you can up load your photo and then change different elements to a color of their paint. Might work for your purpose.
i will check that out! Thanks!!
I think the paint companies’ websites are the easiest way to “test” paint colors on a house. The software that I use is called Paint Shop Pro. I bought it on Ebay, but you can also find it on Amazon. It’s a great program, but there’s a learning curve, and I still haven’t figured out an easy way to change colors on things. I think that Photoshop makes that pretty easy, but it’s a very expensive program.
You are making such nice progress now, Kristi! I love how the columns tie in with the style of the mailbox, too. I have forgotten (sorry!), are you building a ramp on the back of the house for the wheelchair? Or are you doing something at the studio/office door? Everything is looking so crisp and fresh! I’m so glad you painted your front door that cheery coral! Great job! 🙂
For immediate use, we have a ramp going from the doors of the music room down to the sunroom and out the back door. But the final plan will include a back deck directly off the family room door, and that deck will have a ramp down to ground level. And then there will be another ramp from the French doors at the back of the studio to the carport. That’s the one that will probably be used regularly.
I admire your fortitude, ambition and vision. Great jobs on everything. I also enjoy the comments from your loyal fans. I’m sure they will help you with landscaping.
Incredible! It looks fantastic! Congrats on all your hard work.
A few flats of annual flowers in front of the porch and maybe a few buckets would do wonders until you can organize and implement a full landscaping plan (if it won’t be right away).
Such a beautiful transformation!
The whole thing looks great and I love the vertical lattice around the skirt of the porch. It will add some real interest. I can’t wait to see the addition of window boxes and trellis!
Don’t ignore gutters too long…I have very similar columns and ended up having to replace the wood of the fascia and columns at one end from the rot that developed since rainwater wasn’t being siphoned away. Lesson learned after having to do all the repair work!
Nancy
It is looking pretty amazing. The front porch looks inviting and I do agree about the vertical trim being painted the same color of the house. Keep up the good work.
Fantastic transformation to date! Looking forward to seeing it finished.
I agree with some others here. My least favorite covering of concrete under porch turns out best in your mockup! Love it! You’re simply amazing!
Absolutely ahhhhmazing. You remain my hero!
I like your mock-up skirt. I would also leave the water table trim on your house below the porch white to tie into the skirting. Even your mock-up little garden is perfect 🙂
Such a talented handy woman!!
Love what you did with the house. However, I am not 100% sure I like the color of the stone with the gray of the rest of the house. Have you thought of painting the stone, maybe a lighter, fresher color?
Congrats on the hard work!
The stone is painted the exact same color as the siding.
Your improvements are amazing! Beautiful!
Love it all! The vertical trim looks much better painted the house color. There’s another little section that would also blend in better if painted that color; it’s the corner up above the porch next to the trim. I have that same configuration on my house and couldn’t figure out what I didn’t like about it till I changed it from white to the house body color (also a similar gray as yours). It blends in and looks MUCH better now.
Do you mean the trim that’s visible in the second picture of the close up of the top of the unfinished column? If so, I’ve already painted it the house color. I did that on both sides of the porch, and it does look so much better. The one area that I can’t figure out now is the outside side of the porch roof (on the right side of the porch) that’s visible in the first photo. It has both siding and trim. I originally had the siding painted the house color, and the trim (horizontal, vertical, and angled) painted the trim color. I hated it. So yesterday I painted it all white, but I don’t like that either. I think the horizontal part that meets the columns needs to be white, and the angled trim close to the shingles needs to be white. So I guess next I’ll try painting the little bit of siding plus the vertical trim board the house color. Hopefully that’ll be the right combo, but I’m totally open to suggestions.
Yes Kristi, THAT”S exactly what I was talking about…that piece that you’re puzzling over. I think you’ll like it painted the house color, trim and all.
Wow! Its a stunning improvement already. Your across street neighbor must love it! I always like when my neighbors do improvements!
Agree! At our old house, the house across the street was totally bare of plants for about 5 years, and in one window upstairs they had alternating curtains – orange, blue, orange, blue. Drove. ME. CRAZY!!! They FINALLY landscaped, with shrubs, flowers, a tree and decorative rock. YAY! Better. But when we move two years ago, those curtains (now faded) were still hanging. Also, they had some sort of lacy curtains in the master, which you could see right through. I mentioned it to them in case they weren’t aware, but they didn’t seem to care. PEOPLE – Look at your houses from across the street – day and night! I also had a friend who realized after two years that you could see her in the bathroom from behind her house!!!
I has to feel so rewarding to drive up to your home now! Looks great, and just think, it’s not even finished!
Wondering what kind of comments you’ve received from the neighbors? They better be upping their game cause your house looks amazing!! 🙂
Irrigation tip…have it “hard piped” (PVC). The old method of using flexible pipe does not last, it develops “splits”. You fix one, another one occurs. I learned about this issue after having my own “repaired” 3 times. Pony up for several valves; the turf requires one schedule, trees another, bushes a third.
I think what you have done to the exterior is just fabulous!
Yay, you like the same skirting that I do! It really looks good on your house! The before and afters already are awesome, so it will be stunning when completed!
Such a transformation, your home is looking just beautiful Kristi. You must feel so proud of what you’ve done already as the curb appeal is looking so totally different, new, fresh, stylish. The front door color looks awesome and can’t wait to see the difference with all the decor touches added…….shutters, planter boxes, new steps, landscaping. You’ve done an amazing job, kudos to you. Well done. I imagine your neighbors are so envious?
Spectacular and totally inspiring. You are my hero, literally.
My vision includes pretty shutters and window boxes full of flowers on those other 2 front windows.
So does mine. 🙂
https://www.addicted2decorating.com/my-vision-for-my-house-exterior.html
You have probably made your neighbours so very happy!! You’ve done a stellar job. Congrats.
My, O my! Your vision is coming to life. I salute you, your vision, your perseverance, and craftsmanship! How I wish it were 30 years younger right now.
It’s coming together. While I originally wanted you to paint the cement, I think the vertical lattice will look nicer with plants in front of it. I like the columns very much – clean and bright.
Love following along, you inspire me to dream bigger on my home diy wish list. Thank you.
Love how the porch is coming along. Regarding the skirting, your mock up looks great but it is only the view of the porch. Feel like a whole house view mock up would perhaps lead to the stone option for the foundation area. Especially if the stairs/railings will be white. Just a thought.
I think the neighbors are waiting with bated breath to see what happens next ;^)
It is looking beautiful!!
blessings,
J
I am also a committed DIY’er about to make a canopy over the kitchen door of my recently purchased, 1925 home- a door that takes pounding rain during the winter. Although I have reasonable carpentry skills, I’ve never tackled anything quite like this and reallly needed guidance, especially with figuring angles and loads. I truly appreciated your step by step instructions- so clear and easy to understand. Thanks for sharing your adventures- you house is looking beautiful!
It looks wonderful! Can you tell me how deep your porch is? I am hoping to do something similar but husband says our area is too narrow. I don’t agree and am showing him your pictures!
My porch isn’t very deep. I can’t remember the exact measurement, but it’s 5 feet at the most.
Nice upgrades.
I feel better tackling my column base molding. Thanks.
I’m impressed there is so many things we learn the hard way but it makes a great education. You should be proud, I’m proud for you and your husband. A really nice job.
I JUST found your posts showing the transformation of your porch and my hat is off to you! What a difference 😁! I am looking to do the very same thing EXCEPT that the level of the new porch floor needs to be raised about 10″ to eliminate a “step-up” from the concrete porch to the front door threshold that is a trip/fall hazard. I am planning on sealing the concrete as well as any treated wood that is used to provide structure but then using composite for everything else. There are many little details to consider that you were able to point out (thank-you!) and some I have yet to figure out before I start. The most important that comes to mind is what, if anything, should I do about the bottom course of vinyl siding that will be obscured and inaccessible once the floor level is raised. We plan to replace the siding eventually. You did a fantastic job!
WOW! I did an inquiry on how to box in front porch posts and yours came up first. I need to look…no further! Thank you so much! Some people teach, some people instruct. But, young lady, you inspire. I’m on it! My posts (8) are 6×6 and twisting slightly after 4 yrs of the house construction in Tennessee.
Oh, good! I’m so glad you found it helpful!
I can relate to some of the frustration you dealt with, However, your patience prevailed and you did and incredible job on your home. Each mistake you make in the process, and you correct it just makes it easier on yourself when you tackle your next project. Again ….Well Done!