The Finished Studio Door Steps – Painting My Exterior Concrete Steps (Products I Used And Why I Chose Them)
The steps to the side door of my studio are finally finished! I got the final step done yesterday — painting the concrete steps. I’m so relieved to have this project done. It took me a while to figure out exactly how I wanted to finish the concrete steps. I knew I probably wanted to paint the steps from the outset of the project, but figuring out exactly what product to use was a challenge for me. So I’ll tell you exactly what I used and why I made that decision.
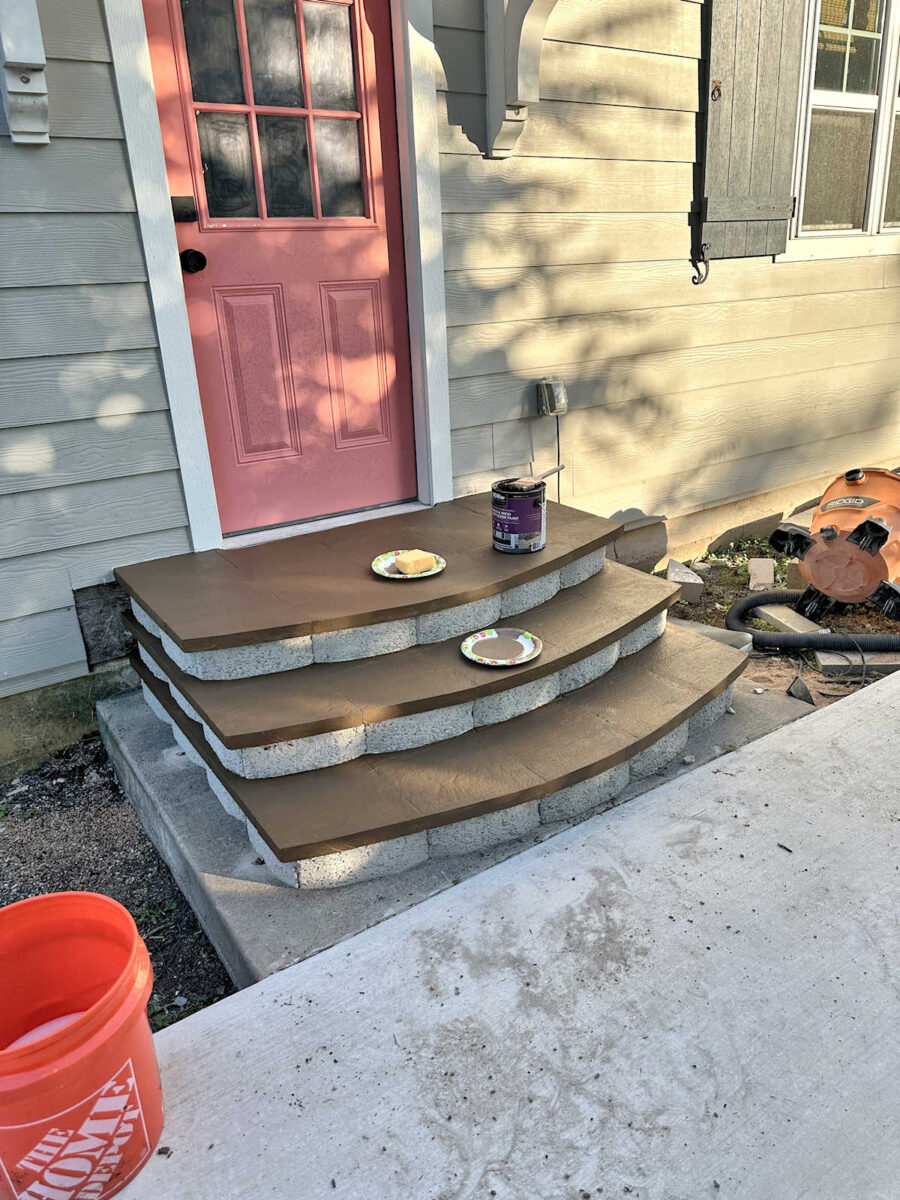
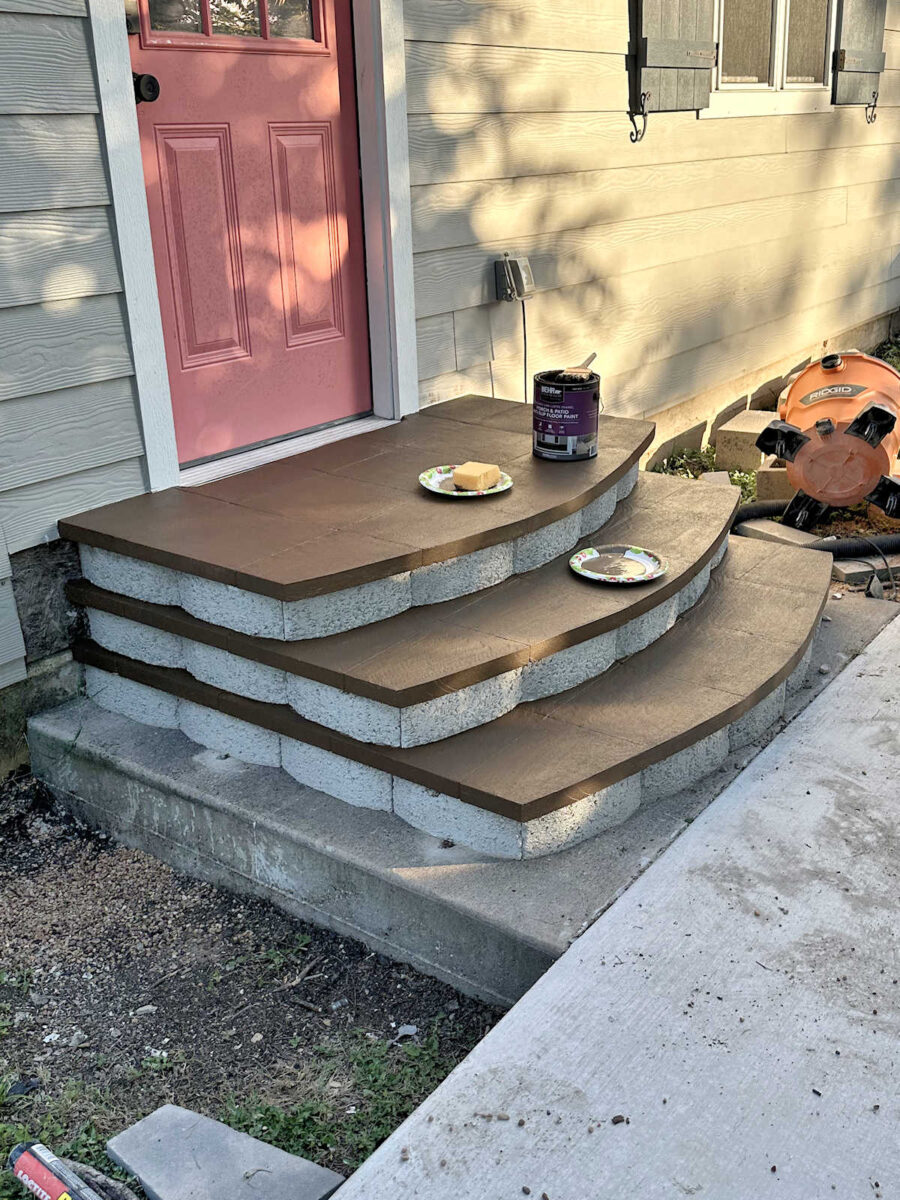
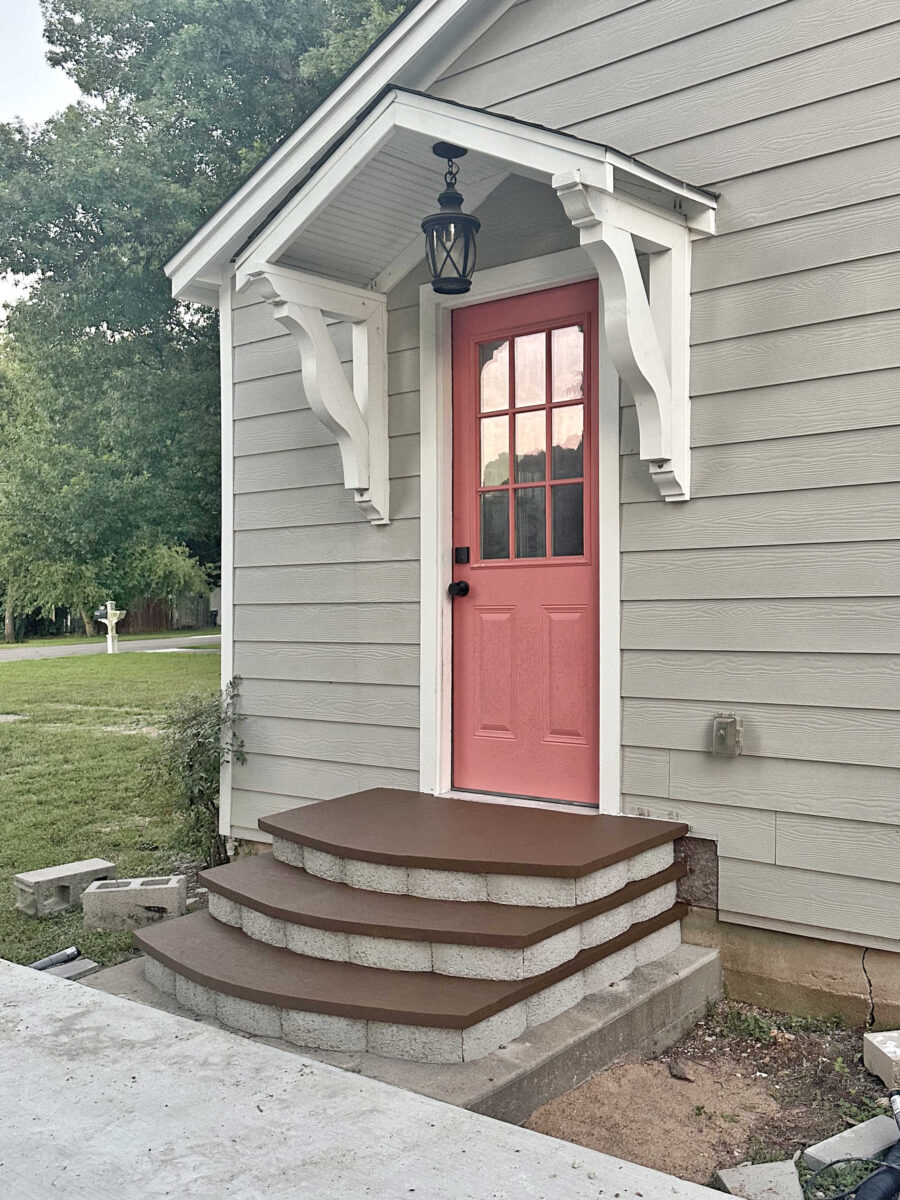
But first, here’s a look at the finished steps.
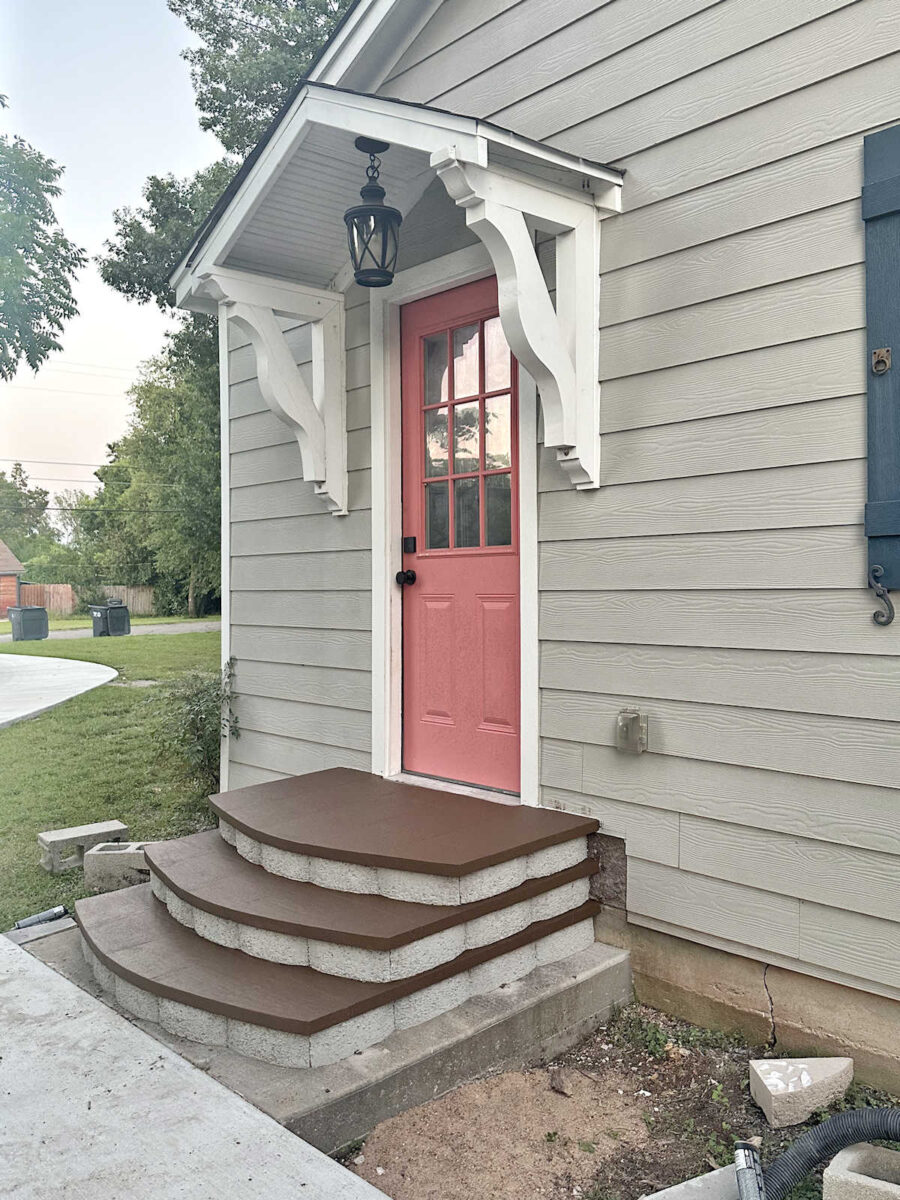
I still need to cover those exposed areas of OSB on either side of the steps where the siding had been previously removed, but for now, at least those areas are waterproofed.
NOTE: This is a multi-post project. You can find all of the posts about this project, from start to finish, here: DIY Exterior Concrete Steps Archives
You can see the previous post in this series here: Painting And Finishing My Studio Steps
As I said, I really struggled with deciding on how I wanted to finish the steps. Deciding on paint for the risers wasn’t difficult at all. I just used the same paint that I used on the rest of the house, including the stone portion of the house, that has held up great for several years now. For the risers, I used Sherwin Williams Duration exterior paint in a satin finish. But there are far fewer considerations for painting risers than for painting steps. Obviously, the risers won’t get the wear and tear that the actual steps will get since they’ll rarely be touched. But people will actually walk on the steps, so I put a lot more into this decision.
During one of my many trips to Home Depot, I saw this product called Granite Grip. I had never seen this before, so I came home and did a lot of reading about it, including the process required to apply the product and the customer reviews.
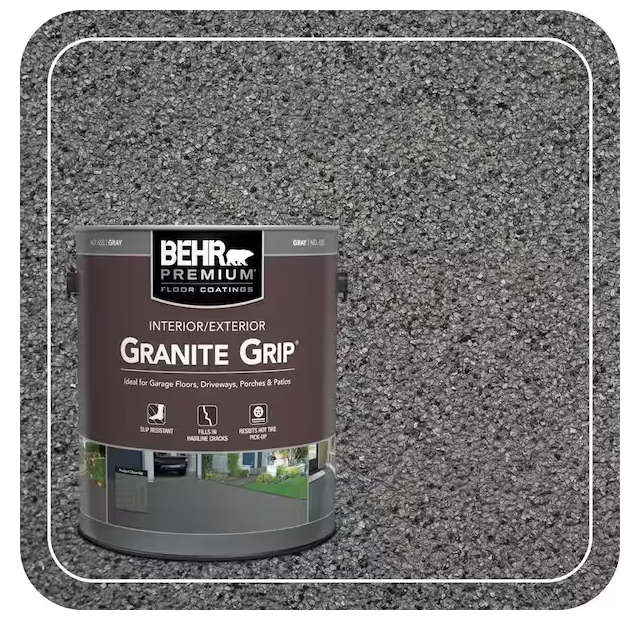
The whole process seemed exhausting to me. You have to clean the concrete really well, preferably with pressure washing. Once it’s dry, then you have to use a chemical to etch the concrete. Once that’s washed off, then you have to let it dry thoroughly and then prime it. And then finally, you can apply the Granite Grip. But from the reviews I read, it’s a very thick product, and it has to be applied with a special roller cover (and adhesive roller cover) which I didn’t even know existed until two weeks ago. The reviews were mixed, but the people who loved the product followed the steps meticulously, and a lot of them seemed certain that the people who didn’t have success with the product probably skipped steps and didn’t follow the instructions precisely.
So I bought all of the products needed — the Granite Grip in a dark gray color (one of the off-the-shelf colors available), the etching chemical, the specific primer recommended in the instructions, and the adhesive roller cover. But after a long day of working on the steps (I was still building the steps at the time) on a hot day and working in the direct sunlight, I decided I didn’t want to go through all of those steps, so I returned everything.
Two days later, I decided that I should never make those decisions at the end of a work day when I’m exhausted, kind of like how you should never go grocery shopping when you’re really hungry, so I went back to Home Depot and bought all of the products again. 😀
But I was still unsure. First, I was unsure about the color. I really didn’t want dark gray steps. One of my main goals was to have consistency from these steps to the front porch to the steps that I’ll eventually build at the new bedroom door, all of which can be seen from the front of our house. And as you know, I’ve also been searching for a new solution for our front porch. The front porch is wood (cedar, to be specific), but after trying at least four different sealers/stains for exterior porches, I haven’t been satisfied with any of them. They all seem to look great right after the porch is re-sealed, but that new, beautiful look doesn’t seem to last long at all.
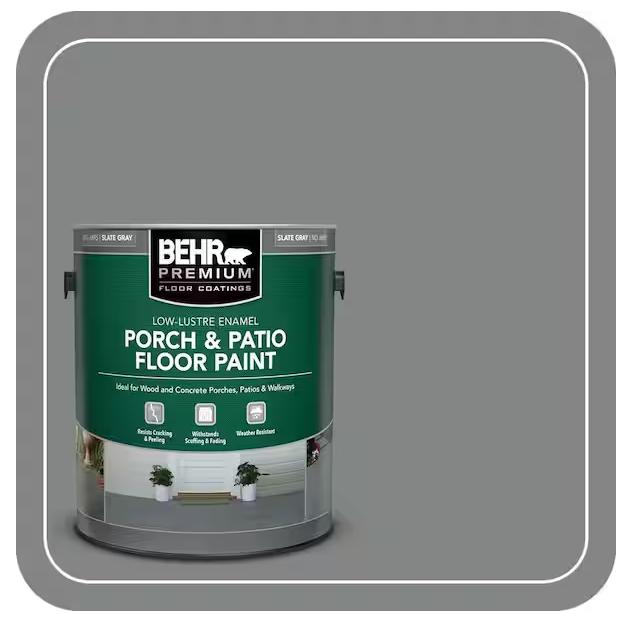
So I went back online to see if there were any other products that I could use not only on the concrete steps, but also on the front porch. And in my search, I came across Behr Porch & Patio Floor Paint.
I actually have experience with this product. This is what I used to paint the hardwood floors in my studio. Here’s what they looked like right after I finished the studio in October 2024.
And these floors have held up amazingly well. I have been so impressed with how durable this paint is. My studio is a very high traffic area, but this paint has held up against all of it. To date, I haven’t had to repaint any of the high traffic areas. It has held up against my abuse as I’ve brought in lumber, plywood, tools, etc., while working on our bedroom suite. It has held up against Matt’s wheelchair as he uses his exercise bike three hours a day. It has held up against a big, rambunctious dog who won’t let me touch his feet (so clipping his nails is out of the question) who loves to play in here. It is the best paint I’ve ever used on a floor.
I painted this floor in June 2024, and then went on to build cabinets and finish the studio, and y’all know I’m a very messy DIYer. And yet, two years later, the floor still looks great. It needs a good cleaning, but the paint still looks great.
But that’s indoor use, and I wasn’t sure about using it outdoors. My main concern is that painted surfaces can be slippery when they get wet, and I don’t want to turn my steps into a potential slipping hazard when it rains. But then I noticed that this product also comes in an anti-slip formula. It’s basically the same paint with a sand-like product mixed into it to give it more texture.
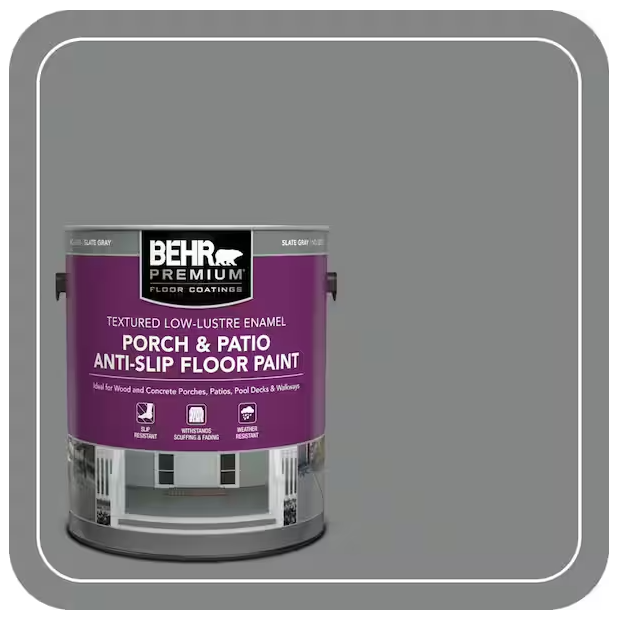
So that’s what I finally decided on. I returned the Granite Grip and the rest of those products…again…and I bought my favorite trusted primer (Zinsser shellac-based primer) and a gallon of the Porch and Patio Anti-Slip Floor Paint. And since this product can be mixed in any of the Behr color, I chose a color that would work not only on these steps, but also on the front porch. I’ll be using this on all three areas so that they coordinate with each other.
I showed you yesterday how I prepped and primed the concrete pavers. This is what they looked like after they were primed.

I let the primer dry overnight, and then the steps were ready to paint. Since this area is so small, I didn’t even bother with a roller. I just used a brush to apply all of the paint. I brushed on the first coat and then gave it a few hours to dry. Then I applied the second coat, but this time, instead of brushing, I used more of a pouncing method so that the brush strokes wouldn’t show. I also had the idea of sponging on a little bit of exterior paint in a lighter color to get a more mottled look.
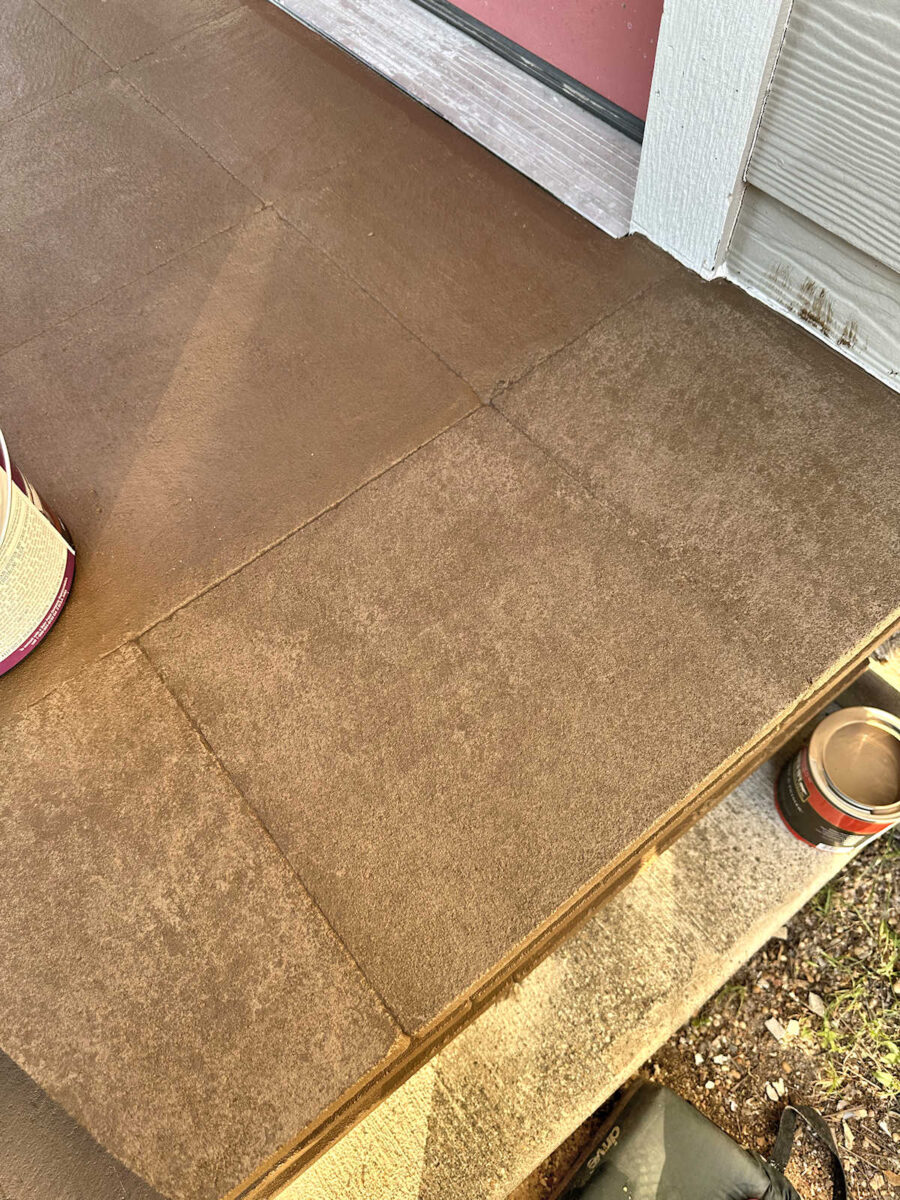
But after trying that out on three of the pavers, letting that dry, and then standing back to look at them, I decided that the look wasn’t worth the added effort. After letting it dry, and then looking at it from a distance, it really didn’t seem to make that much of a difference.
So I abandoned that idea and just painted the steps with the solid color, using that pouncing method with the brush on the whole area.
I am very pleased with how these steps turned out. They were a lot of work, but I really enjoyed working with different materials. I’m so accustomed to building with wood, so this was very different for me. I loved getting out of my comfort zone and learning new things, though. There was a lot of trial and error that went into this, but now that I’ve done the whole process from beginning to end, I think I can do the next set of steps faster. And thankfully, the steps to the bedroom door are in the shade most of the day. Working in the direct sunlight on this side of the house was really exhausting. I had to wait until about 8:00pm last night to take good pictures of the finished steps because this area is in the direct sunlight, with no shade cover at all, from sunrise until sunset.
I’m especially excited to finally have proper steps at this door. Here’s a reminder of what I had before. I was using plain cinder blocks to get in and out of this door.

And here’s the doorway with the new, finished steps. Now I just need to get the door repainted. Check out how much that door has faded since I painted it. 😀 But again, this door gets more sun than any of the others.
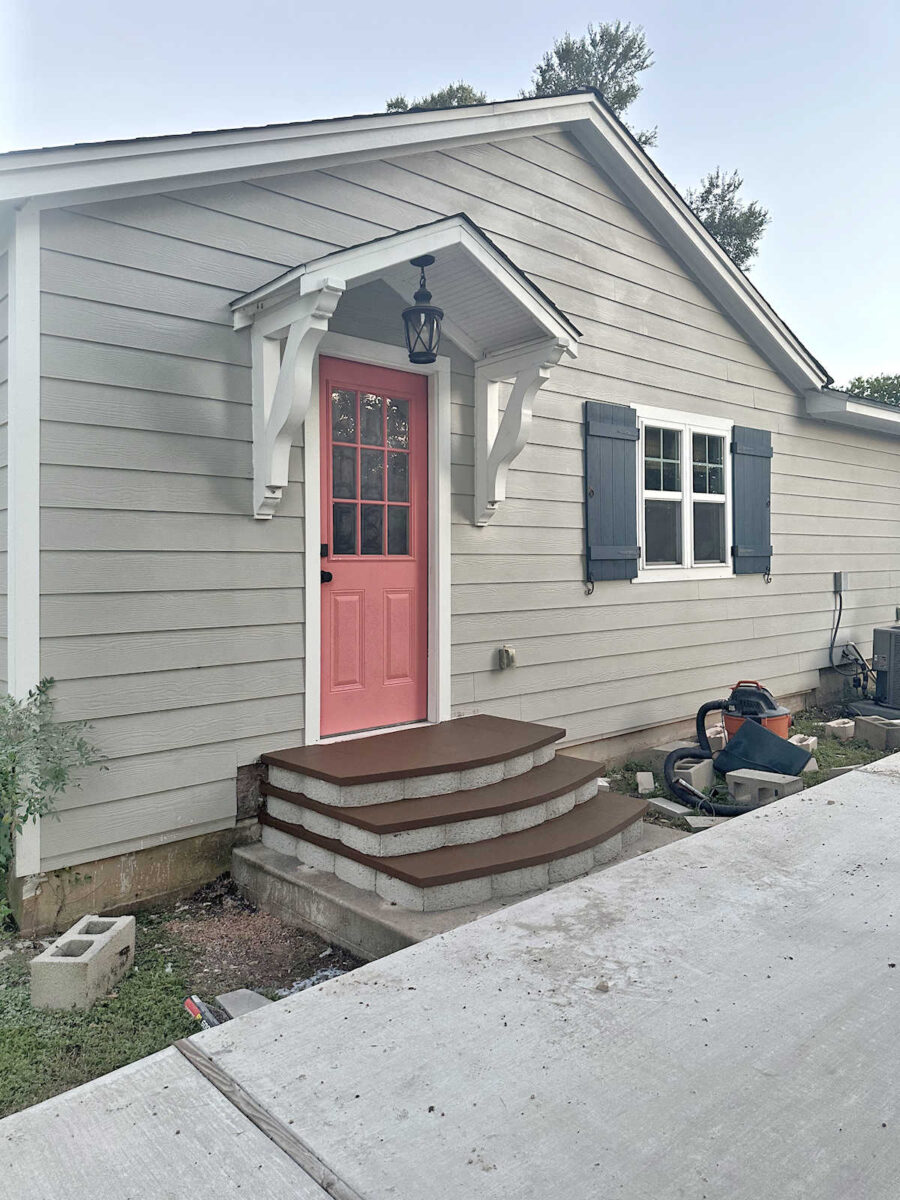
Now that the steps are completely finished, I can’t wait to get the door painted and get some landscaping in place on both sides of this door! I think it already looks cute, but I can just imagine how cute it’ll look once I have some plants and a freshly painted pink door.
NOTE: This is a multi-post project. You can find all of the posts about this project, from start to finish, here: DIY Exterior Concrete Steps Archives
You can see the first post in this series here: Studio Side Steps Progress (DIY Steps With Retaining Wall Blocks And Pavers)
More About Our House Exterior & Yard

see all exterior &
yard diy projects

read all exterior &
yard blog posts

Addicted 2 Decorating is where I share my DIY and decorating journey as I remodel and decorate the 1948 fixer upper that my husband, Matt, and I bought in 2013. Matt has M.S. and is unable to do physical work, so I do the majority of the work on the house by myself. You can learn more about me here.

It looks great! Your steps are great, too. Looking forward to seeing the beds with flowers.
Well done – it looks great!
It camenout amazing. Great job!
Looks so amazing! Thank you for always taking the time to explain in detail the pros and cons of some of the products out there today. That is priceless information when you consider that some of us live over an hour away from a Home Depot or Lowe’s, time is money after all. Looks so professional, heck, better than the professionals I know. I am pretty sure that this would translate well to the bedroom door with a small patio area.
Cheers to you, Matt and the Fur Team!
I am really liking this! May I ask what color you used for the BEHR paint. I am looking for a color that I can use to match or coordinate with my decking. The Cedar Toned stain I used made the wood a darker brown which I ended up liking. but I have some concrete steps to paint and possibly will do the foundation to tie it all in. From your pictures this color may work for me.
Oops! I meant to add that info! It’s a Behr color called Rustic Tobacco.
Just popping in to mention that I am utterly charmed by “the pouncing method.” I know it means something specific, but I picture a fox hunting in winter, which is always a delightful scene (unless you’re a field mouse).
The “It looks fabulous – well done!” is always understood, so no need to mention that!
Haha! I love watching foxes hunt in the snow! I’m just as amazed at their ability to hear their prey scurrying beneath the snow as I am at watching them dive into the snow and come up with a meal.
AH, I pictured them like that since they would look so nice with the front porch. Beautiful finished job…loved your ideas for this one. The finishing touches will be wonderful! Add a new color on the door, and some plants/flowers that love sun…done!
Would a coat of poly over the paint on the door keep it from fading?
It might if I use an exterior poly with U.V. protection. I think General Finishes has one. I’ll have to check.
Looks fabulous! You’ve mentioned building stairs by the bedroom – are you also building a ramp?
Yes!
Those steps won’t have a permanent ramp, but there will be a ramp available.
Love how they turned out! Fabulous work!
can I ask what color you had the porch paint tinted to? It does look great just like cedar wood.
Of course! I meant to add that to the post. The color is a Behr color called Rustic Tobacco.
Love the color. The whole finished project is fantastic! Can’t wait to see the bedroom steps and landing.
It looks really good! But it isn’t REALLY finished until you get that siding in place along the sides. I’m taking bets now! LOL!!! Please prove me wrong!
The steps look fabulous! Love that dark brown color, which ties in so great with the front porch. I wanted to make a suggestion about working in that hot sun. When I have to stain our deck, which is in the afternoon sun, I take the umbrella base of our outdoor table set and place it nearby and then add the tilted umbrella . I can easily slide it along as I work, and it does a tremendous job reducing that hot sun shining directly on me!