Stationary Built-In French Door Panels (French Doors Used As Interior Sidelights) – Basic Build
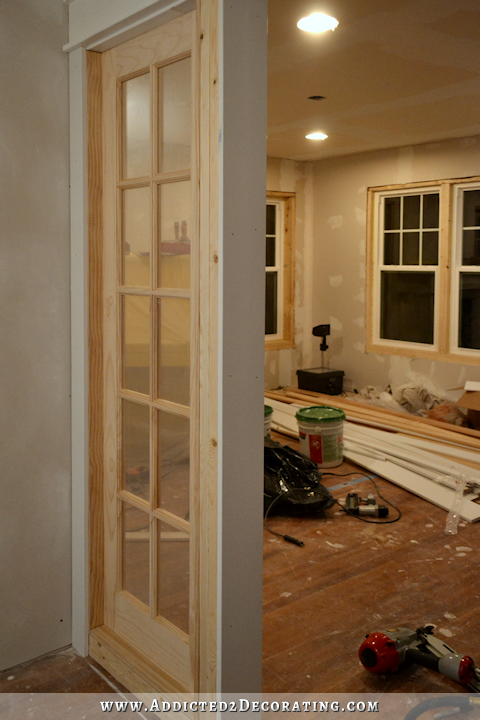
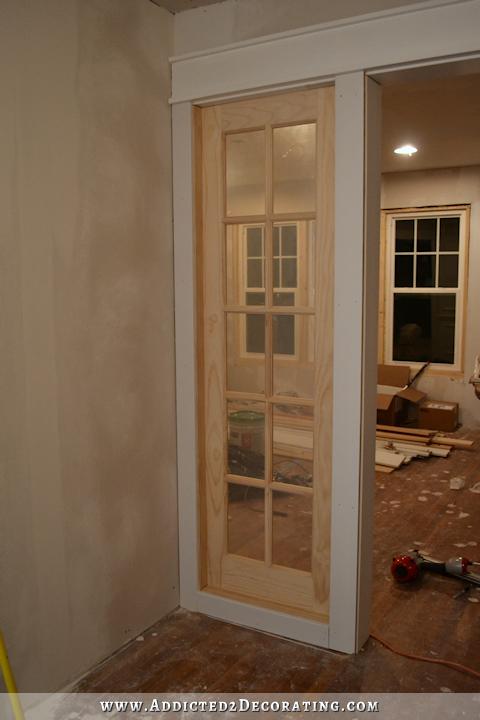
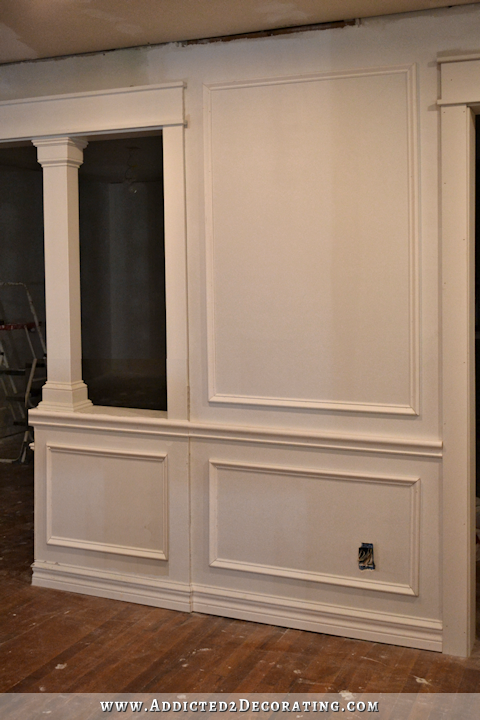
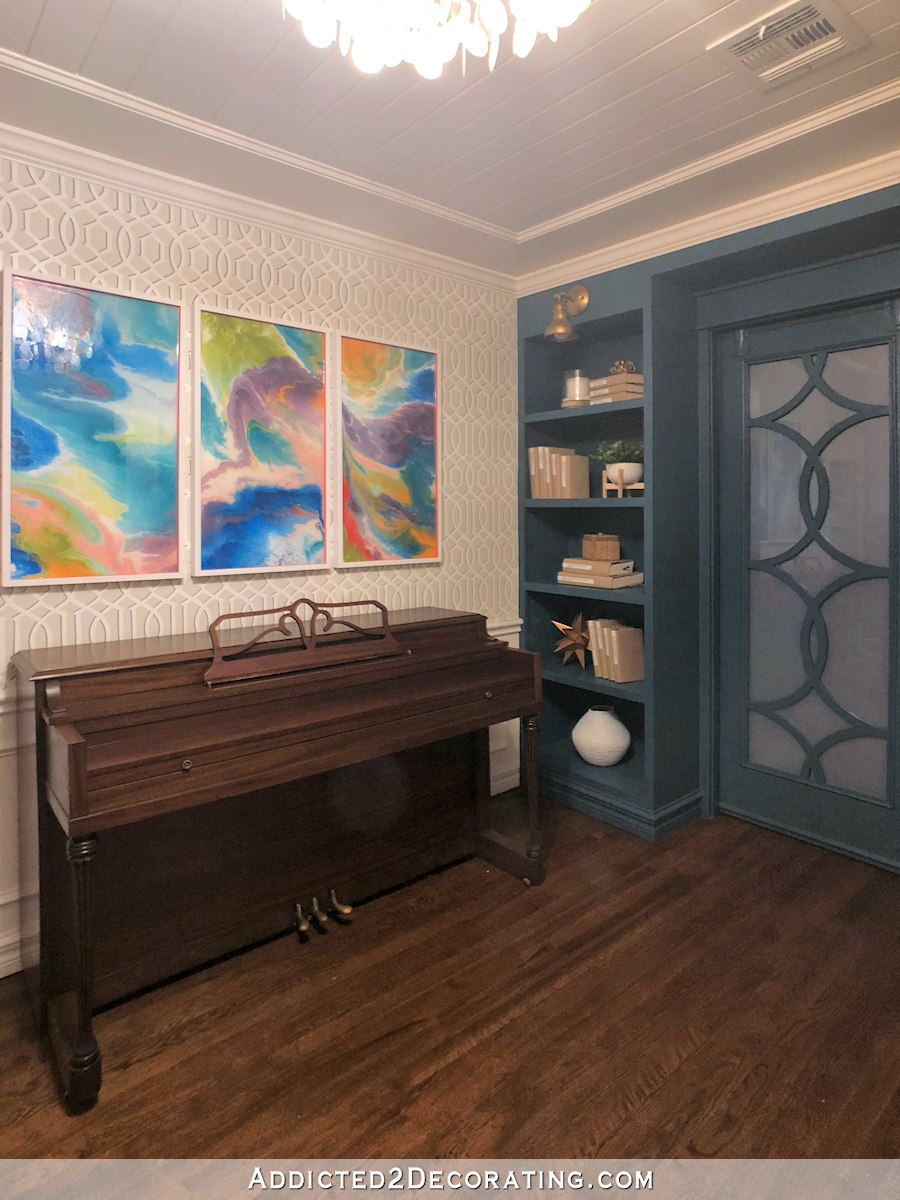
I got one of my stationary built-in French door panels installed yesterday, and I absolutely love it! I know some of you had some questions/concerns/other suggestions, and I’ll address those at the end of this post. But first, here’s how the first built-in French door panel looks so far…
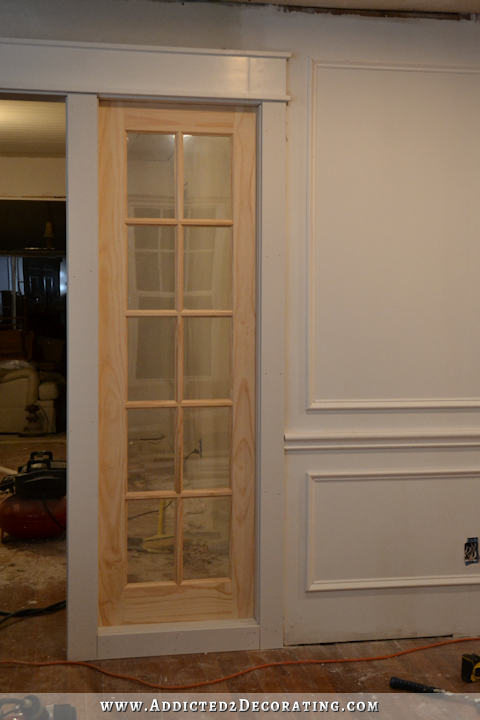
Of course, there’s still a lot of work to do on it — wood filling, sanding, caulking, priming, and painting. But the basic installation is finished on the right side. The glass also looks not-so-clear because there’s plastic over each pane. I guess it comes that way so that the door can be easily painted/stained without having to tape everything off first.
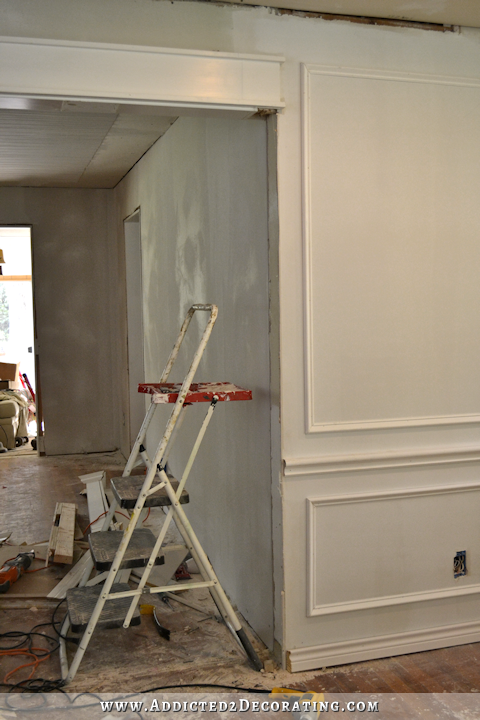
Anyway, this was one of the easiest projects I’ve ever done. First, I had to remove the pony walls and columns. I removed everything down to the side wall, but kept the top jamb and casing in place.
Then I nailed a 2 x 6 to the wall using a framing gun, aligning it as perfectly as possible with the top jamb and using a level to be sure the board was plumb.
And then I added a second 2 x 6 on top of that using my framing gun and 3-inch framing nails.

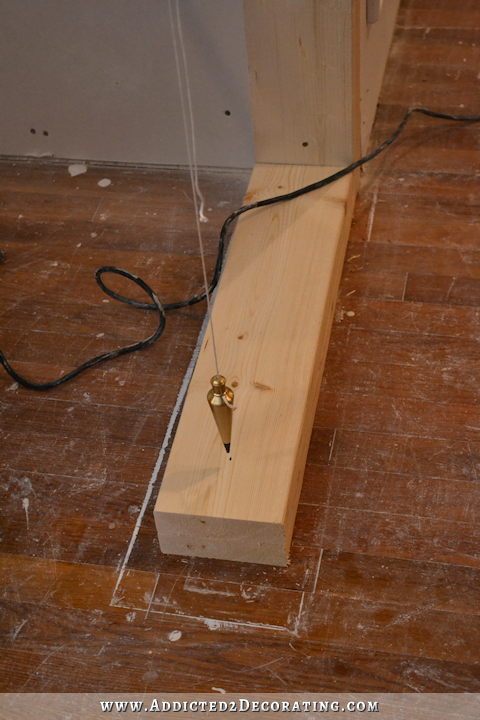
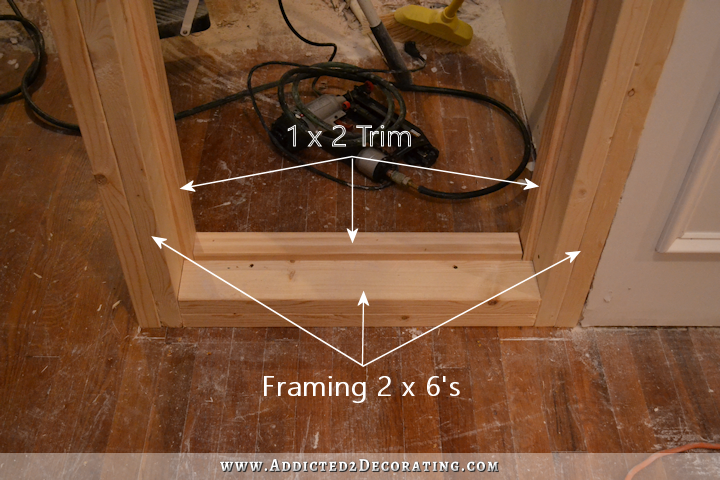
Next, I measured over on the top jamb about 22 inches from the wall (since I was installing 24 inch French doors), and put a screw in the center of the jamb. (The jamb is 5 1/2 inches wide, so I measured 2 3/4 inches and placed the screw at that center mark). Then I hung my plumb bob from the screw. I cut two 2 x 6 boards to the width of my French door plus 1/4 inch. (My French door is 24 inches wide, so I cut the boards 24 1/4 inches wide.) I marked the center of the boards on one end and aligned that end with the plumb bob, and then aligned the other end with the vertical 2 x 6’s. I installed the two boards individually, nailing the first to the floor with a framing gun, and then nailing the second board to the first board.
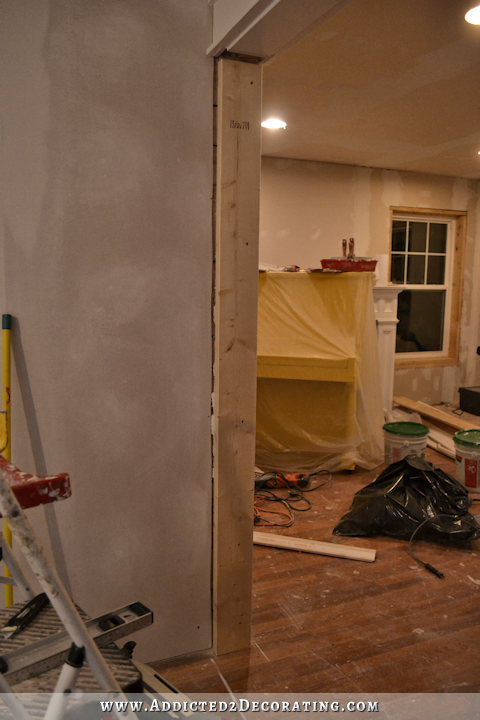
And to finish up the framing, I installed two more vertical 2 x 6 boards. I cut these so that they fit tightly into the opening. I installed the boards one at a time, nailing the first board into the two horizontal base boards at the bottom. Then I nailed the second board to the first board, and then toenailed two 3-inch screws about an inch from the top of the 2 x 6 and into the top jamb. Of course, I used my level before screwing in the top to be sure the boards were perfectly plumb.
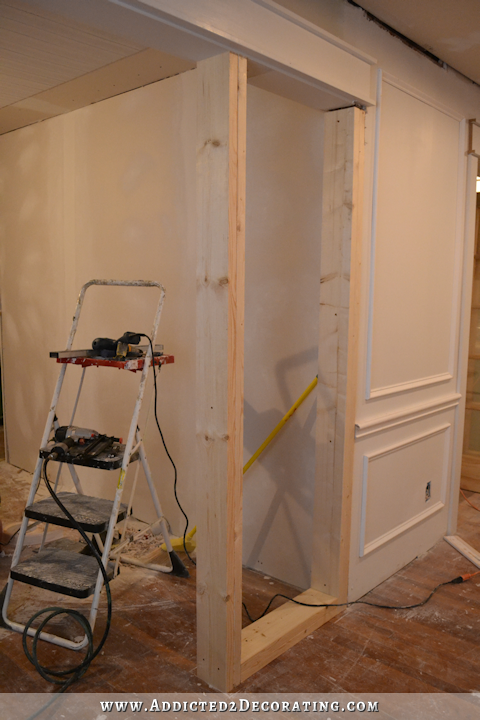
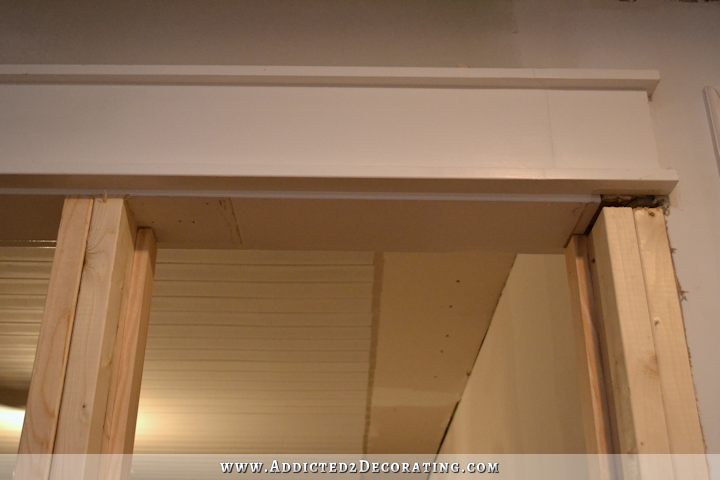
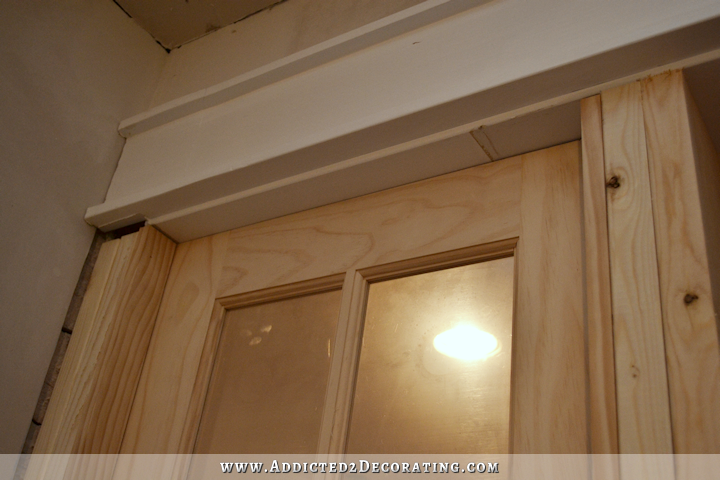
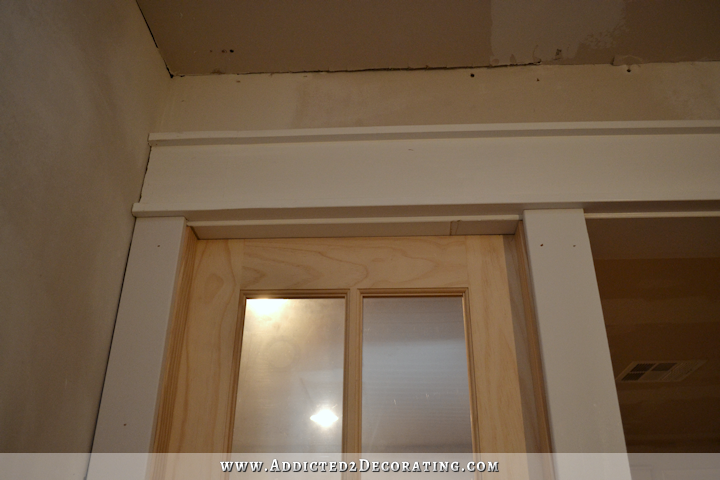
That finished up the basic framing. You’ll notice that I didn’t put any framing on top. The reason for that is because the top was already finished, so there was no need to add additional framing, which would then have to be covered up with more trim pieces. Had I done it that way, the top would have ended up looking very heavy.
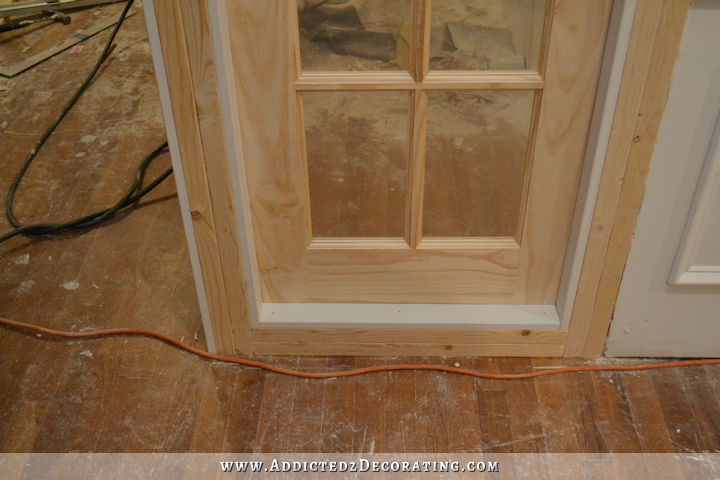
Next I started adding trim pieces. These trim pieces serve a very important function in that these are the pieces that hold the French door in place. I had to use my table saw to rip these boards down to the correct width. The 2 x 6 framing boards were 5 1/2 inches wide, and my door was 1 3/8 inches thick. That left me with 4 1/8 inches of space that needed to be covered with trim, so divided by two, that meant that the trim boards on each side needed to be 2 1/16 inches wide. I ripped those down from 1 x 3 lumber, and then cut them and installed them along the back edge (i.e., the edge closest to the music room) of the framing boards. I installed these using 2-inch 16-gauge finishing nails.
I only installed a trim piece on the bottom and the two sides. I did not install one on the top, and again, that’s because the top was already finished. The trim board (i.e., the top jamb) was already in place and painted, so there was no need to add yet another trim piece.
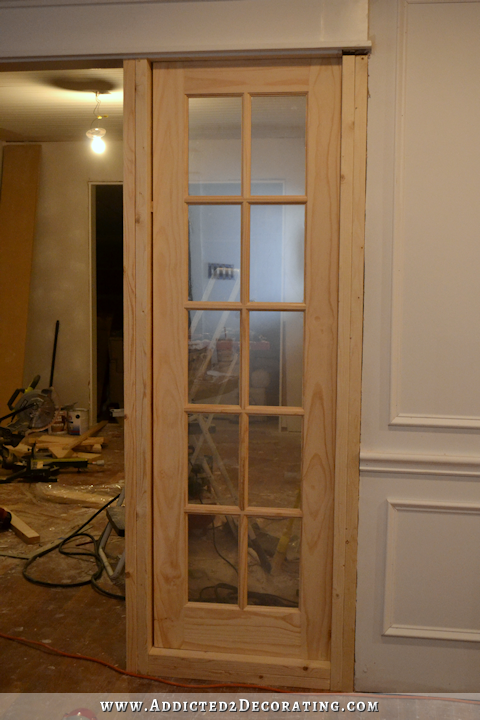
With those trim pieces in place, I was ready to measure the height of the opening, cut my French door to the correct height using my circular saw, and slide the door into the framing and up against the trim pieces. Once it was in place, here’s how it looked on the back side. You can see how those trim pieces are what hold the door in place.
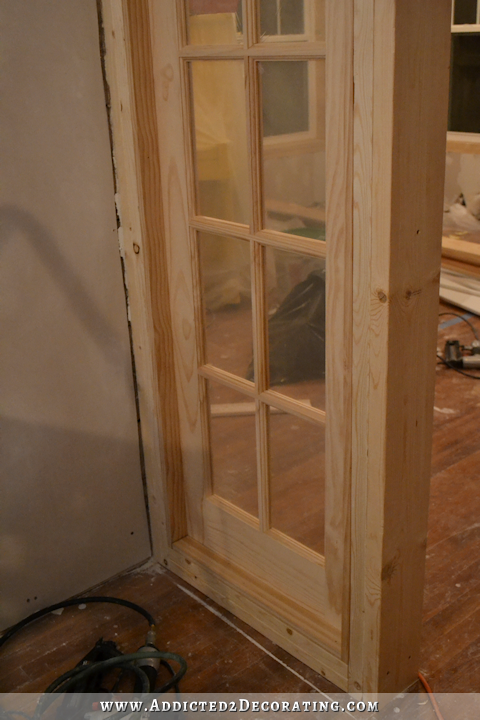
I cut my door so that it would fit very snug at the top and the bottom. And here you can see how the top jamb blends right in with the side trim boards with the door installed. There’s a small gap, but that’s nothing that caulk can’t fix!
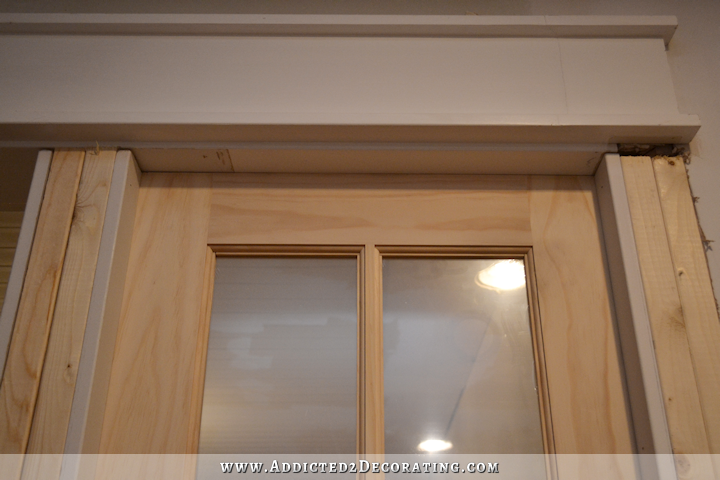
And here’s how it looked from the front side. At this point, there was nothing holding the door in place on this side. I still needed to add the bottom and side trim pieces to the inside of the framing to hold the door in place on this side.
I would generally do that first, but since my door was in there so tight, and there was no chance of it falling out, I went ahead and finished up the casing on the back side. I was anxious to get one side finished. 😀
First, I added the vertical casing piece closest to the wall, nailing it into place with 2-inch 16-gauge finishing nails.
Then I added the end vertical piece.
And then I added the vertical casing piece on the right. The other casing pieces were standard sizes (1 x 4 for the left casing, and 1 x 6 for the end piece), but this right casing had to be ripped down since was a non-standard size. (It needed to be 4 inches wide.) And finally, I added the bottom piece, which was also a standard 1 x 4.
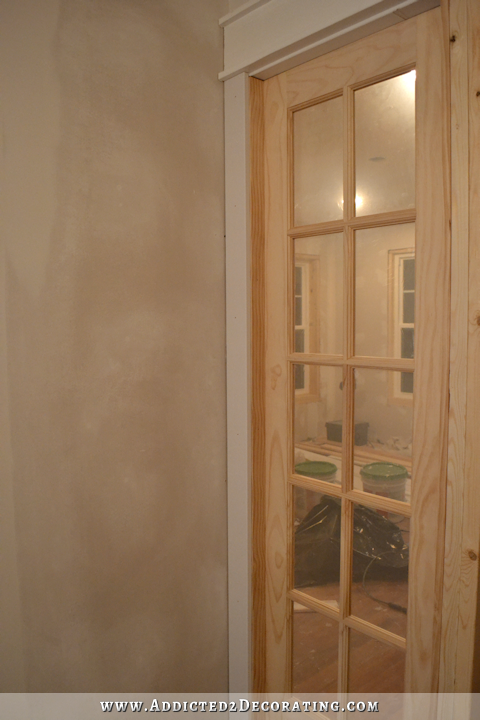
And that finished up the basic build on that side of the door. And now you can see how the top (where I did not add additional framing or trim) just blends right in with the sides.
Then I repeated that whole process on the front side of the door, starting with the inside trim pieces which actually hold the door in place. I used pre-primed MDF boards for this side, ripped down to the correct width. (No reason for switching to MDF boards other than it’s what I had on hand.)
And again, I only added these pieces to the bottom and sides, and left the top as it was.
And then I added the casing to the sides and bottom, just like I did on the back side.
So how far did this major detour set me back? Well, it took me an hour-and-a-half to remove the pony walls and columns (both sides), and then framing and trimming this one side took me two hours. I think the other side will take less time, because on any project, the first one always takes longer for me since I’m figuring things out as I go. Plus, I wasted about 30 minutes searching for string for my plumb bob. I think I can get the other side framed and trimmed in an hour. So in total, that’s four-and-a-half hours for this major do-over. Of course, that doesn’t include the finishing stuff (wood filling, sanding, caulking, etc.), but none of the other trim in these rooms is finished either, so I’ll do it all at the same time.
Four-and-a-half hours. That’s a drop in the bucket in the whole scheme of things. Right?
So now to answer your questions from yesterday. (I thought I’d do it this way rather than answering on yesterday’s post since so many of you had the same questions.)
Why didn’t you just reconfigure the pony walls so that they would align better?
First, reconfiguring those pony walls would not have been a simple task. The columns would have had to be completely rebuilt, and the pony walls would have had to be stripped down to the 2 x 4 framing and completely re-drywalled and re-trimmed. Except for the basic 2 x 4 framing, they would have had to be completely rebuilt.
And the payoff for such a major undertaking would have been very minimal. It may have ended up looking just a tiny bit better, but in my opinion, this still looks terrible.

I’ve got little trim around the pony wall ledge butting up against the big chair rail moulding. And I’ve still got the baseboard jogging out 3/4 inch to wrap around the pony wall. There’s no symmetry or harmony in that design, even with the pony wall raised up.
Some suggested carrying the chair rail around the pony wall ledge like this…
…but that just adds one more 3/4-inch jog in the top moulding, which accentuates the 3/4-inch jog in the baseboard. Plus, I think that chair rail moulding is way too big and heavy to wrap around that ledge. It still all looks like a jumbled mess to me.
Why not just redo it so that the pony wall is flush with the wall? That way you don’t have the 3/4″ jog in the baseboard trim.
First, that trim is door casing. Door casing never sits flush with the wall. If it did, it wouldn’t be casing, it would be wall. Door casing always sits on top of the wall. But if I did make the bottom part (i.e. just the pony wall) flush with the wall, that would make it misaligned with the top jamb and casing, and it would also make the pony wall ledge narrower. A narrower pony wall ledge would require a narrower column. And that column is already bordering on too narrow as it is.
The bottom line is that there really was no fix for these pony walls. I had lots of general ideas, but when I started playing out all of the little minute details in my head, none of them worked.
Won’t these compete with the sliding doors? Why not do a solid pane of glass?
A solid pane of glass does nothing to visually separate the two rooms, and visual separation is the whole purpose of adding these panels. But no, I don’t think these will compete with the sliding doors any more than my windows do (which is to say, not at all). I love being outside at night, and being able to see my beautiful sliding doors through my windows, and that’s basically what these French door panels are — interior windows/sidelights. Now if I painted them black, they would compete. But I’ll be painting them white just like all of my trim, so they’ll kind of fade away and let my rolling doors take center stage in that room.
Why not make your own panels to echo the design on your rolling doors?
If you’ll remember, way back before I even made those rolling doors, my plan was to make two sets of those doors, and install the second set right in this opening. I changed my mind for two reasons. First, I think it would be too much (those doors are very attention-grabbing). But also, I want those doors to be unique, as though I wandered into some little antique store and happened upon this very unique, one-of-a-kind pair of doors, and then brought them home and used them in a prominent place in my home to show off their uniqueness. What I don’t want is for it to look like I came across a liquidation sale at some big box store for some interesting but mass-produced doors, and then just grabbed up as many as I could and used them in as many places as I could in my house. I want that design to be unique to that one pair of doors.
I have no idea if that makes sense to anyone but me. 🙂
Why do this now? Why not get these rooms done (or at least make more progress and finish up other projects) and then come back to this?
I don’t see how the order of my projects makes any difference. The fact is that these rooms won’t be finished until ALL of the projects for these rooms are finished. And since I’ve deemed this project necessary for the design of these rooms, that means that the rooms won’t be finished until it’s done. Whether I do it now or at the end seems inconsequential to me.
Plus, I strained my lower back and neck very badly on Monday while working on my music room ceiling, and was in an immense amount of pain on Tuesday. I felt better yesterday, but still not enough to get back to working on the ceiling just yet. So this much easier project allowed me to rest my strained back and neck while still moving forward with progress.
I’m pretty sure I’ve addressed all of the most-asked questions, but let me know if I missed any. 🙂
UPDATE: You can see this finished project here.

Addicted 2 Decorating is where I share my DIY and decorating journey as I remodel and decorate the 1948 fixer upper that my husband, Matt, and I bought in 2013. Matt has M.S. and is unable to do physical work, so I do the majority of the work on the house by myself. You can learn more about me here.

I really like the look of this door you installed and imagine that it will be awesome when the second one gets in. Go get ’em, Tiger!
Beautiful job as always. One of the nice things about working on your own house, you get to change your mind. If you were having a contractor do the work, it would be too expensive to redo. By doing the work yourself, if it isn’t exactly what you want, do it again. That is the beauty of being a talented DIYer. Bravo!
I think those look AMAZING!!! Great change and great job!!!!!!
Awesome! Looks custom, will separate the rooms nicely while letting in light but will blend in once panted the same while as the trim. And the sliding doors will still be the shining star of the music room 🙂
I wasn’t in love with the pony wall when you did it but I do love this design!! Looks great!
This is one of the reasons I love your blog. You aren’t afraid to admit you’re not happy with something and will take it apart to start over; then you show us all the steps you take to make amazing results.
I so relate!
I couldn’t agree more with this statement! I LOVE the fact that when something doesn’t fully suit your plans you go right ahead and fix it! Even if it means you tear our or redo something you already finished!
Personally I don’t think you should HAVE to explain to us (your READERS!!!), why you choose to make changes in YOUR home! But I do like seeing your thoughts behind why you do it!
I look forward to each and every renovation step you take, even when those steps take you seemingly ‘backwards’, then end result is ALWAYS incredible!!!
Keep on, keepin’ on, Kristi! =D
Wow, this looks great. When you get further along I would love to see a photo from the front door looking thru the music room with the sliding doors closed. I just know that view is going to be stunning.
I really loved the pony walls and columns, but wow, these french door inserts look really sophisticated. Again you’ve done an amazing job and your creativity always wows me! Can’t wait to see it all come together. Awesome job Kristi.
Much improved! I think this suits your home so much better than the columns, AND lets even more light in! Good on you!
Couldn’t agree more!
When you said what your plans were yesterday I couldn’t visualize it (mostly because you didn’t put any inspo pics like you usually do ;)). I for some reason didn’t realize that the door would be completly framed in like a window. I love love love this, you are a genius. I want this in my house now so bad!!!
Girl if I was close to you and was a violent person I would give you a good shake and then a hug…it is not necessary for you to justify why you do something in your house!!! If you posted a pic of you on a bulldozer with your house in a heap IT’S YOUR HOUSE AND YOUR CHOICE!
Sorry just had to get that off my chest.
Having said that I hope you allow more than one day for your back and neck to relax and heal before starting again on the ceilings and I felt from the start of the pony walls that they were to Craftsman for your home as lovely as they were but just not as fitting. These panels are beautiful and more in with the unique classiness of you and your home, I love it. Rest, heal and know you owe no one explanation of your reasons for doing. Much love and blessings Kristi.
“If you posted a pic of you on a bulldozer with your house in a heap IT’S YOUR HOUSE AND YOUR CHOICE!” 😀 Now that made me literally laugh out loud!
🙂
I agree and I never was to onto the pony wall thing, but this fits you so much better. I am of the same opinion , as in, if you wanted to bull dose it, it is your deal! You do what you need to, and we are just observers, and along for the ride, and really enjoying it, too!
Awesome solution. It looks great!!
I love it!
Did you tell us where you got the doors? If so, sorry I missed it. As usual, it looks awesome!
I got them at Home Depot. The 24-inch 10-lite doors were $120 each.
Thanks for letting me know! I have an opening between my living room and dining room that I would l love to do this to!
I’m still in awe of the fact you installed the pony walls… Wow. You did it!
However, changing the design to fit better was a fantastic choice. This new design is perfect! It’s perfectly “legal” to change your mind ???? Great decision. Pony walls, another place, different home.
Classy, very classy! Can’t wait to see both sides finished!!
I think you have accomplished what you set out to do. I like the way it looks although I do love the pony walls. My suggestion to put pony walls between the dinning room and foyer is now unrealistic. I say this because we were really given a clear picture of the dinning room in some of the shots. I did not realize how small the room is. What are the dimensions? I keep thinking in terms of larger rooms but I think I am way off. Anyway, really like the French door.Blessings
Perfect solution. The French doors add movement and a finished look to the area. Good for you for being open to rethinking a project. Congrats
I like them! The pony walls were pretty, but the “French doors” are much sleeker. They add interest without competing with anything else.
Thank you for explaining all this! It’s nice to be able to understand the technical issues with each option! 🙂
Yes, exactly! I would never tell someone they couldn’t make any choice they wanted with their own house. But it is very educational and interesting to know why things can or can’t be done. For example, I had no idea the pony walls would be so complicated to alter. I, like many, thought “why not just fix the jog?”… now I know why not!
Thank you for answering our questions Kristi!
Of course I realize that you don’t have to explain your decisions but for me the most interesting aspect of your blog is exactly this – the thought process that leads to your choices. That is what makes it my favourite blog. Thank you for this post Kristi!
Exactly! I appreciate you giving an explanation because I learn so much from them.
You did a good job and you know what? I agree with the other poster, Len Williams Carver – it’s your house and your choice! I wish I can convince my Mom of that for MY home. I want a shower installed and the bathtub gone. I am not getting any younger and getting in and out of a tub is difficult now, just wait another 5-10 years! Yikes.
And so what about re-sale? Anyone wanting a tub won’t be looking at my place if I do decide to sell and I know that won’t be a large percentage because so many people use showers now, I don’t know one person who takes a bath.
Loved the pony walls , love this door more. Did you build the door? Amazing job especially w/a strained back& neck
While I LOVED the pony walls, I think this looks much more in keeping with your style. Too bad you couldn’t send the pony walls to me, in two big pieces…. 😉
This looks fabulous! My favorite view is through the new door into your dining room, toward your beautiful new windows. The room will be stunning when you’re done with it. The bones are good – you’re almost to the fun stuff!
Question for you regarding your health and well-being (and doggedly doing things that you hate, like mudding ceilings). I know that you wish to do much of this work yourself, but have you ever considered bartering/trading your skills? My sister and BIL, who between them DIYed a house into a showplace, both have major skills, but occasionally bartered/traded some tasks with other people. E.g., you could do something involving moulding or tiling for someone who doesn’t mind mudding drywall and is good at it. Just a thought.
This looks amazing. I love it!
I think this idea is pure genius! The french door panel gives character to the space and provides light. It’s unique and a great way to solve the issue you were dealing with! Good job! You’re just way too clever! 🙂 Hugs, Leena
I loved the pony walls and am sorry to see them go, but this looks truly amazing. I already have pony walls in my house but now you’ve got me wishing I had a place to add this incredible idea.
I was curious why you used such thick framing to hold the new doors in place. Was that mainly to match the rest of the door frames?
Girl!!!!, you DO NOT have to justify anything to anyone!!!!
You are AMAZING Kristie!!!!!
OMGOSHES!!!!! Come on doll……you build, redo, tear out and rebuild….and it turns out FABULOUS!!!!!!
We LOVE what you’re doing……I LOVED the pony walls….I LOVE LOVE LOVE the door walls……way to go again…can’t wait to see the left one up and them painted.
YOU GO GIRL!!!!!
So, is the take-away “Don’t put in pony walls unless they end in a corner?” It seems like apart from a corner installation you’ll always end up with a weird jog.
Your courage amazes me! When we have issues with decor or design, we just live with them (and I stare at them every day thinking why we shouldn’t have bought/attempted that blankety blanket thing.) It must be a positive thrill to remove or change the offending item–like the wind in your hair at the beach!
One of your best redo’s. Absolutely love it.
oh my God a plumb bob … they have lasers now 🙂
I just wanted to say thank you for this! My husband and I used this as the basis for closing in my office. It came out great and I couldn’t be happier. Great tutorial!