Stripping — At Some Point All DIYers Have To Do It
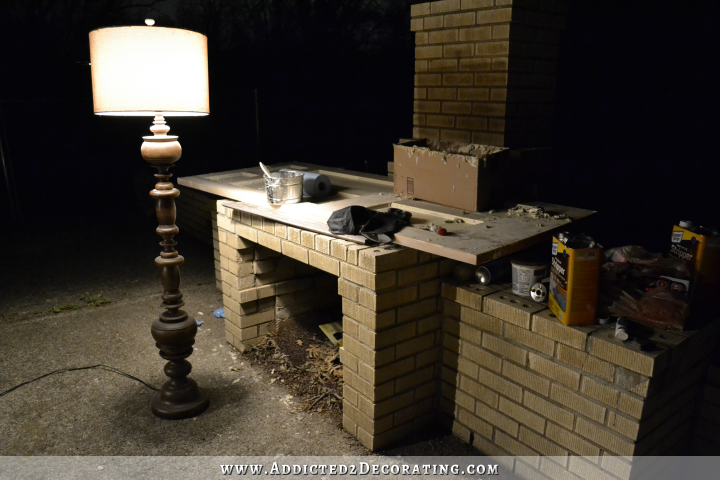
Do you know what I was doing last night at 10:30? I was stripping.
In my back yard.
By the light of one floor lamp.
And I have the photographic evidence to prove it…
Hahaha!! See what I did there? 😀
You can’t expect me to use paint stripper all afternoon and evening and not make at least one juvenile joke about stripping. 😀
Okay, so let me back up just a bit. I’m having to take a break from the kitchen, not because I want to, but because my right elbow demands it. After I got through with another full day (on Monday) of hammering, pulling, prying, ripping, and loading debris into the back of the truck, my right arm hurt so badly that I wanted to cry. Every little motion sent shock waves of pain from my elbow down to my wrist and up to my shoulder. I went later to get us some dinner, and when the lady at the drive through window handed me my tea, I grabbed it with my left hand, and then tried to grab it with my right hand to put into the cup holder in my car, and I couldn’t even lift the cup of tea!!
So I let it rest (for the most part) all day yesterday. I loaded up on turmeric (did you know that’s a natural anti-inflammatory and pain reliever?) and used our sound wave therapy machine on it, and it’s doing much better, but it still needs a couple more days of rest.
But you know I can’t just sit still for that long. I had to find a project, and one project I’ve been really wanting to dive into lately is my interior doors. I’ve been making myself wait because I had already started the kitchen, and I don’t want to get too many different project started at once, but I thought this “elbow down time” would be a perfect time to start.
So let me explain. My interior doors look like this…

Can you see the peeling paint at the bottom? Well, that’s just the first layer of about six. And the layers on there are kind of thick and have runs and drips dried on them. So I’ve had it in my mind that I would just replace the doors eventually.
Then about three weeks ago, it dawned on me that these doors aren’t like those ubiquitous molded MDF six-panel pre-primed, pre-hung doors that you get at Home Depot for $50 each regardless of the size. No, these were quite a bit heavier. They were different.
Now I realize that this should have been obvious to me from the beginning since my house was built in 1948, and I’m fairly certain that they didn’t have the pre-primed molded MDF six-panel doors then. But for some reason, until just recently, I haven’t been able to look past all of those drippy layers of paint.
So I got a piece of sandpaper and just sanded down one tiny area to see what was under there.
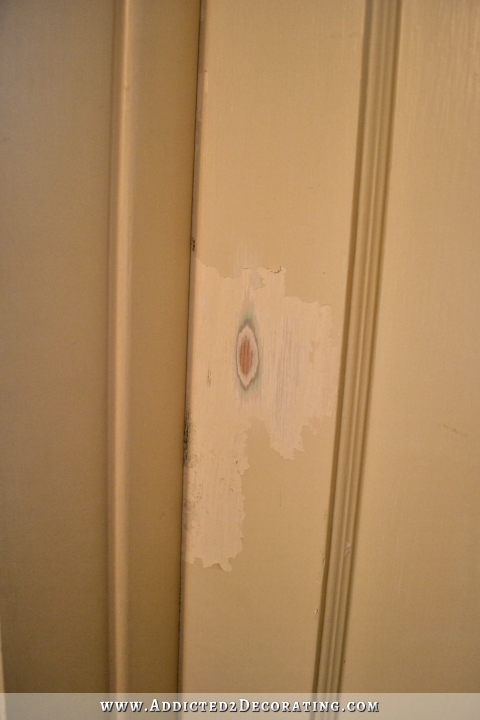
I counted six layers of paint (can you see the seafoam green?), and then lo and behold, there was real wood under there!!! (Okay, now I realize that most of you are probably saying, “Well, duh! Of course they’re wood, Kristi! I could have told you that when you showed us the first pictures last August!!” So you’ll just have to bear with my ignorance. This is my first time owning an old house, and most certainly my first time having anything other than either flat hollow core doors or the molded MDF six-panel pre-primed, pre-hung doors.) 🙂
Needless to say, I was ecstatic. So yesterday, I removed one of the doors and took it outside to strip the paint off of it.
Now let me just say that it’s been years…many years…since I’ve used paint stripper. So in my mind, I’m thinking that each door should take me about two hours. Well, I’m about six hours into the first door, and I’m about 3/4 of the way through. 😀
And after this one, I have seven more to do.
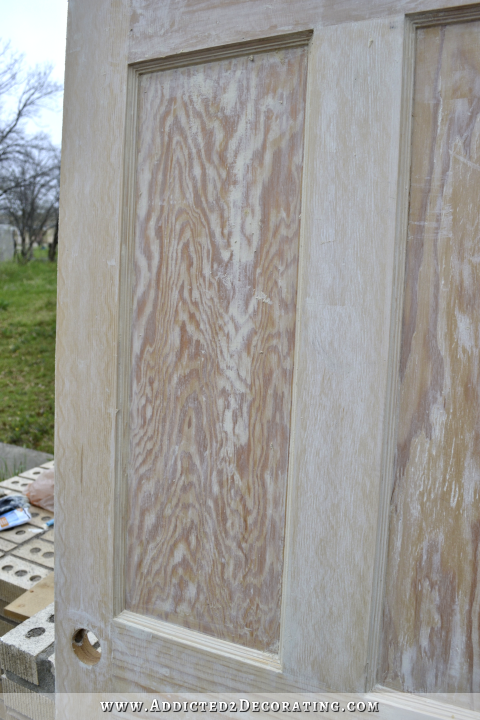
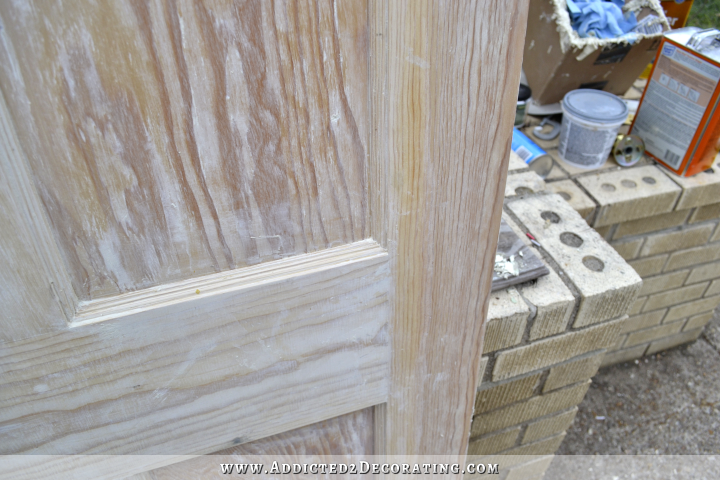
But I feel certain it’ll be worth it in the end. Here’s a look at the one side that I got completely done.
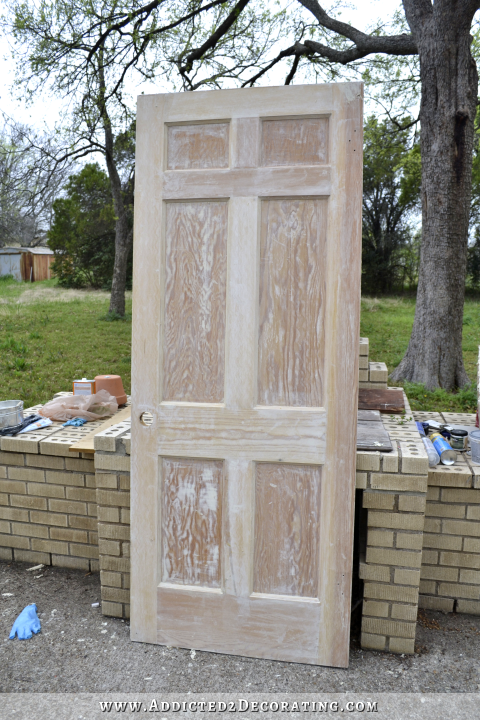
Obviously it still needs to be sanded quite a bit to get all of the rest of the remnants off, but wow. Just…WOW. I’m so excited about these doors!!!
And I’m by no means a wood purist. Not by any stretch of the imagination. But when I look at things like this, I can’t help but ask, “How in the world could someone put paint on that?!”
Anyway, for those of you who have never stripped before, let me show you the necessary tools so that you can strip with confidence. (No dancing skills required.) 😀
First off, this is the chemical stripper I used…
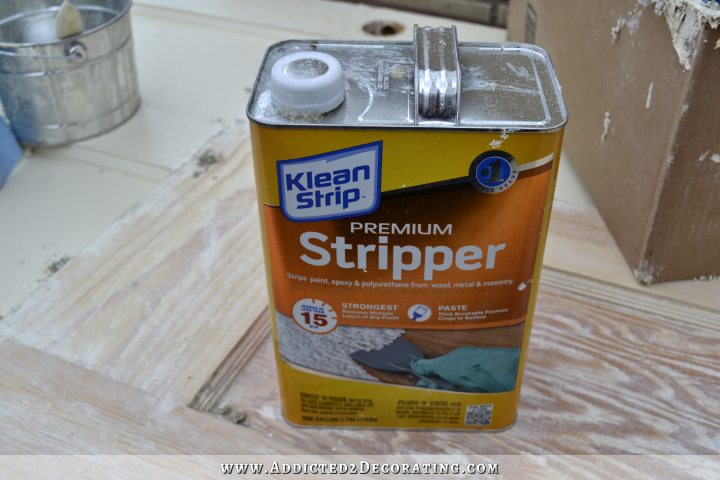
And wow, does this stuff work! I almost grabbed the Citristrip, which I’ve never used before, but I decided to pass on it when I read on the label that it works in as little as 30 minutes, but may take up to 24 hours. Seriously? Twenty-four hours? What the…?! I had six layers of paint to get through on eight different doors. I was not even about to take a chance on having to wait up to 24 hours for the stuff to work. This Klean Strip stuff worked in minutes. It took it off layer by layer (and not all six layers at once), but it definitely worked fast.
A metal pail and cheap chip brushes are a must. This is one job where you definitely do not want to use your good paint brushes. Just pour the stripper into the pail, and then brush it on thick.

These shop towels were a great help.
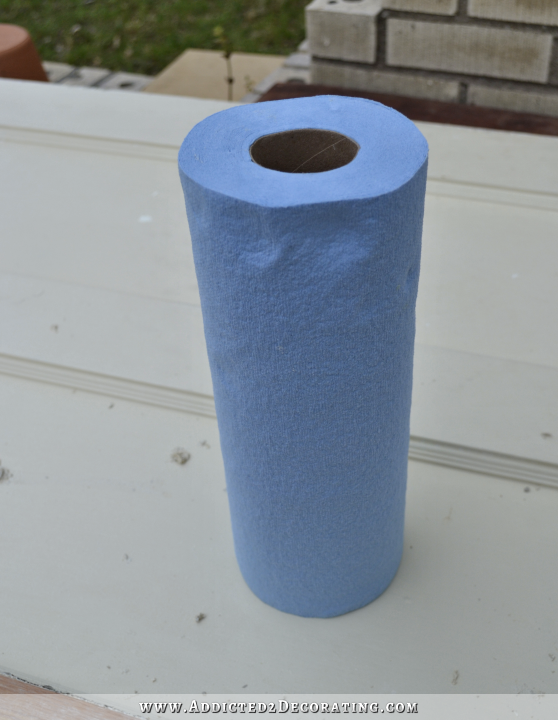
I started out using regular paper towels, and even though I buy the thickest, strongest and most absorbent paper towels ever known to mankind (and I’m certain of that because that’s what the commercials say, and they would never lie to me), I still found them a bit lacking for a job like this. These super thick shop paper towels were definitely the way to go. I mainly used them on that little trim detail around each panel on the door. That was definitely the hardest part to strip off, and I found that by using the paper towels to wipe off most of the paint/stripper, I was then able to use a detail tool to get the rest of it off.
And then there are the scraping tools…

The one on the right is just a 3-inch putty knife. I did almost all of the scraping with that one. The one on the left is a caulk remover. This little thing was invaluable when it came to scraping the paint from the detail trim around the panels. That little tool actually had a little plastic piece sticking off of the top, but I broke it off to make it easier to work with, and it worked amazingly well.
And of course, you need gloves…
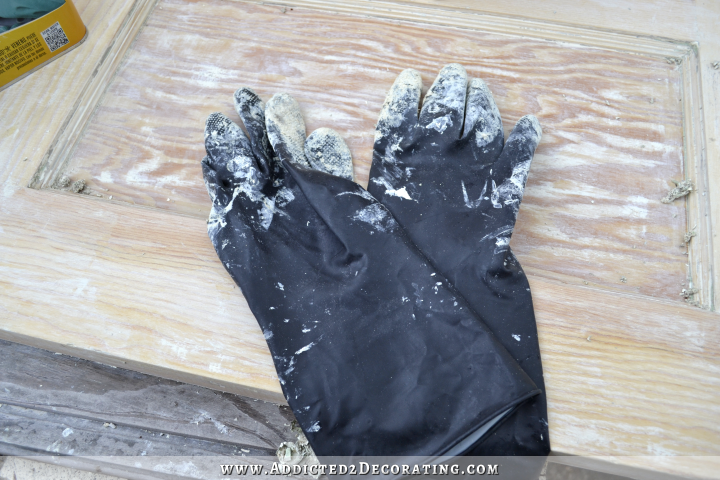
And when the man at Home Depot tells you that the thin blue nitrile gloves will work with chemical stripper, you ignore him, okay? Because let me assure you that the chemical stripper will eat right through the thin blue nitrile gloves and will burn the heck out of your skin. Just bypass the pain and frustration and get yourself some of these thick neoprene gloves. They’ll stand up to heavy chemicals.
And then for discarding all of the scraped paint, just a cardboard box is all you need…

I started out just using paper towels, and soon realized that I was going to end up with so much paint that I really needed a container to put all of it into. Plus, continually wiping the scraper onto paper towels, and having to constantly stop and get a new paper towel, is just incredibly inefficient. I found that the box method allowed me to scrape, and then wipe the blade right onto the edge of the box. It worked so much better.
I’m so anxious to get this first door completely stripped, sanded and then stained.
I have no idea at this point what color stain I’ll use, but it’ll probably be a darker color so that I can minimize some of this busy wood grain. I don’t want to cover it up completely, but I do want it to be more subtle.
It’s definitely a lot of work, but it’s kind of fun, and definitely more relaxing than what I’ve been doing!
So I’m hoping that I can get at least a few doors done, and give my elbow some much needed rest, and then get back to the kitchen next week. In the meantime, I hope to have at least one stained door to show you tomorrow!

Addicted 2 Decorating is where I share my DIY and decorating journey as I remodel and decorate the 1948 fixer upper that my husband, Matt, and I bought in 2013. Matt has M.S. and is unable to do physical work, so I do the majority of the work on the house by myself. You can learn more about me here.


When we bought our current home someone had stained all of the woodwork a very very dark brown. It was depressing. I didn’t know what else to do but paint all the solid wood doors a nice bright white. Can’t wait to see what you do with yours.
I’m actually not a fan at all of stained trim. I like it bright and white. 🙂 But I do love stained wood doors, and I’ve never had them before because they’re so expensive! I can’t wait to get stain on these, and then get my new bright white trim installed. 🙂
Thanks for replying. I don’t know how you do it all! The blog, responding and all the amazing things you do to your home! I think I’m addicted to seeing your progress!!
Outrageous! Love how the door is coming along so far. Well, and the rest of your house too! I am starting to get addicted to your blog! I get so excited when I see you have a new post up! I’m living vicariously through your adventures as my diy-ing has been put on the back burner while I do full time care-giving for my Mom. So thank you very much for sharing, it brightens my day.
and THAT is elbow rest???? looks great. 🙂
Haha! It really is. The paint stripper does all the hard work, so scraping off the paint puts almost no pressure on my elbow at all. Plus, I can do quite a bit of scraping with my left hand. 🙂
Ha! I was thinking the same thing! Looks great so far. Ana White just posted about staining doors at the Momplex with white trim. Looks so pretty.
You took the words right out of my mouth. How funny is that.
Tough work, stripping. And definitely not one of my favorite jobs. Well done! ~:0)
You are wasting your time. Get an electric sanding machine, it will take you an hour per door, tops. Trust me on that.You will have to use sand paper by hand for some parts but still, not as time consuming and no chemicals to breathe in either.
Still winter here but reading about your projects makes me want to get started on the renos on the big house so badly. Another month to wait. I hope not more than that.
I’m actually specifically NOT sanding these because they have at least six coats of paint on them spanning 6.5 decades. So it stands to reason that at least one coat of paint on here (if not more) is lead-based paint. I’d rather not sand lead-based paint and send those particles airborne.
But I’m using it outside, and there was a nice breeze all day yesterday, so I wasn’t breathing any chemicals. 🙂
Your doors are lovely. I also have solid wood doors in my new old house but they are just the slab type. I plan to pretty them up with some molding.
I love your definition of “rest”. But the doors–what a lovely surprise! Those are going to be gorgeous when you’re done!
Not a doctor just a diyer , hairdresser that has had so much elbow pain I finally had to have surgery. I want to recommend using the tennis elbow band you can pick up anywhere. Anything that will hold th forearm muscle tight while you pull twist / pull with the arm will help. I used the band or a neoprene elbow support to get through the pain while I worked . total rest of the arm is the only solution but I know you cannot do that. When you can put that arm in a sling( can be homemade ) so it will force you to use the other arm for simple household chores. Just my 2 cents from a fellow sufferer .
I totally agree with this suggestion! I had a little air pillow attached to the band and it made such a world of difference for me. After about six weeks of wearing the band the pain completely went away and has never come back. GET ONE!!!
have u tried putting plastic wrap over the stripper. It keeps it from drying as fast and for us helped the chemical reaction. Just a thought.
your doors are lovely…I would just worry that some of the previous may have contained lead – did you test for that before you started? Can’t wait to see what you do with them!
I didn’t test, but I do assume that at least one layer is lead-based paint since these layers were painted over the course of the last 65 years. That’s the main reason I’m using a chemical stripper, and working outside, rather than sanding the finish off. I don’t want to send any paint dust airborne. The chemical stripper keeps it as a paste, and doesn’t send particles airborne where they can be inhaled.
I had some concerns about the lead—my son lives in an almost-restored 90-year-old row house in Washington, DC, so he’s had to deal with lead paint and with remediation. So glad you used the chemical stripper.
Your energy and lightening speed work absolutely facinates me! I don’t know how you do it! However, I think that I am living vicariously through your projects. When I began our 1970’s house remodel, I didn’t have the courage to tackle alone what you do, so hired out at the best price I could find. You make it seeem, well, SORT of easy! And…your creativity– nothing short of phenomanel! You could have sold me on the seafoam inside wall…what you do always turns out fantastic and is totally amazing!
That door is a looker and certainly befitting of a “strip tease”! They’re going to look awesome when you get to the other side of this journey – so glad you’re putting in the hard work and bringing them back to their former glory.
Remember, this isn’t a race, it’s a marathon — take time to take care of yourself!
That would be phenomenal!
You have inspired me to get this year’s projects going as of late. Last weekend I was out in the yard and have been going to replace a rotting retaining wall in my garden area where we have raspberries grow. I removed about half the wall, cleaned it all up and out and am replacing it all with broken concrete from old sidewalks or driveways. It weighs so much that the weight of it all just keeps it in place. The price is right too – free! (Just a broken back and rubber arms – nothing Advil can’t take care of) Half-ish done and half-ish to go. Weather got rainy and snowy Monday and Tuesday so will continue this weekend I hope. Thanks for the inspiration. The doors will look great. It’s a lot of work but the reward in the end will be worth it all. Thanks for keeping us all posted…
I can’t tell you how excited I am to see what you do with these doors!
Wood!!! 🙂 Can you imagine buying 8 of those? 🙂 You hit a gold mine girl! I think and natural wood is so rich and warming. Excited for you!
Blue towels……THEY ARE THE BEST……we use them by the bundles in our small screen print shop! Costco sells them by the bundle (very reasonalbe–very). 🙂 Well worth the investment trust me, we’ve tried them all!
PS: No I don’t work for Costco…….LOL Just saying~~~~
Mary……….bravo girl and keep up the fantastic inspirational work!
Take care of that arm! One who knows! 😉
I have a home that was built in 1902, all the wood trim upstairs was painted over and over thru the years, all the wood trim downstairs were never painted all Oak, so I surmised the same for upstairs.. went to the hardware store to get stripper and luckily the gentleman who help me has done a lot of restoration on old homes, he said the easiest way to strip years of paint off is to use a heat gun and scraper and a mask, after stripping take a power sander and smooth it out! WOW it worked like a charm and I was happy not to have used the can stripper solution in the house and the clean up was easy…
Hah! Only YOU would consider stripping paint a “rest.” 😉 Isn’t that just the yuckiest job?? And I’ll have to remember your box idea next time I have to strip something. I’ve wiped off onto the side of a paper bag, but not nearly as efficient as a nice sturdy box! Hope your arm feels better soon Kristi. Until then, have fun with your doors!
Those doors are (formerly hidden) treasures! Good for you to put in all that hard work. You will certainly be enjoying the fruits of your labors for as long as you live there And if it comes time to sell the house, it will most certainly add to the attraction and the selling price.
May I add a few suggestions to augment your stripping instructions? I was a professional stripper (!) for many years, refinishing and repairing antiques.
1. Let the stripper do its work by not scraping until it is bubbling up and wrinkling. The plastic wrap mentioned above is a good one if the chemical is not working very quickly.
2. File the corners of the putty knife so they won’t gouge the wood softened by the stripper. You also use the plastic putty knives.
3. For details: Use small toothbrush-shaped wire brushes, but not those with steel bristles—only brass. (The steel can rust and leave marks on the wood.) You can also use those brass scrubbies made for pots and pans. And I liked small pointed dowels for getting into small cracks and crevices.
4. Don’t sand the wood until it’s completely dry.
5. Wear goggles to protect your eyes—especially if the piece is at eye level.
I know you were responding to Kristi but I’m taking notes… thanks for the insight!
I look forward every day to reading your blog. I love all of your blog directions and have especially enjoyed the Roman shade and the curtain instructions. Most older doors of that time have plywood panels as the inserts. I am a bit concerned that you may not be as impressed with those plywood panels once you start staining the doors. Just wanted to pass that along.
Now you’re doing something that I know a little something about. Love to strip furniture, although the fumes are strong and it takes some patience & elbow grease. White is the hardest to strip, although I have no clue why that is. Most days I’m just blown away by your blog, thinking “there is no way I could ever pull that off” I’m glad there was something I could relate to today and just maybe I’ll try some of the other projects you’ve done. (my husband is not a fan of me taking out a wall though… 😉 Good for you!! The door looks great!!!
Stripping in the backyard. Ba ha ha ha ha! Funny stuff.
That door is beautiful! I do love the ‘busy’ woodgrain as it adds to the character/reality of the wood the door is made from. Can’t wait to see it stained and hung. Betting it’ll be spectacular.
Take care of that elbow.
I’ve done tons of stripping over the years and it’s not a job I relish in my old age. I will agree though that it’s worth the effort and I think your choice of dark stain will really make your moldings and trim look all the better once the doors are returned to their original state! Keep going…I’ll keep cheering you on!!
As always you are simply amazing. I don’t think that there is anything that you can’t do. Take care of yourself and keep up the amazing work. You are an inspiration.
WOW!
Once again, I’m blown away. AND
“and THAT is elbow rest????” was my thought also!!!
About the turmeric, I didn’t know (well, MAYBE I’ve read in on internet before) Any particular brand, and strength you care to recommend?
Thanks so much.
You amaze me Kristi!! I hope your elbow recovers quickly. And thanks for the reminder of turmeric…I’d forgotten. 😉
I have to tell you that I really like the door the way it is. Sure you’ll want to even the look out a little…but it would be fun to have one or two in this natural washed look. IMHO. 😉
I love wood doors…they can be so rich! The ones I grew up with were stained a shade I would call dark chestnut (had a chestnut tree in backyard). They were beautiful. Have to agree with everyone’s tips and concerns. Take care of that elbow!
I stripped multiple paint layers off a wood door a couple years ago to make a headboard for my daughter. It was a lot of work but the kind of mindless work that just relaxes me. I know that sounds crazy but peeling those big slabs of paint off was so satisfying! Good luck with your doors. I’m not sure I’d be brave enough to tackle that many.
I am so amazed each time I get a new notice of another blog post. You need your own HGTV show; and it should be a reality show that just follows you around. I can’t wait to see what comes up next…like, a painted couch:-) My goodness, Miss Kristi, you do more in one week than I can get done in a year.
Wow! Great job! Just wondering, how can you tell if your doors are real wood and not the newer kinds? Was it only by scraping off that patch you did? I have a 1960 house with 6 panel doors that were poorly painted. Maybe this is something I could do with them? Thanks!
Your doors are going to look fantastic! One word of caution for everyone – when stripping or other flammable products are used, please leave the trash from the job outside while waiting to dispose of it. Fumes can gather and ignite in an enclosed area. Hugs, Leena
Okay, I’m now so hooked on your posts, I go to your website each day before checking in the Petersiks at Young House Love. Your ability to tackle things is awesome and I’m living vicariously through you. And seriously, don’t underestimate the time it takes a “tennis elbow” to heal. I whacked mine on a counter and three months later begged the doctor for an x-ray because “something must be broken.” Turns out it was a tendonitis caused by striking the base of the tendon hard. And I have permanent shoulder pain 25 years later after spending over a week painting the interior of a house by myself. After 30, we don’t heal as fast as we do when we’re young and repetitive motion (painting overhead, whacking down walls, scraping and sanding) is very very hard on our joints and their supporting structures. (Of course, 25 years later I’m still painting ceiling and walls and putting up with the pain as a true DIY’er.) So learn from your “elders” and don’t overdo it! Thank’s so much for brightening our day and yes, you totally got me with the April Fool’s joke yesterday! Hugs to you and hubby!
I feel you. I tried this once. Couldn’t get the paint out of the grooves in the panel detail. I decided white painted doors would look just fine.
I’ve stripped a lot of wood and the last step is to use #0000 steel wool and odorless mineral spirits and rub away all the last little bits of paint and stripper. Do this while everything is still soft. You’ll need to do a lot less sanding. I’ve always used the citrus stripper but I imagine it works the same. And I’ve never had it take 24 hours to work….but if I get pulled away, I have left it there overnight with no ill effects. I think that’s what that means. Your doors will be beautiful!
Kristi:
I’ve done a bit of stripping in my time and one way to get the stripper to work a little better and a little faster is to put it on the door then cover all of that with some plain old kitchen plastic wrap. Let it sit for about 1/2 hour and then come back to it and it’s like magic. Cause it looks like you were having a bit of a tough time with the stripper. The plastic wrap keeps it from evaporating and seems to make it work a little faster.
I can’t believe I just wrote the sentence “I’ve done a bit of stripping in my time.” without a hint of irony.
Girl, beg, borrow, steal or buy a handheld electric planer!!! We live in a 1892 Victorian with too many doors and layers of paint to count. After I tried to chemically strip the first door I gave up. Many months later hubby got out his handheld electric planer and went to town on one of the doors. That paint came off so fast. It was painful knowing the hard work I did thus far only to see him strip it off like a magic eraser.
I stripped most of the doors in my 100 year old house with a heat gun. Still very hard time consuming work. I have trouble with my hand and elbow when I use my electric sander for large areas. Between Naps on the Porch said she just got a new sander that is much quieter and doesn’t vibrate as much as her old one, that may be my next tool purchase.
Honey please please please get the band for your elbow before you really mess it up. I had to have surgery on mine. Oh the pain. Great job. Love the beautiful doors.
Those doors are going to be beautiful. I work a lot slower than you do (I think almost everybody does!). Although, in my defense, my front door had over 50 more years of paint on it. I had that door off and in my living room for most of the winter. And we live in blizzardy, below zero Iowa. Could be one reason our fuel usage increased by 25% in Jan-Feb. If something could go wrong, it did. But the door came out beautiful and I am happy. Your results will be worth it.
Nice post. Those doors are going to be beautiful and decided white painted doors would look just fine. Great job and thanks for awesome sharing, it brightness my day. Keep it up.
I am SO HAPPY I stumbled upon your blog! I’ve already pinned your tufting and upholstery tutorials. I’m going to pin this too!
I saw this link at the end of today’s blog post and it will come in handy when I strip all 9 of our 1883 doors. Also wondering if you did use these doors or went another way? I haven’t noticed any stained wood doors in your posts, so maybe you painted them. Stripping is best in that scenario as well, with decades of built up paint.
10… I forgot about the basement door. 😳
Also two sets old French doors and the front door. Oof!