Studio Half Bathroom — FINISHED! (Before And After)
My studio half bathroom is finished! And I couldn’t be happier with how it turned out. This bathroom is basically what my whole house would look like if I weren’t married and didn’t have to consider the fact that I share this home with a person who doesn’t love color as much as I do. 😀 But since this is the bathroom in my studio, and Matt doesn’t get a say in how I decorate my studio, I was able to go a little wild with the color.
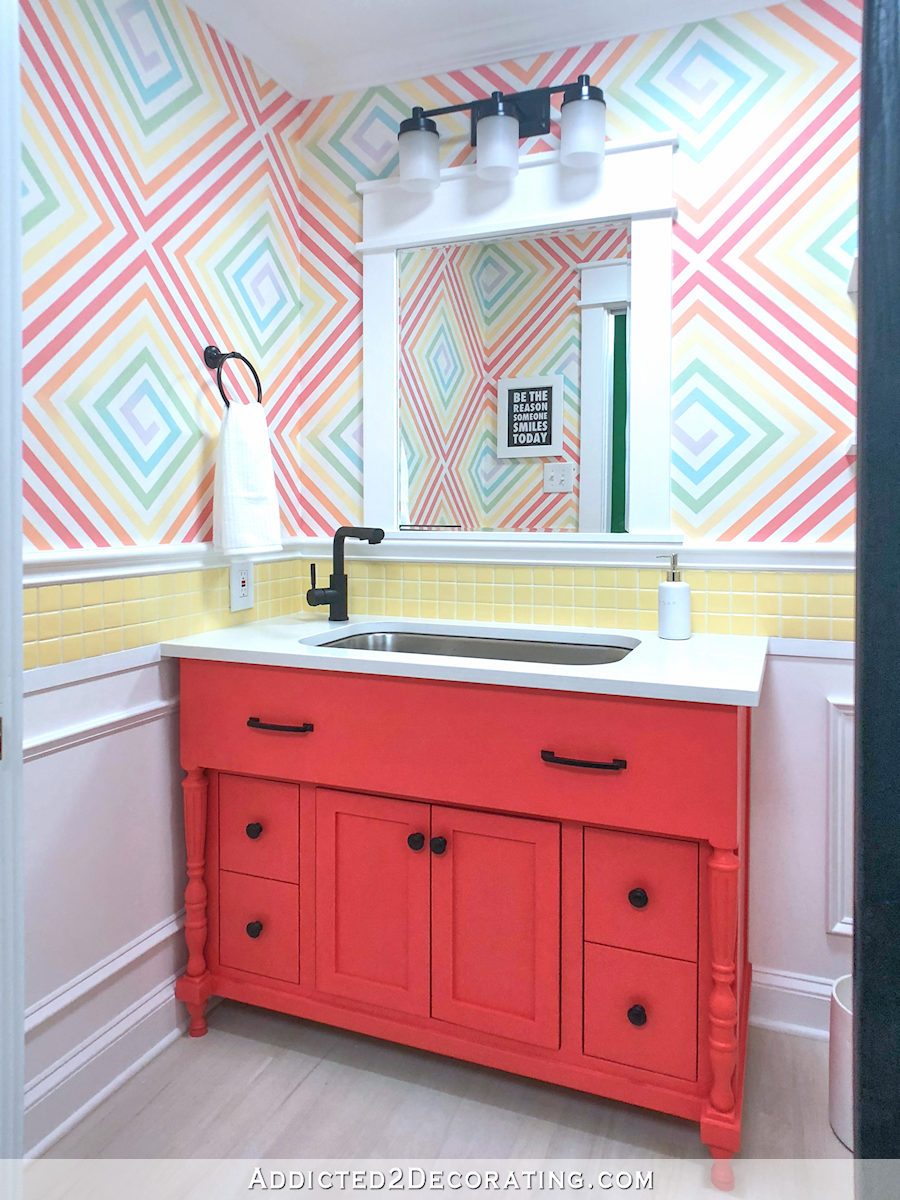
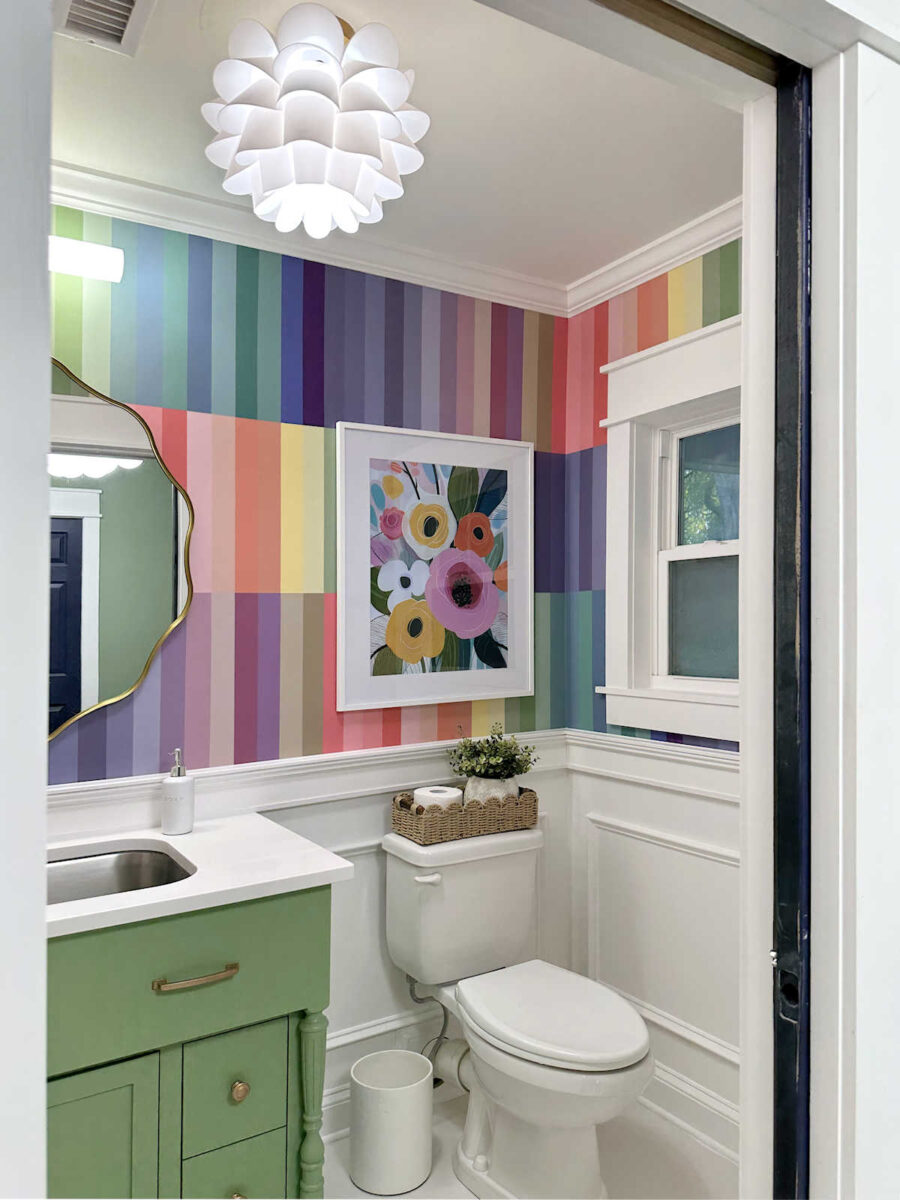
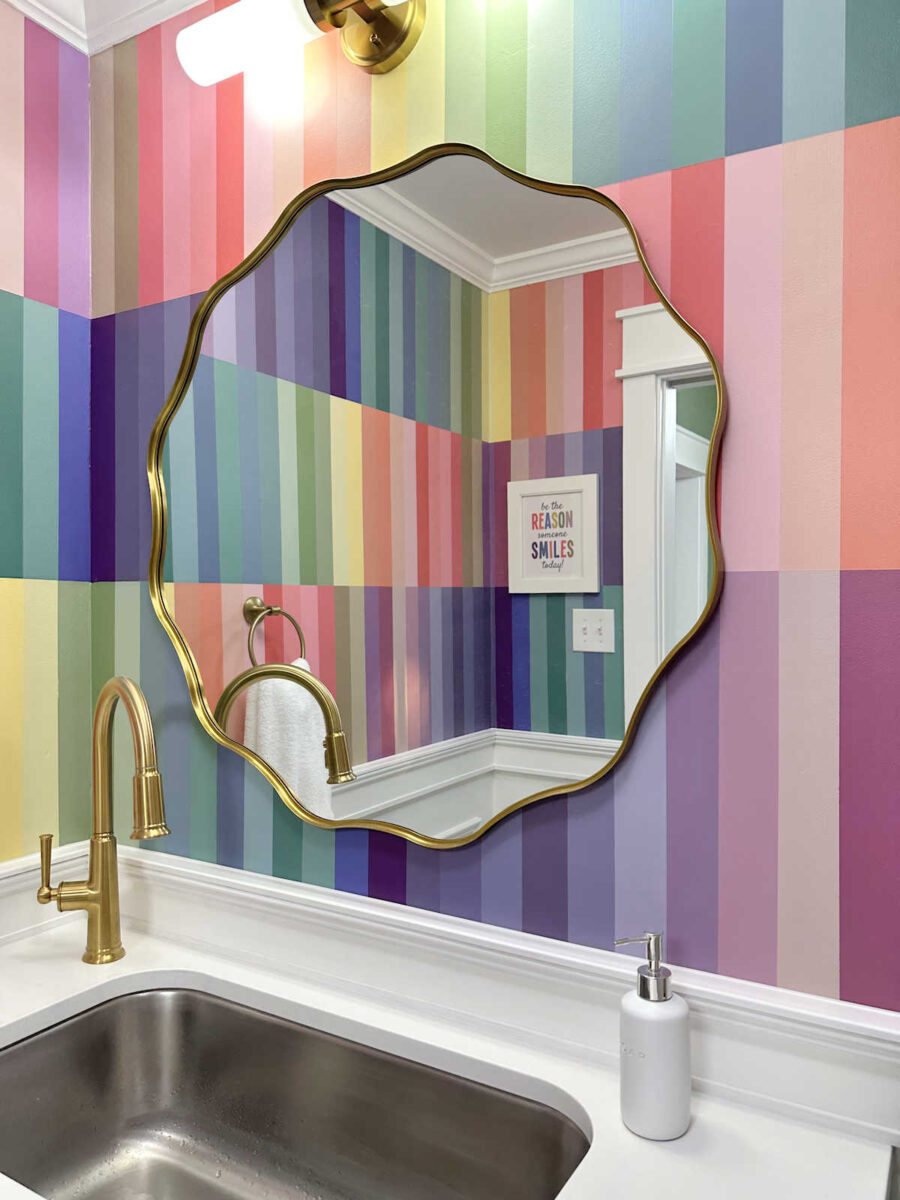
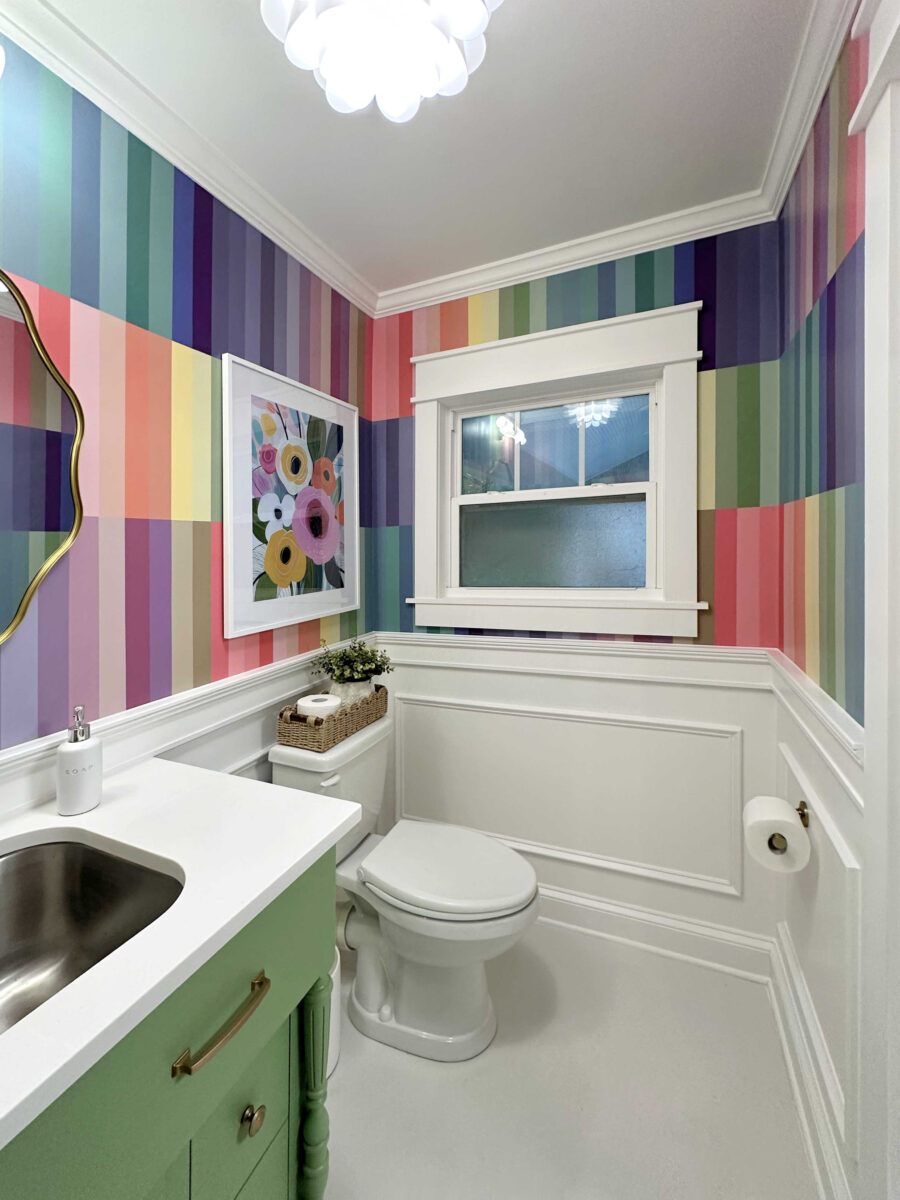
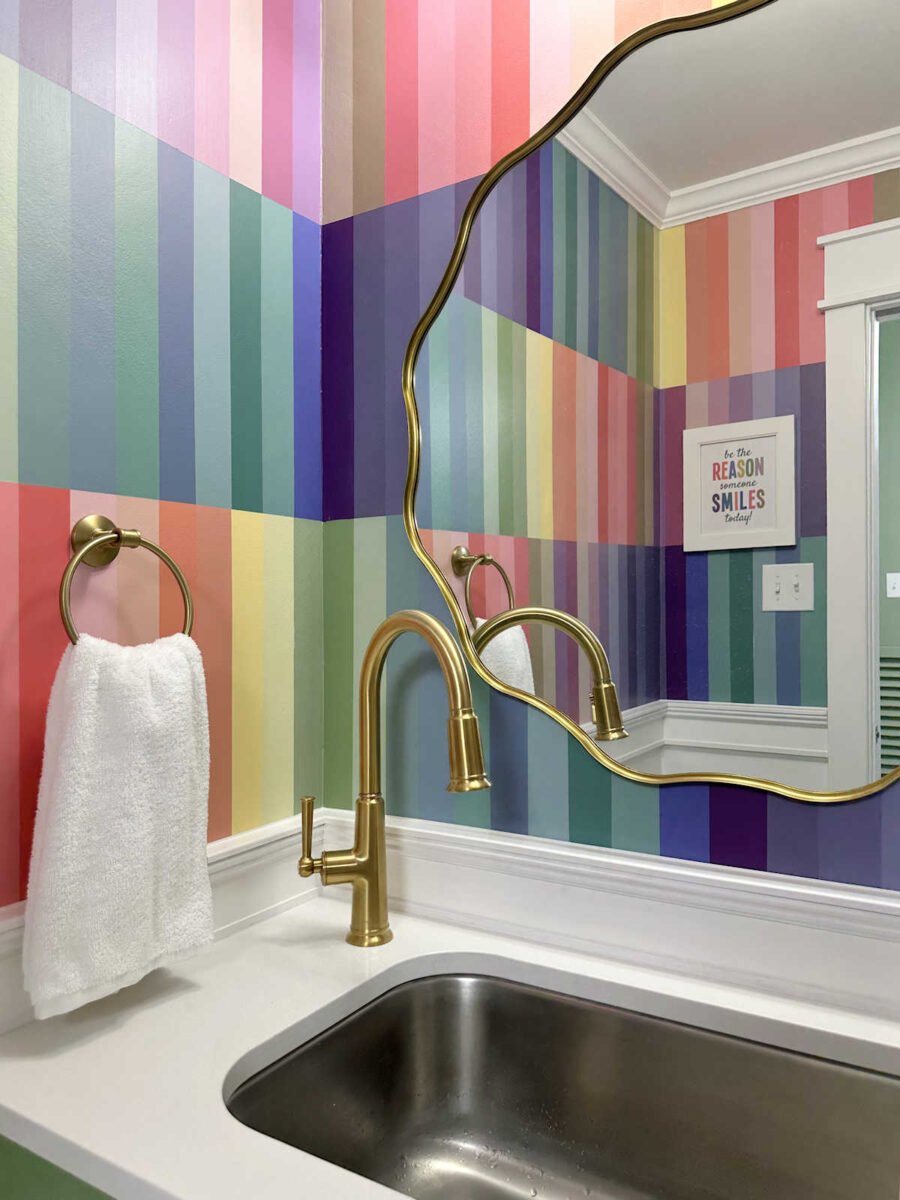
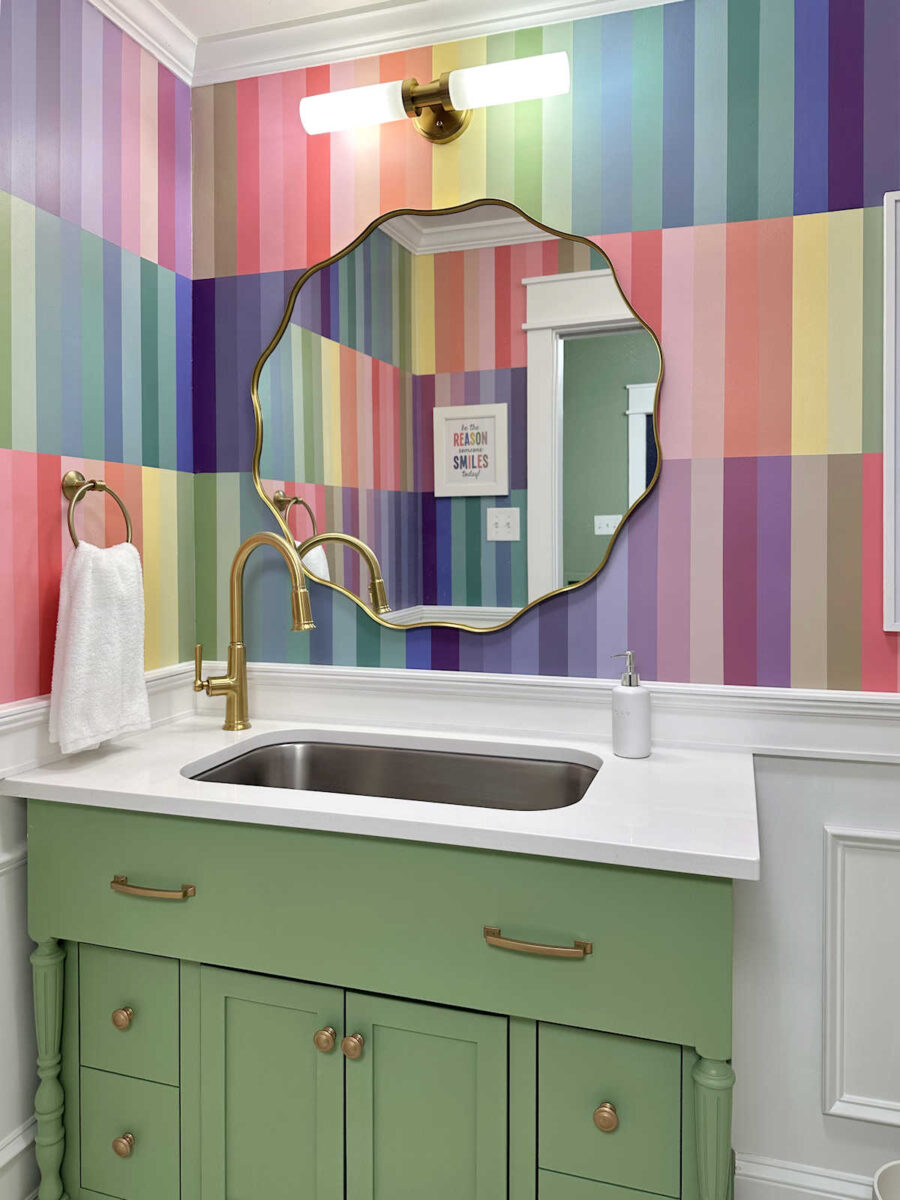
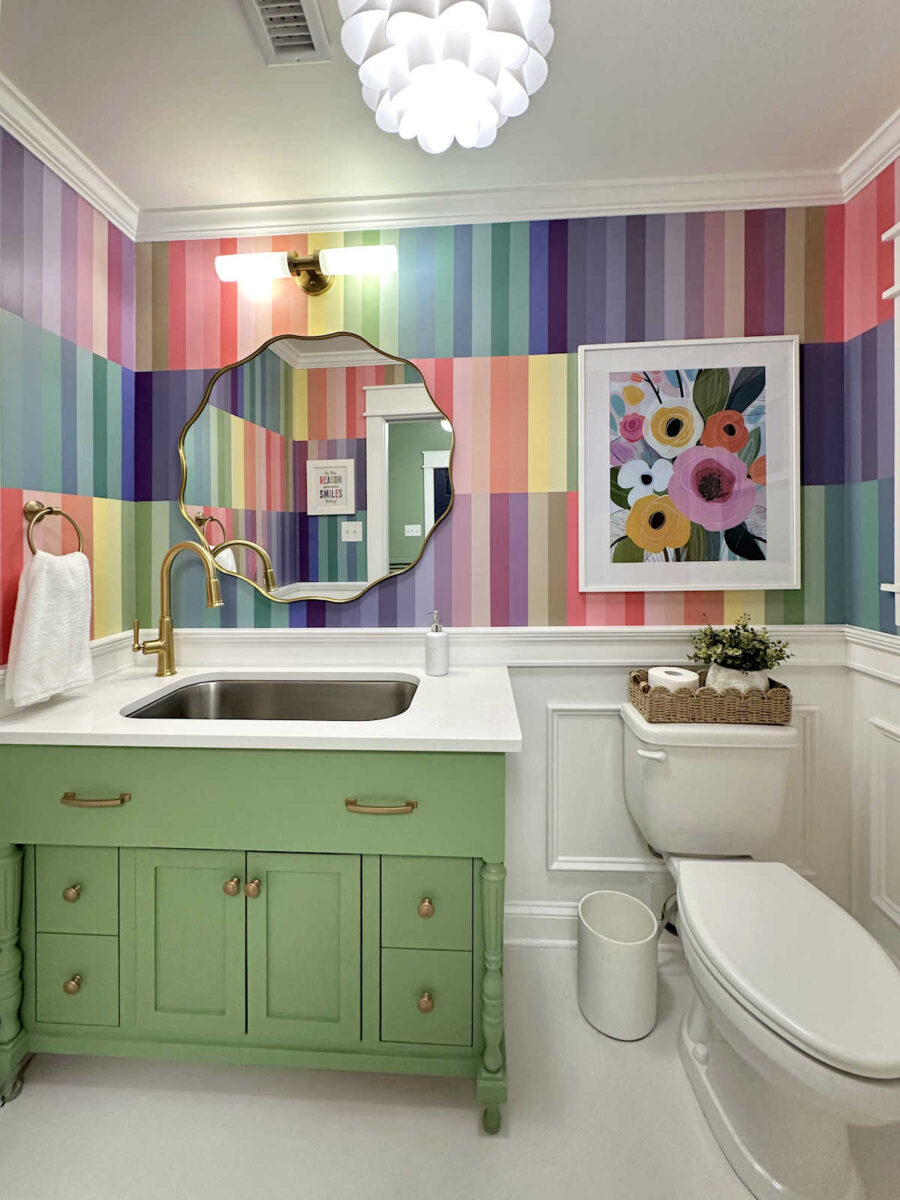
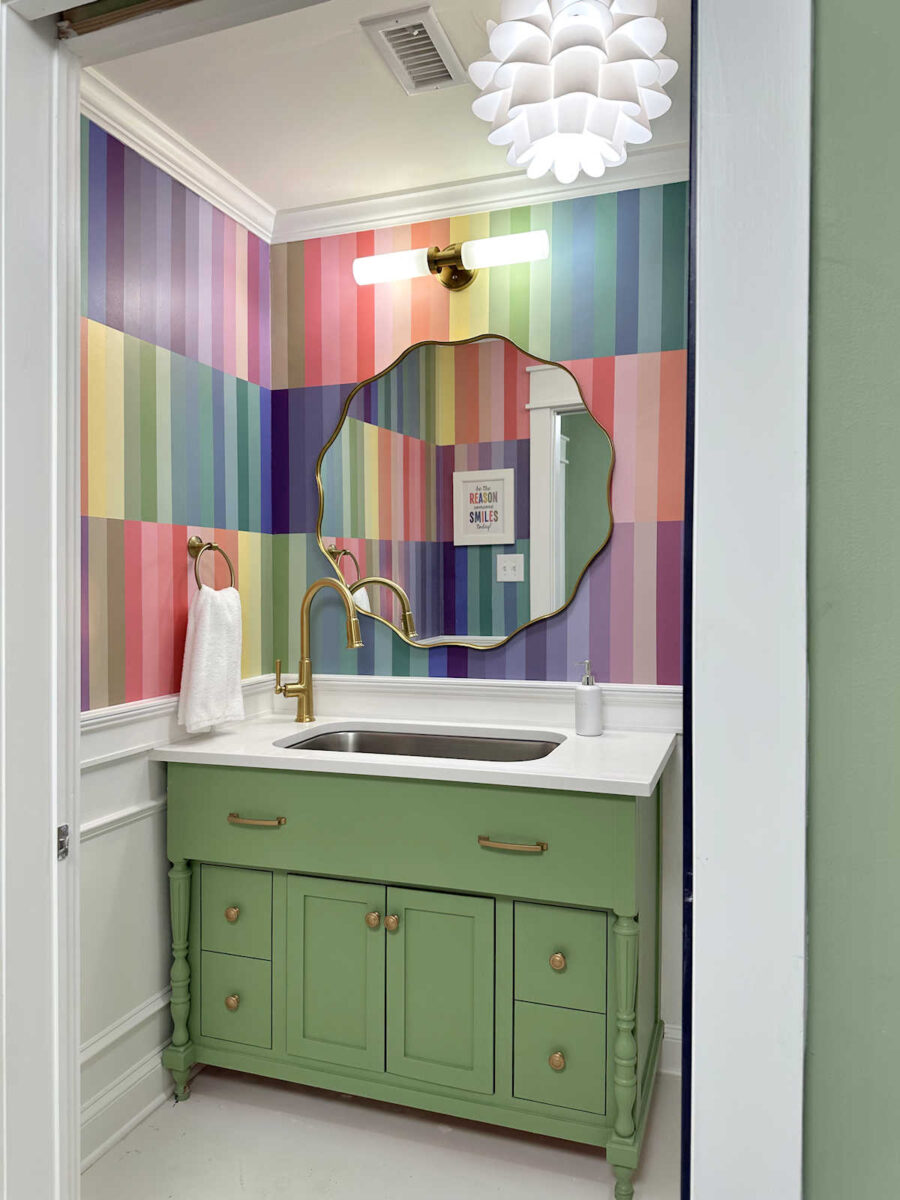
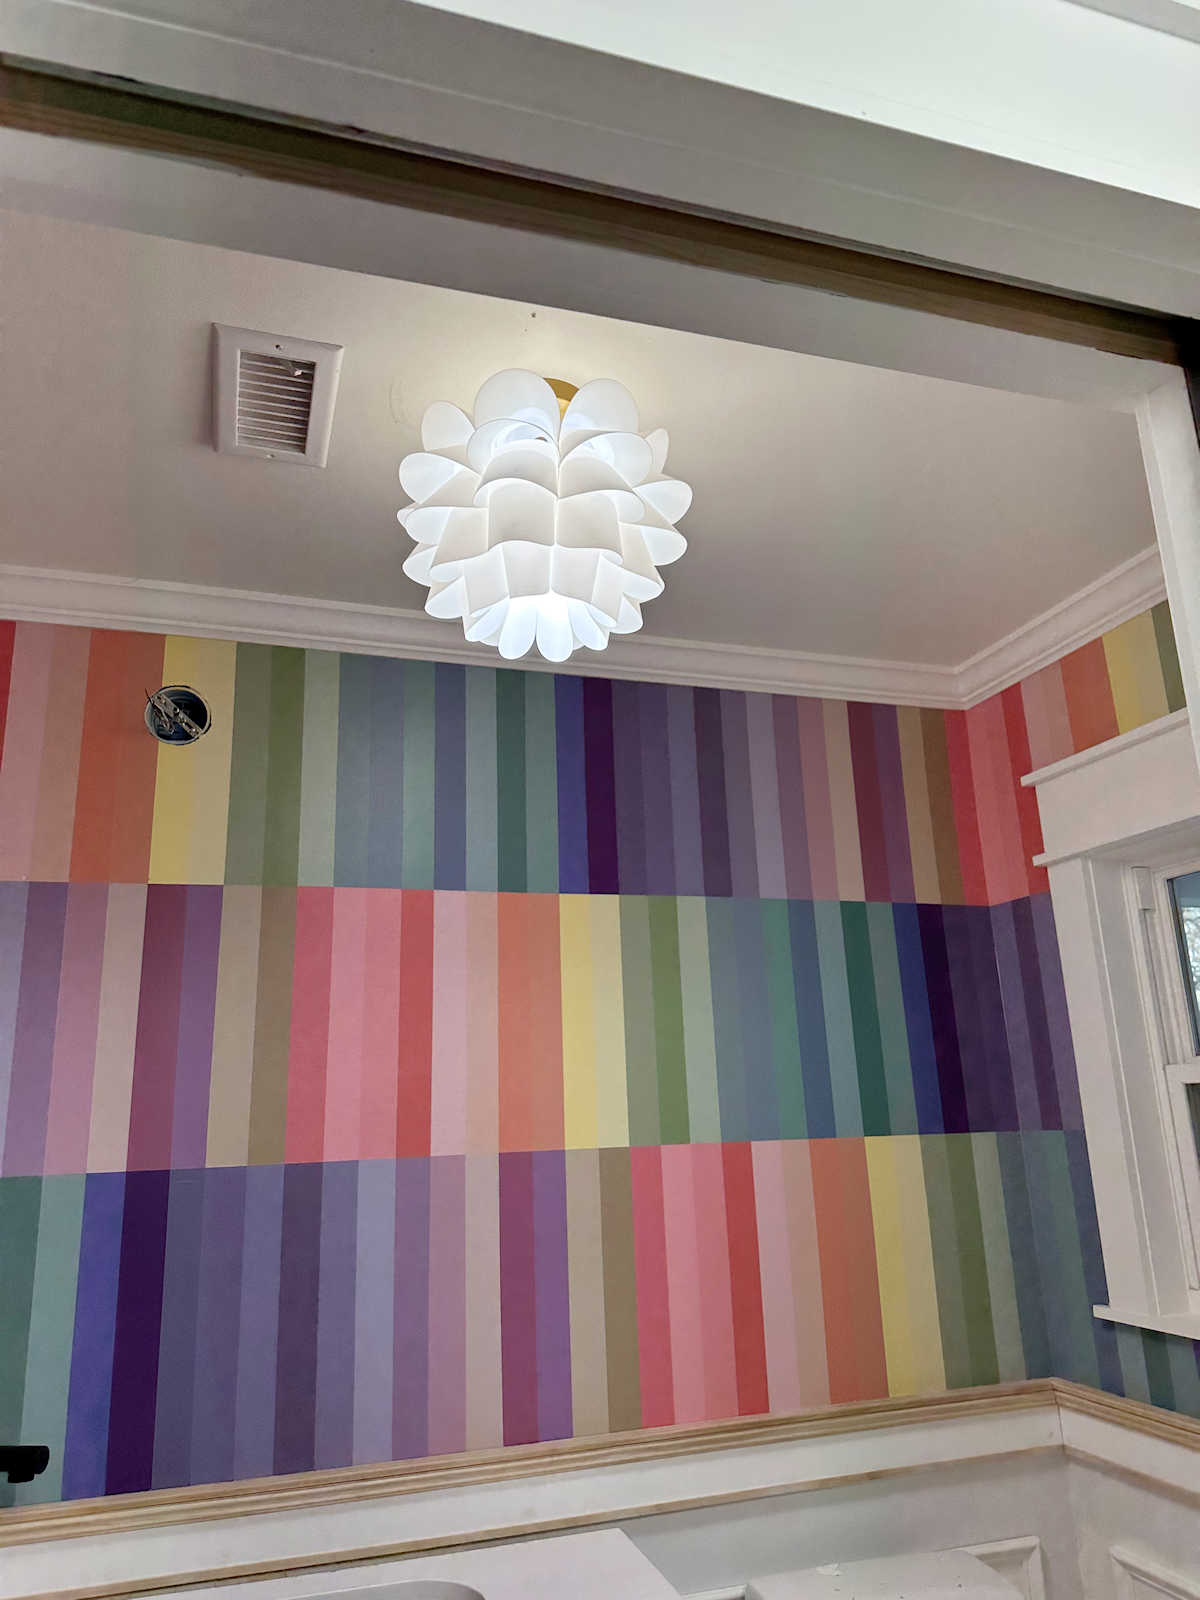
Here is how it turned out. The walls are a hand painted design. My original idea of using wallpaper didn’t work out, and in the end, I’m actually thankful. It took a lot longer to do the painted design, but I like it so much better!
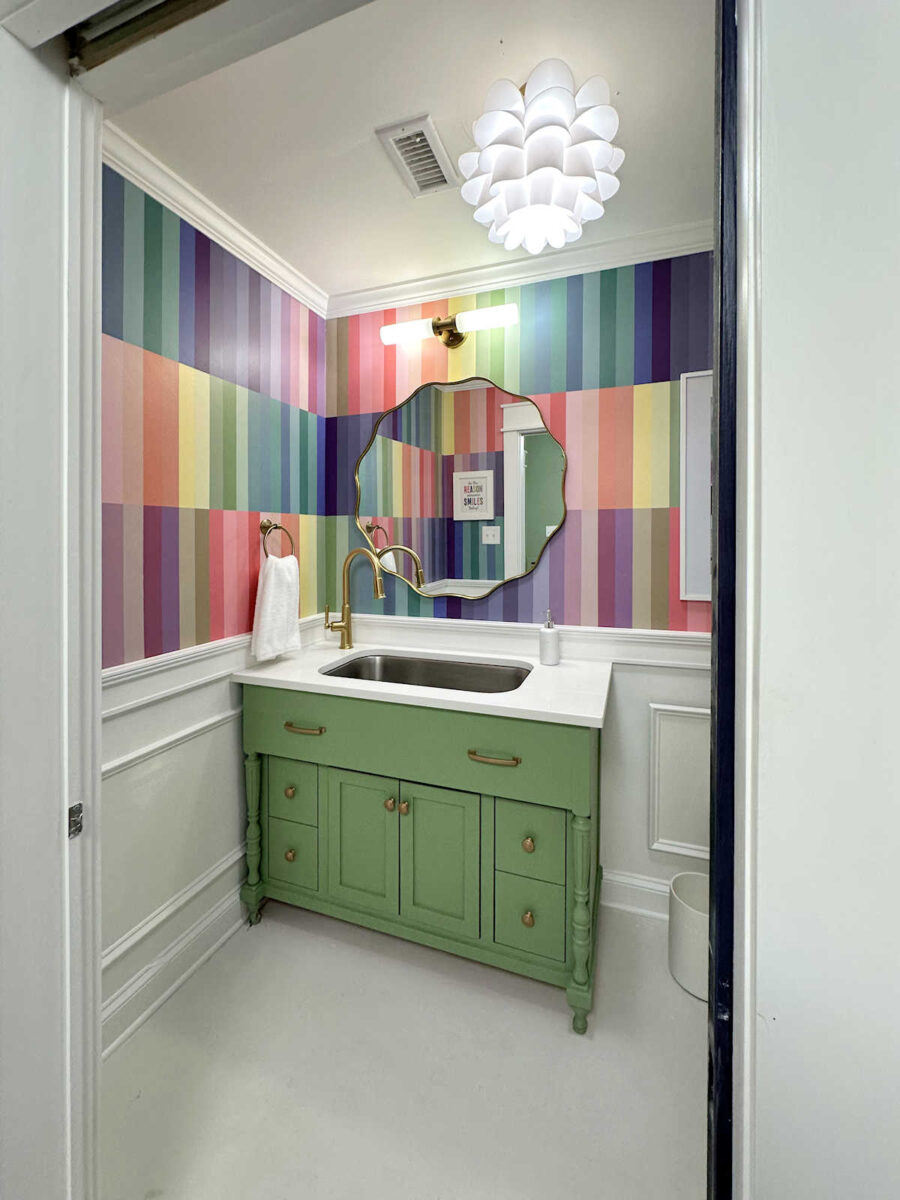
It’s a tiny bathroom, but it really packs a punch now.
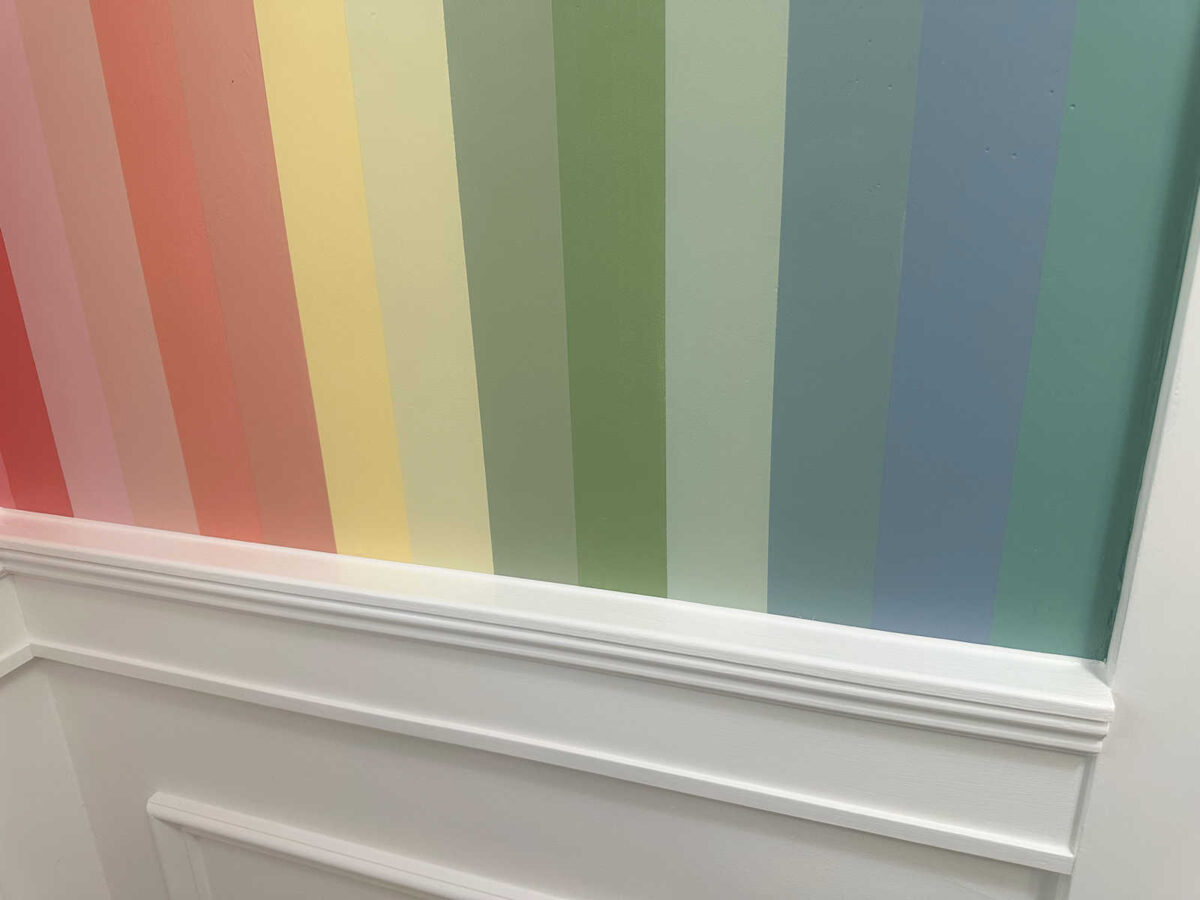
Before I show you more, I want to show one detail that I had to figure out. I painted the walls first, and then I painted the wainscoting. And after everything was painted, I needed to caulk between the top trim of the wainscoting and the striped wall. I decided it do it by placing a paint stick on top of the trim, and then placing the painters tape right along the top of the paint stick. This gave me a space of about 1/8 inch above the top trim of the wainscoting.
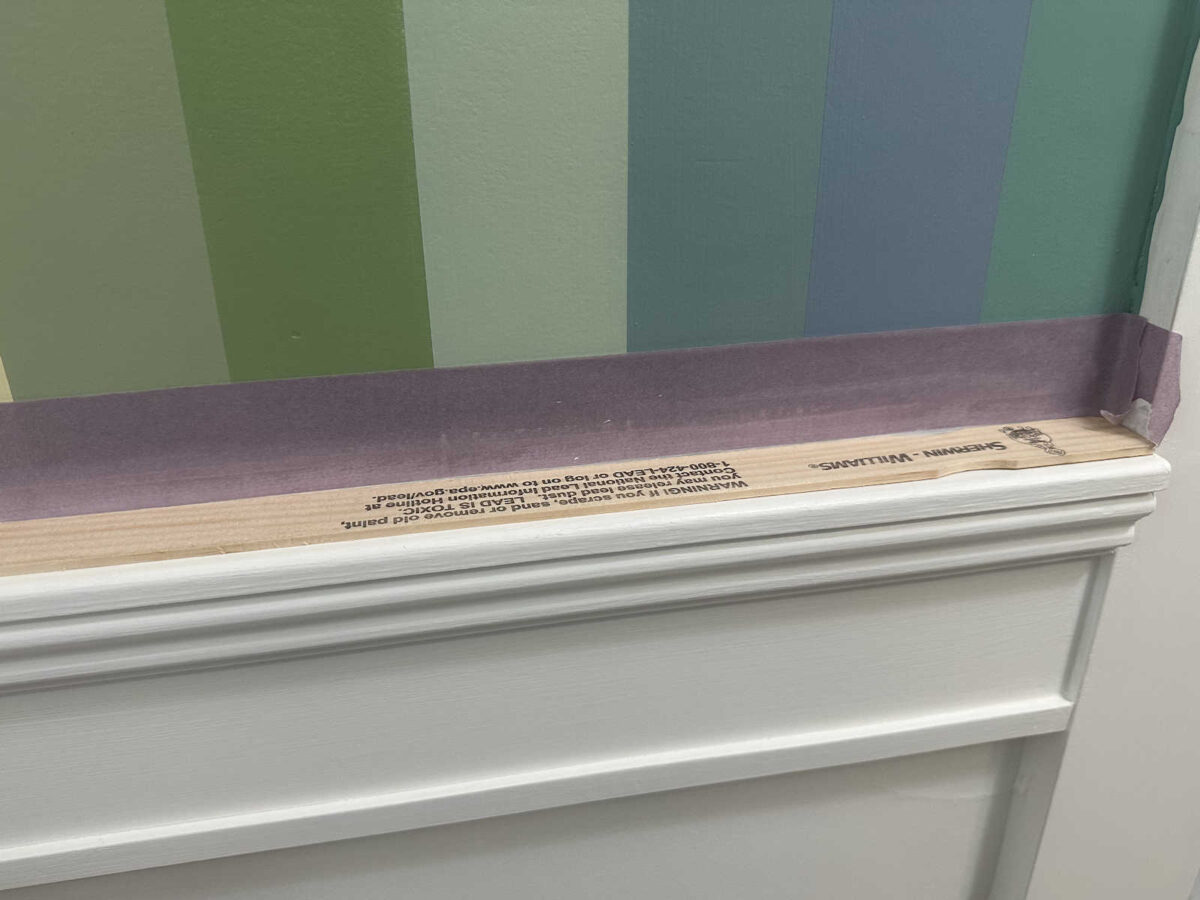
Once I had the tape around the whole room, I went back and caulked and then added two coats of paint.
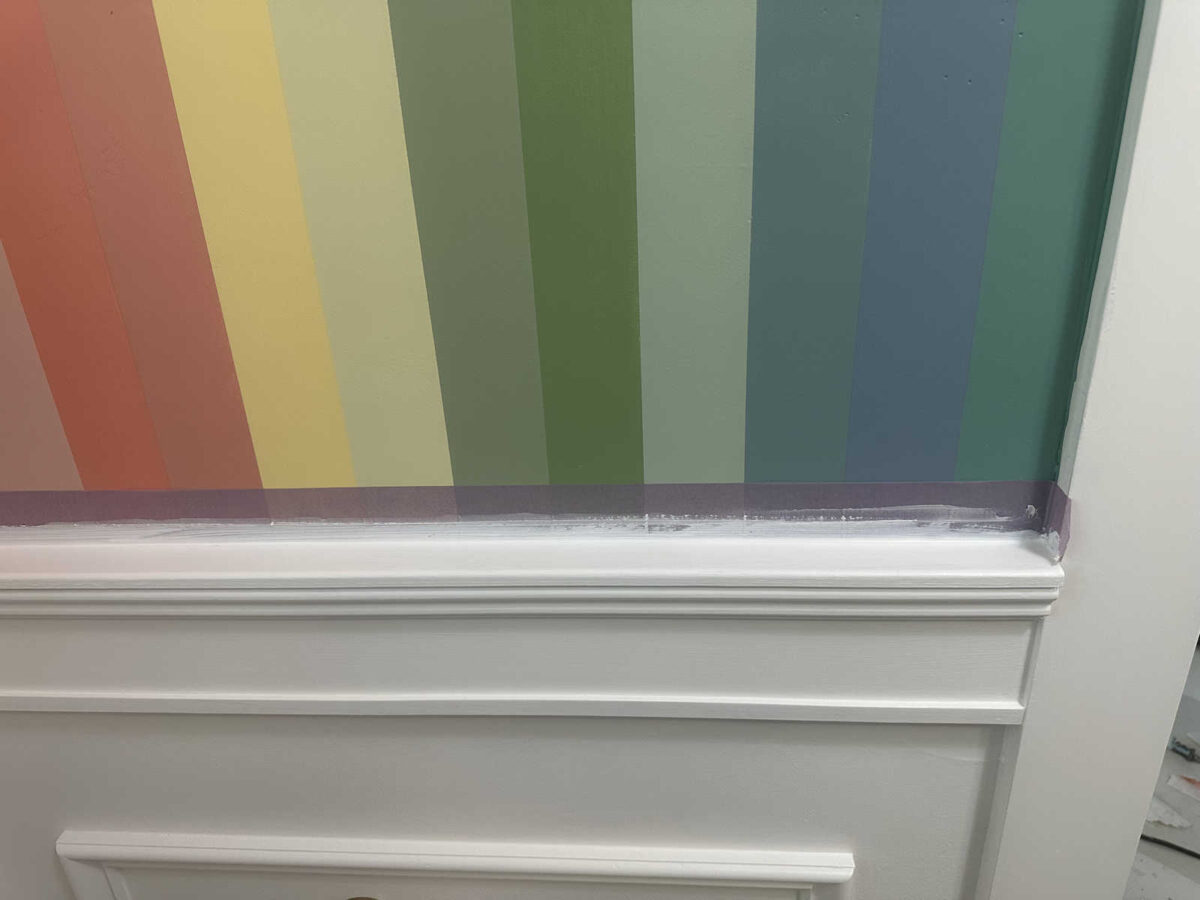
I removed the tape while the second coat of paint was still wet, and it left this perfectly straight and crisp caulk/paint line between the wainscoting and striped wall.
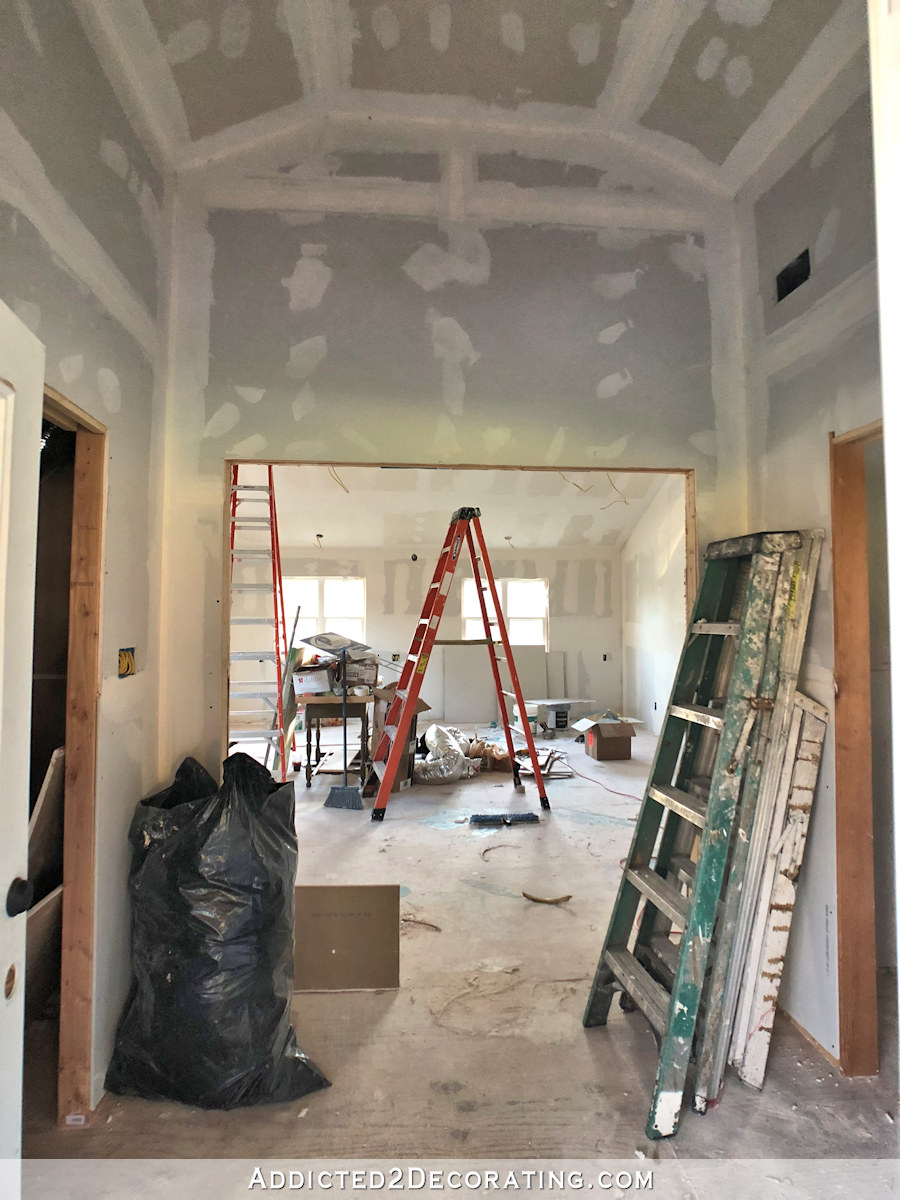
With that detail out of the way, now let’s take a few minutes to travel way back in time and remember where all of this started out. This bathroom is located in my studio, which was originally our garage. Sadly, I don’t have a picture of what the garage looked like in the very beginning, but I do have this picture of it after my father-in-law and I put up some drywall. The door on the left goes to what is now our breakfast room (sitting room). The opening on the right went to a storage room at the back of our garage. The storage room was the whole width of the garage and about 7 feet deep.
And this is the side of the storage room that eventually became my studio bathroom. It originally housed the huge furnace, but we got rid of that the second year we were in this house.
So when we decided to turn the garage into my studio, that back storage room in the garage was turned into a back entry (which now leads to our carport) with the bathroom on the left and a smaller storage room on the right. In the picture below, you can see the area that was walled off to become the bathroom.

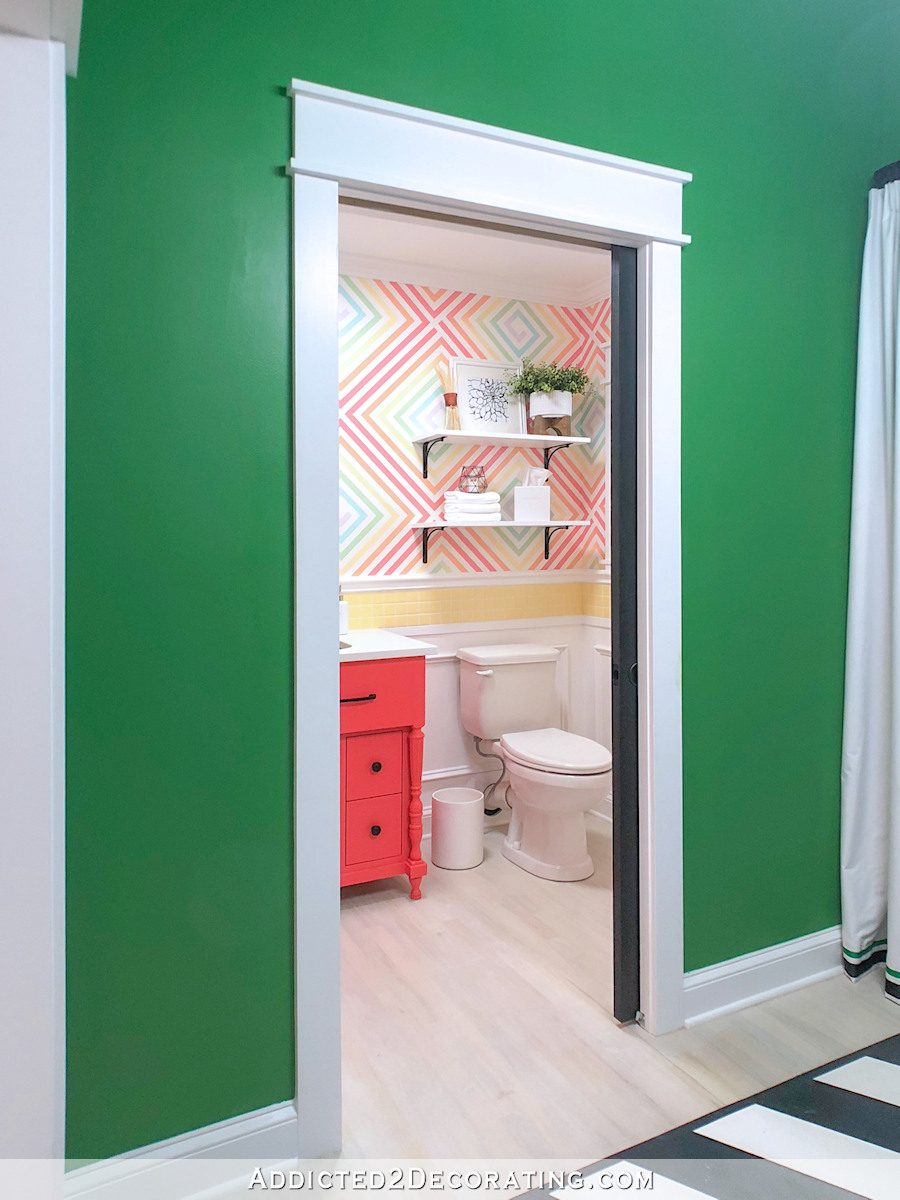
The first time I finished this bathroom, I did a crazy square spiral design on the walls. I loved it at the time, but after a few years, I grew tired of it.
The new design is definitely more me.
Here’s a look at the other side of the bathroom in its previous colors…
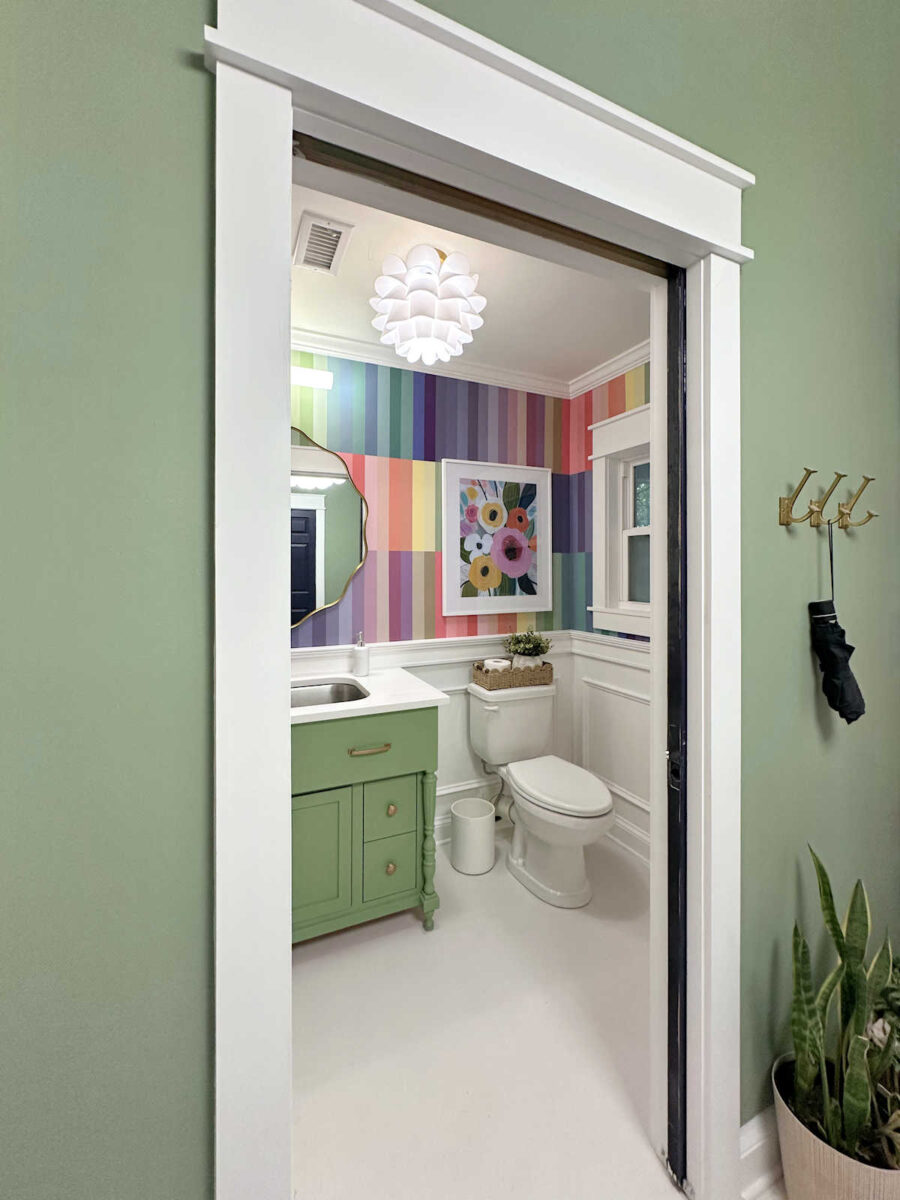
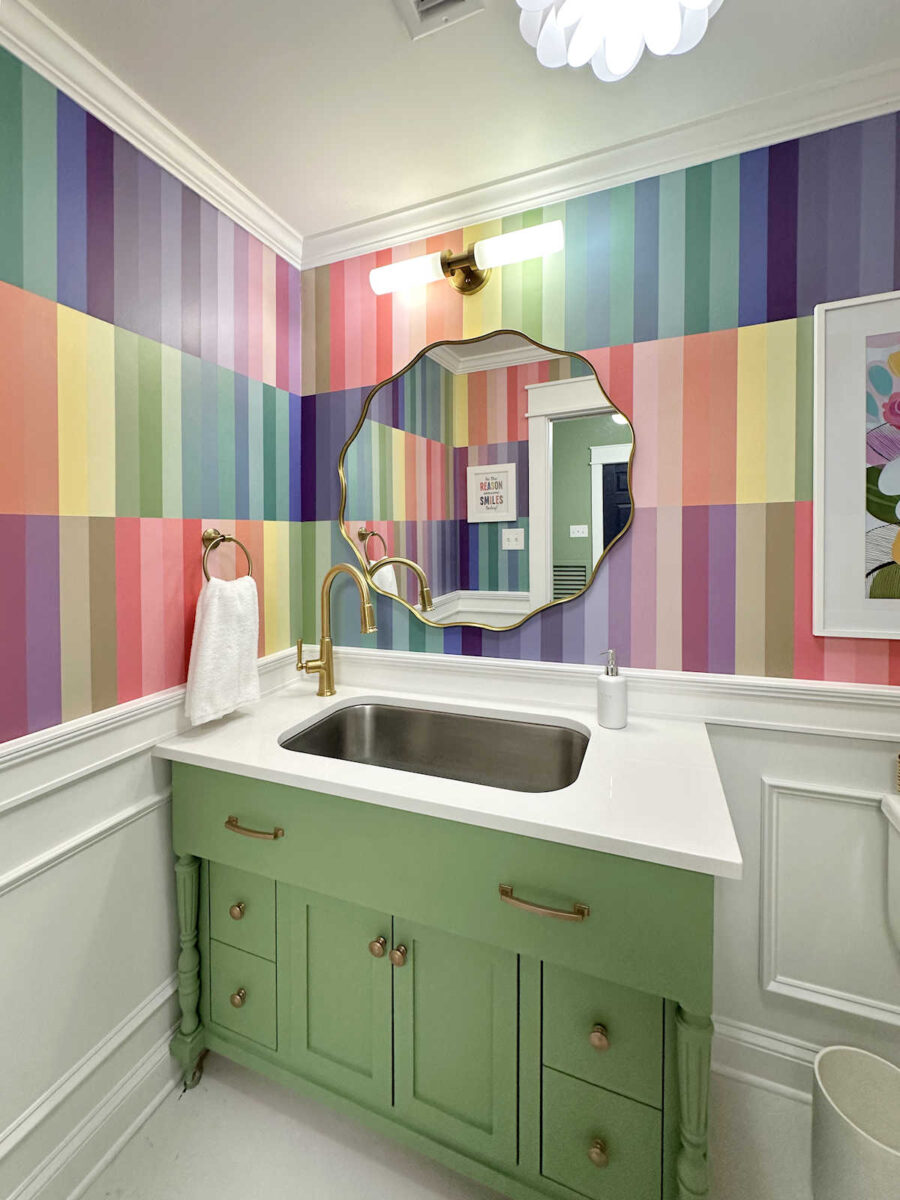
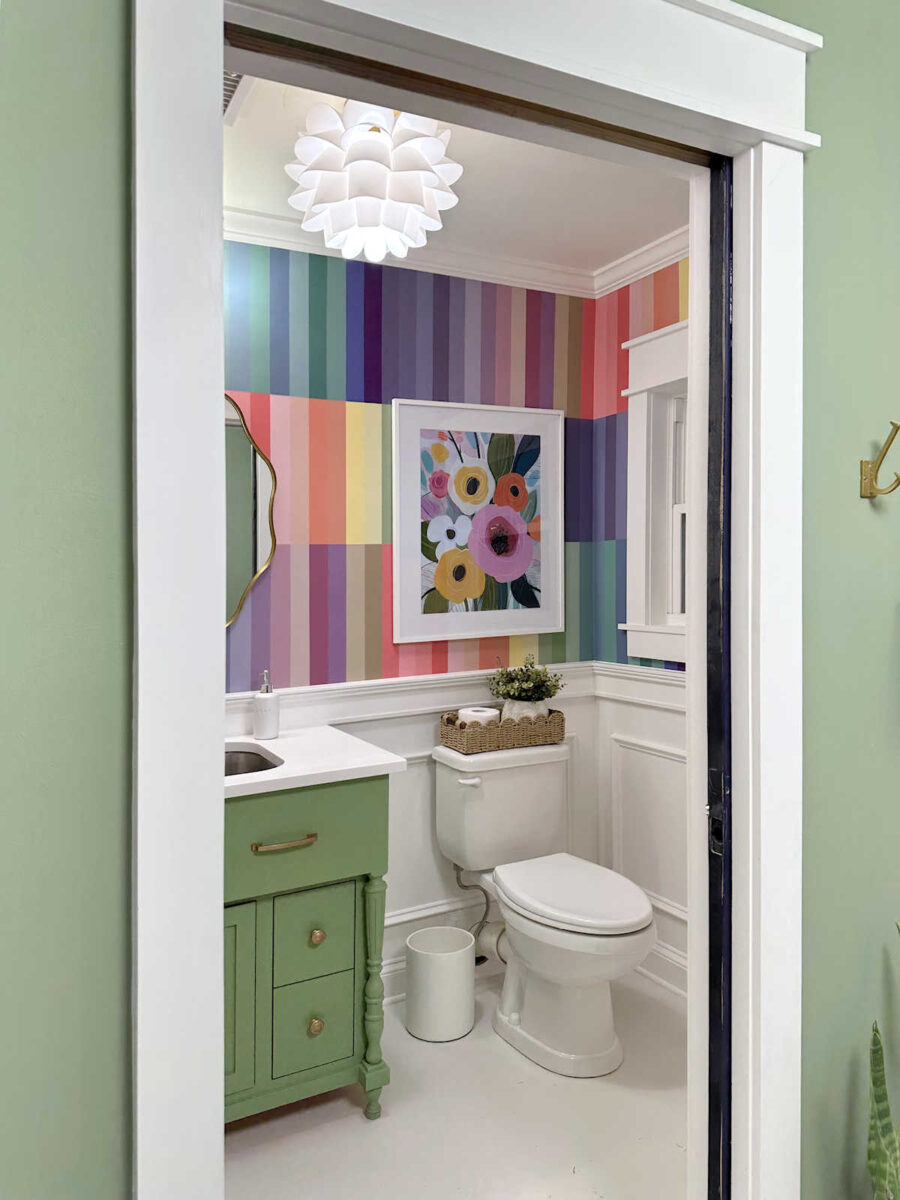
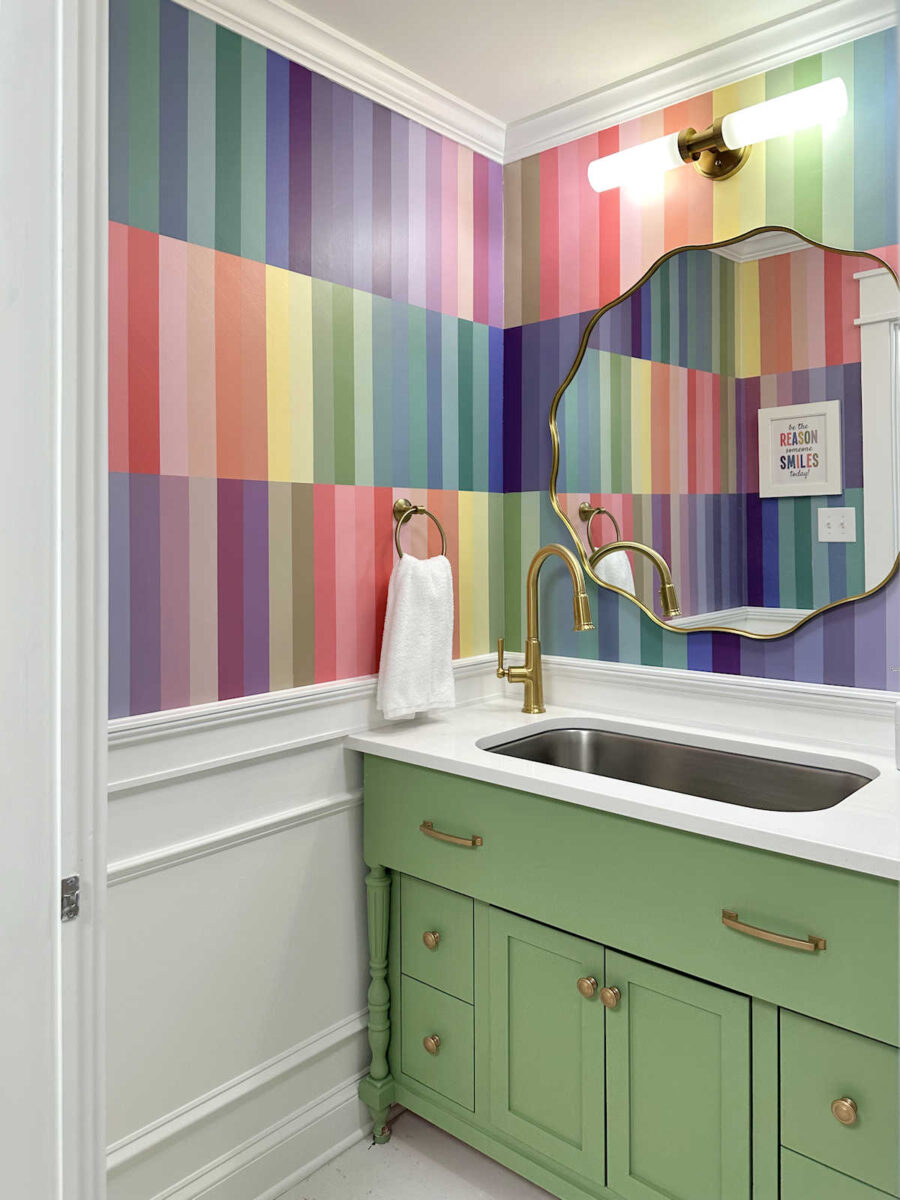
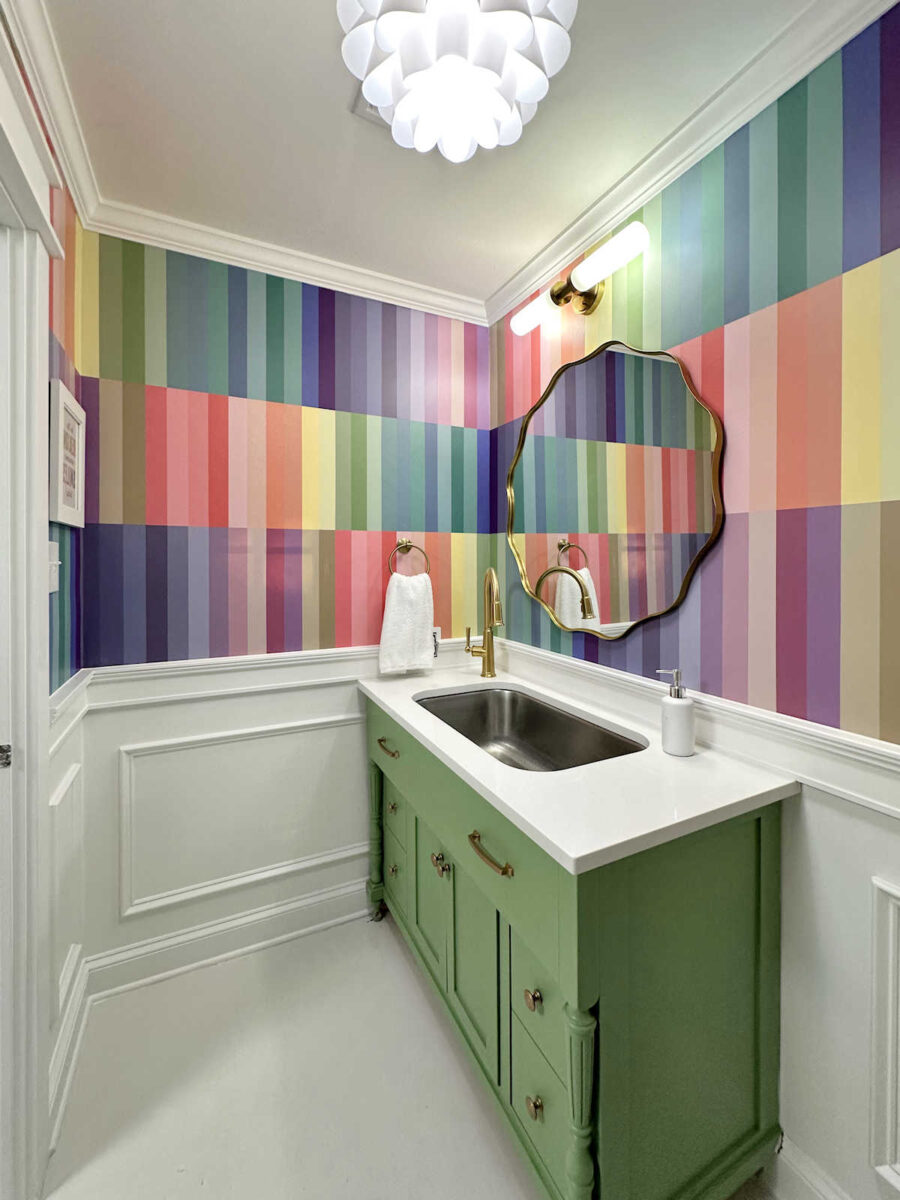
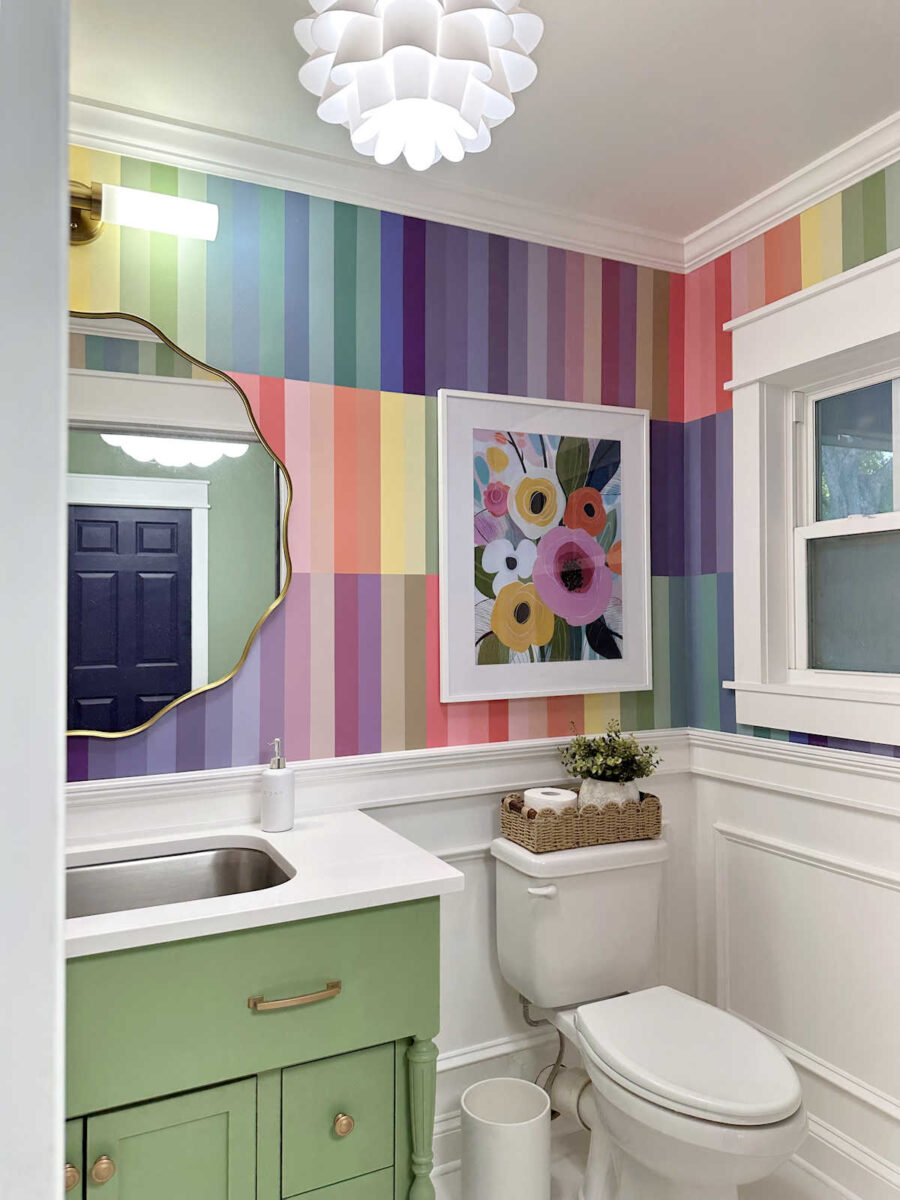
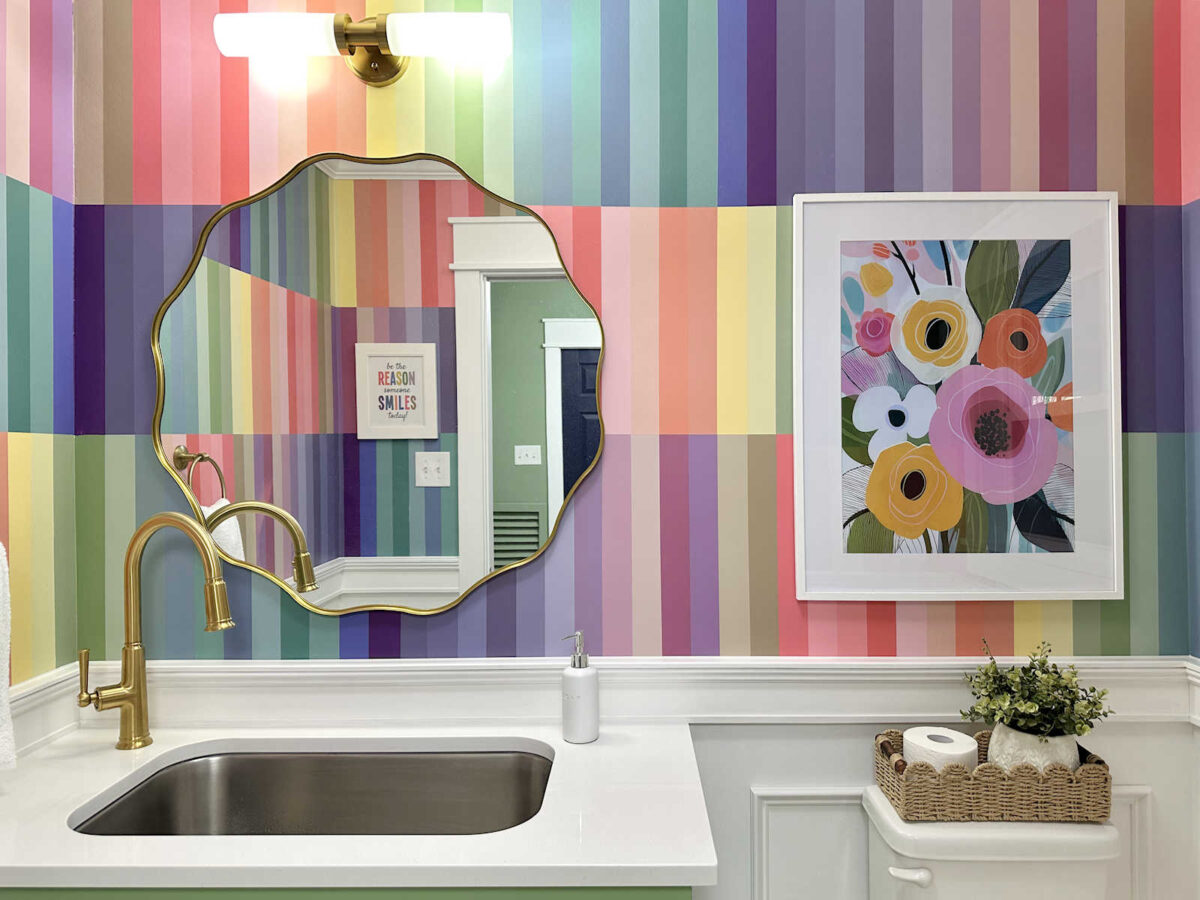
And here it is now with its amazing 35-color walls and new artwork.
Here’s a look at the previous design from the back entry. It’s funny to me how this previous design used a lot fewer colors, and yet, it’s just so jarring.
The new design has about 28 more colors in it than the previous design, and yet, this looks so much more pleasing to me. It’s bold and colorful, but it isn’t jarring (at least to me).
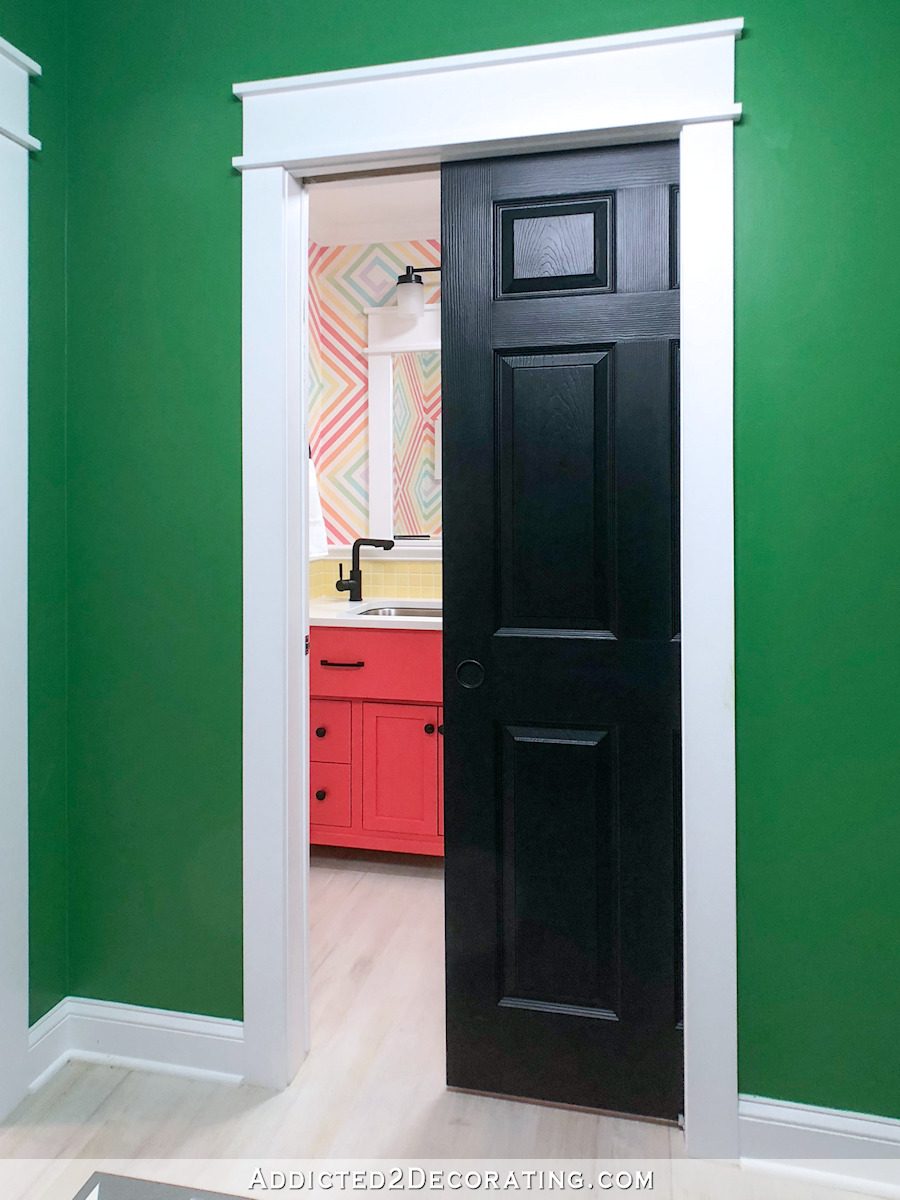
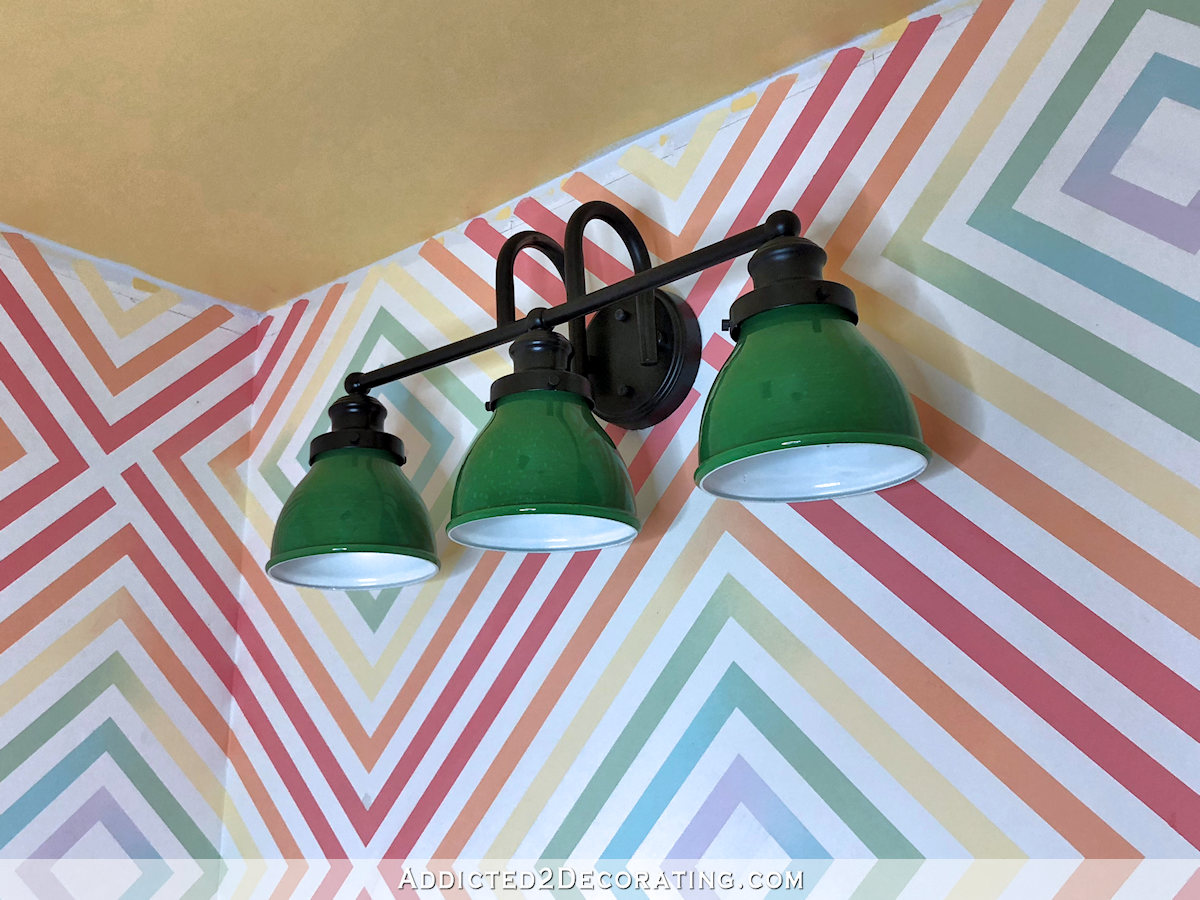
And here’s one more look at the previous design with the pocket door showing.
And here’s a look at it now. The color of the back entry walls in this picture isn’t quite accurate. I think sun was coming in through the back doors and washing out the color, but the actual color is more of a true green with far less yellow.

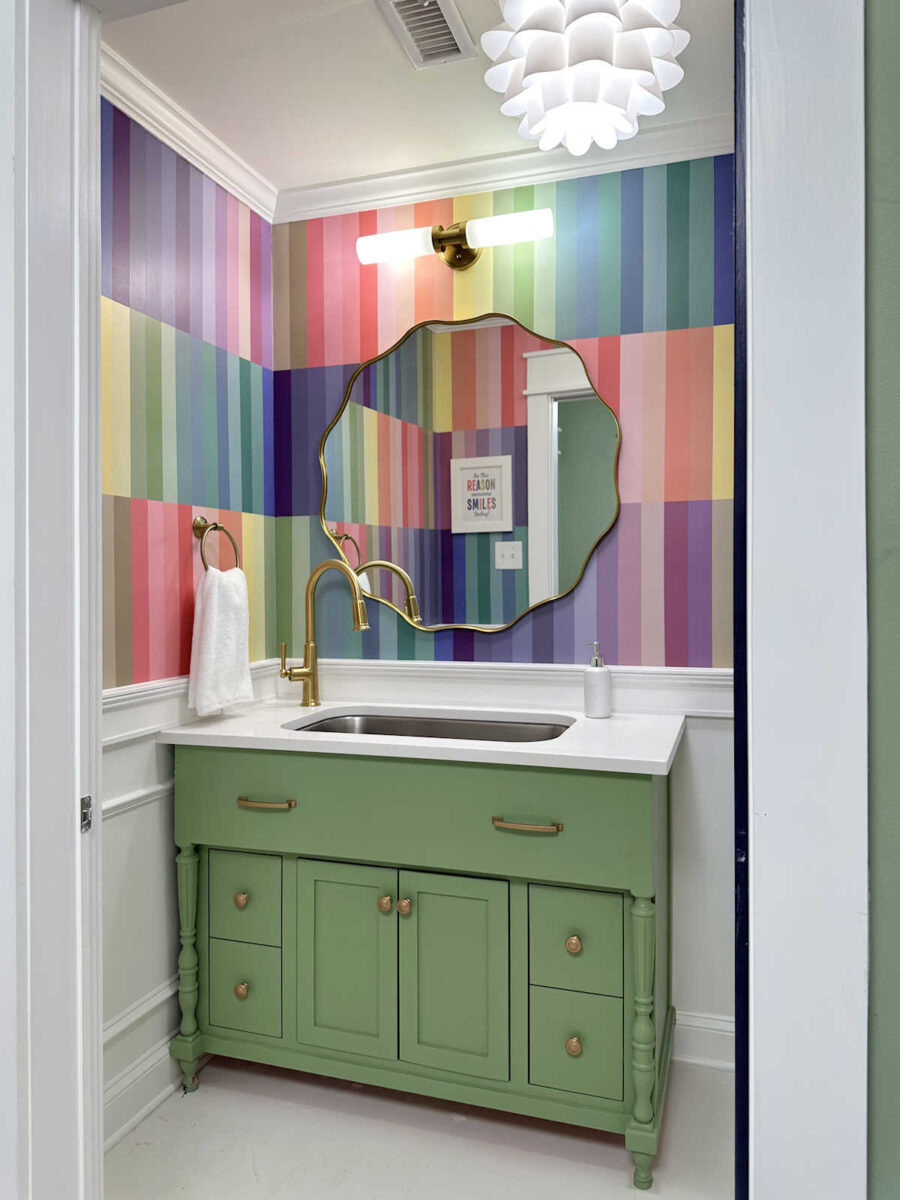
In the previous bathroom, I had a print hanging on the wall opposite the mirror that said, “Be the reason someone smiles today.” But I printed it backwards so that it was seen the correct way reflected in the mirror. My mom loved that, as did I, so she made me on to match the new colors of the bathroom.
Because of the two different fonts on this one, it’s a little harder to see in pictures. But when standing in the room, it’s quite easy to see reflected in the mirror.
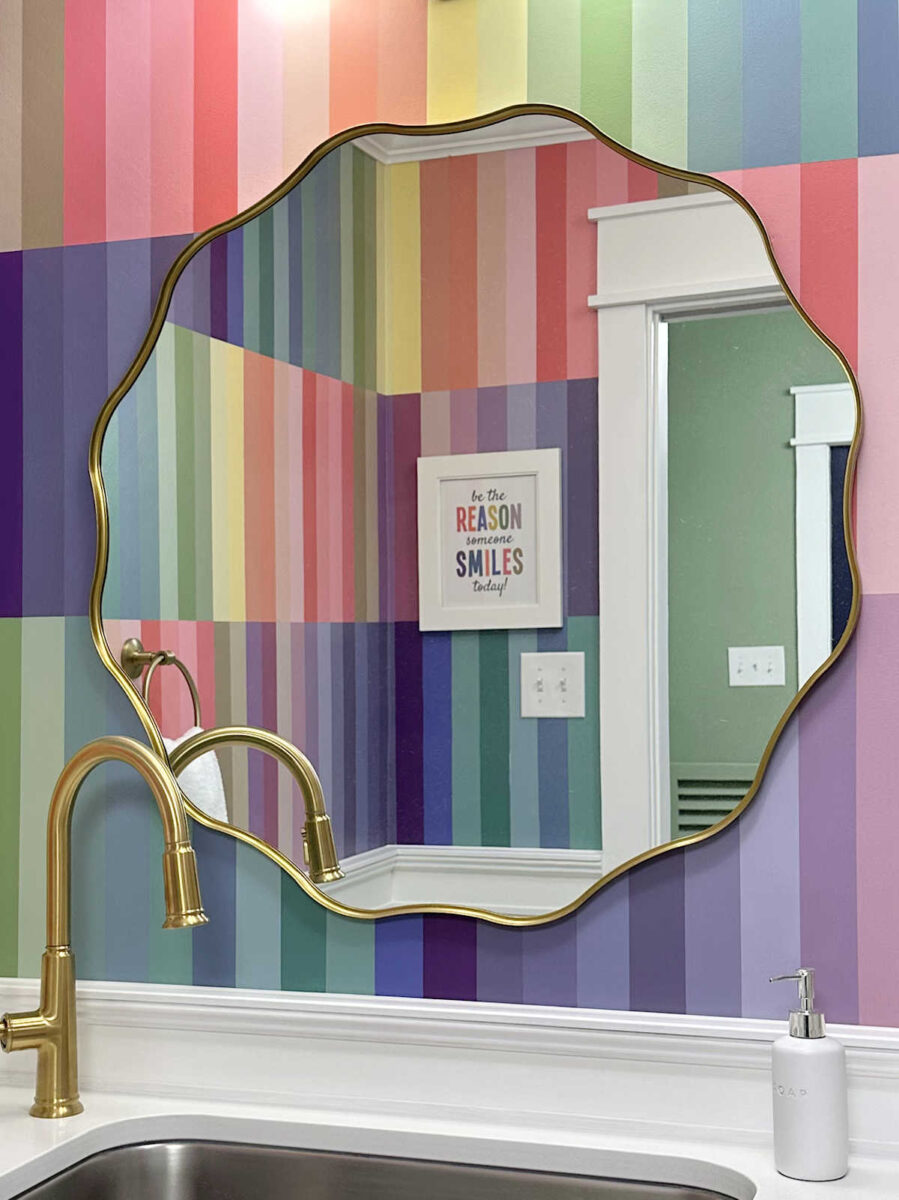
I had considered painting the ceiling in the room a light pink. Now that I see the room finished, I’m so glad I left the ceiling white. I love how the white trim and ceiling above, and the white trim and waincoting below, really frame out the colorful walls and let them be the star of the show.
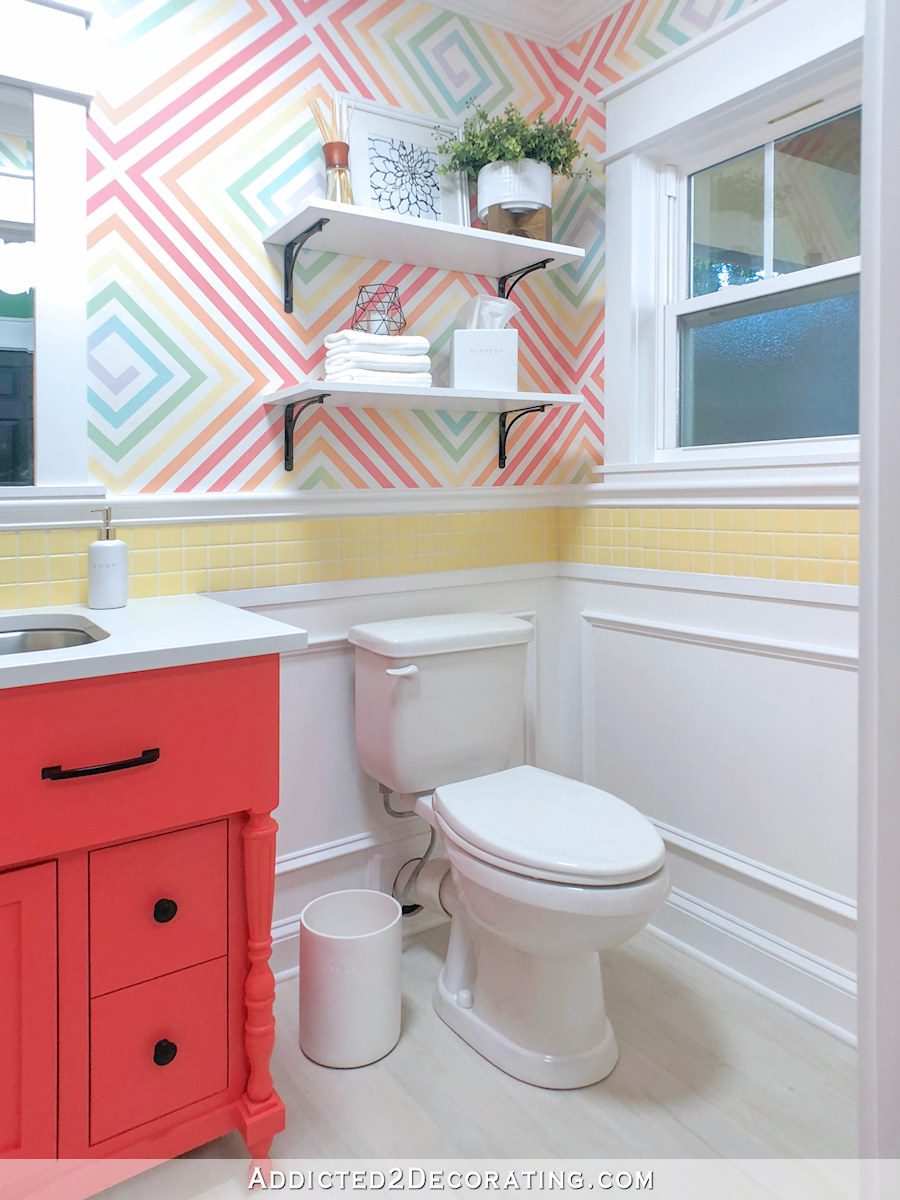
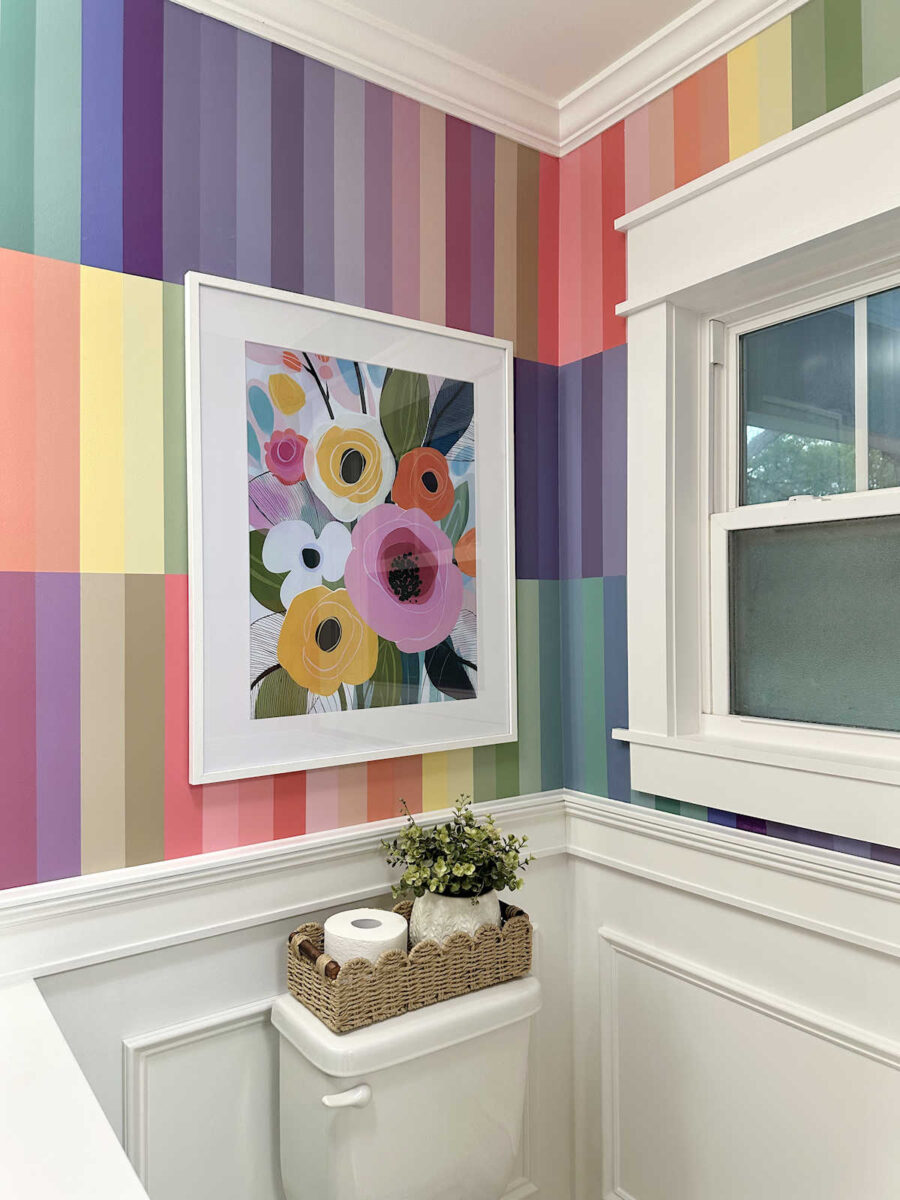
And while I love, love, LOVE the walls, I did feel like I needed something to break up all of the color and stripes, so I found this colorful floral downloadable artwork, had it printed, and then put it in a white frame with a large white mat. I think it’s a nice “break” in the wall design without hiding too much of the walls.
I really do think this is my favorite wall design I’ve ever done. In fact, I love it so much that I almost wish I had saved it for a much larger room or a more prominent area in our home. But then again, I know I love it a whole lot more than Matt does. 😀 So I guess it’s good that it’s tucked away in my studio bathroom.
And in reality, I can’t imagine taking the time to do this wall design in a much larger space. It took quite a while to do the upper walls in this tiny bathroom. Had I tried it in a larger space, I think I would have lost interest halfway through. 😀
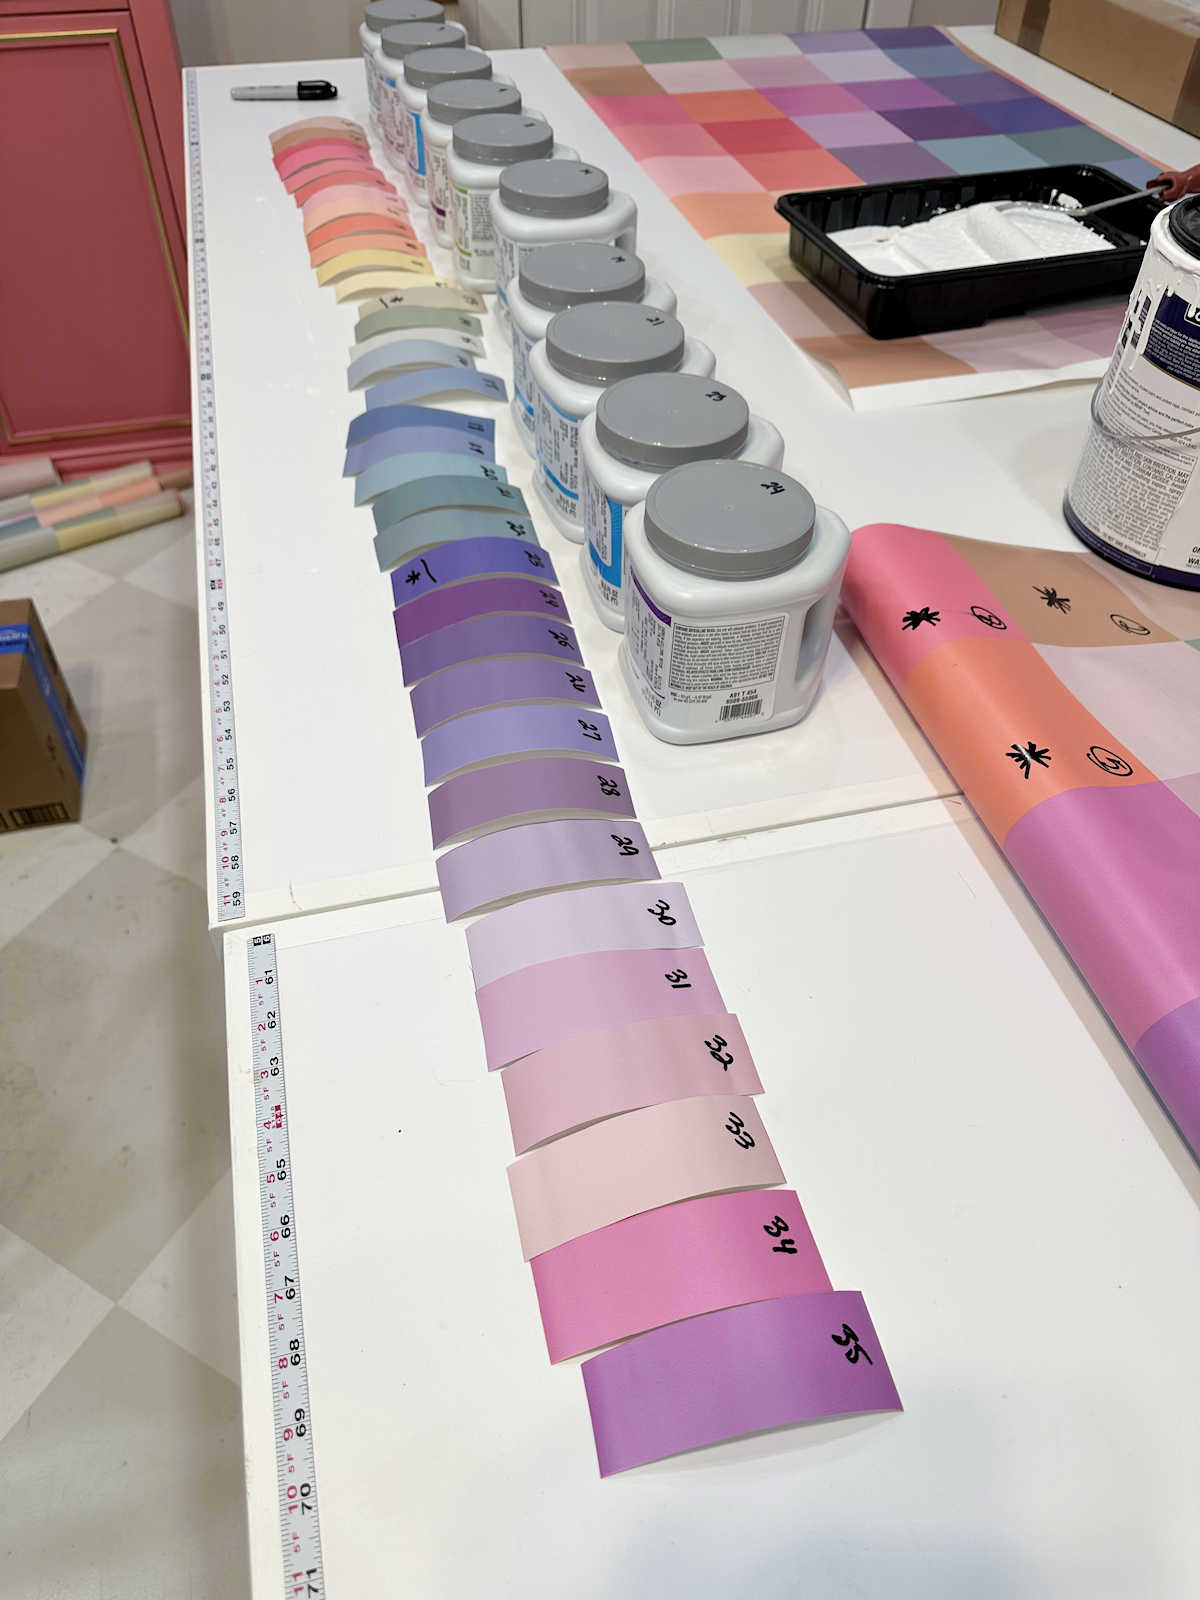
Because I chose all of these color based off of the wallpaper I had originally designed for the room, and those colors came from the floral wallpaper mural in the studio, the colors of this bathroom coordinate perfectly with the rest of the studio. When I sit at my desk and take it all in, it all looks so good together.
I’m going to have to wait and show you pictures of the whole area at a later date. I was really hoping that I could get my studio put back in order and get it sparkly clean so that I could show you the whole area today, but I ran out of time. And after doing a wall design with 35 colors, most of which I mixed myself, plus all of my other tools and supplies strewn about, let’s just say that my studio has a bit of a post-tornado look to it. I’ll try to get it all cleared away and cleaned up soon so that I can show you the wider view pictures soon.
If any of you happen to be new here, I also wanted to explain why I have a kitchen sink and faucet in this tiny bathroom. Again, this is my studio bathroom, and I do all kinds of projects in my studio. As we were turning this area of the room into a bathroom, my original thought was to put a utility sink in here. I wanted a deep sink and a large faucet because I never know what I may need a sink for with all of the various projects I do. But in the end, instead of a utility sink, I decided to build my own sink base and then use a kitchen sink and a kitchen faucet instead. I thought that would be much prettier and give me more flexibility than a utility sink.
One of my favorite additions to this room is this cute little ceiling light that looks like a flower.
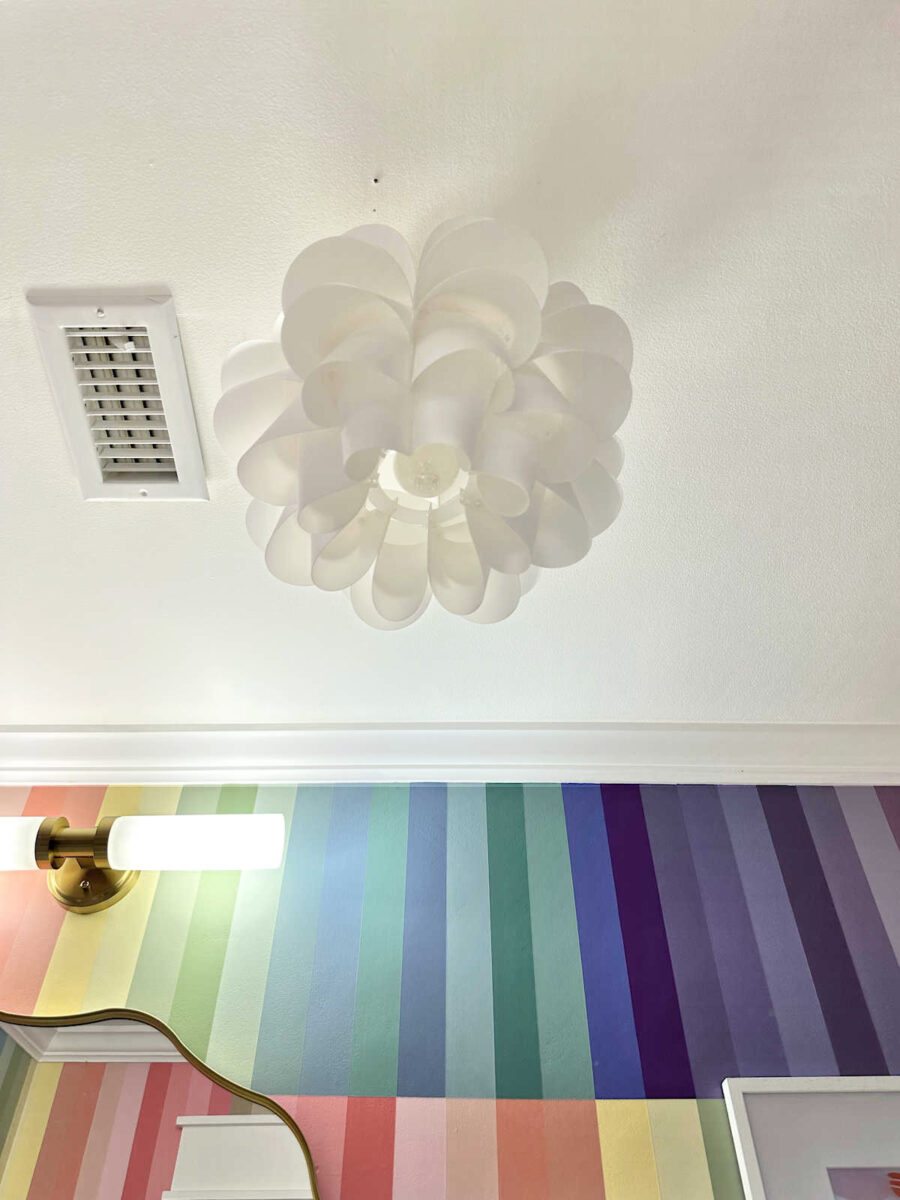
It’s made of a hard plastic, and it is durable enough to be cleaned with a damp cloth or a Swiffer duster.

But I’m very glad that I swapped out that previous wall light for this more streamlined design that doesn’t compete with the cute floral ceiling light. I think this one is perfect for the bathroom. But I overlooked the fact that this light requires a special shape of bulb. I got the light installed, and then realized that there’s no way regular lightbulbs will fit into those shades. So I had to order new elongated bulbs to fit.
And in hindsight, I kind of wish that I had gone with a set of four prints to go over the toilet instead of one large print. When I ordered the frame and the print, it didn’t even dawn on me that I’d have one large print next to a one large mirror. I think a series of four prints may have looked a little better. My mom suggested that I could actually cut this print into four pieces and frame them individually to achieve that look. I love that idea, and I may actually do that at some point. But for now, I decided to just stick with the one large print.
I wanted to get the whole wall, the flower ceiling light, and the vanity in one picture, so I set my camera to the wide angle setting and took this picture. I laughed so hard at how that wide angle setting distorted the shape of the toilet. 😀 But it’s the only way I could get everything into one picture.
So that’s it! This project is wrapped up, and my whole studio area is now completely finished. I’ll show y’all pictures of the whole area as soon as I can get the studio put back together and sparkly clean.
Sources:
Flower ceiling light: Amazon (affiliate link)
Floral printable artwork: Etsy (affiliate link)
Mirror: Amazon (affiliate link)
Wall Light: Amazon (affiliate link)
Elongated light bulbs: Amazon (affiliate link)
White 24″ x 30″ frame with mat: Amazon (affiliate link)
Faucet: Home Depot
Scalloped basket: Amazon (affiliate link)
Paint Colors:
Vanity: Sherwin Williams Broccoflower
Wainscoting: Behr Polar Bear
Floor: Benjamin Moore Classic Gray (color matched in Behr Porch & Patio Paint)
DIY Projects:
DIY vanity for kitchens sink
Striped wall design
More About My Studio Bathroom
see all studio
bathroom diy projects
read all studio
bathroom blog posts

Addicted 2 Decorating is where I share my DIY and decorating journey as I remodel and decorate the 1948 fixer upper that my husband, Matt, and I bought in 2013. Matt has M.S. and is unable to do physical work, so I do the majority of the work on the house by myself. You can learn more about me here.
Love, love every element of studio bathroom. Don’t change a thing.
That is absolutely amazing!!! And, I love all your Mom’s inputs – the backwards sign is perfect and creating four prints out of the one above the toilet is genius!!
Kristi I see that hand towel hiding the outlet. I was curious to see your idea for that…
Me too
Me, three.
Same!
Same!
This is a home run! The colors are rich and I love the big bold print. It does not compete with the wall pattern.
I’m glad you are so happy with the way the powder room turned out. I think four pieces of artwork over the toilet would be busy looking. You could possibly cut an inch or two off the top of the floral artwork, above the flower with the yellow center surrounded by white. I think the narrow light fixture over the sink looks very nice. I was hoping you would show us how you finished the wall outlet. It is nicely disguised by the hand towel.
So happy with some of your choices…love all the artwork…cherry on top! The colors look wonderful together, and I love the white ceiling/white base. It all looks so beautiful…you must be so happy.
Dynamic and elegant! Love it.
Kristi I’m not as brave as you are with color and if I tried this it would NOT turn out right at all…that said this is stunning!! The flower artwork is perfect, the mirror is perfect, the lighting, all of it. You have such a gift! I’ve also wanted a kitchen sink and faucet in our bathroom for awhile and doubted myself but inspired by you I’m doing it soon! Oh and the backwards artwork across from the mirror is so clever. Once again great job! Blessings from NC
You have created another masterpiece! I absolutely love this powder room. It’s fun, whimsical and still classy and sophisticated. I hope you will treat yourself for a job well done!
Once again your vision and execution amaze me! At the beginning I had some niggles of doubt about the how it would turn out…but I should know after following you since condo days that the result would be perfect! Trust the process!
Beautiful! Perfect!
It is FABULOUS!!! Wouldn’t change a thing!!!
The print over the toilet is perfect as is – it is not a problem being similar in size to the mirror on the same wall – the mirror reflects the rest of the room and is like ‘invisible art’, so there is no competion here.
The room is simply delicious!!! LOVE, LOVE, LOVE!
Love every detail in this bathroom! Great job!
I love it! It’s stunning, and your caulking idea was brilliant. Thank you for sharing it.
How satisfying! You have created and now finished a space that is all you! It is beautiful and happy. You should be so pleased with your hard work that has lead to this brilliant outcome.
The finished room is very YOU! The stripes remind me of the NBC Peacock (kinda!), and I don’t find anything wrong with the print and the mirror – they are different shapes, and I think they work with the sort of Circus quality of the whole design. I’d wondered if you saw the mention in the ad for the narrow light that it required those bulbs. (It was in the boxes of different pictures of the light.) Anyway, glad it’s done! MISSION ACCOMPLISHED!
Love this!
You knocked it outta the park!!
I love the wall light; do you know if it is dimmable? Were the bulbs pricey?
I’m so amazed to see that it doesn’t look as chaotic as the small squares looked to me. I love the crisp white which off sets it beautifully.
As to the art, perhaps one large print reads ‘quieter’ than 4 small ones do.
You could do a mock up and try that. Well done, Kristi.
Now on to the yard!!!
You must be tickled pink💓. The art work was the cherry on top.
Another project “well done!”
WOW!!! OH WOW!!! OH WOW!!! Oh my gosh, I love this room. It turned out beautifully, as if there was any doubt in any of our minds. Your mom is awesome, she rocks! Enjoy next week “off” if you can, and we all wait anxiously for the next adventure.
Cheers to you and Matt, and the Fur Babies!!!
Love it! Beautiful job, Kristi, as always! Congrats on another “finished off.”
This bathroom is absolutely perfect, gorgeous colors! I would be so happy to be in this room.
Somewhere along the way, i missed what you did for the awkward outlet.
Yay!!! It looks so good and the colors are SO much prettier than your previous spiral pattern. You amaze me with how you’re able to take so much color and still make it feel peaceful. ☺️ It’s just lovely. ☺️
Blog post for next week though … How’d you do the funky outlet that’s hiding behind the towel?!? 😂
Beautiful!
I’m glad you hung the large artwork and think it’s lovely just as it is. It really helps to connect and balance with the other white in the room which I think you realized is just what all that color needed.
Job well done.
Plus, I’m loving the backsplash being reduced in size from the previous one. So nice.
Kristi, it turned out beautiful and I love the whole thing…..large picture and all. Its gorgeous!
4 small pics would be too busy I’m afraid 😁 this is perfect!
Wonderful!!!
Love it! This room makes me happy😁 I would vote to leave the artwork as is- I think four small frames would compete awkwardly with the rectangular paint design. It’s so fun seeing it all put together 💛
Gorgeous! I did like the spiral finish as well. I understand why you like this one better. The previous spiral had a lot of movement in it whereas this is all plain recto-linear and nothing is changing direction. That allows the colors to become the focus.
Love, love, love your guest bathroom. It is gorgeous!!
Wow – that is stunning! I absolutely love everything about it! Another awesome project Kristi!!
Gorgeous & what an awesome job you did! Congrats! While the white ceiling is beautiful….my heart was set on pink! (I’m a pink lover).
But it looks amazing – and I love the “kitchen” tap – it elevates the sink! The artwork is great!!!
Luv it all!!
This is so beautiful! I love it so much!!! <3
What a difference it makes to have the perfect hue of the color you want. I wish I could just go inside and stare at it and enjoy it in person. So glad it turned out perfect for you. I hope your guests enjoy it too.
I did not think I would like all of those different color stripes but it looks amazing! The whole bathroom looks amazing!
Oh so fabulous!
I LOVE it! You did such an amazing job.
Glorious! Beautiful job. Above and beyond, as usual.
It is so pretty. I love the one big picture. I have embroidery designs that look just like that. I could do you a white towel.
I have to ask, did you get the window shutter put back up?
Not yet. 🙂
Love it! The print makes it for me; I’m not sure why—but the bold organic shapes do counterpoint the linear geometry! I get why you are thinking you might not want the mirror and the large rectangle next to each other, but the floral design in that size really pops. Dividing it up or getting four small framed prints might “busy it up” too much. (I guess I’m really into bold and dramatic!) While I loved the first iteration of this bathroom, this one is much more “me,” too. The green cabinet is amazing with all the colors, and the kitchen sink and faucet are inspired. I wish I had the where-with-all to do that in the tiny bathroom near my studio. So smart.
I really, really love how this turned out! I must say, the prior wall treatment was probably my least favorite of those you’ve done, and this is probably one of my most favorite! Definitely one that I think will make you and anyone else entering smile every time they see it.
Kristi, I haven’t been on your blog for awhile, but I LOVE this new design! The last design always reminded me of the zebra striped gum from the 80’s for some reason. This is absolutely beautiful!
This is absolutely my favorite room. It’s like cake with a surprise filling. I do not think the color treatment would have worked on a larger wall. It was meant for this sweet space. I want to print a picture and frame it!!! Great job!