Use The Wallpaper! (My Tips For Wallpaper Installation)
I spend a lot of my downtime scrolling decorating and design accounts on Instagram and Facebook, and I’m always amazed at the comments on photos and videos of rooms that include wallpaper. Bold, beautiful wallpaper is almost always well-received and generally loved by commenters. But there are always plenty of comments from people who say that would never, ever use wallpaper because it’s so hard to remove.
I get it. I think we all get it. Most of us DIYers have had that experience of trying to remove wallpaper that was installed in the 70s or 80s. And it is, in fact, a nightmare to remove those wallpapers. They were often installed right on top of bare, unprimed, unpainted drywall. They require steamers and chemicals to get them off. And even then, it’s sometimes as if these wallpapers were installed using some sort of polyurethane adhesive that was meant to survive the apocalypse and require you to spend days scraping off one tiny centimeter at a time, if you’re even lucky enough to get that much off at a time.
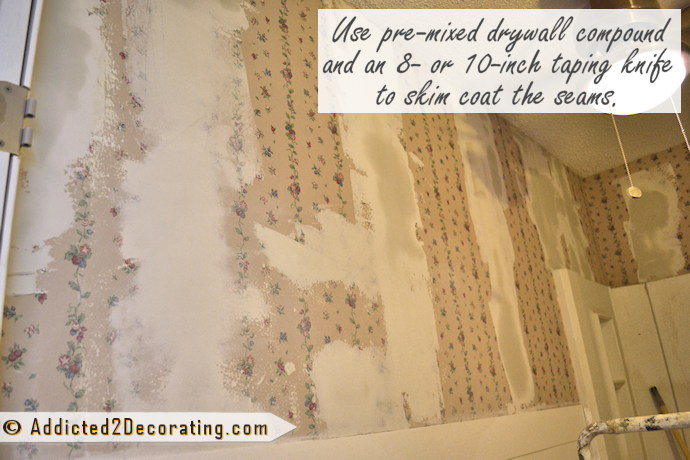
I remember that our tiny little condo had wallpaper like that, and rather than attempting to remove the wallpaper, I ended up using my sander on the walls to remove all of the lifted edges, and then drywall mudding over the uneven areas, sanding the mud, and then priming and painting the walls. There was no way I was going to spend a week or two trying to get that wallpaper, which had probably been installed in the 70s, completely off of the walls. You can see my whole process here.
But wallpapers today are very different. Most of them don’t come pre-pasted anymore, so you can choose your own wallpaper adhesive. And the ones that do come pre-pasted today are very easy to remove when you’re ready to redecorate.
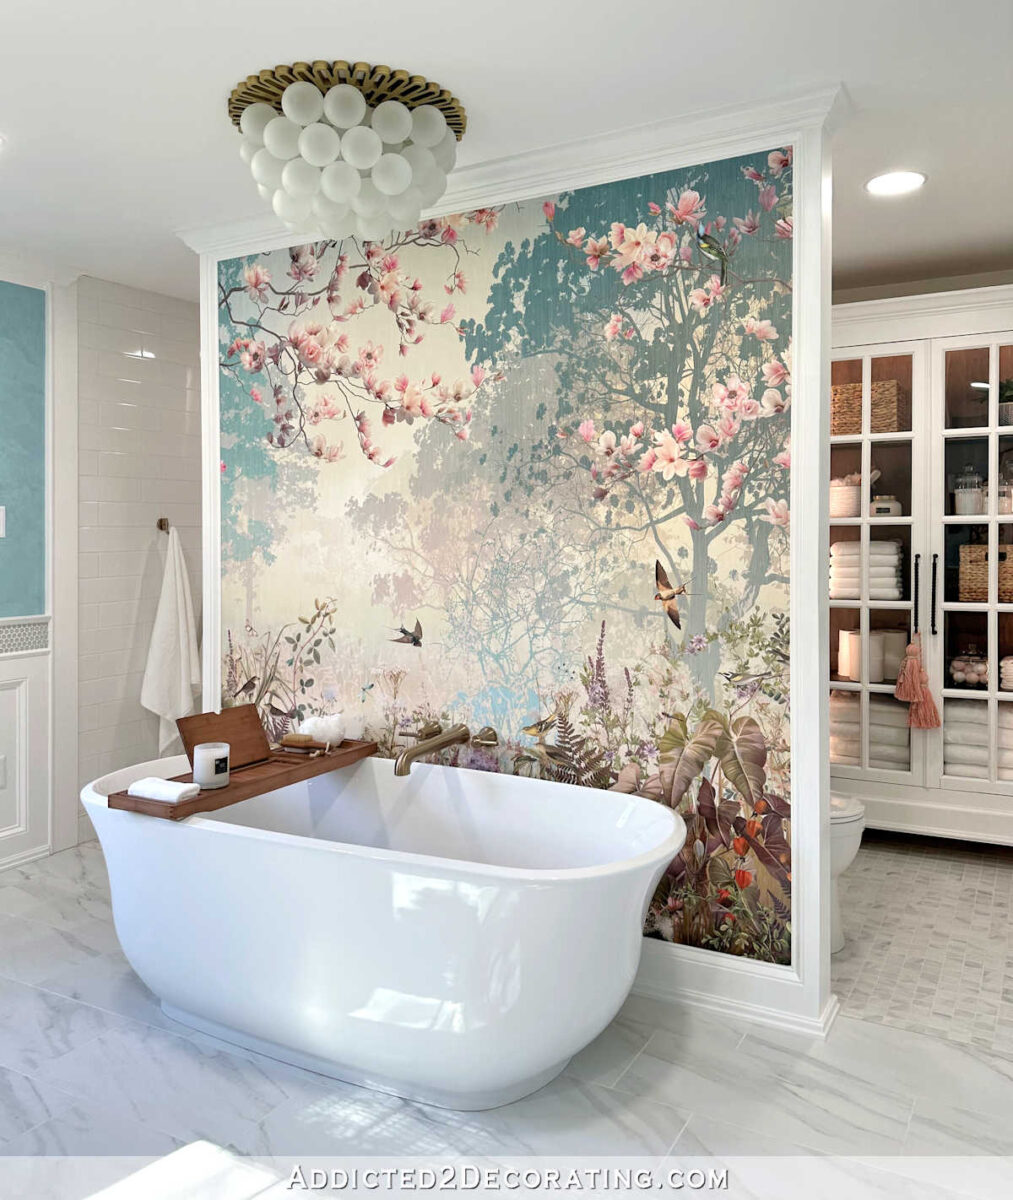
I am a huge proponent of wallpaper. I think a wallpaper or mural can make a whole room. It can take a room from “pretty” to “WOW!” When anyone walks into our bathroom, the mural is almost always the first thing they comment on. I think our bathroom would be pretty without it, but it would be a bit plain. The mural takes it to the next level. This is the Sparkling Garden mural from Photowall.
I feel the same way about our bedroom. I would still be pleased with our bedroom had I just painted the walls a solid teal. But there’s something about the grasscloth, but there’s something about the grasscloth that bumps it up a notch and makes it look more “designer”, for lack of a better word.
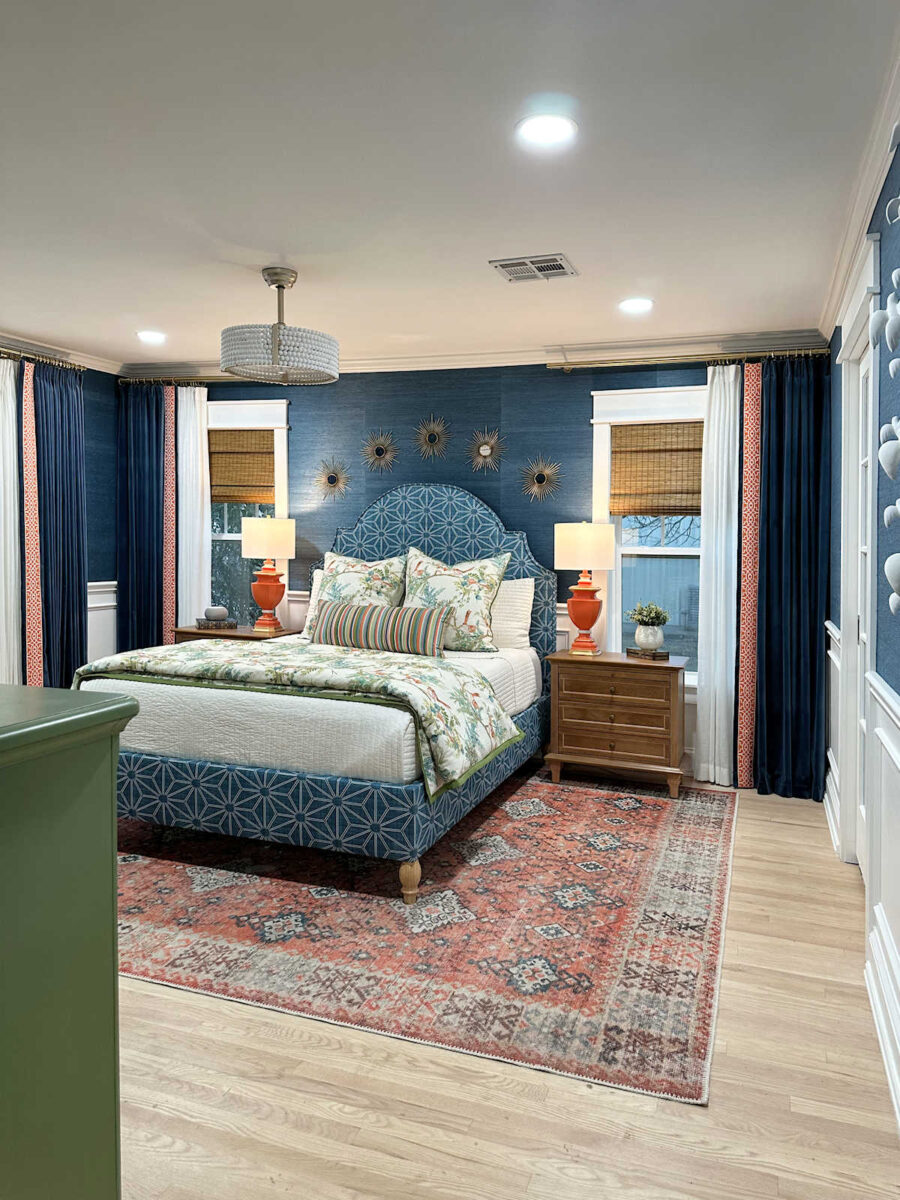
The walls in our bedroom suite are also the first thing that people comment on when they see the space. It’s a look that can’t really be achieved with paint, and it makes the whole area feel so much more special.
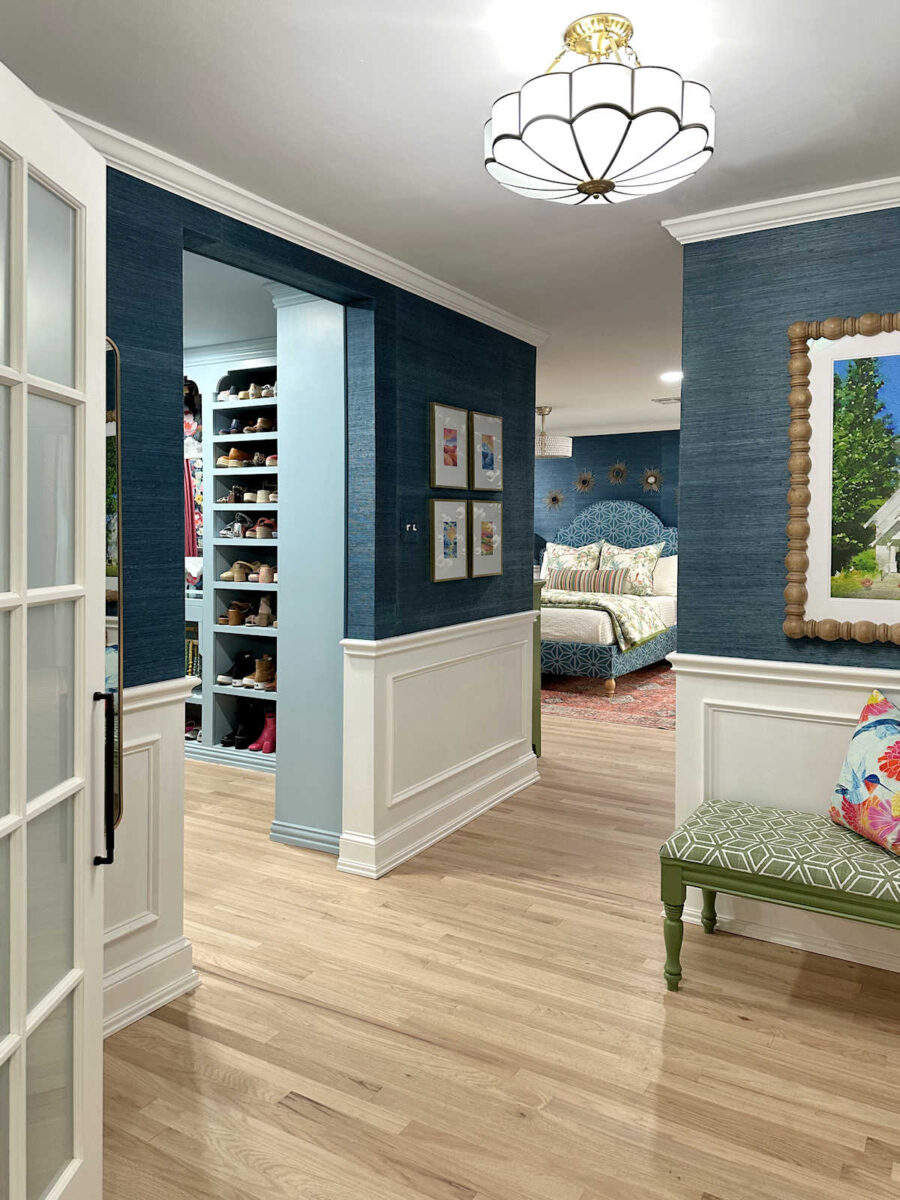
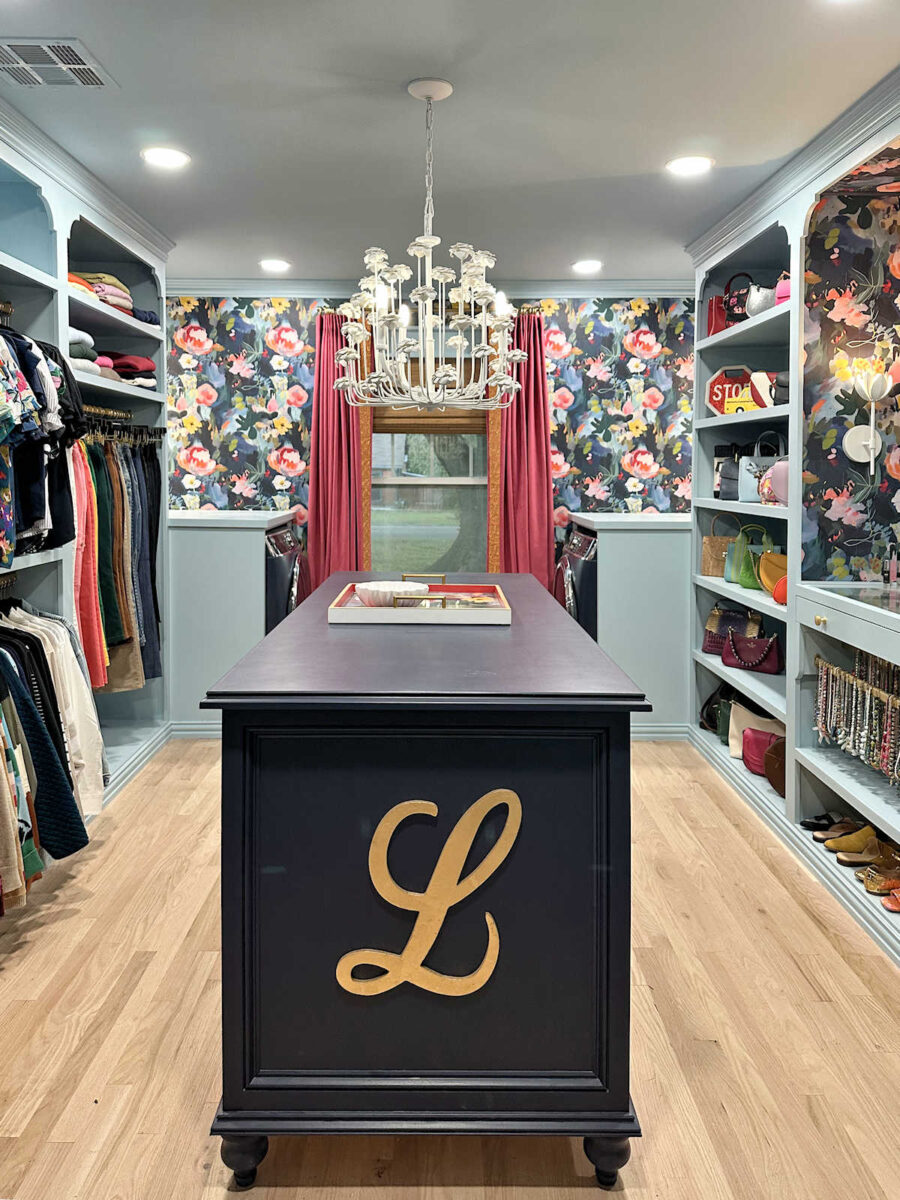
And of course, my walk-in closet just wouldn’t be the same without the wallpaper. This is the Taylor wallpaper from Jupiter10.
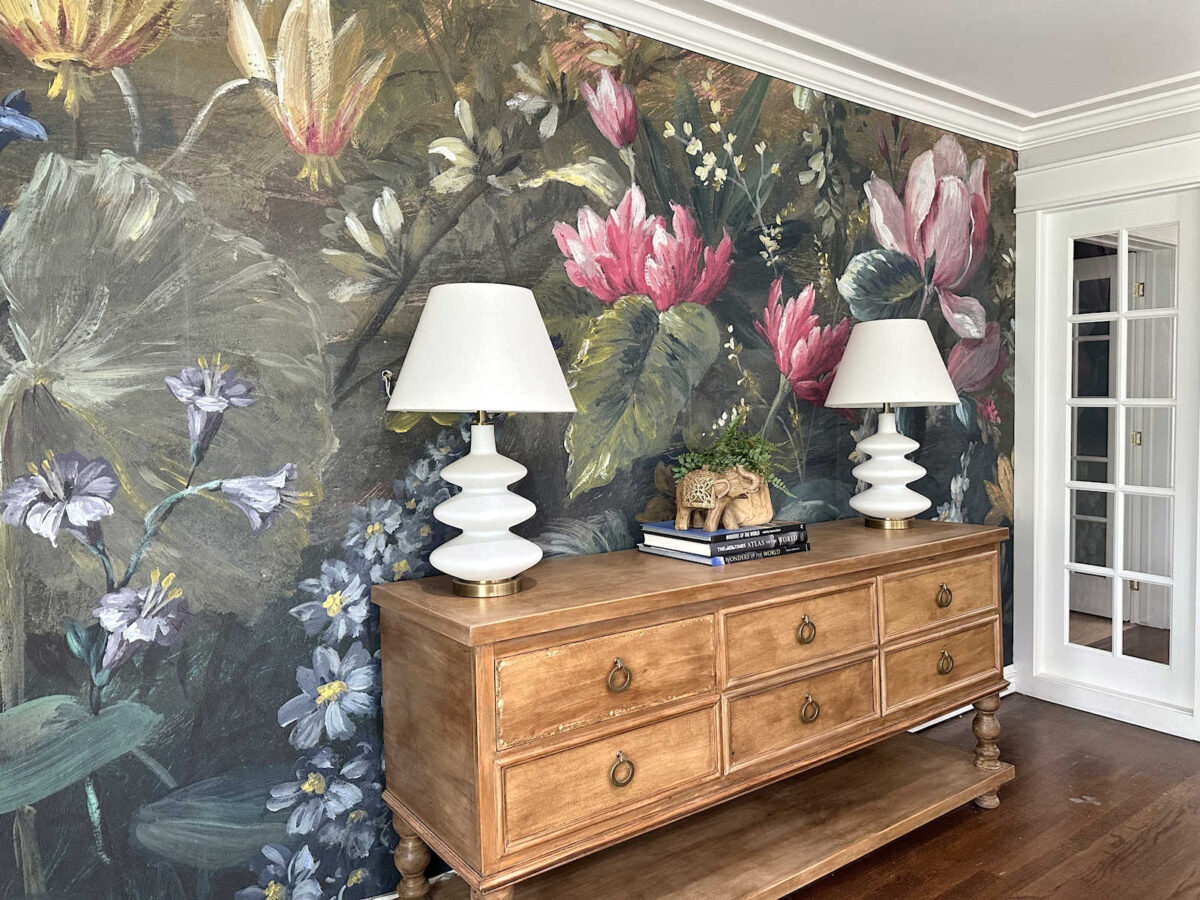
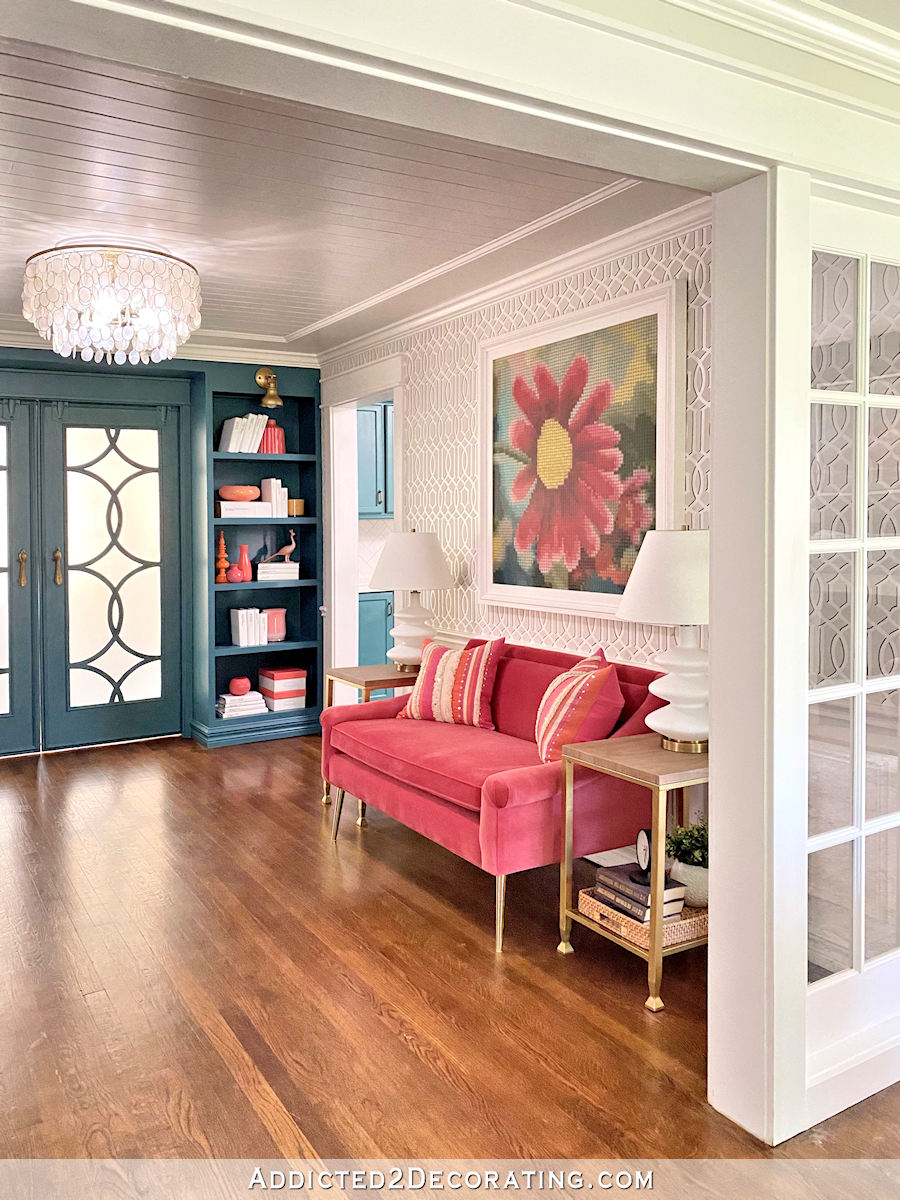
And now I have this gorgeous mural in the entryway. I liked this wall before, but there’s just something magical about the impact that a wall mural can make in a room that you can’t really achieve with a painted wall. This is the Paradise Tropical Floral mural from Anthropologie (affiliate link).
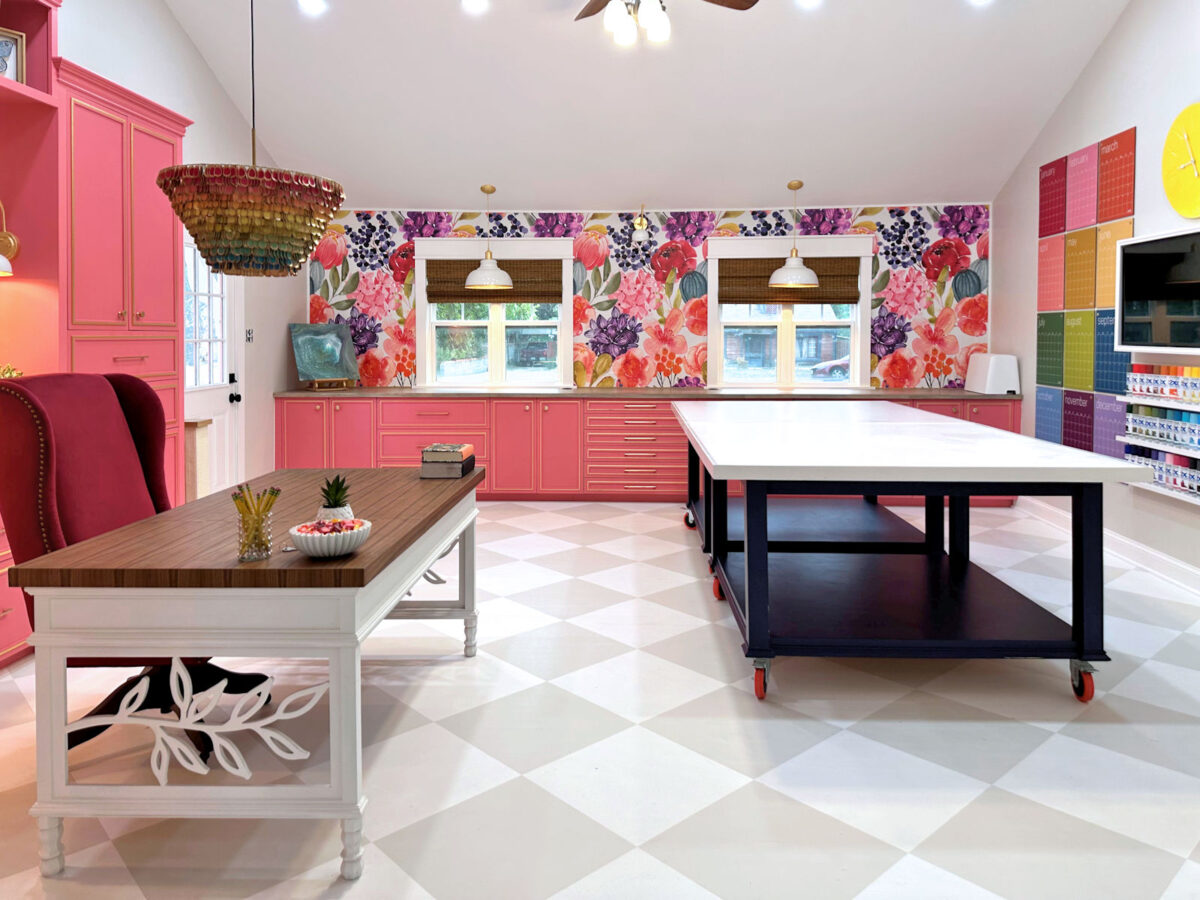
And, of course, the mural in my studio is the star of the room. I can’t imagine this room without it.
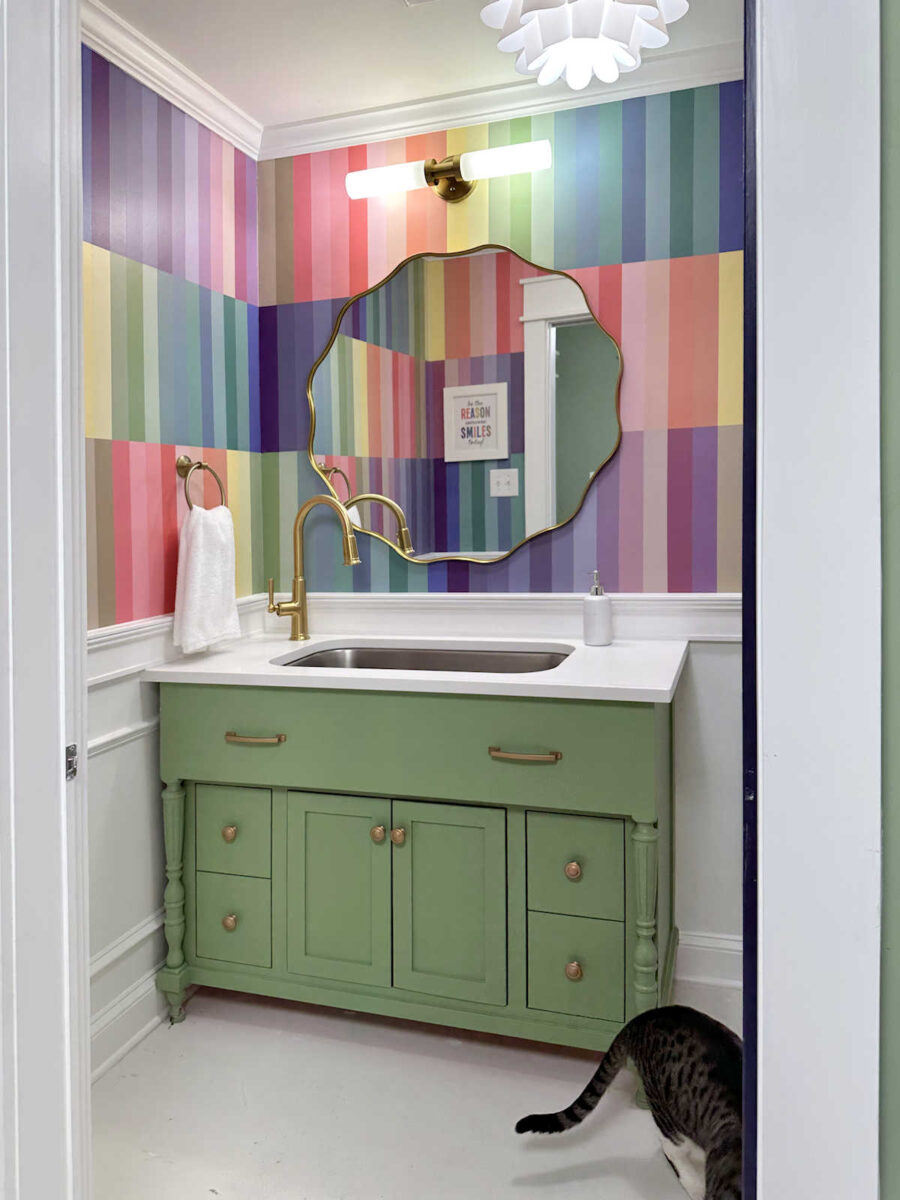
Of course, if you’re really scared of wallpaper, or you have a room where wallpaper just won’t work (and there are some rooms like that, which I’ll show you in a minute), you can always just use paint to achieve a wallpaper look. That’s what I did in my studio bathroom. But for most of us, when it comes to achieving a wallpaper look with paint, we’re pretty limited by our artistic ability. Most of us are limited to designs that can be achieved with painters tape, like I did in the studio bathroom. And that limits us to linear designs.
And then, of course, there’s always the option of using a stencil, which is what I did in our music room. But even then, the design possibilities that you can achieve with a stencil are pretty limited compared to the hundreds of thousands of wallpaper options that are available.
Our music room was my only experience using a stencil on walls, and I can tell you, I found it to be much more challenging than installing wallpaper. After that stenciling experience, if given the option between a stencil and wallpaper, I’d choose wallpaper every single time without question.
Of course, there are rooms where I wouldn’t use wallpaper. For example, our breakfast room, which used to be an outdoor breezeway that a previous owner closed in to make more interior space, seems to always be shifting ever so slightly. That’s partly because our house has a pier-and-beam foundation and the soil in our area is always moving and shifting slightly. But I notice it more in this room than any of the others. You can see the shift in the corners of this room where the paper in the corners (i.e., the paper that is applied before the drywall mud is applied) is shifted and wrinkled.
All of the corners in this room are like that. This is the corner opposite the one above, and it looks the same way. All four corners in this room look this way.
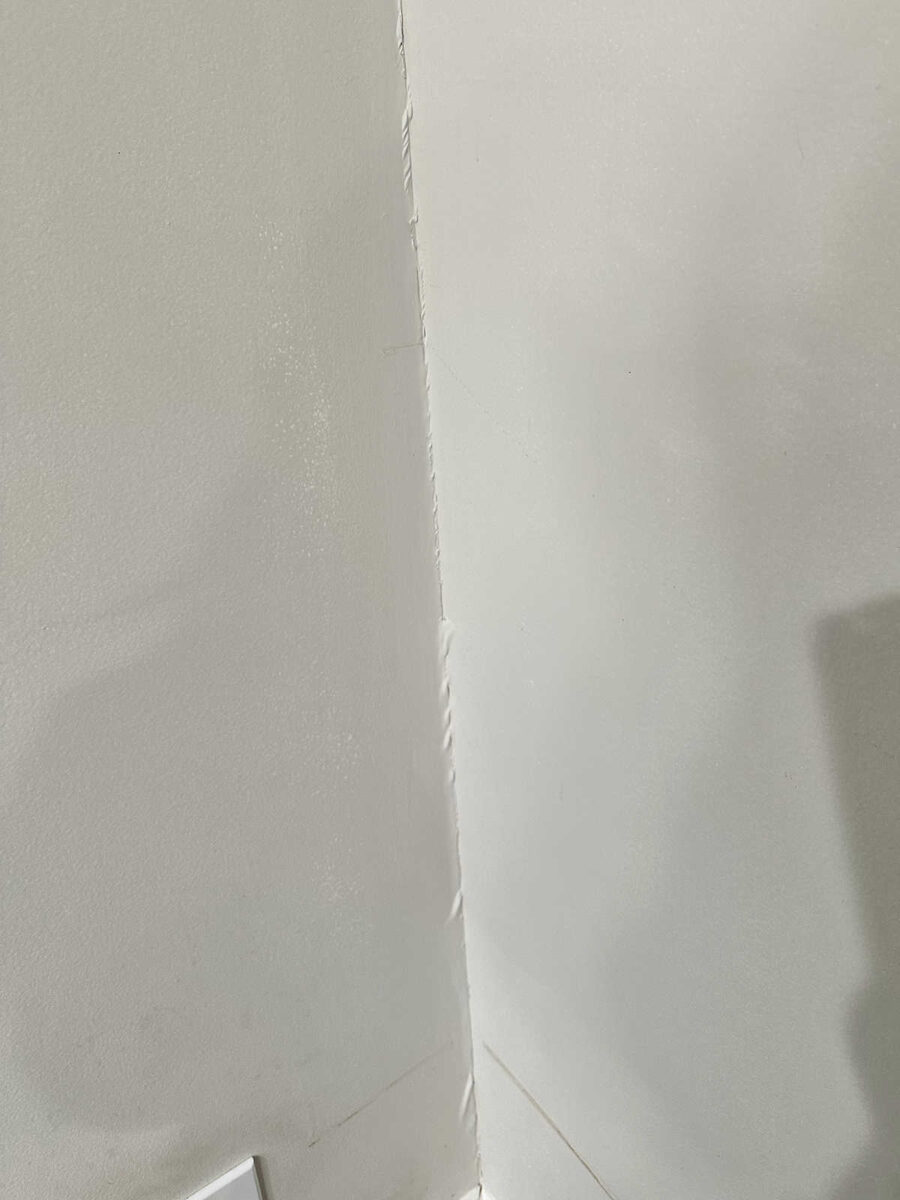
I would never use a wallpaper in this room that wraps around the corners from one wall to the next because eventually, the wallpapered corners would look like that also. That’s a problem with a lot of older homes. But in rooms like this, a wallpaper mural on a feature wall (if there’s one available) is still a viable option. Just make sure the wallpaper starts at one corner and ends and the corner on the opposite end of the wall.
As far as types of wallpapers and adhesives to use, I prefer wallpapers that are NOT pre-pasted. It costs a little more because you often have to purchase adhesive separately (although some companies do provide adhesive with your order, like my bathroom wall mural from Photowall), but I find it so much easier to work with.
When using wallpaper that isn’t pre-pasted, I roll and brush the paste onto the wall and then put the wallpaper up. And if you’re looking for a paste that is easy to apply, easy to remove, and makes wallpaper removal very easy, I highly recommend Roman Pro-880. Just as long as you’re applying your wallpaper to painted drywall and you’ve allowed the paint to fully cure, the wallpaper will come off very easily.
As far as pre-pasted wallpaper, the only kind I’ve used in the last few years is Spoonflower pre-pasted wallpaper. You just use a paint roller to roll water on the back of the paper, give it a couple of minutes to activate the adhesive, and then you can apply the wallpaper. And removal is very easy. When I decided to remove the original wallpaper that I designed for the studio and use a larger version of that wallpaper instead, the original wallpaper came off in whole sheets. It took me about ten minutes to strip the wallpaper from the entire 20-foot wall.
I have people ask me often about peel-and-stick wallpaper, and I don’t like them. I will always choose paste over peel-and-stick. The reason is because I always do my wallpaper projects by myself, and wrestling with large sheets of wallpaper on my own means that I never get the paper on the wall exactly where it needs to go right off the bat. With peel-and-stick wallpaper, you have to remove and attempt again to place it on exactly where it needs to go. That’s much easier if you have someone to help you, but I never do.
With paste, it remains wet and slippery long enough for me to place the wallpaper against the wall and then slide it around a bit until it’s exactly where it needs to be. Of course, I don’t apply the entire sheet of wallpaper and then attempt to slide it because that won’t work. But I get a small section applied (generally lined up against the previous piece), and then can slide it around until it’s exactly right, and then smooth down the rest of the piece.
I am a huge fan of wallpaper. And I think there are so many people who would love to use wallpaper, but they have nightmares about trying to remove the wallpaper in the future. I’ve seen comments from countless people who have sworn off of wallpaper for that one reason alone. So I just want to encourage you that hard-to-remove wallpaper really isn’t an issue anymore. Those days of renting steamers, buying all kinds of scrapers, and trying various chemicals, and even then, only being able to remove tiny pieces at a time, are in the past. So buy that wallpaper! Hang that wallpaper! LOVE that wallpaper! And then have no fear of removing the wallpaper when you’re ready to move on.

Addicted 2 Decorating is where I share my DIY and decorating journey as I remodel and decorate the 1948 fixer upper that my husband, Matt, and I bought in 2013. Matt has M.S. and is unable to do physical work, so I do the majority of the work on the house by myself. You can learn more about me here.

I have zero experience with wallpaper so this might be a dumb question.
You wrote:
“I would never use a wallpaper in this room that wraps around the corners from one wall to the next because eventually, the wallpapered corners would look like that also.”
Would it be feasible to put the wallpaper up wrapping the corner and then using a very thin, fine blade to score the paper so it is cut and the walls can move freely, thus avoiding the wrinkles?
This is how it’s supposed to be applied. You don’t wrap the corners. You cut the corner and then apply a new piece on the second wall.
I didn’t realize how much wallpaper you have in your house until you put it all together today. I really love the look and am happy to hear that today’s wallpapers are so much easier to remove. I was thinking of using some for my upcoming guest bathroom remodel but hesitant in case I changed my mind. You’ve now convinced me it’s the way to go. When I moved into my current house, the 1980s grass cloth in the foyer was so difficult to remove that I had the old drywall removed and put in new. Three other rooms had painted over wallpaper and we just sealed, skim coated, and sealed again rather than trying to remove it.
You have changed my mind on wallpaper altogether! And I think it has mostly to do with how colorful they are. I never really liked grasscloth, but your application does exactly what you describe. Where other places I’ve seen it just made it look dated to me, but again I think its the color you use and then the overall decor of your rooms. Bravo! And thank you for sharing
My roommate from back in college does interior design, and she’s totally against peel and stick as well. I recently went against her advice and used it for my powder bath, and I’m generally pretty happy with it. I’m not trying to convince Kristi, but for others who consider it, I used EZ Hang by Roman (the wallpaper company). It makes the peel and stick slide a little like traditional wallpaper would, so you don’t have to get it perfect when you lay it down. I highly recommend it if you’re doing peel and stick. I went with the peel and stick over the traditional because the colors on the traditional were slightly different from the P&S colors, but it was enough different that it didn’t match my color scheme plus I just didn’t like it. So having the Roman EZ Hang was nice.
I was coming in to say the same thing. I had a peel and stick that wasn’t sticking. Used the EZ hang and it has stayed up like a charm. I have no idea how it works, but the paper glides around like pasted and has helped my non-sticking paper stay up.
You make beautiful use of wallpaper in your home. I’ve always been too nervous to use wallpaper, but you make it seem possible for me to include it in my own home. I think you should add the wall treatment of your former guest room (now your master walk-in closet) because that might be my favorite wall treatment of all that you have done.
I recently removed two layers of wallpaper from a 20 foot wall. The bottom wallpaper had probably been installed about 40 years ago. The first layer came off fairly easily but the second layer was demanding. It took about 16 hours, over the span of 4 days, to remove the second layer. And I didn’t use any fancy tools or steamer, just a spray bottle, a scraper, and a lot of patience. I didn’t mind it, it can be rather therapeutic.
The key to removing wallpaper is to spray it, then let the water sink in for 10-15 minutes, spray it a second time and wait another 5 minutes or so, and then get scraping. It isn’t difficult.
Im glad it worked for you. It didnt work that way for my daughters bedroom. She tried all that plus…….
I have considered using a large mural type of wallpaper in my bedroom, but I have textured walls throughout my house. Do you have any solutions that don’t involve skim coating and sanding the whole wall (I might be asking for magic here 😂)? Will it look as bad as I think it will if I don’t do anything to the texture?
I have textured walls in my whole home. I tried to find a link to post, but wasn’t able to. It’s called wallpaper liner. It is a thick heavy duty paper you apply to the walls first horizontally. Let it dry for a couple of days and then use your wallpaper as directed. I’ve done three rooms in my home over the last 10 years and have not had any issues with it since.
As I viewed the tour today, which I thoroughly enjoyed, l marveled how each choice you made was perfect for the space. Just beautiful to see them all.
Thanks for the detailed tutorial. It will help a lot of people.
Have you ever used a sizer prior to wallpapering?
It’s really good to hear these details. We did have a home with a lot of 70s-80s wallpapers, which came off with varying degrees of difficulty depending on the paper. I have more or less forgotten the pain of getting rid of it, but at the time my husband swore that we were NEVER EVER putting up any wallpaper of our own and tried to get me to promise him (I skirted the issue LOL). I will forward him this blog post if I decide to wallpaper something in our current fixer upper. Not a big pattern girl overall, but I love texture (grasscloth) and I love traditional murals or mural panels.
I’ve been looking at a site called Wallism.com that has beautiful southwest themes as well as many more. But I’d hire a professional for 2 reasons; I’m 74 and don’t do ladders anymore and I’m just not good at this sort of thing regardless of my age.
Couple of updates…has your stalker been dispatched to the trash heap?
Did you get the roof leak fixed that ruined your grass cloth and will you patch that area? And have you decided on color for the entry way console?
I LOVE wallpaper, but my husband only remembers the hard to remove kind.