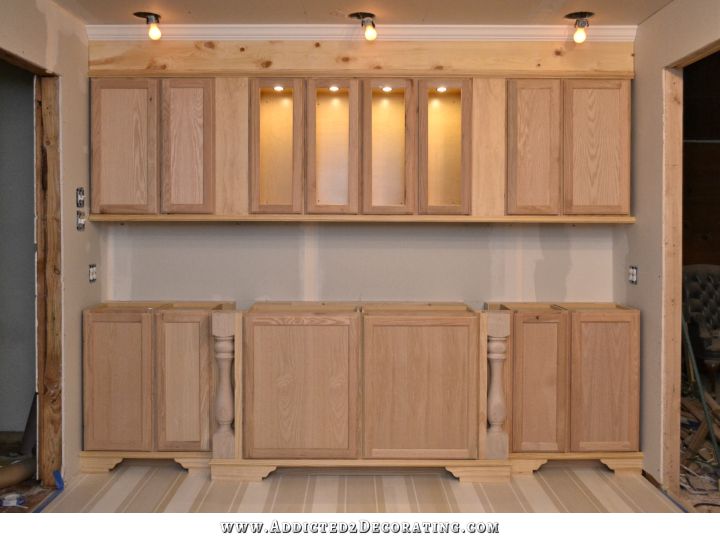
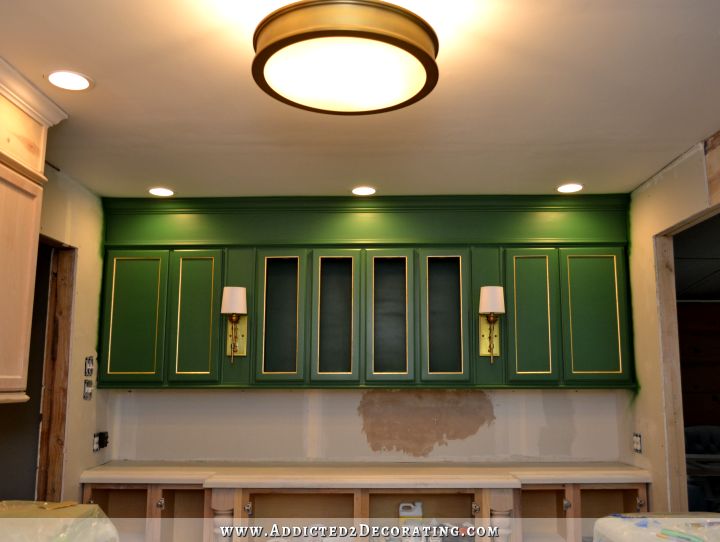
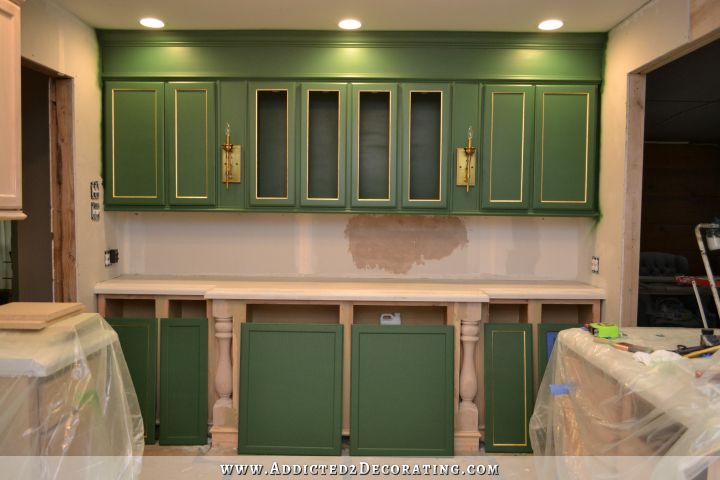
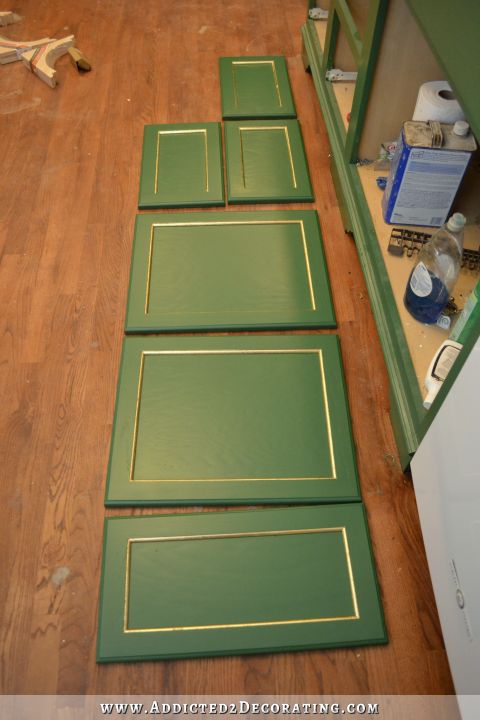
Wall Of Cabinets Finished For Now
I didn’t quite get everything done, but the wall of cabinets is done enough for now.
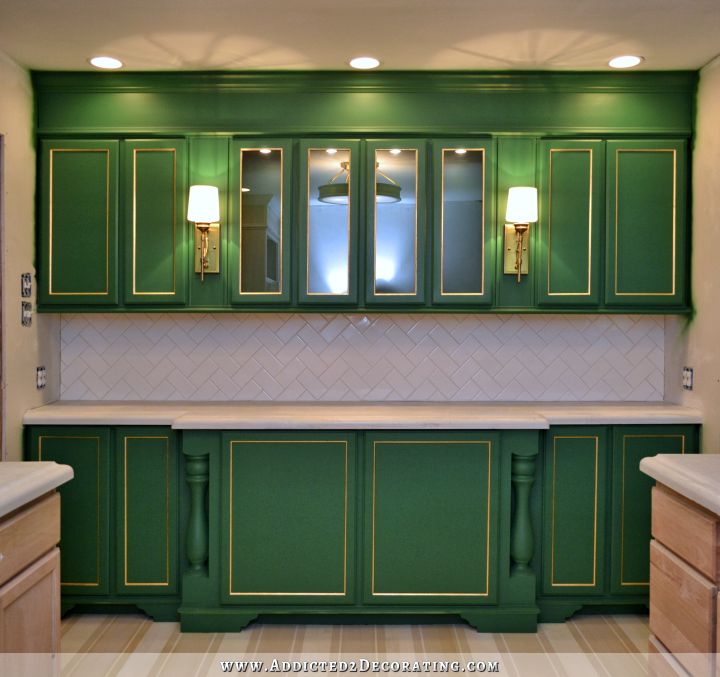
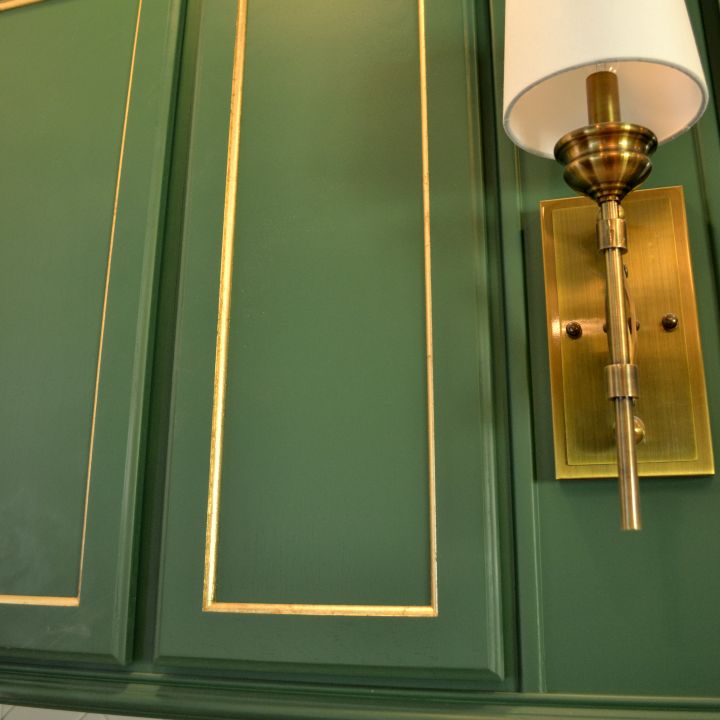
I ended up having plain glass installed in the four upper cabinet doors. The plain glass adds some shimmer while not adding yet another pattern/texture to the mix.
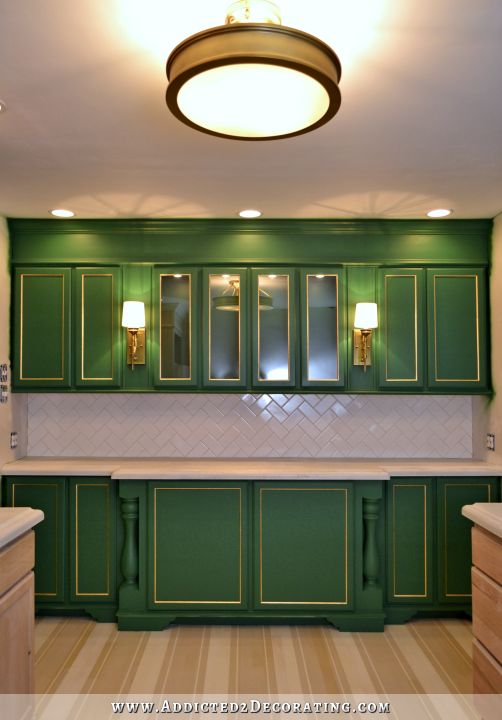
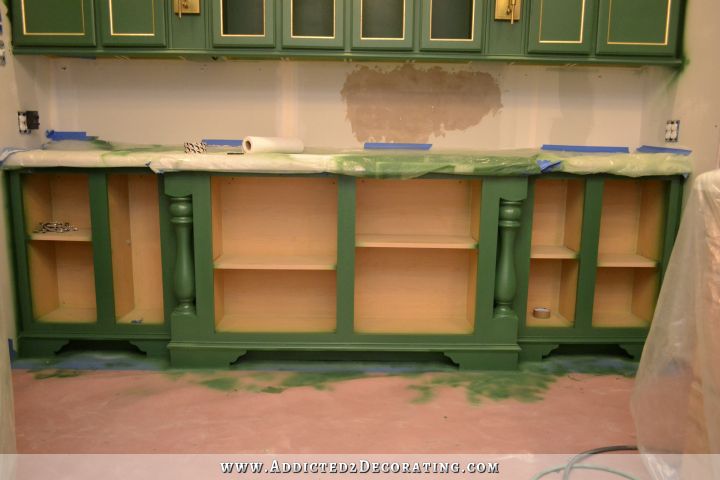
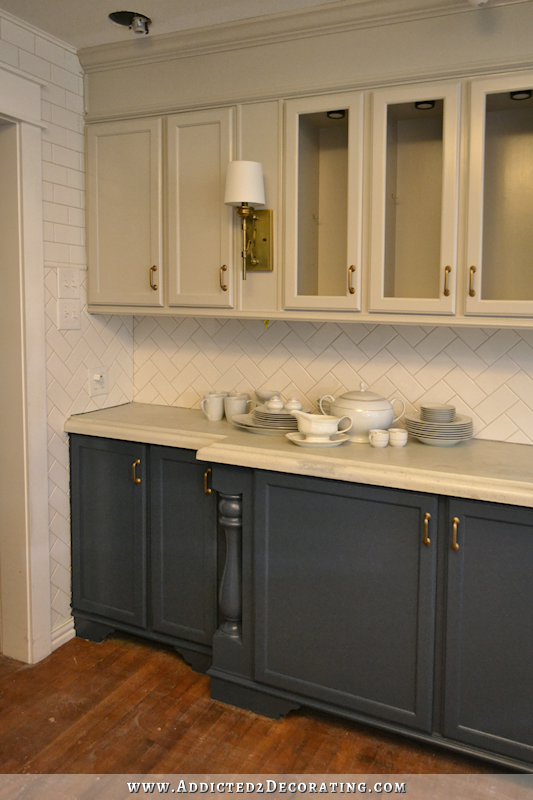
I also got the base cabinets and doors topcoated with the polyurethane, and got them all installed. And then I was able to do the one wall of tile. All of those cut angles really slowed me down, so I didn’t get as much done on that as I had hoped. But it’s a start! I didn’t want to use white grout, so I chose a color called Bone that blends really well with the countertop as well as the darker color in the floor. It turned out just like I had hoped — nothing too dark and contrasting, but not white that would just make everything blend together and disappear.
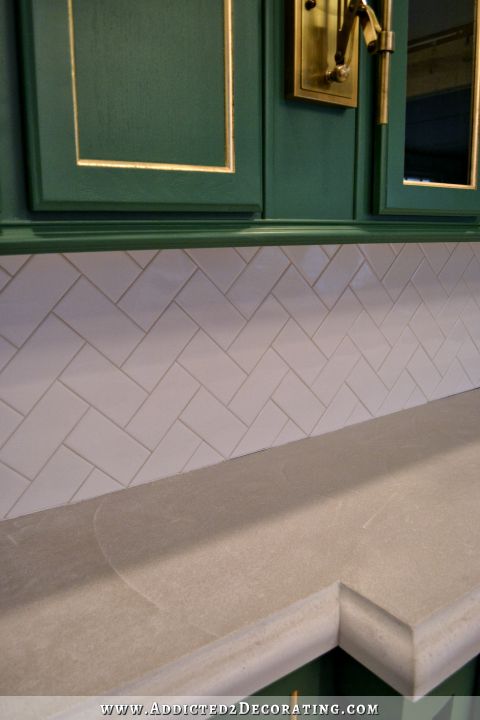
I tried to caulk between the tiles and the countertop, but it looked awful. I used white caulk, and I’m not sure if that was the problem, but it looked so cheap and disgusting, so I wiped it off immediately. I’m going to have to come up with another solution for that. So that part still isn’t finished.
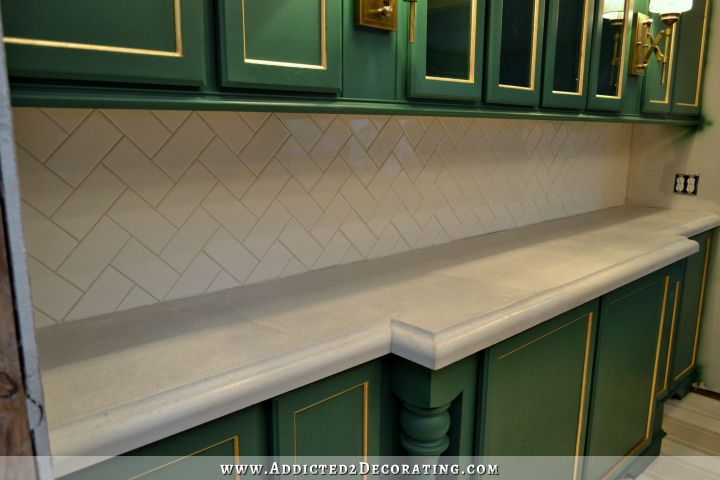
And I still haven’t cleaned the haze off of the tiles. I ran out of time for that, so once that’s done, they’ll shine a little more and the contrast between the tiles and the grout will show up just a tad bit more.

I also got the glass shelves for the four middle cabinets, but I don’t have any pretty shelf pins for them. I don’t want to use the bulky cheap-looking plastic ones that come with these stock cabinets. So that’s still on my list to do for this wall.

But it’s all coming together! And for now, I’m done with this wall. I’ll come back and finish up the rest…obviously. But for now, it’s time to move on to the refrigerator/range wall.

Still to do on this wall:
- Make and install the corbels on the upper cabinets (yes, I still want them!) 🙂
- Find the right cabinet knobs or pulls and install those
- Order shelf pins and install the glass shelves in the four center cabinets
- Install undercabinet lighting
- Touch up paint on the ceiling
- Tile the side walls
I think that’s everything. 🙂
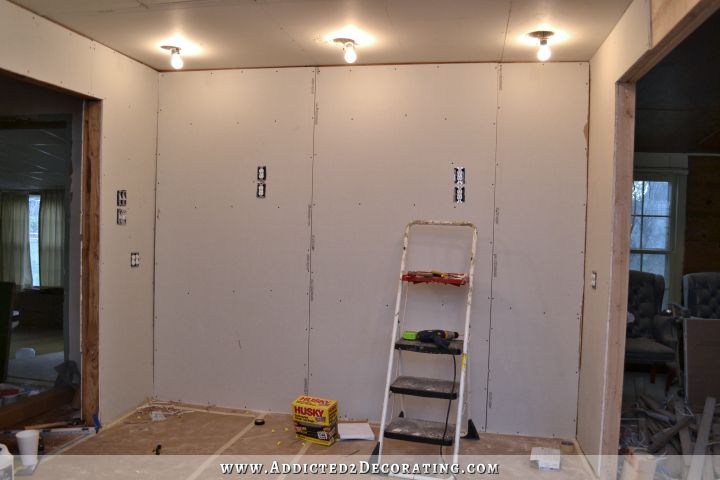
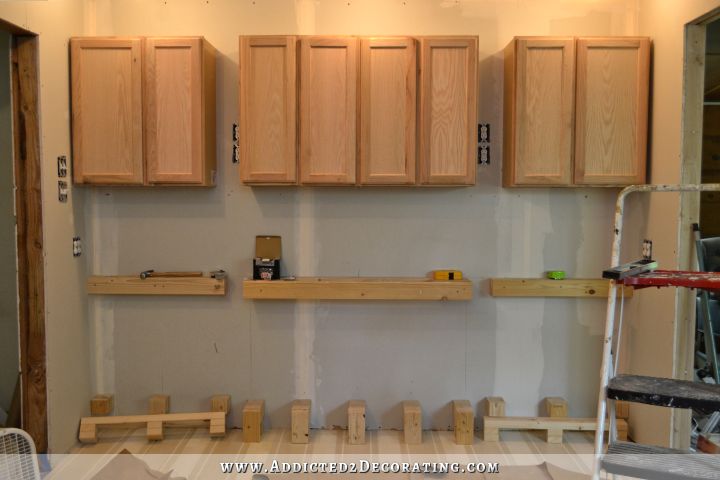
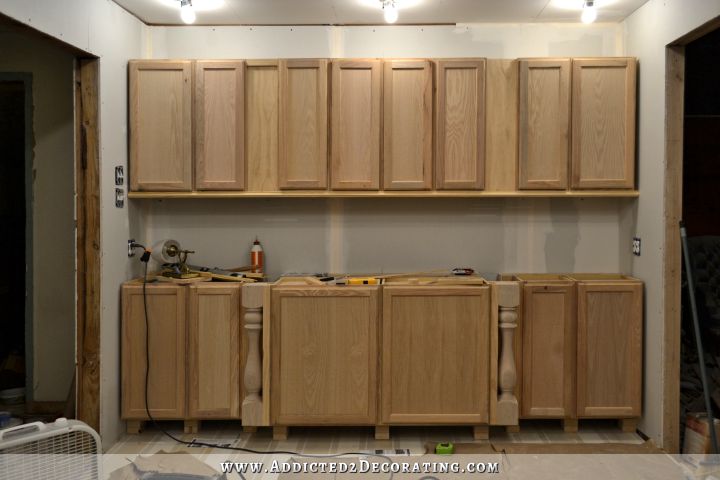
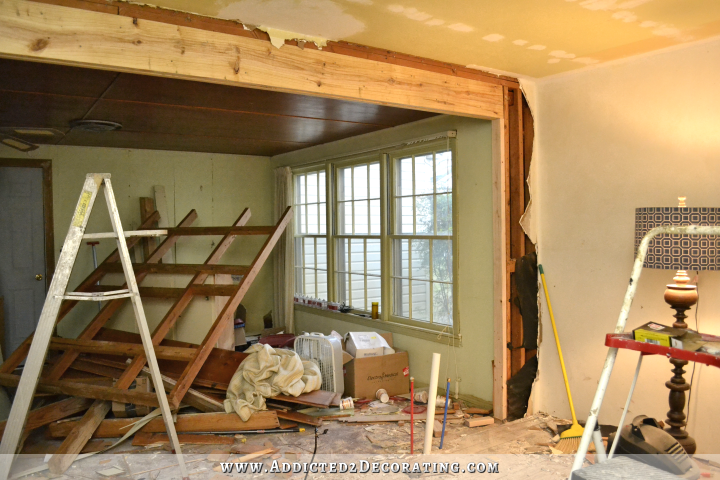
And now, how about a quick look at the before and in progress view of this wall? Here’s how this wall started out…
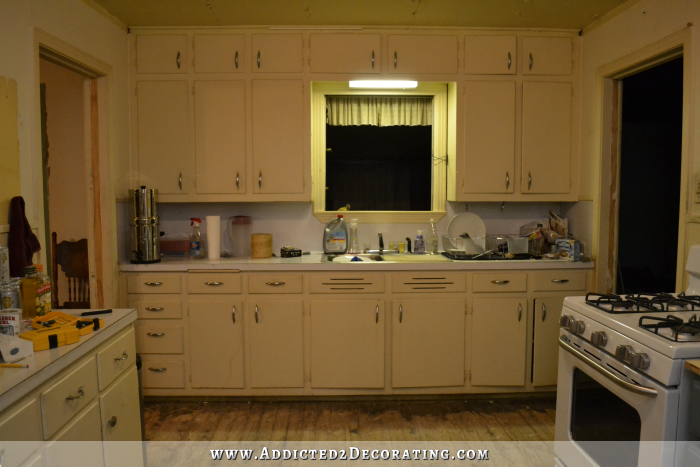
And here’s the progress…
Quite a difference! 😀
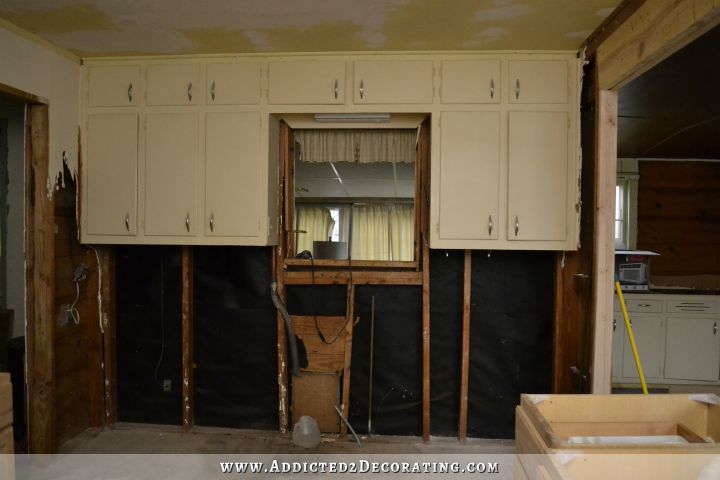
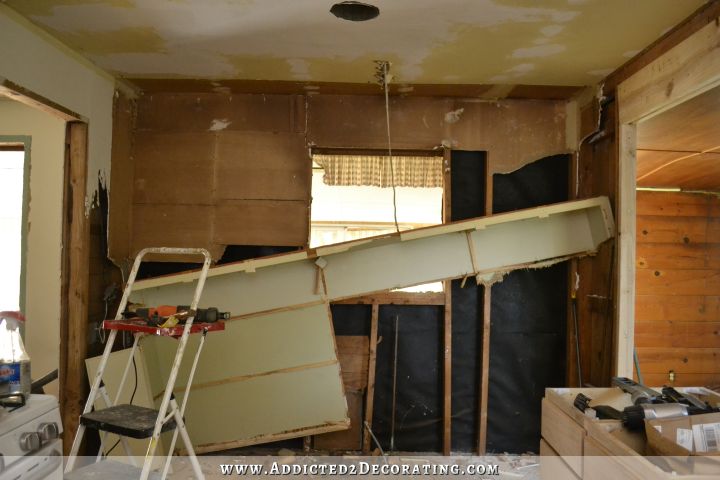
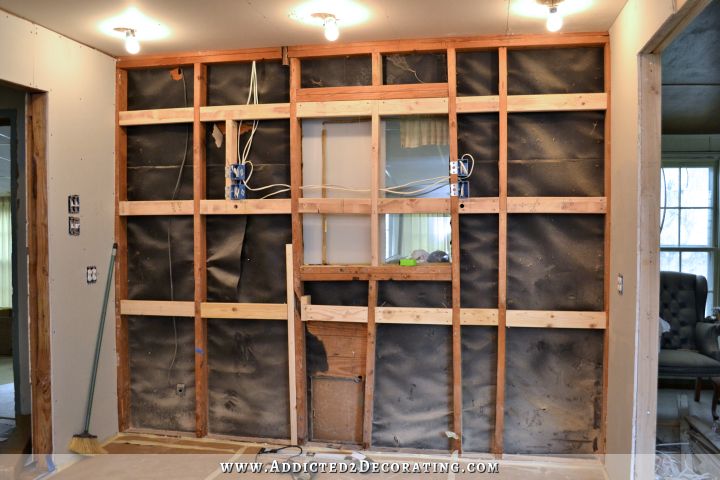
And just for fun, here’s a progression of the progress on this wall.

I’m leaving it at that for now, and I’m moving on to the refrigerator/range wall. All the little finishing details can wait until the end.

Addicted 2 Decorating is where I share my DIY and decorating journey as I remodel and decorate the 1948 fixer upper that my husband, Matt, and I bought in 2013. Matt has M.S. and is unable to do physical work, so I do the majority of the work on the house by myself. You can learn more about me here.
Kristi,
I was talking to a friend of mine this weekend who does our tile and he told me about a sanded caulk that he uses in showers and it works good. You might try that on your tile and have better luck. It’s looking great so far!!!
Absolutely fabulous! You are a miracle worker!
Every aspect is absolutely stunning!
You are my hero! Love your insight, your drive and your tenacity! Keep the photos coming!
Kristi, I hate to tell you but I actually like the Before picture better. NOT!! Your new kitchen is looking magnificently beautiful!!
Haha! I guarantee you that before the day is over, I’ll have at least two people tell me that they like the before kitchen better, and they’ll be dead serious. 😀
Ha. Ugh! Crazy.
Hahaha! People are crazy!
Your wall is gorgeous! I have loved seeing every bit of your progress and hang-ups! It’s helpful to read your thought processes and how you go about fixing things that don’t go as you hoped. You have right to be very proud of your work. If I were you, I would find myself walking in that room often just to stand and look at that wall, smiling!
Kristi, if they do… then you can rest assured that a computer has been installed in some hospital in the mental ward. LOL or someone wants to try and start some drama. It is the MOST beautiful kitchen I have ever seen. Can’t wait to see more!
Aaaaaahhhhhhmazazing! Absolutely stunning, and so “you.” Well done. Can’t wait to see the rest of your kitchen coming together!
HOLY F*@&#ING SHIT, Kristi!
This seriously looks amazing. At this point, I absolutely prefer this to Cameron’s kitchen. Great work, as usual.
This is way better!
Kristi you are one talented lady. I’ve been following your kitchen makeover from the beginning and trying to see your vision in my mind as you tossed around your ideas..i get it now! This is turning out fabulous!
Absolutely Beautifulllll work Kristi!
I love the cabinets and the shimmer contrast. And the herringbone! And the counters!! Even with a floor paint color choice that I wouldn’t pair with the cabinets in my own home.. I love the look. So much hardwork and determination. Bravo!
It looks awesome!! Very upscale looking to me. I love how the light reflects off the glass doors like a mirror and how you see the reflection of the light fixture.
Absolutely beautiful. Truthfully, the green cabinets from where you took your inspiration didn’t impress me so much (even though I am CERTAIN they cost a boatload more than yours). Your paint choices, detailing, artistry….fantastic and so lovely! If HGTV doesn’t see your work and offer you a contract, they have missed out on the best!
You are a super talent! Absolutely fantastic job!
Looking good! Still think that gold leaf is the thing that puts it over the top.
I love it all. But my favorite is the pretty shadows on the ceiling from the sconces! LOL I love to see the shadow of lamps and such on walls. It is, to me, a form of artwork, Well done Kristi, well done.
Me too!!!
http://www.homedepot.com/p/DAP-Kwik-Seal-5-5-oz-Clear-Kitchen-and-Bath-Adhesive-Caulk-7079818008/205030344
I love it! I think it is gorgeous!
This just blows my mind!
Gorgeous!
For the countertop and tiles gap could you use a thin line of the silicon caulk? Might not clash as much with the tiles, tile grout, and counter color.
Stunning!
Maybe you can find a sanded caulk that matches your grout color. We used it to finish our line between the backsplash and the counter and it looks just like the grout between the tiles, yet was super easy to apply and not as shiny and tacky as regular caulk.
I can’t speak. I am dumbstruck. It is so pretty. You must be so proud! If you aren’t, your fan base is proud for you! I love it! It’s perfect! OK, I can’t speak, but I can type to let you know I think this is just about the nicest kitchen job I’ve ever seen – and as a retired Realtor, I’ve seen a LOT of kitchens. Way to go, girl!
As I have watched this delicious Kitchen unfold, I’m in the middle of my kitchen makeover as well. I’m reusing the original 3/4 wood cabinets that were already here. I also bought another whole kitchen cabinet set if the same quality since I was adding more to my kitchen. I’m going to paint mine as well. Going concrete counters too. My unknowns are backsplash, flooring and colors if these. My colors are going to be yellow and red. Any help for these would be so appreciated from all.
Simply stunning work! Love it all!
It looks FANTASTIC!!!
If it were me, I would not be able to get anything else done, as I would be too busy staring at that wall of cabinets and patting myself on the back! 😉 Seriously stunning. Can’t wait to see it all done with hardware and appliances in place.
Simply gorgeous!
WOWZA! Beyond gorgeous.
Beautiful! Love the reflection in the glass doors!
Beautiful! Can’t wait to see it in person!
Kristi, it is absolutely breathtaking. You have done a wonderful job. Your kitchen really is going to be, as someone else said in an earlier post, the jewelry box of your home. I continue to be amazed at your vision as well as your mad skills!
Onward and Upward!
This looks absolutely beautiful. As I was looking at the two wider cabinets on the bottom, I thought that they would look great with some type of design in the middle using the gold leaf. You may think that would be “too much,” but I think some small detail would look great there.
Absolutely breath taking! I’m so glad you included the before pics and all your steps. I just shared it with my 17 year old son and he was sincerely impressed too! About your caulk, have you considered colorless transparent silicon?
Oh my gosh, I love everything! Oh how I wish my kitchen could revamp itself to look like yours…..I want to paint my cabinets in a satin black and have a gray marble counter top…..I LOVE the subway tiles…..Did you place those directly on the sheetrock? Ummm, thinking here!
WOW!
It’s those comparison pictures that blow me away! I’ve watched as you preformed miracles before, so I never had a doubt about the kitchen. And still you over perform. Thank you for going ahead and installing that backsplash before moving on. It completes the picture. And yes, I, too, want to see corbels. I hope you’ll spray them the same color as the cabinets. I see four corbels on that one wall.
Just think how small that range/refrigerator wall is. You’ll have it knocked out in no time, since you don’t have to make decisions, and then remake decisions. LOL.
Three cheers for Kristi. Hip hip horray, hip hip horray, hip hip horray!
Absolutely gorgeous! So much hard work!
Just stunning. Looks fantastic. I didn’t think I would like the green, but I really do. How about tile edge trim between the counter and the tile wall?
Inspirational! I might steal some ideas for my own kitchen. Since I fell and broke a bone in my rt hand, everything is on hold. I have a wall that could use that look.
My god…..these are stunning. What a lot of work, a beautiful job
You must have been so stressed with all the paint and other hassles you went through but everything you learned on that wall will make the rest a walk in the park. It was really a monumental task but so worth it for a phenomenal result.
Just one tiny suggestion…what do think of one tiny ring of gold leaf top and bottom of the balusters where the curves meet?
Also people have suggested clear silicone for the join but I have used it and it tends to yellow over time and that would not be nice. How about taping off the counter and just run a bead of grout in the join? I have done a few kitchen counters with tile and something different for the backsplash. Grout works just fine to tie the two together and seal the gap.
The glass shop will have the clear pins for your shelves.
The only problem I can see with such a gorgeous kitchen is I would never want to cook in it in case I got it dirty.
I agree! The kitchen is so pretty that I wouldn’t want to risk getting it dirty by cooking in it! LOL!
Love that suggestion for the gold leaf!
Absolutely beautiful. I admire your determination to keep going, and to redo when it’s not exactly the way you want it. You are SOOO talented. Thanks for sharing along the way. I enjoy reading your blog every day, to see how your mind is working and your progress.
Congratulations.
My suggestion- spend a day in the kitchen just staring at your work and patting yourself on the back!!! I like the way the glass doors reflect the light and the floor is waaay better than the dark ceruse idea. Love those stripes. 🙂
It all comes together perfectly. What does Matt say?
I love the look of it!!!!! congratulations!!
and I love the extensive overview of the steps in between – it’s like looking at travel pictures from a journey. they remind me of so many steps you posted which in between I’d clearly forgotten (oh my god, the picture of the old cabinets hanging in midair still gives me a serious fright), so thanks for that gallery 🙂
Hey you! The only missing from this pic is YOU standing in front of them! You should be taking your bow. I know nothing about caulk, but when they did our soapstone counters and the slate backsplash the “pros” used a clear silicone caulk. You don’t even see it. Maybe that will be the right answer for you too. How do you plan to make the corbels and why not just purchase them? My girlfriend did her dining room and put them in the corners with the crown molding. Well actually her husband did it, she just tells him what to do. Anyway, they got the kind that are made from some kind of white stuff that is real light weight. They got them at Lowes or HD. Once they were painted I don’t think anyone could tell that they were not wood. She said the reason she did it was because she wanted them to have certain detail and the wooden ones she wanted were expensive. Don’t know if you have seen these things in your area or not. I love the way Matt’s light reflects in the glass fronts, so stunning! It makes sense to do all the minute details at the end since you will have to do some of them on each wall. Find what you need have everything shipped and you will be ready when the time comes. I hope you are pleased with the countertops. They look so great! I am curious about the tile for the side walls. How will you decide where to end it? I guess you have pretty much ironed out the kinks, so the rest of the job should be pretty easy. It truly is an amazing work of art. It should be featured in a publication. You certainly know what you are doing, or are good at figuring it out. As always, Blessings
Serously freaking gorgeous.
This sounds silly but the “after” picture of the lovely green cabinets with the lights and the tiles brought tears to my eyes! I stripped my dining room table yesterday and am still aching from the labor. I had forgotten what it takes for a project like that, and your kitchen remodel amazes me! That you have the know-how and determination and energy to pull off something that beautiful is such a gift! Thanks for sharing the process:)
Winner! Winner! Chicken Dinner! That wall ‘o cabinets is spectacular and worthy of ANY decorating magzine/blog in the country. Love it!
Damn, girl, but you are a talent!!!!!!
Wow! It’s really beautiful. I love everything about it.
WOW! Just WOW!
So impressed with you and with your design capability. Are you for hire? JK! You are doing a marvelous job!
Kristi that is absolutely beautiful. You did a wonderful job and I love the gold strip. Sometimes when I do a piece of furniture over I want to put a strip in but my hand never can do it. Next time I will try the gold leafing. Thanks Kristi.
with everything you have done the floor is such a statement. just beautiful.
So BEAUTIFUL! I can’t tell you how much I enjoy your Blog & I look forward to each new post. You are incredible!
Spectacular – you have a vision and you have taken us every step of the way to see it happen.
Thanks for taking us along!
WOW! WOW! WOW!
Fabulous! I think you deserve some much earned recognition for your many talents. I hope someone working for some of these magazines are following you and your incredible journey.You have certainly earned my respect! You are one amazing woman. Betty
Hi,
I am so impressed I want to rip out my kitchen and copy yours! Since I can’t do that I am going to copy your back splash. So I need your help. What tool did you cut the tile with? And tips for cutting the angles? And what materials exactly did you use to stick the tile to the wall? Since you have a lot of free time, maybe you could do a step by step tutorial for your blog? I have never done tile work, well I did copy your ceramica vinyl tile in our bathrooms (I am such a creepy Copy cat of all things you do) but I don’t think that really counts as tiling.
Free time?
Free time? What free time?
I assumed she was being sarcastic…at least I hope she is
Fantastic! So impressive!
Absolutely Beautiful !!!
Wow! That wall is stunning. Fantastic job. Your hard work is paying off.
You kick ass, girlfriend!!!
Absolutely beautiful!! And I didn’t think I liked green cabinets or concrete counter tops!
Now, I love them both! Great Job, Kristy!
Beautiful Kristie, just beautiful!
Loveee this!! Have you thought of putting any gold on the spindles/legs?
WOW WOW WOW. Gorgeous! Stunning! (you might want to try clear silicon caulk. I used that between the granite and travertine and it turned out good, just a suggestion).
My oh my,how stunning! I just want to stare at it too! What an inspiration to go on with the rest !
Just….wow
Love, love, love it!!!…just beautiful, did I miss the floor, what on the floor?????
You can see how she did the floor here:
https://www.addicted2decorating.com/painted-hardwood-floor-diy-details.html
Wow!!! Amazing! You have done it once again. I admire your determination to get absolutely right even if that means do overs. Can’t wait to see the corbels. Great job!!! Love it. Wish it was my kitchen!!!
Opening your blog is like getting a Christmas gift EVERY EVENING!!! (it’s already 18:30 here in SA) and so far this one takes the cake!!!!
I have to say I like yours MORE than Cameron Diaz’s kitchen …….I am blown away.
Dunno if this works, but if anyone can make it work, you can… https://www.youtube.com/watch?v=CRG9I8MUQ6k
Custom colored caulk!
WOW! WOW! WOW! It looks so good! I would love to be there with you as your create such works of art!!
If you ever have the notion to do a travel series Blog, on a track house to create some personality— then I am your person! You could have total freedom to liven up my blah pallet of a house!! (I live just a few hours from you in Boerne, TX, just outside San Antonio) 🙂
That should say tract house.
The cabinets and tile are gorgeous! You probably already know this, but in case you haven’t seen it, many of the grouts have matching caulk with sand in it.
Stunning! You must stand in front of that wall of cabinets and beam. I know I would be. There are no justified comments left without repeating. You amaze all of us everyday. I wish I had your perseverance and zest for life you do. Congrats!
This is absolutely amazing. You must be so proud!
I know you posted early on, I searched in previous post and couldn’t find it. Where did you find your cabinets?
Tiffany, she got stock cabinets from Home Depot and added trim and custom feet she cut herself. Is she great or what?
Kristi, If I were you, I’d put my bed in the kitchen so that I could wake up and see those beautiful cabinets every morning….at least for a week or so. How beautiful. Love the gold accent and the white tile. And I can’t get enough of that green paint. Girl after my own heart! Thanks so much for sharing your inspiration.
Outstanding!!! You’ve done yourself proud! I just love it and I love what the white tile does for it too.
To be honest, I didn’t like the inspiration pic at all. Definitely wasn’t sold on the green. Am not usually into concrete counter tops, but then never saw them with such a pretty edge to them. You’ve converted me and totally nailed it. This is STUNNING and looks so much better than Cameron’s, hands down. You rock.
LUV LUV LUV! <3
HD has more kinds, as well:
http://www.homedepot.com/p/Prime-Line-5mm-Brass-Plated-Steel-Shelf-Pins-8-Pack-U-10165/100556917
You should be very proud of yourself, it is looking fantastic! Everyday I am excited to see how much further you got, and it’s beautiful!
I don’t know if I’m more impressed with the result or the fact that you did the majority of the work all by yourself. Every time I feel like I’m too lazy to do some project or that I wish I had some help, I think about you and everything you’ve accomplished. Thanks for being my inspiration.
These would be a definite contender for me. 🙂
http://www.aliexpress.com/item/single-hole-Retro-Rectangle-Cabinet-Hardware-Drawer-Wardrobe-Furniture-Bar-Knob-Handle-Pulls/1727890969.html
Those are gorgeous and inexpensive!Great find!
Looking awesome!
WOW! You did such a great job! I’m so impressed! Your kitchen looks gorgeous ! How long did it take you to get such an amazing result!
You’re so talented, motivated, determined…WOW! WOW! Well done!
Wow! You’ve got to be both happy and impressed with what you’ve gotten accomplished! I certainly am impressed with your skills! As a side note they make a grout caulk (not sure what it’s called) but they use it in showers and wet areas. It’s sold at tile stores for sure and you should be able to find a color that will work for you. Also, I would suggest using the blue tape method for this application, but I’m sure you’re WAY ahead of me on this! I love how your vision has come to fruition!
IN. FREAKIN’.SANE!!!
I just cannot believe this is the same room! I cannot tell you how happy i was to be able to have shared in this voyage with you! I missed the hole condo redux!
So proud and happy for you!
You DONE GOOD GIRLY!!! 🙂
Yours is even better than your inspiration photo!!! It’s absolutely beautiful!
YAHOO!!! LOOKS TERRIFIC!!! Sit back and take a long look, you’ve accomplished a lot.
Oh, I forgot. You need your own television show!
Kristi,
In the same section where you found your grout there is grout caulking. It’s has the sand in it and it will match the bone grout.
FABOULOUS!!! BEAUTIFUL !! STUNNING!! WOW KRISTI LOVE IT
That is one of the most amazing transformations I’ve ever seen. I’m in awe!
Gorgeous!
Speechless! Awwsome!
BRAVO! It is such a delight to follow your progress. You just amaze me!
I read your blog regularly, although I don’t think I’ve ever commented… but… your kitchen looks just beautiful!
I look forward to seeing your progress. It’s really getting beautiful.
Kristi,
I am so impressed! you are incredible and your Kitchen is beautiful!!! you are truly an inspiration to all of us….
Thanks for taking time to share your Home and DIY projects with us…I know that your blog posts take an incredible amount of time to prepare. I really appreciate it…
Debbi Saunders
Orlando, Fl.
Kristi, I am sitting here at work (shhhh, don’t tell anyone!) with biggest, goofiest grin on my face because I am so amazed and proud of you for all the work you put in on the kitchen, and how well all your efforts paid off! IT. IS. GORGEOUS! Wow, what a vision you have! It’s nicer than the Cameron Diaz kitchen hands down, and looks every bit as high-end as that one if not moreso. The progress pictures are mind-boggling, and I don’t think the average person would believe such a complete transformation would be possible if you didn’t have picture proof.
Well done, brava, three cheers for you!
Absolutely gorgeous! I love all of it!
I love it!!!! Soooo beautiful!!!!! Thank you for sharing the process with us- we love it:-)
Beuatiful! To trim out the tile, have you thought about a porcelain moulding trim. I trimmed mine on the sides and I love it.
Outstanding – Could not see it when you were working, but you have out done yourself. Painted floor is great – the subway tile cannot be beat. Congratulations
Great job! I’m in awe.
I found some serious blingety-dingety hardware whilst Googling for my kitchen cabinets … did not look at price but I do like some (all) of them…
http://knightmovesblog.blogspot.com/2013/08/cabinet-hardware-finding-right-mix-of.html?m=1
Your cabinets look majestic! On the caulk, I recommend the Commercial 100% Silicone Caulk by Custom Building Products. If you call them (800-272-8786) they can send you a swatch brochure with all of the colors they carry. Then you can order it from Home Depot and have it shipped to the store for free. Antique White, Alabaster or Bone are the colors that might work for you.
** I don’t work for either company, just a happy customer!
WOW! Great job! I love the before and after views.
So pretty. How wonderful to see your vision become reality. As far as grout goes, have you tried clear? We’ve used that in several places and it is inconspicuous. Looking forward to following along as you continue your makeover.
Kristi,
I just love it! The floor is my favorite but the entire look is also fantastic. Can’t wait to see what happens next.
Well done!
Absolutely beautiful!!
Absolutely stunning and gorgeous Kristi. You must be so proud of your accomplishments. You really are extremely talented and I admire your determination, courage and vision so much. I love your Blog and can’t wait to see your progress everyday!
Stunning! Absolutely Stunning!
I just tiled my mother in law’s entry way and used bone colored grout. I bought matching bone colored caulk for the edges along the wall. It was made by the same company that made the grout to match. Got it at Lowes (my favorite store!)
The kitchen looks amazing! You’re awesome 🙂
OMG Kristi. I didn’t think I would like the green and still don’t in the inspiration picture. But your kitchen is wonderful. The gold leaf just makes it even more beautiful. I am so in awe of you! I like the idea of gold leaf directly on the drawers BUT what about routing two tiny rounded grooves a small distance apart (maybe the distance apart that the right size trim would be) around the drawers and put the gold leaf between those lines. It would give the drawers some texture since they don’t have the texture of the cabinets. I think you wouldn’t like the trim sticking out on the drawers when there is nothing comparable on the doors. And if you don’t have a router, here is an excuse to get another tool. 😉
I’m so in love! Seriously your kitchen looks amazing. You are truly a gem. Your hard work has paid off with the most beautiful results.
It’s Gorgeous!!! I Love it!!! The tile looks amazing with it and I’m still drooling over the sconces.
WOWZERS!! I love it!!! I just renovated my kitchen, so I know how hard it is to make decisions! You ARE doing an amazing job!!!!
KRISTI…… I can sit here and read everyone’s comments, sometimes I do but I just wanted to tell you that YOU ARE SIMPLY AMAZING……!!! I haven’t been on here for about a week coz’ I started a new job and to come on here and see this brings tears to my eyes…. because I am so proud of what you can accomplish…. !!!!! I can only image how you feel to walk in there and see that everyday… WONDERFUL job…!!!!!
Beautiful!! All your hard work pays off! Enjoy for a few days and then finish the rest. : )
Ahhhhhh beautiful!!
Blessings,
J