C.O.P. Week 5 – Kitchen Edition (DIY Kitchen Utensil Drawer Dividers)
This week, I decided to focus on two organization projects that I’ve wanted to do for quite some time — getting my two messiest kitchen drawers under control with a bit of purging followed with some DIY utensil drawer dividers.
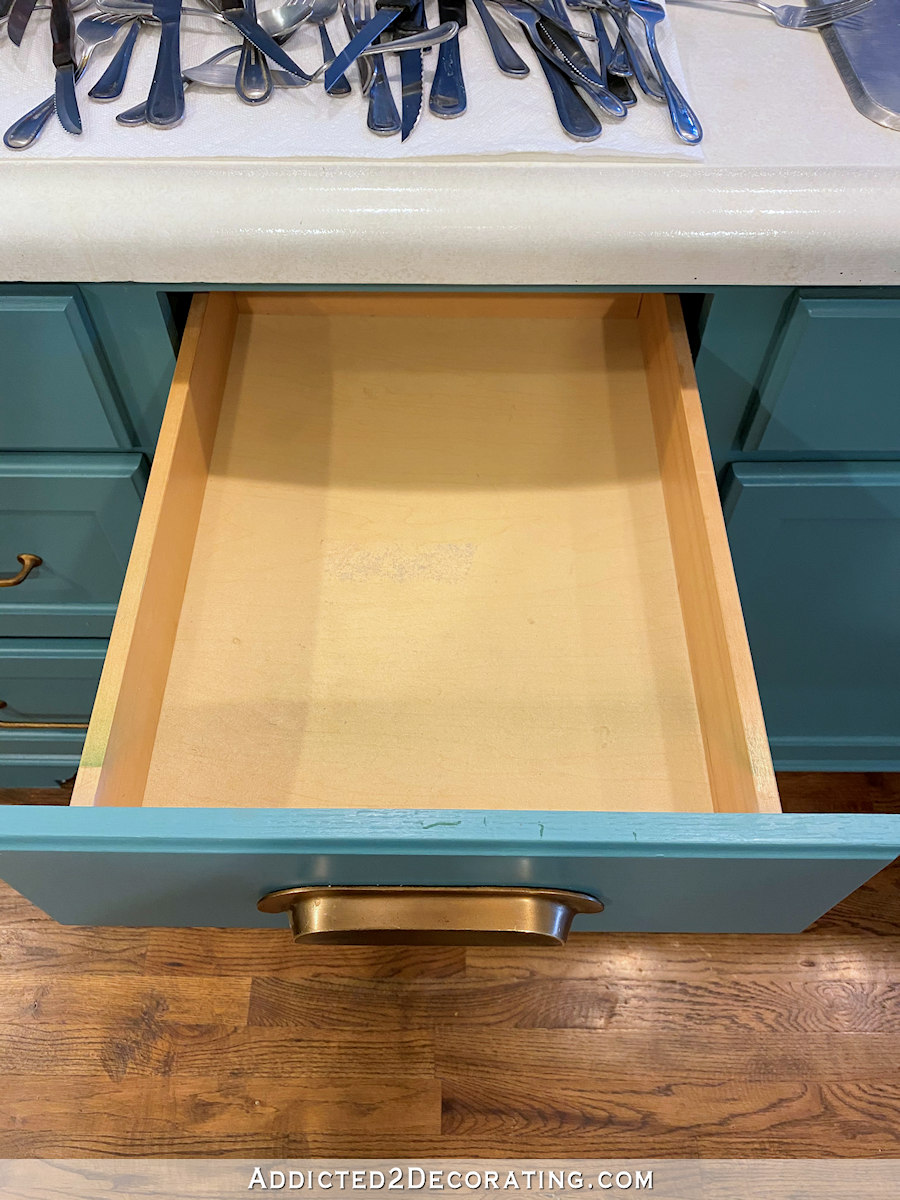
I wish I had taken a picture of my silverware drawer before I emptied it out, but just imagine all of your silverware dumped into a drawer with no organization and no dividers. That was my drawer.
I used to have one of those plastic silverware dividers that you get at basically any store that sells housewares. But what I don’t like about those is that they never fill up the entire drawer. So over time, I start filling in the open areas around that plastic divider tray with random junk.
So instead of just buying a new plastic silverware divider tray for my drawer, I decided to divide the drawer up myself using the small 1/4-inch-thick project boards that you can find at home improvement stores, Michael’s, Hobby Lobby, etc. The ones I purchased were 1/4-inch by 3 inches by 4 feet.
Here’s what my silverware drawer looked like before I added the dividers…
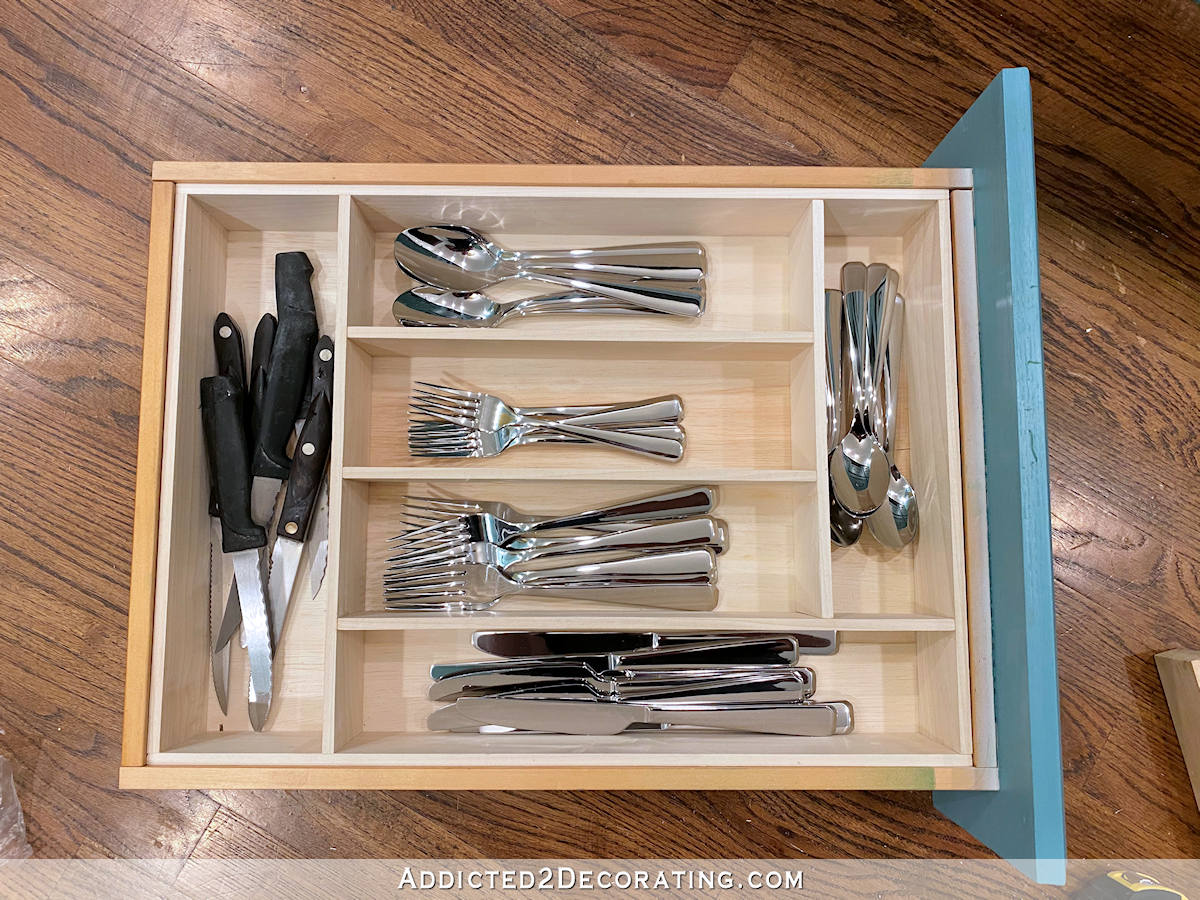
And here’s the new, improved, organized, and divided drawer…
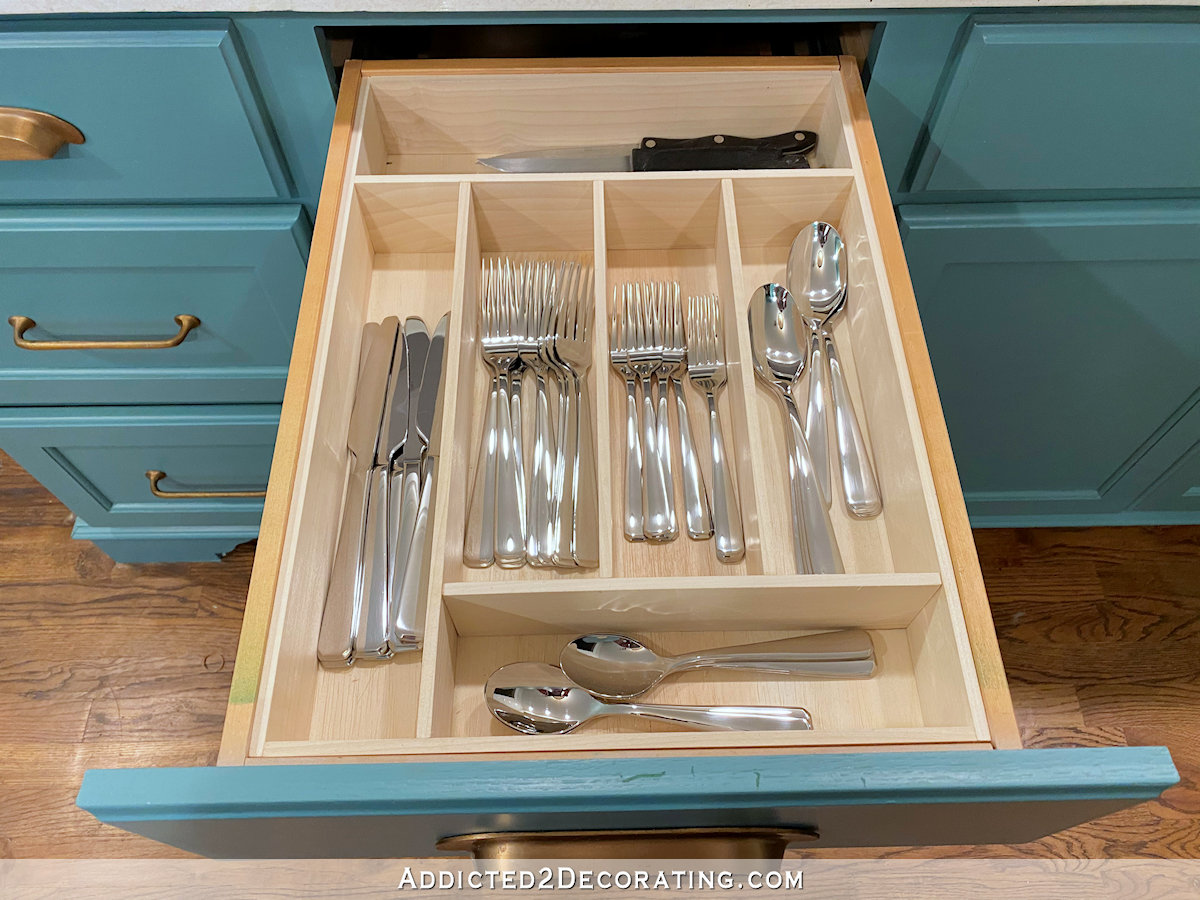
So much better! And what a big payoff for such a simple project!
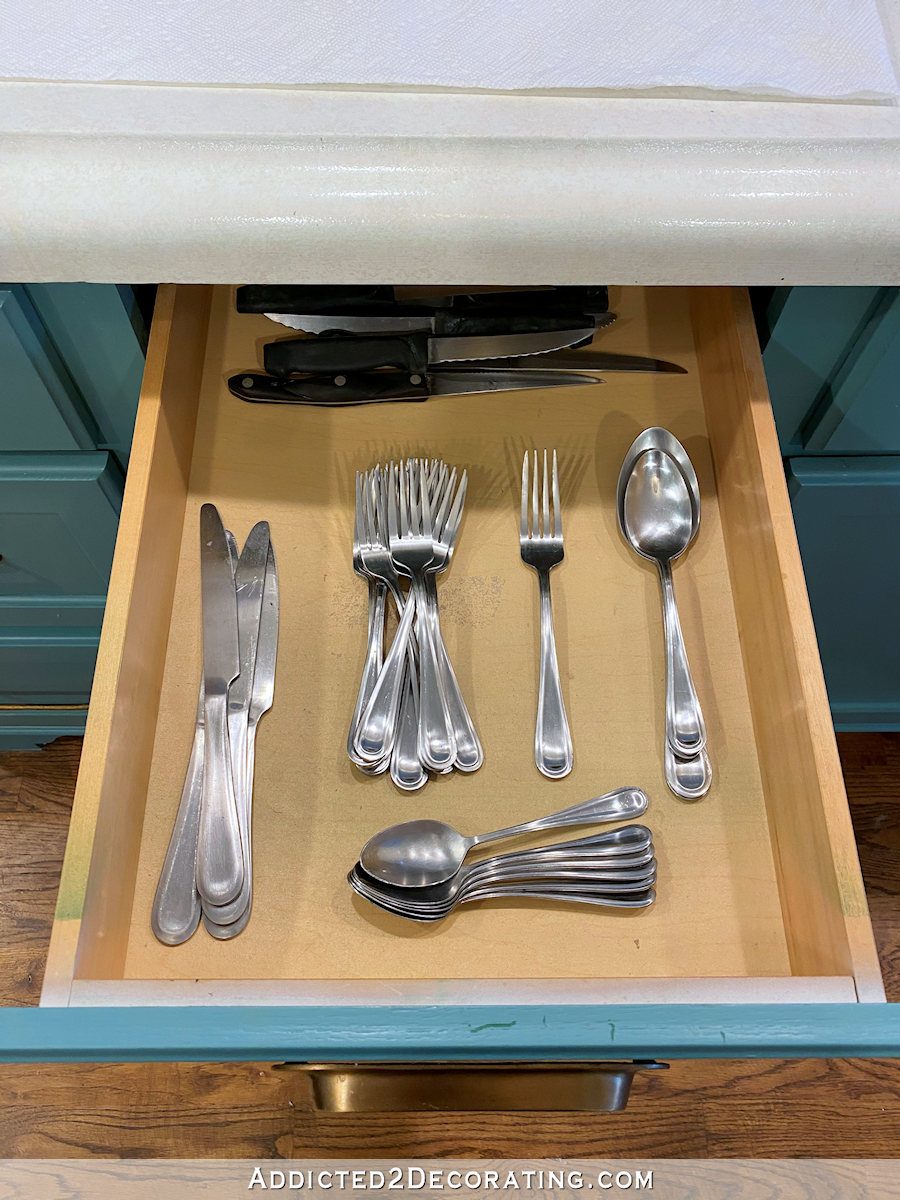
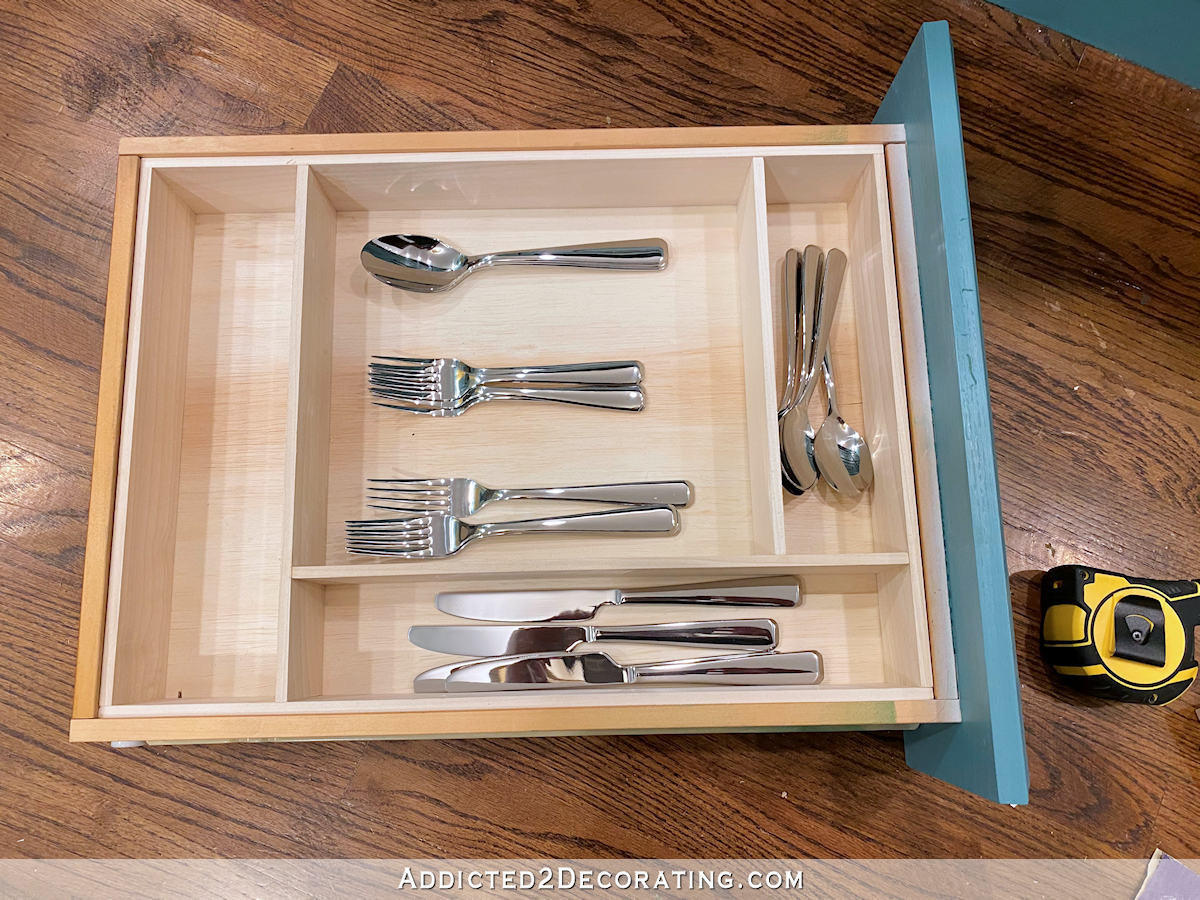
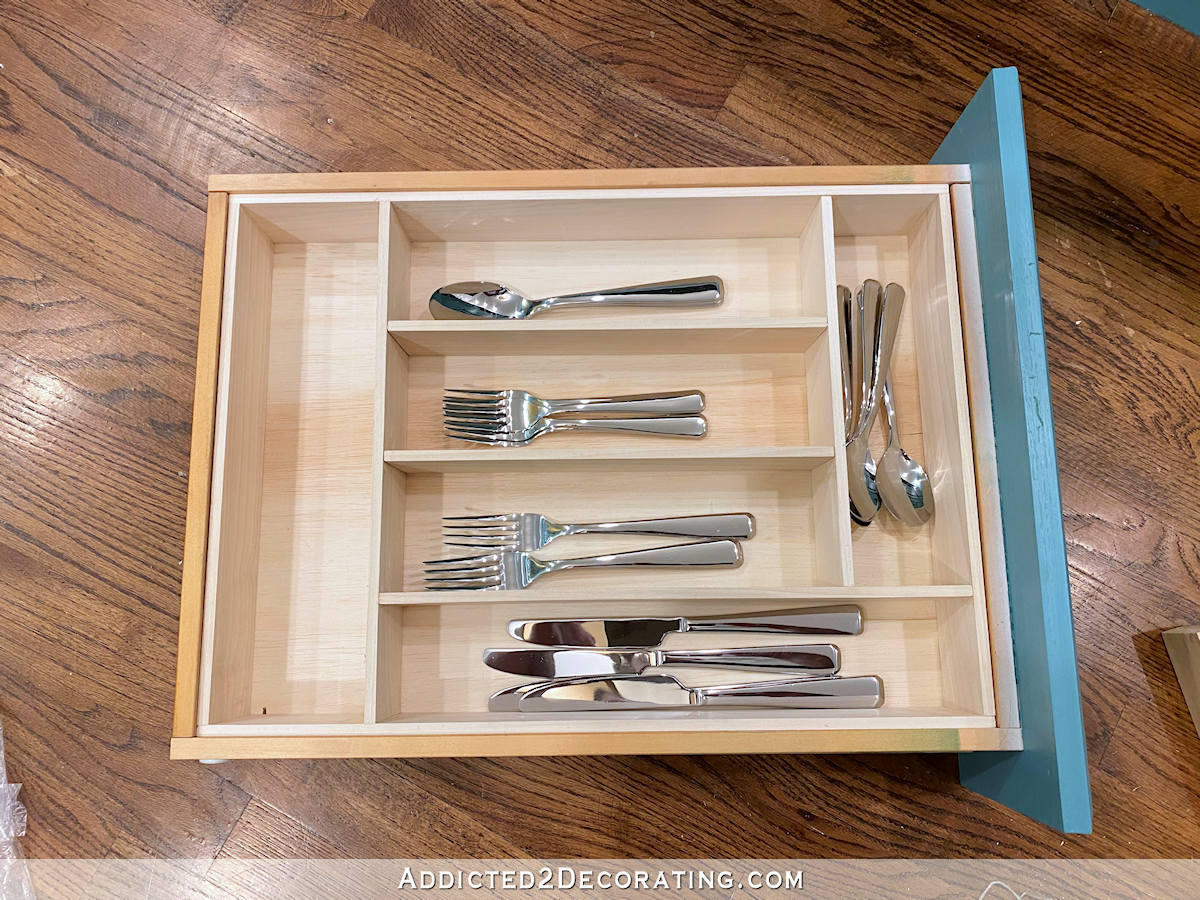
Before I made any dividers, I placed my silverware and steak knives separated in the drawer to get an idea of where I’d like the dividers.
Once I had a plan, I started making the drawer divider/organizer. Before I could start adding the dividers, I needed to do something with the bottom of the drawer first.
My cabinets are the stock unfinished oak cabinets from Home Depot, and one thing about these unfinished stock cabinets is that they have some cheap materials. The drawer fronts and doors are oak, but the bottoms of the drawers are super thin hardboard (which I think is like a thin material along the lines of particle board or MDF) with that plastic-lined veneer on top. So over time, the thin drawer bottoms have bowed down a bit in the middle of the drawers.
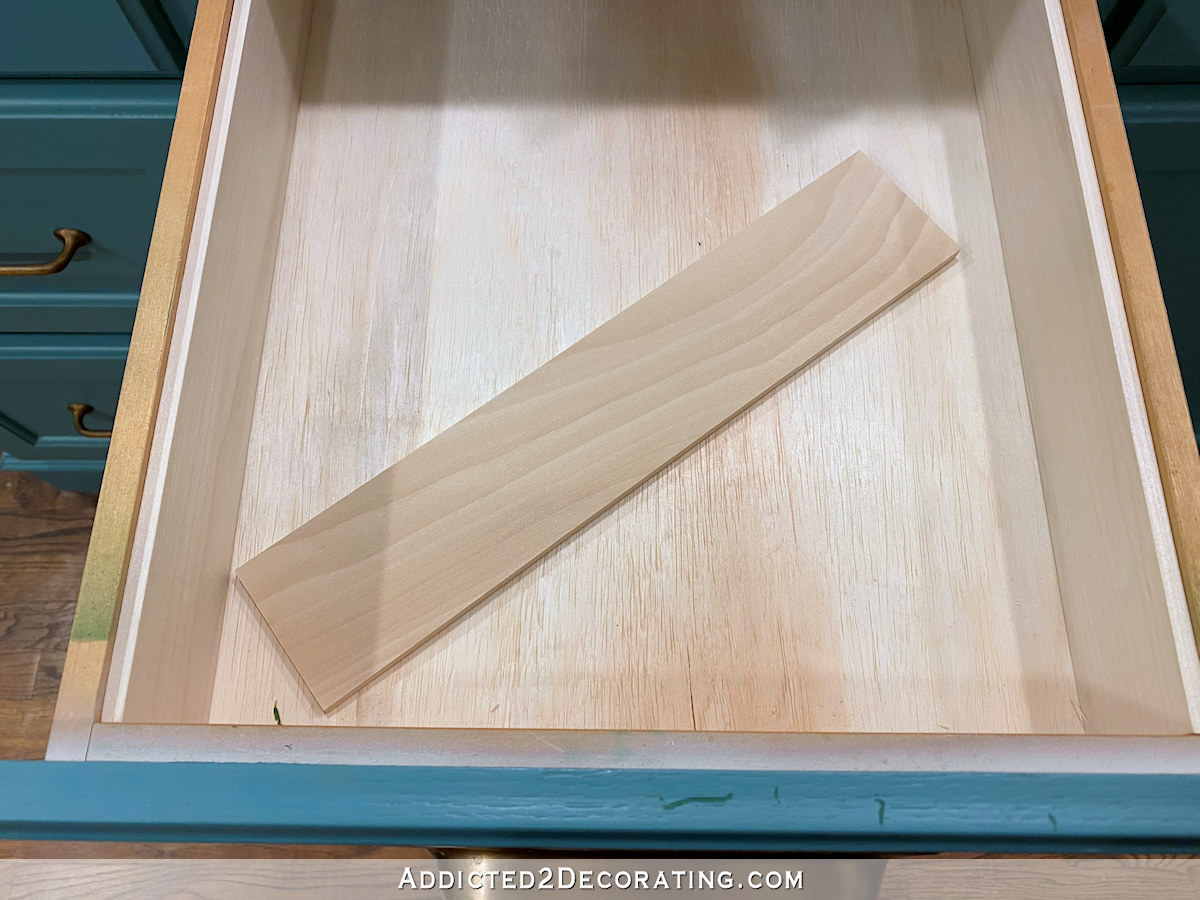
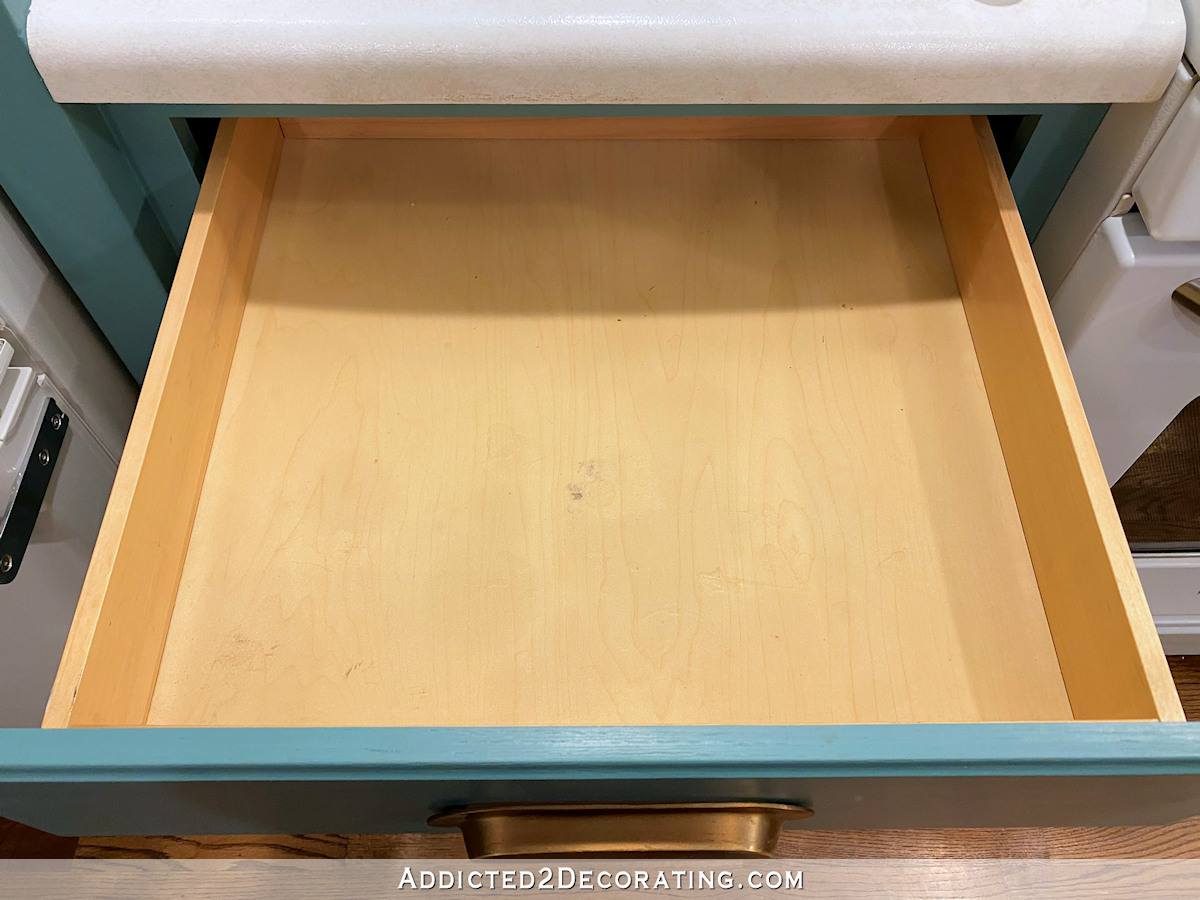
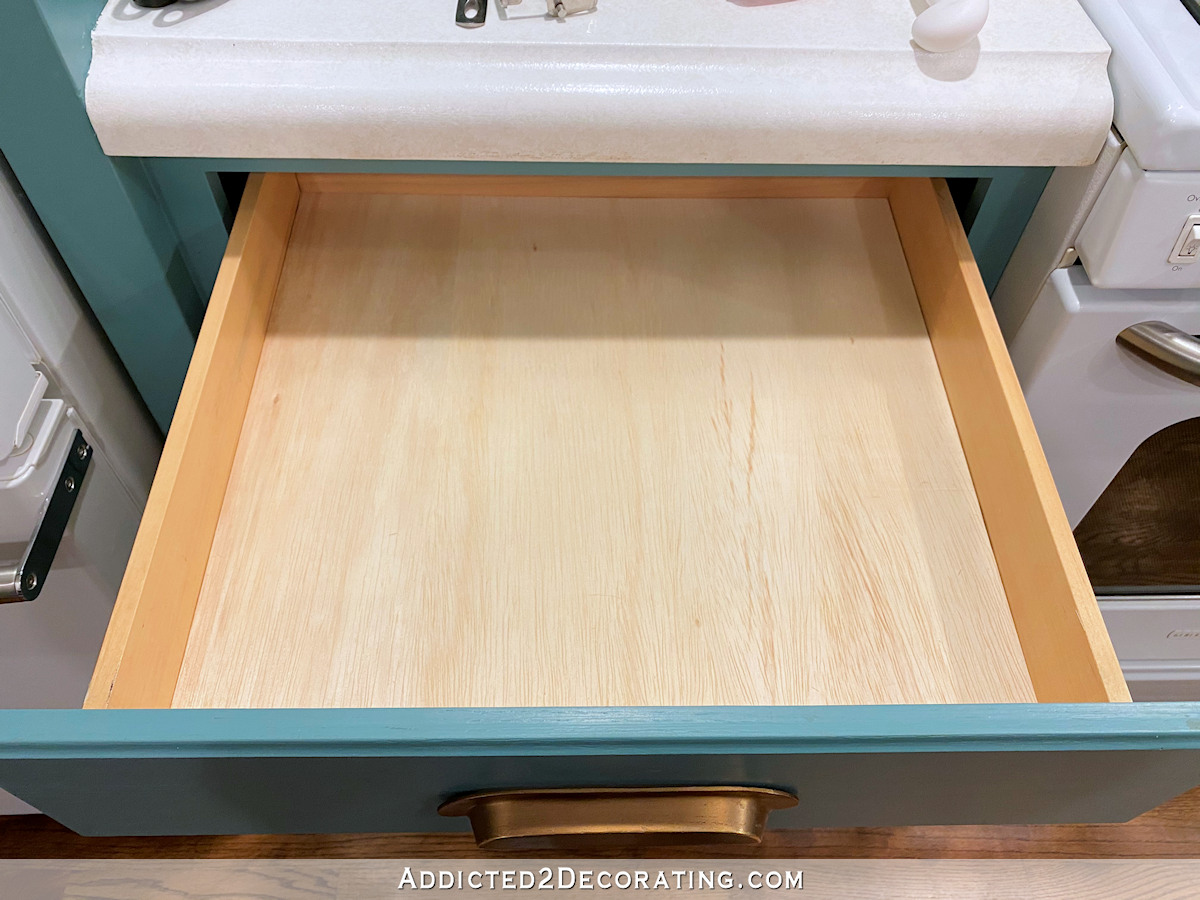
So before I added my dividers, I cut a piece of 1/4-inch plywood to fit the bottom of the drawer. I didn’t take a picture of this bottom piece on the silverware drawer, but you can see the piece I added on the bottom of the cooking utensil drawer here…
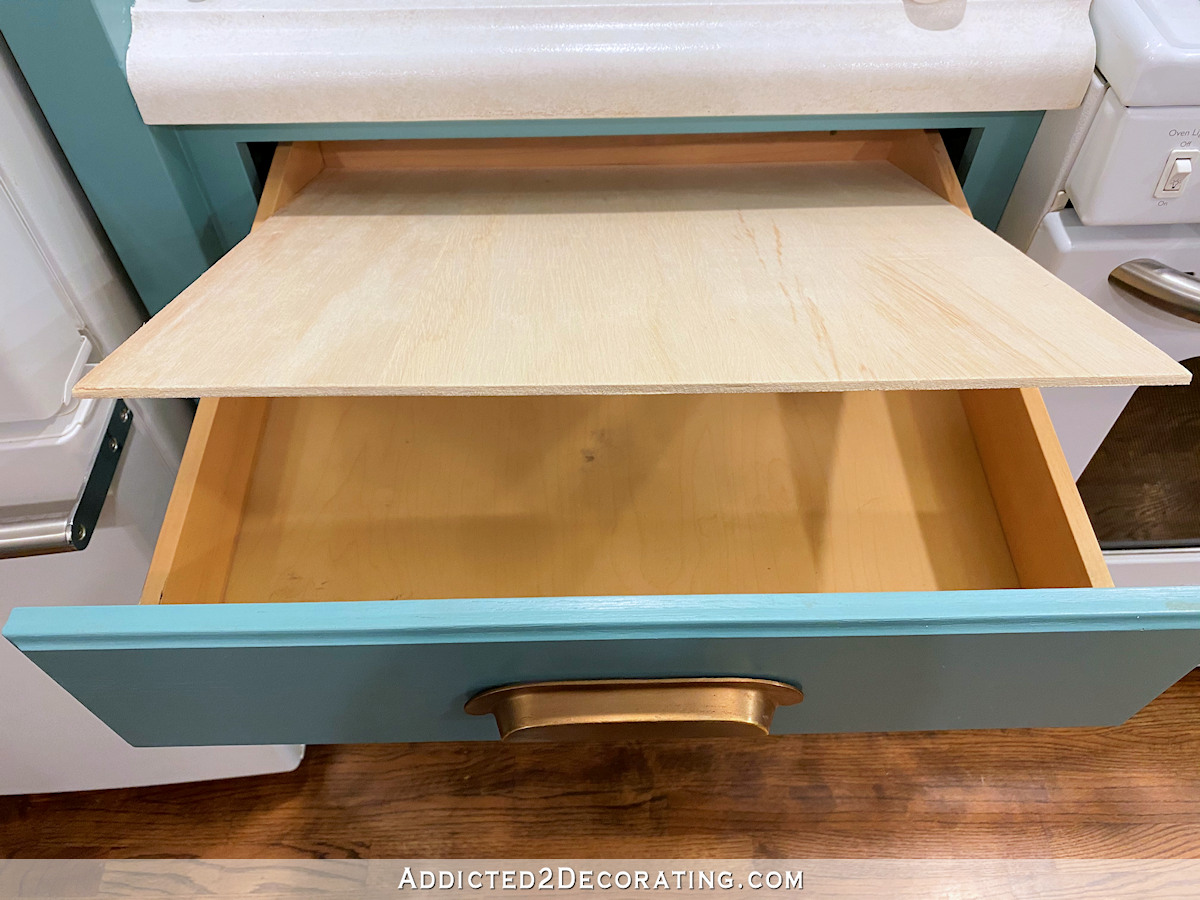
I didn’t glue that piece down or anything. I just placed it in the bottom, and that’s it. This gave me a new flat drawer bottom to work with, but it also gave me something to glue my dividers to. I didn’t necessarily want these dividers to be permanent. I didn’t want to glue anything directly to the drawers so that these are easily removable if I ever decide to change the configuration in the future.
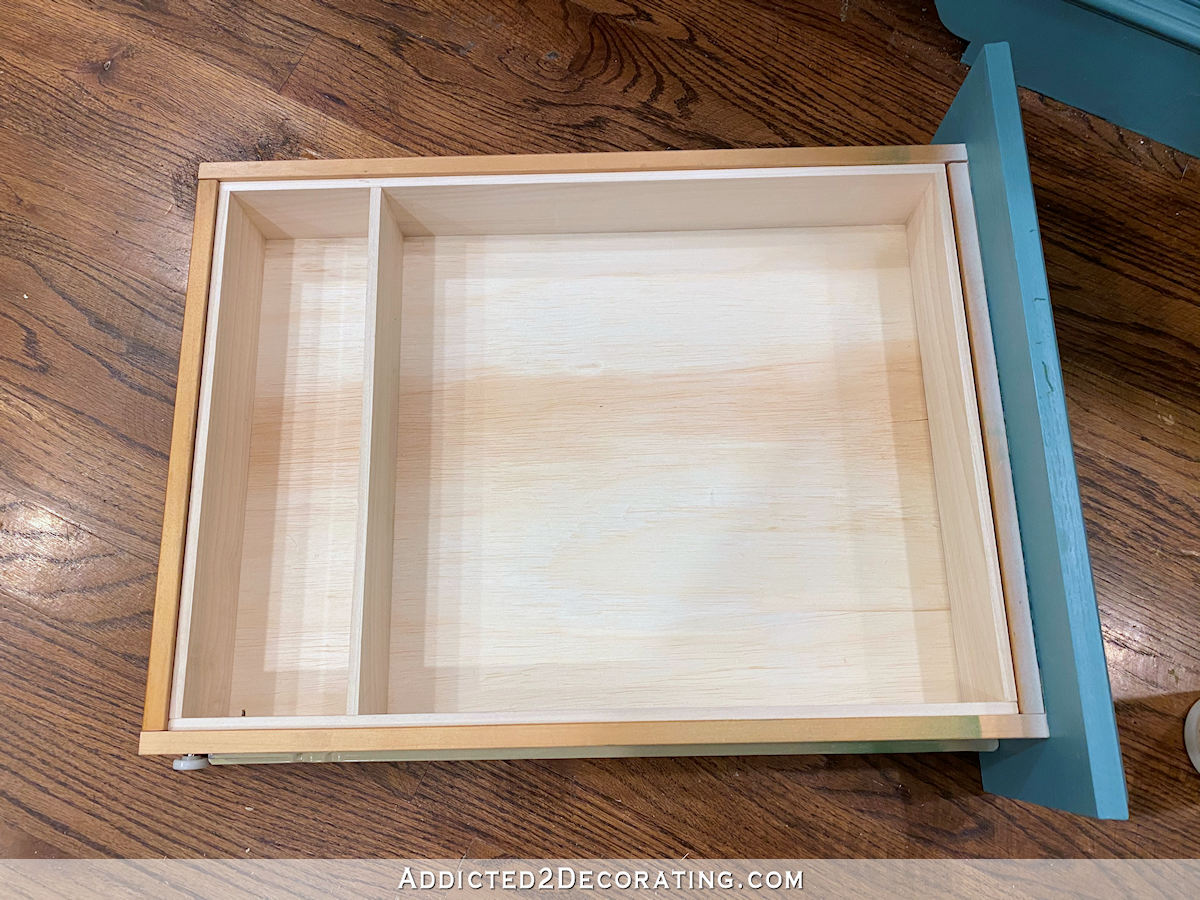
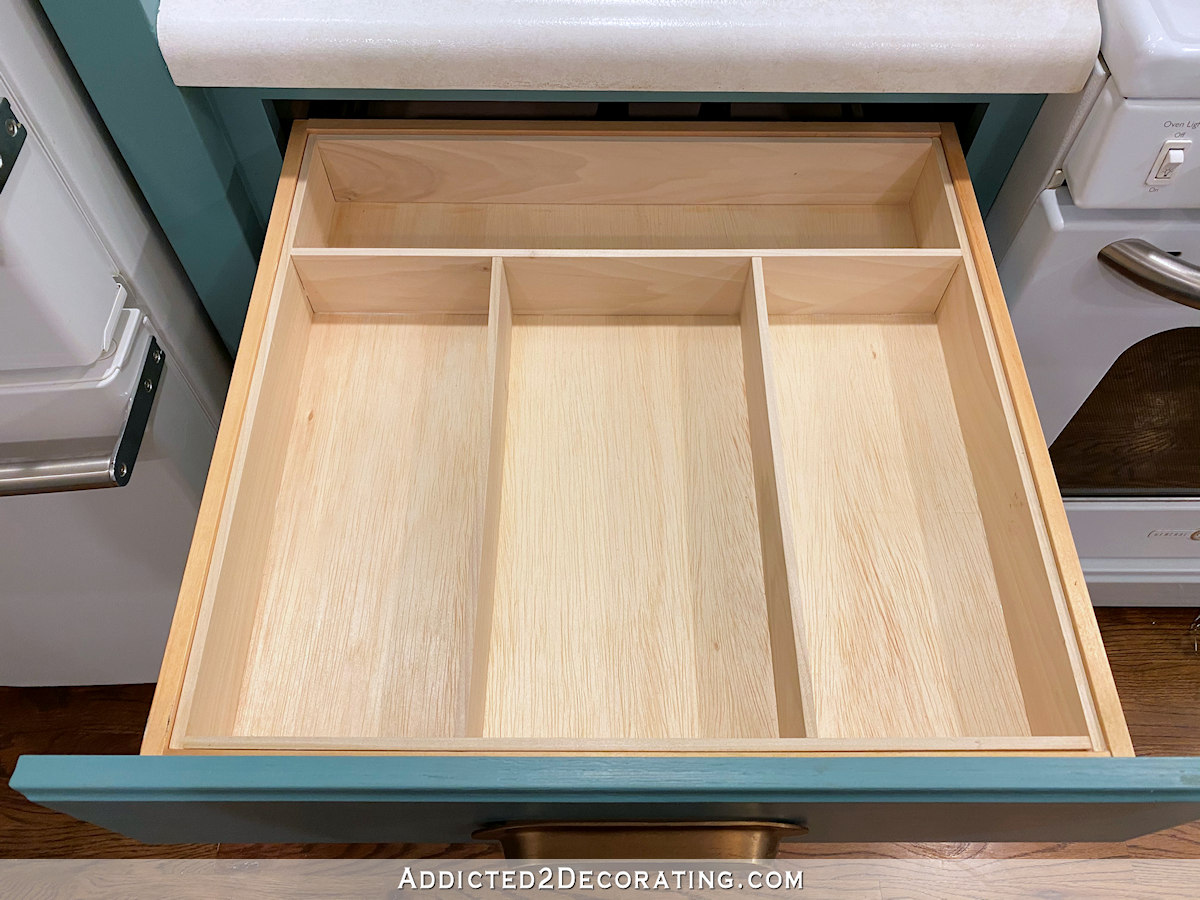
After adding the plywood bottom, I cut and added pieces to go around the inside perimeter of the drawer box.
I glued those four perimeter pieces to each other and to the bottom piece of plywood, but again, I didn’t glue anything to the actual drawer.
Then I began to add the separator pieces only using wood glue. Of course, the order in which you add these will completely depend upon how you want the drawer arranged. But here’s how I added mine.
I started with the large back section.
And as I measured for each divider piece, I added just a smidge (maybe 1/32-inch) to each measurement because I wanted the pieces to fit in the drawer very snug so that the tension would hold the pieces in place until the glue dried. I just used regular wood glue to glue the divider pieces to the perimeter pieces and to the bottom plywood piece.
Next I added the large side section. Again, I measured and then cut just a touch over that measurement so that it would fit kind of tight — not too tight or it would push that first piece out of place. But since the first piece was snug, this second piece could fit kind of snug as well, and the tension would hold everything in place.
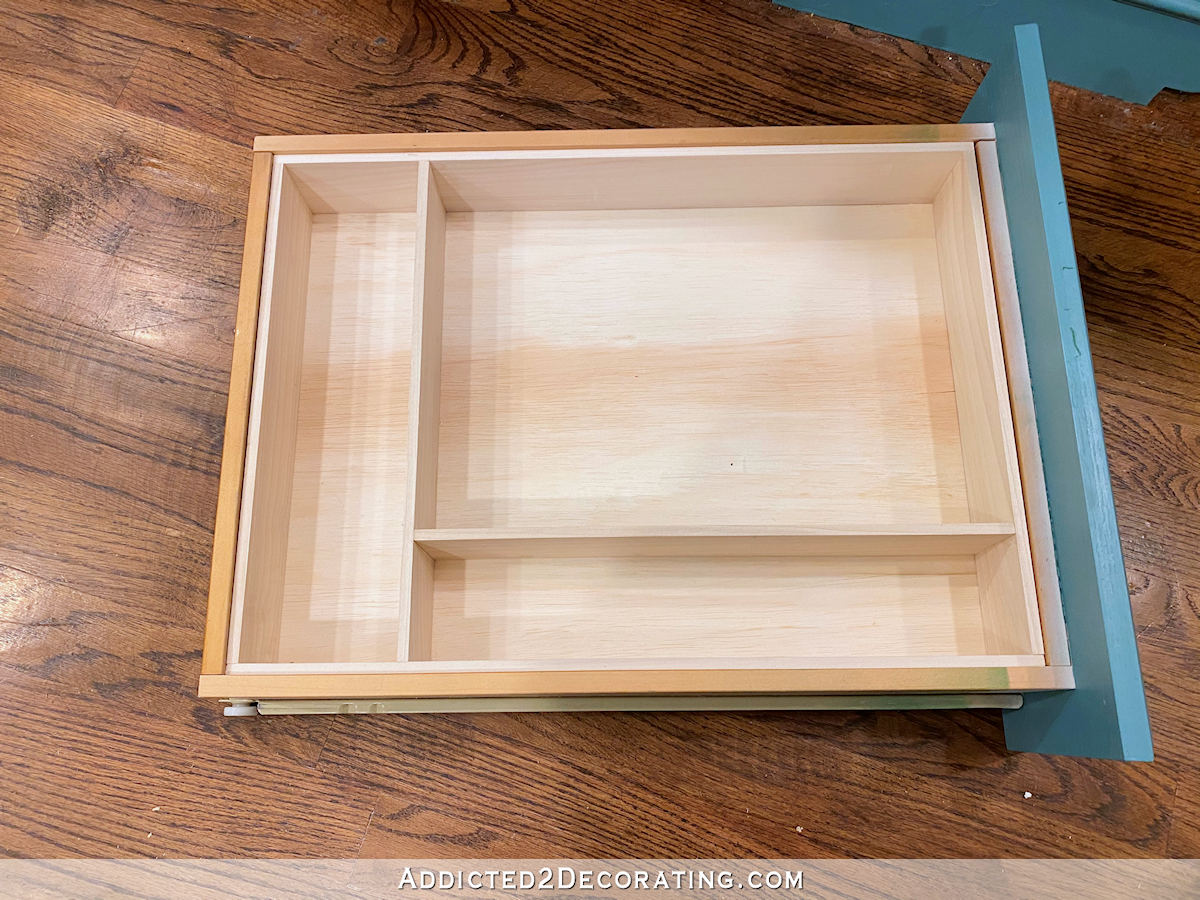
Then I did the bottom spoon section in the same way…
And then finished off with the other two pieces creating three equal sections for the big forks, small forks, and big spoons.
And here’s the finished and filled drawer divider, with no extra space to fill up over time with random junk…
When I put the drawer back in, I did have one problem, but it didn’t come as any surprise to me. Another issue with unfinished stock cabinets from big box home improvement stores is that they come with the cheapest drawer slides that are far from full extension. So with the drawer installed, I couldn’t access the back steak knife section.
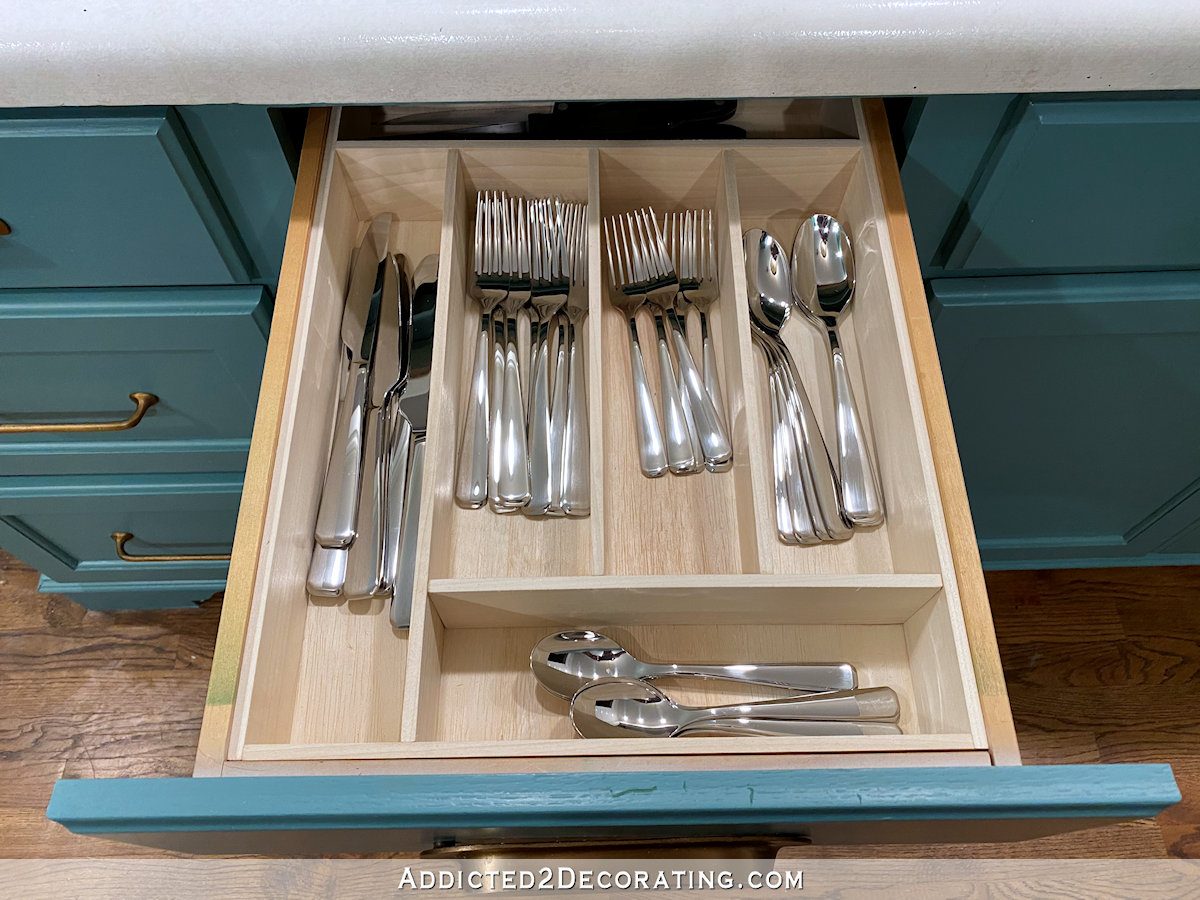
So I also took about 10 additional minutes to switch out the cheap drawer slides for full-extension drawer slides that I had left over from my pantry. Now I can easily reach everything in my newly organized drawer.

I love easy projects with a big payoff!! And this one was so satisfying to me.
I also tackled the messiest drawer in my kitchen — the cooking utensil drawer. I did get a picture of this mess before I unloaded the drawer.

I mean, is that not the biggest mess?! 😀 I had to do some purging on this drawer before I could even get to the organizing. There’s no way I need all of this stuff. So I separated everything into piles. First, I gathered all of the things that I don’t really need…
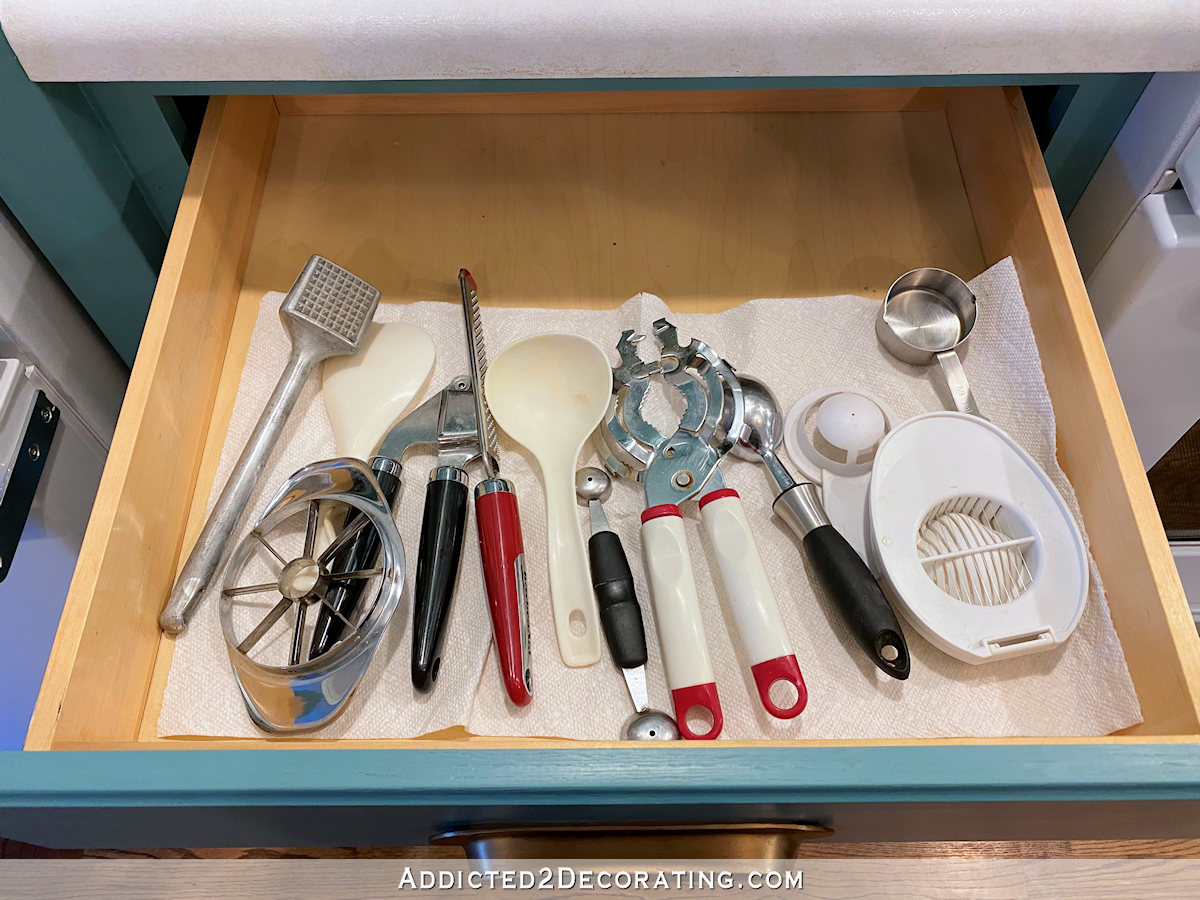
Those are all gadgety things — a jar opener, an egg separator, an egg slicer, a garlic press, an apple slicer/corer, etc. — that just take up space but don’t add any real value to my cooking experience. And I think those plastic spoons came with my InstantPot, but I’ve never used them.
Then I gathered the items that actually go with small appliances…
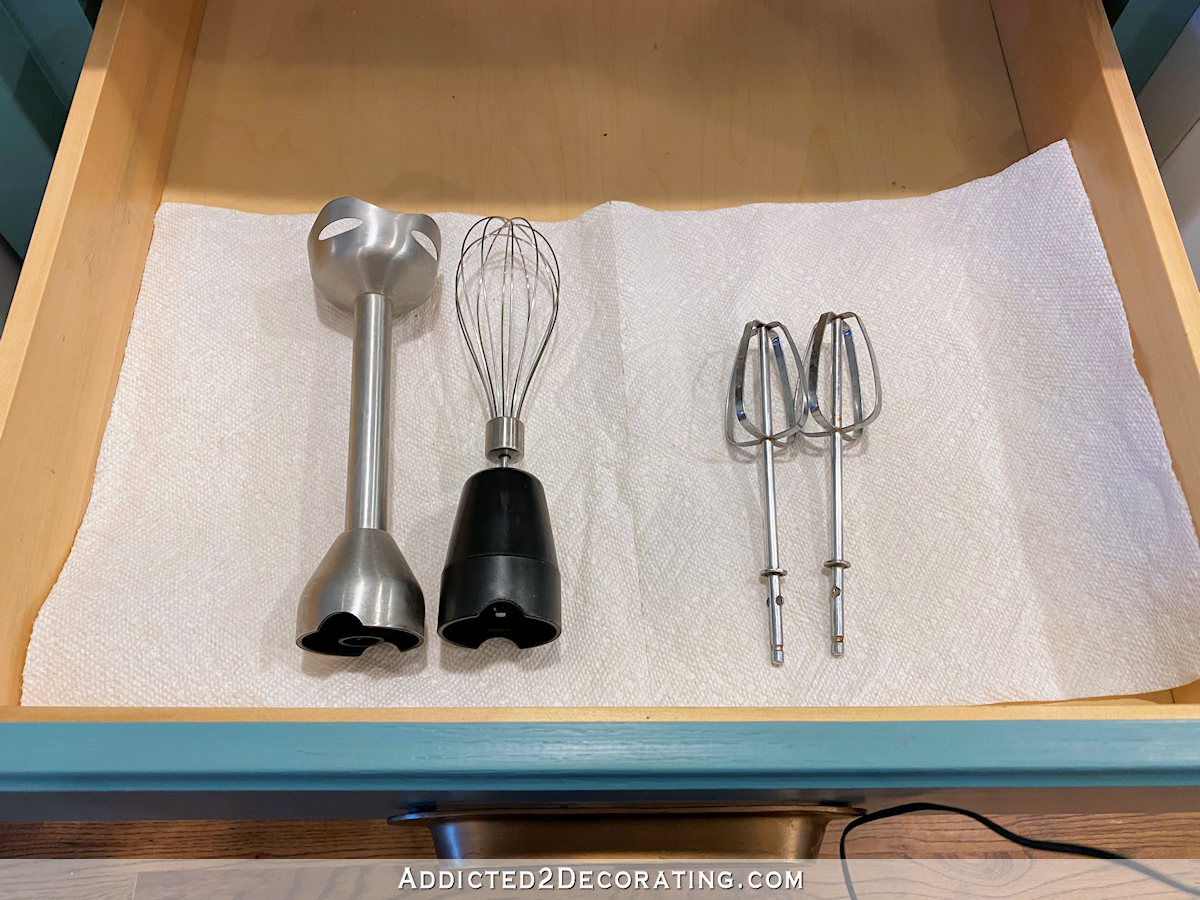
There’s no need for those to be in this drawer. They should be stored with the small appliance.
Then I gathered all of the cooking utensils that I use on a regular basis..
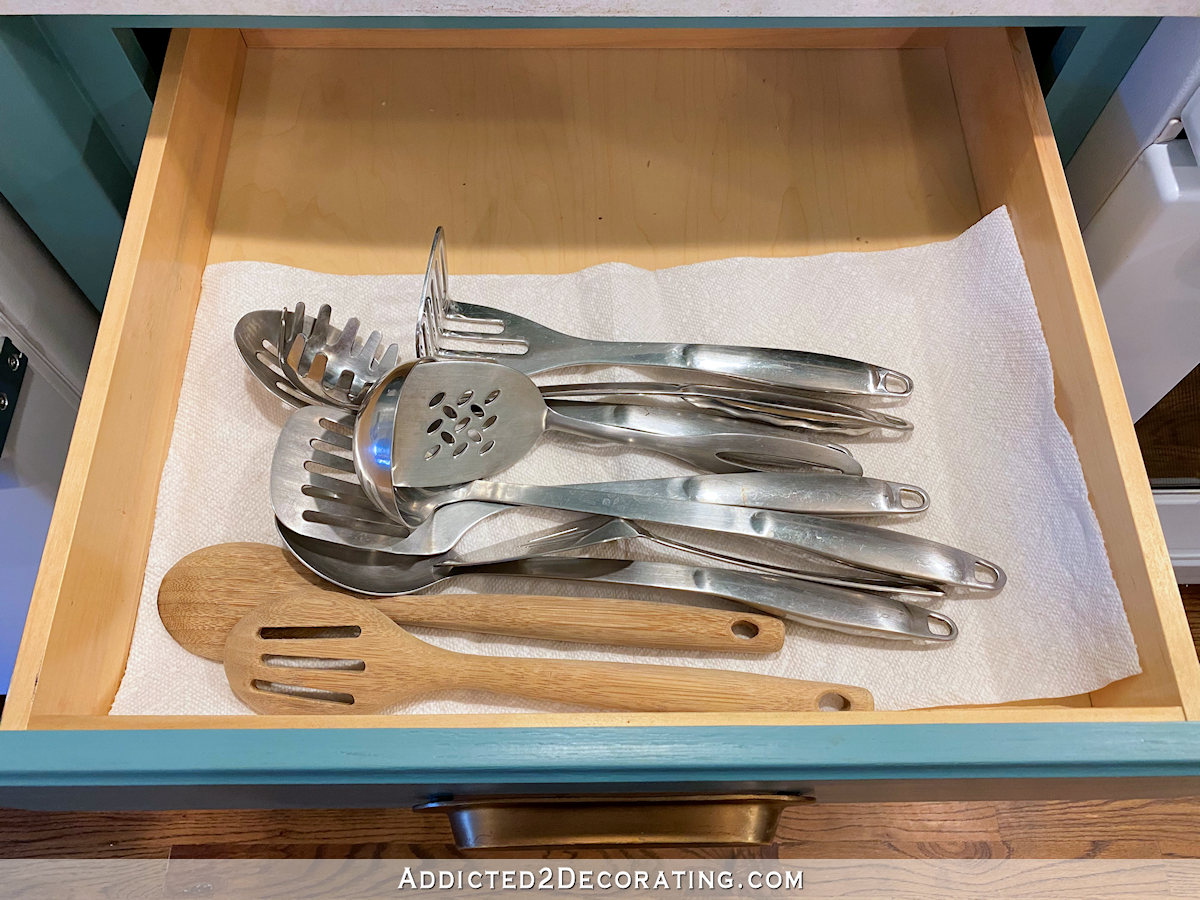
I don’t like a lot of things on my kitchen countertops, but I do actually like spoons and other utensils like this to be in a pretty little container sitting on a countertop in a convenient place near the stove. So these didn’t need to be in the drawer.
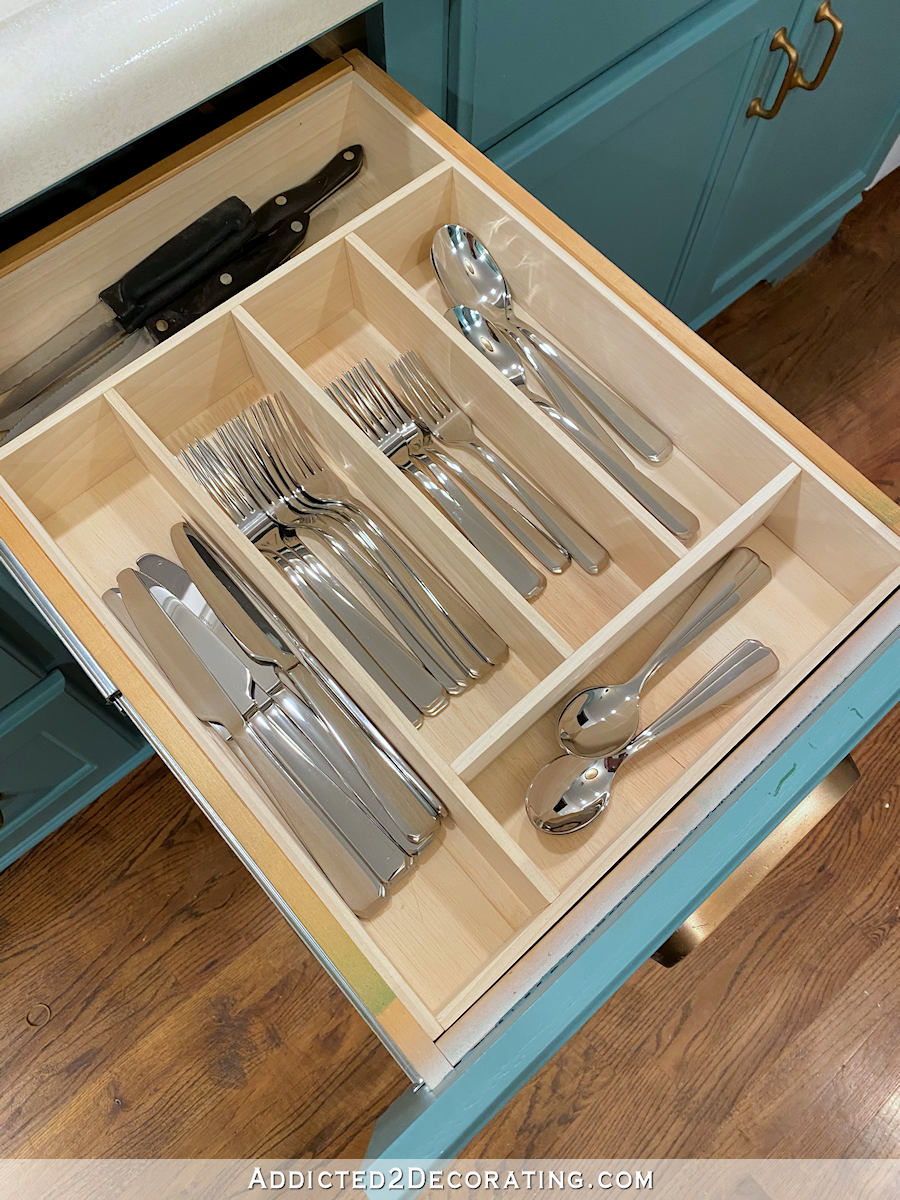
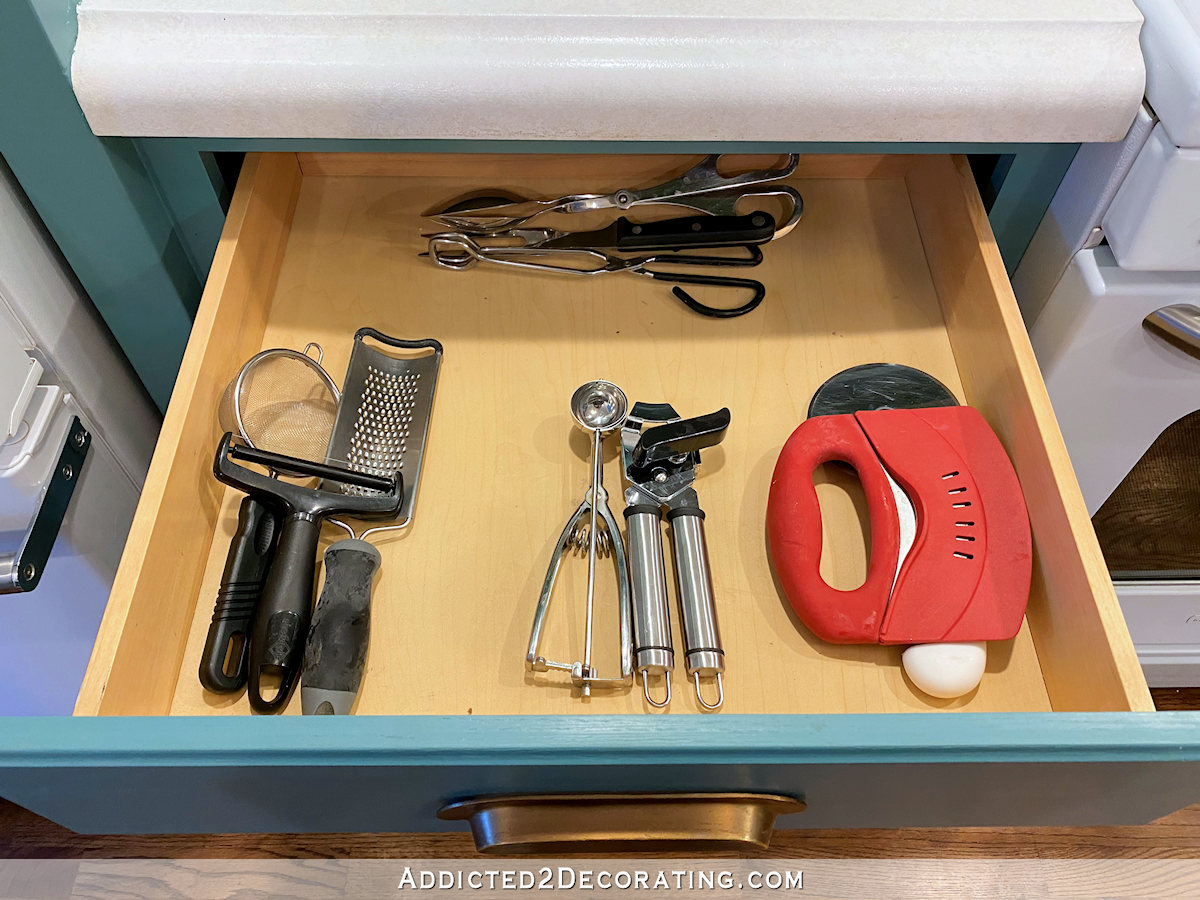
And that left this much smaller and more manageable selection of utensils. With all of the other stuff gone, I had a much better idea of how to divide the drawer.
This drawer, just like the others, had the thin and misshapen drawer bottom.
So once again, I started by adding the 1/4″ plywood in the bottom.
And then, just like the other drawer, I began by gluing the perimeter pieces to each other and to the bottom plywood. Then I added the divider pieces, also glued to the bottom plywood, to the perimeter pieces, and to each other.
With this drawer, it wasn’t so much about putting like things together. After all, each of these things serves a different purpose. If they didn’t, I wouldn’t need all of them. But it was more about separating out the drawer into smaller and more manageable containers so that the items in this drawer can’t become a tangled mass of confusion and disorganization again.
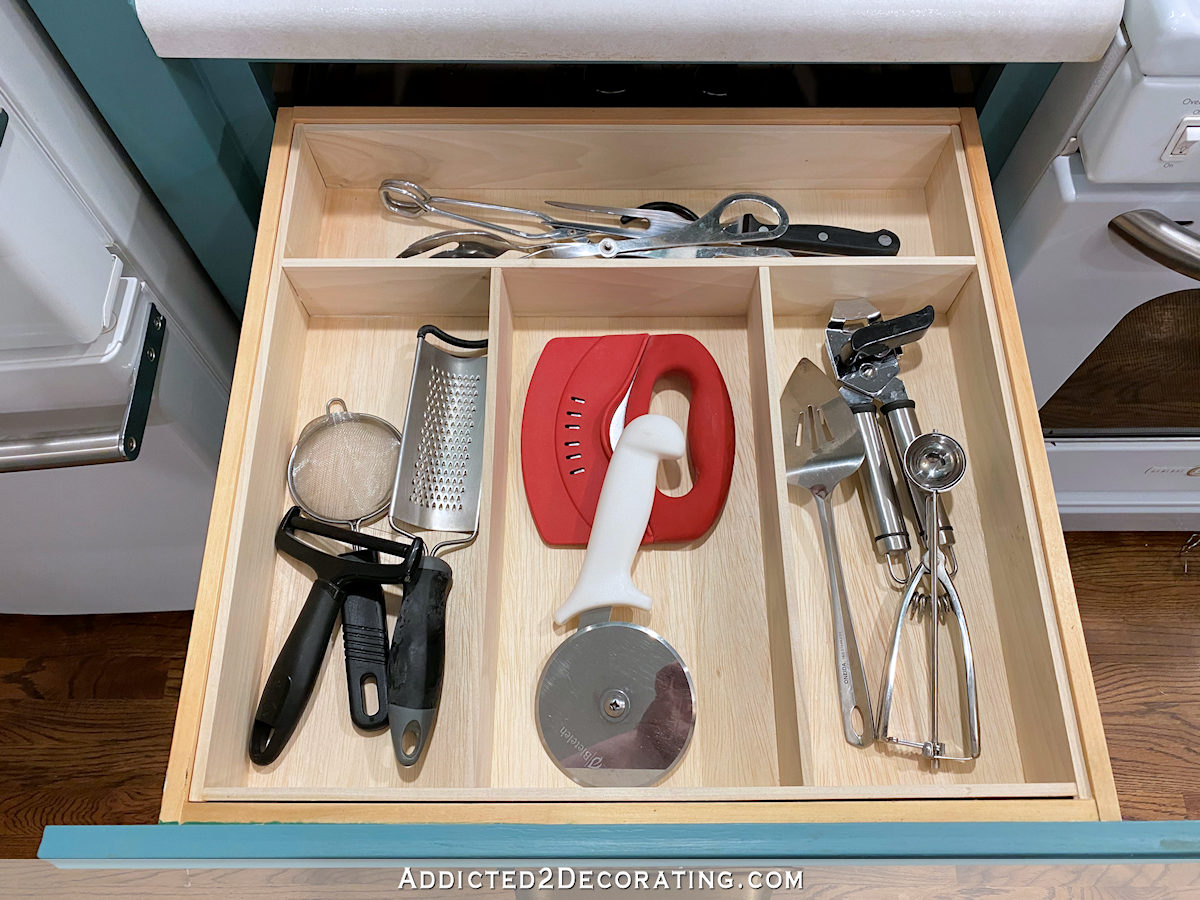
That drawer also needed a quick drawer slide switcharoo so that I now have a full-extension drawer with everything easily accessible. This newly purged and organized drawer feels so much more manageable than the original jumbled drawer!
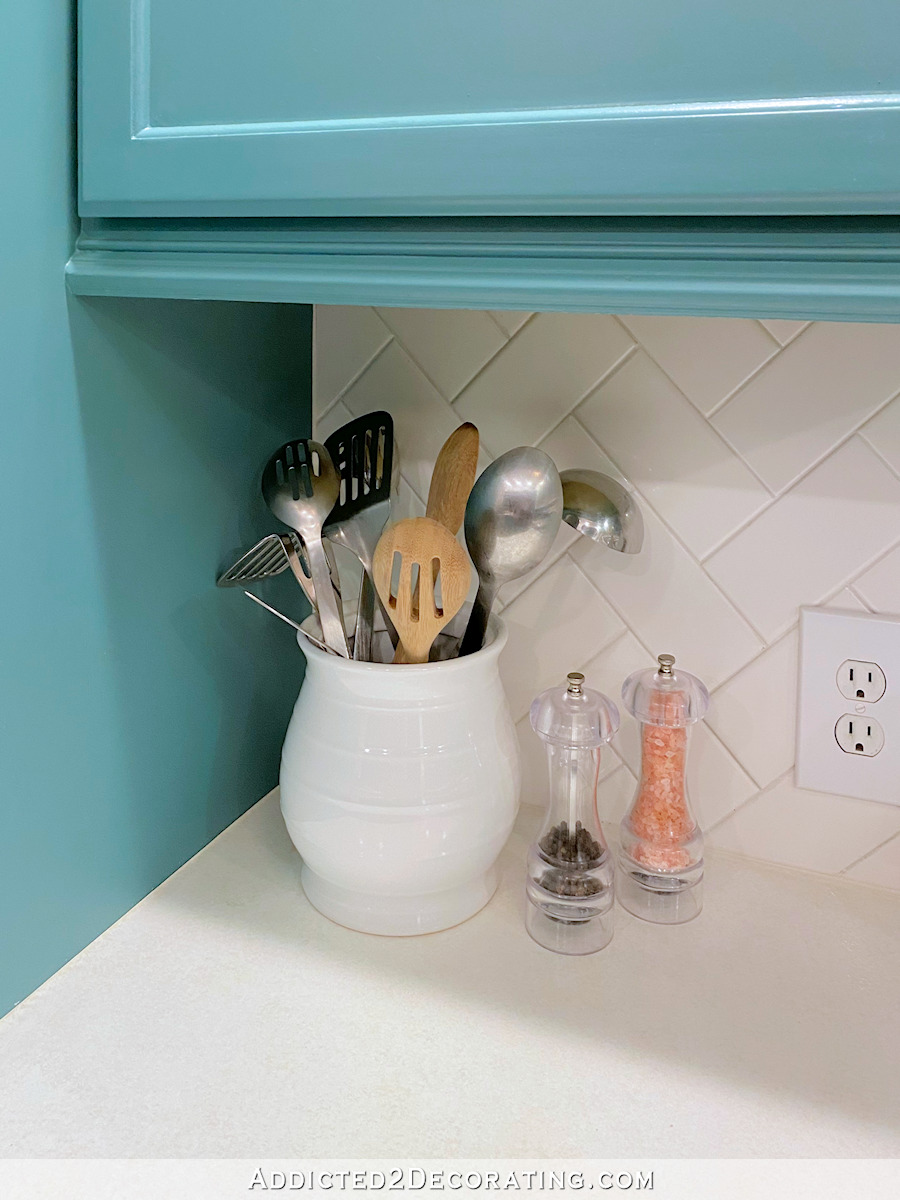
And for the cooking utensils that I use regularly, I bought a simple white container to go on the countertop right by the stove. I like the convenience of having these right there within reach without having to dig through a drawer to find the one I want.
So little by little, I’m getting my kitchen organized, and I love it! I love turning my stock cabinets into something that is customized for the particular way in which I use my kitchen.
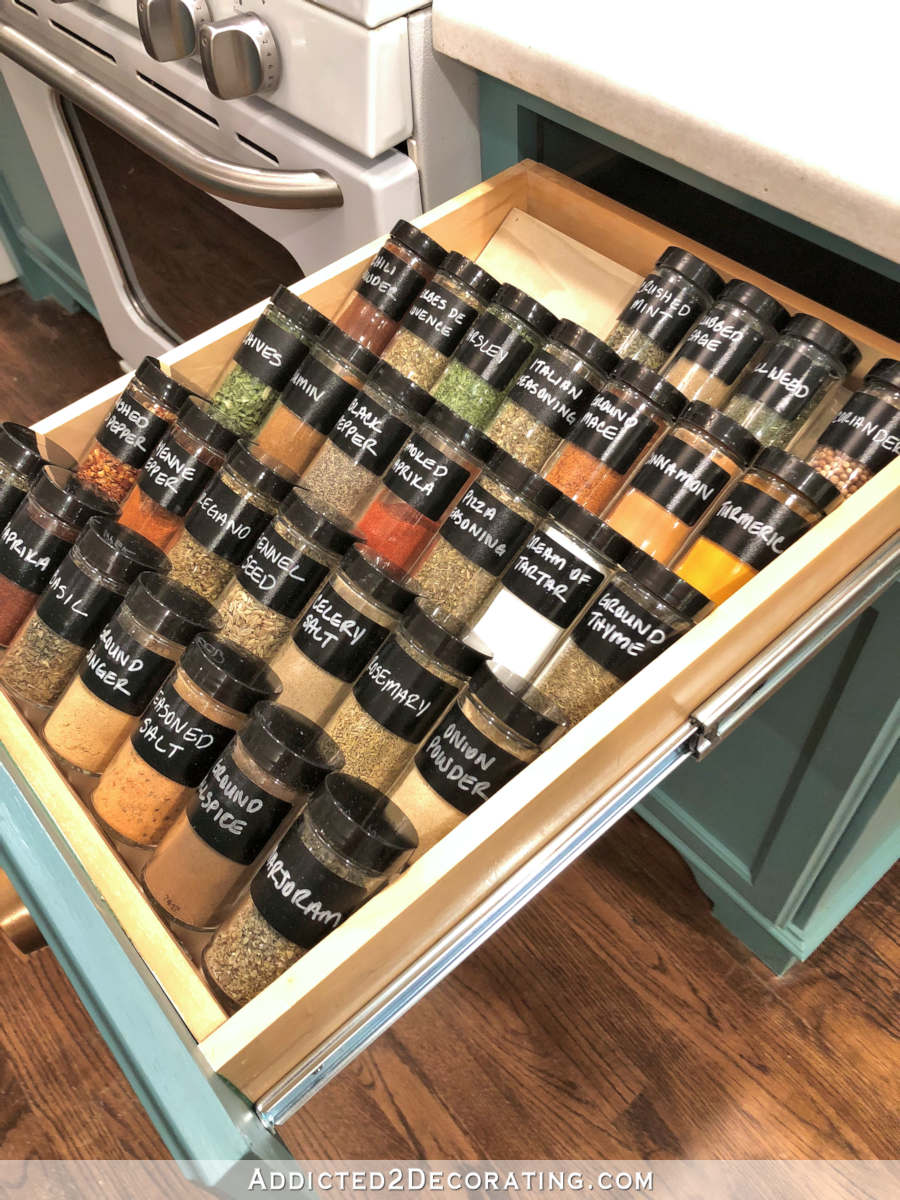
In the past, I’ve turned a standard drawer into a tiered spice drawer…
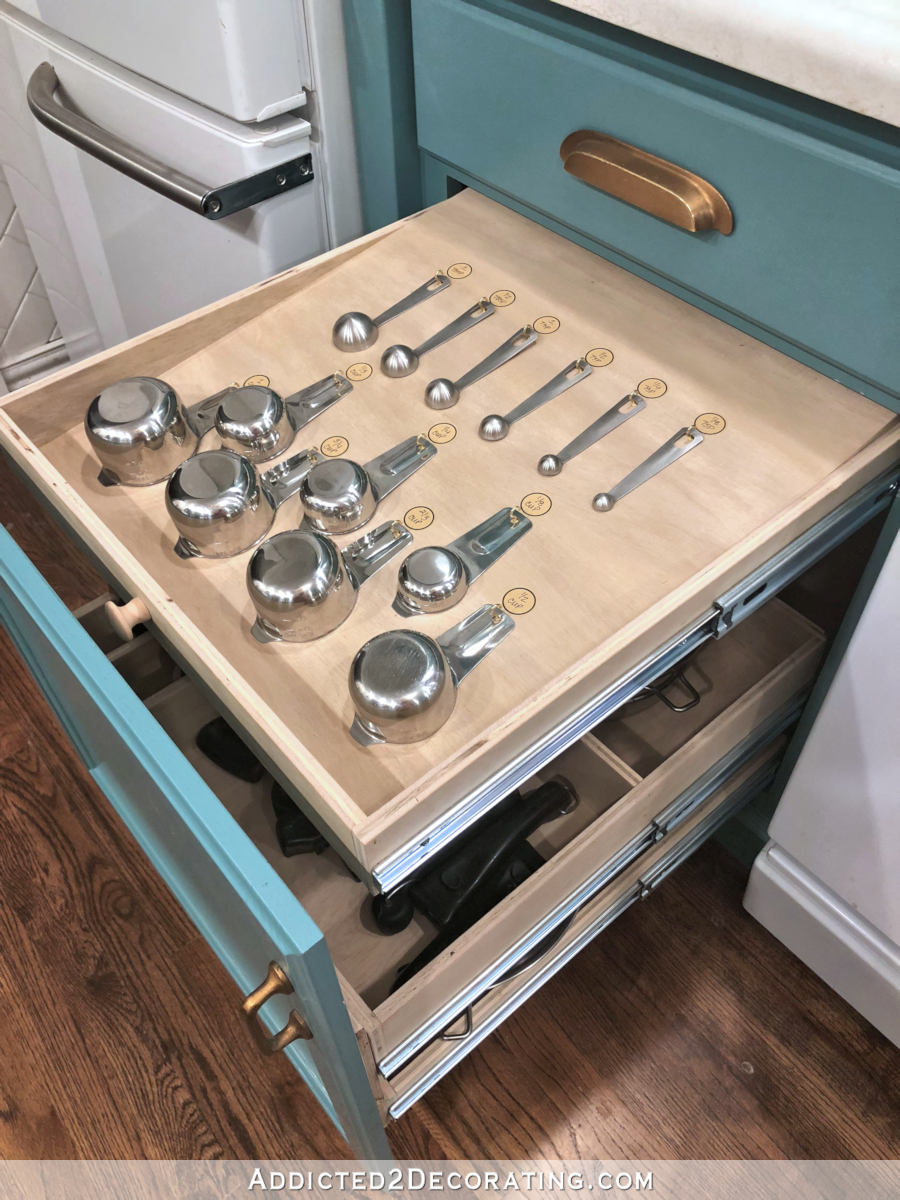
I also turned a standard cabinet into two customized pull-out shelves, and one pull-out specifically for my measuring cups and spoons…
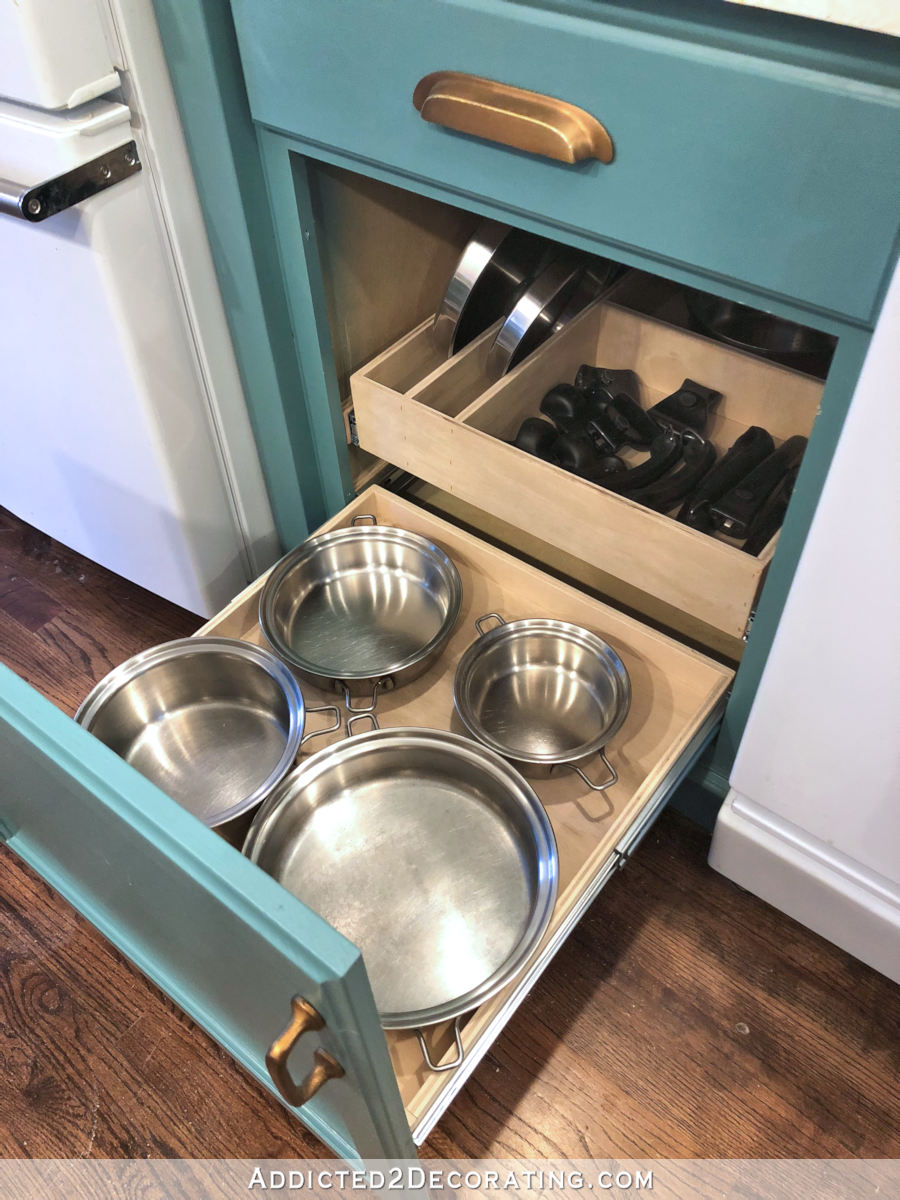
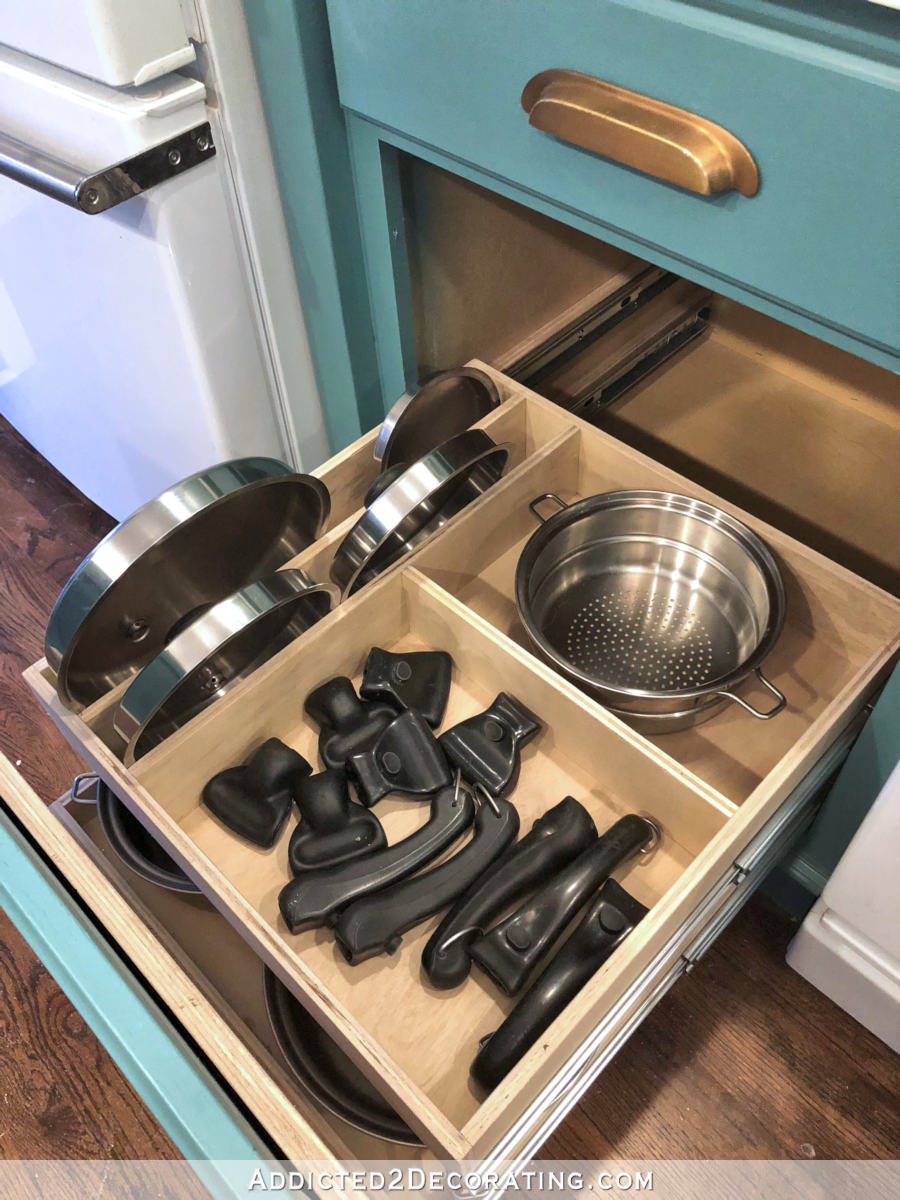
All of that has worked out so well, and I love that I now have even more function with two more organized drawers. I still have a way to go before it’s all done. I need to add another pull out on the other side of the oven for my pans and lids. I want to add some organization under the sink. And I’m sure there will be other organizational things I want to add as well.
So how did I do on the rest of my C.O.P.ing this week? Well, I did better with the cleaning, but still not perfect. Part of that was out of my control because we were without hot water for a couple of days.
The plumber came last Monday to give me an estimate for the plumbing on the master bathroom, and as soon as I removed the foam board covering the doorway to that room, we both heard the sound. He said, “You have a water leak over there!”
I panicked because I thought for sure we had caused a leak during our demolition of the room, and I could just imagine that the water had been leaking for a full week without me knowing. But he went over to investigate, and said that it had just started because the ground underneath was barely wet at all. Isn’t that crazy?! The leak just happened to start literally minutes before he got there!
Anyway, it was a hot water leak, so he turned the water off to the hot water heater, and then we had to wait until they had time in their schedule to come back and fix it. So naturally, I wasn’t going to wash dishes in cold water. But after that was fixed, I did much better.
And what about my purging efforts? Well, the pile is still sitting there from two weeks ago. I decided earlier this week that Fridays will be my C.O.P. days (or really, my O.P. days, since cleaning should happen every day). My plan was to load up all of that stuff into my car and take it to The Salvation Army immediately after lunch yesterday.
Well, I tried, but quickly realized that the stuff wouldn’t fit in my car. I needed my truck to transport everything, but my neighbor is borrowing my truck right now. I’m not sure how long he needs it, but as soon as he’s finished with it, I’ll load everything up and take it.
So that’s my C.O.P. progress for the week. If you’re C.O.P.ing with me this year, how did you do this week?

Addicted 2 Decorating is where I share my DIY and decorating journey as I remodel and decorate the 1948 fixer upper that my husband, Matt, and I bought in 2013. Matt has M.S. and is unable to do physical work, so I do the majority of the work on the house by myself. You can learn more about me here.

I have been C.O.P. Ing also; garage, utility room, and laundry room which have a ton of cabinets. It is so satisfying when all clean and neat.
You have me looking at everthing in my home differently. I am C.O.Ping every chance I get. Feels great to be organized and free extraranous stuff. I think you are off to a great start this year. Keep the good vibes coming!
I did this with the kitchen Island I built. I did the two top drawers for silverware. The first I had the spaces all going with the length of the draw, the second one I had most of the spaces going with the width of the drawer.
What I discovered is that the opening and closing of the first drawer caused the forks and knives to hit the divider and the divider started to show signs of wear and I would get little wood splinters in the bottom of the knife and fork compartments.
With the 2nd drawer I didn’t have that problem because it was the whole length of the fork that would slide into the side of the compartment when I opened and closed the draw.
I did not make removable trays I glued and stapled my dividers in when I made the drawers so I will have to make new drawers to make any changes. I did put foam tool draw padding up against the top of the compartments to stop the wood splintering and protect the tips of the knives and forks.
Excellent feedback on the way the utensils slide when opening and closing the drawer. Thanks for that tidbit!
I just cut liners to stop sliding to fit my compartments. It is clear plastic so you do not see it.
Amazing progress! I am in the process of planning kitchen organization. Thx for the great ideas and details!
Could you make Tuesday/Wednesday your O.P. day? Loading up your car/truck on Tuesday to take on Wednesday before/after lunch with your family?
I love the drawers! I’m looking at my kitchen now thinking where I can do something similar!
Well, that makes a whole lot of sense! 😀
We live outside of town, so I try to integrate all of my “in town” errands into a single day. I also tack errands onto appointments that I have in town. Even though it is only a 20-30 minute trip into Waco I have found that I’m saving a ton of time bundling my errands that way!
Yep! I was thinking make 2 trips if you need to to fit it in your car. I’m also COPing and I’m trying not to have any excuses no matter how valid to get rid of stuff. I always figure that if you really want to do something, you find a way.
It’s much easier to clean when everything has a place of its own to go. I love the dividers and have those oak cabinets too. I can’t reach the back of the drawer. Love the new sliders.
Keep it up, Kristi! Some day, keeping things clean and organized will become a habit that you don’t even need to think about. Stay in the race, no matter how small the progress and you’ll reap huge rewards.
Love this easy, but so practical project!! I’m going to do this to my silverware drawer. I have some dividers that are the length of the drawer and work great for the big items, but they are spring tension and don’t work so well if I want to divide in both directions. This is the answer I’ve been looking for!
I need to organize my utensils as well, but I fear my husband won’t return things to the designated space. That will constantly frustrate me if I go to the trouble and he doesn’t get with the program – and he has a habit of doing just that! Guess it’s worth a try though!
First let me say: Kristy, you are amazing – Your skills, strength, perseverance, motivation and results!! Wow!
As far as organizing is concerned, when I taught Kindergarten, I taped onto the shelves, little pictures of that item/craft supply/game/ toy/etc so the kids knew where it was to be returned. The kids always knew where to look for them and where to put them away. This would work in your utensil drawer.
Also, my pots and pans only fit in their drawers when they’re arranged one particular way, so I have pieces of masking tape with the pot’s sketch and sizes marked on the tape, in the spot in the drawer where that pot belongs. Now anyone can put the pots and pans away. And the drawer is never a heap!
example: 🥘 3 qt
As for neatness becoming a habit, for some people it is a life time struggle. Neatness can be achieved but you ALWAYS need to think about.
Oooo. I may need to do that. Thanks for the great idea!
I’m glad for this tutorial because I paid someone to do a drawer organizer like the one you ended up with and I want to change it somewhat. I have found that the large compartments cause too much sliding around and are dinging up both the divider I paid more than $100 for and the silverware. It’s really showing scratches now. I’ve been trying to figure out if what I want to do is custom build a wood divider with compartments EXACTLY the size of each silverware item (once stacked) or if I want to use foam to build a foam platform with a receptacle for each category (again, stacked) and then take that to a place with one of those plastic vacuum sucky things that can suck a plastic liner to that precise shape. I think the wood would probably be easier but will require parallelogram shaped compartments If I want to minimize the sliding. With this tutorial I think I can do it.
Put the rubber-like shelf liner in the bottom of each compartment. Thinks won’t slip as much.
I use the clear liner can’t see it and no sliding
This morning I went through my dishes and glasses cabinet, and purged a whole bunch of “gift” mugs and mismatched dishes. Feels SO GOOD to have adequate room for the items I really like and use.
My drawers are painted on the inside is the reason you cannot see
Sorry was replying to post above
Even if you don’t do what you planned YOU ARE ACCOMPLISHING SOMETHING! Every little or big thing you do gets you closer to the finish line. You go girl!! 🏃🏽♀️👑
Kristi, thank you for posting you COP updates. It is enouraging to know someone else is struggling with simplifying their live and their stuff.
Great dividers! Did you fill the top edge of the plywood or use another wood? The coolest thing is that you replaced the drawer slides. I would love to do that to mine to get full extention. Can you tell us how you did that? Since it (wow) went so fast, could you use the same holes? Thanks!
I only used the plywood on the bottom, The wood I used for the dividers is solid poplar, so the edges have a really nice, clean look to them.
Switching out the drawer slides is incredibly on cabinets with frames like I have. (I don’t have personal experience with frameless cabinets, but it looks pretty easy, too.) I just used the Kreg drawer slide jigs. You start by putting them facing into the cabinet to line up and install the drawer slides. Then you turn them around facing outward (on the face of the cabinet pointing towards to room) and you set the drawer on it and attach the drawer slides to the drawer box. It’s super easy!
You can see it in use here: https://www.youtube.com/watch?v=oFuO6_meRxA
Please do a tutorial on the extension slides.
Redid our kitchen cabinets a couple of years ago and added full extension glides which made a huge difference. I bought pre-made bamboo cutlery dividers that are extendable to fit my two wider drawers. One was lined with cork and the other one for larger utensils was not. I liked the cork so much I lined the other one with thin cork and then lined all of my kitchen drawers and upper cabinets with cork. I love how it looks and how quiet it is. I also had a couple of skinny drawers that I bought a bamboo divider to halve the drawers for spatulas and plastic utensils.
Which cleaning program do you follow
I have purchased over the years the plastic dividers, and the tray for silverware. Nothing ever fits the drawer exactly, and other stuff winds up in the crevices. Then I made some cardboard box ones the fill in the gaps. Nothing would ever work as good or look as nice as what you made! Love it. If things slide too much there are all kinds of rubber liners to help, or the cork, or foam. I just need to talk my husband into making this for us! Thank you for the idea.
I did these custom poplar board drawer dividers in my current and previous home. Aren’t they the best? I used a little Loctite Clear Power Grab to glue them in place. They stayed in place and I had no problem getting the ones in my last home back up again and the varnish wasn’t stained or damaged.
Because you inspired me to COP, I’m thrilled with the results of my week-long progress! I tossed 3 bags of trash, 4 bags of recyclables, and took 10 (TEN!) bags of clothing and knick knacks to Goodwill! During that process, I questioned each room’s function and made mental notes about what changes needed to be made to improve and streamline each room for its optimal use. What a massive difference! The biggest change has been to my spare bedroom-turned-art studio. For 4 years I’ve been using my front room to sew, paint, and run my small jewelry business but whenever I had guests, I was mortified as the mess that greeted them when they walked into my home. Not anymore! My front room is clean and welcoming and I have a clear vision of what my new studio will look like. Yes, there’s a TON of work to do before my new studio is ready to use, but I feel so empowered for having done all that work in the rest of the house that the extra work needed to design my studio feels like a reward instead of a burden! I finally have the momentum I needed to me to do this because of YOU, Kristi! THANK YOU for inspiring me to change my environment so I can live my best life <3 <3 <3 🙂
👏🏻👏🏻👏🏻👏🏻👏🏻👏🏻👏🏻👏🏻
You are my hero!
Your drawers are beatufily orginized
Kristi,
I have been wanting to do this to my kitchen drawers too. Could you please tell me what you used to cut the pieces and the wood glue that you used? Have they been holding up well for you? You are very talented, thanks for the inspiration!
I used my miter saw to cut the pieces, but if you don’t have one, you could purchase an inexpensive hand saw and miter box. The wood is pretty soft, and only 1/4″ thick, so it wouldn’t be difficult to cut by hand. I always use Gorilla wood glue. And I literally only made the drawer dividers on Friday, so I really haven’t had time to break them in. But wood glue is very strong, so I don’t anticipate any problems.
Thank you!😁 Excited to see what you create next.
Just fill up your car and make a drop the next time you leave the house. Even if Salvation Army is out of your way I’m sure it wouldn’t be more than 10min, right? You don’t have to take everything at once, but I bet you can fit more in your car than you think you can. And even one load out of the house will make that extra 10m worth the mental free space you get.
Also, I’m sure it’s simple to you…but could you think about a tutorial for swapping the drawer glides? Ours are also very far from full extension and I would LOVE to swap them out. We don’t have many drawers and I’d love to make them more functional!
That looks great! I cleaned out and purged a lot of things out of my ‘junk’ drawer this weekend and it looks like I might actually know what’s in it!! LOL
I love how your dividers turned out. The light wood looks makes it look so fresh and clean.