Prepping Kitchen Cabinets For Paint (a.k.a., Why I Don’t Prime Or Paint Before Installation)
After I installed the cabinets in my kitchen, I had many people ask me why I didn’t paint, or at least prime, the cabinets before I installed them. I tried to explain why I do things in the order I do them, but today I thought I’d just show you. Of course, I’m not saying that this way is the correct way to do things. I’m just saying that it’s my way of doing things, and it makes sense to me. And it’s how I always get the very best end result possible.
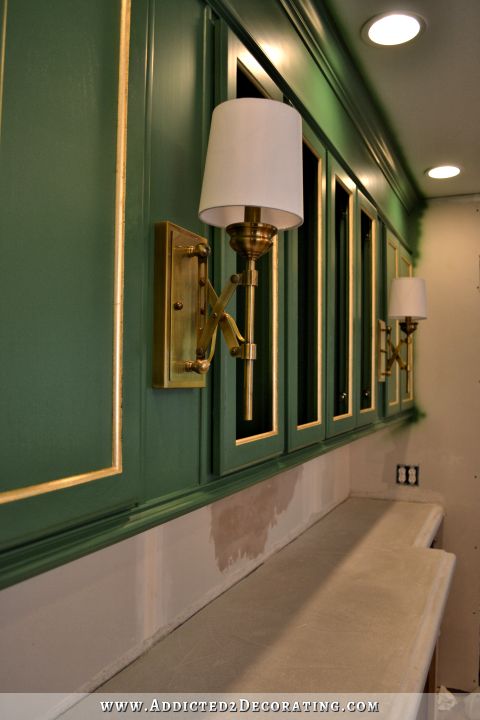
But first…LOOK! GREEN! 😀

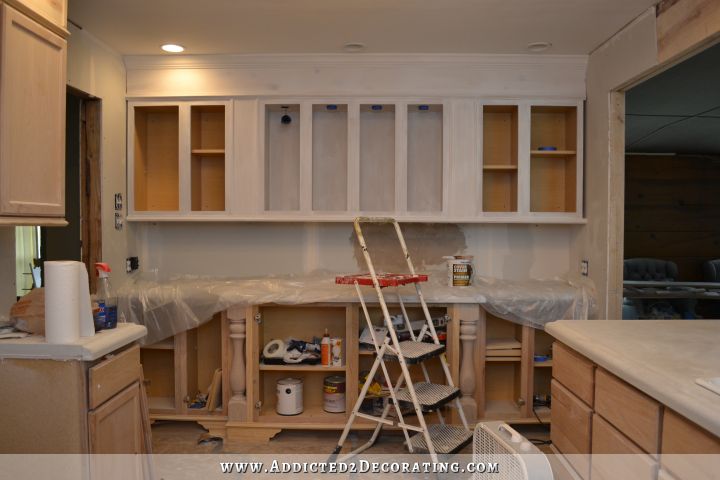
As you can see, that’s far from finished. Only the section on the left side has two coats of paint on it, and even it was in various stages of drying when I took the picture. Everything else just has one very streaky coat of paint, but at least you can see the color! It’s called Derbyshire from Sherwin Williams, but I decided not to use Sherwin Williams paint. (More on that later.)
And you’ll probably notice that I also decided not to spray. I’ll still spray the doors outside, but I’m painting the cabinets inside with a brush. Long story short, I was just at that point where I needed to see green paint somewhere. But in order to spray, that would mean that all of the cabinets would need to be finished (the cabinets on the peninsula aren’t finished — they still don’t have feet or trim), and the room would require at least a day’s worth of very precise and thorough taping, papering, and hanging plastic in order to prep for spraying. I just didn’t have it in me to do all of that. I needed to see green now, and I didn’t want anything delaying that anymore. So I’m painting with a brush.
So back to the prep work and why I don’t prime or paint before installation…
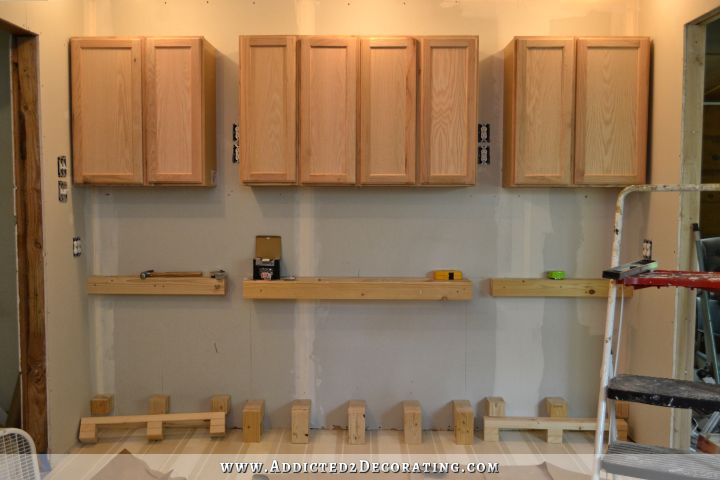
Here’s how the original stock cabinets looked right after I installed them.
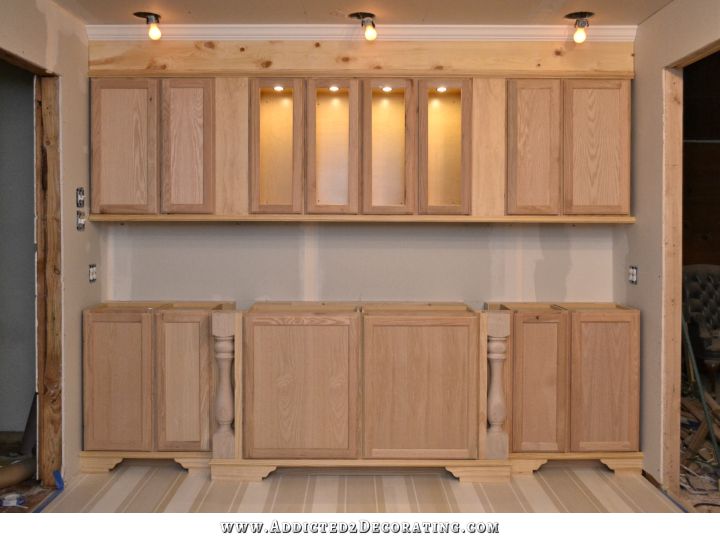
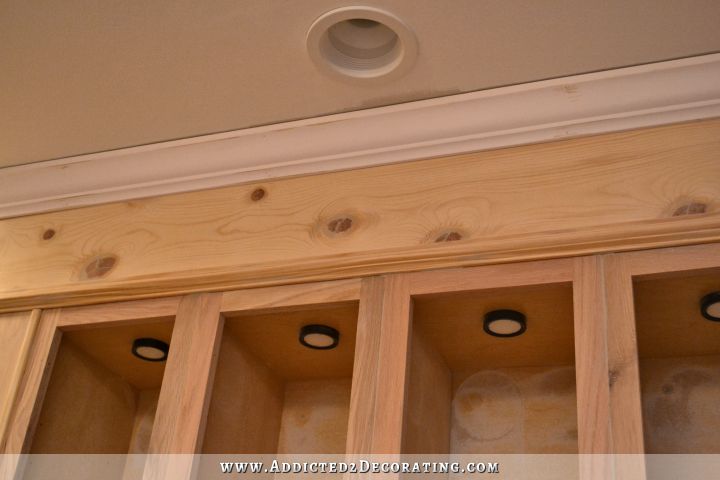
After they were installed, I added a ton of trim to them to customize the look. I added trim to the bottom, spacers where the sconces will be installed, trim to the top, and tall 10-inch header on the top, and crown moulding. So in reality, once the cabinet doors are removed, the amount of wood on that wall that belongs to the original cabinets in relation to the entire installation that needs to be painted is pretty low. So painting, or even priming, before installation really wouldn’t have saved me any time at all.
In addition to that, I’m a perfectionist when it comes to painting kitchen cabinets. I use wood filler and caulk to fill in every single hole, gap, space, and everything else so that once the paint goes on, I’m painting the absolute smoothest surfaces possible.
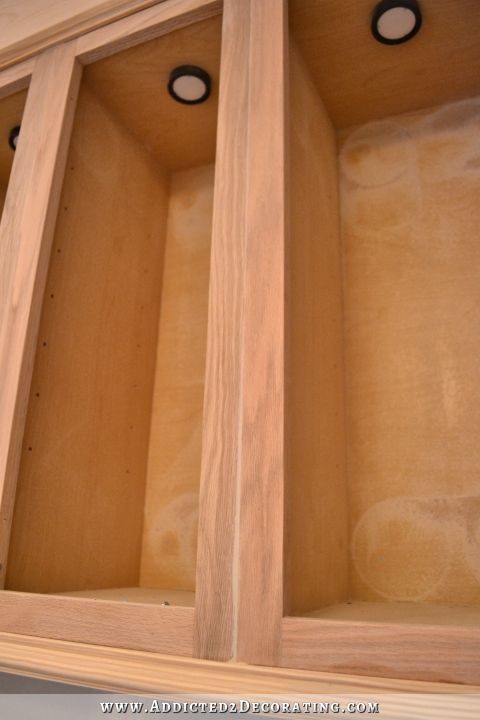
I start with wood filler, and I use it on any areas that need to be sanded perfectly smooth. This includes nail holes from trim installation, rough areas on the knots, the small spaces between the individual cabinets, and the holes left from where I actually screwed the cabinets to the wall. (I only filled and sanded those holes in the four middle cabinets that will have glass doors on them.)
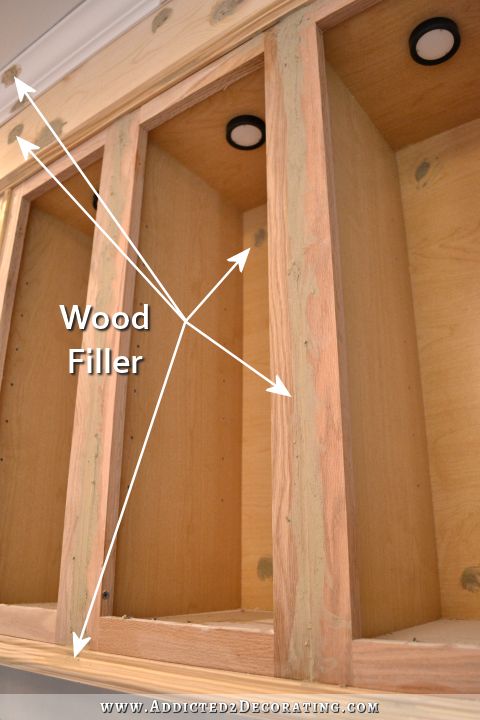
On any trim with intricate detail, I try to use as little wood filler as possible to do the job, because those areas have to be sanded by hand and getting sandpaper into those details can be a real pain. But on flat areas like the knot holes on the header and the small spaces and uneven areas between the stiles on the cabinets, I pile on the wood filler because those can be sanded with an electric sander until they’re perfectly smooth.
And yes, it looks like an absolute mess before sanding…

But once everything is sanded, it feels so perfectly smooth that you can’t even tell where once cabinet ends and the next begins after it’s painted.
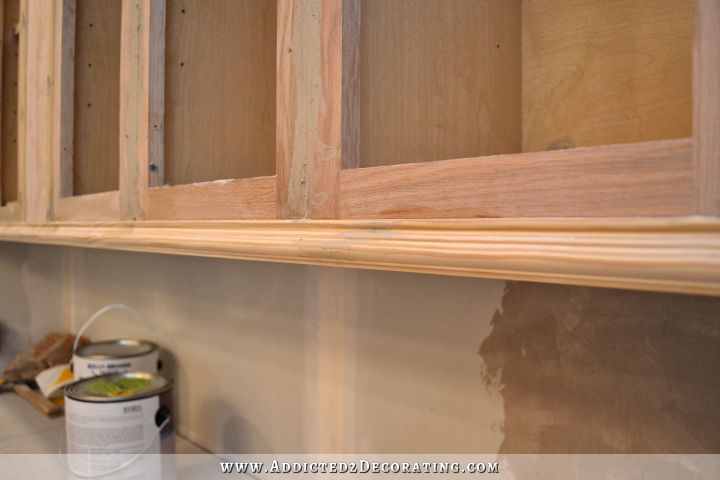
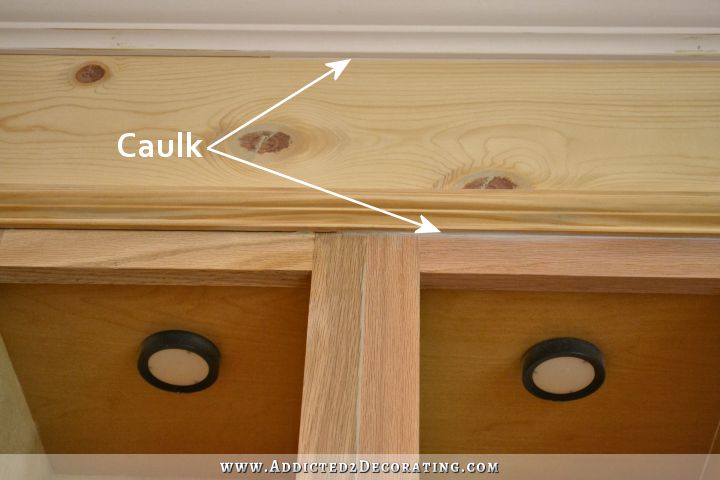
After I finish all of the areas that require wood filler (which again, is any area that needs to be sanded perfectly smooth), I move on to the areas that need to be caulked. These are the areas where trim meets something else (ceiling, cabinets, etc.) at an angle, and it’s not necessary for those areas to be sanded perfectly smoothly. For example, where the crown moulding meets the ceiling or the header, or where the smaller trim meets the header or the cabinets.

I also caulked the inside of the four middle cabinets. Some of them had tiny gaps where the side panels met the back panels, or where the backs met the top or bottom panels, and I wanted those perfectly filled before priming.
So only after all of that prepping — wood filling, sanding, and caulking — are the cabinets finally ready to be primed. Had I primed before installation, most of the primer would have been sanded off by this point.
My primer of choice is oil-based Zinsser Cover Stain. I’ve used the water based stuff once or twice, and still had stains/knot holes bleed through. The oil-based stuff never fails me, and it sands beautifully once it’s dry.
Just one coat is generally all I need, and once it’s dry, I give it a quick sanding. When you sand, the stuff that comes off should look like chalk dust. If it starts to roll or pill up as you sand, you need to let it dry more and then try sanding again.
So after all of those steps, I’m finally ready to paint.
I’ve said before that I’m big on prep work, and you can see that I really do take it seriously. It definitely takes quite a bit of time, but I think your final result will only be as good as the prep work you put into it. And really, how often do any of us paint our kitchen cabinets? Cabinet paint is one of those things that generally has to last for several years, so taking extra time to do it correctly, and get the absolute best and smoothest result possible is totally worth it to me. And my belief that the prep work is the most important part of the process is exactly why I’ve never been a fan of any product that claims that it will allow you to skip any of this prep work.
I’ll share more details next week, including the paint I selected and why I selected it. And hopefully I’ll have something finished to show you on Monday! But for now, I’m going to have a relaxing and restful holiday. 🙂

Addicted 2 Decorating is where I share my DIY and decorating journey as I remodel and decorate the 1948 fixer upper that my husband, Matt, and I bought in 2013. Matt has M.S. and is unable to do physical work, so I do the majority of the work on the house by myself. You can learn more about me here.
That green!!! Love love love. I want to marry that green.
Or at least make out with it.
LOL…that made me laugh so hard! 😀
Love it!
Most people do not understand the importance of caulk an how it makes a paint job look as wonderful as yours does.
Again, I am just loving the look of the kitchen:)
I wasn’t sure about green. Wow! It looks fabulous…..
Lovin’ it!! Your kitchen is going to be amaaaazing, Kristy! All the beautiful color is so you, and I cannot wait to see your lovely finished room! 🙂
I love…love…love your kitchen can not wait to see the finished project. I love how you show everything! Nice job!!!
OMGoodness , THE most beautiful color , I’ve ever seen on cabinets!!! Prep work is tedious , but, oh so worth it!
I am loving the green!!! I also think the shot showing your light fixture with the green cabinets is beautiful!
love it….I spray painted my doors and towers before installation of a bookcase; but still had to hand paint. Spray painting is too much work with little gain if it has to be hand-painted again. I find the panthenol and paint brush/roller gives the best finish.
Love, love,love this color! And the beautiful light that started it all! It is just amazing. Have a lovely restful weekend! Happy 4th of July.
Kristi, I cannot even begin to tell you how much I adore this color on your cabinets! This color adds so much “pop” to an already fabulous kitchen.
I simply admire your talent, perseverance, and generosity to share all the details with us. You are such an inspiration. Keep up the hard work! It’s totally paying off.
Looks like you’ve got a good start to the cabinet painting. I really like the color and am sure it’s going to be awesome with the lighting and flooring. Enjoy the holiday weekend!
LOOKS BEAUTIFUL! Oh I can’t wait to see the whole thing finished!! And that light… oooh ahhh…
-Christine
I knew you would go with Derbyshire over Once Upon a Time! And personally, I am delighted you did. You always second guess yourself (but you know that) and you always stick with the original plan 🙂 Your kitchen is going to be stunning, absolutely stunning.
Happy 4th! Hope you enjoy the day!
OH, OH, OH, I couldn’t click on your link fast enough to see the green – it is absolutely GORGEOUS!! Great work:)
One question – how do you decide if you should use caulking or wood filler?
The simplest way to explain it is that wood filler goes on any areas that you want to sand perfectly flat and smooth. Caulk goes in corners to fill in any little gaps. Corners don’t need to be sanded perfectly flat and smooth, so it’s good enough to stick some caulk in there, and smooth it with your finger to remove the excess, and the leave it to dry.
Looks fantastic!
Love! And thanks for the info/advice on caulk. I have to paint he trim around a new entry door and have lots of gaps.
Excellent design, meticulous handwork, and daring color, a winning combination! Kristi, you can do magic. Have a restful holiday and Happy 4th of July!
You make me tired.
LOL….
MB
I’ve said it before but I feel compelled to say it again…this blog is so addicting! Why? Because everyone loves an amazing transformation! When I first saw the kitchen when you bought the house I was wondering what you had gotten yourself into! But every new piece added and task accomplished just makes me more and more amazed! It is truly exciting to see an old, outdated and unwelcoming space be made into something pleasant, beautiful and classy. It is really interesting to be able to watch this kitchen bloom. You deserve an awesome kitchen because you have the hard work and dedication to make it happen. Working hard and not giving up…it’s how this country was built! ; ) Happy 4th!
Thanks, you give such good concise info, it’s so much help. The kitchen looks so wonderful. And inspiration!
Hey kid, I’m with you! The minute I saw the picture I yelled “green”!!! You are so right about the prep work and sadly, even when you hire the very best, you don’t get that diy quality. It is tedious work, but so worth it in the end. It does take a whole lot of patience, which you obviously have. I am not sure that I do. I hope so, when it comes time to do my kitchen cabinets. My one savior is that they have been here for 23 years and they were well done so I won’t have the nail or screw holes to contend with. Maybe a little caulk and wood filler for settlement and then just a good sanding so the Zinsser has something to grab onto. I have most of the interiors finished, so next step is to remove the doors, empty the cabinets (thank goodness for the billiard table!) and get to sanding the frames. The hubs went to HD and bought me the dremel with the blades and sanding thingy. I need to send him back to get the cutter for metal. We already used it to enlarge the opening for the microwave. Ours died and the new one was about a quarter inch too wide. Got it all done the same day they installed the new ovens. Glad you are taking some time off to relax. Enjoy your INDEPENDENCE DAY, and the rest of the weekend. Blessings
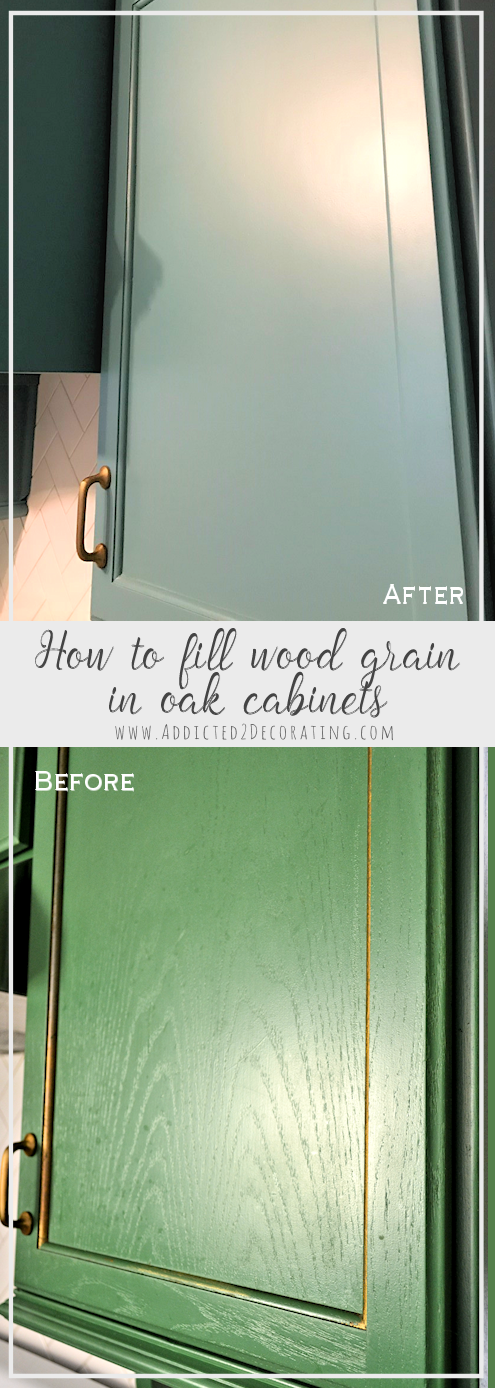
Existing cabinets are definitely easier to do — less caulking and wood filling. Although I do still do those things, I find that existing cabinets require quite a bit less of those things. They do require more sanding, though, especially if you have old oak cabinets.where the grain has raised and become more pronounced over the years.
Painting the interiors is the worst. At least you have that part finished! Yay! I’m debating whether or not I want to paint mine. Right now I’m leaning towards just leaving them as is.
Hi Kristi,
I don’t think painting the interiors of your cabinets is worth it. The horizontal surfaces take so much abuse that I don’t think they would hold up. You can always just paint the back/vertical portion if you want something popping out through your glass doors. Or you can add a decorative paper to the backs.
I just finished painting my 15yr old oak cabinets. I did white for the uppers & a dark blue/green for the lowers. I like the wood grain coming through. And the color on the lowers makes me so happy. I don’t think I could ever live with just stained wood cabinets ever again.
My cabinets were custom, I forget what the wood is but I know it is not oak. I have never been a fan of oak except on floors. I originally wanted cherry but they told me I was crazy because they were going to be painted white. I know they are made out of a hardwood with out much grain so it should not be too hard. There are a few spots where the paint has chipped off. I guess I will just have to sand enough to feather it all in. Between the primer and the self leveling paint I am using it should not be a problem. I am worried about spraying to doors and drawer fronts. It has to be done outside but how do you cope with the drying process with the wind and critters blowing around. I wonder if I should rent a small tent with sides for the back yard, I could work in there without it being disturbed. I will have to check into the cost for a tent, even if it’s a couple of hundred bucks I am still ahead of the game doing it all myself. I am planning on doing my island in a color called Ominous Cloud. It looks just like it sounds. Then I thought I would also do the bottom cabinets in the same color and do the top in a lighter grey. My husband will probably stroke out, but hey we are selling the house anyway. The colors will look great with my slate back splash and soapstone countertops. Or maybe I will just keep them white, LOL. Hope you are having good weather, it is beautiful here in the North East now that Arthur has scooted by. Anxious to hear what you have to say next week, I am sure you are busy thinking about the breakfast room! Blessings.
An Irish green to be sure! <3 this!!
It’s so great to finally get to see a photo; it looks exactly as I imagined it would, and of course you are the one person that will turn the perfect imaginary picture into the perfect reality.
There’s just one detail that’s been missing in this picture in my mind all this time: What colour will the legs-turned-to-columns be? Green or white?
They’ll be green also. 🙂
Ummmm,not a lover of green but I love everything else you do so much that I am going to keep my mind open until it is finished.
I am amazed at how you have updated the stock cabinets .They look absolutely fantastic.
You can already see how spectacular the lighting is going to be washing down the front of those cabinets. Your planning shows. Nice work.
The green looks fantastic – much better than I imagined. Wasn’t against green but wasn’t for it either, but you are pulling me over that fence! It’s going to be a wonderful kitchen and breakfast room.
Love the green, it looks rich and beautiful!
Thanks for the green! I was getting anxious to see it, too. It is going to be stunning, as planned. Your way of painting makes since to me. But like you I am a perfectionist especially when it comes to cabinets, moldings, and built-ins.
Quick question: I had typical builders oak cabinets in my last house with its heavy grain (which I do not like) that is so hard to cover. I have something else that is the same type of oak. It will need a really good filler of some sort. I had considered trying artist acrylic gesso but I don’t know much about it. I know it does add ‘tooth’ to a substrate and is sometimes used when painting on wood panels but I have no idea if it would help fill in the grain of wood. Have you ever tried it?
The kitchen is looking really good!
Connie, I’m with you on your feeling about the oak grain. Such open-grained woods typically have a grain or pore filler put on to level it out before applying a stain or clear finish.
But Kristi, how do you prepare the oak cabinets’ open grain for paint? Do you use a filler, or is the Zinsser primer enough to fill the grain?
Well, let me preface by saying that I actually like a little bit of grain showing through, kind of like on my painted floors. That way you can tell that they’re actually wood, and not some perfectly smooth man-made material.
But with that said, I don’t like the heavy grain that you often see on oak, especially on older oak cabinets where the grain has become more pronounced over the years. But I generally find that sanding it really well minimizes the look of the grain enough to suit my own taste. I use my electric sander on all of the flat areas, generally with a 150-grit sandpaper, and then sand the rest by hand with either a 150-grit or 120-grit. The once the primer goes on, and the primer is sanded with a 220-grit sandpaper, the grain is hardly noticeable. I’ll still see some of it if the lighting is just right, and especially if I’ve used a higher sheen paint, but like I said, I actually like that slight hint of grain showing through.
I’ve never used any product to fill the grain before painting. Just sanding, priming, and sanding again.
Hmmm…I haven’t used gesso in over 25 years (since I was a very young girl and used to prepare my mom’s canvases for her oil paintings). 😀 I honestly don’t know if that would work or not.
Although I have not used them, many companies make wood grain fillers. Just google it and you’ll see a lot of them. I imagine it would be a tedious process to fill an entire kitchen’s worth of cabinets, but a single piece of oak furniture probably would be too bad.
As for the green cabinets – GORGEOUS! Love the green with the brass fixture. The “white” counters and tile backsplash are really going to make it pop.
Susan, thanks for the info. I will see what I get with a Google search. This conversation made me remember an online woodworking supply company I used to order sandpaper, etc. from them. They had some great neat little products that, though made for woodworking, would work for so many other uses. Great for crafters. One product I loved was the sponge sanders. They are so great for sanding spindles, decorative trim which is too ornate to use a sander and sand paper isn’t flexible enough to easily to get it to form to the carving detail in the carving.
Thanks everyone for all the tips you sent. I suspect that I will be trying several methods until its like I want it to be. It should keep me busy and out of trouble for a while.
Connie- Jenny on LGN did a post where she filled grain on some heavily grained cabinets. I’m not sure what product she used, but here is the link
http://littlegreennotebook.blogspot.com/2012/10/how-to-fill-heavy-wood-grain.html
I’m so glad you stuck with the Derbyshire!! Looking amazing!!
Will you go with a bright white subway tile or more of an off-not-quite white? More of a cream than milk white?
On its own, it looks bright white. But when you put it next to a true bright white (like my appliances), it looks slightly warm white, but definitely not cream or off white.
I’ve always liked green but couldn’t quite envision it in a kitchen. But that shade is beautiful!! Can’t wait to see the first group of finished cabinets!!!
I see this work, I remember that room with a wall that was unwanted, with wires hanging – I remember that cabinet hanging when it got stuck because you could not get it to budge – the cracks in the original floor — and my FAVORITE “”KITTY NARNIA”!!!!
And I see it coming together, so incredibly, blissfully, and sweetly beautifully now.
I STILL Can’t believe that, you were so rudely called an AMATEUR yesterday!
I’ve never been so impressed by a person in all my life!
You just keep on with your, “I am woman see me ROCK self”, and, this kitchen is gonna be EPIC!!!
OMG. Amateur? Asshats. Ignore them, Kristi. They’re just unhappy with their station in life.
Wow! The green is the perfect shade! Just gorgeous!
I am just dashing by and wanted to say AWESOME!
I am so excited to see the green! It is as pretty as I was imagining. I am so glad you went with green and can’t wait to see more.
It’s looking beautiful already, and I love the way the lights reflect off of them. They can never look dark and depressing with all that light.
Your perfectionism is in a class by itself hats off to you! What a hard worker and patient person you are. Admirable and I wish we could bottle it and have every contractor drink it!
Have you considered a tinted primer? If you tint the primer a fairly light medium grey it should help you have to paint less coats (or even sometimes you can get the primer tinted in color as well =])
Also LOVEEE The green =]
My guts bow to your guts, Kristi. ‘Cause my guts would have never made the leap to that gorgeous green. I love your fearlessness- it always pays off.
I’m with you on this one! I wanna know every nook and cranny is caulked, sanded, and smooth as silk before I paint. Love. Love. Love the green with the brass on you splurge fixture and can’t wait to see more green! Take a bow, Kristi, you’ve earned it!
Kristi, I LOVE that green! I actually yelled “OMG, she’s painting already” and scared my poor cats. I just cannot believe how much work you have done in such a short time. Taking a rather dismal if serviceable kitchen from before to this amazing in-progress after is just so impressive, and it is going to be a really gorgeous showpiece of a kitchen when you are done. The difference in the before and after will be mind-blowing!
Will your awesomeness ever run out? Everything about that kitchen is amazing! Your ability to visualize what you want & make it happen is incredible! I admire you so much! Can’t wait to see it finished.
It is awesome. I am so excited to see the green as the green is the perfect shade! Just gorgeous and also love the way the lights reflect off them. I am amazed at how you have updated the stock cabinets .They look absolutely fantastic. Nice share.
Oh, my tummy hurts. Eating all those words about NOT using green has come back to haunt me. Now, I want a green kitchen. It rocks!