Kitchen Remodel – Finalized Design For The Wall Of Cabinets
Well, progress has been slow (perhaps nonexistent) on my kitchen for the last two or three weeks. I got a bit overwhelmed, and then hurt my elbow and needed to work on something a little less physically demanding, so I played around with my hallway doors. Then I decided I needed to do something fun that would actually end with a pretty result, so I refinished my dining table and chairs. Then I got food poisoning that hit me like a ton of bricks early Thursday morning of last week and took me down like a darted elephant for about three days.
And now, here I am…five days away from my brother-in-law Bill coming here to do my electrical stuff for the kitchen, and until last night, I was still really uncertain about many of the design decisions for the kitchen. So I decided to sit down and put pencil to graph paper, and finally make some decisions.
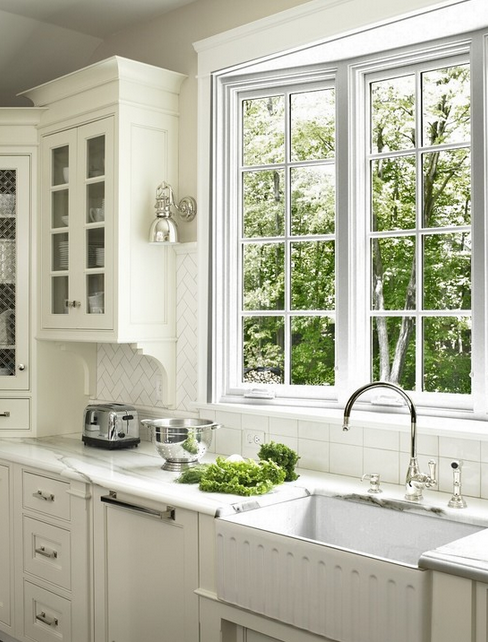
The wall that was giving me the most trouble was the one wall of storage where the kitchen sink used to be. It used to look like this.
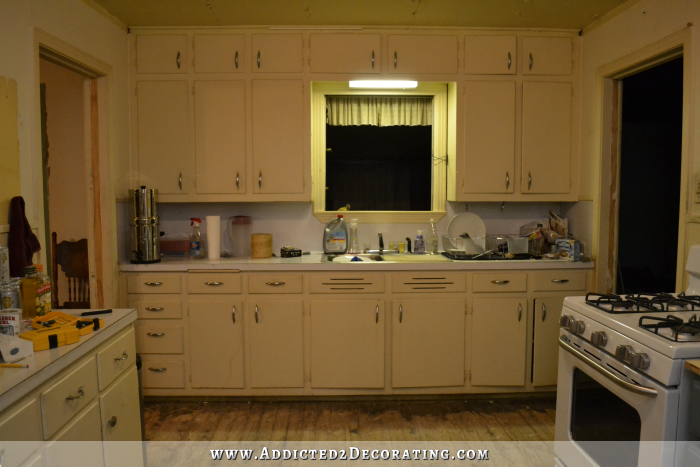
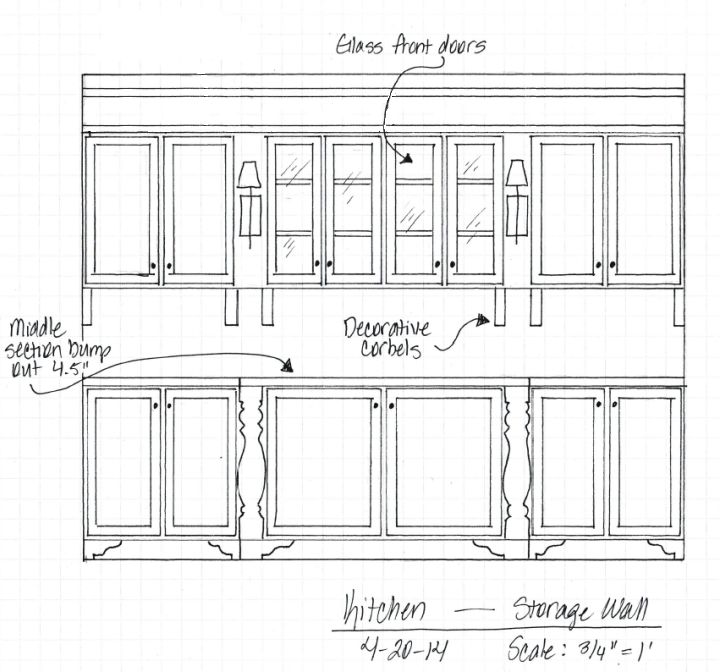
I mean, I have one solid wall of cabinets that won’t be interrupted with a sink or appliances (and that window will be covered over — it’s not an exterior window, and looks into the sunroom that will eventually be the family room), and this was my opportunity to really make a statement. But until last night, I was just uncertain what statement I wanted to make. So I’ve finally got it. Here’s the drawing I did.
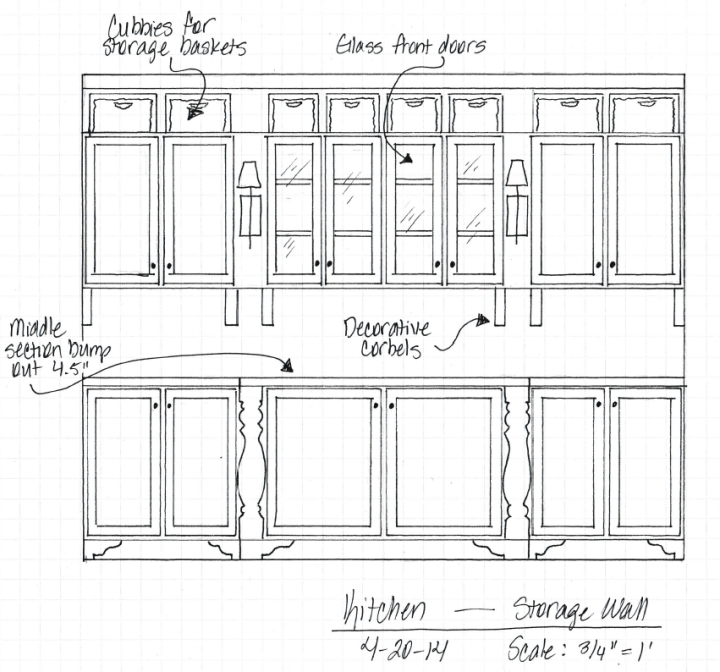
Now of course, the main challenge is the fact that I’m using stock unfinished oak cabinets from Home Depot. And those only come in certain specific sizes, so I had to make those work. I ended up with a plan that uses all upper wall cabinets, and I’ll be using eight of the 15-inch cabinets, four of the 12-inch cabinets, and two of the 24-inch cabinets.
As I’ve already told you, I plan to add feet to the bottom of the cabinets. I’ve looked at photo after photo of kitchen cabinet feet with slightly varying styles, but I just want something simple like this…
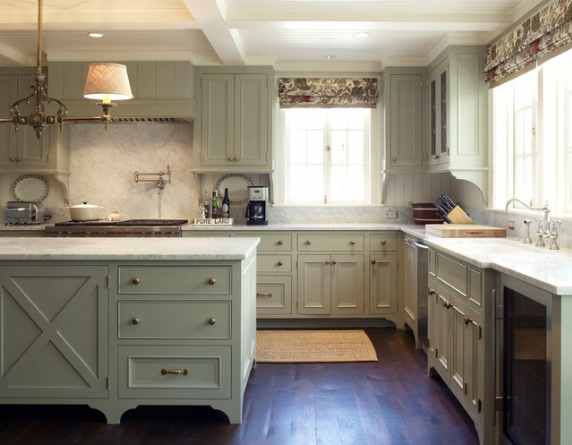 Traditional Kitchen by Seattle Cabinets & Cabinetry Warmington & North
I won’t purchase those feet. Instead, I’ll just cut them myself using a jigsaw. Once I have a template drawn, cutting them myself should be simple and will save me quite a bit of money.
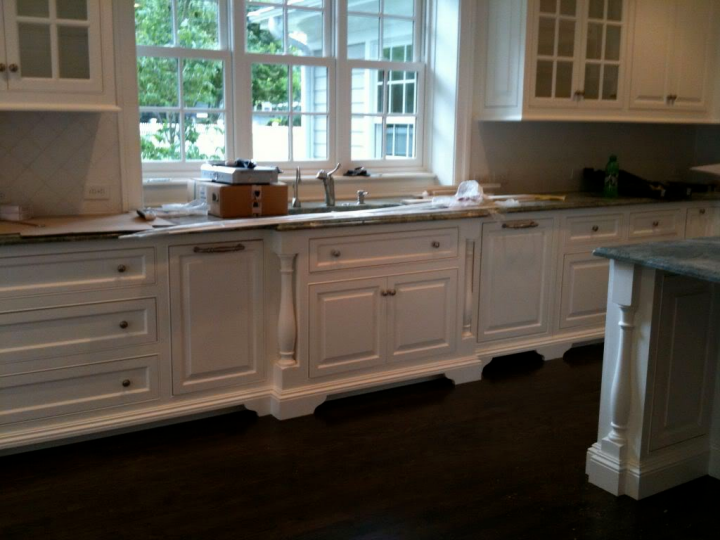
And then I decided that I do want to bump out the middle section about 4 1/2 inches, and then add some wood columns to either side. It’ll look very similar to the sink cabinet in this kitchen…
And of course, I’ll turn those wood columns myself out of chunks of wood using my lathe.
😀
Okay, just kidding. I don’t own a lathe, and even if I did, I wouldn’t know the first thing about turning wood columns. I’m actually looking at these columns from TableLegs.com.

All of their legs come unfinished, and from my experience, they’re fantastic quality. That’s where I got the legs for the tufted ottoman I built for the living room.
So that’s it for the bottom cabinet details. Now let’s move on to the upper cabinet details.
First of all, remember when I was trying to force the whole sconce thing on the new sink “wall” by considering the addition of a column? You might notice that I ruled that out, and now that wall is just wide open with no column. That’s because somewhere along the way, I decided that I wanted to use my sconces on this cabinet wall. That way they won’t be near the stove, or near the sink, but they’ll still be in the kitchen and will be a part of the design.
These are the sconces I have…
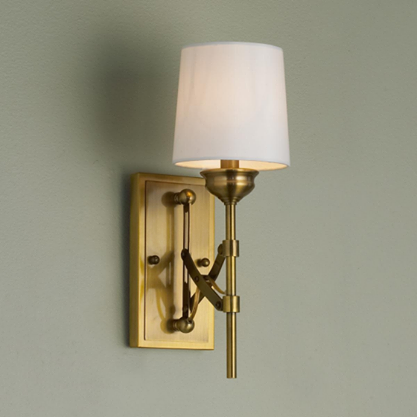
I bought them from Shades of Light, but right after I bought mine, they disappeared from the site. I’m not sure if they’re discontinued or what.
The center section of the upper cabinets will be bumped out just like the lower cabinets, and on the center section, I want to add glass to the cabinet doors. This might be the trickiest part of this plan, seeing that I’m using stock cabinets and those doors are probably pretty well glued together. I’ll have to figure out a way to get them apart so that I can swap out the wood panel for a piece of glass.
If that just won’t work, I have two options. (1) Have doors custom made just for those four cabinets, or (2) forgo the glass front cabinets and do open shelves instead. The open shelves could look something like this cabinet on the left side of this kitchen…
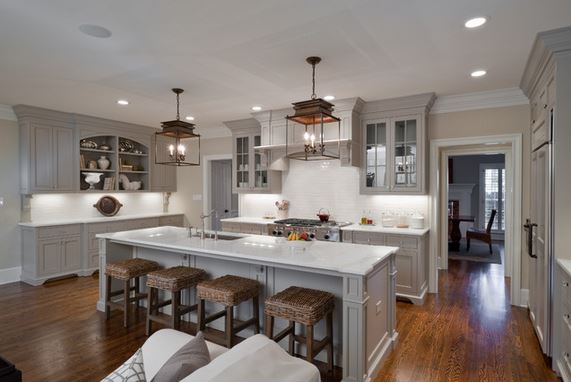 Transitional Kitchen by Charlotte General Contractors Andrew Roby General Contractors
But I really do hope I can make the glass front cabinets work. I would love to add that bit of sparkle.
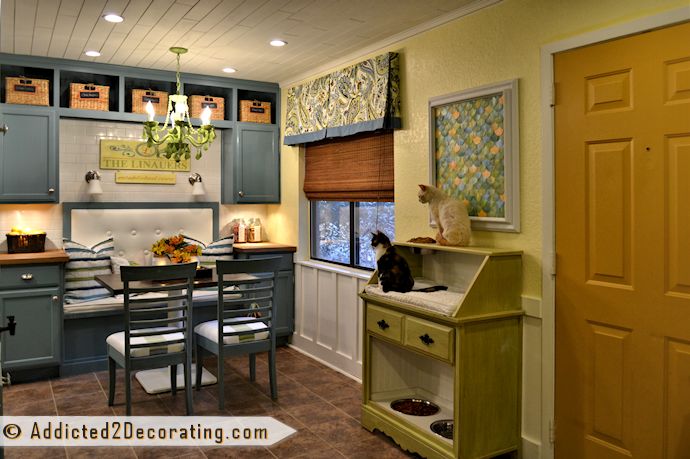
And then above the cabinets, I’ve added cubbies. The cubbies I built in the breakfast room at the condo were one of my favorite things about that condo…
So I’d like to do something similar here. I had originally planned on just adding really tall trim, moulding, and crown to the top of the cabinets to go all the way to the ceiling, kind of like the Kelly Wearstler kitchen that inspired the color of my kitchen…
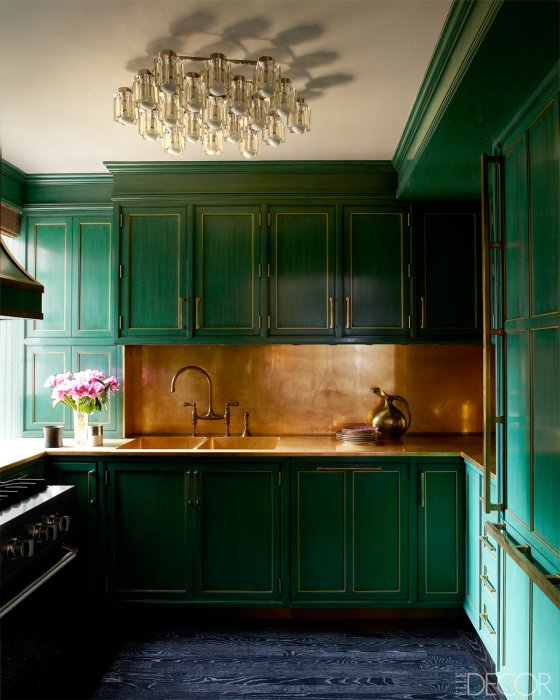 Cameron Diaz’s Manhattan apartment kitchen as featured in Elle Decor
And I still may end up doing that, but for now, I’m entertaining the idea of cubbies with baskets. I just love the texture that baskets add.
And then the final detail…corbels. I want them very simple like this…
 Traditional Kitchen by Dc Metro Design-Build Firms Glickman Design Build, LLC
And to save money on those, I’ll probably end up cutting those out myself with my jigsaw rather than purchasing corbels that could cost $20+ each if I buy them ready made.
So that’s the whole plan for the wall ‘o cabinets. I know I’ve shown y’all bits and pieces of this plan, but I finally have it all together as one (pretty much) finalized, cohesive plan not only in my mind, but on paper.
I have so much to do before Bill gets here next weekend to do my wiring!! But I’m excited to get going on this kitchen again.
UPDATE: I just modified my drawing to exclude the cubbies and make the top of the cabinets more like the green Kelly Wearstler kitchen. I think I might like this one better. Sometimes less is more, and I may have been trying to force too many ideas onto one wall in the original drawing. You can let me know what you think.

Addicted 2 Decorating is where I share my DIY and decorating journey as I remodel and decorate the 1948 fixer upper that my husband, Matt, and I bought in 2013. Matt has M.S. and is unable to do physical work, so I do the majority of the work on the house by myself. You can learn more about me here.

I LOVE your plans for the kitchen wall of cabinets and cannot wait to see your progress. It will be beautiful!
I agree! Amazing, especially second one… More classy without cubbies 🙂 you are incredible
I have seen a ton of times where someone takes a cabinet door, cuts out the center section and adds glass. Usually they use a router on the back side to recess the glass. I would bet you could figure out how to do this (because you are very smart!!) or find a tutorial online. This way you can use your stock cabinets but get the look you are going for without the additional cost of having someone make the doors for you. It might at least be worth the attempt and if it doesn’t work then you can get doors made. Just my thoughts…no matter what you do, it will turn out great!! I like the plan for the wall. The sconces and the table legs on the center bump out give it so much more visual interest than just a plain run of cabinetry. Can’t wait to see both your in-progress posts and the final outcome! Good Luck!!
i have seen that too and that is what i was going to say.
Everything looks so good on paper. I especially like how you plan to use the sconces. So did you figure out the lighting plan for your sink side while you figured out the layout? Btw, while at the restore , I wondered if you have a tutorial for putting in a sink. I can’t wait to see the one you snagged! Just wondered since I am clueless, but I see other people say it is easy. Glad you are feeling better.
I decided to just to recessed lighting for now over the sink side. I figured with the decorative ceiling light that Matt bought me, plus the sconces, plus whatever fabulous light 😉 I use over the breakfast table, it might be a bit much to add pendant lights to the mix.
As far as putting in a sink, I don’t have a tutorial. I’ve done it, and it’s not difficult at all. But I’ll be honest…when it comes time to put in my kitchen sink, I’m calling a plumber this time. I’ve paid my dues, and I don’t want to mess with plumbing this time around. 🙂
I hope you’ll do thick moulding instead of cubbies. I think the moulding in the “designer room” with green cabinets is the icing on the cake…just my humble opinion;)
wondering what in the world you keep in baskets that are up so high…..
Dust 🙂
Anything you don’t use on a regular basis. At the condo, we would buy our sea salt and turbinado in bulk, and keep the extras in our baskets. Tablecloths, plastic cutlery and paper napkins for parties, etc. I could always find stuff to put in ours — things that I need only occasionally.
So sorry you have been under the weather, but glad to hear you have bounced back. Love the plans and your vision. If anybody can make it work, that would be you! Loving watching your journey and the thought processes behind it.
Looks fabulous! I am eager to see your progress – you always add the most amazing details, and I have no doubt you could turn those columns if you really wanted to 🙂 I especially love the sconces you’ve added – I just saw a similar design in an older Windows & Walls magazine, – I can envision them illuminating the buffet filled with wonderful treats. One last thing – the cat bed/feeder in your condo is awesome!
i love the first photo and it looks like the matched the feet with the corbels. i thing is i have subscribed and most of the time i go to your blog and you have a post up and i did not get the email until way later in the day. do not know if it is just me so for me it is almost not worth it to subscribe.
The email generally goes out about 90 minutes after I post. 🙂
That’s a great plan for your wall of cabinets. I want to tell you about another option for your countertops. I know that you want concrete, but the Young House Love blog has another option you might consider. They just completed their kitchen counters. This might not be the look you’re going for, but it seems a little less expensive and possibly easier.
It’s definitely less expensive and easier, but that’s more for a temporary solution. 🙂 That’s exactly what I was going to use when I thought I was just going to do a quick and easy temporary update to my kitchen and wait on the bit remodel. But now I find myself knee-deep in a full-blown remodel, so I’m forgoing any of the temporary solutions I had in mind.
Wow lady that is really ambitious…but I’m sure you can make it work. It will be freaking beautiful…!!!
You are awesome!! The one thing that remains the same, no matter what you are working on, will be the phrase “but, I’m not going to buy it, I am going to make it.” That is, indeed, what sets you apart from other bloggers… You show us ways to get what we want (or very close) without spending money we don’t have. Thank you!
Hmmm… Meant to be independent comment, not reply. Don’t know how that happened and don’t know how to fix it. Sorry.
Looks good! Are you expanding the window to two windows? It looks bigger than the current one. Also, how is your elbow?
There won’t be any window at all on that wall. Just cabinets. 🙂
And today (Tuesday) is the very first day that I’ve felt no pain at all in my elbow! Yay! Thanks for asking. 🙂
Kristi, I love those sconces. I fell in love with them too but I found them at Ballard Designs. When I finally bit the bullet to buy, they were no longer available. Now they are back and available for anyone else that “has to have” them. They call them the Ramona Sconce and there is a matching chandelier too.
How interesting! That is the EXACT sconce! But the matching chandelier that Ballard Designs has is drastically different from the one that Shades of Light has. The Shades of Light matching chandelier/pendant is the one that Young House Love used above the kitchen island in the showhouse they just did. Honestly, I don’t like that one at all, but I really like the one at Ballard! Don’t like the price, though. 🙂
I now officially wish I had a larger kitchen soI have a wall of cabinets, although this has given me ideas on a possibility other than a buffet or hutch for my dining room. Beautiful rendering/ideas.
Chris, you just made a light bulb go on in my head. While modifying our house to make it more accessible as we grow older (preparing for our old age) the one roadblock I have had is that there is almost NO cabinet space in my kitchen. We have a dividing wall between our kitchen and dining room with open display shelves from halfway up. It had never occurred me to bump the kitchen wall into the dining room about 12″ and install upper cabinets on both the upper and lower wall. That would completely solve my kitchen storage solution, plus give me countertop space. I would have to move our kitchen table out from that wall and go with a much smaller kitchen table for two in the middle of the small kitchen, but that could be possible.
Kristi, see what you’ve started. LOL. I can’t wait to tell my husband. I hope my excitement overcomes his objections. LOL.
Look at “myuncommonsliceofsuburbia.com” (April 15) for how to add glass inserts to cabinets.
Beautiful Kristi! You’re going to have a lot of counter space in that kitchen! 🙂
Thank you for sharing that table legs link, in turn I’d like to share one of my favorite sources too (I like their blog too)- http://www.osbornewood.com/ We’ve only bought 3/4 cabinet feet from them but they are my go to for seeing what’s available (or does it only exist in my mind), sometimes just for detailed info and other times for (more realistic?) inspiration.
Oh and we found our glass retainer clips here (strongest/most secure and best fit to our diy doors): http://www.rockler.com/
Great resources! Thank you!
Sorry, to hear you were down with food poisoning! Glad that you are feeling better. I truely look forward to your post and ideas for your home. The ideas for the kitchen are sounding wonderful, can’t wait to see it finished. You are so inspiring!!!
I never blinked an eye when you said you would turn the legs using a lathe! I don’t doubt for a moment you could do it. The plans look great and I bet you’ll have enough done by the time your Bill gets there for him to do the wiring. Good luck your doing an amazing job . Arlene
Arlene, I thought the same thing! When Kristi said she didn’t have the tool or know-how I was like “really?” I have no doubt that it’ll be beautiful regardless of the path!
Have you thought of possibly doing two different color cabinets on that wall? You are taking out a window, which will darken the room,…perhaps lighter cabinets on the top? Just thinking out loud. I love the plan you came up with. I did something similar in my kitchen, but didn’t bump out the cabinets like you are planning. I was able to save some dollars by ripping a turned column in half, and putting half on either side of my sink. I got the look, but saved $$$. Anyway…looking forward to seeing more….
Oh, love that idea of rippnig a column in half! Wheels a spinnin’…….. 😉
I am taking that window out, but it’s not an exterior window, so it doesn’t really let in a huge amount of light. That window looks into the sunroom, which will eventually be the family room.
But remember, I took out an entire wall so that the kitchen would get light from the big wall of windows at the front of the breakfast room, as well as the two smaller windows at the back of the breakfast room. That room gets a considerable amount of natural light now. 🙂
Each time you feature those sconces, I fall in love with them all over again… jewelry for your walls, subtle and eye-catching. I’ve questions about the cubbies and the footed cabinets. Because I’m 5’2″ (on my good days,) I’m wondering what you plan to store in them. Standing on a ladder to haul down anything heavy or unbalanced is a disaster waiting to happen, at least for me. Because I’ve become an increasingly reluctant cleaner, I imagine having to chase the errant grape or onion skin or bag of M&Ms that will find their way under your cabinets, and I shudder at the thought of spilled sweet tea and other kitchen horrors. Do you plan some kind of well recessed kick plate to handle these problems? Can’t wait to see your progress, especially the bump out. Brava.
If you look again at the picture she provided for an example, you will see that there is a recessed kick plate. The furthest cabinets, under the kitchen sink and window show it best. 🙂
On the lower cabinets, there will definitely be a toekick underneath. The cabinets won’t be raised up off of the floor all the way to the wall. 🙂
And as far as the cubbies (which I think I’ve decided not to build), I would just keep items that I use only occasionally (like plastic cutlery and paper napkins for parties and such), or I would keep the overstock bulk items that we always have on hand, like extra containers of sea salt and turbinado.
I love your kitchen plans . Now I am even more excited to see the project all done . If I could I would come help you!
Sounds like a great plan Kristi. I do love the way every thing looks. I especially like the feet on the cabinets. Are you going to do one long piece tat goes across the bottom or just the feet in the corners? I am anxious to see how you do that. I would like to try it too.
I actually haven’t decided that yet. I’m thinking that I’ll do separate feet, but once I start on the project, I might change my mind…and the plan. 🙂
Wow, that’s a rough run for sure. Glad you’re feeling better! What ever happened to the condo? Have you sold it and I just missed that?
Ugh…we still have the condo. I’ve kind of buried my head in the sand where it’s concerned. I need to get over there and finish up some stuff so that we can get it on the market, but I don’t want to! 🙁 It’s so hard to make myself go backwards like that. I just want to focus on the house!! But we’re wasting money each month by holding on to it, so I really do need to make it a priority.
Great idea for the bump out with the columns, etc.Adding that bit of architectural detail will really make a lot of difference in the look of that whole run of cabinets.
oh, and thanks again, Kristi. Now I’m off to the kitchen to see if the thick molding, like in the green cabinets photo you showed, will work in my kitchen. No, I don’t think I will say anything to my husband just yet.
I’ve had food poisoning once and I remember thinking that I would have preferred to die a slow death. So glad you’re on the mend!
I am so stinkin’ excited to watch “Kristi’s Kitchen Chronicles” unfold – it’s going to be an awesome summer learning and watching vicariously through your efforts. So wish I lived in your area… I’d be there in a heartbeat to help. Wondered if you had an old cabinet door on hand to practice cutting out the panel for the glass insert – or, might be worth a trip to Restore to pick up one. You know, work out the kinks before so you can continue with confidence. I’m sure you’ve already visited a number of sites to get an idea of the process – I’ve had this bookmarked for a while – sure seems pretty darn easy: http://myuncommonsliceofsuburbia.com/adding-glass-to-your-kitchen-cabinets/
I’ll definitely be heading to ReStore to grab a cabinet door (or a few) to practice on if I decide to cut the panel out myself. But I was thinking to day that it probably wouldn’t be very expensive at all just to take it somewhere and have them route out that section for me on four doors. I think I’m going to look into that. I don’t own a router, and while I do look for any and all excuses to buy new toys…errr, tools, buying a new tool plus the learning curve kind of makes me anxious when I just want this to be done. I’m sure there will be tons of other projects in the future for me to play around with a router when I get one. 🙂
So glad you decided to forego the cubbies — that bank of cabinets is going to look awesome! Can’t wait to get out the cheerleader pom poms and cheer you on – Goooooooooooooo Kristi!
LOVE IT!!! You have to know my kitchen remodel was put on hold until yours is finished. I have a much smaller kitchen and the layout is a little more awkward, but I’m hoping to use a bunch of your ideas!
Will there be drawers or pull-out shelves behind the doors in the base cabinets? I redid out kitchen using drawers in the base cabinets, not concealed behind doors because, when busy, I didn’t want to bother with opening two things. I was so happy to get rid of those unhandy stationary shelves! The only doors in the base cabinets are in front of tray/cutting board storage, the recycling trash cans, and under the sink…which then has a pull out tray behind the doors. There are also doors for the lazy Susan in the corner.
I’ll probably build some pull-out shelves. I’d love to have drawers on that wall, but since I’m using upper wall cabinets as base cabinets, that’s not really an option.
You’ll never regret those pull-out shelves! They’ll make your life in the kitchen so much easier and more convenient.
I hate catching typos after I’ve already posted! 🙂
Anyway, I wanted to add that I think your design is lovely.
LOVE!!! It’s going to be amazing 🙂
I wish I had your energy and know-how! (I’d have to have BOTH of them!) I have the ideas and the “want to” to do things, but I have no idea how to approach the tasks. You’re awesome!
I know you have enough skills/tools to build your own cabinets. You should absolutely do that. You’ll get exactly what you want, and it will be a much better quality than the stock ones from HD. I have some book recommendations on my blog on where/how to get started. http://www.theprojectgirl.com/2013/06/22/how-to-build-kitchen-cabinets-getting-started/
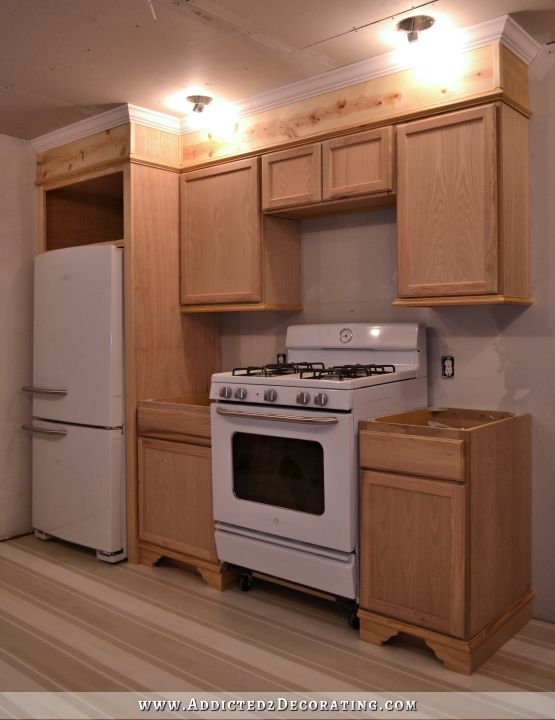
Kristi’s original plan was to build her own cabinets. But after much consideration, she decided to purchase stock cabinets and modify them. (She covered this in earlier blog posts.) Also, she’s already purchased the cabinets for the rest of her kitchen.
Yeah…I ruled out making my own cabinets a few weeks ago. If I were more of a cook, and spent more time in the kitchen, I’d probably go to the extra trouble for custom cabinets. But I try to spend as little time as humanly possible in the kitchen, so stock cabinets (customized, of course) will be just fine for me. 🙂
Replace cabinet doors with doors designed for glass
I plan to replace by stock cabinets with new doors and paint the cabinets. It is not very expensive and a good way to do it. Check this site out. They have doors in all styles,
but these plain doors seem to work best with stock cabinets.
http://www.cabinetnow.com/squared-raised-panel/century-glass
I meant replace my stock doors, not cabinets!
Hi – have you looked at Habitat ReStore for table legs? I have gotten several there for a lot less than your source. Since you only need two of them, it shouldn’t bee too hard to find them. Also, will you be getting much light for those sconces recessed between those cabinets?
I was thinking she would have a filler wall between the cabinets. Not a sunken in area. You place a piece of wood in to fill the gap. I assume
That is her plan – otherwise I would have the same question.
I’ll actually need four of the columns — two for the wall of cabinets, and two for the bar side of the peninsula where the sink will be. 🙂 But no, I didn’t look at ReStore. That’s a great idea!
The sconces won’t be recessed. They’ll be part of the bumped out section of the upper cabinets.
Finding four columns will be harder, but you could actually buy a table and demo it for less than the cost of most of the columns I have seen online.
I’m sorry that you were so sick. Food poisoning can be nasty and if you were down and out for 3 days, it was nasty! Poor Kristi.
I love your plan for the wall of cabinets! So much storage and you’ll have a great place to lay out a beautiful buffet for guests. Your light fixtures will look beautiful on that wall of cabinets and should reflect off your glass cabinets very nicely. LOVE the idea of storage baskets up above. Good place to store little used items.
I’, sorry I was negative about using the sconces in the kitchen. You now have a perfect place for them, without them being on the cooking wall or sink wall. They will look amazing and make your cabinets look even more custom. Of course, now they are becoming custom instead of stock. What a beautiful wall. I knew you would do something that would amaze all of us.
I took two of my upper cabinet doors to my friend and had him cut out the wood panels and
rout out a groove and I installed glass in the openings. I truly love my two glass front cabinets. It wasn’t possible to use the small dividers on the glass, so I just have a full pane of glass in each. I didn’t particularly want to buy knew doors because I light the light natural finish on my cabinets and want to keep it.
Consider adding some pot lights in the ceiling in addition to your decorative lighting. Fairly inexpensive and can be used to really light the kitchen up for cleaning. Well, maybe not. LOL.
I’m thinking I’ll be doing the same thing — finding someone who can cut out those panels for me from the doors. I could buy a router and learn to do it myself, but I think I’ll save that learning curve for another project in the future. 🙂
I definitely plan on adding recessed lights to the kitchen. Just need to figure out where before Bill gets here on Saturday! 😀
thanks for showing your amazing plans – the lovely sconces made me rethink my own lamp plans on for our guest bathroom just now and I found some real beauties on the web, so thanks for being an inspiration on that topic as well!
I love the idea of the bumped out part and the little columns as well as all the other ornate details but have to chime in with the others: Do you really use the baskets in the cubbies? Isn’t whatever gets stored in there prone to getting really dusty? I’m sure it would in my house! But I agree that they look very nice in the pic of the condo!
btw I’m curious, too, about whatever happened with the condo (perhaps too curious? sorry if it feels that way, the condo just feels so familiar after having followed all your fantastic work and changes there… don’t mean to pry!)
We still have the condo. :-/ I really, REALLY need to get over there and finish up some things so that we can get it on the market. I just hate the thought now that I have a house to play in! 😀 But it needs to be done. I just need to do it, get it finished, and get it sold so that I won’t have to look back anymore, and I can just be full steam ahead on the house.
So glad you are feeling better. I like the second cabinet plan, the scounces will look great. But I agree with Marcia about drawers in the lower cabinets, especially for future resale. You could still have drawers behind the doors in the lower cabinets. This would be helpful for future resale. I wholly dislike the lower cabinets in my kitchen as it is very difficult to reach the back. When I redo my kitchen, there will be drawers a plenty in the lower cabinets. Am looking forward to your finished kitchen. All the best and stay safe and healthy.
Love it! It’s gonna be GORGEOUS!
Also, Don’t forget to get wire run for under cabinet lighting. It always looks like an after thought in so many kitchens. Keep the cubbies if you need the storage or display space. If you decide to use the cubbies for display, wire them for small spotlights.
I like the more simple layout without the baskets 🙂 it seems like your corbels, sconces, etc will have more room to shine! Call me crazy, but I had an idea. Why not keep the window? And Install the glass door cabinets over them? It would really make the glass sparkle to have natural light shine through them! Just an idea! Who knows if you could even install the cabinets over them? 🙂
Love the idea of keeping the window behind the glass!
I love the idea with the glass cabinet over the old window opening.
Maybe glass door on both sides. The light passing through and
also not being clothes off from the family room. Amazing work and ideas..
oops closed off..
That window opens into another room rather than to the outside. She probably wants to get rid of the window so she won’t have to deal with it when she she does the redesign on that room.
In addition to what my sister Cathy said above, I also hate that window because it’s not centered. 🙂 I mean, it really, REALLY bothers me. I have way too high of a need for symmetry to work around that off-center window. I can’t wait to cover it up! 😀
Love the tall crown moulding that goes all the way to the ceiling. It really makes a nice statement! Baskets kinda’ diminish it’s “stature.” 🙂
My husband retrofitted quarter sawn oak cabinets in our home. He added glass to the front of two cabinets. He lit the inside of these cabinets with a self sticking narrow string of LED Fairy Lights. Lights use a low voltage transformer. We had to have lights on hand when electrician came to install wiring. Our cabinets look great and interior lighting does not produce any heat build up.
I thought your first drawing was splendid. That is, until I saw your second one. Some much better! Cleaner, classier, prettier. I am excited to see this kitchen happen.
I am so excited Kristi….you have inspired me to open up above my cabinets… right now it is closed in useless space but I need it for storage…and so I have talked the hubby into opening it and finishing it so I can put baskets to fill with some of the things I only seasonally use for baking and such…I know the cubbies aren’t what you want but because you first thought of doing that…it is not a wasted idea for me…cause I am going to use it…I am so excited about my kitchen and can’t wait to see what you do with yours. I love your blog. Wait for it each day…by the way so sorry you had a rough few days of sickness…probably the first real rest you have gotten huh?
Ha! Those three days of sleep were definitely the most rest I’ve gotten in a very long while. I could do without all the ugliness that goes along with the sickness, though. 😀
Hope you are feeling better! I love the plan to use glass front doors in the center group of upper cabinets. I love framing those with the sconces, so I hope the glass doors work out for you. If the glass doesn’t work out, the photo you show of open shelves with the curved top edge is very, very nice. Again, the sconces would frame that very nicely. I didn’t love the high placement of the cubbies. Seemed impractical to me. While I like cubbies, I think they should be lower down. Your idea of using the interesting molding at the top of the cabinets is very nice. And would look great whether you have glass door cabinets or open shelves. Smart of you to get ahead of the costs of the corbels and the decorative bump out area on the lower cabinets. And thanks for letting us all know about the table legs site. It helped me rehab my ottoman. As always, I stand in awe of your energy and ideas.
Wow! I love your plan for that wall in your kitchen! It’s going to be amazing! Personally, I like your original idea with the cubbies — I think the texture the baskets add will be welcome with the brass and the green glam you’ve got going. I am, once again, inspired by your ideas, your skills, and your progress on making your home your own!
In order to put glass in the wood front cabinets you can cut the wood out with a jigsaw then router the back to hold the glass. We’ve done it before and it works great, hope that helps! Love the plan, you are super talented!
Hi! Sooo sorry you were under the weather…
I would like the basket better than the wood trim, but you need to do what makes you feel right and smile. If not at the top, how about removing one door on each side of the outside bottom cabinets and make that an open shelf for baskets? I love being able to reach in and grab a basket to take the items to another part of the kitchen. I redid my kitchen with stock cabinets also and on did that on the cabinet on either side of my stove.
One side I have with baskets and the other cabinet I use to hold open acryclic canisters with flour, salt, etc. I also change it out with flowers or greenery on one side in a basket, depending upon the season….
I do like that idea of adding baskets to the bottom! Those would be very handy for Matt.
Beautiful design! Love the 2nd picture with the tall trim and crown, it goes beautifully with the turned legs and corbels. Also, glad to hear you are feeling better.
I like both designs but like the cleanness and simplicity of “no cubbies”. You could always make smaller cabinets at the top with glass doors and lighted so you could display pretties. I have seen that in numerous pictures and love that idea as well. Thanks for sharing your life!!!
I’m sorry you have been feeling poorly and I’m glad you’re back to your old self again! I love the second drawing with the tall woodwork and moldings. Sometimes less is more, if you know what I mean. You have a number of other special details on that wall so I think the basket section would just be a smidge too much. This is going to be a beautiful kitchen1
Beautiful plans and I enjoy reading about your designs and how you carry them through out the process. Would there be enough space to add a shelf under the cabinets between the corbels to add your cubbie baskets? Do you plan to add lights under the cabinets? You have amazing skills and talents. I look forward to seeing the finished work.
I’ll definitely be adding under cabinet lights. Not sure about the cubbies between the cabinets and corbels. It’s definitely an idea to ponder. 🙂
Your drawing is amazing!
I used chair/sofa legs on my kitchen cabinets. I love them! They’re squarish/tapered, but I considered all shapes and sizes. So much more substantial than the legs sold for the kitchen! I love being able to see all the way to the wall.
My question would be how clean can u keep the baskets. You know that greasy dust stuff ?
I had them in the condo, and I never did have to deal with greasy dust on them. I guess I don’t cook enough to generate greasy dust. 😀
OH!! I forgot the cubbies!
My two cents… I have a teeny tiny kitchen, so my worldview says to use every inch of space available. I’d hate to have a substantial amount of space that could have been used but isn’t. (I have open shelving all the way to the ceiling.) So, my vote would be cubbies, but maybe use baskets in every other space with statues/mementos/display pieces in the empty spaces.
Or, I’d be the girl to try to figure out how to flip up or slide the moulding so it’s still usable space but visually still “less.” 🙂
Posts!
I am in the midst of improving and painting my kitchen as well! I decided to beef up my Island with table legs aka Newell posts. I finally found some at Lowes. They are identical to the ones you found online. Except they we only $25 each unfinished! 36″ high and 3 1/2″ diameter. They come in split halves or whole posts. You have to look in the railing and the outdoor posts sections of the stores. Some are even in the moulding aisles with the decorative wood pieces. They are in different places in each store. Just search.
After much browsing online, I could only find them for $75-120 minimum!
I also found turned bun feet that fit perfectly under the cabinet toe kick. People have just used Liquid Nails to install them.
Good luck!
I love the plans! They are so beautiful! I would definitely go with the less is more approach of the moulding vs the baskets. I agree they give you more texture, but maybe they would be better off on a lower shelf that is easier to access. Can’t wait to see the results!
Your kitchen design is so pretty! I love how you worked the sconces in on the wall. I’m glad you nixed the cubbies- I think it’s prettier without. Also, they would be dust collectors. OTOH, at the end of the day, you have to do what makes you happy. Glad you’re feeling better!
I like it without the baskets, myself. I don’t know how much room you have for your sconces, but you might want to make sure there is enough room for them if you bump out that center section of cabinets. The spacing from the edge of the cabinet might make things look a little off-centered. Do you know what I mean? There’s about an inch or so of space around the cabinet doors and that space will not actually be available for the sconce if your center section is bumped out. I’m sure you have enough room, but it’s hard to tell from the drawing. Just a potential hiccup if the spacing is tight.
I’ll be adding a spacer board to each side of the bumped out section for the sconces. There’s enough room…just barely. 🙂
So sorry you got food poisoning! I got it about 2 weeks ago and was also down for 3 days, missed a whole day of work because of it. Didn’t you think you were dying? Jeez, the barfing and headache and bodyache and dehydration is enough to kill a weaker person! It’s just AWFUL, and because I ate at a restaurant and got sick, I actually reported the incident to the County Health Department. You might want to do the same.
LOVE your kitchen plans! I really like drawing #2, without the basket cubbies. I love that feature in your condo kitchen which was a more casual atmosphere than what you’ve developed in this kitchen, but with the finishes and fixtures (which are real statement pieces – those sconces!) you are using in this new house, I think the basket cubbies are just too casual. Also, since you plan on this being your forever home, I think years down the road the basket cubbies will date the kitchen. Drawing #2 with the moulding details is classic and timeless and will never go out of style. You can always place a basket or two for storage on your counter, or even behind your glass doors. Speaking of those glass doors (which I think are a GORGEOUS additions to your plan!), are you going with clear glass, or do you plan on using reeded or seeded glass? Your plan for your kitchen is drool worthy!
Question: what is meant by “transitional” design? How is it different than “traditional”? I’m guess transitional is a step less traditional than “traditional” design, but would love clarification and your input on that. I think transitional best describes my personal style.
Cannot wait to see how your kitchen turns out!
Oh wow…you have food poisoning too?! Yes…it’s awful. Just AWFUL!!
Transitional design is basically a combination of traditional and contemporary. That’s definitely my style. I tend towards traditional with contemporary touches here and there.
Thank you for your reply, Kristi. Yep, transitional is definitely my style! I do love antiques and classic/traditional architecture and design, but also like some contemporary things thrown in for interest. Glad I have a name for what I like in design!
Hi Kristi,
I love both plans but the second one without the cubbies really looks great.
I had the centers of cabinet doors cut out a few years ago and they looked great. I am planning on doing it again in my current home.
Thanks for all of the great inspiration! Love your blog.
Annie
I couldn’t remember what your cabinets look like, or even if you had actually purchased them, so I went back thru your posts to find them. When you initially posted about them, I look for them on HD’s site to see if they were carried locally, and I thought they weren’t because they DON’T carry them at the closest one to me (which is less than a mile away) so I thought they just didn’t carry them in the state, well I just checked the next closest store, and sure enough, they DO carry them. Do you know how often they go on sale?
Love the plan btw, but I’m wondering if a 12″+ countertop would be deep enough?
*for my purpose I would like to use them for a family built-in.
I don’t really know how often they go on sale, but it seems like it’s about once a month, or maybe once every two months.
My countertop will be deeper than 12 inches. I’m not planning on pushing the cabinets all the way to the wall. 🙂
Yes, I went back and re-read your post about your built-ins in your condo, and was reminded that you pulled the center portion away from the wall, so I assume you’ll do something similar here. I guess we could do something like that. One side would be open so we’d have to add a panel to that side (I’ve seen someone do that somewhere)
Thanks Kristi!!!
Oh, and so sorry to hear about your food poisoning – not fun. One of my dds had what we thought was food poisoning last Sunday/Monday, but then she said some of her friends had a “flu” that mimicked food poisoning, so maybe it was the flu, on the other hand, none of the rest of us had it, and neither did her boyfriend. But I and her sisters ate the same food.
So sorry to hear you were down and very happy to know you have recovered! As much as I like the cubbies, in the design you’ve created, I like the wall treatment/crown up to the ceiling better! A couple of people have mentioned baskets on the bottom which sounds like a great idea to bring in the texture and make them accessible.
cupboards all the way to the ceiling – other wise you have a dust collecting area
Skip the cubbies, I think you’d regret it in a few years.
a note on your update: That looks fantastic and much calmer – so from me you get the thumbs up for the design without cubbies 🙂
Love the revised plan. I really liked the first one with the cubbies but when you showed the second plan without, it does have a better look to it. The sconces while I originally wasn’t so fond of with your first two ideas I’m in love with on this wall of cabinets. Funny how placement can change so much. It’s going to be gorgeous. I think I’ll have to see the finished product to get the countertops you’re doing. The idea photos just haven’t grabbed me like the wood countertops you’ve made in other projects have. I’m sure you’ll make them look wonderful though.
I do have a question about the cabinet color. Last I saw you had a few colors you’d narrowed down to but none of them were the color of the original kitchen you saw of Cameron’s. Is there a reason you weren’t going with that color or at least a very similar color? I know you’re not afraid of color. 🙂
Love all you do!
I haven’t really made a final decision on the paint color yet. The one I’ve been using as a “maybe” I realized last night is probably too olive. So it might be back to the drawing board on that. But I definitely want a dark green, just like the Cameron Diaz kitchen.
Love that wall. I like the design with tall crown. Works the glass/corbels/sconces better than cubbies. I used stock cabinets from Lowe’s & doors with glass were an option.
Love these plans! Are you sure that the sconces won’t stick out too far and be a hazard for heads? Will they be attached on the cabinet that it already 4.5″ protruded?