Bathroom Makeover Day 2: My DIY Bathroom Countertop Made From Cedar Fence Boards
I’m trying to get our condo bathroom makeover done as quickly as possible and on a budget, so I needed to come up with a budget-friendly countertop option. So yesterday, I made a DIY bathroom countertop made from cedar fence boards.
Now before I show you the countertop, you have to put on your “this bathroom is a work in progress, and I can envision that it’ll look fabulous when it’s finished” goggles, because as it is right now, my new countertop looks absolutely hideous next to the unpainted cabinet, and the ugly original wallpaper and bare drywall are very distracting. So you’ll need to envision the cabinet painted in a light and bright color…perhaps white…or maybe yellow.
So do you have your goggles on? Here’s how my DIY bathroom countertop made out of cedar fence boards turned out…
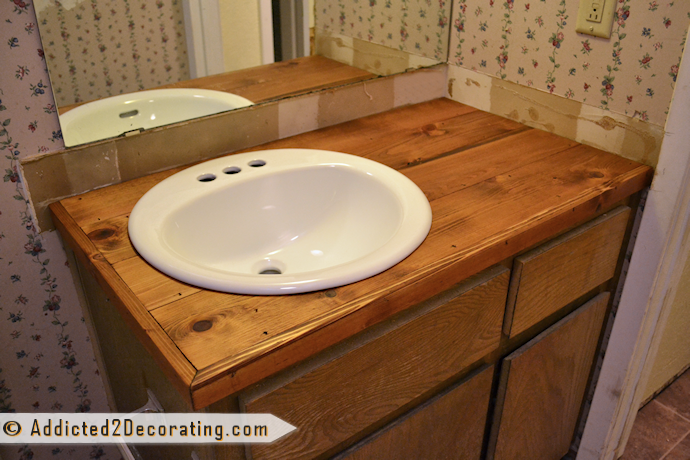
I wanted it to look a bit rustic, so I didn’t fill any of the areas between boards like I normally would, and I didn’t even fill the nail holes. I like the way those things give the wood a weathered look.
Now because I know that at least some of you have probably lost your goggles, I did my best with this next photo to block out all of the surrounding visual clutter so that you can just see my countertop.
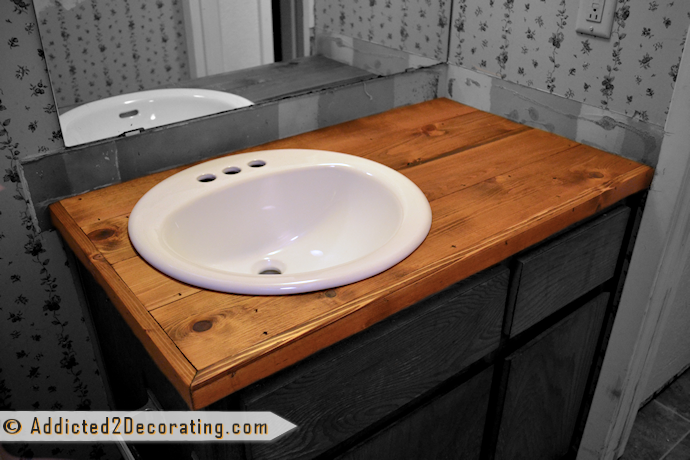
I’m really excited about how it turned out, and I can’t wait to finish the bathroom and see my whole vision come to life!
The best thing about this wood countertop was that it just took about three hours to make, and it cost a grand total of $34.11. And it’s a vast improvement over the old generic, apartment-grade laminate countertop that was there!
I just love the warmth and character that wood gives a room! So let me show you how I made it.
How to make a DIY bathroom countertop from cedar fence boards:
Step 1: Cut the base out of plywood
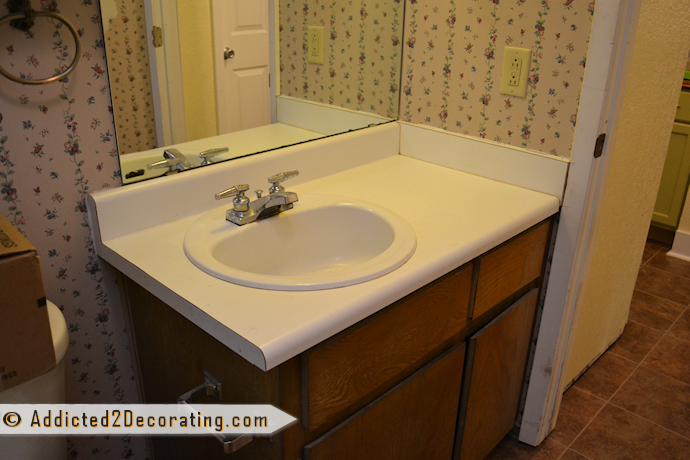
To make this DIY bathroom countertop, I started by removing the old countertop (which just required some unscrewing of pipes, a few whacks with a hammer from underneath the front lip of the countertop, and a bit of prying). Then I placed a piece of 3/4″ plywood on top of the cabinet. This would be the base for the new countertop, and I needed to mark the cut lines.
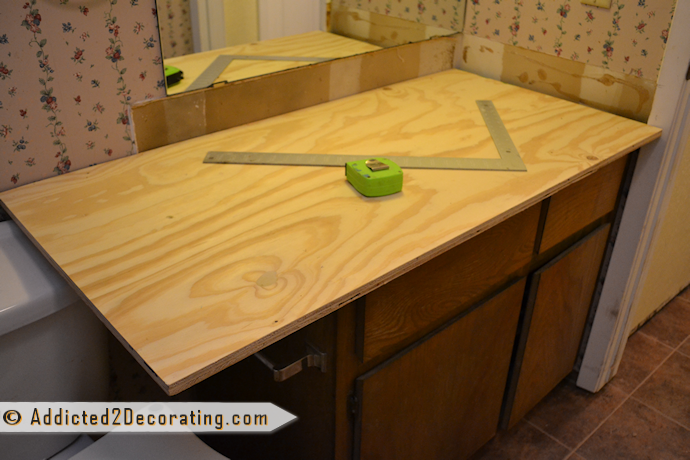
After marking the cut lines, I cut the plywood to size with my circular saw. Then I fit it on the cabinet again just to check my cuts.
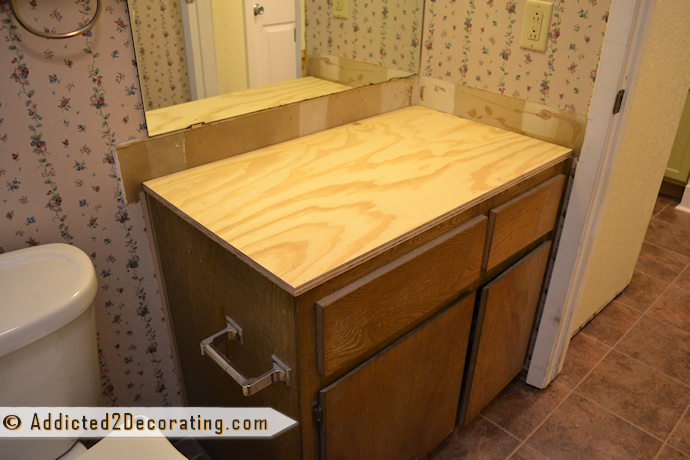
I allowed the plywood to extend past the cabinet about 1/4″ on the front and the side.
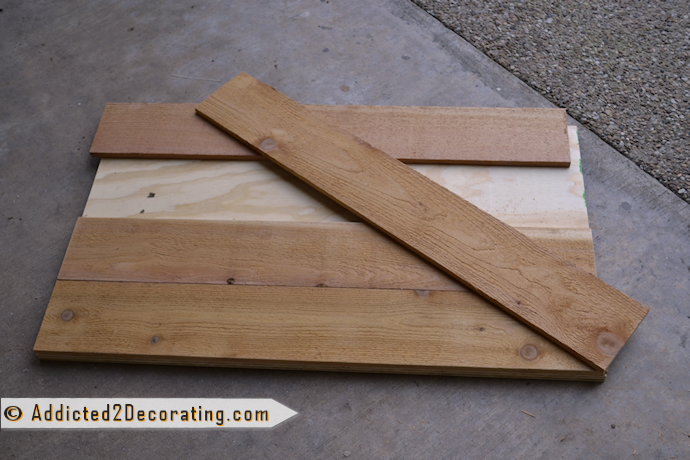
Step 2: Cut cedar fence boards to cover the plywood top
Next, I cut pieces of cedar fence boards to cover the plywood. I used the cheap cedar fence pickets that are really rough, and only $1.97 each. I only needed four boards for my countertop, but I bought five just in case I got them home and found that one of them wasn’t usable for some reason.
Next, I used Liquid Nails and my brad nailer to attach the cedar fence boards to the plywood.
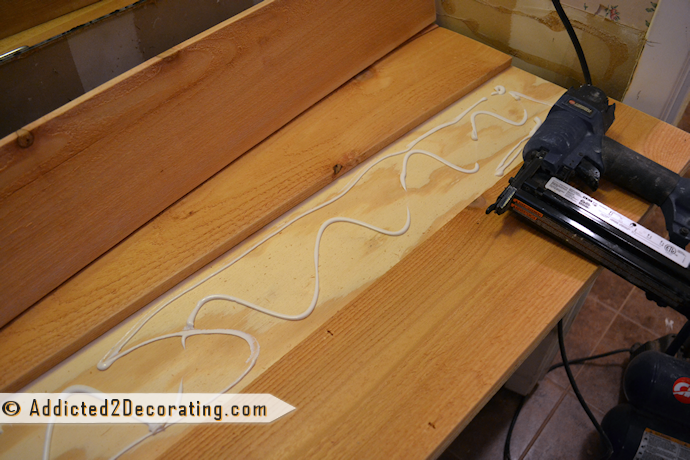
If I were a patient person, I could have just used clamps and weights to attach the boards with Liquid Nails only. That way, I wouldn’t have had the nail holes in the countertop. But I’m not a patient person by any stretch of the imagination. 😀 And I kind of think the nail holes add character, so I’m okay with them.
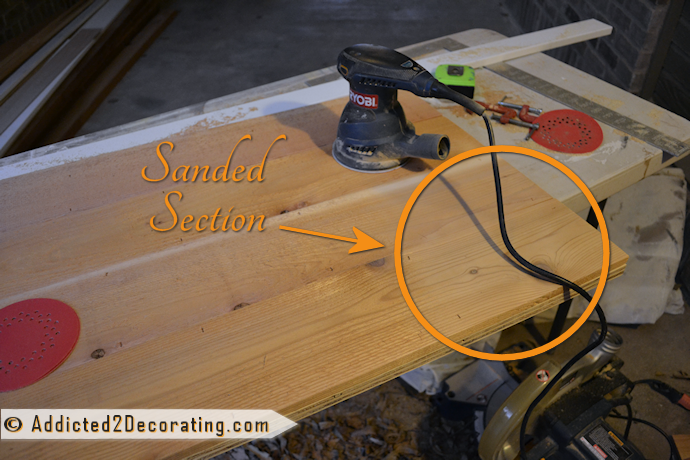
Step 3: Sand the boards smooth
Once the boards were attached, I used my electric sander to sand the entire surface. Here’s an interesting fact about cedar fence boards. They may start out incredibly rough, but they sand very easily to a beautiful smooth finish. I’m not sure if you can tell from the photo below, but sanding them not only makes them incredibly smooth, but also lightens the color a bit.
Step 4: Frame the edges of the plywood
When the boards were reasonably smooth (I didn’t need them perfect at this point, because I’d be doing more sanding later), I cut some lengths of 1″ x 2″ cedar lumber to attach onto the front and the side to finish out the edges. I attached them with wood glue and my brad nailer.
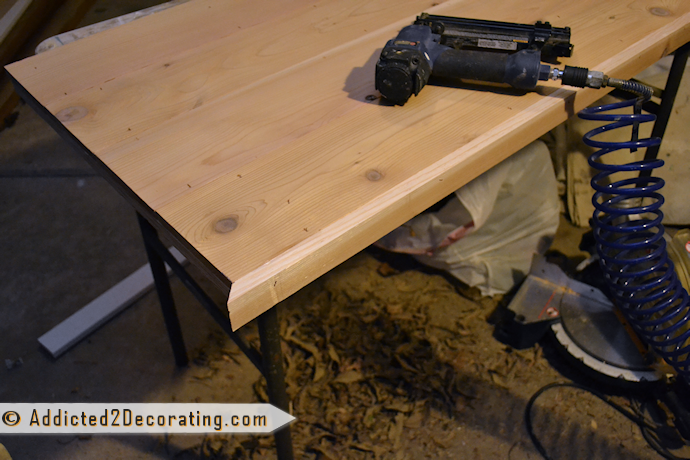
And of course, I mitered the corner using my miter saw.
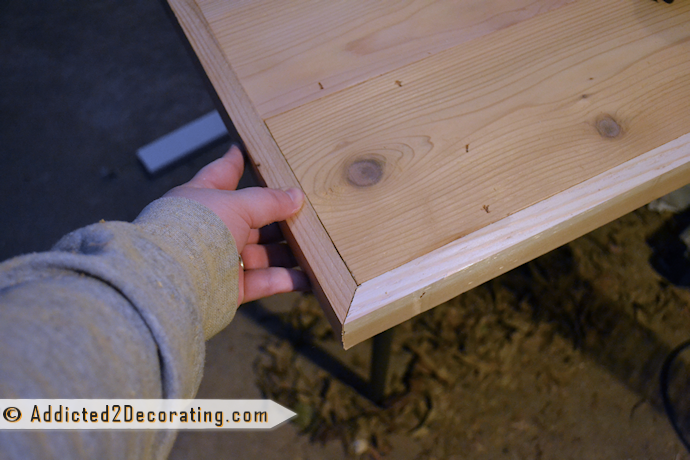
Step 5: Check the countertop for fit
With the edging attached, I tested just to be sure it fit. Note that at this point, if there had been any issues with it being too wide or too long, I could have easily trimmed off any excess from the right edge or the back edge using my circular saw. But there was no need for that. It actually fit perfectly! So I gave the entire thing one last thorough sanding with my electric sander.
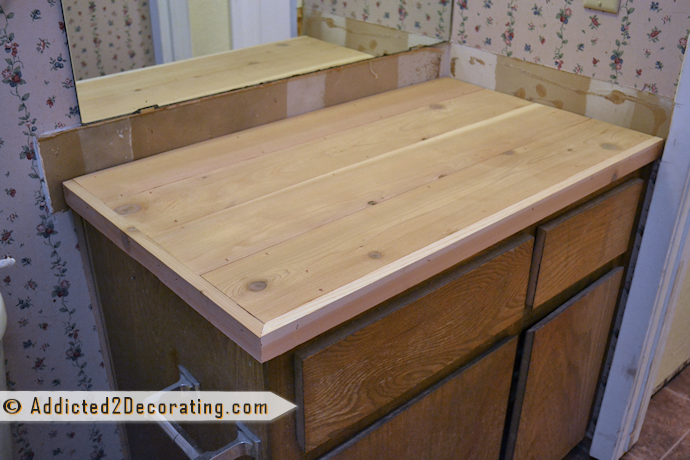
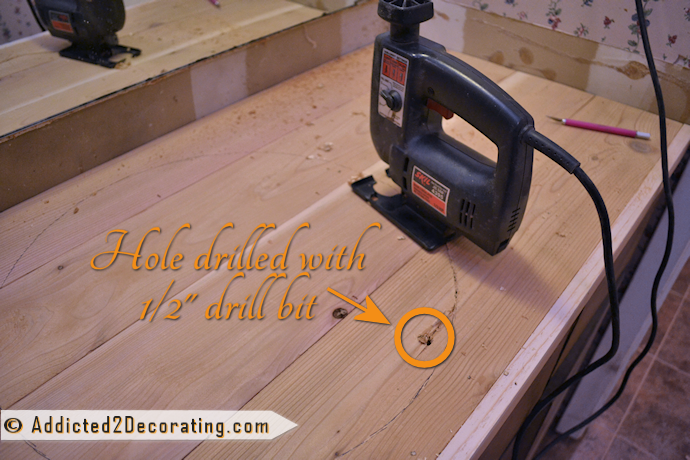
Step 6: Cut the hole for the sink
Next I marked where the sink hole would go using the template that came with the sink.
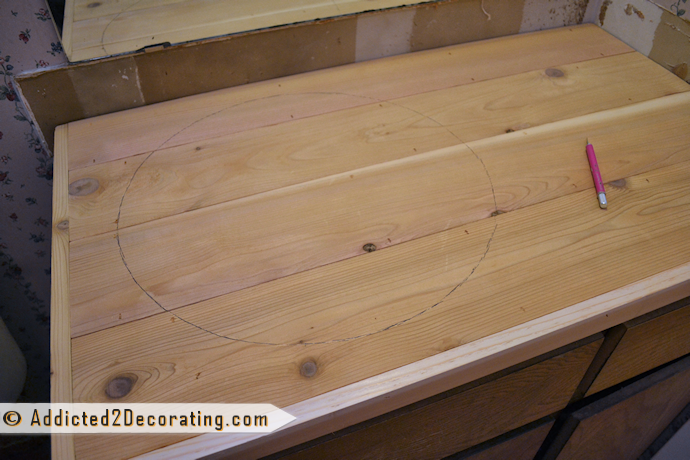
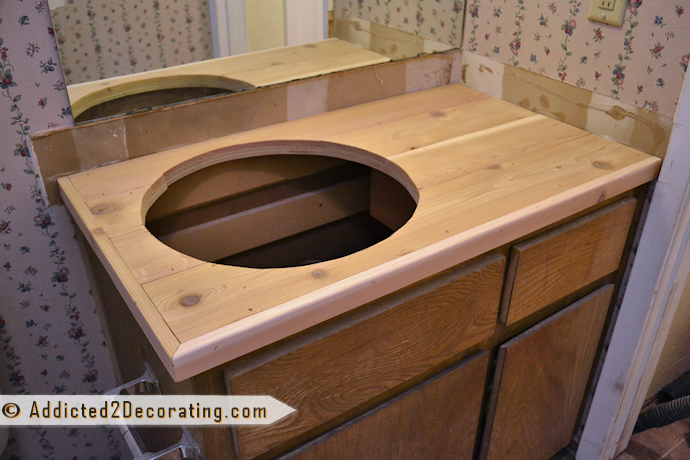
Then after drilling a pilot hole with a 1/2″ drill bit, I was able to use my jigsaw to cut out the sink hole.
And voila! It certainly wasn’t perfect. In fact, far from it. But since I’m using a drop-in sink rather than an undermount, it really didn’t matter. I did a bit of sanding just to remove the really rough stuff, but that was about it.
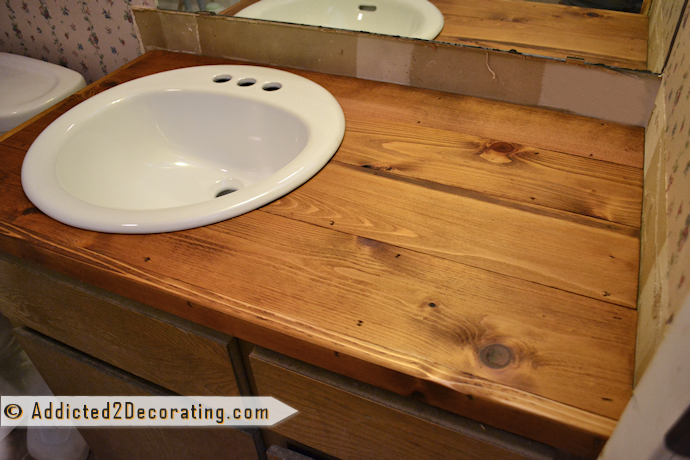
Then it was on to the fun part…the staining!
Step 7: Stain and seal the countertop
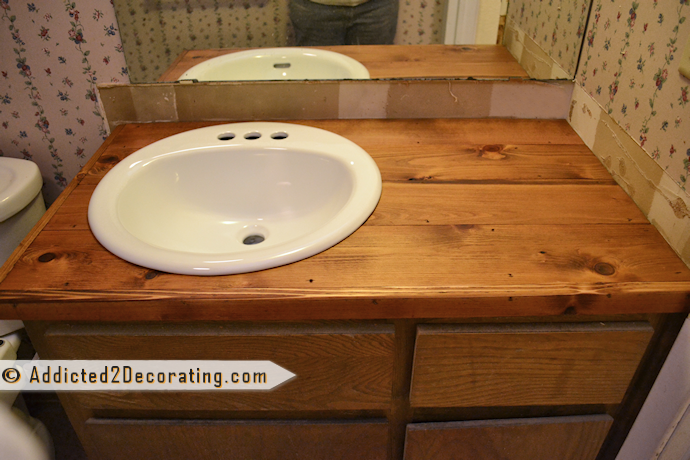
I new that cedar tends to take stain way differently than oak or pine, so I was kind of at a loss as to what stain color to use. My experience in the past has been that if I use one of my go-to stain colors such as Dark Walnut, it turns almost black on cedar. I wanted my countertop to be a medium brown, so I asked the guy at Home Depot and he suggested that I use Golden Oak stain color. I was hesitant, but I tried it anyway, and I loved the result!
I’ll have to wait until I get paint on the cabinet to see if this will be the final color for the countertops. If I use yellow on the cabinet, it’s possible that the countertop will need to go darker. Until I know for sure, I won’t be able to polyurethane the top. So for now, I’m enjoying my medium brown Golden Oak-stained cedar countertop.
Now I’m more anxious than ever to get some trim and paint on that cabinet!
Here’s the cost breakdown for my wood countertop:
- 4 cedar fence pickets – $7.88
- 1″ x 2″ x 8′ cedar board – $2.46
- 2′ x 4′ plywood – $15.65
- Golden Oak stain – $4.78
- Liquid Nails – $3.34
- TOTAL – $34.11
The project required other items, such as nails for my nail gun, wood glue, rags, polyurethane, etc. Those are items that I always have on hand.
So what do you think? Can you envision my new countertop with a pretty painted cabinet? If not, check back soon (hopefully tomorrow) and you won’t have to envision it. You’ll actually be able to see it! 🙂
Update:
The condo bathroom is finished! You can see the finished bathroom, as well as all of the other DIY projects that went into this bathroom, in the post below:

Addicted 2 Decorating is where I share my DIY and decorating journey as I remodel and decorate the 1948 fixer upper that my husband, Matt, and I bought in 2013. Matt has M.S. and is unable to do physical work, so I do the majority of the work on the house by myself. You can learn more about me here.


i love it and i’m gonna do it!
Oh good, Beth! And when you do, please send photos!
Love, Love your wood countertop!!! Your style is right up my alley. I want to do this and use a copper pan that I have as a sink. I love items used outside the “norm”, and not cookiecutter. You should be very proud of yourself for making your home unique. Look forward to seeing your complete bathroom makeover.
Maggie
Maggie, I love the idea of using a copper pan for a sink! I had a client at one time that had used an old stool with a salvaged bucket on top in place of a sink and vanity. It was so unique and fit the style of her home perfectly! I really like it when people think outside of the box on things like that.
I really LOVE this! Great job!
Thanks so much, Benita! I really love the look too, but not so much next to that ugly base cabinet. Haha! That’s next on my list…I think. 🙂
I love it! What a great look! But my second thought is….how do you clean it? How does it stand up to water?
It will once I polyurethane the heck out of it. 😀 But until I get the poly on it, I’m trying to be very careful with it. Although, in reality, it IS made of cedar, which is what we build outdoor fences with, so I think it’ll be perfectly fine in the interim.
Absolutely gorgeous!!!!! Cant wait to see the finished room. Good Job!!!!
Thank you so much, Andrea! I can’t wait to see it finished, either! I sure hope it turns out like it looks in my head. Ha!
I really like how the color turned out. I’m more of a dark-wood kind of person (at least I am at the moment) but I like how warm it looks. First of let me tell you, I don’t know anything about wood haha, but I see you used it in your kitchen and now your bathroom. Do you use a special product to protect it from getting water damage?
On my kitchen butcherblock, I just use mineral oil on it about once a week. I shared more about that here: https://www.addicted2decorating.com/my-ikea-numerar-butcherblock-countertop-saga-continues.html
In the hallway, I just used polyurethane, and that’s what I’ll do here on the bathroom countertop as well. Just several coats of polyurethane should be fine to protect it.
Absolutely LOVE this idea! I’ve seen many ppl use the Butcher Block countertops from Ikea (like you did your for kitchen) but I don’t have an Ikea anywhere near me. This is a fantastic idea! I’ll def consider using this! I’m so glad I “stummbled” across your site! 🙂
I considered butcherblock as well, but this version was a lot cheaper. And I’m all for doing things on the cheap. 🙂 But Kate at Centsational Girl used butcherblock in her bathroom, and even used a router on the edges to give it a really pretty edge. Maybe I’ll do something fancier like that when we get into the house, but here in the condo, I’m all about cheap, quick, and easy. 🙂
You are off to a great start!! I love the rustic-ness of your new countertop. I’m gonna wait and see how the rest of the room comes together, cuz all I’m seeing right now is a cabin feel, which I know that’s not what you are going for!
Haha! You’re definitely right about that, Gen! Cottage, perhaps. Cabin…definitely not. 😀
These types of counters are my new obsession and may just allow me to refurbish my two bathrooms quite a bit cheaper than they otherwise would have cost me (that is, if I can get the base cabinets out during the demolition of both bathrooms without ruining them). I love, love, LOVE the color you picked.
They’re definitely cheaper than even the pre-formed laminate countertops that they keep in stock at home improvement stores! And much easier to make and better looking, in my opinion. 🙂
love it! and I thought I was the queen of the cheap-o re-do!
Ha! I take great pride in being cheap…but I just don’t like for things to LOOK cheap. 😀 Where there’s a will, there’s a way!
That is going to be an amazing transformation.
I love that it was so inexpensive.
Can’t wait to see the rest,
Deb@LakeGirlPaints
Thanks so much, Deb! I just hope it turns out like I envision it in my head. 🙂
I love it! I think this type of counter would be perfect for the games room vanity. I have to pin in case this is the way we go. Great job, Kristi!
Debbie 🙂
Thanks, Debbie! If you make one, you’ll have to send a picture!
This is so inspiring. I’ve been waiting for a “real person” to build a countertop like this!
I’m as “real” as they come, Tracie! 😀
Kristi, You are an amazing young women. I don’t know your age, but from my perspective at 72, you are definitely young. The ideas you come up with and then carry out just blow me away.
Thank you so much, Carol! 🙂 I’m 39 years old, by the way. But my mom is around your age, and in so many ways, she’s “younger” than I am. And my grandmother is 100, and most people have a hard time keeping up with her! Age is nothin’ but a number! 😀
You are so right Kristi. I tell people my body is 72 years old but that I’m much younger. Thankfully, my body is still in pretty good shape but my knees can no longer handle laying tile unless I have some heavy duty knee pads and someone to help me get up and down.
Love it! In my mind I kept hearing “look beyond what you see” lol (too many Disney movies!). Can’t wait to see the next phase!
Haha! I like that! “Look beyond what you see.” That needs to be the mantra of every DIYer, because that’s exactly what we have to do. 🙂
Thans for the step by step how-to. I love being able to show these to my husband to explain the next project’s “master plan”. This looks great, now I’m looking forward to the rest of the room.
So glad you found it helpful, Lee Ann! So do you pass the project on to your husband, or just show him to convince him to let you do it? 🙂
It’s usually a combination effort, following our individual talents and strengths. But he needs to see it with his eyes to get the idea, whereas I can see the finished product in my head. That’s why it’s so nice to have your blog to show him that countertop. “Easy peasy, dear. Now, let’s go get some cedar planks.” 😉
I love this!!! I would never thought to use any of these products in a bathroom, but what a fantastic idea to get rid of the old countertop that so many people have in their homes. I love the rustic look. Looking forward to when the cabs get paint!
I thought I’d have it painted by today, Karen. But then I went and decided to make new cabinet door. 🙂 Hopefully it’ll be painted by tomorrow!!
This turned out gorgeous!
Thanks so much, Jenni!
It’s lovely. I followed each step with avid interest. I think you did a splendid job and that it will look fantastic once it’s all finished. The thing about DIY is that you just have to have the vision of how things COULD look, rather than how bad they look now.
That’s exactly right, Anne. We DIYers have to have vivid imaginations, whether we’re making over our own severely outdated rooms, or shopping in thrift stores!!
Hi Kristi,
absolutely love that counter top, genius!
In some way you become my teacher, I’m happy to get news from you, plenty of things to study. Thank’s a lot for sharing…
looking forwards for the base drawers…
So glad you find it helpful, Anat! I’m definitely not a pro, and I generally make things up as I go along, but I’m happy to pass along things I learn! 🙂
Another excellent Kristi production! Can you just come to Maryland and stay with me for, oh, about a month and teach me to use all these tools?? I’ll cook for you . . .
Ha! I’ll teach you about tools, and you can teach me how to cook! 😀 To say that cooking isn’t my talent would be an understatement. I’m very blessed that Matt isn’t a picky eater at al!! 😀
hi Kim, I also had a tool Phobia, and that tied my hands up. with all the ideas in my had couldn’t do anything! that’s frustrating… but since I took carpentry lessons all the barriers have been broken (I even can hold a drill and saw!!). And of course, Kristi is my inspiration. Good luck!!! love you Kristi
Fabulous job, love the final look. I can’t wait to build one for my laundry room!!! Cheers!
I saw a similar countertop in a laundry room, and it looked amazing! It wasn’t on top of cabinets, but was actually on top of the washer and dryer. It really expanded the work area, and looked amazing at the same time. Hmmmm…I wish I could remember where I saw that!
I absolutely love the floor and counter top! Can’t wait to see the finished room!!
It would go a lot faster with some help. Are you volunteering, Kelly? 😀 Ha!
Actually if we lived closer I would love to help and learn from the “master” first hand 😉
This is brilliant, I just love how the counter turned out and your tutorial is fabulous, makes me think that even I could attempt it!
Of course you could attempt it, Jayne! Using miter saw doesn’t require any special talent. If you can pull a handle and push a button at the same time, you can use a miter saw. 😀
I’m loving going through this step by step. I am a big fan of before, during and after, and this project is giving me some ideas for my hall bath. Keep on moving! I think the next blog will show the paint on the cabinet.
Ha! I tricked ya! Actually, I was planning on painting next, but then changed course a bit and decided to make new cabinet doors and drawer fronts. Hopefully I’ll be able to paint today!
That came out really great!! Good job!! Is that kind of wood ideal for a bathroom that has a shower? Like, will it take moisture and all that okay?
It’s made of cedar, which is naturally weather resistant. The boards that I used are actually fence pickets…the kind that you use to build a privacy fence that’s exposed to all kinds of weather and lasts for a couple of decades. So I think it’ll be fine in a bathroom. 🙂
Oh ya I didn’t think about that. The fact that they are actually for the outdoors anyway, clever!
great job! one question thou, are youi going to put up a backsplash?? and if so what kind??
made the same wood that you sued for the top??
It’s going to be kind of like beadboard, but wider and horizontal instead of vertical. 🙂 And I’m going to paint it white.
post pictures please?!
Oh, I definitely will when it’s finished. I’ll share the whole step-by-step process.
All I can say is, “I. Love. This.” I want to do something similar for the guys’ mudroom, but I never thought of the cedar fence posts! Thanks for the great idea!
I’ve used cedar fence posts for several projects, and they’re definitely the way to go when you want cheap lumber! They’re about 5 1/2 inches wide, and six feet long, and only about $1.50 to $1.99 each. Super cheap! I think most people overlook them for projects because they’re so rough (really, really rough!!), but they sand smooth very easily!
The counter looks amazing! I wanted a wood counter (I was thinking butcher block) with vessels sinks. My counter is 71 inches and this made it expensive. This will totally work, I think. But I would prefer to fill the gaps between the wood for a more smooth finish. What would you have used to fill those gaps if you did fill the spaces between the boards?
I actually decided to fill the gaps in mine, too. 🙂 I got some walnut wood filler from Home Depot. I wanted the cracks to be darker, like they naturally are when they’re left exposed and stained. So I thought the walnut wood filler would be naturally darker than the cedar countertop. It’s still drying, so we’ll see how it goes. 🙂
Kristi, wright decision to fill the gaps, it would be much better that way…
Kristi,
What a beautiful up-cycle of a countertop for a bathroom for a incredible price. Thank you for the tutorial. This isn’t the same vanity you posted a few days back that was in your condo? The cabinets look a bit different. I think using wood is a very nice style change.
Hmmm…I wonder why it looks different. It’s definitely the same vanity that’s in the bathroom of my condo! 🙂
I thought the cabinet was different but it was such a transformation. I didn’t realize the wood counter top was not one piece but more than one. I am so glad you did a tutorial on the counter top. I really want to try this in my new bathroom when I move as the bathroom is in really bad shape.
I luv, luv your countertop!! Do you think I could do this in my kitchen. I luv your kitchen countertops too. Why didnt you do this in your kitchen?
I love the color of your new countertop with the sink you’ve got. Very nice and I’m sure it’ll look great with the painted cabinet. Can’t wait. : )
I have been looking everywhere for a way to install a new counter top without breaking the bank and this sounds/looks perfect! The only question I have is how did you attach the new counter to the cabinets? I haven’t had a chance to look through your whole blog so I’m sorry if you explained this elsewhere..
It looks fantastic and if I can get my boyfriend and our roommate on board I am totally going to try this!
Hi Liz~
I actually haven’t attached it yet, but when I do, I’m just going to use construction adhesive and glue it on. Something like Liquid Nails will work perfectly. That’s how I installed my kitchen butcherblock countertops, and I haven’t had any problem with them.
Thank you so much! I hope mine turns out as good as yours. I am by no means an interior decorator (in fact, I have absolutely no taste) but I am really good at copying what other people do in their own homes so thank you for all the inspiration. I can’t wait to read through the rest of your blog and see what else I can steal! 😉
Amazing job — would love to tackle something like this but don’t think I am as skilled as you! Beautiful bathroom!
I LOVE your idea for this countertop! I’ve been wanting to re-do our in a similar fashion, but would’ve never thought of using fencing – it turned out beautiful! I’m already thinking of how I can use this. I have an old trunk I want to re- do & line with cedar, this would be a cheaper way to do it. I also found a big table at the thrift store for $25 that had a beautiful, heavy metal base with ivy leaves but the top was rotted. I was going to paint it turquoise & figure out a new top – I think the redwood would look fantastic on it! Happened onto your blog by accident, looking for small bathroom ideas, can’t wait to look at the rest of your stuff! Thanks!
I meant cedar, not redwood – was thinking color while typing 😀
How is this countertop holding up? Is it getting dented or banged up at all? I know cedar is a pretty softwood. I’m just asking because I’d like to use cedar on a bar top.
It’s holding up really well! However, if I had to do it over again, I’d use cedar 2″ x 4″ lumber to make the countertop, and connect the pieces using my Kreg jig. Once you sand down the rough surface of the cedar 2″ x 4″, the wood is really pretty, and stains beautifully. In fact, I’m going to be making a countertop on my built-in cabinets in my living room out of the 2″ x 4″ cedar. Of course, the 2 by 4’s aren’t quite as economical as the fence boards. 🙂
Just looked at your total remodel and hopped over for your tutorial on this counter top… LOVE LOVE it, and this will be my future double sink counter top. THANK YOU for saving me a bundle of money!
Kristi,
Looking at your wooden counter tops have given me a great inspiration. I live in a house that has the old amber tongue and grove knotty pine paneling in the living and dining room but none in the the kitchen. Thanks to you I know how to put in a touch of pine without overwhelming the space. The tub and entire makeover are spectacular.
One question? Did you REALLY keep & have access to your sink template??? I guess I’d have to make my own new template as I sure didn’t keep mine, but I’ll think about keeping it NEXT time! 🙂 Love the look!
I used a brand new sink (but a cheap one) that came with a template. 🙂 But in the bathroom that I’m currently working on, I’m reusing the old sink since it’s in great shape. I made a template from the old laminate countertop before I threw it away.
You inspired me, but now I am in kind of a mess. I used left over oak hardwood flooring with a finish for some bookshelving countertops we installed. I thought I would fill in the cracks between boards and sand the entire surface down to be able to stain the wood the color I wanted. Right now it looks like a mess! One problem, I have no idea what I am doing. Any suggestions? I have a power block and orbital sander.
Hi Amber,
Just happened to see your comment. Still looking for help? Maybe you’ll find something of use here: http://lifebeyondsilicon.wordpress.com/2014/03/18/hardwood-bathroom-countertop/
Wood filler doesn’t stain very well…
Whay a great idea! I have wanted a counter top across my front load washer and dryer snd this will look great in my laundry!!
Thanks for the how-to on your countertop! I hope you feel appropriately credited here: http://lifebeyondsilicon.wordpress.com/2014/03/18/hardwood-bathroom-countertop/
Thank you for posting this! I’ve been looking for ideas for a low-cost, rustic DIY countertop for my kitchen…..and this one is PERFECT! (This post plus your Bookcase countertop post are all I need to make my own!) THANK- YOU!!!!
Maybe I missed it in the post but how did you attach the top to the vanity? My wife and I just picked up two vanities to use as the base of an entertainment center and I want to make sure that the top is attached securely to the cabinets.
I used construction adhesive (either Loctite or Liquid Nails…can’t remember which one) around the perimeter of the cabinets and the placed the plywood for the countertop on top of that.
Just discovered your blog and love it. Feel silly for asking but how did you bevel the edges of the countertop?
They’re not really beveled. I just kind of rounded the edges with sandpaper to take off the sharp edges.
Hi Kristi–I stumbled on your site while looking for ideas for renovating our second bathroom. You are awesome! I was pretty worried about whether or not I could tackle a remodel that big but after looking at this, you inspired me to give it a shot. I ended up making my own countertop, mirror frame, diy toilet paper holder and towel rack, repainting and re-sizing the cabinet faces and putting on new cabinet hardware, installing new bath and sink fixtures and sink, installing a backsplash, and resealing the grout in the tile floor…whew. Plus my husband (who was skeptical at best) loves it. Thank you so, so much!!
Love it, I’m about to start the project! One question how and when did you attached the countertop to the vanity?
Oh, lol! I just seen where someone asked that same question! Yhanks
I’m building a built-in entertainment center and was planning on using your technique of cedar 2x4s for a counter above the base cabinets. Which method (2x4s or cedar pickets) came out better in your opinion? I have all the requisite tools, so that isn’t a factor.
The 2 x 4’s put together using wood glue and pocket screws (I used a Kreg Jig) was FAR better.
Thank you for sharing this! This is the best tutorial I have found yet!
Hi Kristi! I was so inspired by the counter top and the whole bathroom remodel that I decided to attempt the counter top and so far so good! I’m currently waiting for the polyurethane to dry so i can apply the coat. I’m so excited to see the end result in my kids bathroom!
I just came across the bathroom project you did with your vanity. It is totally gorgeous! I would love to try something like that on mine. My only question is how does it stand up if you happen to get water on it by accident?
As long as you seal it really well with oil-based polyurethane, it’ll hold up great.
I just came across your countertop project & have a question. Is it OK to use cedar fencing inside the house? Isn’t it pressure treated with chemicals we shouldn’t be breathing, or is cedar naturally used for it’s inherent qualities & doesn’t need to be pressure treated? Thanks
I’m pretty sure it’s pine that’s pressure-treated for outdoor use. Cedar is generally left natural, since it’s naturally weather resistant. But just ask to get sure. I always ask or read the labels to be sure I’m not getting pressure-treated wood.
I really love your wood countertops. We have the top to a dining room table we have never used & we want to make a 2′ x 6′ countertop out of it for a kitchenette. The table top already has a finish on it. Once installed, we are thinking of putting bar top lacquer or aqua spar on it. What do you think? Can you suggest how we should prep it?
Thank you for your advice! Love your site!
Your vanity looks awesome. My wife and I are going to do the same thing but with a vessel sink. Quick question for you, if you don’t mind. How did you miter the edges of the front and side piece so nicely? The boards are so long? 30″ or so? Did you have to use a table saw? I have a chop saw and it won’t let me insert boards of that length. This is the only roadblock I am encountering in understanding your fantastic project. Please explain. Thank you very much.
The only thing I mitered are the corners where the side piece and the front piece meet, and I used a miter saw to do that. But I think you’re probably talking about the top edges of those pieces, which look like they have a miter along the long edge. I didn’t own a table saw when I did this project, so if those edges are mitered (and it looks like they are), the boards came that way.
I love this! Excited to have found such an easy way to redo my terribly dated bathroom vanity! One question: did you remove the existing counter top or cover it/ How is it secured in place?
I removed the original countertop. It was held in place with screws from underneath, so I just removed those and lifted it off. I glued and nailed the new plywood in place (nailed through the top of the plywood into the top edges of the cabinet) before attaching the cedar fence boards.