Breakfast Room Ceiling (It’s Very Good News!) – [VIDEO]
Y’all know how I’ve been so disappointed with how low the ceiling is in the breakfast room, right? That ceiling was about 7.5′ high in most of the room, but sloped down to about 7′ at the very back of the room (where the pantry will go).
Well, yesterday I decided to take the plywood off of the ceiling to get a good look of what’s up there, and make a final decision on what needs to be done. As it turns out, it’s great news! The low ceiling is a drop ceiling, and the actual ceiling joists are at regular height! Once I remove all of the drop down framing, the ceiling will be a standard 8′ high, just like the rest of the house! Except for the pantry, that is. That’s going to have an angled ceiling.
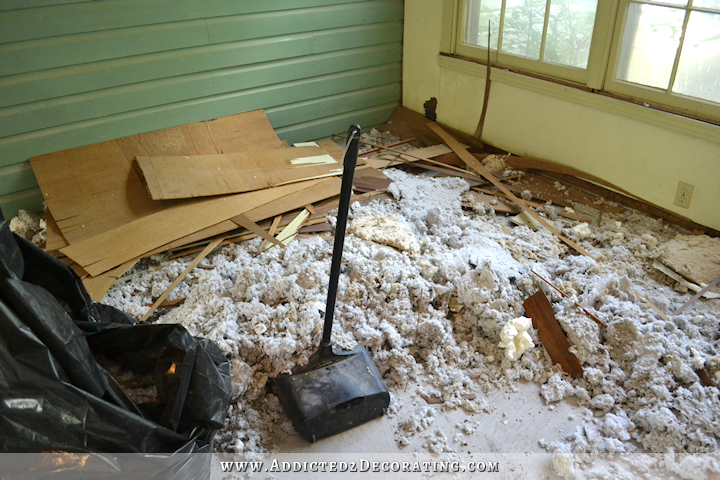
It was a messy, disgusting job. That old insulation is probably a few decades old and it was filled with stuff I’d rather not ever have to deal with. But that’s the reality when dealing with an old fixer upper. And dealing with that old plywood plywood instead of drywall was a real pain. It was so old and brittle that it would come off in whole pieces. It came off layer by layer, and even most of those layers splintered into strips. So what would have taken about an hour if the ceiling had been covered in old drywall, took me several hours to remove.
But let me show you what I discovered!
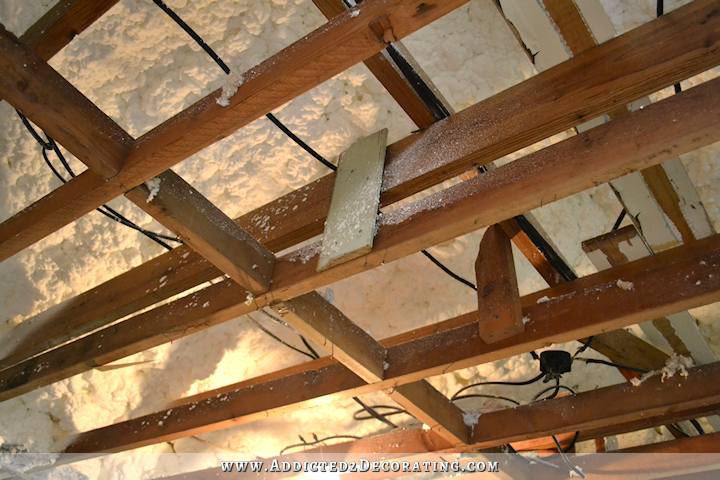
The first thing I noticed is that the original roof structure ends where I put the white line in this picture…
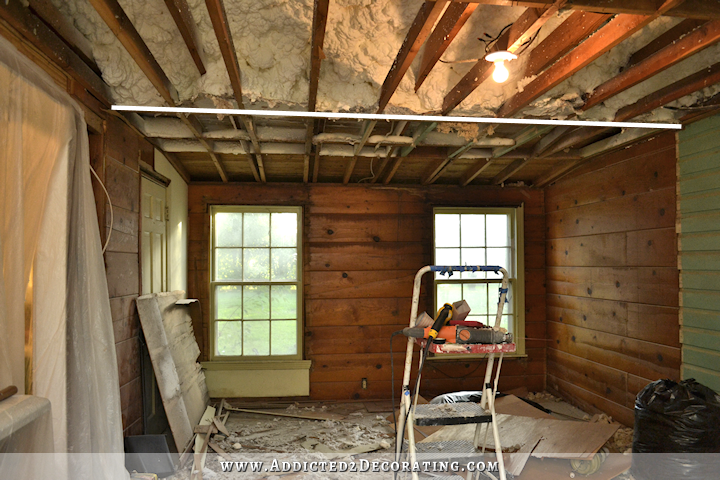
That picture is looking towards the back of the room (towards the back yard) where the pantry will go, and where the room had a downward sloping ceiling. Remember that awkwardly sloping ceiling? You can clearly see it on the right side of this picture…
Anyway, the white line indicates where the load-bearing beam is that’s holding the original roof rafters.
Remember that this area was originally an outdoor covered breezeway that connected the house to the garage, and it ended where the white line is above. You can see that the white line is right in line with where the green shiplap ends on the right wall. That green shiplap is the original wood siding that was on the garage.
From that load-bearing beam, the roof angles up towards the front of the house until it reaches the center of the original roof structure, and then it angles back down so that the rafters rest on the front wall of the room.
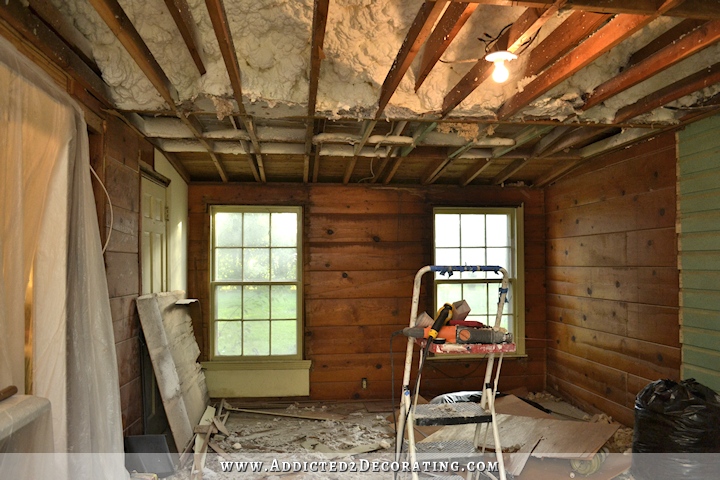
So at some point, a previous owner decided to extend the breezeway back about eight feet, and then enclose it to make it part of the house. You can see on the wall in the picture below where the wall was extended beyond the original green wood siding. And then whoever did this just added a low sloping ceiling to the back, tied in to that original load-bearing beam, which you can see on the right side of this picture.
Now here’s where it gets interesting. Because they wanted this to be a big, open room, and they clearly didn’t want any kind of angled ceiling or that load-bearing beam showing, they had to come up with a way to make most of the ceiling flat, so they built an entire drop down ceiling frame with scrap wood and 2 x 4’s.
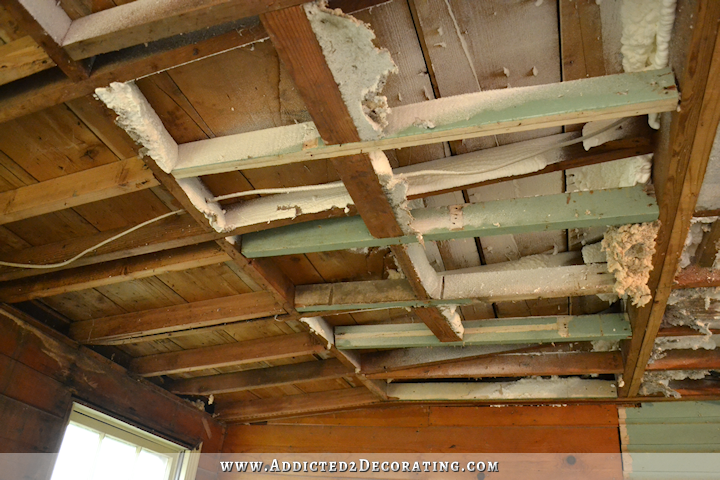
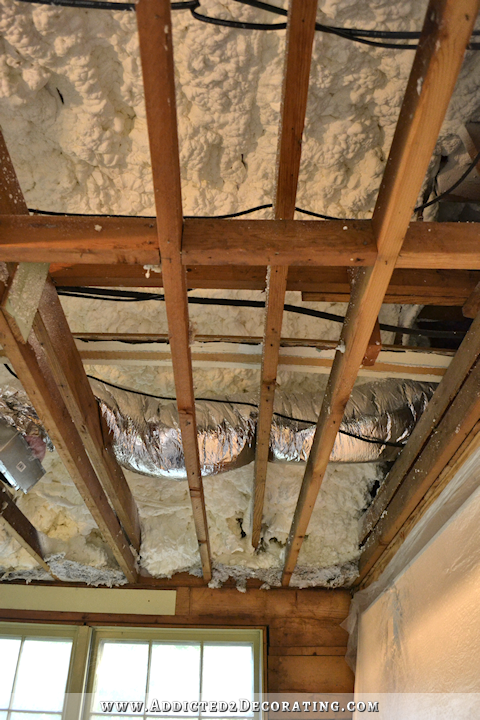
You can see in this picture below that actual rafters that are holding the roof extension are sitting on top of that load-bearing beam. (Indicated by the red arrow.) But to avoid having a beam visible in the room. they added a drop down ceiling framing to be flush with the bottom of that load-bearing beam. (Indicated by the yellow arrow.) You can see that by doing that, they dropped the ceiling down six inches.

And then from that load-bearing beam and heading towards the front of the room, they continued the drop down structure at the same height (flush with the bottom of that load-bearing beam). You can see below that they used scrap wood (e.g., the light green piece right in the center of this picture) nailed into the actual ceiling joists to hold the drop down ceiling structure.
So the good news is that all of that drop down structure can come out. None of it is actually structural. It’s only purpose was to hold the ceiling level and hide the back load-bearing beam.
Side note: You’ll notice a lot of black wiring in the attic. All of that old wiring is being removed, room by room, and replaced with new, up-to-code wiring. I’ve found a lot of open junctions in the attic in that old wiring, and that’ very dangerous and definitely a code violation. Wiring codes are different in different states (and cities/counties), but wiring junctions in an attic should always be closed up in a junction box. I’ll be working on updating all of that in the next few days.
This picture shows how much it’ll raise the ceiling. The drop down ceiling structure hits the front wall just right above that white horizontal strip of plywood above the windows. But the actual ceiling joists are several inches higher.

And where the previous owners tried to hide that load-bearing beam at the back, that won’t be necessary for me. As it turns out, that’s exactly where I had intended to put the wall for my pantry, so it won’t show at all!
So the pantry will have an angled ceiling, with the drywall attached to the angled rafters. And the main part of the room will have a standard 8-foot-high ceiling. I’ll get exactly what I want, and all without the need for any costly structural reframing. That’s the best possible outcome I could have hoped for!
In case you’re totally lost looking at those pictures (I know it can look confusing!), I’ve made a video explaining everything. Hopefully it’ll be a bit clearer. Please excuse my coughing, though. There were insulation fibers floating through the air and irritating my throat.
Update:
My pantry is finished! Want to see the entire project from start to finish? You can find every single post about the pantry build right here…
Or you can skip to the end and see how it turned out. Here’s a peek of the finished pantry…
You can see more pictures on the before and after post right here…

Addicted 2 Decorating is where I share my DIY and decorating journey as I remodel and decorate the 1948 fixer upper that my husband, Matt, and I bought in 2013. Matt has M.S. and is unable to do physical work, so I do the majority of the work on the house by myself. You can learn more about me here.


![Q & A With Kristi [VIDEO]](https://www.addicted2decorating.com/wp-content/uploads/2019/06/thumbnail.jpg)
I found a picture of a pantry with a window that you might enjoy. The light coming through the window on a sunny day is really cheerful!
http://cedarhillfarmhouse.com/2015/06/bhome-summer-open-house-tour.html
I like those pictures. Very classy. Lots of light.
That is not a food pantry, though. It’s a butler’s pantry, which serves a very different purpose. However, point taken, that a window can work even in a food pantry and Kristi plans to install one.
Super news! I do still think you might want some sort of window in the pantry. You love natural light and it might look funny from the outside to have a big strip of wall with no window. But, I’m sure you’ll make it work, even if you decide no window.
I actually did order a 32″ x 32″ window for the pantry. 🙂 The more I thought about it, the more I couldn’t imagine not being able to see into the back yard from that room, and I just imagine sunlight coming through the glass on the pantry doors.
The window will keep the room from feeling like a damp celler. No musty smells.and some natural light.
I am so happy things are going well..hope it makes you feel excited to keep going with lots of energy.
Oh I agree, you will be so glad you did that! I am all for natural light, windows if possible, in powder rooms, pantries, walk in closets too.
Funny – I was going to post today that I thought getting rid of that source of light might be a mistake. It will keep the pantry nice and bright – and with the glass door you have planned for the pantry it will bring needed light into that end of your breakfast room.
So often when you are renovating surprises are of the negative kind. It’s nice to get a break like this with the ceiling height.
Hell’s bells, girl! I would RUN for the hills!!!
Not you! You dig in…again and again.
Just wanted to say I admire your drive and can-do spirit!
I’m happy you’re happy. But I’m especially glad you found a little help this time. It’s already a lot to tackle, glad you were able to clear part of it out of the way. GIANT KUDOS!!!
Wonderful news Kristi.
I may not have your same taste in decorating but I will say – I am floored by your endless energy, enthusiasm, motivation and creative vision. It is beyond admirable. I become exhausted by reading your blog and cannot turn away. What a lovely home you are creating.
You said exactly what I was thinking and wanting to express. Amazing–such knowledge, skill and talent, Kristi! Congratulations!
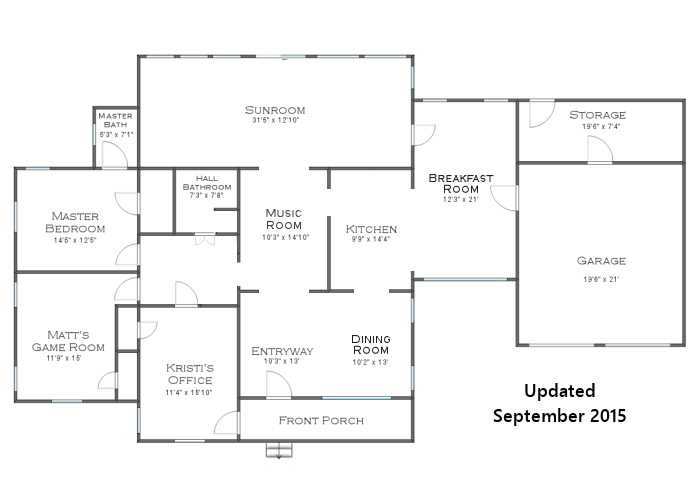
Another day starting out on a good note. So when the pantry is built out, what will the dimensions of your breakfast room end up being? Also, what will the pantry dimensions be? Too bad you have to lose the view out to your back property, but we all must make compromises when space is at a minimum. You will end up with just the things that will improve you and Matt’s life tremendously.
The pantry will be 12′ x 8′, and I did decide to put a small window in there. I couldn’t bear the thought of not being able to see into the back yard from that room.
That will make the breakfast room 12′ x 14′.
Hmm, I think a 12x 10 pantry and a 12×12 breakfast room might work better. If you are going to have a table and banquet and built-ins in the breakfast room, do you really need 14 feet? you can never have enough storage space. Once it is done it’s done. Although, I guess since it is you, that might not be true!
When doing a major remodeling (esp. of an old home) it seems we always hit a low point in progress. We get bummed out and lose momentum. THEN A MIRACLE OCCURS! Someone shows up who understands exactly what we want done and is able to complete the project in a timely manner and on budget. We are once again invigorated – full speed ahead. Such good news about your ceiling. YAY!
This is all GREAT news!!! I’m so happy for you!
Oh the things that get uncovered in older homes! I’m glad that it isn’t structural and you can raise the ceiling to where you want it.
You love natural light so a window in your pantry will be nice.
After years of reading your blog, I have, for the first time, heard your voice– love it! Keep rocking it, sister!
I agree with Tracy. Love the drawl, sounds like a bit of Australia in there. You should do more videos they’re great to hear.
Love all the work coming together for you. Keep going Kristi 🙂
You took the words right out of my mouth. when I saw the floor video and heard your voice for the first time, it helped complete my picture of “Kristi”. so glad you’re going to put a window in the pantry-you can also put together the storage you need to keep light off stuff…
Awesom-est news to date!!!!! I am really exvited for you and without expensive work to do! Happy dancing!
Kristi, I am so excited to have found your blog. I just enjoy reading it but it may also get me inspired and educated to tackle some things. I used to be more bold than I am right now so i might get it back from following your work! Thank you so much.
I’m sure you noticed some of the wiring in the ceiling looks frayed, careful as to not have a fire after all your hard work !!!! You should work construction !!!! Great Job !!!!!
What?! That looks perfectly safe to me.
😀 Just kidding. I’m actually about to rewire everything so I can get rid of all of that old black wiring. That stuff is scary looking, and definitely not up to code.
You know what? I’ve never watched a video from you before so I’ve never heard your voice! I should have known it’s a sweet southern voice that can make rafters and dry wall sound gooood.;0)
I wanted to come through the video and put a mask on you- but that would make a video difficult! Don’t you love the mysteries your house keeps revealing as you dig and uncover? Kind of like life.
On a different note, I told my husband about your insulation. How are you liking it? I don’t even remember what it’s called but we’re going to look into it. Our attic is kind of large so I’m hoping it’s cost effective (but on a cold Colorado night it’s got to save $$$!)
I love it! It was so nice yesterday being able to take the plywood off of the ceiling, and having the room remain cool, rather than having the cool air sucked into a hot attic.
I’m kind of jealous of the spray foam insulation. I’d love to have our living room crawl space done with it (and never have to worry again) but at something like triple the cost, I just don’t think I can do the expense right now (I’m having some tree work done tomorrow AND heating pellets delivered in September, so there goes the excess money). So we’ll probably go with batt insulation and vapor barrier.
This is such wonderful news on the ceiling! So awesome!!!!!
HURRAH!!!!!
Sounds like Kristi has got her groove back. Or your mojo or whatever the trendy word is. Nevertheless, it looks like you are getting energized again and have a vision and your fans are going to be seeing a new room remodel this year! Yay!
Have you ever traced the past ownership of your home? That might be interesting to dig into. I wonder if family of any past owners still live in your area?
The house has only had two (well, actually three) previous owners. I don’t know who the original owners were, but I think they’re dead now. They sold it to a couple who lived there for 40+ years and raised their children there. After that man and woman passed away, the house went to their two daughters, and they are the ones we bought the house from. One of the daughters was actually my very last interior decorating client.
I am happy for you regarding the ceiling! Thank you for the video! Seeing the pantry side. Really helps me invincible your plans. That will be a really nice sized pantry and the breakfast room will have plenty of room for Matt to maneuver. LOVE IT!
Envision! Lol
You caught a lucky break! Sometimes these “renos” are done and create more problems structurally, but at least they didn’t hack up any joists or beams! The wiring, well, maybe when they did it they weren’t so observant of fire hazards? ( I hope that was the case! )
I was worried about you shooting that video – inhaling that insulation. Please be careful concerning that stuff! You may not feel the full effects from it for years, and the damage can’t be undone.
Looking forward to what comes next!
JANET SAYS
I came in late with this comment for your August 11th posting, so I don’t know if you read it. But I liked what you said at the end of your video, “It’s all going to work out. Life is great, have a joyful day!
August 15, 2016 at 4:50 pm
Hi Kristi,
I Have a statement that I would like to share with you. I have this posted by my computer.
“It isn’t as bad as you sometimes think it is. It all works out. Don’t worry. I say that to myself every morning. It will all work out. If you do your best, it will all work out. Put your trust in God, and move forward with faith and confidence in the future. The Lord will not forsake us. He will not forsake us. … If we will put our trust in Him, if we will pray to Him, if we will live worthy of His blessings, He will hear our prayers” (Gordon B. Hinckley)
Sometimes when I have to much to do, I read this statement and it does all work out. I just work on getting the easier things done first. And I feel like I have been successful that day. Life is great!
Reply
Great news Kristi! And I think that creative mojo is definitely back!
Great news and happy for you!
I love that you ripped this all out and figured out how to get what you wanted from the space. So often when I find myself feeling a little discouraged or unsure about whether I can handle a home improvement project, I channel my inner Kristi and ask whether you’d let yourself be put off by the challenge. Posts like this always make me say, “Kristi would do this, and I will too.” I’ve yet to get myself into trouble with that. 🙂
I love your posts but I really loved the videos you’ve done the last 2 posts. Pictures are great but the videos just makes what you’re doing come alive. Hope you keep doing them.
I’ll definitely keep doing them! I don’t really know why I haven’t done them until now. I guess I thought they had to be some kind of professionally-edited, TV program-quality videos, and I don’t know how to do that, and I don’t want to spend time learning. Then when the concrete guys were here, Matt asked me to video the process for him, and when we were watching it later, I thought, “Hmmm…I think my readers might enjoy seeing that!” 😀 Made me realize that professionally-edited, TV program quality isn’t really necessary. I can definitely manage simple videos!
Well that’s great news. Hope the glass of water fixed your cough! This is going to be a great room,the pantry are you leaving the windows in.?
I’m taking those out and putting a smaller one in the middle.
Any chance you might get your Foam Insulation guys back out to spray the rafters above your panty “ceiling” area, before you replace that ceiling? And while they are there, maybe have them insulate the pantry outside wall after you’ve replaced your window? Congratulations on the progress. You’re doing a great job. Love reading every entry of your blog.
I LOVED the video and now desperately want to see more! Could you do a video tour of your home??
I’d love to! Let me get a bit further along on the breakfast room so that I can take the plastic down separating it from the kitchen, and then I’ll do a tour. It might be two or three weeks. I want to keep the plastic up until the drywall goes up and the taping and mudding is done.
I hope to God there wasn’t as estos in all that stuff you pulled down, given the age of the house! 😳😳😳. But otherwise, I’m so glad it’s working out how you want it! 👌
*asbestos