I Have A Level Breakfast Room Floor! (Leveling A Concrete Floor With A New Layer Of Concrete) [VIDEO]
The concrete guys came through for me!! They told me they would be here between 7:30 and 8:00am on Saturday morning, so I was expecting them about 9:00am. That’s just what I’m used to when it comes to working with subcontractors. Well, they showed up at 7:45, and got right to work!
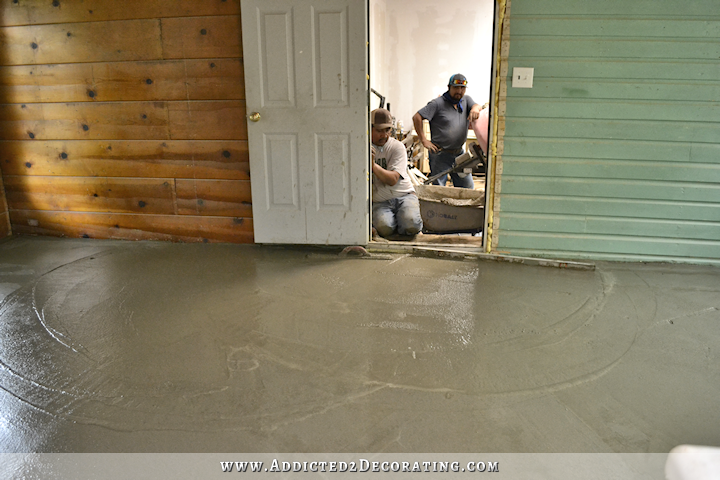
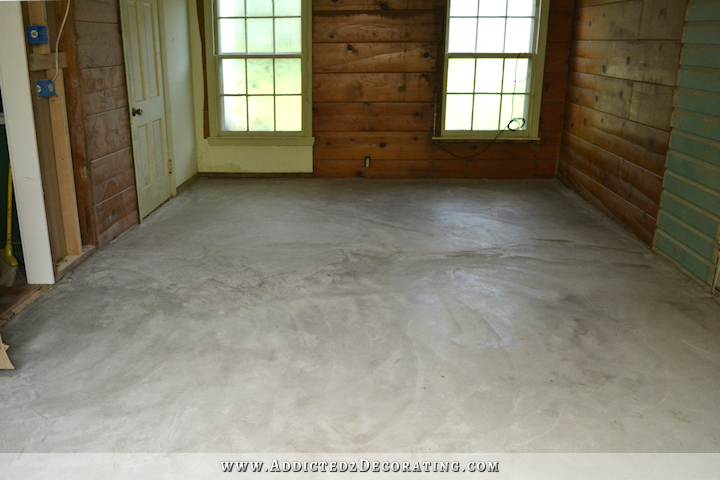
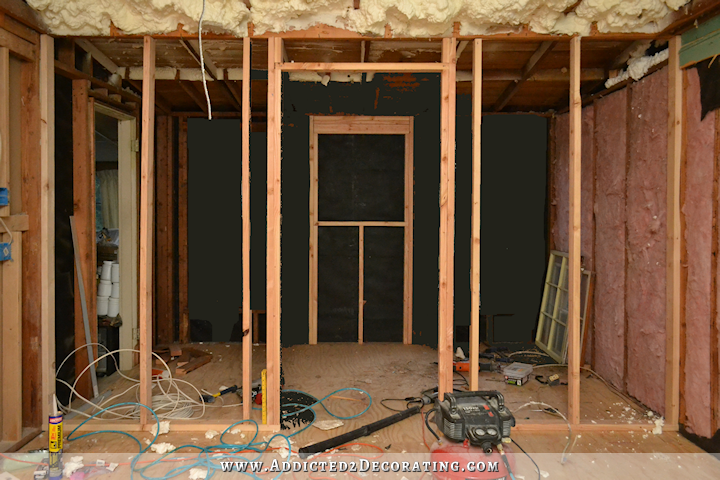
Just before they started, I managed to get a couple of quick pictures of the room in its pre-new-concrete state, so that you can see it in all its glory. Here’s the view looking towards the back of the room (that will eventually be pantry). The other men who came last week (the ones I hope will be “my people”) wanted to see what was above the plywood on the ceiling, so that’s why the ceiling looks even worse than usual. But anyway, the story here is the floor.
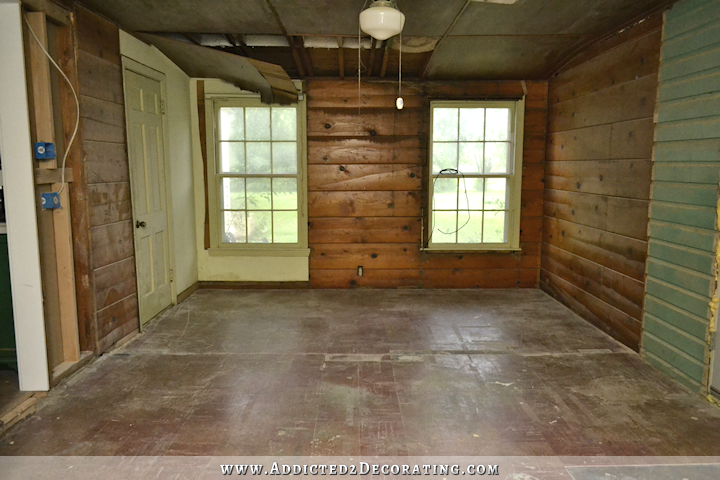
You can see one of the large cracks in the photo above, and the whole floor was covered in 9 x 9 asbestos tiles in two different colors in the design of a large treble clef. Don’t ask me why. 🙂
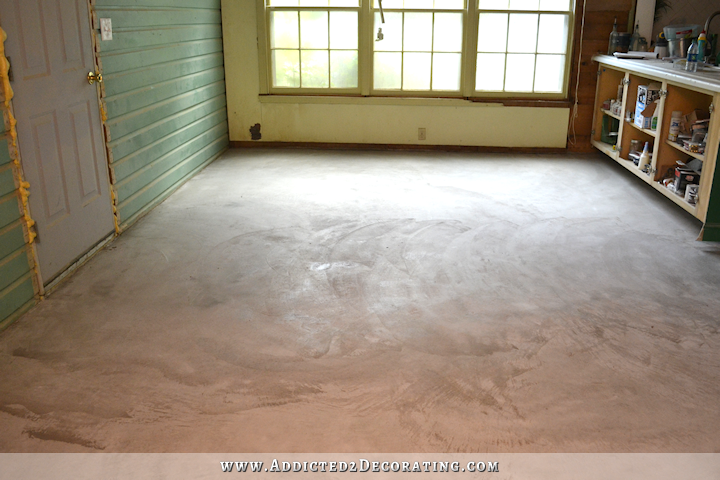
And here’s the view towards the front of the room.
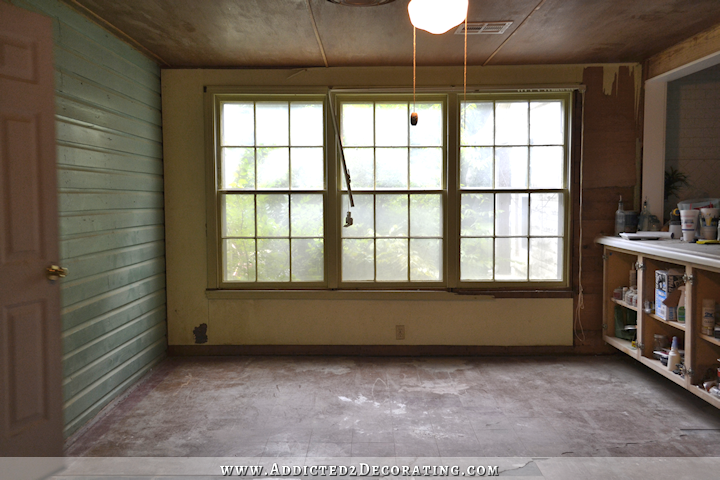
And here’s the second big crack with some of the tiles missing.

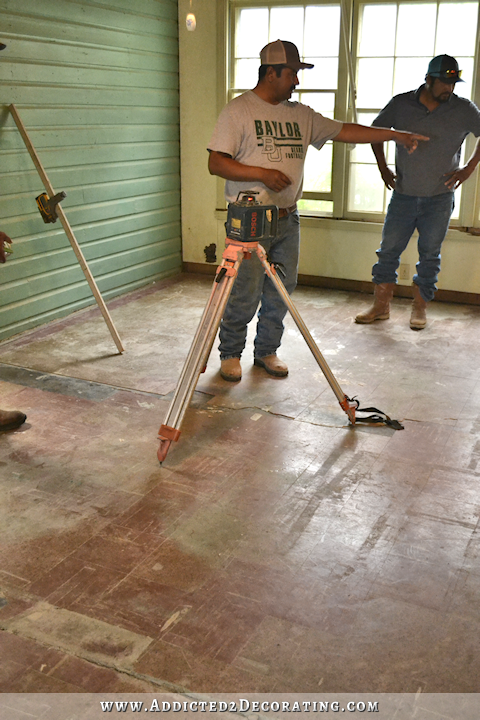
So they started by determining just how much the floor needed to be raised in order to meet up with the underside of the subfloor boards under the kitchen floor. They had this big, fancy, very expensive self-leveling spinning level that they put in the middle of the room. The small part on the top spins and shoots a level line around the entire room. And then he used the thing leaning against the wall on the left and placed it in various places in the room and along the wall to determine where the level line was.
Then they drilled holes about 5 inches deep into the floor.
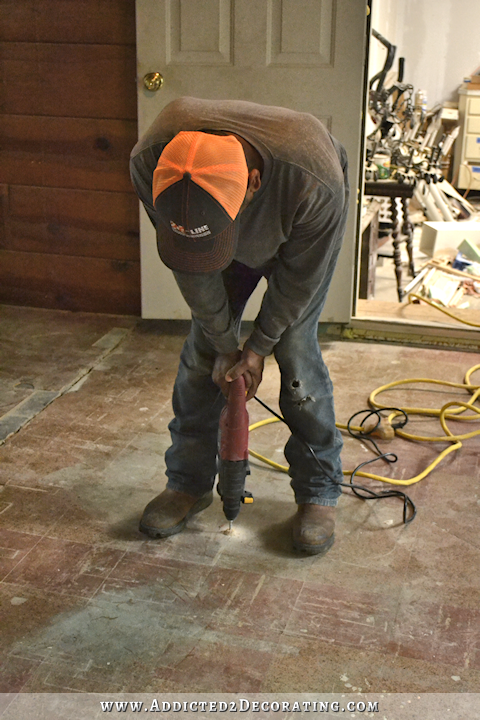
And then put these special nails into the holes sticking up about an inch or so.
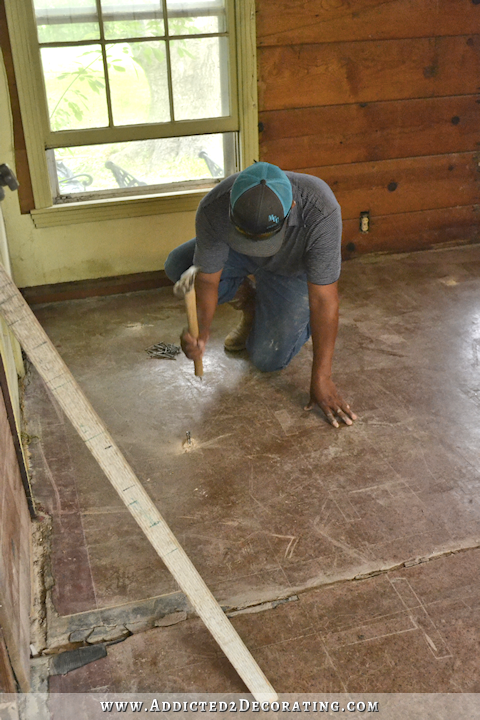
He said those are used to anchor the new concrete to the old concrete.
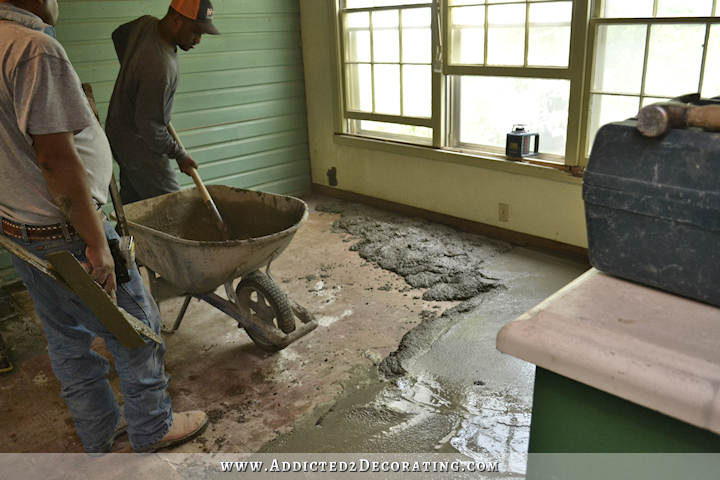
And then they started pouring the concrete at the back end of the room (the future pantry). While they were working, they set up the spinning level in the front window, and then as they would pour some concrete, they guy would take this tool that “talks” to the spinning level to see if they had poured enough concrete. When the level line being shot around the room by the spinning level hits a certain point on this tool, it beeps really loudly.
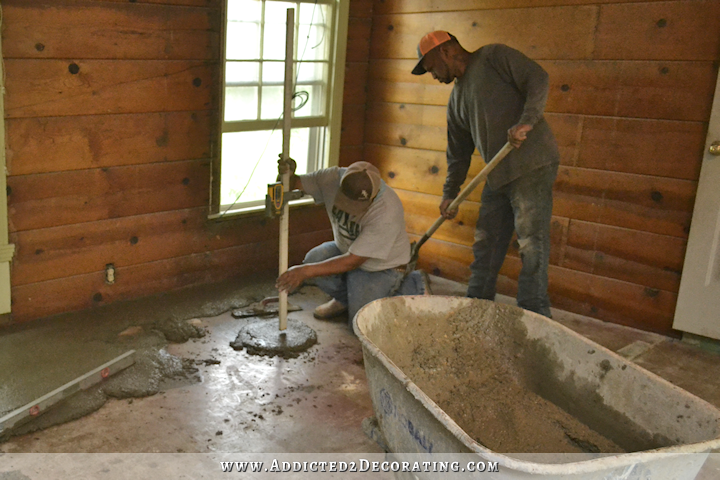
They poured a good two inches of concrete on most areas of the floor.
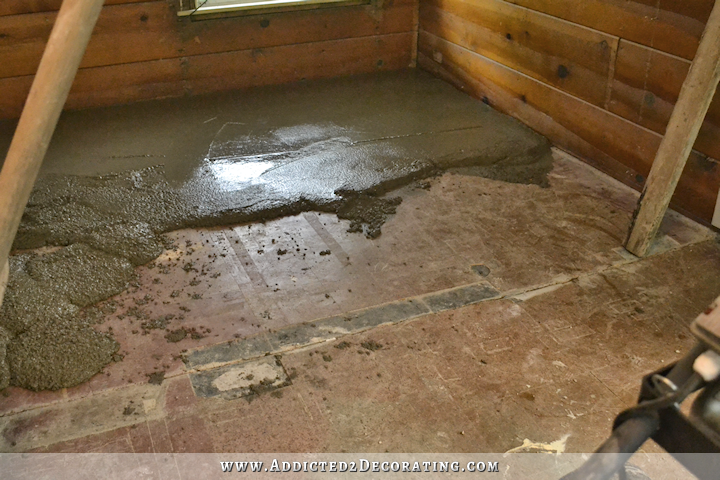

When they got a large section poured, they went back over it with this really big float.

They started at the back of the room (the pantry side), then did the middle part towards the kitchen, and then did the front of the room, working their way out the garage door.
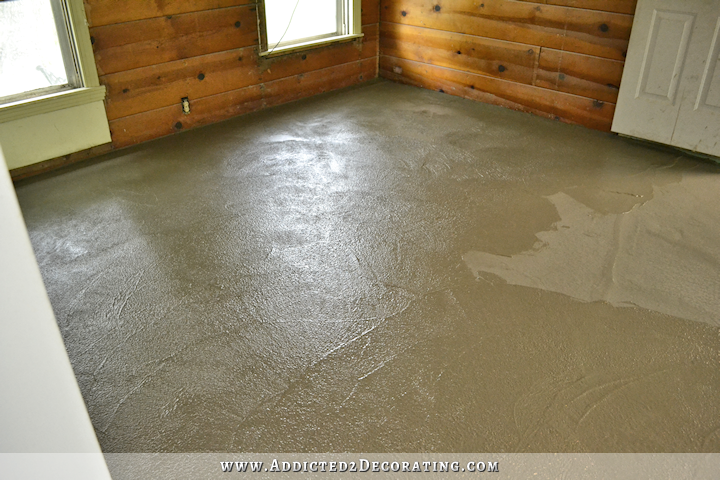
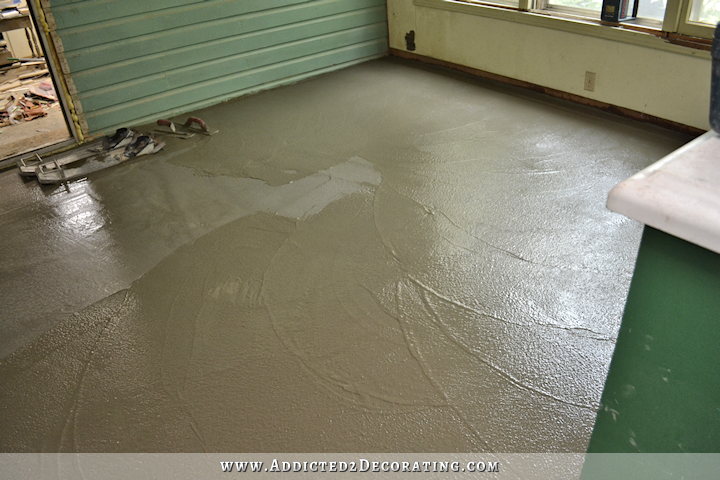
And here’s what it looked like with the entire floor covered in freshly poured concrete.
They waited about an hour and then troweled the entire floor.
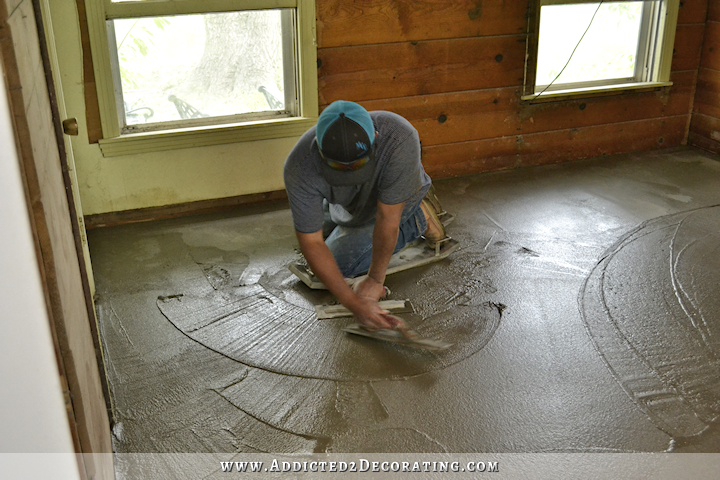
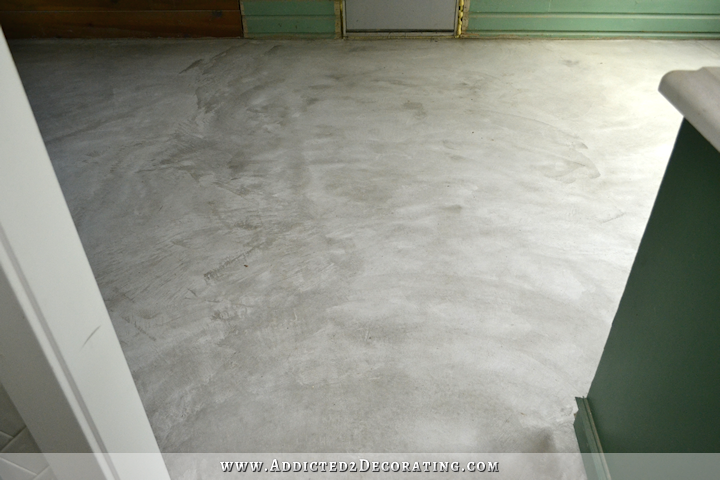
And after the first troweling, it looked like this…
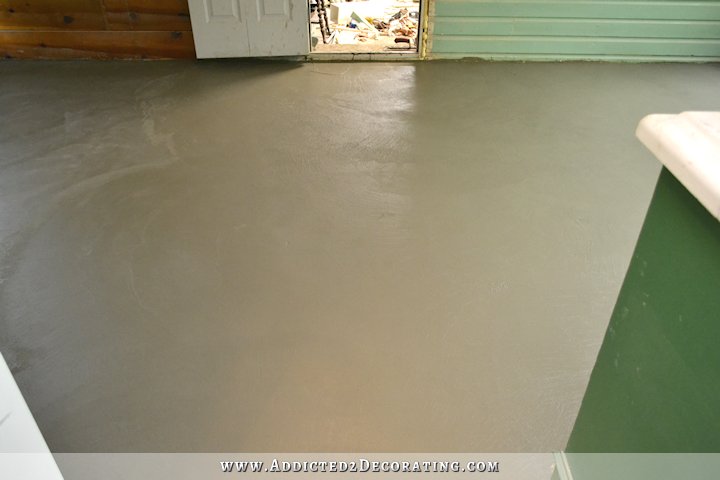
They troweled it a total of three or four times, waiting about an hour between each time. After the final troweling, it was very smooth.
They started about 8:00am and finished up around 4:30pm. It was a lot of work, and that’s with three men doing the work. I’m so glad I paid to have this done!
And here’s what it looks like this morning after drying for about 36 hours.
It’s not pretty yet, but just having this floor level, and ready for me to put flooring onto, has felt like such a huge weight off of my shoulders.
This room has never really felt like part of the house to me. I think it was because of the step down from the kitchen floor into this room, plus the terrible state of this room. It’s pretty much been a storage room and even a work room since the day we moved in. I’ve used this room for sawing wood, mixing concrete for my countertops, painting my kitchen cabinet doors, and so much more. It’s been the forgotten and badly mistreated room for far too long now, so it’ll be very fun to see it transformed into an area that Matt and I will enjoy on a daily basis.
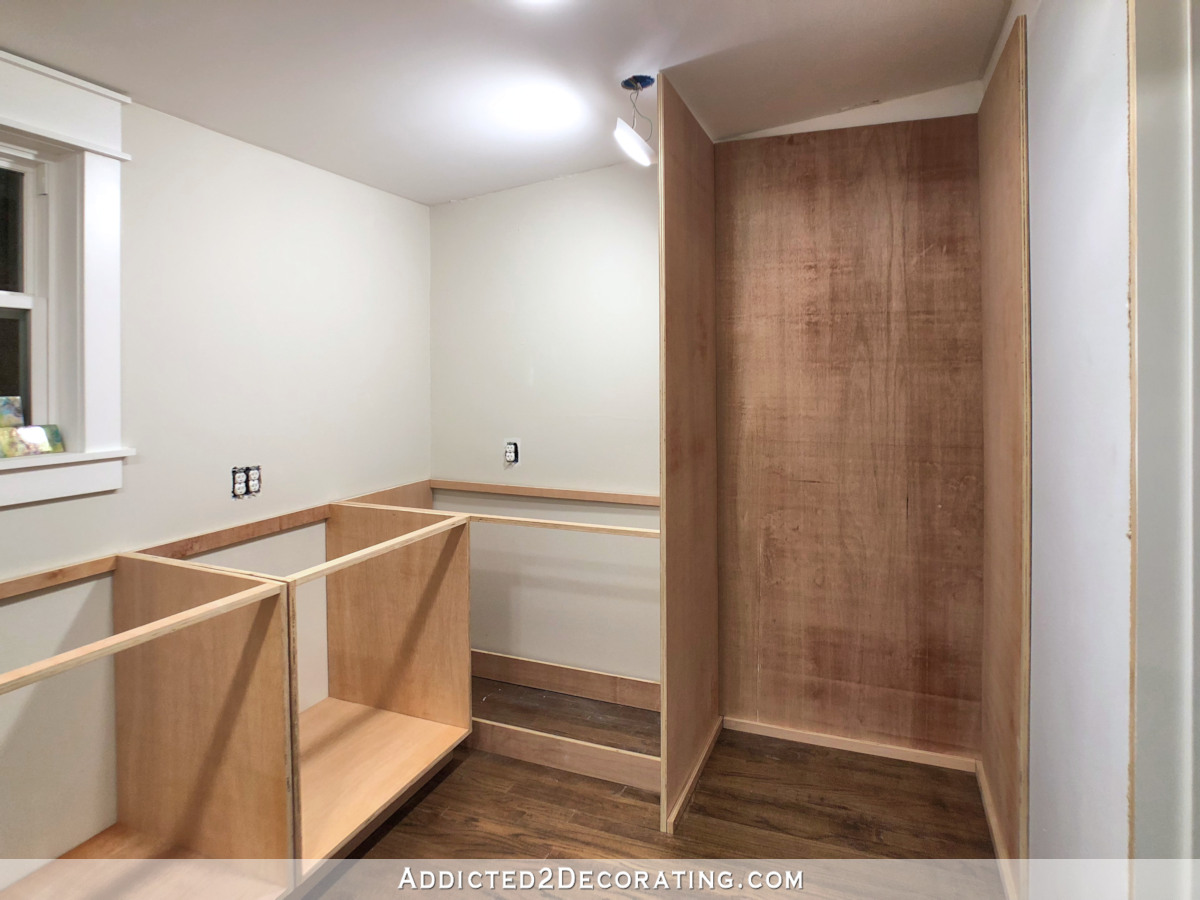
And now that this major step is finished, I feel like the rest of it will be very manageable. I have to wait for the concrete to cure for about four or five days, but they said that by Thursday or Friday, I can start putting down my plywood subfloor, and then getting my hardwood flooring installed in here. That will totally transform this room and make it feel like part of the house!!
I took a couple of videos! Nothing fancy, but you can see the process they used.
Update:
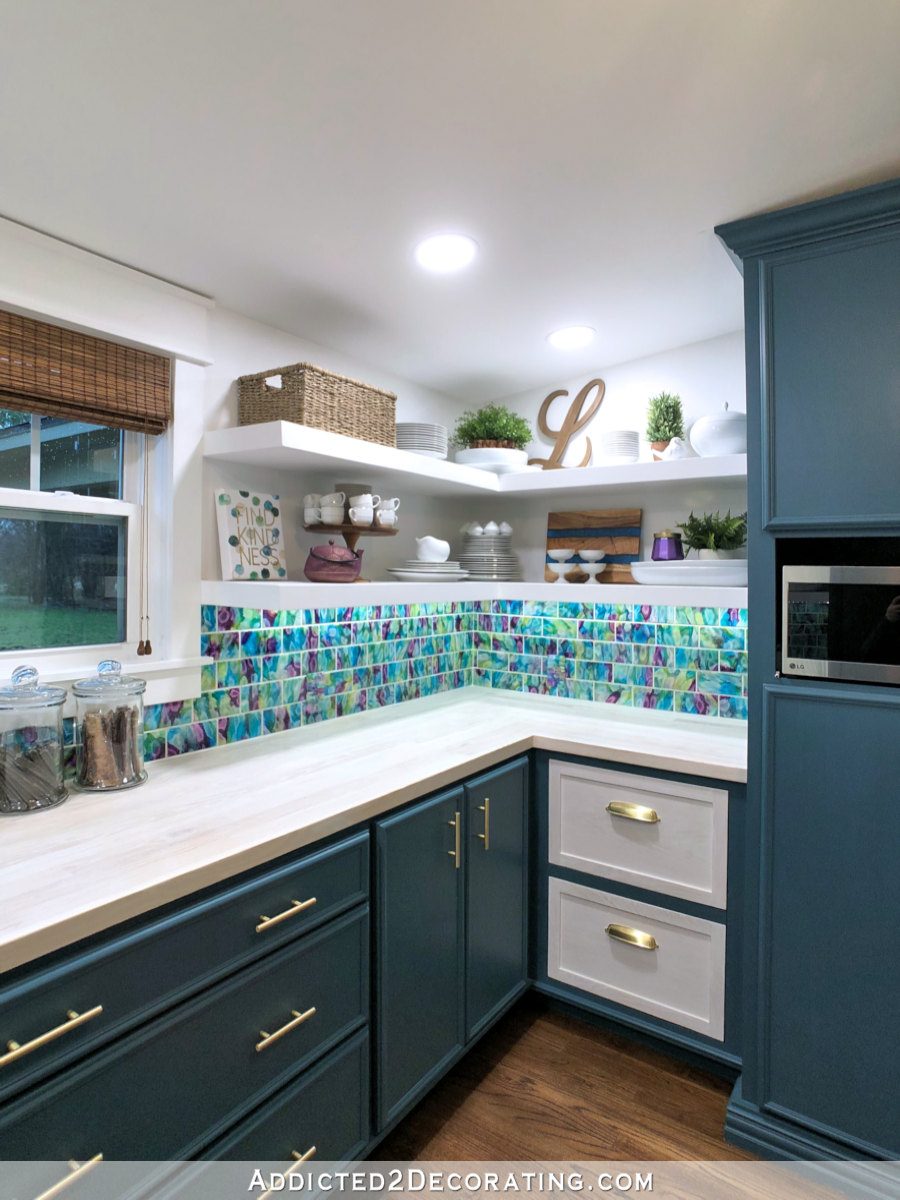
My pantry is finished! Want to see the entire project from start to finish? You can find every single post about the pantry build right here…
Or you can skip to the end and see how it turned out. Here’s a peek of the finished pantry…
You can see more pictures on the before and after post right here…

Addicted 2 Decorating is where I share my DIY and decorating journey as I remodel and decorate the 1948 fixer upper that my husband, Matt, and I bought in 2013. Matt has M.S. and is unable to do physical work, so I do the majority of the work on the house by myself. You can learn more about me here.


Wonderful! I’m so glad it worked out for you. Sounds like they were very good workers. Will you have the ceiling done before laying the floor?
Whoo Hoo!
Hooray for your people! 🙂
Why would they drill through asbestos tiles without any precautions?
That was my question as well.
I was wondering the same thing.
I was wondering the same thing!
It looks like he is drilling an area without tile, and I hope he/they continued to only drill tileless areas for everyone’s health and safety in the house.
I guess they didn’t think it was enough to matter. I’m not concerned about it. When the room is nearer completion, I might do an air quality test to be sure everything is okay, though.
So happy for you that this arrangement with ‘the new guys’ is working out. There is nothing like a reliable and diligent crew to inspire confidence. Can’t wait to see the hardwood flooring in place. Do you feel your mojo returning?
I definitely do!! If I didn’t have to wait for concrete to cure, I’d be working on that floor TODAY! I’m so anxious to get plywood and hardwood flooring down in there.
Are you going to remove the interior paneling? It looks like there is some green vinyl siding in there. It would be neat if you got the breakfast room totally done before winter.
I’m leaving it up. It’s the original wood siding, not vinyl. And I’ve found that I really love having wood behind the drywall on my walls. It makes hanging things on the walls so easy. No worries about finding studs or using anchors.
Did you discuss with them the pros and cons of running the concrete up against the wood walls and moisture concerns from the concrete it dries and in the future when temp changes cause it to sweat?
They’re the pros, and I figured they know what they’re doing. If it was a problem putting concrete against wood walls, I’m sure they would have told me. And I can’t imagine a slab that’s two feet above the ground having sweating issues.
I am so excited for you and Matt!!
Wow! That was a lot of work. I thought your descriptions of the work being done was interesting. I also wonder why/how they worked on the asbestos with no precautions. I get that once the concrete is poured and dry, it’s safely entombed, but during the drilling was there any safety precautions?
No. I’m guessing they didn’t think it was enough to matter. I’m not concerned about it, but when the room is closer to completion, I’ll probably do an air quality test to be sure everything is okay. But I’ll wait, because there’s still lead paint in this room, and I’m sure there are other hidden contaminants as well.
That confused me too. But it did look as though they were drilling in an area where the tiles were already popped. My Dad died from Mesothelioma. It is a horrible preventable disease. Please double check you air quality. But, anyway, I loved the video and I am thrilled for you and Matt!
Holy Cow, Kristi! That looks a zillion times better already! So glad you hired this one out, some things are better left to the pros. I can’t wait to see how it comes together. You are amazing!
What an accomplishment, however, I am curious about what caused the cracks in the first place. If the cause was not fixed, won’t the new concrete eventually crack as well?
I was wondering the same thing…is the original floor stable now or will the cracks continue to move and grow?
The original floor has probably settled as much as it’s going to. Those cracks have been there for decades, according to the previous owner. They will shift some as the seasons change (just like the rest of the house does), and the new concrete will probably crack. But at least it will be level. But that’s why I have to use plywood between the concrete and the hardwood flooring. I couldn’t use the concrete as a subfloor for the hardwood flooring because there needed to be something in between them to act as a buffer.
It cracked because this house was built in the late 1940’s following WWII when access to steel and other metals were limited and very expensive. So around that time, concrete was often poured without rebar. Those cracks have been there for decades. The new concrete will most assuredly crack, which is why it can only be used to level the floor, but can’t be used as the subfloor for my hardwood floor. Plywood has to be glued and screwed to the concrete to act not only as the subfloor for the hardwood floor, but also as a “buffer” between the concrete and the hardwood floor. The plywood should greatly minimize any shifting that would otherwise transfer to the hardwood floor.
The only way to fix it completely would be to remove the entire slab of concrete and start over, but the cost of that would be about $25,000, so it was out of the question.
Gottcha, Kristi. I love your blog! My daughter just bought her first home and is a loyal follower of yours as she doing some minor (in comparison to yours) renovations!
I’m wondering why the plywood would be glued and screwed to the concrete, if you’re pretty sure the concrete will crack. Wouldn’t that possibly put stress on the plywood? It seems like it would be better to float the subfloor over the concrete. Of course, I don’t really know what I’m talking about and I’m sure you’ve done a boatload of research! It’s just something I thought of.
Anyway, wasn’t it nice to have a room inside where you could make big messes for a while? You got a lot of stuff done in there!
Yes! That’s exactly what I thought, too! I thought it made sense for the plywood to be floating on the concrete, and maybe joined together on the edges to create one large floating (sub)floor. I asked them about this, and I can’t remember the reason they gave me for not doing that. But it just makes so much sense to me! I think I need to really research this and possibly get more opinions.
I agree. It should be researched more. I believe the floating plywood might possibly be a better idea.
I think you have to lay a moisture barrier on the concrete before you can nail down your plywood.
I know nothing about building, but intuitively having a floating subfloor makes sense to me. I would definitely research options. My other question was going to be whether they put rebar into the NEW concrete to make it more stable. Regardless, I love the progress. At least it’s level and almost the proper height so that it will flow with the kitchen. Yay for progress!
And don’t forget you’ll need a moisture barrier on top of the concrete.
Sorry, my laptop is skipping as I scroll, and I didn’t realize someone had already posted about the necessity for a moisture barrier.
I’m sure it will make a world of a difference when the room is done and you can enjoy it as a breakfast room! We’ve just finished our garden shed (after 4 years of waiting and procrastinating) and this weekend was the first time ever I didn’t have to fetch tools from the basement in order to do work in my garden. And even though I have loved gardening before, ths took the experience to a whole new level – I guess it will be like that for you when this area will be finished, only far more impressive as we’re talking a proper room and a pantry here not a simple shed :)!
(still, I’m fairly proud of all the work we did, starting from creating a drainage, laying the foundations up to building the entire thing – I have to thank your input for the courage it took me to even contemplate this project!!!)
I’m confused. I thought you were told you couldn’t fix it by pouring new concrete over the old and would need to use furting strips and build a wood platform.
I was told that a new layer of concrete couldn’t be used as a subfloor for the hardwood floor (i.e., hardwood floor put right on top of a new layer of plywood). But through talking over options with various people, it was finally determined that a new layer of concrete could be used simply to level the floor. Then plywood can be placed over that (glued and screwed down) to act as a buffer between the concrete and the hardwood flooring, and the plywood will be the actual subfloor.
Sooooo happy for you. The waiting game is tough but it was worth it. Glad you didn’t try and conquer that on your own. Congrats on moving forward. This is one room of yours I’m really eager to see Wghat you do with.
Furring
The waiting game is tough but it was worth it. Glad you didn’t try and conquer that on your own. Congrats on moving forward. This is one room of yours I’m really eager to see what you do with.
I love to see how this is turning out. Is that green wall siding? I admire how your rough diamond is getting polished out. Such a difference from when you bought it already.
Yes, that’s the original siding on the garage. This breakfast room was originally an outdoor walkway between the house and the garage, and at some point someone decided to enclose it, but they kept the original siding on the garage.
I can’t decide if this was the most exciting post for me – or the kitchen reveal – or the music room – or…..
It will be great for you and Matt to have a nice level floor. Can’t wait for your next step.
So so tickled for you…..what a weight lifted off is right!!!!!,
So happy for you! I just wondering about the boards on the wall around the room. How are you going to remove the bottom one, when you are ready for insulation and drywall?
I’m keeping all of the siding and shiplap on the walls. I’ll be able to remove enough to add insulation without removing the very bottom boards, and then I’ll just put them right back up, just like my father-in-law and I did in the dining room and entryway. I really like having shiplap underneath my drywall. It makes hanging things on the walls so much easier, especially in a pantry where I’ll probably be installing lots of open shelves.
Thanks for posting pics of the work in progress, very educational. Yes, it looks like you have found your people. I really liked that the crew troweled the surface several times…that’s one of the hallmarks of a quality job. VERY happy for you!
What keeps the cracks from not transferring to the cap? Will the leveling be enough deterrent?
This new concrete will probably crack along those same lines. But the idea is that the floor has already done any major shifting that it’s going to do (decades ago), so any movement from here on out will be minimal, just like I have in the rest of the house as the seasons change. But that’s why I need plywood on top to act as a buffer between the concrete and the hardwood flooring.
Actually with central heat and air now, there will be little to no shifting of the floor as the season change. Does the ceiling of the new breakfast room also have the new blown insulation?
I’m so pleased for you. You obviously found people who know their business. Isn’t it lovely when your expectations are exceeded? It’s also lovely to hear your voice! I can feel your diy mojo returning at warp speed.
So fascinating watching how leveling was achieved! The new pour must have filled the large gap created by the crack and the “nails” will stabilize and secure the new top layer–so cool–you’ve just got to admire the knowledge, skill, and quality workmanship of your people! Kristi, I was wondering about the ceiling. . .didn’t you say you were planning on opening it up and having a sort of vaulted/raised ceiling thing going on in there? I think that would be fabulous!
I actually decided against the vaulted ceiling, especially now that the back third of the room will be walled off as a pantry. But I do still hope that the ceiling can be raised some. We’ll just have to wait until the plywood comes off of the ceiling to see what we’re working with up there.
Ha! I wish I could have hired these guys to level out my kitchen floor! I did it on my own, with self levelling screed (mixed with a tiny 550W drill), on a really hot day.
Needless to say the results were less than impressive and the drill didn’t survive the experience. Fortunately a second thin layer got it level enough for the floating floor to be layed on top.
I’m actually not sure. I’m still researching the best way to do that. The rest of the house has the wood subfloor, and then tar paper over that, and then the hardwood floor on the tar paper. But the rest of the house is also on a pier and beam foundation, so the subfloor can breathe from underneath.
I’m just not sure if a vapor barrier is needed on a concrete foundation that sits two feet off of the ground. I still need to read more about it before I make a final decision.
Oops! I responded to the wrong comment! 😀 Sorry, Alexis!
Should a vapor barrier be put down before the plywood to prevent moisture? I would think that would be helpful to the plywood and laminate floor.
I’m actually not sure. I’m still researching the best way to do that. The rest of the house has the wood subfloor, and then tar paper over that, and then the hardwood floor on the tar paper. But the rest of the house is also on a pier and beam foundation, so the subfloor can breathe from underneath.
I’m just not sure if a vapor barrier is needed on a concrete foundation that sits two feet off of the ground. I still need to read more about it before I make a final decision.
Thank you for contracting that HUGE job out! Three strong men, nine hours, and the tools and experience. Three men! And you were going to tackle that on your own…. It was totally the right decision. You have plenty of hard work ahead of you! Love watching your progress. You GO, Girl!!
So happy for you! Can’t wait to see the room come together!
So happy for you that these guys did the right thing, showed up on time, and did an amazing and thorough job! Already the floor is a big transformation. This is all getting very exciting!!
It was so nice to have a voice to put together with your picture and written words Kristie! How are you going to handle 3/4″ plywood? I have a project using that and I’ve been procrastinating because they are too heavy and big for me to handle alone. Also, won’t the plywood then hardwood put the floor higher than the garage door threshold?
I think there’s just enough room under the garage door for the subfloor and flooring. The flooring will add another 1.5 inches to the height, and I have about 2 inches right now from the concrete to the bottom of the door. It’ll be close! 🙂
As far as lifting the plywood, I have a strong brother who’s going to come help me. 🙂 He’s already volunteered, and is just waiting for me to tell him when to come over.
The master bath I just had remodeled had to be leveled and the contractor took a week or a little more pouring self leveler in increments. It’s a sizable room but not as big as your room. He told me that the room (over a crawl space) was probably never level when the house was built in 1990 by a large builder still in business. They just used a lot of a material call “dry pack” under ceramic tile to make it appear level. So now I have a level floor under 12 by 24″ limestone, so important! You are going to sing these guy’s praises forever, especially while you install your gorgeous wood!
Kristi,
Isn’t it wonderful when you get good results from subcontractors! I love reading your blog and learn so much from you. I would have so much work done on my house if I could find people that I trust.
Rita
What a wonderful end to such a nagging problem! And to hear your voice in the video was wonderful! Please make more videos! It was amazing to see the technical part of shooting a level line. Loved it.
As I’ve been reading all the comments and your replies, I’d been wondering about the moisture aspect from the concrete also. Does not having the concrete at ground surface make a difference? I’d never come across that in poured concrete before, so I can see where that might not be a problem in your situation if that’s the case. Glad those guys came through for you. Makes a big difference in the way we feel when things are finally going our way, doesn’t it?
The wonders of technology! Just think 20 years ago laser levels weren’t very common in for residential uses. Looking good.
Quick question…I love the reason you’ve kept the shiplap!
How do you lay drywall on top of wood siding and shiplap to reduce wobblyness on a finished wall? Are there techniques (a lot of shims, a lot of mud, or no hi-gloss paint)? I’d think it’s much more difficult than studs to create a great smooth wall on top of siding? When you make a basic stud wall, idealy you turn the boards a certain way so the “crown” is the same direction (imperfections work with each other vs against)
I was concerned about that when my father-in-law and I did the dining room and entryway. We took all of that shiplap down, insulated the walls, and then put the shiplap back up. It didn’t look smooth at all, and I was sure it would affect the drywall. I was pleasantly surprised at how forgiving drywall is! It didn’t show any irregularities at all once the drywall was taped and mudded. I’m hoping for an equally good outcome in the breakfast room.
That was so interesting to watch! Thank you for sharing that. It was also nice to hear your voice. I’m so excited for you and can’t wait to see your progress.
This is like an episode of “This Old House.” People come in who know what they’re doing and the job looks great at the end.
This is great you had someone to do this. Are you going to do the floor before the drywall? Do you need the attic insulated and how about heating & a/c vents? Since that was an add on I didn’t know if there was attic access from the main house. I know you’re anxious to do the floor but I know you hate drop clothes so wouldn’t it be better to get all the messy stuff out of the way before doing the hardwood so you won’t have to go back and clean it ? Waiting to see what’s next.
I’ll install the floor, cover it with that thick paper, and then have the drywall installed. Then I’ll build the wall for the pantry. I’ll save the finishing (Waterloxing) of the floor for last.
The attic is insulated over the breakfast room, with the exception of the end 3 feet or so towards the back of the room where the plywood was attached right to the rafters so that the spray foam insulation couldn’t get in there. And because of the low roof/ceiling at that end the pantry won’t be able to have its own air vent in the ceiling. I’m looking at some other options, though. The main part of the breakfast room already has an HVAC vent.
Are you sure you don’t want to go the classic way: subfloor, framing, windows, drywall, paint, hardwood floor? It avoids many headaches, unnecessary work and extra cleanups.
If you can get access to the last feet of attic you could spray foam yourself using Touch’n Foam
If you had to insulate that last 3 ft you could probly DIY it by installing foam insulation board and using sprayfoam in a can to connect to the other sprayed areas and seal the gaps. Just make sure there’s room for all the electric and other hidden goodies for between the insulation and drywall before installing the foamboard. To see if you can spray in tight spots, practice with a can of air that has a straw.
Great news Kristi, now the fun begins. I have read the comments on this. But I’m sure you will research all areas. But so happy for you.
It’s going to be your favorite room in the house! That was money very well spent. It looks like they did an amazing job. I’ve helped do concrete jobs with my husband in our remodeling projects. Not an easy job. Happy for you and Matt…..looking good.
excited for you to get your flooring in there! i loved hearing your voice. 🙂
So happy for you that things are finally moving. The floor looks great already and I can’t wait to see your vision for the room come to life and be inspired by it. You are my motivator. Also loved hearing your voice on the video.
I’m desperately looking at the pictures trying to see the pattern in the old tile. Alas, I cannot. You didn’t happen to grab a close up before the concrete was poured, did you? I’m quite curious about this large treble clef. 😀
I don’t think I ever got a picture of the whole treble clef, but if you look at the last picture in this post, you can see the bottom 1/3 or so of the pattern:
https://www.addicted2decorating.com/the-joys-of-buying-an-older-home-faulty-plumbing-and-more-asbestos.html
Kristi, I just came across this beautiful pantry. I know you talked about possibly using a barn door. This one is really pretty and not as rustic as most. I’m sure you could make one just like it. There’s also a pretty banquette you might want to take a look at.
http://peoniesandorangeblossoms.blogspot.com/2016/08/touring-modern-french-country-house.html
Happy days! You HAVE found your people. Is the new floor low enough to leave clearance for both the plywood and hardwood so it’s leve with the floor in the kitchen/adjoining room or will the breakfast room be at a slightly different floor height? Just curious since we just ripped out an ugly blue tile floor in my kitchen and installed oak hardwood to blend with the surrounding rooms and had to rip out the plywood under the tile to keep it all at the same level. (Good thing we had to since we found some spots of dry rot on the subfloor that needed replacing.) Fun times when remodeling a 60-year old home. LOL
Squeal! I know it’s “just the concrete” part – but oh my gosh it looks great! It already contributes to “flow” into the kitchen space. And can we talk about that amazing leveling tool? Wow, so cool!
Thanks so much for sharing.
Best part…first shot of the breakfast room cleaned out! No tools, no trash, just a cool room waiting to become beautiful. Second best part….actually hearing your voice. You always think you know want someone will sound like but you don’t!!!! No Texas twang. Such a neat thing to hear your voice. Of course the floor is great, and I am sure I will learn a lot when I read all the posts, but for now I am behind a few days.
It’s looking GREAT!!!
The G-clef was in the old floor because the Moore’s were amazing musicians and probably thought it would be cute!!
I’m cheering you on girlie!!!
Blessings to you and Matt,
J
That’s what I assumed, too, when Vicki told me it was there underneath the carpet. I thought it made perfect sense since her father was the band director at Baylor and such a great musician. But she said it was actually there when they moved in. 😀 Isn’t that strange?
Kristi, My son lives in Waco and has to do the exact same thing in his house. Any chance you could give us a referral to these contractors? Thanks!
Sure! The guy’s name is Johnny Martinez, and his number is 254-534-0736.
Thank you, Kristi!