Rolling Barn-Style Doors – Inexpensive Hardware For Under $60
This weekend, I was so anxious to try out my idea for the DIY hardware to make the rolling barn-style doors that I got right to work as soon as early as I could on Saturday. And by Saturday evening, I had my doors up and working.
I’m so excited about how well this hardware worked out!! So let me share the details. I’ll share the components of the hardware, then a picture of how the hardware fits together, and then I’ll back up and go over the steps I took to get from idea to installation.
Now let me be really clear — these doors are far from complete!!! I still haven’t framed out the doorway, refinished the doors, or added the glass to the doors. There’s still a great deal of work to be done before this project is finished. But I did things in this order because I wanted to be sure my idea for this hardware would even actually work before I framed out the doorway specifically to fit the doors, and before I took the time to actually refinish the doors and add glass. Now that I know that the hardware design works (and works really well!!), I can backtrack and work on the finishing details.
The products you’ll need to make inexpensive DIY barn door hardware (for a rolling door)
So first, here are all of the components of this cheap DIY barn door hardware:
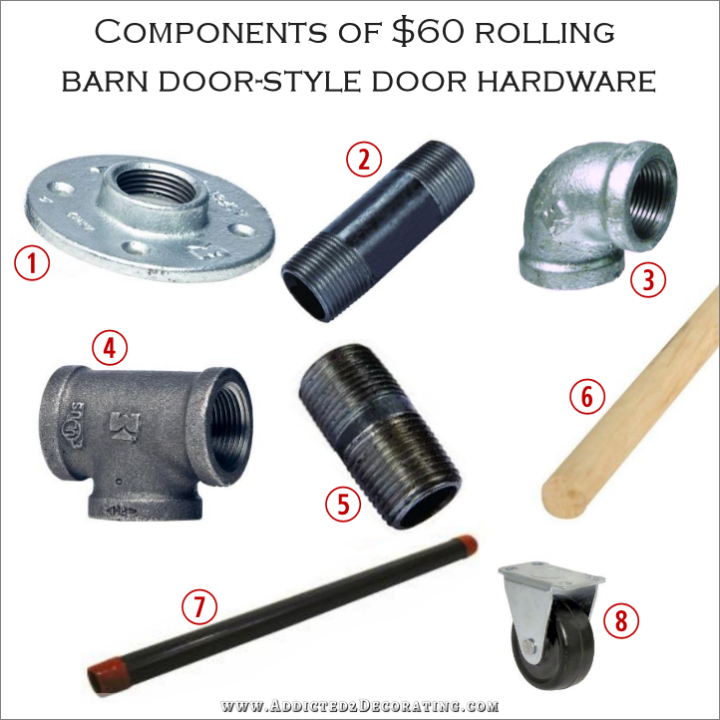
- 1/2-inch galvanized iron* floor flange (2)
- 1/2-inch black steel nipple (2) (I used the 1 1/2-inch length, but these come in different lengths, so you can find what you need. It just needs to be long enough so that the bar on which the doors slide will clear any trim you have around your door.)
- 1/2-inch galvanized iron* 90-degree elbow (2)
- 3/4-inch black iron tee (2 per door)
- 3/4-inch x close black iron nipple (2 per door)
- 1/2-inch oak dowel rod (1)
- 1/2-inch black iron conduit pipe (1) (These come in lengths up to 10-feet long, which is a perfect length for two 30-inch doors covering a five-foot-wide doorway. If you need a shorter length, the hardware store can cut and re-thread these for you.)
- 1 1/2-inch rigid (non-swiveling) casters (2 per door)
*These items do come in black iron, but the Home Depot here didn’t have them. They only had galvanized steel, so I’ll end up painting them to match. However, if you actually want your hardware to be silver in color, you can buy all of the components in galvanized steel.
All together, this hardware came to just under $60:
Casters: $2.47 x 4 = $10.96
1/2-inch conduit pipe: $10.62
1/2-inch nipples: $1.01 x 2 = $2.02
1/2-inch elbows: $1.65 x 2 = $3.30
1/2-inch flanges: $6.61 x 2 = $13.22
3/4-inch x close nipples: $1.31 x 4 = $5.24
3/4-inch black steel tees: $2.71 x 4 = $10.84
1/2-inch oak dowel rod: $2.98
TOTAL: $59.18
Not too bad, right? That’s 1/10th the price of the hardware I priced out for my door online!
How To Make DIY Barn Door Style Hardware (For Rolling Doors)
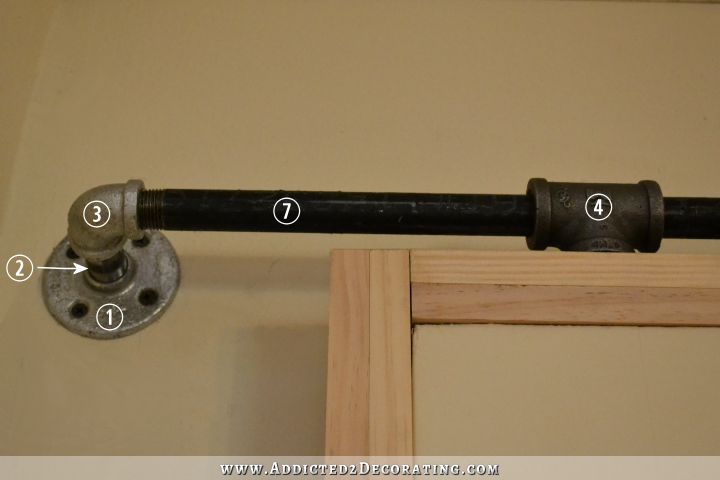
Here’s how these items fit together:
- The black steel conduit pipe (#7) is what the doors slide on.
- On each end of the pipe is a 90-degree elbow (#3) connected to a 1/2-inch nipple (#2).
- That is connected to a 1/2-inch flange (#1) which is screwed into the wall.
- The doors are attached to the pipe with a 3/4-inch tee (#4) which slides on the conduit pipe.
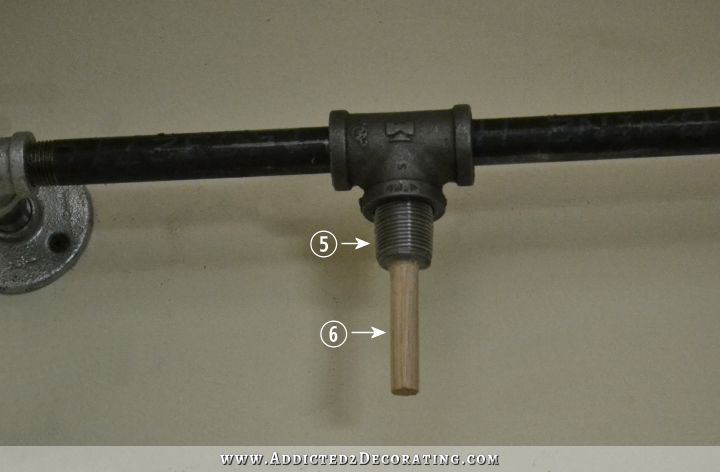
The components that are hidden inside the top part of the door, and which keep it stable, are:
- The 3/4-inch nipple (#5) that is screwed into the bottom of the black iron tee, and
- The 1/2-inch dowel rod (#6) that is glued into the 3/4-inch nipple and extends about three inches beyond the nipple for added structural support.
Now let me back up a bit. :)Once I got started on my rolling doors, I realized that my doors would take an extra unexpected step.
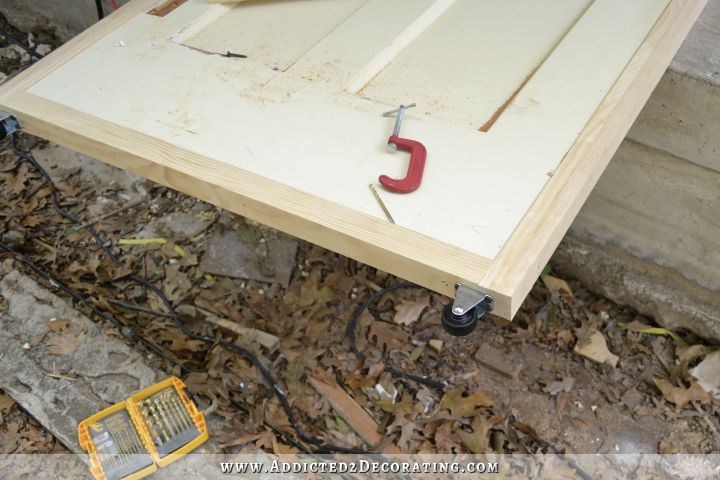
I have four matching 30-inch doors, but they’re all different heights. I think a couple of them had been trimmed off on the bottom to allow for clearance over the carpet when it was installed. So my first step was to cut both of the doors to the same height. This made my doors too small, so I ended up adding the height back on by “framing” the doors using 1 x 2 lumber. I added two pieces of 1 x 2 to each side of the doors, and glued and nailed these on. It’s not so pretty now, but once the door is all refinished and painted, it’ll just blend right in.
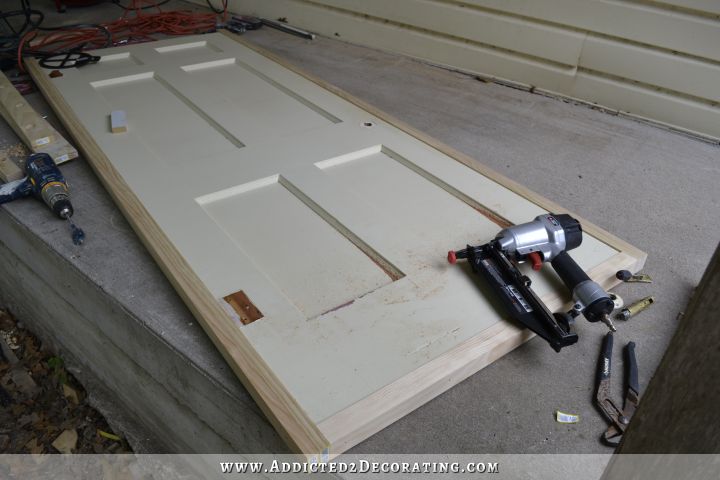
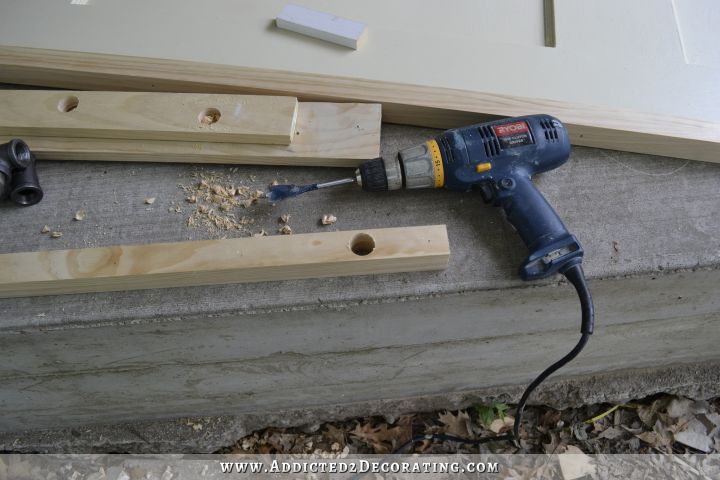
Before I put the top piece on, I used a 1 1/8-inch spade bit to drill the holes for the hardware. The part that would go down into this hole is the 3/4-inch nipple that is connected to the 3/4-inch tee. But the thing about these conduit fittings is that the measurements (i.e., 3/4-inch) measures the diameter of the inside of the pipe, not the outside of the pipe. So naturally, the outside is larger.
I originally tried a 1-inch bit, but it was a very tight fit that required that I actually screw in the nipple into the hole. I didn’t want a tight fit because that would make door installation almost impossible. I wanted a snug fit, but I wanted it to be able to slip in and out without much effort. The 1 1/8-inch bit did the job.
With both holes drilled, I tested to be sure that they would fit. Then I glued and attached the top piece to the door.

On the bottom of the door, I attached two rigid (i.e., non-swiveling) casters. It’s very important that these be non-swiveling!!
The first time I installed everything, I did so without the dowel rods. It worked, but the doors weren’t as secure as I wanted them. It needed something longer that could go deeper into the door for more stability.
I originally thought of just using a longer nipple (they come in lengths up to at least 6 inches). But that wouldn’t work since the 3/4-inch nipple required a hole of 1 1/8-inches in diameter and my doors are only 1 3/8-inches thick. That would leave very little margin for error, and I’d end up drilling through the face of the door.
So that’s when I came up with this dowel rod solution. It made sense to me to insert 3/4-inch dowel rods into the 3/4-inch nipples (which was a perfect fit), but that plan was thwarted when I tried to drill a deeper hole into the top of the door using my 3/4-inch spade bit. The spade bit broke off a big part of the door.
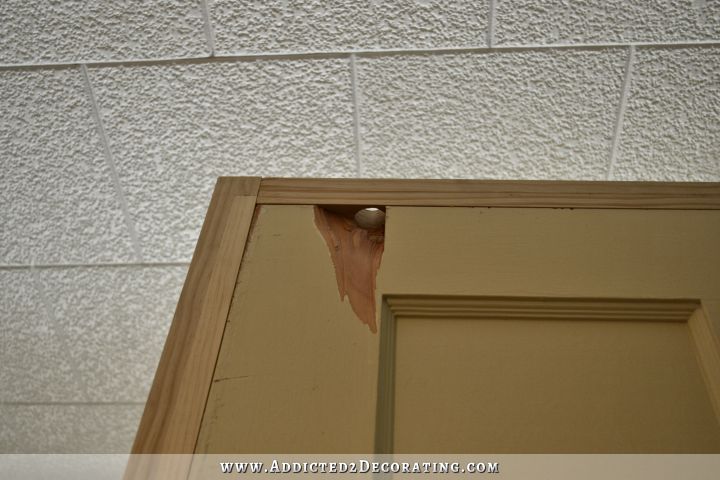
So just be very cautious when you’re drilling into old wood doors. I would suggest that you don’t use spade bits, as they can be a bit too powerful and can easily damage your door. (And by the way, I was very wrong about my doors being hollow core.) 🙂
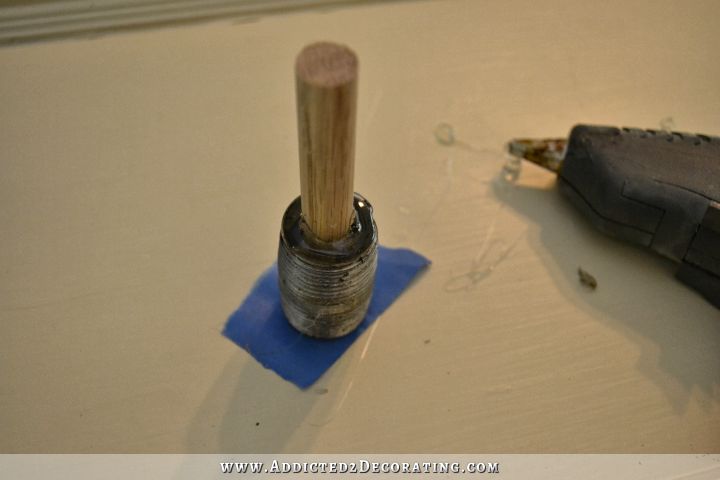
My only other option was to use the largest regular drill bit I had, which was 1/2-inch. So I used a 1/2-inch dowel rod inserted into the nipple and held in place with a massive amount of hot glue.
I placed a piece of tape on the bottom of the nipple, filled the nipple up about half way with glue (high temp!!), and then pushed the dowel rod into the glue all the way to the bottom. Then I filled up the rest with glue, made sure the dowel was straight up and down and centered in the hole, and then set it aside to dry completely.
I was able to use my 1/2-inch drill bit to drill about 3 inches down further into my door. I sanded the dowel rod enough so that it slid into the hole easily with a snug fit, but wasn’t so tight that it required twisting back and forth to insert it. I want to be able to remove these doors (for painting and adding glass), so it was important that these things fit together snugly but without requiring any twisting or screwing together of parts.
Once everything was together, this dowel rod idea made the doors so incredibly secure. I’m so pleased with how everything turned out!
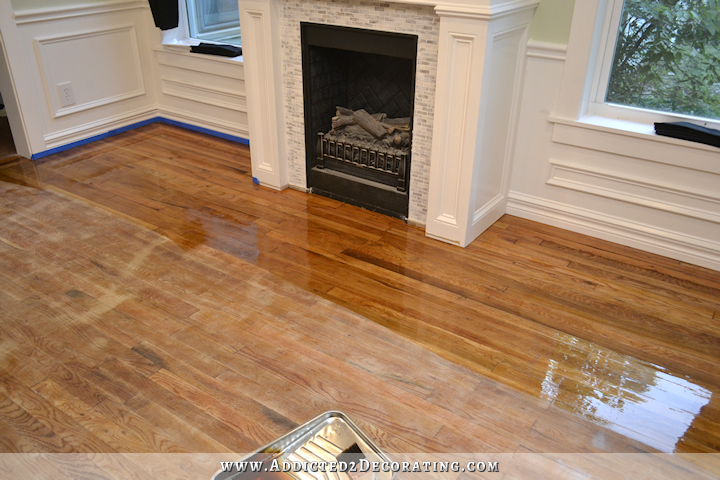
Now one thing about the black steel conduit pipe is that it’s covered with a kind of thick, ugly paint with words on it.
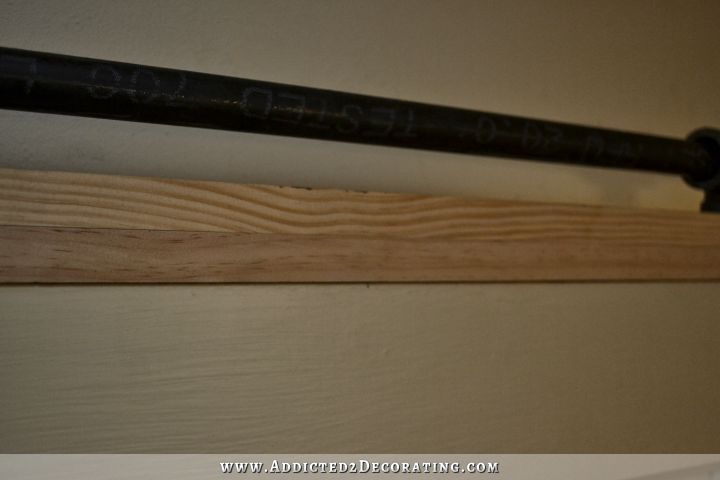
That paint can be removed with paint stripper and/or paint thinner. What’s underneath is the actual black steel, which you can see is not quite as black a the painted areas. (The jet black areas in this next photo are the areas that still have paint on them.)
Here you can really see the difference between the two. The pipe in this photo still has the dark black paint on it, while the tee is the natural black steel color.
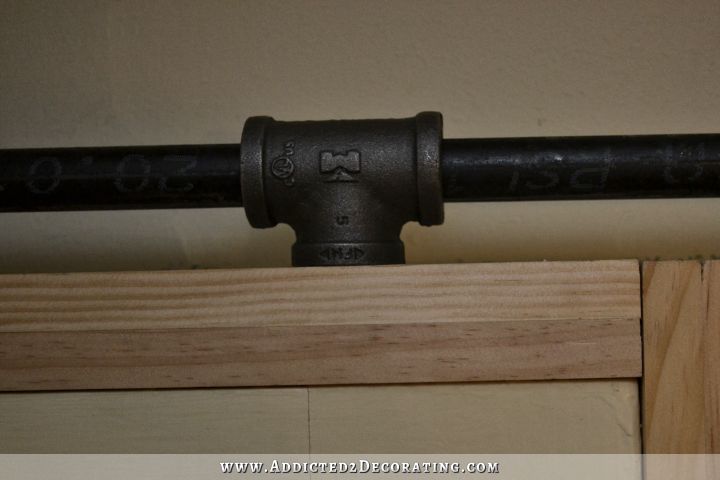
So I still need to finish stripping the pipe, and then I’ll need to do something to the galvanized parts to make them blend in. But the basic building phase of this project is done!
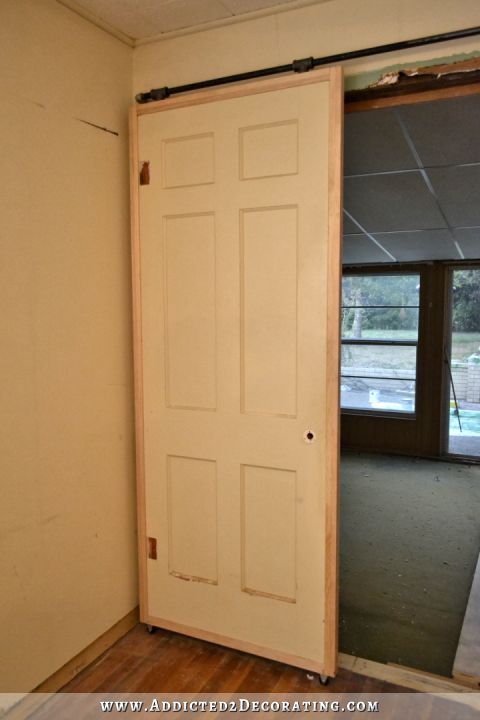
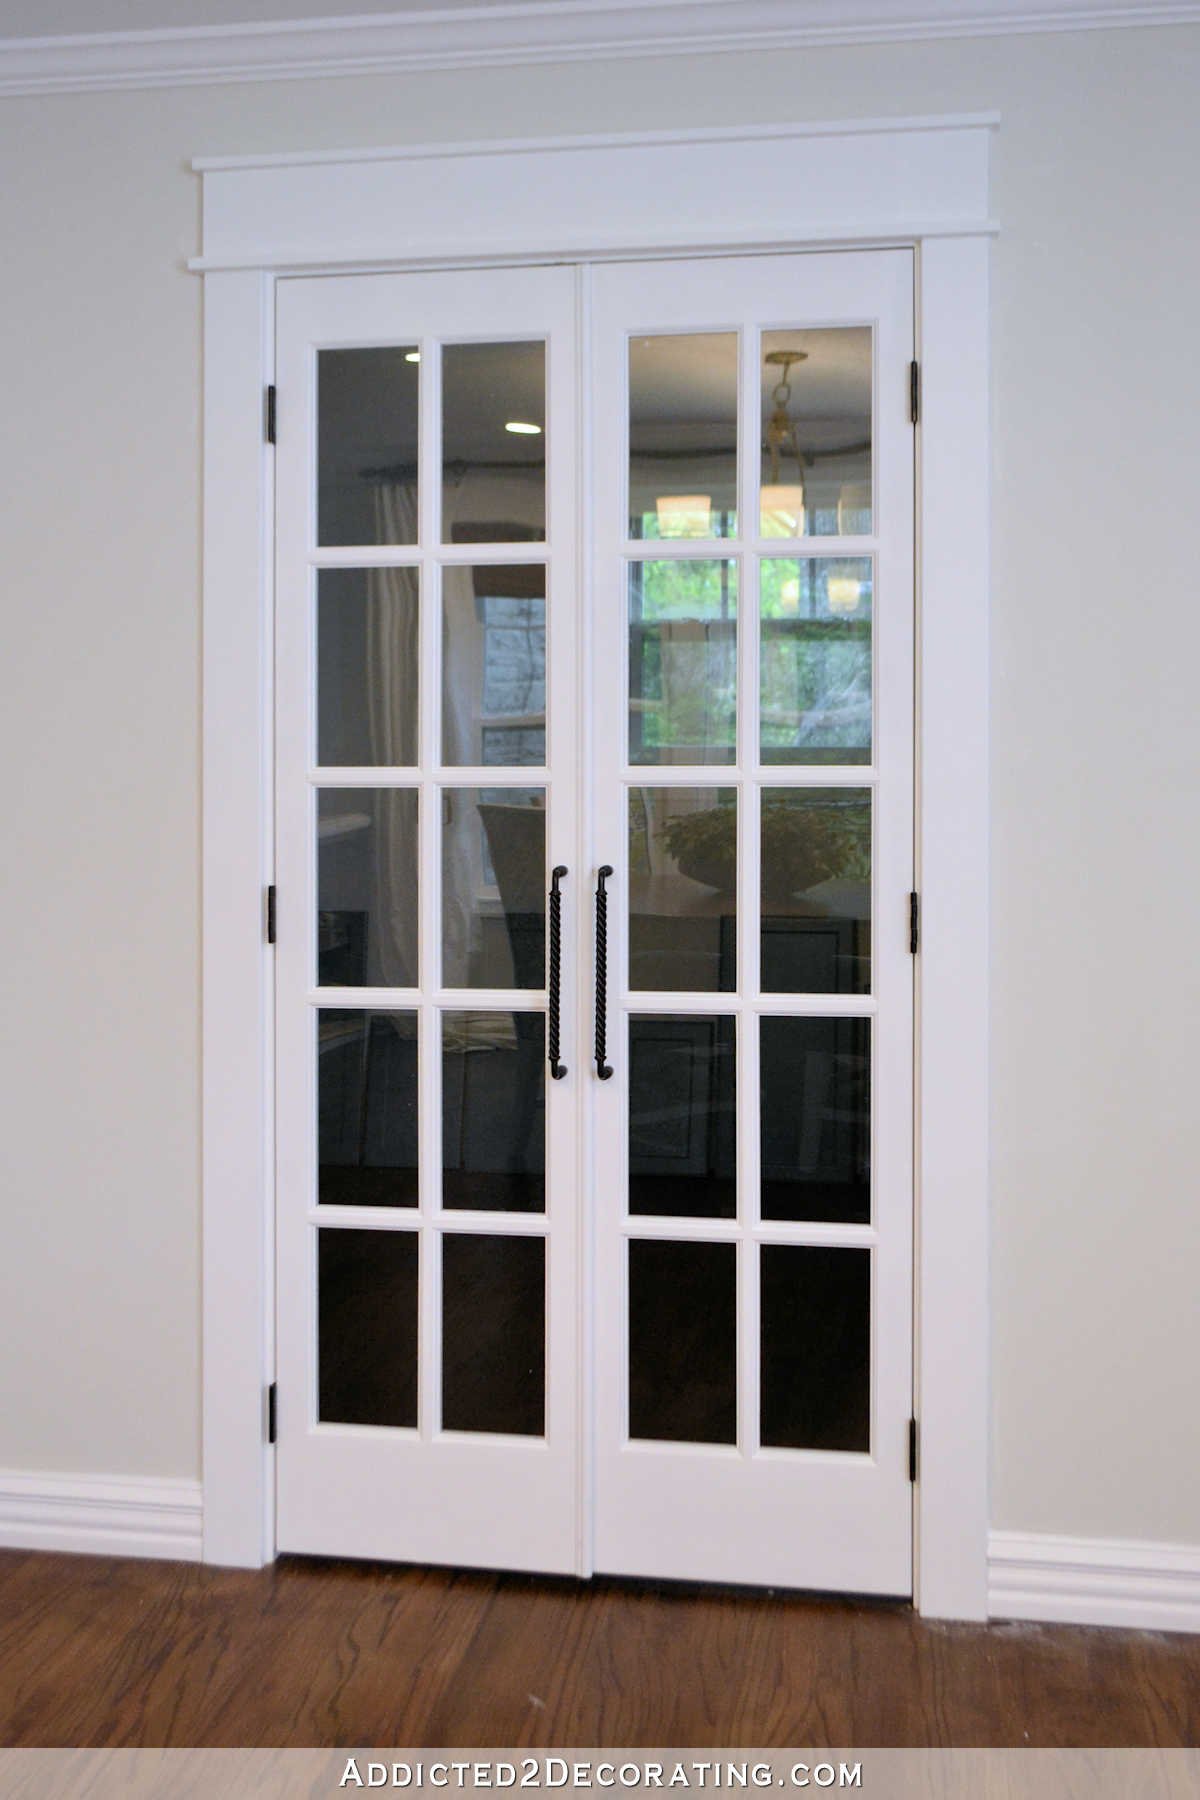
Here’s how they look when they’re closed. You can see that the doorway isn’t centered on that wall, so when I frame it in, I’ll make it a bit narrower, and perfectly centered. When it’s finished, the doors will cover the doorway perfectly with no gaps like it has now.
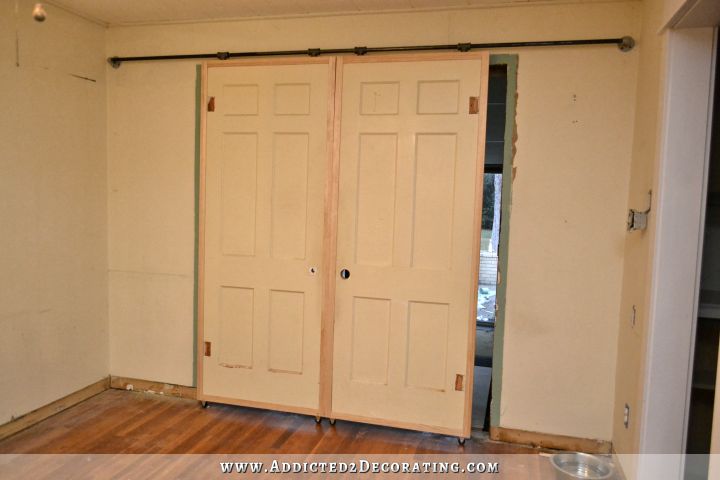
And you’ll just have to use your imagination for now to picture the large section of door at the top removed, and glass inserted in its place.

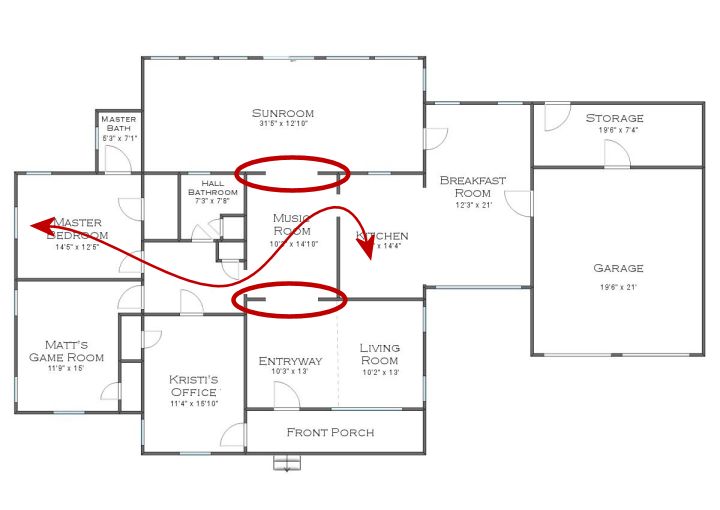
I’ve decided that I’m going to use frosted glass in these doors. Once I have both doorways finished, I’ll be able to close both doorways off at night, which will give us much-needed privacy at night all the way from the bedroom, hallway bathroom, through the music room, and to the kitchen.
I never go to the trouble of closing the shades in the living room, and when I sacrificed the extra width of drapery fabric in order to make Roman shades, I gave up the option of closing my draperies and actually having them cover the window. So right now, it kind of feels like we’re living in a fish bowl at night.
If a light is on, people can see right in. And even from our bedroom, there’s a direct line of sight to the side window in the living room. (Not that there should ever be anyone there, but still.) So those doors will actually be used every single night.
And in the sunroom, I’ve had the old curtains up that were here when we moved in. I didn’t want to take them down because again, at least they provide privacy at night. Now that I have these doors, I can finally take them down. And these doors have been, and will be, used every single night.

Now one final thing that I know I’ll be asked if I don’t cover it. 🙂
Here’s how I installed these by myself.
First, after I finished both doors, I brought them inside and leaned one door up again the wall on either side of the doorway (pretty much exactly where you see them in the photo above). Then with all of my hardware already assembled, I climbed up on the ladder with the pipe and attachments in hand (it’s not really heavy at all), and I rested the pipe on top of the doors.
Then I moved to one end, inserted the nipple and dowels into the holes on top of the door, and then I moved to the other side and did the same thing. Once all four of them were inserted, there was no danger at all of the pipe falling. It was very secure.
Then working on one end, I held the flange against the wall to maintain the correct distance from door to wall, while maneuvering the door (very gracefully with some karate kicks to each side while standing on the ladder…LOL) into an upright, plumb position. I used my level to be sure they were plumb (while continuing to hold the flange with one hand to keep the distance correct), and then I checked the pipe for level and screwed the flange into the wall with one screw. Then I move to the other side and repeated that process.
I didn’t get it perfectly right the first time (which is why I only used one screw on each side to start), but at least with the flanges secure on the wall, I could make some final adjustments, readjust the flange, get everything perfectly level, and then add the additional screws.
It was definitely challenging doing it by myself, but…you know…it’s what I do. If you have someone who can help you, that would be preferable.
Now let me emphasize one thing, and this is very important. This hardware design is not intended to carry any weight!!! A 1/2-inch conduit pipe will bow (very slightly) under its own weight. It will not carry any additional weight. The doors and the iron tees attached to the doors actually help to hold the pipe perfectly level. So again, do not consider tweaking this design to allow for hanging doors. It won’t work.
So that’s as far as I got. Lots more work to do on this one, but I’m so excited that my hardware design idea worked! I just love how understated, and yet not too wimpy looking, the hardware is on top of the doors.
If I left anything out, or thoroughly confused you with my wordiness, please leave a question in the comments and I’ll do my best to answer and clarify any of this process. 🙂
UPDATE: To see the next step in my rolling barn door-style French door project, you can find that here: Kitchen Cabinet Hardware, Rolling Door Progress, and My Piano
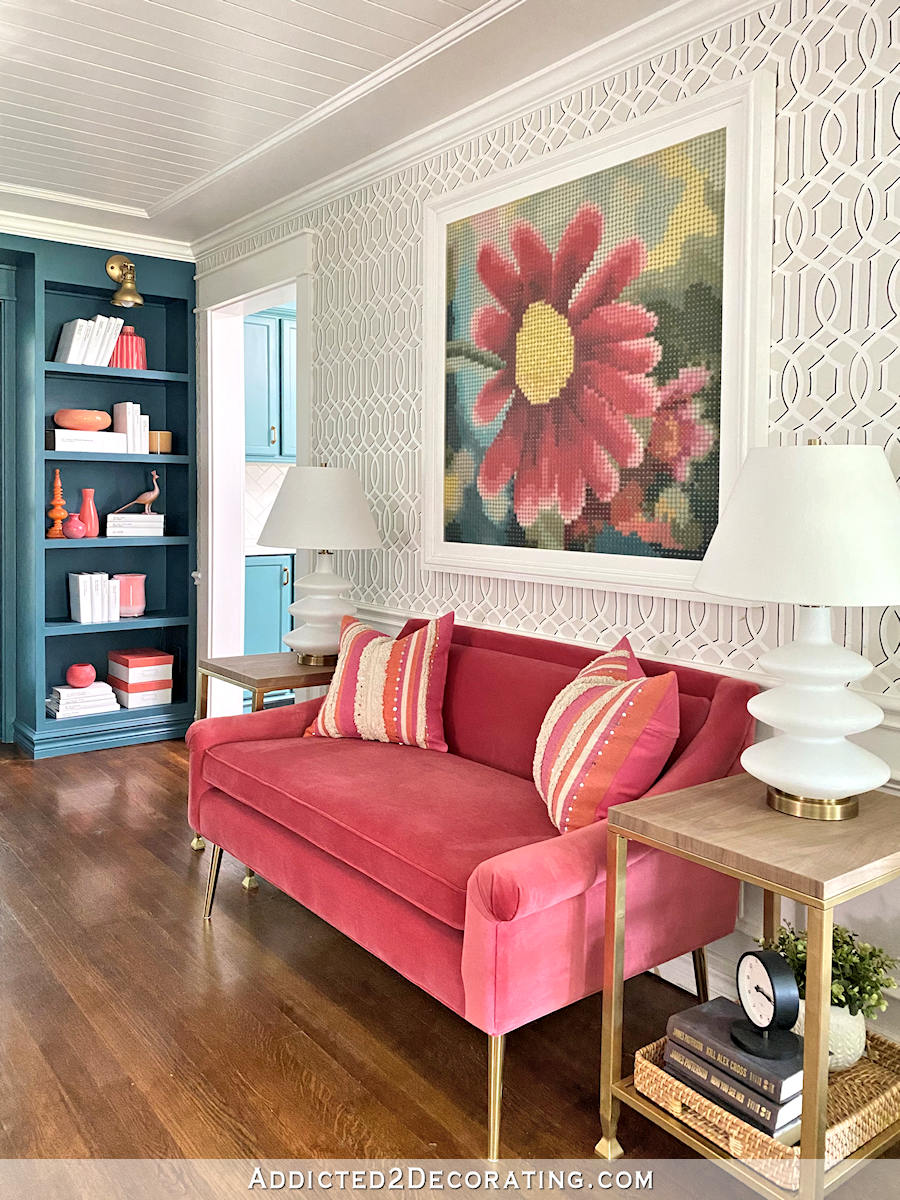
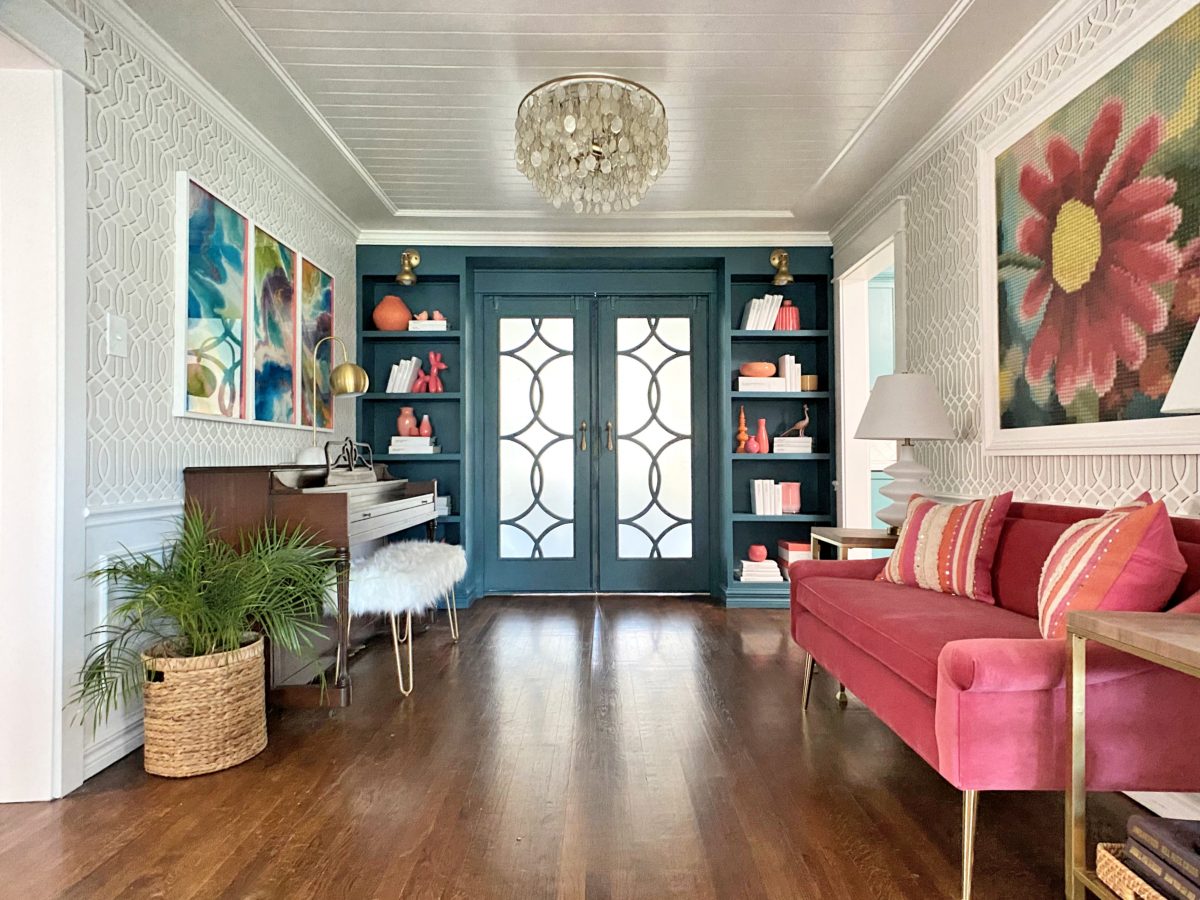
UPDATE #2: My rolling doors are finished! Here’s a peek at how they turned out: DIY Sliding French Barn Doors With Custom Fretwork Panels
More About Our Music Room:
see all Music Room
diy projects
read all music room
blog posts

Addicted 2 Decorating is where I share my DIY and decorating journey as I remodel and decorate the 1948 fixer upper that my husband, Matt, and I bought in 2013. Matt has M.S. and is unable to do physical work, so I do the majority of the work on the house by myself. You can learn more about me here.

Oh my gosh, I am in awe!!! I love your tenacity. Very nicely done!!!
Kristi, very impressed with your ingenuity, and love the kitchen makeover. With regard to your rolling barn doors, have you considered insetting the casters into the bottom of the door so that they are virtually invisible, and the doors would be nearer to the floor?
Brilliant idea Dave!
Well that’s just an ingenious idea! Where were you on Saturday when I was starting this project?! 🙂 I’m going to frame out my doors and see if the door extends above the trim enough so that it can be lowered an inch or so. I’m afraid I might be cutting it really close with my door height.
I need to ask a question about the noise when opening and closing the doors. I’m going to do a barn door going into the guest bath but have just read one of the reviews of the plans and it seems that the sliding of the doors using the large eye hook method sounds like 15 screaming cats. Not really what I’m looking for. Several posted comments with similar results using eye hook method. Does using the tee make a similar noise?
I don’t think so at all. It does make sound, but it’s not an unpleasant sound to me. For me, the loudest thing is the sound of the wheels on the hardwood floor, but I have a pier and beam foundation, so there’s nothing underneath the floor to buffer the sound. If you have a solid slab foundation, that shouldn’t make noise. If you have a pier and beam foundation like I do, then you’re probably already used to things making sound…even walking across the floor. But as far as the hardware at the top, it does make sound, but it’s not loud, harsh, or unpleasant, at least to me.
Just a thought – if you take a bar of Ivory soap and rub it on the top of the conduit – it should make it slide easier and might reduce or remove noise. And yes, it really should be Ivory bar soap – something in their recipe works where others don’t.
Since you stated that these will be used EVERY night, you may have to reapply ever so often.
Otherwise, fabulous job! Thanks for sharing.
I was also wondering about the noise factor, was expecting you to somehow put ball bearings inside those tees. SO the weight of the door is resting on the wheels, and the tee is NOT resting on the pipe? The plan is for the tee to be stabilizing the top, not resting on the pipe so much? I love this idea I have been pricing the KITS for installing my doors, but they are SO pricey. Yours is the first I have seen that is really affordable and all parts are available at my corner hardware Great idea! Thank you for sharing
These are prefect! You did a great job.
I do have an unrelated question for you. How do you protect your feet when you are working? I am making a cabinet and found tennis shoes offer little protection from my clumsiness. Nothing broken but my toe is a pretty color.
I’m honestly not very smart when it comes to footwear while I’m working. I almost always wear these really thin, cheap canvas-type shoes that I got at Walmart. They’re cheap, and I don’t feel guilty about getting paint and caulk on them. So far I haven’t had any foot-related injuries due to my lack of appropriate footwear while I DIY. 🙂
Love it! One question- how ar eyou going to fix the door that busted from the drill? I need to know about this magic.
Fortunately, that piece broke off as one whole intact piece of wood, so I just glued it back on with lots of wood glue. Had it splintered into may different pieces that couldn’t be put back together, I really don’t know what I would have done, other than sit in my floor and cry. I probably would have gotten some of that high performance wood filler to fill the area completely. (This stuff: http://www.homedepot.com/p/Minwax-12-oz-High-Performance-Wood-Filler-21600/100376245) I’ve never used that stuff before, but it’s supposedly really strong stuff.
When I have a problem like that I use Bondo it’s incredible. If it’s a really big hole I put some screws in so the bondo has something to attach to. By the way beautiful work Kristy
Ok, I’m really impressed with your design for the hardware and the installation. Of course, I knew you’d be centering the doorway when you added the trim. I do have one question. Since you want privacy on that door, why go to the trouble of installing glass? Why not just paint the doors black and leave them solid? You can open them in the daytime for light, and close them at night for privacy. It would be a lot less work, and you don’t know what you’re going to run into once you cut into those panels.
It’s so great to be able to watch your mind work and come up with these amazing results! I’m baffled again, how you manage to go through processes like this over a weekend!!
I have had that same question as Alta popping up, though: if you’re going for privacy, why add glass to the doors, as they look absolutely fine now? I do understand about wanting to have light come through, but if you open the doors during daytime anyway, isn’t that money (and effort) you could save and put to better use elsewhere? I’m sure there is a perfect reason for your wish to insert glass – and I’m curious to hear about it 🙂
It’ll look great when you’ve finished both sets of doors – like a real room in there!
It’s just one of those things I have my heart set on. 🙂 I wish I had some really brilliant, well-thought-out explanation as to why I want glass, but I don’t really. I just want it. LOL
I wish I had some brilliant, well-thought-out answer other than “because I want it”, but I don’t. 🙂 It’s just one of those things I’ve had my heart set on. I had originally wanted French doors on both doorways, and obviously I’m not getting those, but I’m not quite ready to abandon the “doors with glass” idea altogether.
“just because I want it” is a good enough reason! But if you really love the French door look, why not just replace the 6 panels in the doors with glass? That would be more French door looking than a big single pane at the top, right? My inner worrywart is concerned that a big single pane will not be as sturdy as replacing the smaller panes, and will look more like a front door than French doors. Just my humble opinion!
I am just wondering do the doors slide all the way over to the wall and disappear from sight when open or do they still show? I would like to use your idea to replace the laundry doors in my kitchen but it will cover the opening by 9 inches on one side.
The doors are never hidden from sight. The second picture from the bottom of the post shows exactly what they look like when they’re open.
Will you be using “regular” door knobs where the holes are already in the doors or are you planning to conceal those holes with some other type of hardware? Looks great.
I’m going to fill those holes by using a hole saw and cutting out circles of wood from scrap parts of another door. Once it’s glued, wood filled, sanded, primed, and painted, I’m hoping those holes won’t be noticeable at all. Then I’ll use large door pulls.
What is the width opening when open? I assume they will easily accommodate Matt’s wheelchair? Looks fab! I love the idea of the frosted glass. Have you considered that ‘crackled’ glass?
The doorway will be 60 inches wide. Matt will have no problem with it at all. Most of our doorways are 32 inches, and he maneuvers through those just fine. Not sure about the crackled glass. I wonder if that would provide the same amount of privacy. It would definitely be pretty!
Genius at work again!!!
I’m so excited you figured this out Kristi! I’ve held on to a couple old closet doors in order to attempt this for my master bath (that’s lacking a door). I found the same pic online, but have been afraid to make any attempt at this. Thank you for stepping up to the challenge and paving the way! The doors look awesome already, and the space seems like it was just meant to be!
You are brilliant! I just love this.
Ingenious! I love that you are reusing your vintage doors. I find them so pretty and I can absolutely picture frosted glass in the upper panels – it will be so charming. Brilliant use of common hardware to make the tracks. I also like the scale of your hardware vs. the hefty scale of the commercial ones. Yet another project I look forward to seeing completed. Thanks for sharing!
It took me a little while to get my mind wrapped around the sliding nipple with glued in wooden dowel (very ingenious by the way…must be why it took me a bit to visualize the working concept; ) But
…making sure I have it correct… when you remove your doors, you will be able to see the constructed wooden dowel inserts that your door slides up… inside your drilled top door holes.Amazing you are! Can’t wait to see them finished!
I believe you’re correct (if I’m understanding you correctly), but I did add a photo of the hardware without the door attached so that you can see what it looks like for sure.
This is AMAZING. Thank you. In our old house the bathroom door opens inward and bumps against the toilet. Now the door will be a rolling door using your design.
Can you post a picture of what the doors look like from the sunroom side?
Thank you!
I’ll try to remember to do that once I get the doorway all framed out! 🙂
This is going to turn out GREAT!!!!!
Kristi
Wow, what an undertaking. You are superwoman today to have completed it all and take pictures and write it all down. What an “energizer bunny” you are! I think these will serve the purpose very well…wonderful
G.
This awesome project had me walking around my house several times to see if there was a place I could put a sliding door. Alas, to my disappointment, there is not one place I could put even a single door. I’m thinking of ripping down a cabinet in my Master Bath to put one in. Logan’s going hunting in Colorado in a couple of days, so that’s the time to surprise him when he gets home! LOL
yeah, that happened to me too 🙂 and I’m really sorry that I cannot find a place for it either… Kristi, I guess this project will inspire your fans even more as it’s so original!
All I can say is WOW! You knocked this one out of the park! Great job! 🙂
Wow, Kristi, you’ve done it again!! You have absolutely brilliant ideas and just love the hardware and that you are able to use your old doors……they are going to look fantastic when you’ve refinished everything. Well done, you’re amazing!!!!!
Wonderful! I am going to do this. One question. What kind of sound do the doors make opening and closing- with the tees running across the conduit pipe? Does it grate? Is it smooth?
It does make a noise, but it’s not a grating noise, or an offensive noise at all. No “fingernails on the chalkboard” type of sound at all. A lot of the noise on my particular doors is the sound of the wheels on the floor of a house with a pier and beam foundation. Since there’s space under my floor, the sound of rolling the doors back and forth is louder than it would be for someone with a house on a slab foundation.
Love this idea! glad you explained that they were NOT load bearing, that was throwing me off a bit until you mentioned that. But, I am still confused on the wooden dowel part. can you give us a photo with just that and how it works? Will the wheels eventually make a groove in the wood floors? Would the rubber wheels be better for this purpose and be quieter? My experience has been that those wheels can be noisy. Love all your projects and have learned so much from you!
I added a picture of the whole top hardware structure where you can see the dowel rods. Hope that clarified things! As far as the wheels, they’re kind of a soft plastic, so they don’t make much noise, and I don’t anticipate any problem with my floors. But I do have oak floors, and oak is a very hard wood.
Beautiful well thought out plan, Kristi and I love the more streamlined look!
Kristi, Did I ever tell you that you’re my hero! (singing in my best Bette Midler voice, ha ha) .
I have been looking, researching, scouring, begging, pleading, bleeding…okay, maybe not that last one,
but for the past year I’ve been in the process of making a room for my adult son. We’re making his room in what used to be our living room, which may sound weird but it’s really not. We never used it as a “Living Room” , we have a very large Great Room…Anyway, the ONLY doors that would work are sliding doors, and they can’t be pocket doors. The doorway to his room is an arch and it’s also 4 feet wide, we really don’t want to change that. So sliding doors it is, but as you know, the track systems can be very expensive. I’ve looked up alternatives and saw the one you showed with the giant eye screws but it seemed like it would be a little wonky at the top, and this is for privacy on a bedroom, so I continued to look. We have very little money, (my hubby was forced into retirement after 32 years of service and we’ve been struggling for 5 years now) long story…but today you made mine and my sons dreams come true, he can have a bedroom door, or door(s) in this case. I’m so grateful that you have the eyes and brain that you have. If there is ever the technology to transfer, or rather, share brain USAGE….i’m first on that list for you share your brain usage by putting in my brain so it will work like yours, if that’s okay with you. I’ll get the paperwork started 😀 Hehe!
Truly, thank you so much!….Co
I’m so glad to hear that! I hope this design works out perfectly for his room. 🙂
“I’ll get the paperwork started.” LOL That made me laugh. 😀
Do you have any idea how many people you have helped with your blog? Not only are your ideas genious, tasteful, and decorative, your pictures and explanations are clear and easy to understand. And you respond to your readers questions. Many bloggers just ignore questions. Thank you.
Just wondering how you will take them down to refinish them. Do you have to undo the flanges on the wall and then slide the entire piece or is there a way to remove just one door at a time and leave your track in place? Great job on these! I think a lot of people will be emulating this idea too!
I just have to grab the doors towards the bottom, and pull the bottom of the door away from the wall until the top of the door drops below dowel rods and is completely free from the top hardware.
ok…first of all…LOVE!!! and I definitely intend on stealing/borrowing this design. I’ve been on a mission for an afforable way to cover a large opening with a barn door but haven’t really LOVED any of the designs i’ve seen…until now. But I have a question since yours are now up and operational. How loud (if at all) is the pipe fitting as it slides across the pipe? that’s been my main concern with all the eye hole screws, etc…so although i love your idea of this hardware, i’m even more curious since it’s a larger metal to metal fitting. Help!!!
It makes noise, but it’s not really loud. And the noise it makes is not an awful noise like a screeching or grinding or anything like that. Part of the noise on mine is also the sound of the wheels rolling across the floor in a house with a pier and beam foundation. It’s definitely louder than it would be for someone who has these doors on a slab foundation. But still…not really loud or annoying at all.
Awesome! I was definitely going to do the casters and I do have a slab foundation. I was more concerned with the metal to metal connection so this is great!!! you rock!
Oh my goodness! You are so smart! How I wish I had somewhere to do this in my house. I don’t, but I wish I did. Your instructions are so straightforward, I think I could do it (with another set of hands and without the karate kicks)
You are Amazing!!!
I just finished reading the post today from Kristi at The Hunted Interior blog and she put up barn doors using a barn door hardware kit from Home Depot for $149.99. Not as inexpensive as your innovative approach but for anyone out there who might not want to put together the plumbing pieces, a fairly cheap alternative.
Yep, I looked at that kit myself. It’s a great price. It will hold one door up to 36 inches wide, so it wouldn’t work for my situation. Or I could have used two of them, but then I’m right back up to $300. Definitely an option for someone with a smaller doorway, though.
You did it again! Amazing work. I can’t wait to try this. Cheers
Hi, love all your work and the detail you go into for us. One thing please if I also used this myself the problem I have like you is a big dog, if you shut yours in the sun room could he not push into the doors and be able to gain entrance to the rest of the house, my problem is I have two of them.
If you have a huge dog who is very strong and has displayed behavior that indicates he might aggressively push the doors with all of his strength and all of his determination, then you might not want to try these doors in your house. My dog is big and strong, but he’s very good at staying within boundaries and not trying to dig or push his way out. At most, he might give a small nudge with his nose to see if the door can be easily opened (these doors wouldn’t be affected by a nudge), and when it’s not, he’s satisfied to stay behind the door.
You are so clever, creative and smart!
Hi Kristi,
Fabulously done. Funnily enough I’m just about to do the same with some doors we salvaged from my childhood home, before we demolished it and rebuilt. The doors are about 100 years old and cedar. I was thinking, what would stop you using flanges and elbows (thingies) made for bath towel rails? As they come in all sorts of styles, and won’t actually be carrying the weight of the doors, just guiding the doors’ movements, do you think that’s feasible? This is such a simple idea, (using gal pipe components), but might be a tad too industrial for my situation. I’d appreciate your thoughts.
Thanks so much Kristi.
PS!! When you attached the flanges to the wall, was it just sheer luck that the wall studs were exactly where you needed them to be, or did you do something else?
Well, it’s just sheer luck that most of the walls in my house have 1 x 10’s attached to the studs horizontally from floor to ceiling with drywall over it. There are very few areas where I’ll actually have to use wall anchors when hanging something, because most of the time, I’m drilling right into solid wood. 🙂
I don’t think I’ve ever seen towel rail components that are made out of metal that is thick and sturdy enough that I would trust it for doors, even if it doesn’t need to carry weight. Conduit and the conduit components are very study and thick metal. You might check those out first, and then see if you can find something that you think might be comparable in strength and stability.
Hi Kristi, fantastic doors!! One suggestion is maybe putting in door stops to stop the sliding doors hitting the elbows or sides of the adjacent walls, or does it not require them? Btw, Love your work!
I will definitely be doing something like that. I had originally thought that I wanted the doors to open all the way to the side walls, and I actually measured and planned the placement of the hardware specifically so that they would open all the way. The problem is that my house is old, and nothing is perfectly level, square or plumb, so when the doors are open all the way, the door on the right hits the wall at the top, but is about 1/2-inch away from the wall at the bottom. 🙁 It’s very obvious. So now I want the doors to be stopped about an inch-and-a-half away from the wall so that the difference isn’t so plainly obvious.
I love your idea! It looks great and will look awesome when it’s all finished. I have been trying to figure out how to make a ladder into a library ladder. The hardware is astronomical in price! I’m wondering if I could tweak your idea to work for a ladder that will be on a slant.? Any ideas?
I am so amazed that you just came up with this idea on Friday, and have already executed it. I would love to do something like this in my victorian era home, but have slightly uneven floors in the room where they would go. Do you this that I could have longer pins that just sort of float in the holes on the top of the door to allow the casters to stay on the floor, or would that be too unstable?
I should have mentioned this, but my floors are actually slightly unlevel right where these doors are. That’s one of the main reasons I wanted the dowels in the doors to be snug but not so tight that they had to be screwed in and didn’t have any give to them. It works really well, and the length that I used is plenty long to hold them very securely when everything is in place.
Awesome! Once again! Great job!
This solution really strikes my fancy! I love the solution you came up with, as well as the fact that you are reusing existing doors. The hardware solution is genius!
Very modern. They look great open. I can’t wait to see them with the glass.
Thank You SOOO much for sharing this!! I have needed barn doors to close off our den (where the young adults gather in our home) for a L O N G time!! I never could figure out how to a) afford to do it because the hardware was so expensive b) take the load of weight off the hardware that they hang from c) afford it !! You have helped me tremendously and I will now be on the look out for the doors that I need to close off that room!! YAY!! 🙂
What color are you going to paint them?
Black, to match the rest of my interior doors. 🙂
I’m gobsmacked!! Very nicely done and so functional. I have a place for a set of doors but it would require making the walls wider and the doorway smaller….way beyond my expertise. Darn! I also need to move a kitchen doorway from one end of the room to the other. Are you for hire? Nice autumn trip to Nebraska perhaps? LOL!
LOVE! LOVE! LOVE! and love that you will be painting black!
I wonder how a valance box would look to cover the pipe? hmmmm…..
You really are my inspiration Kristi. Thank you.
What a great post! I have been looking for an affordable way to get the barn door look for my office (the unused formal living room). I am dreaming of one side being fixed looking like a barn door toward the hall and a shelving unit in the room. The other door will slide! With this hardware I may not need to wait so long 🙂
OMG, I’m so excited about the way you did your doors! I am buying a fixer upper house and I want to put a sliding door over the entry to the laundry room. I have been looking online for something inexpensive because I just cannot afford the fancy hardware for sliding barn doors! Your’s is perfect and will be even cheaper because I’ll only need 1 door! Thanks for the awesome tutorial!
Tania
hi do the doors stay in alignment because the bottom casters are not the swivel kind?
Yes. If you use swivel casters, they would never stay put. They probably wouldn’t even stay upright.
I have installed a similar system in my house but have found the doors like to “wander” away from the doorway because the castors are not in a groove or rack. Have you found your doors moving beyond 90 degrees?
Yes, I have. I just push them back into place when that happens.
Thanks Kristi.
I was just sharing this on facebook and my mind has been going crazy with the possibilities this system could be used for, when I thought- Hey! I could put this on the outside of my house to cover the patio French doors! The only exception would be to use the same pole system on the bottom as well, plus something to “lock” it in place (open and closed)- hurricane protection?
just wondering if the doors make a lot of noise when they are opened or closed. I love the design.
The top hardware doesn’t make very much noise at all when opening and closing.
Kristi, do you think that this idea would work on a loop carpet area???
Oh, that’s a good question! There has to be a way to test it out before you go to the trouble of making and installing these doors. If you have something — perhaps a piece of furniture that weighs somewhere around 30 pounds and has casters — you could see how well it rolls on the area where you want to put the doors. If it rolls easily, then I would think the doors would roll easily as well. But if you have a hard time rolling it around, you might want to consider another option.
Now, why couldn’t I have thought of that? LOL Because I’m not equipped with the brilliant mind that you have! GREAT idea!!! I definitely will try that!!! Thank You so much! P.S. BTW, I love your posts!!!
Radar Love!!!!!! (from the Golden Earring song from ca 1974 — meaning HOW did you possibly know this is EXACTLY what I have been thinking of!!!!) My 1937 house has so many windows and doors that it is difficult to place furniture — I love the space saving barn door idea, but the cost of the hardware put me off. I cannot wait to try your genius solution on two bedroom doors and the two doors to my Jack & Jill bath!!!! Thanks so much for sharing!!!!!
This is so awesome!! Thank you for such great instructions! Can you tell me how far the door ends up being out from the wall? We have a light switch next to the door. Would there be enough room for the switch poking out? I would love to try this in the kids’ bath, where the builder should have used a pocket door because of the lack of room!
The amount of room will depend on the nipple length you use, but regardless, there should be plenty of room for a light switch.
Awesome job! This will be the perfect solution for a door between my bathroom and closet. I’d like to know how you cut the inserts in your doors. I’ll be reusing my existing interior 6-panel door. Did you use anything to frame the inside of cut out portion? How do you hold the glass in place?
I love this idea! I have an old pocket door where the hardware broke. It was a nightmare to try to use and it is a bathroom passway that really needs door. I decided to close in the pocket and install a barn door instead I was trying to find barn door hardware to fit in my limited space to replace it (nothing it so I would have to cut it down) and stumbled on your idea. Instead of using angled ends, I plan to just run it to the side walls, hanging the pipe much like a closet rod, inserted into solid wood. I too thought of inserting the casters as one comment suggested. Being a bathroom, more privacy will be desired. Now to figure out how to latch/lock the door while the rooms are in use…
If I use all the same hardware but am only doing one door do you think I could hang the door? I would love to email you some pictures and get your opinion on whether or not you think this type of system would work for the space or if I’m just dreaming. I also have another design concept based on your design and would like your opinion or that too.
I personally wouldn’t use this hardware for hanging a door. I just don’t think it’s strong enough. But you can make your own judgment call on it.
you did such a great job , i just have one thing i need to know did u need to grease it in order to move it properly,
No, it wasn’t needed.
Just a note to consider. The rolling of the casters on the hardward floors eventually ruin the floors surface. I have had this happen and the area of the floor will need sanded and refinished
You are brilliant!
I wonder if you might find casters in nylon to keep from damaging wood floors? My application will be on carpet. I have two doorways perpendicular to each other and plan to take both doors out and use the barn door hardware you suggested. Most of the time they will be left open. I like the idea of sinking the rollers at least part way, into the door. My question is regarding the trim around the doorway. Once I remove the doors and put up the barn door hardware (two separate doors will meet in a corner) could I also use a floor guide to keep the doors from moving out of the desired “track”?
You inspired me! I have an office at the top of a set of stairs that desperately needed a door during the summer when my kids are home from school and I need to concentrate on work. I used just the plans for the hardware, and it worked out fantastic! I would love to send you some before and after pictures if you’re interested. Thank you for posting and helping me solve a problem cheaply!
When you slide the doors open, do they make a lot of noise with the metal on metal? (Iron tee on conduit pipe)
No, it doesn’t make a lot of noise at all. What makes the most noise is the sound on the floor, but that’s because I have a pier and beam foundation. If you have a slab foundation, you won’t have to deal with that. But even that noise isn’t terribly loud.
Love this, I’m hoping to do the same. Just curious as to the weight of your doors?
The probably weigh 50-60 pounds each.
Hi Kristi Brilliant idea and craftsmanship on your barn doors project. One question – why did you conduit pipe instead of regular iron pipe? Wouldn’t iron pipe have been stronger?
Nice design overall one suggestion use a 3/4″ tee with 1/2″ reducer on the bottom and then you can use a 1/2″x 4″ nipple, that way you don’t need the 1/2″oak dowel and glue….
Question, do these doors make alot of noise when opened and closed?
The hardware at the top doesn’t make much noise at all. The loudest thing is the wheels rolling across my hardwood floor, but that’s because my house has a pier-and-beam foundation, and even normal things like walking are louder in a house with a pier-and-beam foundation. If you house has a concrete foundation, the noise from the wheels should be greatly reduced.
I agree with the post on using the T that has 1/2″ reducer on the bottom (saw one that had 3/8). If you like the dowel idea but not that much glue the 5/8 dowel at Lowes for some reason goes into the 1/2-close nipple just right. Trying this on carpet and so far the wheels are not loving it, but will try different wheels and/or put a track in. I think this is a cool design but the wheels on top bar design seem to be more universal/floating and if built from scratch (vs kit) perhaps not too much more money (like maybe $90?). Thanks
I liked the idea of the barn door, and took it a step further instead of the black iron tees I used 3″ pullies from a old riding lawnmower. The tees would scrap off the paint and were a little noisey and the pullies make no noise.
Hello there!
This is a great idea. I installed a a barn door system in our master bedroom to bath with different hardware on line though. I do have a question and a statement though. From looking at what you did, I think that you would have been able to hide the rollers more if they had been recessed into the bottom about half way or so; which would in able you to drop the door down that much more. Don’t get me wrong, the idea is great; just trying to help. Then I got to thinking about the two areas where it looks like the two hinges were. Think I’d grab some pre made trim and do a frame around the door covering those areas and adding a little more style to it.
Great job!
Hello there!
This is a great idea. Love it.
Johann (South Africa).
You are creative and ill give you that. But the overall design and functionality is just completely dumb. I rehab whole houses by myself and have done so for about 20 yrs. But having people look at this and say wow this is a fantastic idea makes me sick to my stomach. First of all I have found descent barn door kits as cheap as $75 on sale. Just need to look around. Installing an actual manufacturer kit takes 1/10 of the time to install and operates 100% better. Has the ability to be adjusted for different heights also. This idea was such a complete waste of time. Spend a few extra dollars and do it right. Youll be glad you did.
Three points:
1. You could have made your point without being a complete asshole. Work on being a better human being.
2. This post is four years old, written back when real barn door hardware was all the rage and still not widely available and very much seen as a specialty item. So no, you couldn’t just pop into the big box store and purchase it for $75 at the time.
3. I had this door hardware for long enough to know that it worked just fine.
Trying to make sliding doors for an almost 3 1/2 foot long, open, lower cabinet space. Do you think there are plumbing parts that could work for smaller “made “ cabinet doors that could cover this area?
I don’t know, and if there are, I don’t know that they would be very strong.
What a fantastic idea!!!! And it matches what I want to do for my room too!!!! Love it! Love it! Love it!!!
Thank you for the inspiration!!!!!